OVERVIEW
This Cisco Validated runbook will be a guide through the setup and configuration of Smart Workspaces, ensuring that the benefits of a connected and intelligent workplace can fully be realized.
Cisco Spaces Smart Workspaces transforms traditional work environments into dynamic, data-driven ecosystems that enhance productivity and collaboration. By leveraging advanced location-based services, Smart Workspaces enables organizations to optimize space utilization, streamline operations, and create a more engaging workplace experience.
This solution provides real-time insights into workspace occupancy, usage patterns, and environmental conditions, empowering businesses to make informed decisions on space planning and resource allocation. With features like interactive digital maps, customizable alerts, and seamless integration with IoT devices, Smart Workspaces offers a holistic approach to managing modern work environments.
SUPPORT & ONBOARDING INFO
Please follow the link below to find out about the different ways to get support for Cisco Spaces.
PREREQUISITES
Spaces OS
This Cisco validated runbook is designed only as a follow on from the Spaces OS Runbook. The Cisco Spaces OS is the base installation for Cisco Spaces and is a prerequisite for this outcome. Please refer to the Spaces OS runbook for guidance on fulfilling this requirement.
Device Support Matrix
Devices that are supported on Cisco Spaces ranges in use cases from different levels of occupancy to asset tracking to environmental metrics and more. Please review are list of currently supported devices along with their intended use cases on our Knowledge Article on device compatibility.
IDM (IOT Device Marketplace) Support Matrix
The Cisco Spaces IoT Device Marketplace is a platform where you can discover, research, and purchase IoT devices. IoT Device Marketplace is a part of the Cisco Spaces full-stack partner ecosystem. Each device is preconfigured to give the customer an out-of-the-box experience with sensors, tags, wearables, and more.
To learn more about the sensors available and supported on Cisco Spaces please visit the IoT Device Marketplace.
https://dnaspaces.io/devicemarketplace/home
Calendar Support Matrix
Please refer to our Knowledge Article Cisco Spaces Calendar Integrations (Webex Hybrid Calendar/O365/Gcal) for supportability details.
IMPLEMENTATION AND OUTCOMES
To complete these steps, an admin will require read/write permissions within Spaces for Space Manager and Space Experience, as well as read/write access to Webex Control Hub and/or Meraki Dashboard.
Space Explorer - Kiosk app
Space Explorer - Kiosk app requirements
The Cisco Spaces digital kiosk app is a web app that can be remotely configured using a Cisco Board Pro or Desk Pro, and potentially 3rd party touchscreen or static TV displays. However, certain conditions must be met in order to function properly, and unless otherwise stated 3rd party displays are not certified or guaranteed to work by Cisco.
Chromium-based browser engines are highly recommended.
WebGL
WebGL is a JavaScript API that allows users to create interactive 2D and 3D graphics in a web browser without the need for plugins. In order to run reliably, it must run on a device with a GPU.
An all-in-one display, computer browser, or kiosk container app’s browser engine MUST support WebGL. Check support here: https://get.webgl.org
Local Storage
Most modern browsers have the Local Storage capability. However, whether the browser or kiosk container app’s browser engine supports Local Storage persistence across reboots, operating system upgrades, etc. should be verified and tested on a case-by-case basis.
Browser Session Storage is required to deploy kiosk, and clearing the Session Storage clears the kiosk configuration, which requires re-claiming the device in the Non-Webex Devices section of the Space Experience app.
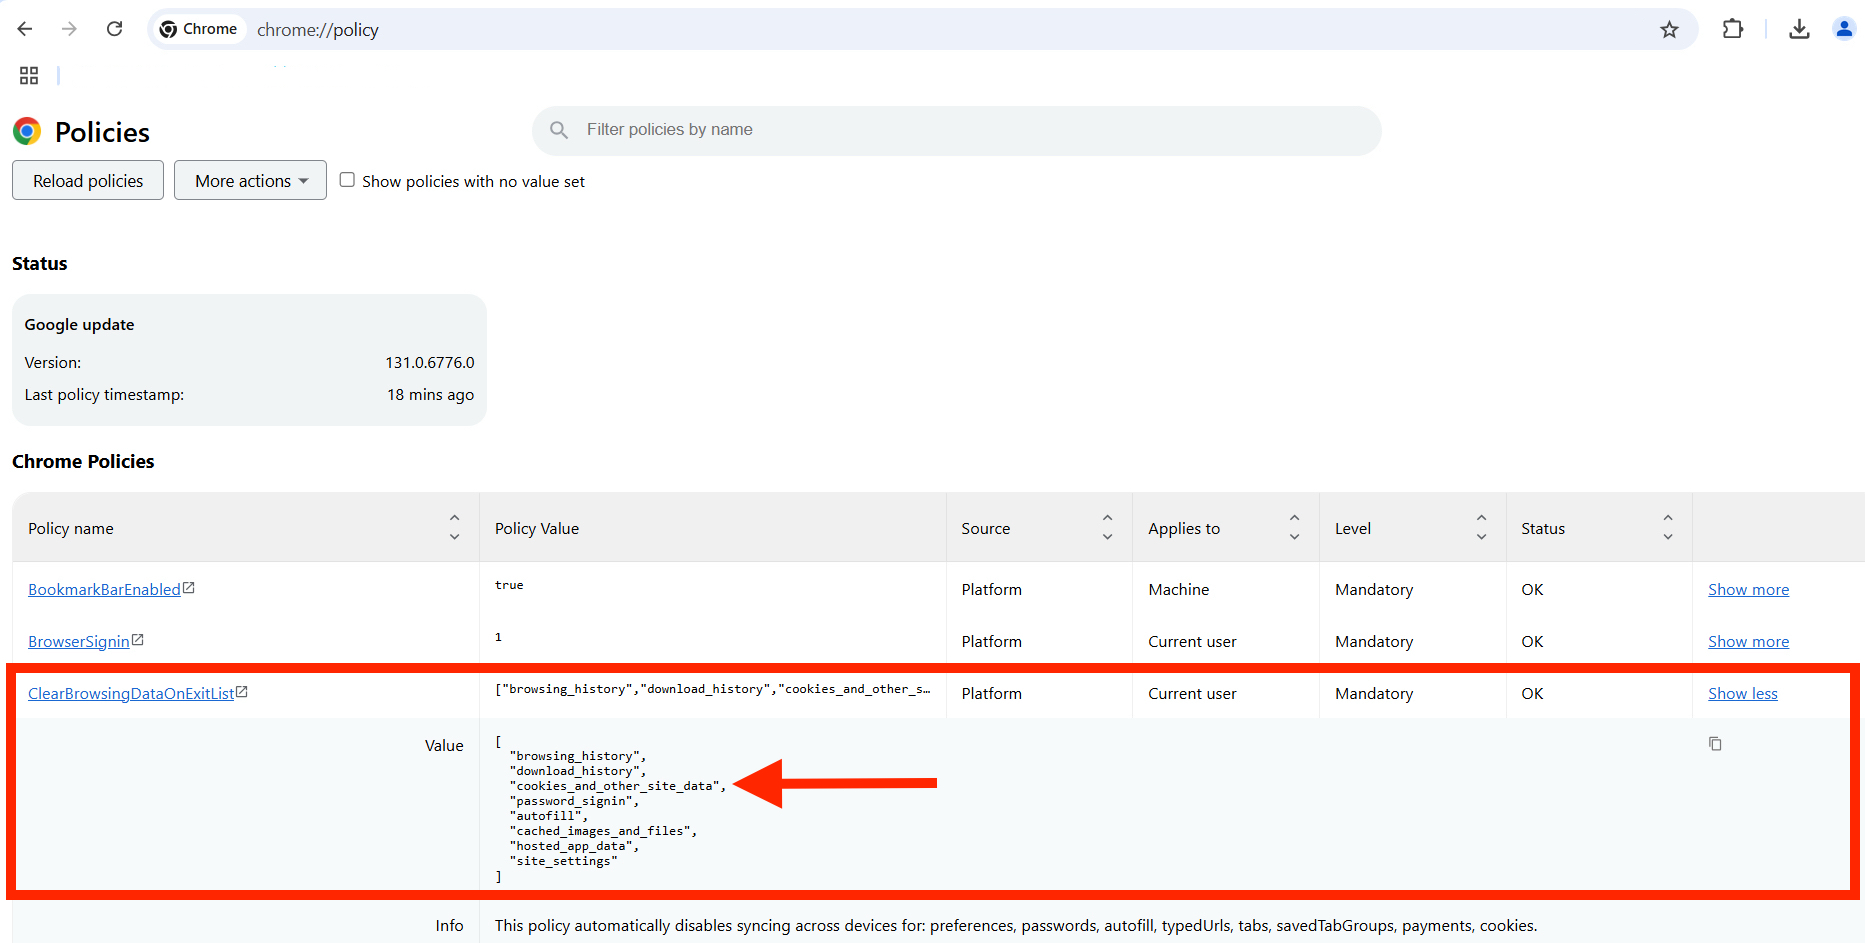
Example: Chrome Browser policy that deletes session storage on reboot
Not that a Chrome browser would be used specifically to deploy the kiosk app, but to highlight that Local Storage can be erased automatically depending on various settings. It is best to use a dedicated kiosk program with policies in the embedded browser engine that support persistence of Local Storage.
https://support.google.com/chrome/a/answer/2657289
-
chrome://policy
Kiosk Device Compatibility
Recommended – Best Performance
-
Cisco Board Pro (55”, 75”)
Compatible - not recommended due to being EOS
-
Webex Board 55S - EoS
-
Webex Board 70S - EoS
-
Webex Board 85S – EoS
Other Options
Some kiosk displays may require a host device such as a Room Kit Mini, mini PC, or another computer with a built-in browser or kiosk app to load the Cisco Spaces kiosk web app.
Matrix of Deployment Options
|
|
Webex Control Hub Integration w/ Webex Board |
Non-Webex Device Method + Kiosk Mode w/ Webex Board |
Webex Control Hub Integration + Kiosk Mode w/ Webex Board |
Webex Control Hub Integration w/ 3rd Party Kiosk Device |
Non-Webex Device Method w/ 3rd Party Kiosk |
|---|---|---|---|---|---|
|
Availability |
Available (Recommended) |
Available |
Roadmap |
Roadmap |
Available |
|
Benefits |
|
|
|
|
|
|
Caveats |
|
|
|
|
|
Note: Microsoft Teams Room (MTR) devices…
-
DO support Digital Signage Mode (xConfiguration Standby Signage Mode)
-
Do NOT support Kiosk Mode (xConfiguration UserInterface Kiosk Mode)
-
Do NOT support WebApp (xCommand UserInterface Extensions WebApp Save)
Kiosk List of API Endpoints for Firewall Settings
Below are the endpoints used to deliver Cisco Spaces Kiosk app. Signage endpoints should be able to reach every one of these endpoints on an outbound request.
Ports: 443 for all domains / endpoints listed below
|
IO Region |
EU Region |
SG Region |
|---|---|---|
|
Highly recommended to add these wildcards:
|
Highly recommended to add these wildcards:
|
Highly recommended to add these wildcards:
|
|
Required |
||
|
temporary: |
temporary: |
temporary: |
|
Optional |
||
|
non-blocking: |
non-blocking: |
non-blocking: |
Digital Signage Setup & Configuration
Webex Control Hub Setup
Device Modes
-
Digital Signage mode: A webpage takes over the entire display when in Halfwake state, but all device functionalities remain accessible by swiping up from the bottom edge of the display.
-
Home screen Web App: Ad hoc access to one or more kiosks from the home screen app list on the device.
-
Kiosk mode (Recommended for lobby displays): Lock the display to a specific webpage URL and block all other functionality on the device.
Webex Control Hub: Device All Configurations Settings
Enable WebGL, WebEngine, and optimize Standby, Halfwake, and other Cisco Board configurations:
-
[xConfiguration WebEngine Features WebGL](https://roomos.cisco.com/xapi/Configuration.WebEngine.Features.WebGL/ ) ⇒
On(default:Off) -
[xConfiguration WebEngine Mode](https://roomos.cisco.com/xapi/Configuration.WebEngine.Mode/ ) ⇒
On(default:Off) -
[xConfiguration Standby Control](https://roomos.cisco.com/xapi/Configuration.Standby.Control/ ) ⇒
Off(default:On) -
[xConfiguration Standby Delay](https://roomos.cisco.com/xapi/Configuration.Standby.Delay/ ) ⇒
480(default:10) -
[xConfiguration Standby Level DeepSleep Mode](https://roomos.cisco.com/xapi/Configuration.Standby.Level.DeepSleep.Mode/ ) ⇒
Off(default:Off, optionally:OutsideOfficeHours) -
[xConfiguration Standby WakeupOnMotionDetection](https://roomos.cisco.com/xapi/Configuration.Standby.WakeupOnMotionDetection/ ) ⇒
On(default:On) -
[xConfiguration Time OfficeHours Enabled](https://roomos.cisco.com/xapi/Configuration.Time.OfficeHours.Enabled/ ) ⇒
True(default:True) -
[xConfiguration Time OfficeHours WorkDay Start](https://roomos.cisco.com/xapi/Configuration.Time.OfficeHours.WorkDay.Start/ ) ⇒ when the board should exit standby or deepsleep (default:
07:00) -
[xConfiguration Time OfficeHours WorkDay End](https://roomos.cisco.com/xapi/Configuration.Time.OfficeHours.WorkDay.End/ ) ⇒ when the board should enter standby or deepsleep (default:
19:00) -
[xConfiguration Time OfficeHours WorkWeek Monday](https://roomos.cisco.com/xapi/Configuration.Time.OfficeHours.WorkWeek.Monday/ ) ⇒ days of the week office hours should be applied (default:
True, separate xAPIs for Monday through Sunday) -
[xConfiguration Time OfficeHours OutsideOfficeHours Standby Delay](https://roomos.cisco.com/xapi/Configuration.Time.OfficeHours.OutsideOfficeHours.Standby.Delay/ ) ⇒
5(default:5) -
[xConfiguration Time OfficeHours OutsideOfficeHours Standby AutoWakeup](https://roomos.cisco.com/xapi/Configuration.Time.OfficeHours.OutsideOfficeHours.Standby.AutoWakeup/ ) ⇒
Enabled(default:Disabled)
Kiosk Mode:
-
[xConfiguration UserInterface Kiosk Mode](https://roomos.cisco.com/xapi/Configuration.UserInterface.Kiosk.Mode/ ) ⇒
On(default:Off) -
[xConfiguration UserInterface Kiosk URL](https://roomos.cisco.com/xapi/Configuration.UserInterface.Kiosk.URL/ ) ⇒ paste Non-Webex Devices kiosk URL in Space Experience app to generate a 4-digit code, this method will be replaced by automated xAPIs configuration (default:
blank)
Digital Signage Mode:
-
[xConfiguration Standby Signage Mode](https://roomos.cisco.com/xapi/Configuration.Standby.Signage.Mode/ ) ⇒
On(default:Off) -
[xConfiguration Standby Signage Url](https://roomos.cisco.com/xapi/Configuration.Standby.Signage.Url/ ) ⇒ automatically configured via xAPIs (default:
blank) -
[xConfiguration Standby Signage InteractionMode](https://roomos.cisco.com/xapi/Configuration.Standby.Signage.InteractionMode/ ) ⇒
Interactive(default:NonInteractive)
Webex Control Hub: Configure Webex Device in Digital Signage Mode
Cisco Spaces Integration Method
-
Click on Devices (left menu)
-
Search for the device in the list view
-
Click it to open the device details view
-
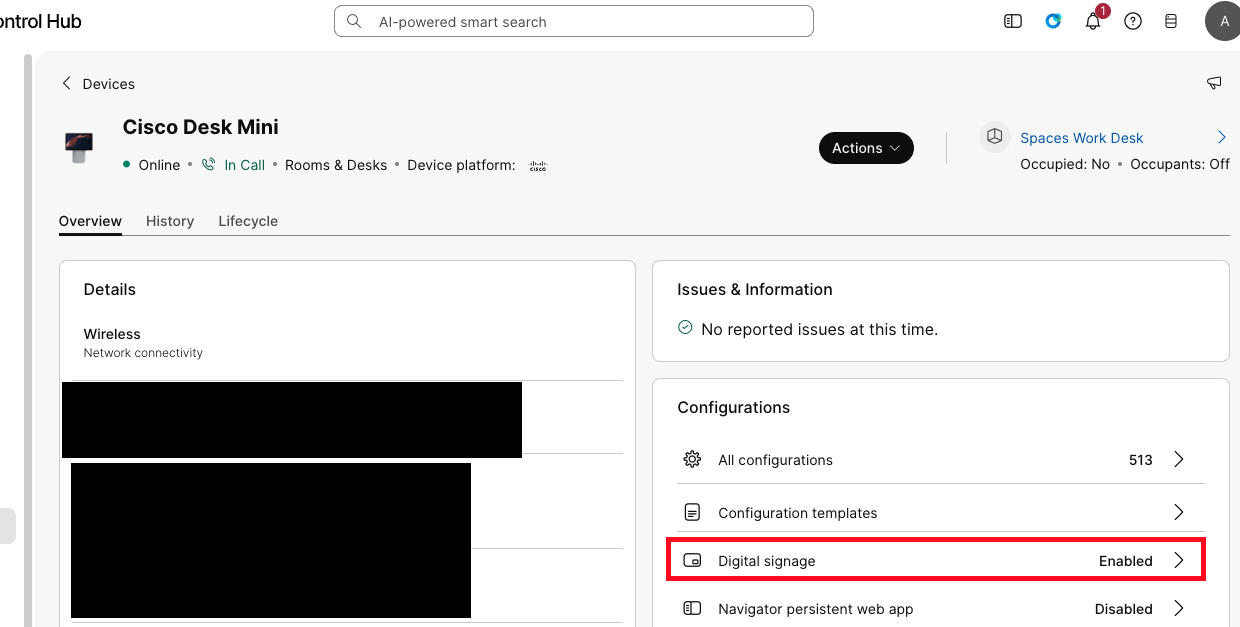
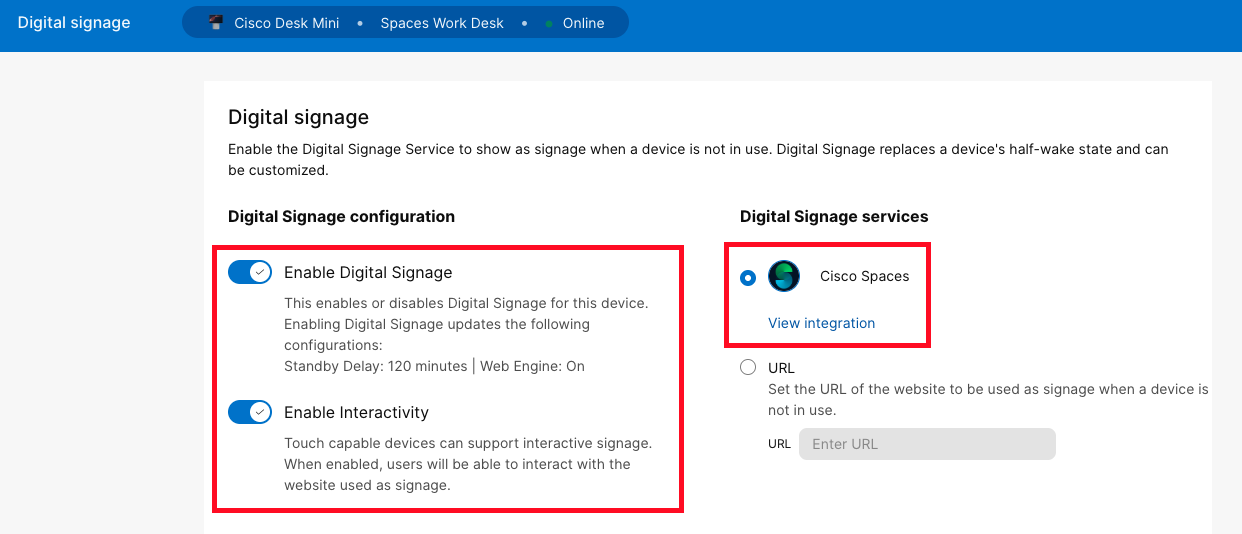
Click on Configurations > Digital Signage (right side section)
-
Toggle Digital Signage and Interactivity
-
Choose “Cisco Spaces” radio button
-
Click Save
Devices placed into this mode will be detected in the Space Experience app automatically as long as the device is organized in Webex Control Hub under a Location > Floor and merged into the Cisco Spaces Location Hierarchy under Setup > Locations & Maps.
If the Cisco Spaces kiosk app is stuck on a “Loading…” screen in kiosk mode on a collaboration device, clearing the device’s cache from Webex Control Hub should cause it to sync and load correctly.
URL Method
URLs with “?token=…” are not supported. The kiosk app MUST be deployed using the Non-Webex Devices methods in the Space Experience app.
-
Click on Devices (left menu)
-
Search for the device in the list view
-
Click it to open the device details view
-
Click on Configurations > Digital Signage (right side section)
-
Toggle Digital Signage and Interactivity
-
Choose “URL” radio button
-
Click Save
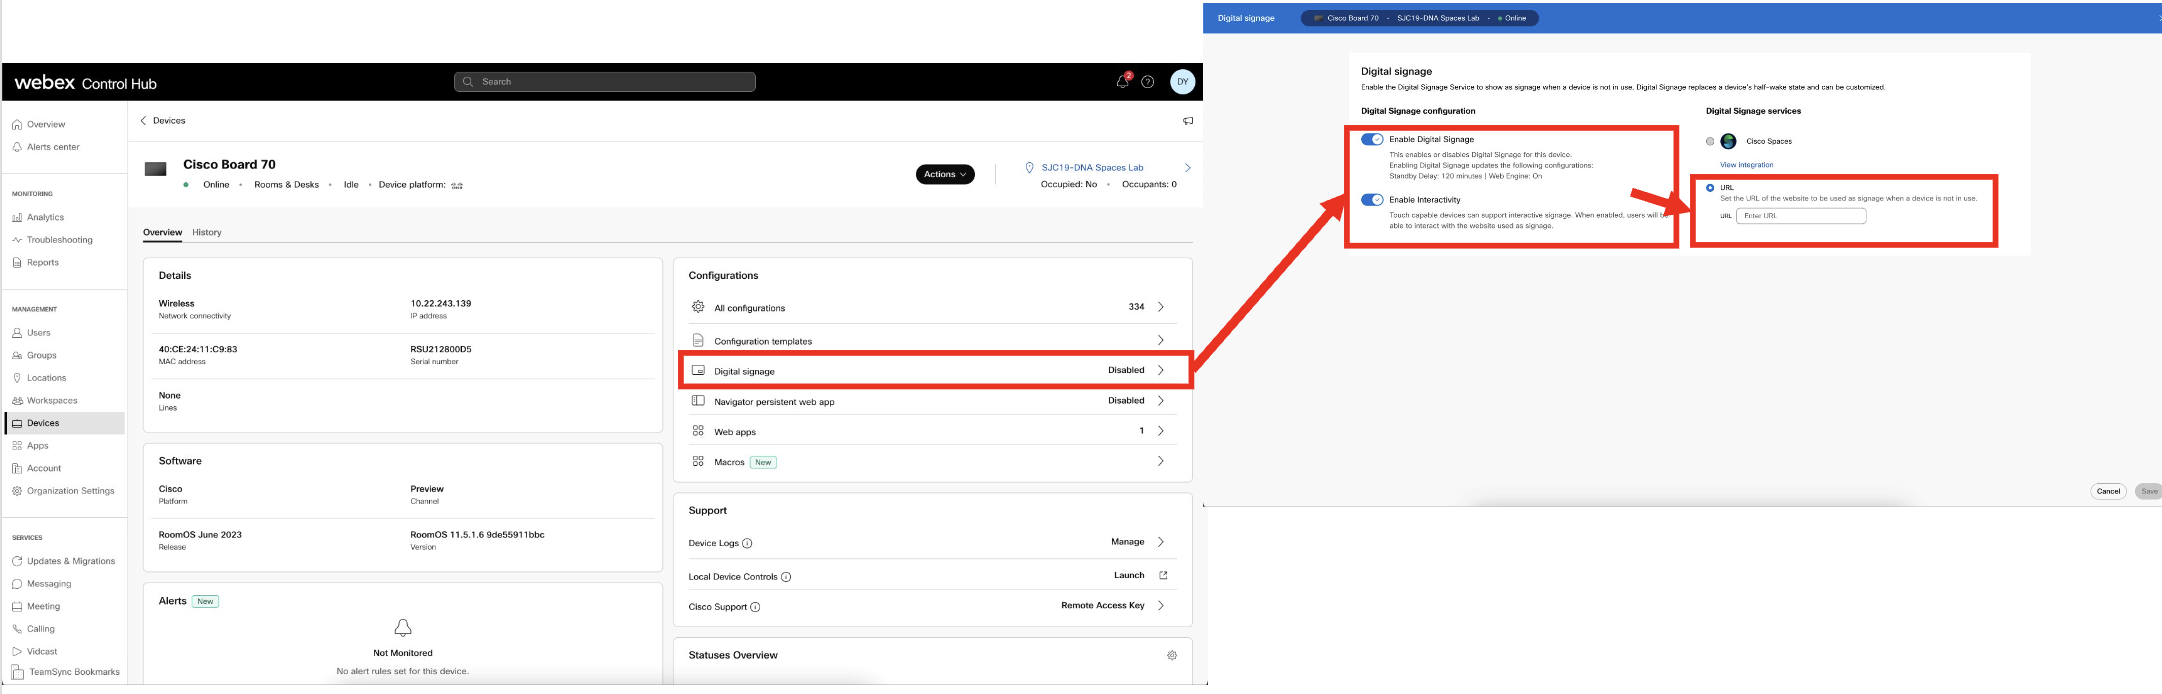
Note: use with caution. Clearing the browser cache for the URL Method disconnects the device from any configured settings. The browser Local Storage is cleared and requires Kiosk setup again.
If the Cisco Spaces kiosk app is stuck on a “Loading…” screen in kiosk mode on a collaboration device, clearing the device’s cache from Webex Control Hub should cause it to sync and load correctly.
Web App
URLs with “?token=…” are not supported. The kiosk app MUST be deployed using the Non-Webex Devices methods in the Space Experience app.
-
Web App configuration steps
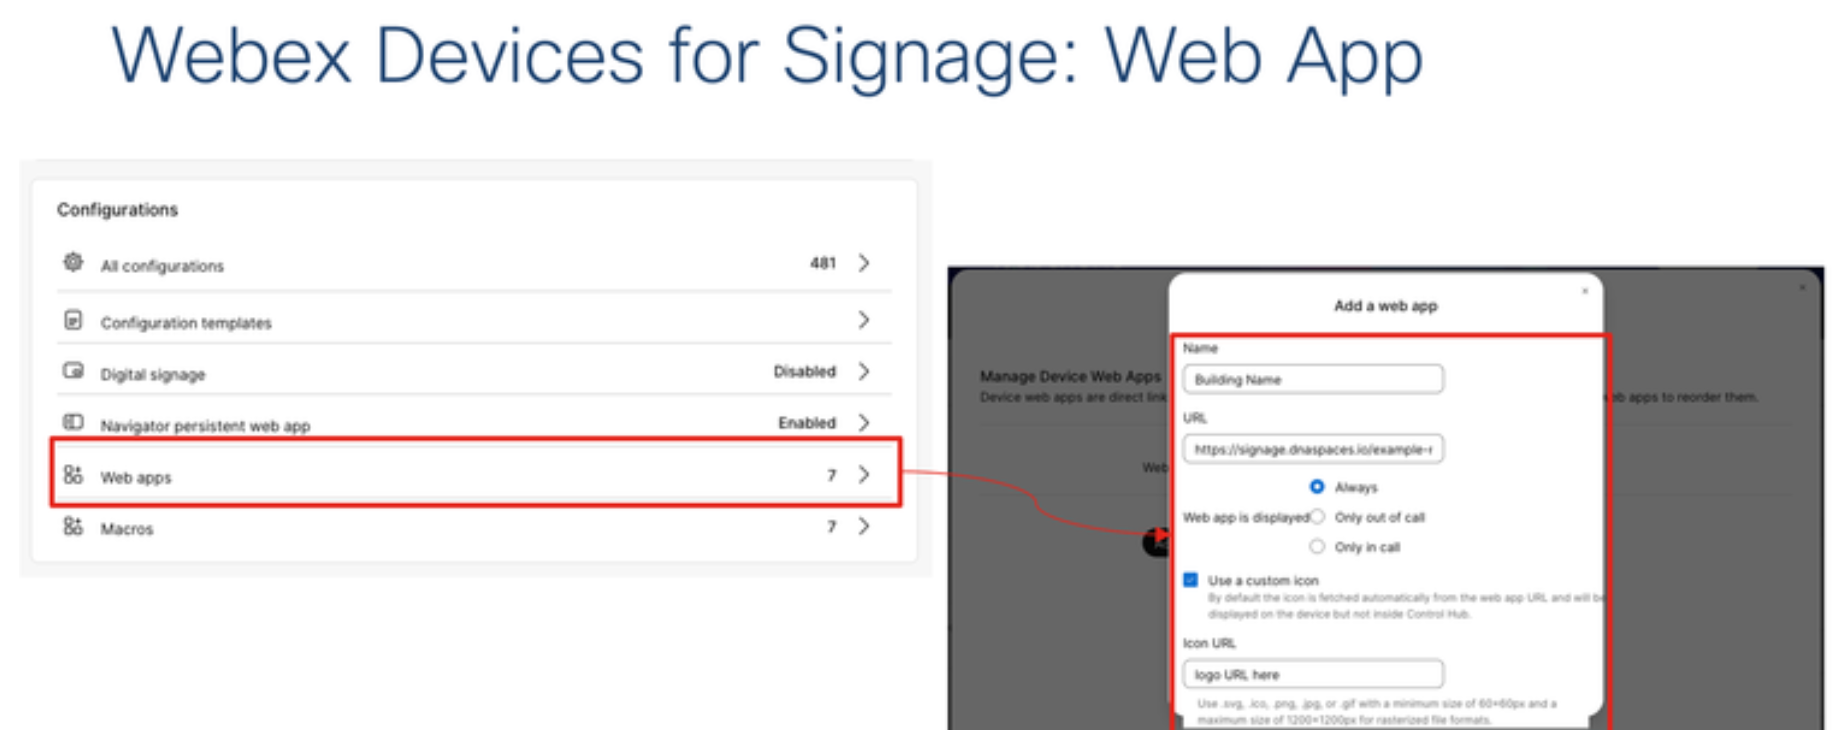
Kiosk mode (Recommended for lobby displays)
URLs with “?token=…” are not supported. The kiosk app MUST be deployed using the Non-Webex Devices methods in the Space Experience app.
-
In Space Experience app, click Non-Webex Devices (tab)
-
Click Add Signage (blue button) in the top right corner
-
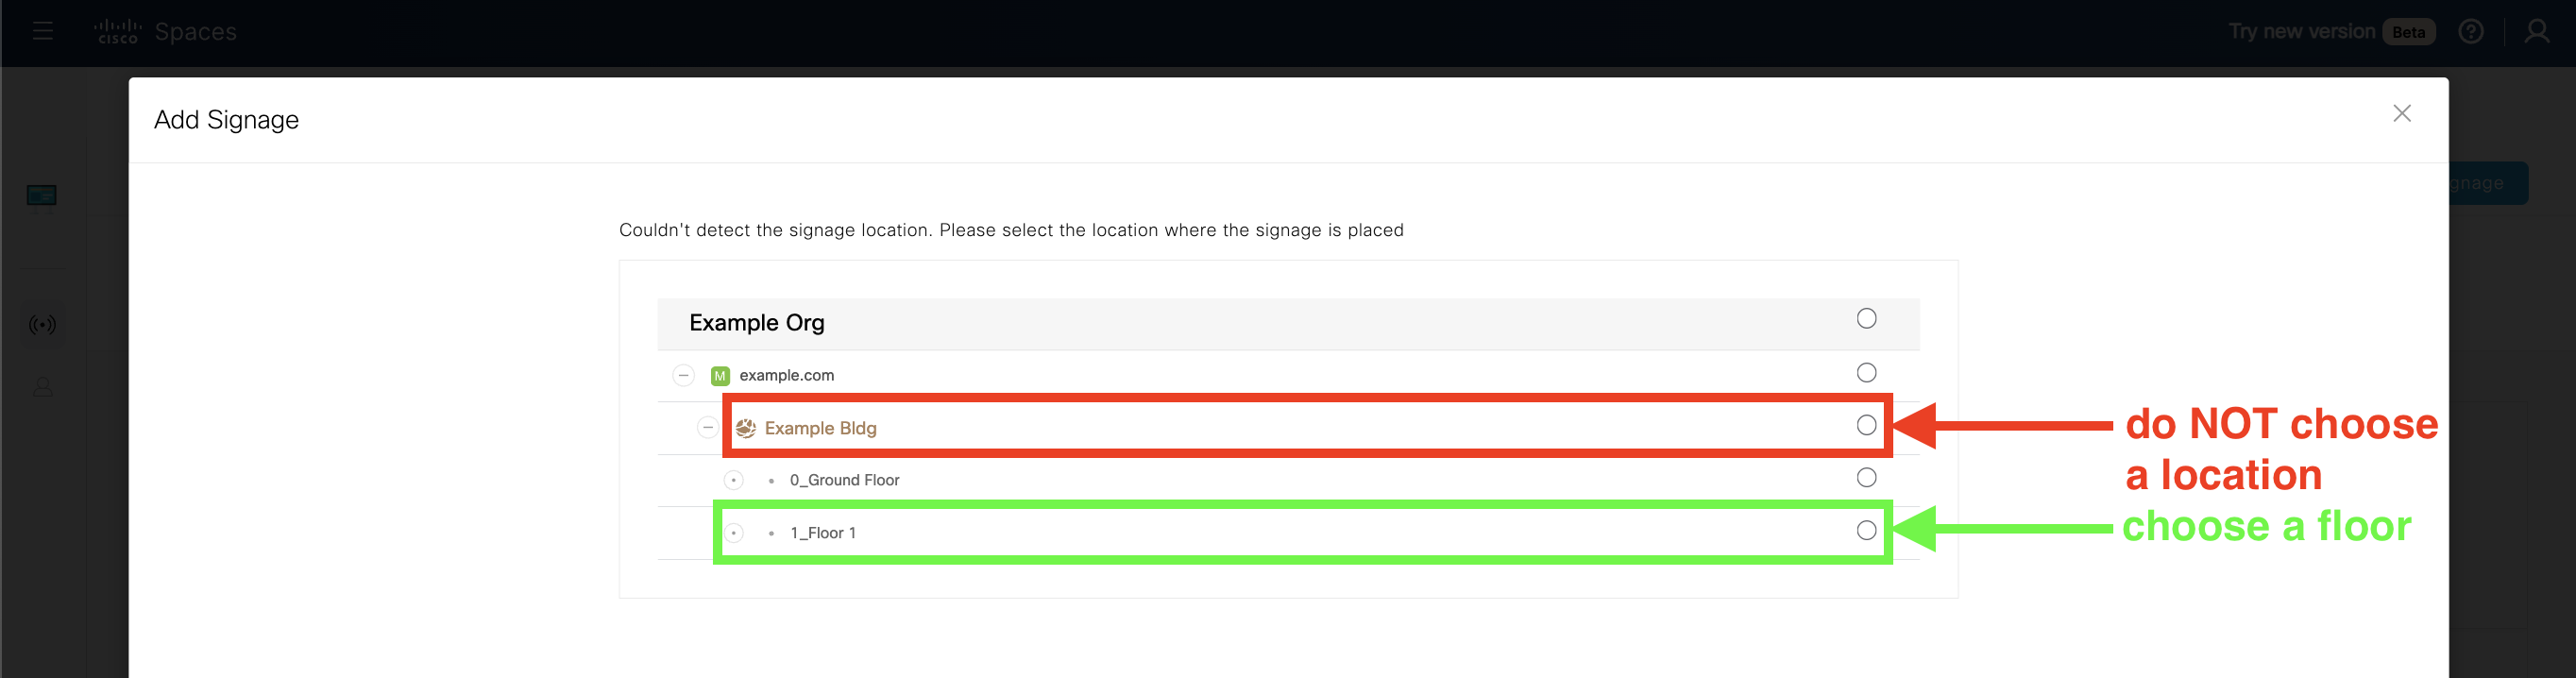
Expand the Location Hierarchy until you find a Location and importantly the specific Floor the Kiosk device is on physically
-
Click the radio button on the right side of the Floor
-
Click Next (blue button) in the bottom right
-
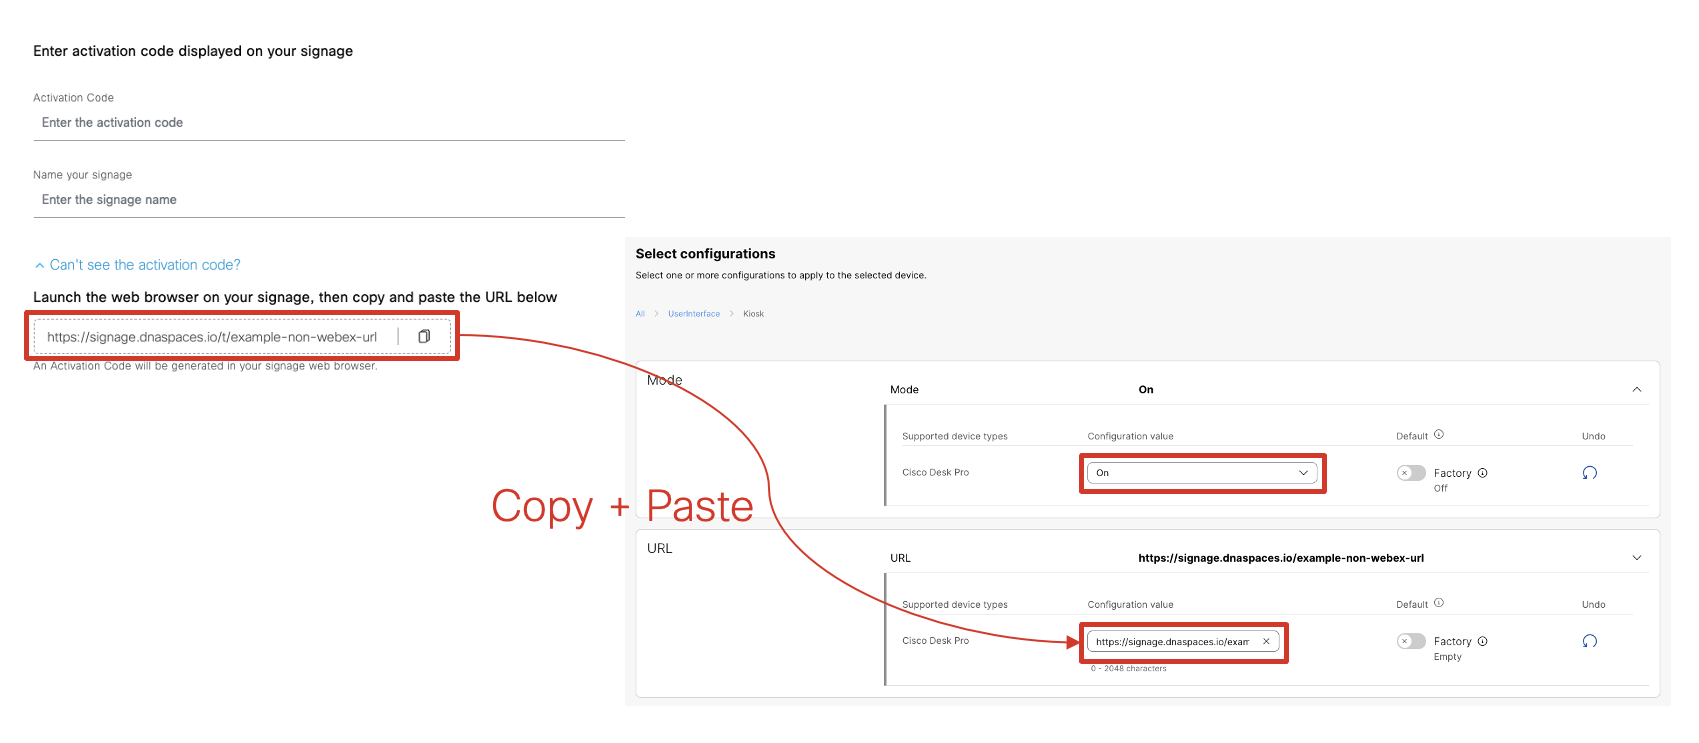
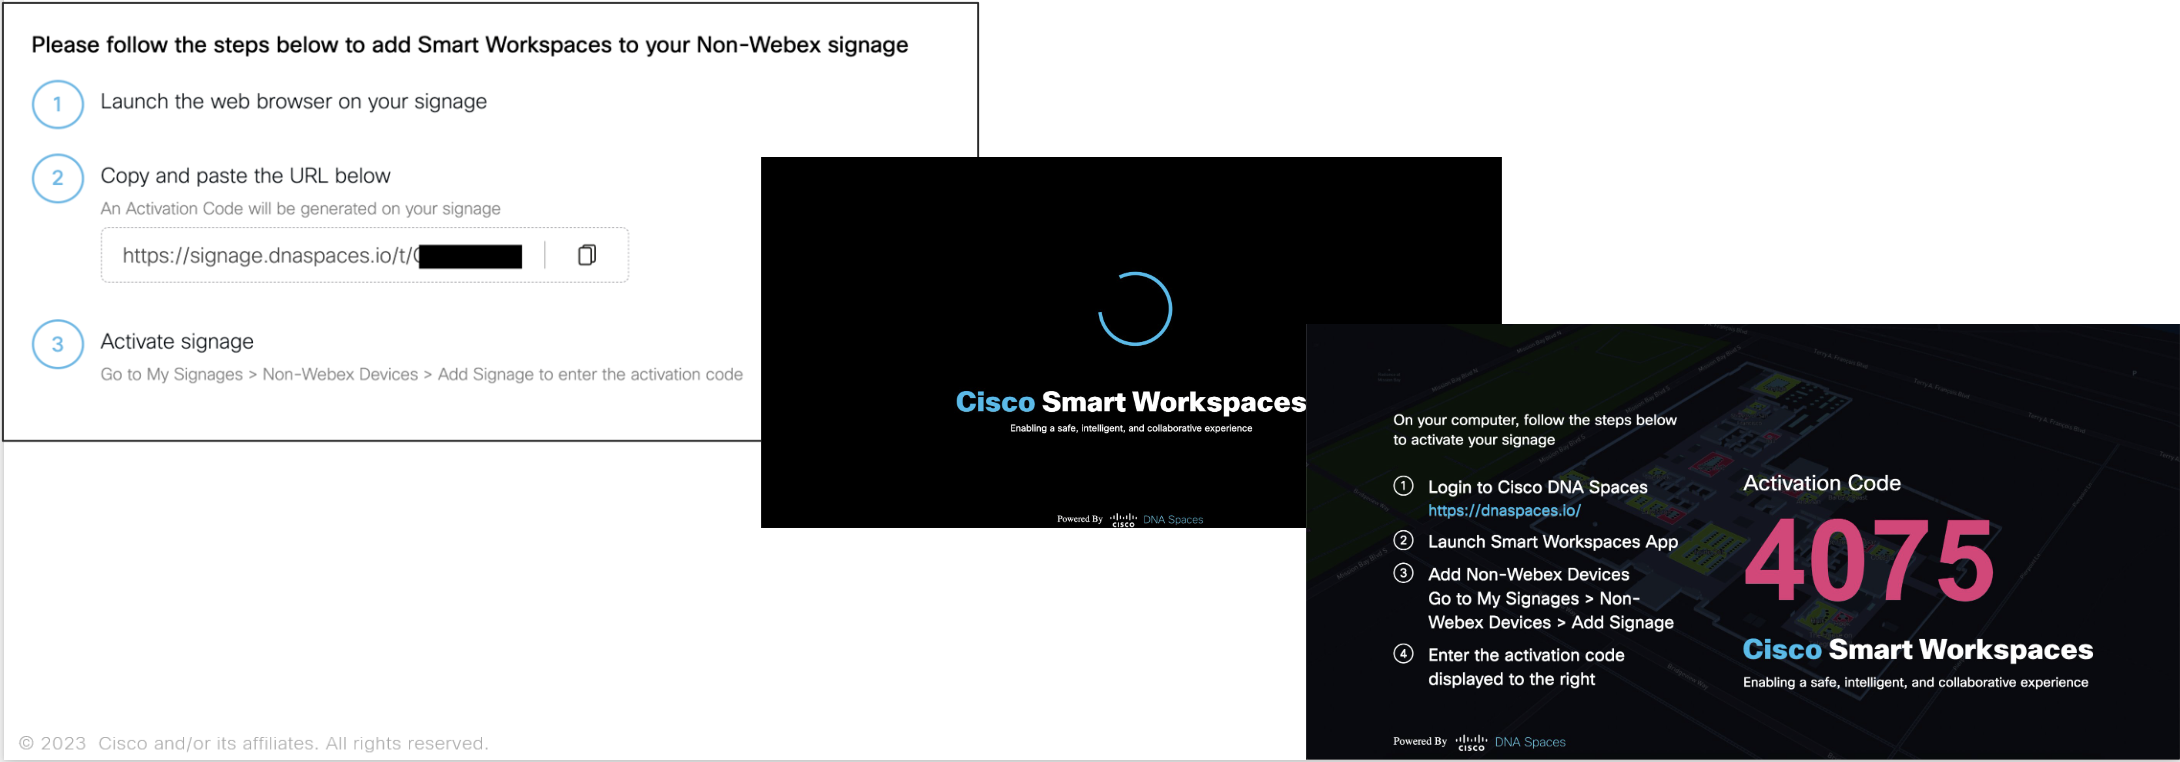
Click Can’t see the activation code?
-
Copy the URL (looks like: https://signage.dnaspaces.io/t/…) This URL is unique to your Account/Tenant. Save it for setting up more Kiosks later.
-
Leave the Spaces dashboard at this stage and go to Webex Control Hub (https://admin.webex.com)
-
In Control Hub, go to Devices (left nav)
-
Scroll to or search for the Kiosk device (e.g. Board Pro) and click on the device row
-
On the right side, under the Configurations header, click on All configurations
-
Scroll to or search for Kiosk under UserInterface > Kiosk
-
Paste the URL from Step 7 above into the Configuration value field under UserInterface > Kiosk > URL
-
Choose On from the Configuration value dropdown under UserInterface > Kiosk > Mode
-
Click Next (bottom right)
-
Click Apply (bottom right)
-
Click Close (bottom right)
-
The kiosk device display will show a 4-digit code (single-use)
-
Go back to the Space dashboard tab in your browser with Space Experience app open showing the fields for Activation Code and Name your signage
-
Type the 4-digit code from Step 18 into the Activation Code field
-
Type a unique name for this kiosk in the Name your signage field (see: https://runbooks.ciscospaces.io/docs/cisco-spaces-smart-workspaces-runbook-cisco-valida#CiscoSpacesSmartWorkspacesRunbook(CiscoValidated)-SetupNon-WebexDevice%E2%80%8Bin a later section for best practices)
-
Click Save (blue button, bottom right)
-
Click Close
-
Under the Non-Webex Devices (tab), find the kiosk on the list view
-
On the row of the kiosk, click Configure under the Actions column
-
Go through the kiosk configuration workflow under https://runbooks.ciscospaces.io/docs/cisco-spaces-smart-workspaces-runbook-cisco-valida#CiscoSpacesSmartWorkspacesRunbook(CiscoValidated)-SpaceExperience:ConfigureDigitalKioskSteps
Cisco Spaces: Space Experience app
Webex Devices
-
Setup Webex Device
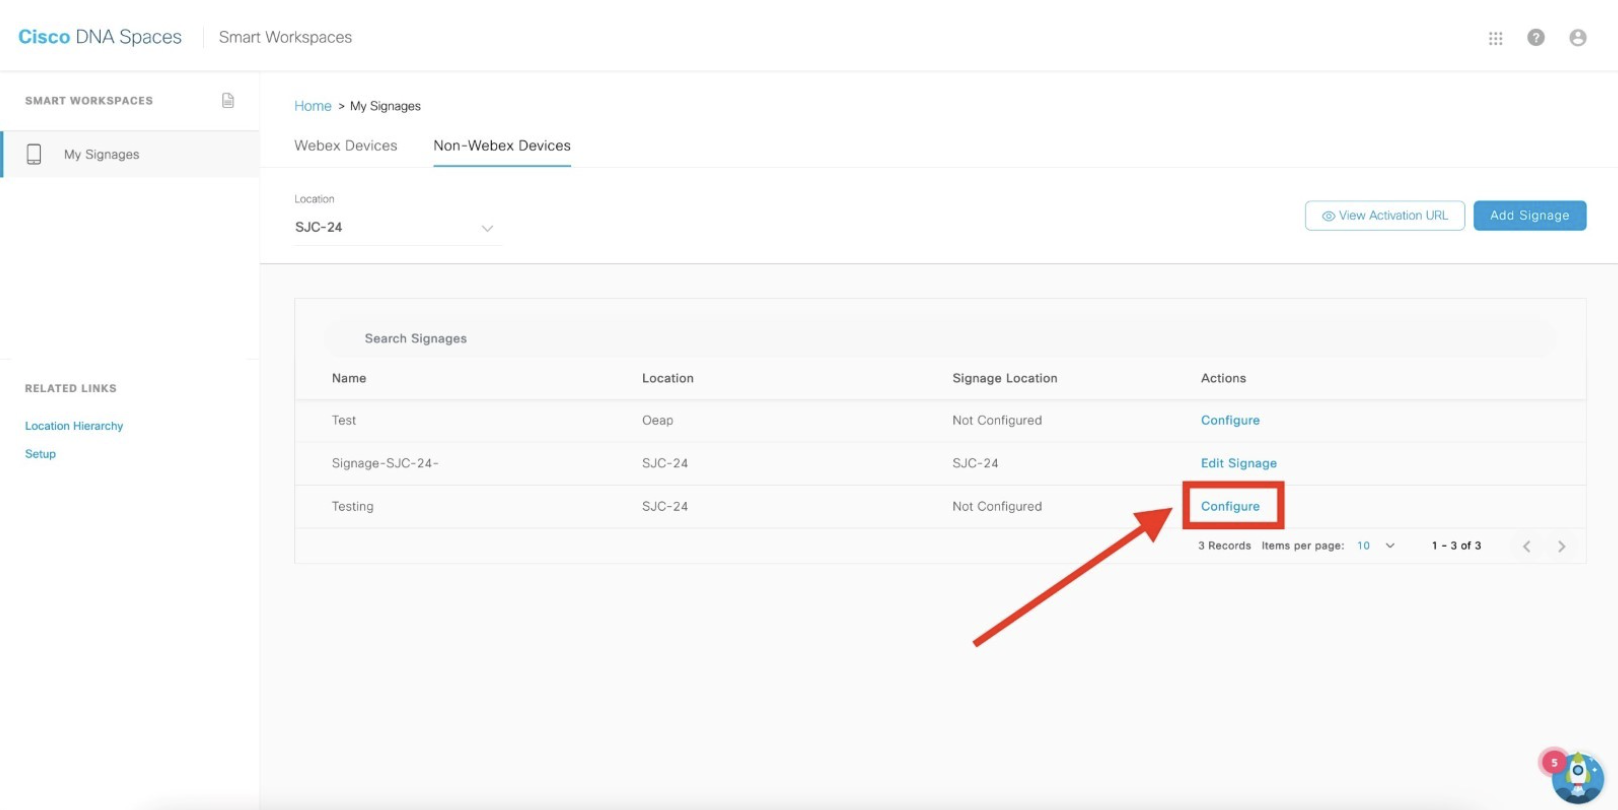
Setup Non-Webex Device
-
Simple and secure Digital Kiosk deployment
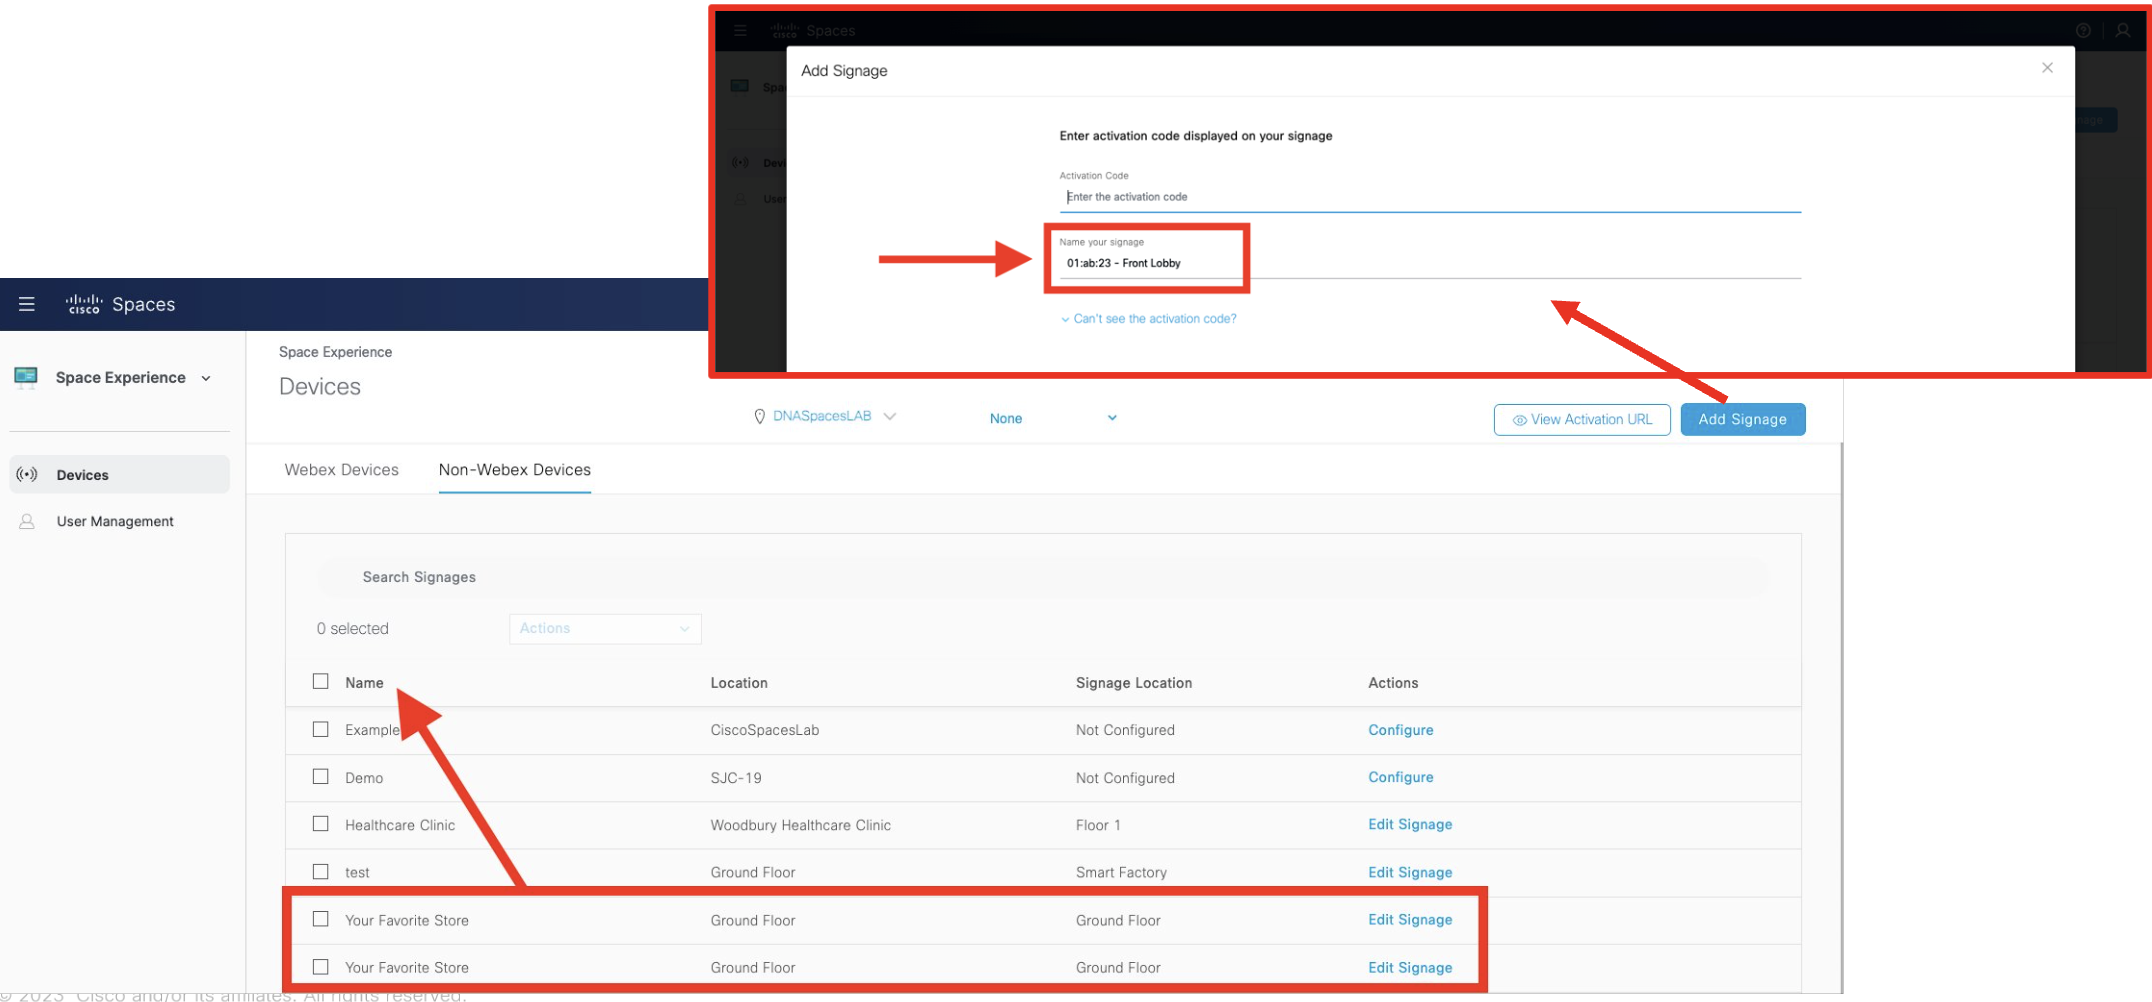
Non-Webex Device Method Naming Convention
When setting up multiple displays, especially many per floor of the same building, we recommend establishing a kiosk naming convention in the Space Experience app that makes identifying devices easier.
Using the Non-Webex Devices deployment method does not share device metadata with the Spaces platform, so we recommend including some kind of device identifier (e.g. serial number, partial MAC) in the name of the kiosk in the Space Experience app.
Avoid Duplicate Kiosk Names
-
Steps to configure Non-Webex Devices kiosk
Space Experience: Configure Digital Kiosk Steps
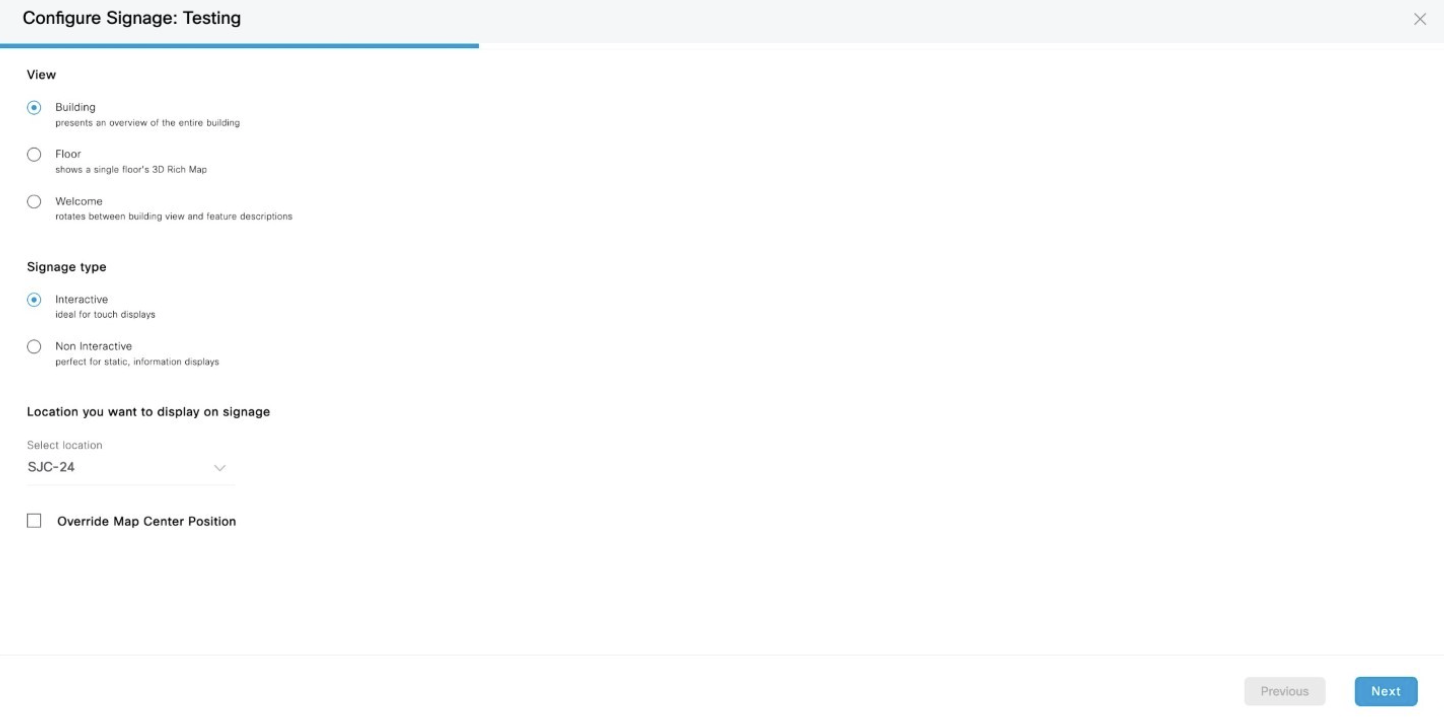
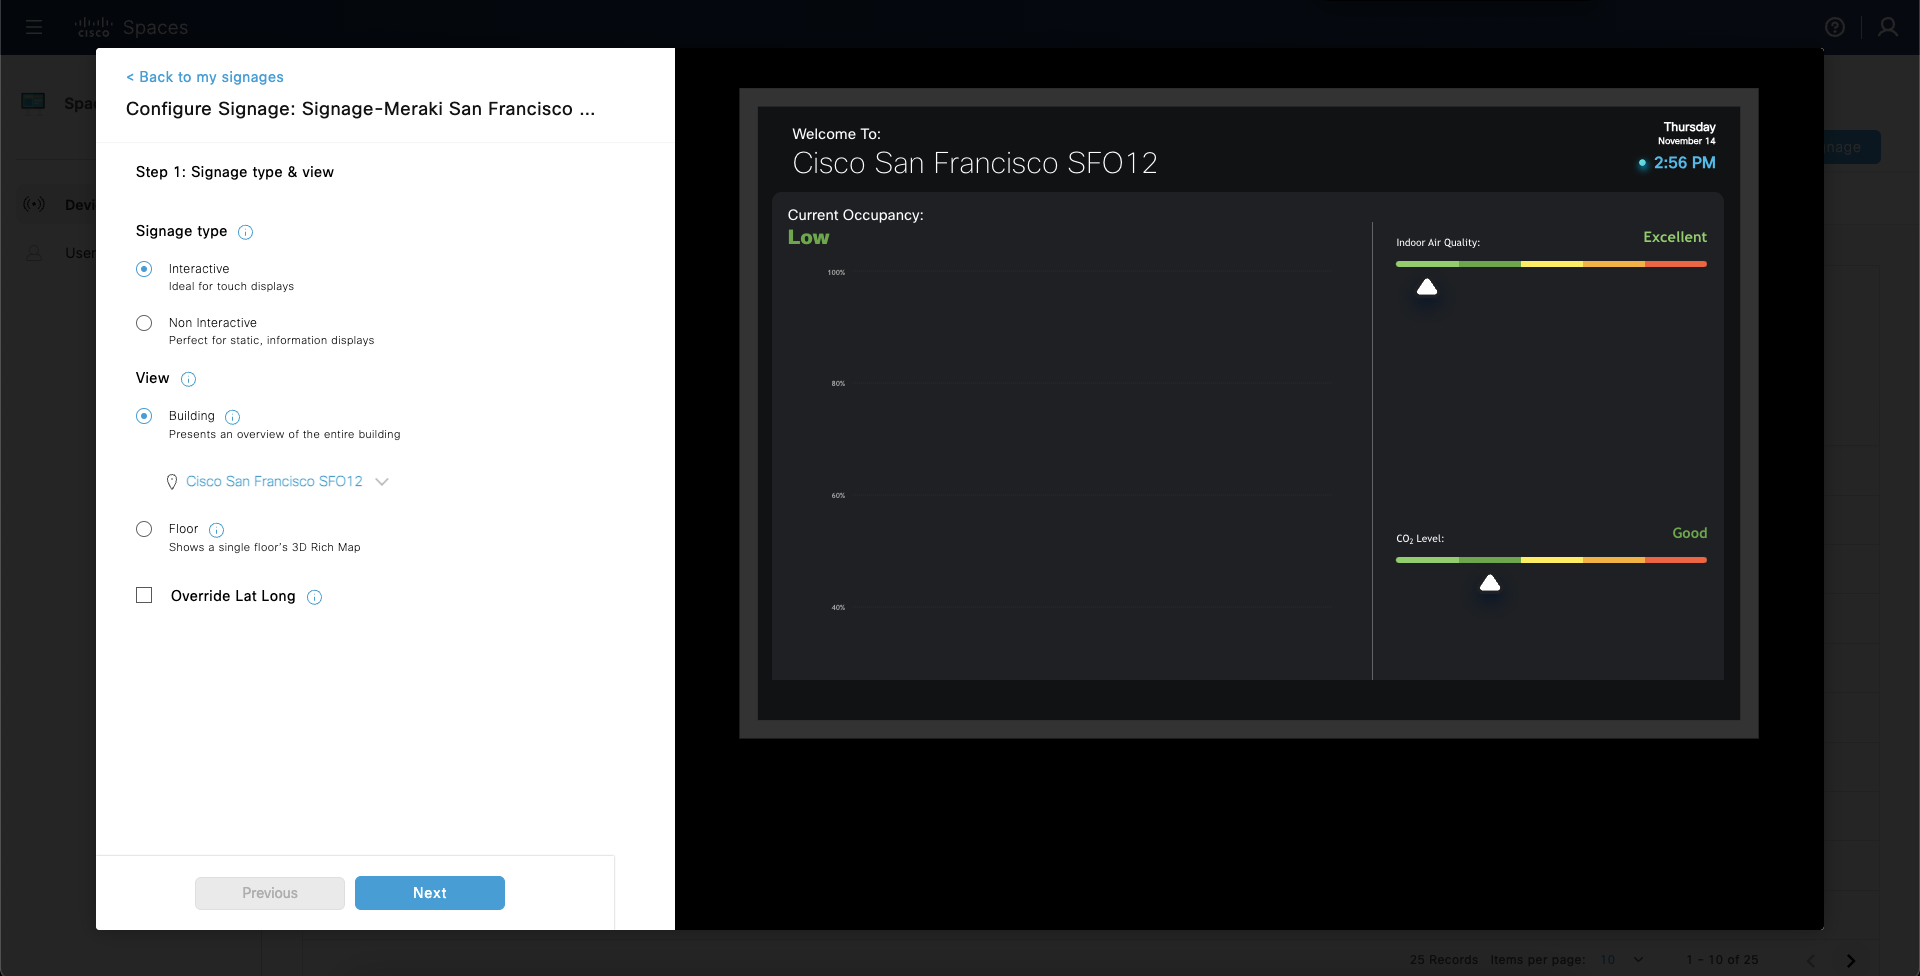
Step 1: Kiosk type & view
-
Signage type
-
Interactive - Ideal for touch displays
-
Non Interactive - Perfect for static, information displays
-
-
View
-
Building - Presents an overview of the entire building
-
Floor - Shows a single floor’s 3D Rich Map (cannot select other floors)
-
-
Override Lat Long
-
The default map center point is taken from Setup > Locations & Maps > Locations by clicking on the “3 dots” menu for the location and editing the Location Metadata. The pin location on the Google Map view is the center point used by default in kiosks, but it can be overridden using these fields.
-
Get latitude and longitude values from Google Maps (as an example) by right-clicking on Google Maps on the building.
-
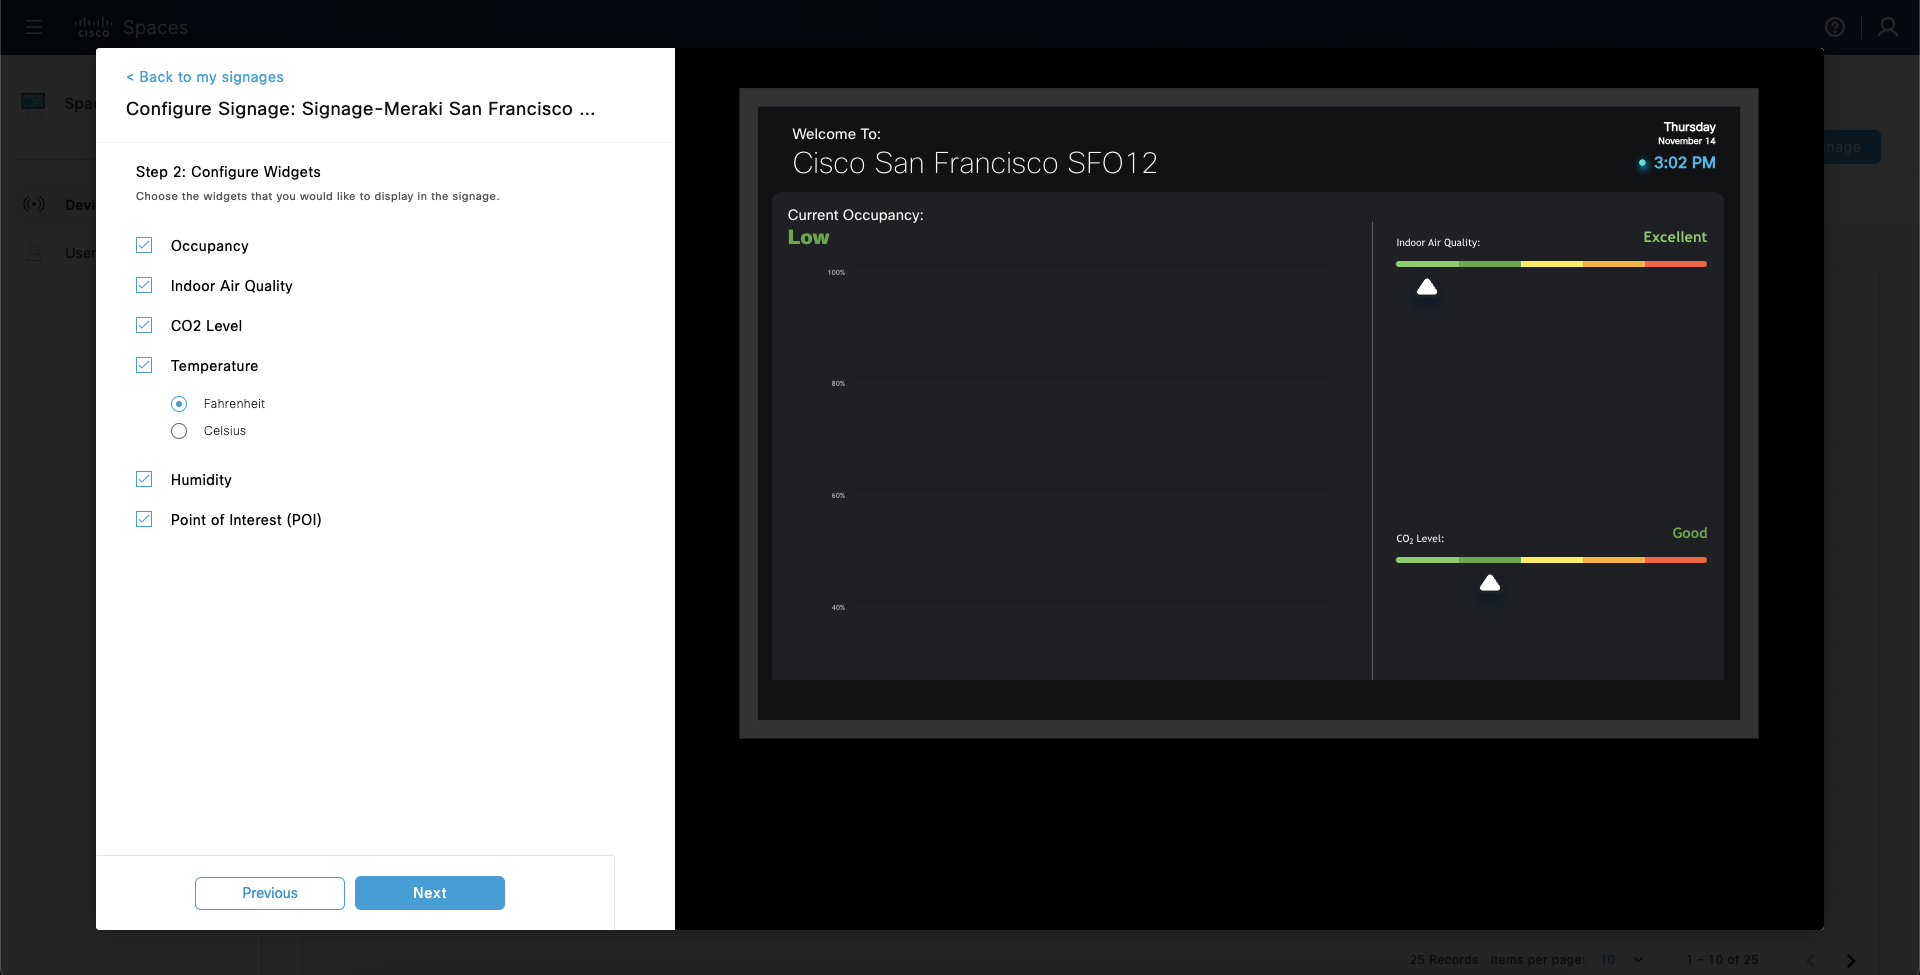
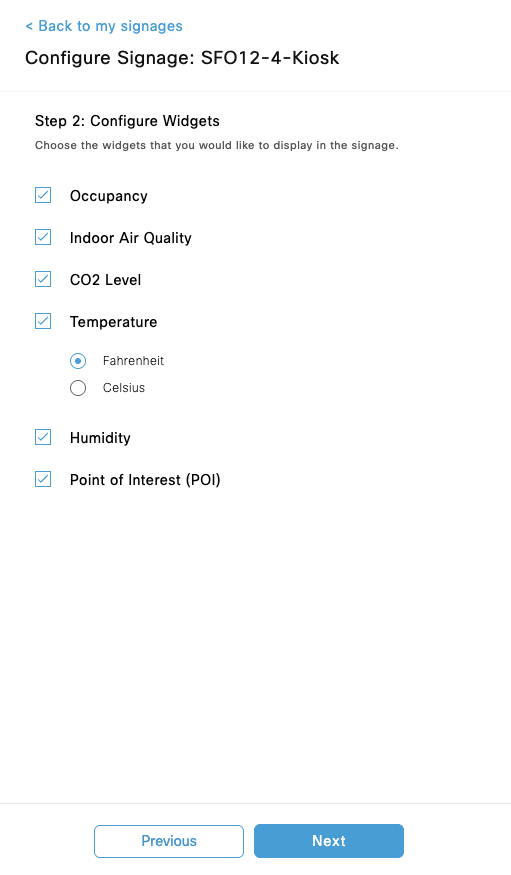
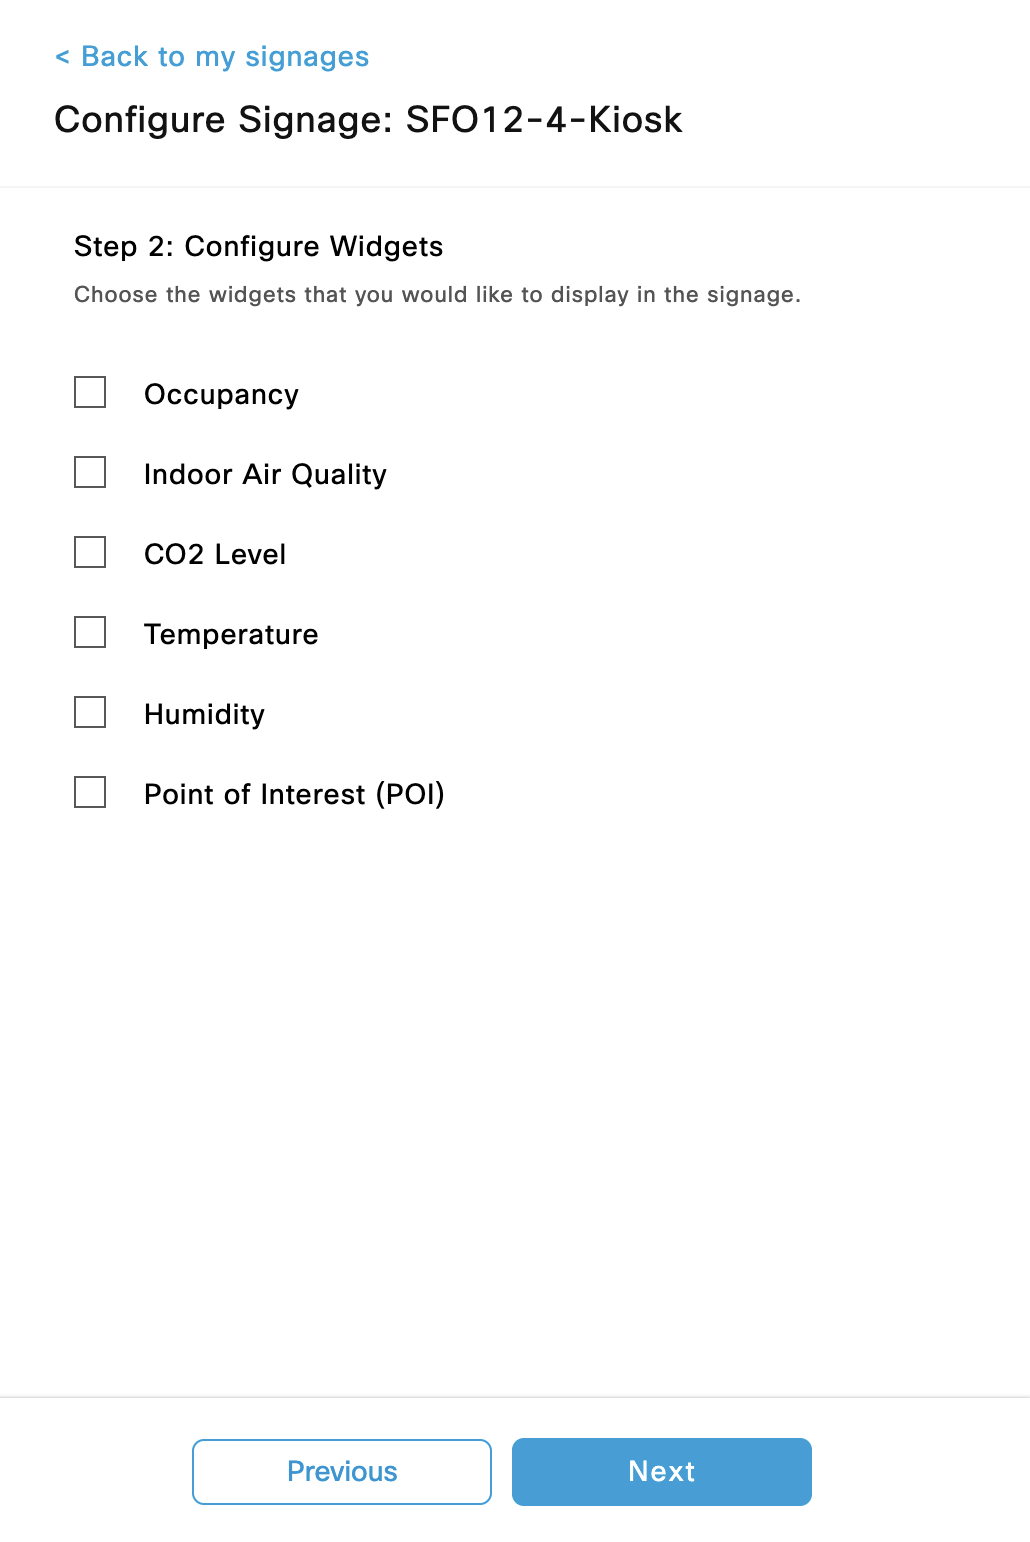
Step 2: Configure Widgets
Configure which widgets to show on each signage:
-
Occupancy
-
Indoor Air Quality
-
CO2 Level
-
Temperature
-
Fahrenheit
-
Celsius
-
-
Humidity
-
Point of Interest (POI)
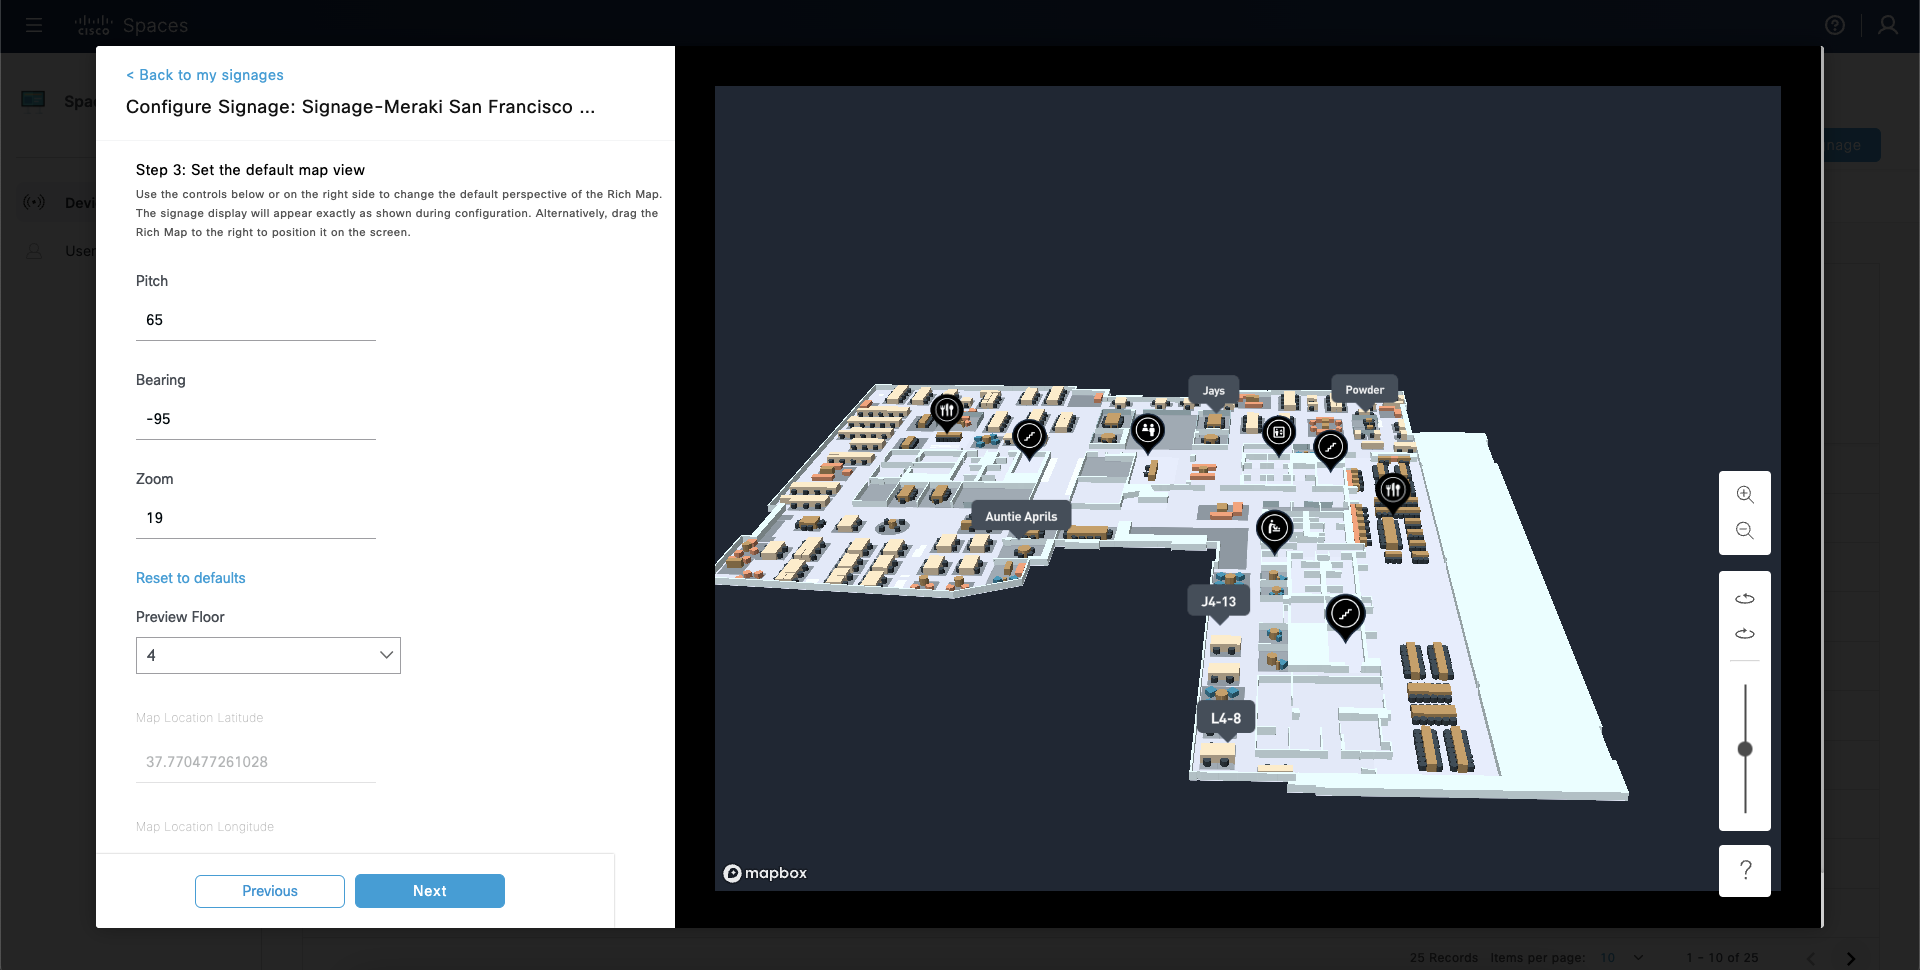
Step 3: Set the default map view
Use the controls below or on the right side to change the default perspective of the Rich Map. The signage display will appear exactly as shown during configuration. Alternatively, drag the Rich Map to the right to position it on the screen.
Pitch - vertical angle of the map view
Bearing - horizontal rotation of the map view
Zoom - level of zoom in the map view
Note: only whole numbers are supported for Pitch, Bearing, and Zoom.
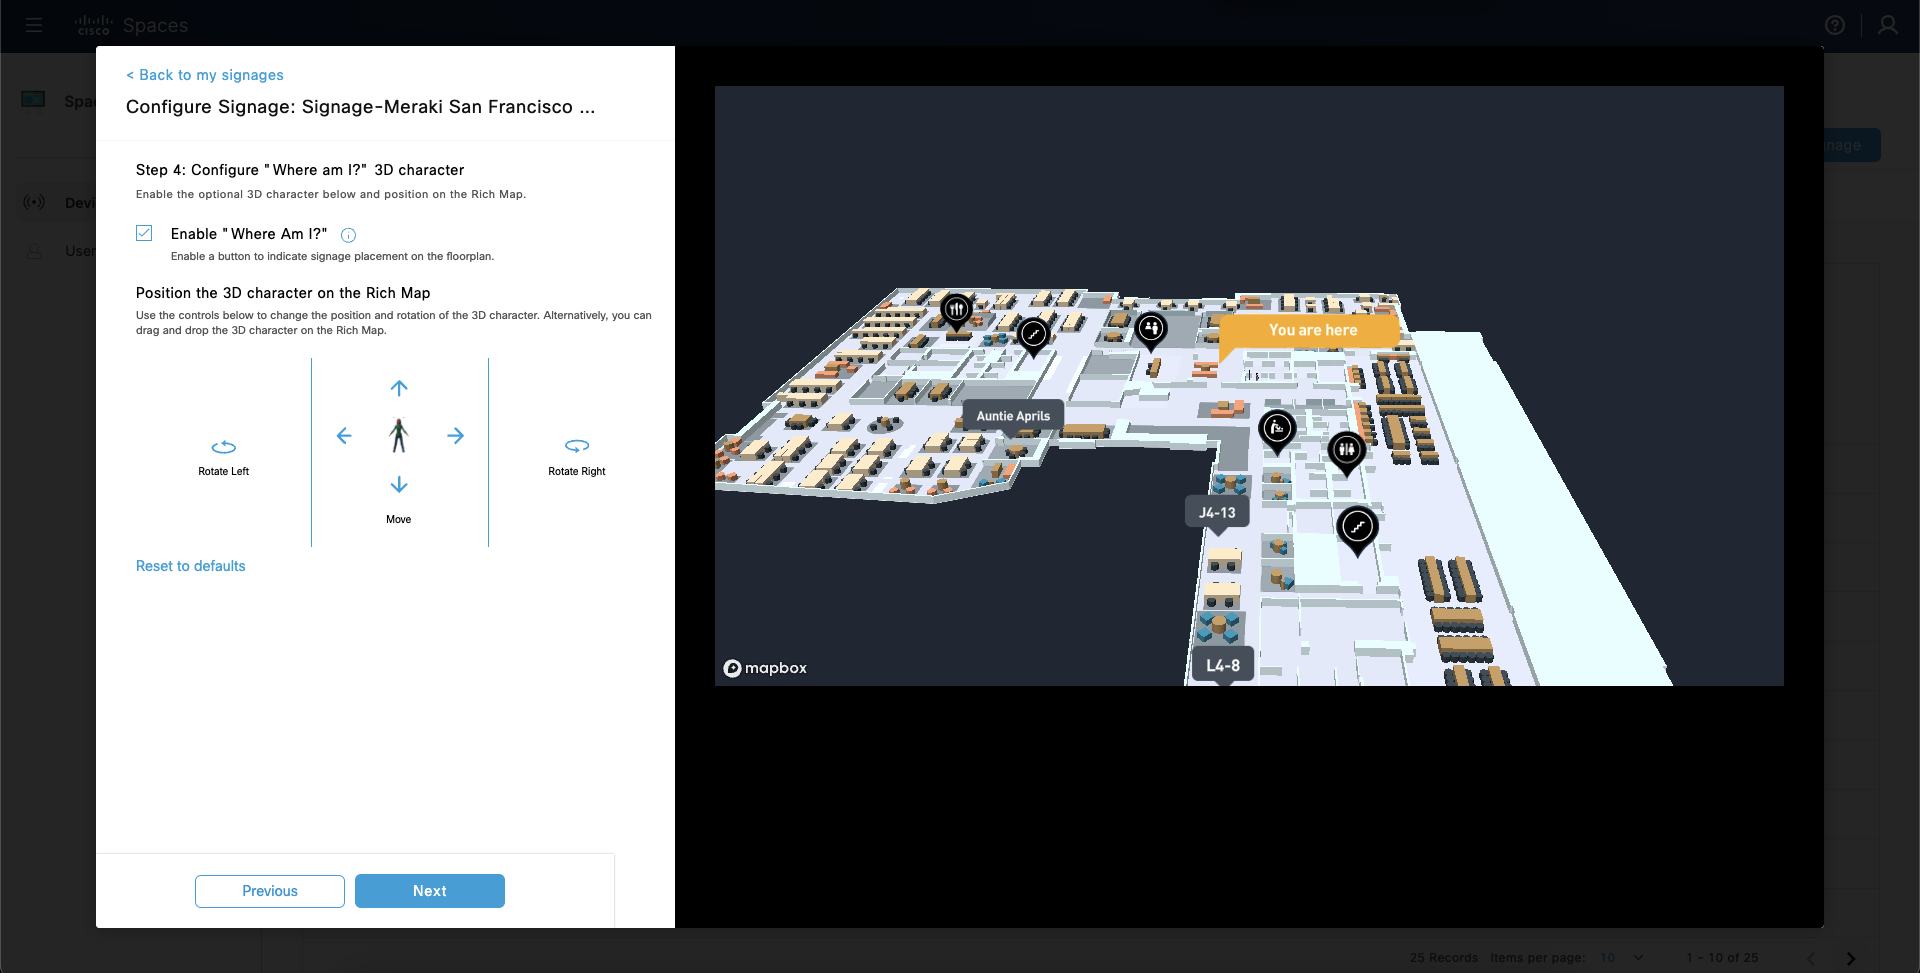
Step 4: Configure "Where am I?" 3D character
-
Place and rotate 3D caricature (named: “Spot) with a Digital Kiosk display on the floor map for giving context to the person interacting with the kiosk.
Note: a floor must be chosen in the “Add Signage” step (before Configure) to place a “Where am I?” character.
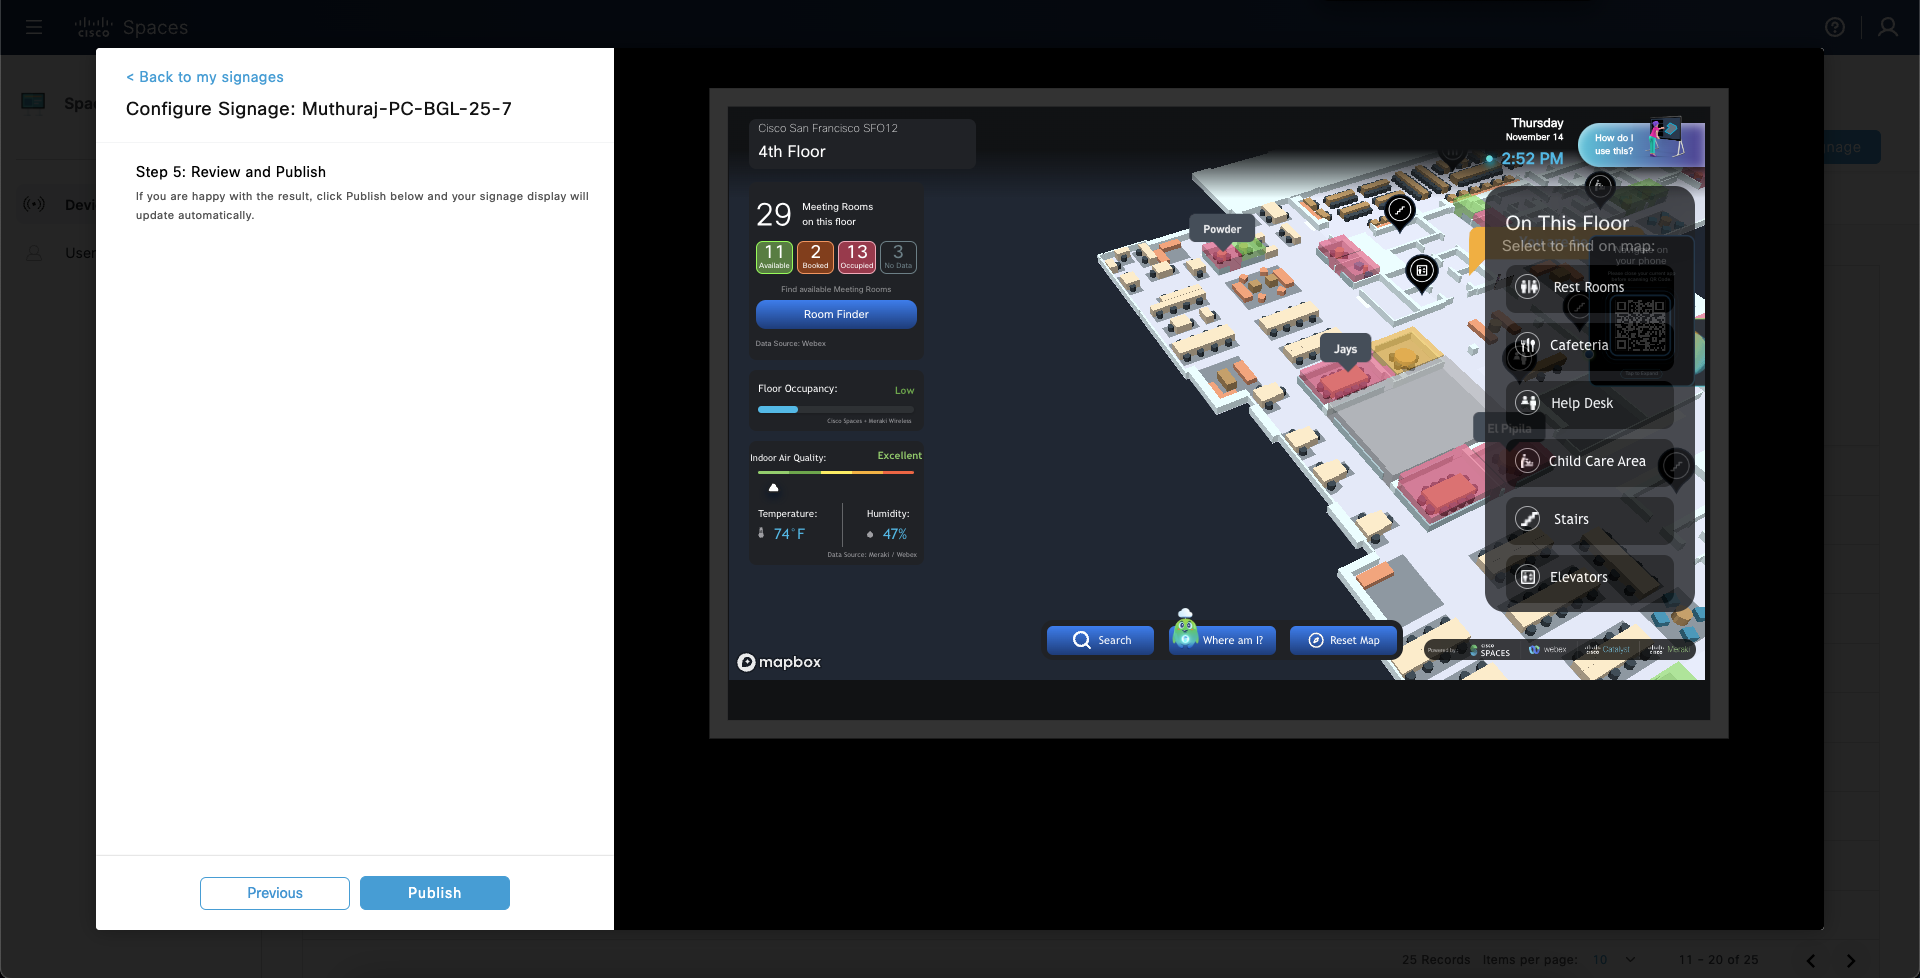
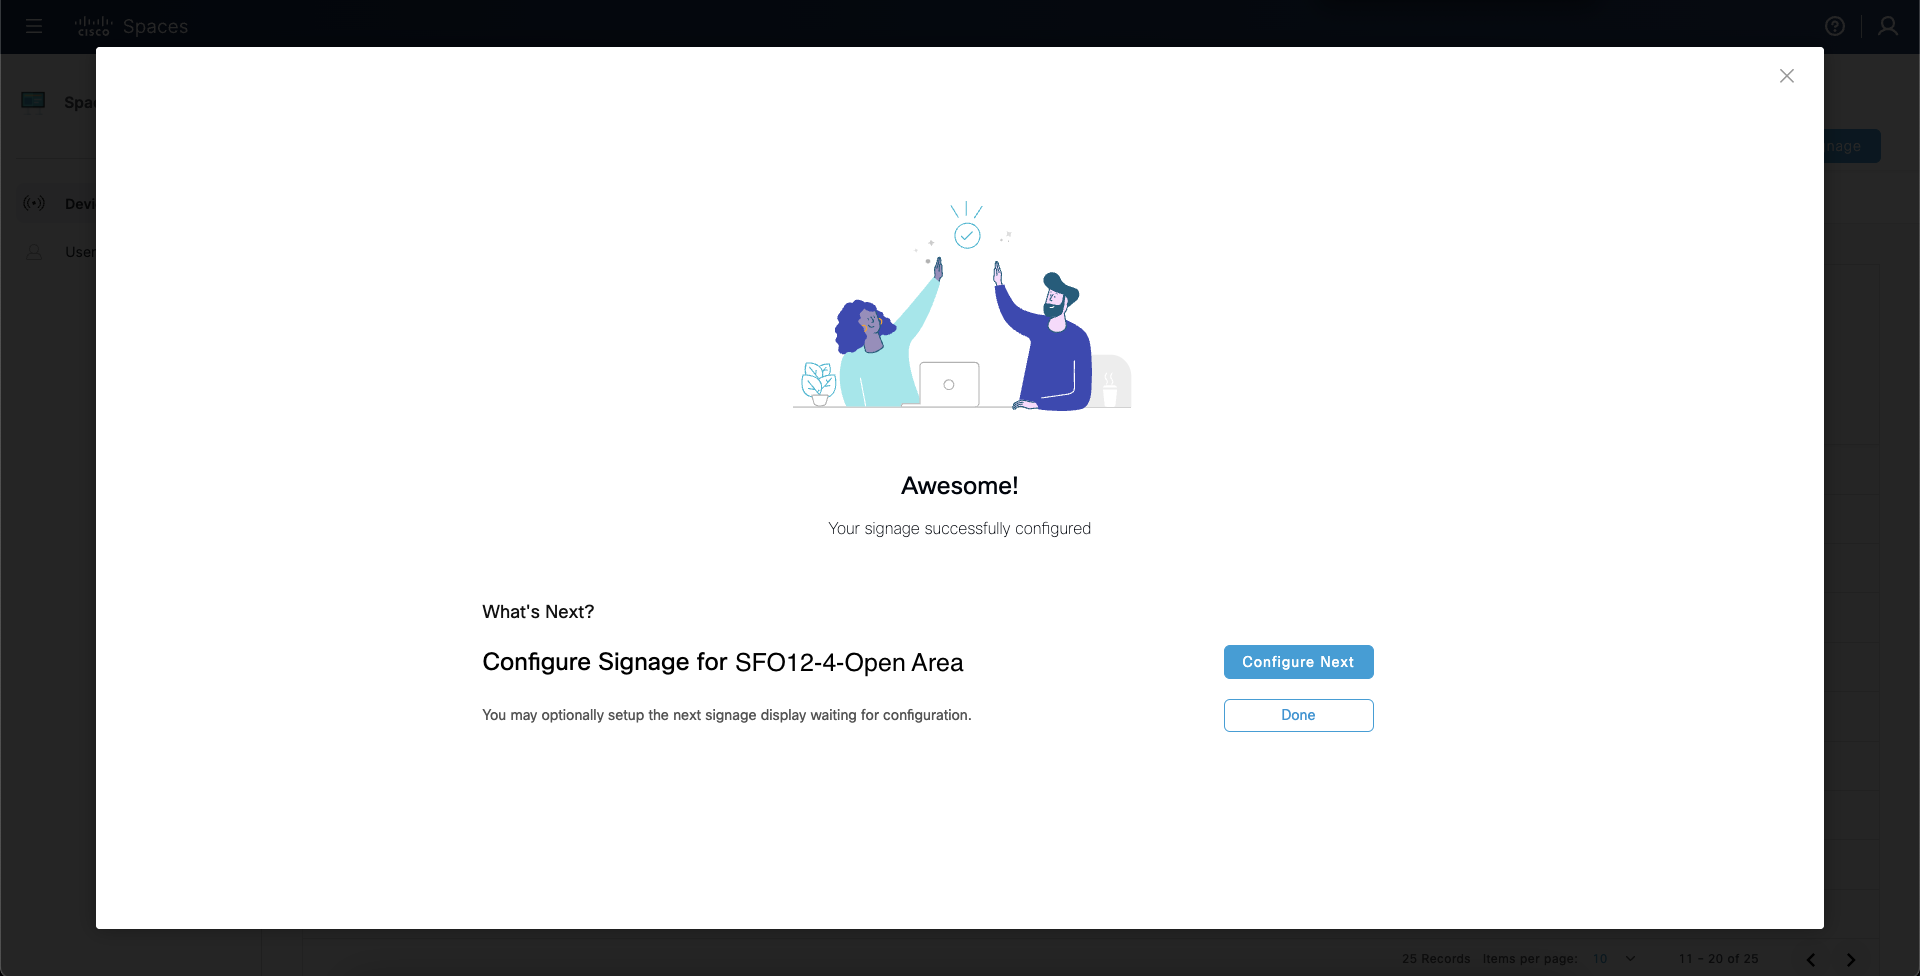
Step 5: Review and Publish
Note: the preview will show the previously published version of the kiosk app. It will not update with new configurations until after clicking Publish.
Visualizing Outcomes with Meraki Things (MT) Sensors
Overview of Outcomes
Note: Publishing MT data to Cisco Spaces Digital Kiosk and dashboard apps requires that the Meraki integration has already been performed as outlined in the Spaces OS runbook.
Pre-requisites:
-
Upload floorplans and properly geo-reference them
https://app.vidcast.io/share/09711009-fd50-4bd7-8403-6aa758f98f03
Meraki Things (MT) Sensor Meeting Room Assignment
In Space Manager > Manage Rooms:
-
click on a Meeting Room’s name in the list
-
go to IoT Sensors → (+) Add Devices
-
search for and select device(s)
-
click Add Device
Environmental Analytics Outcome
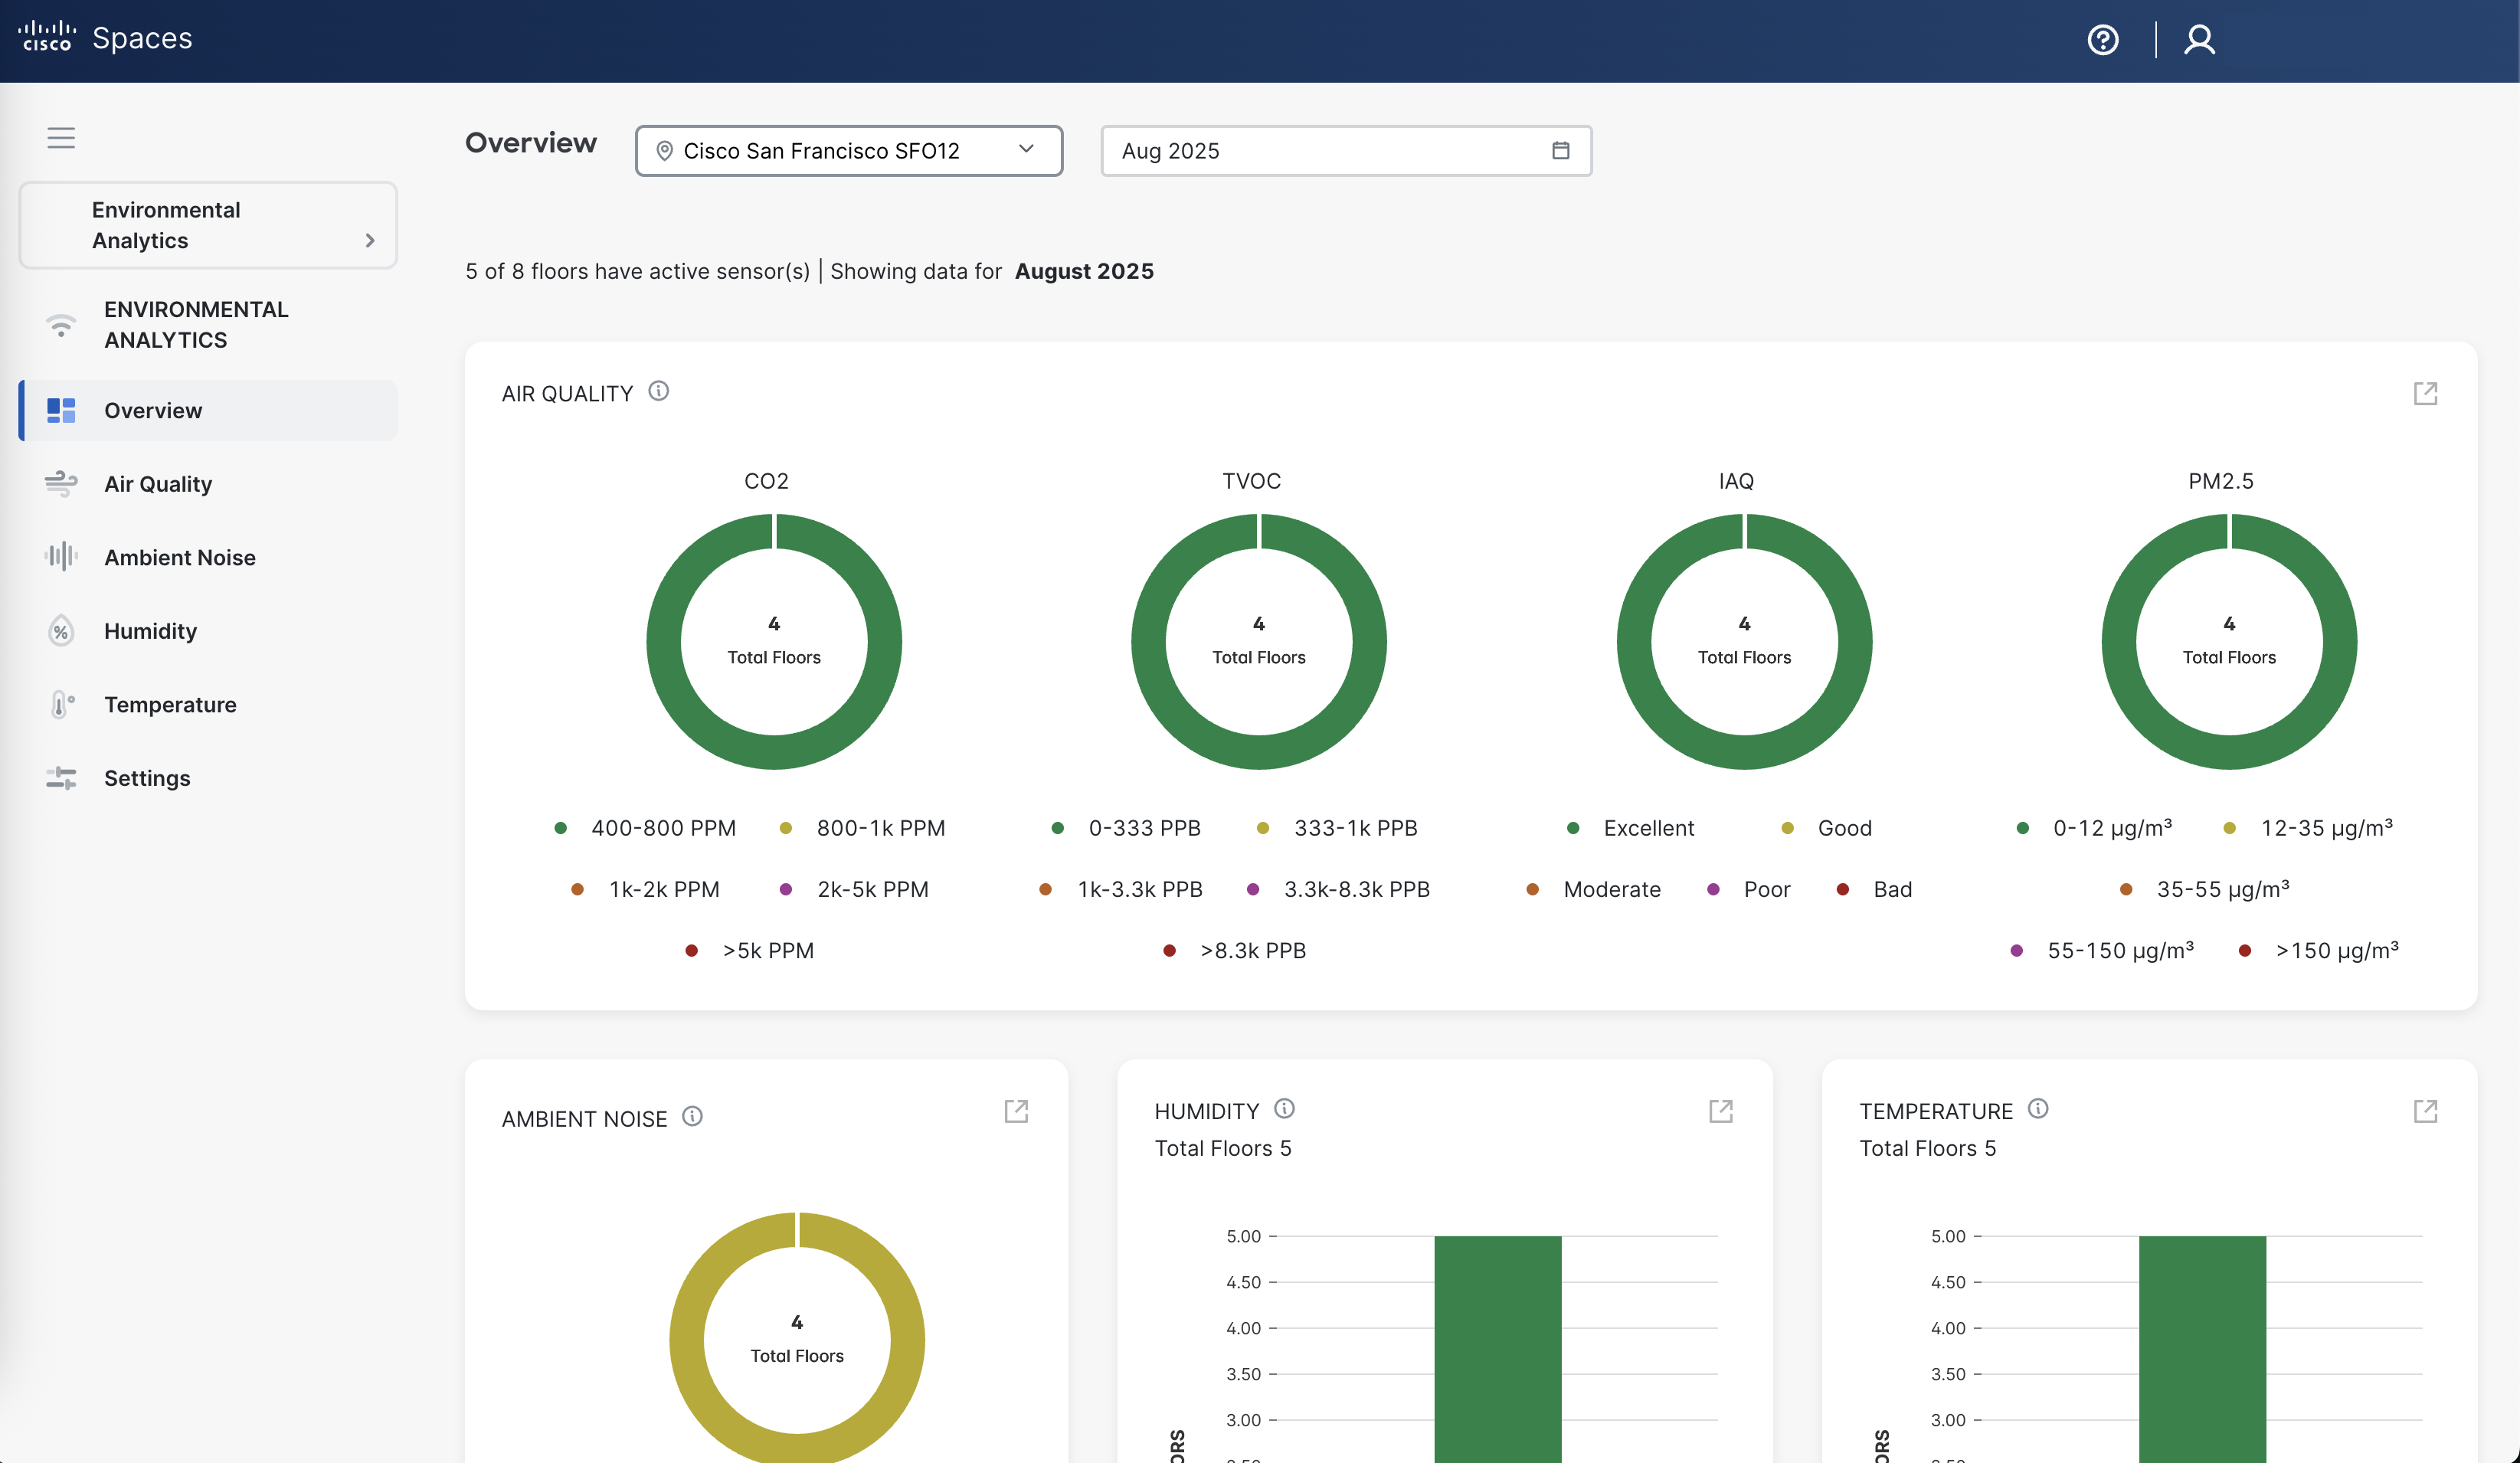
At a high level, get an overview of the performance of your portfolio or specific buildings to figure out where to drill into problem areas.
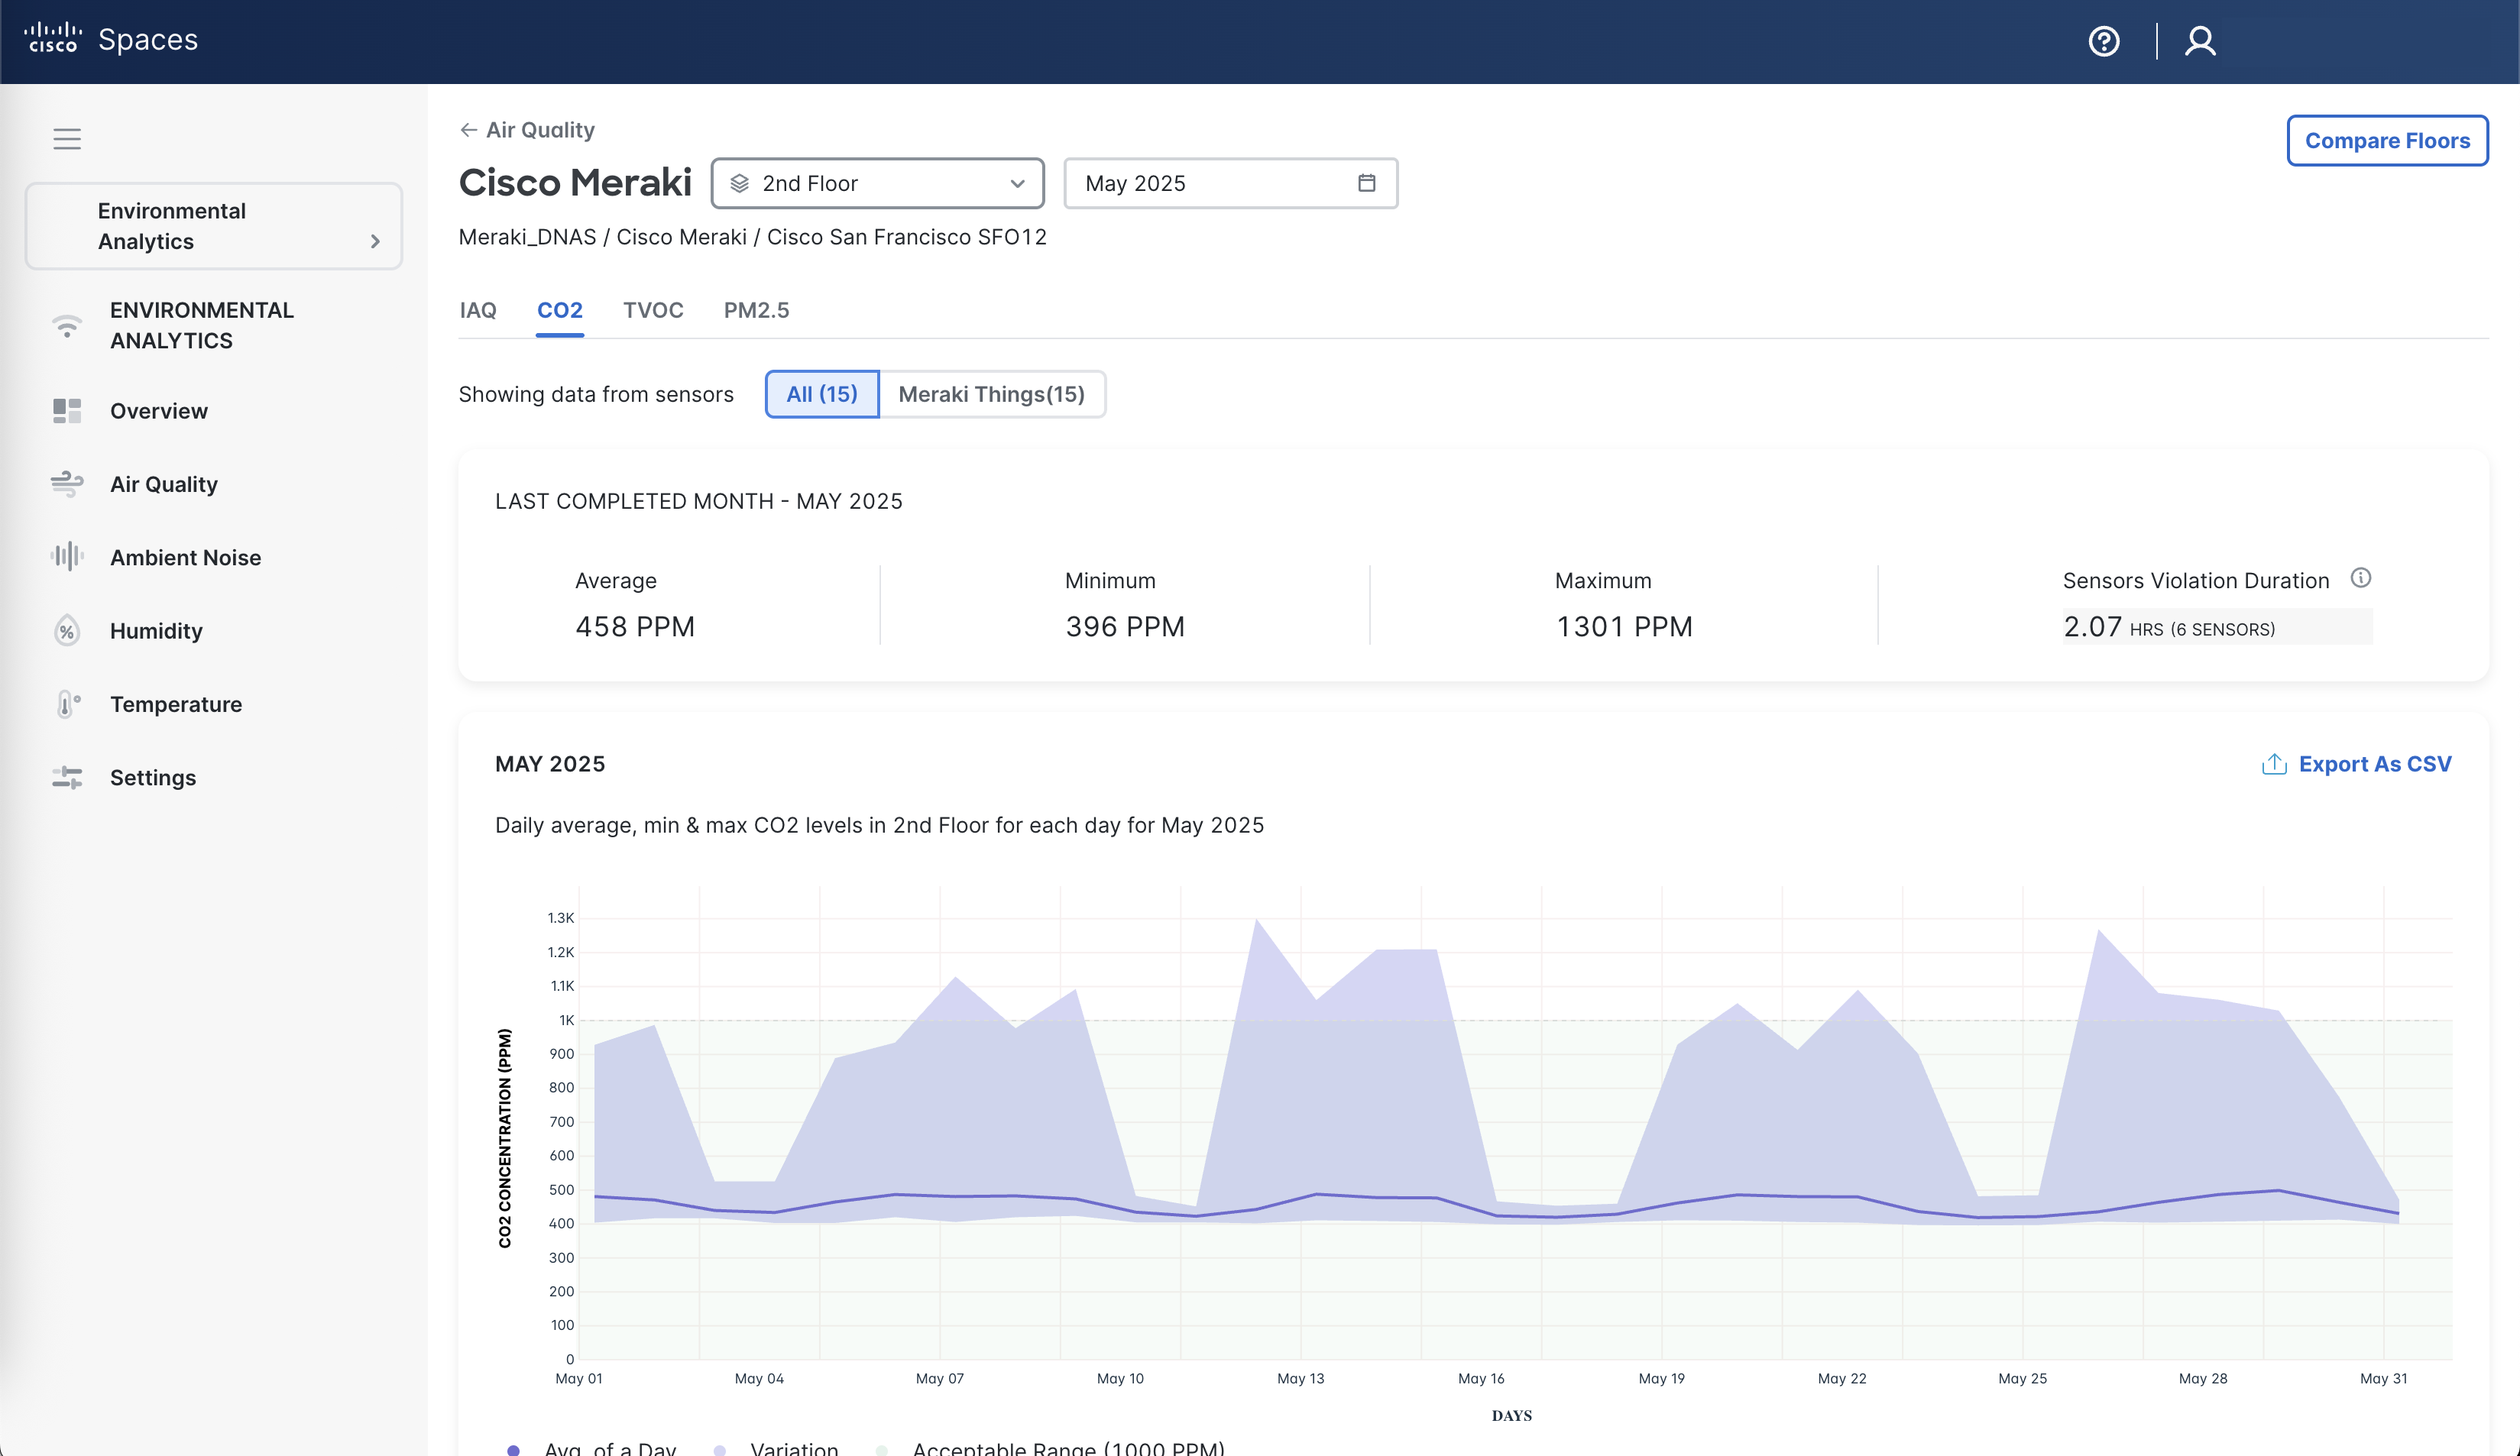
Once drilling into specific buildings and floors, visualize daily and monthly aggregated sensor data. View cumulative time across all sensors spent outside of their ideal ranges. Compare floors and drill into specific time ranges, especially for peaks to see which specific sensors or meeting rooms were contributing to out of range sensor violations.
Note: MT placed on the network floorplan in Meraki Dashboard and in the Cisco Spaces Location Hierarchy will show up as individual sensors when drilling into specific time slots in the graphs. MT assigned to Meeting Rooms in Space Manager are aggregated along with all other sensors of the same environmental metrics type assigned to that Meeting Room, but can be viewed individually, too.
Kiosk Outcome: Building, Floor, & Room Sensor Metrics
-
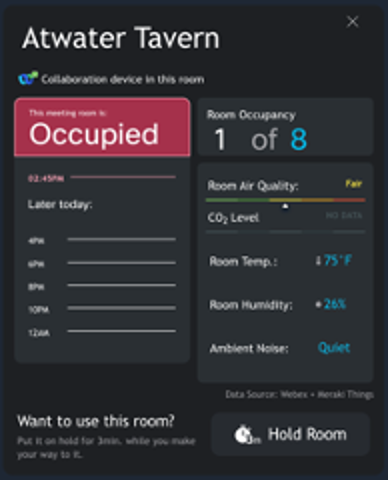
Building - temperature, humidity, and air quality aggregated metrics
-
Floor - temperature, humidity, and air quality aggregated metrics
-
Room - temperature, humidity, air quality, and ambient noise metrics
Configuring Spaces for IoT Services
-
Integration: BLE, wireless, & wired IoT Devices
-
Outcome: building^, floor^, room**, & desk** sensor metrics
-
Building – aggregate - temperature, humidity, air quality, and CO2
-
Floor – aggregate - temperature, humidity, air quality, and CO2
-
Room – aggregate – temperature, humidity, air quality, CO2, and ambient noise
-
Roadmap**: presence, people count, and calendar resource integration
-
Desk**
^ Currently requires additional work and will add time to deployment
** Roadmap
IoT Devices Pre-Requisites
Catalyst 9136/9166 on-device sensors (e.g. temperature, humidity, IAQ)
IoT Device Marketplace sensors
https://dnaspaces.io/devicemarketplace/home
AP Configuration Setup
Catalyst 91XX Access Points w/ simultaneous BLE beacon and gateway capabilities
IoT Services
Claiming Sensors
Configuring the Cisco Room Navigator
-
Factory Reset and setup in PWA mode
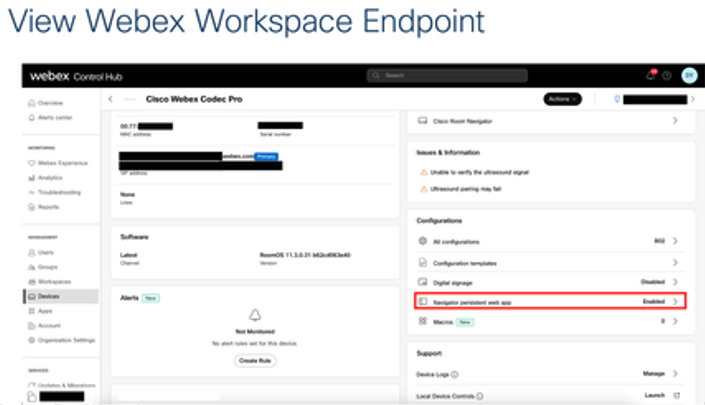
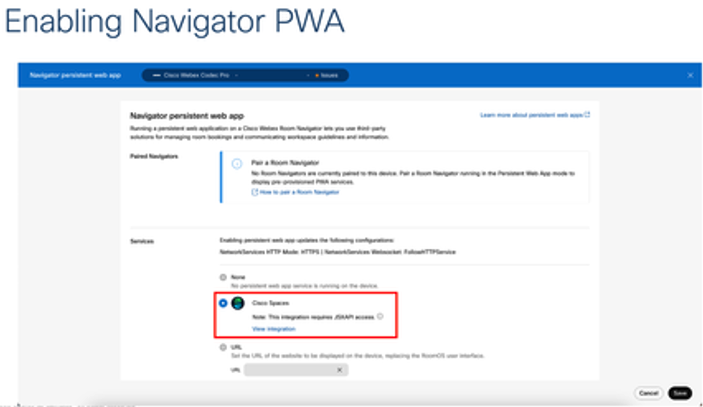
Note: the wall Navigator must be paired with an in-room video equipment in order to display the Cisco Spaces Navigator Meeting Room PWA. A Standalone Navigator will display the Kiosk application, which does not run properly on a Navigator due to limited resources for web rendering.
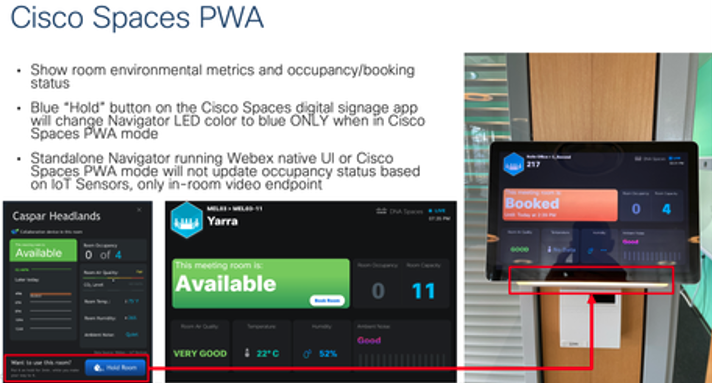
Configuring the Cisco Spaces Navigator Meeting Room PWA (persistent web app) on an outside the room Wall Navigator is optional, but currently the only supported method to turn the Navigator status LED bar blue to indicate the “Hold” status and color when clicking the 3-minute “Hold” button on a configured room on the Space Explorer Kiosk or Web App. However, not all native RoomOS or Microsoft Teams Room (MTR) features are available on the Cisco Spaces Wall Navigator PWA (persistent web app). For example, you cannot book a room and check-in/auto-release is not available from Webex Control Hub configuration settings. Available, Booked, and Occupies statuses are reflected on the Cisco Spaces PWA. A Standalone Navigator with or without Cisco Spaces PWA running cannot be configured to update occupancy status based on 3rd Party Occupancy IoT sensors from the Cisco Spaces platform, but may be possible in a future update.
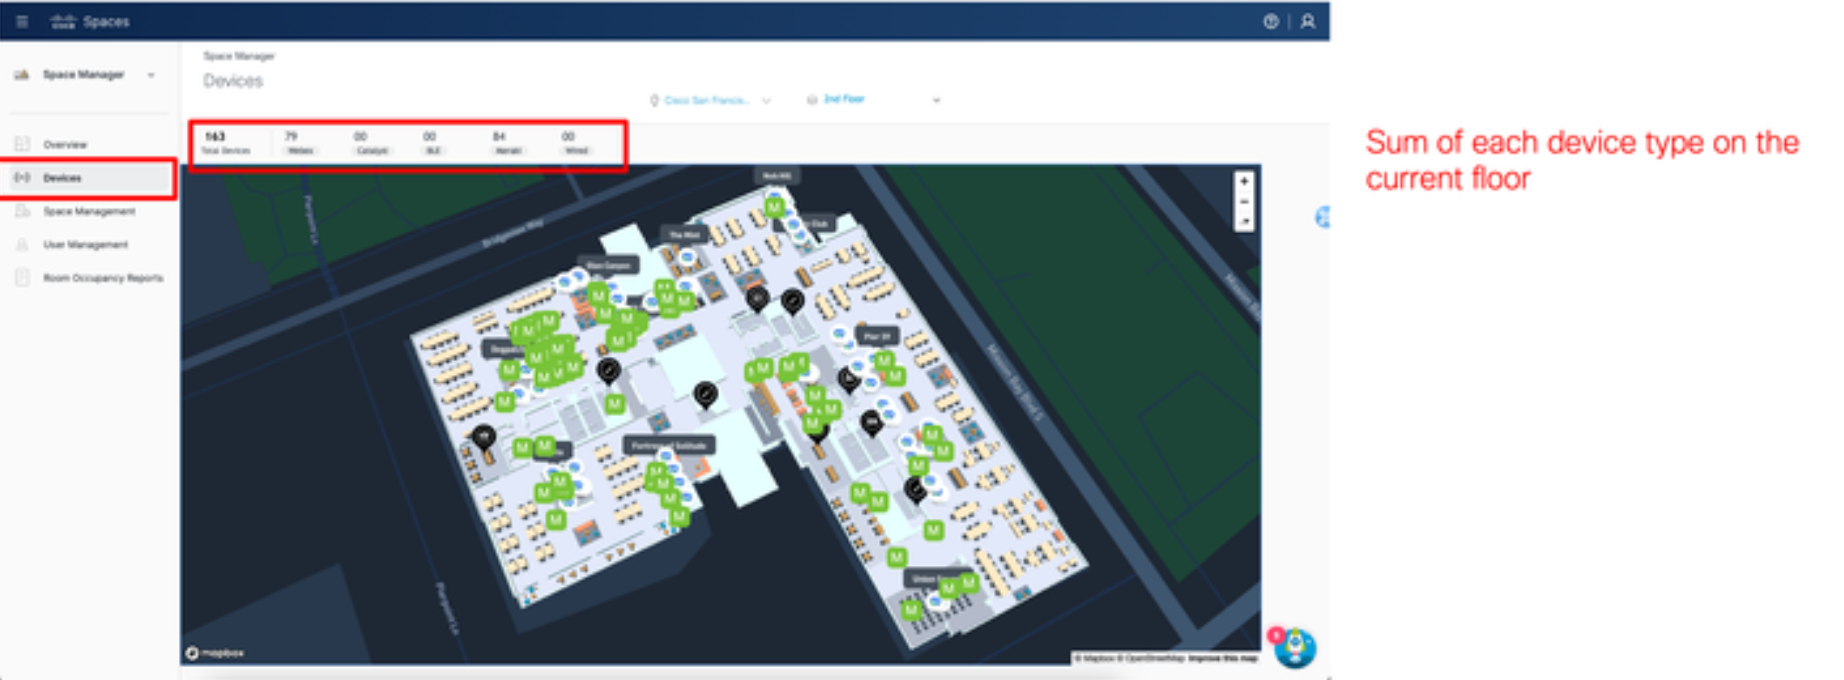
Visualizing Room Telemetry Data with Space Manager
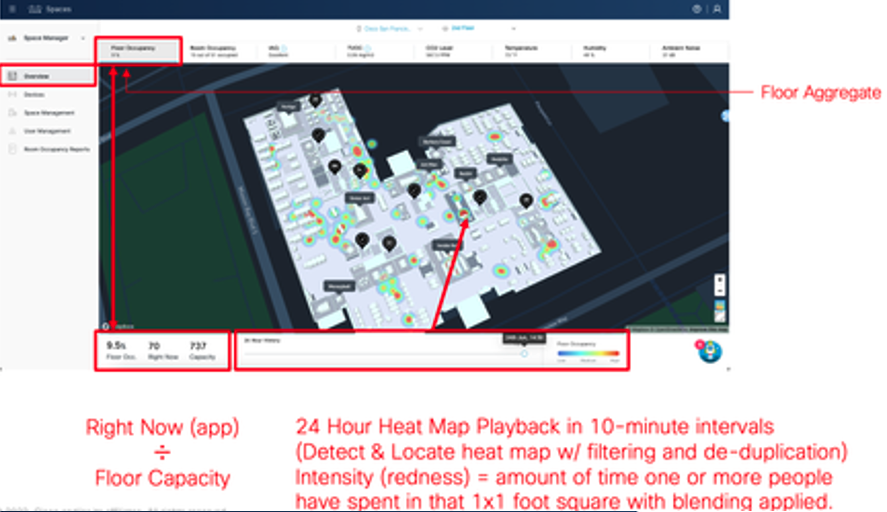
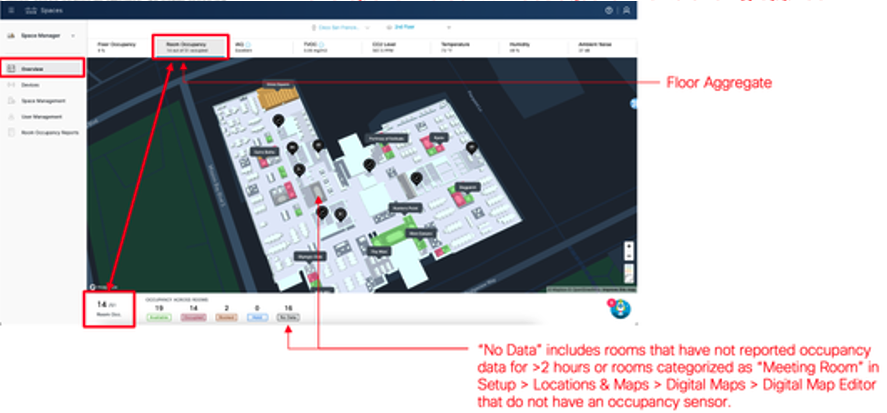
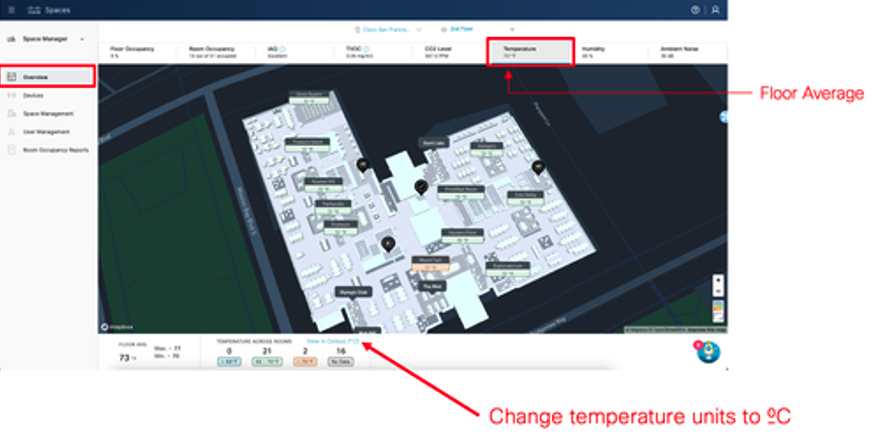
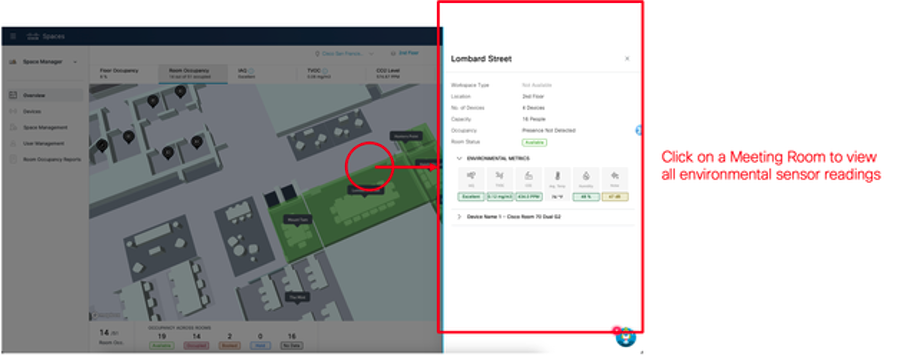
Devices
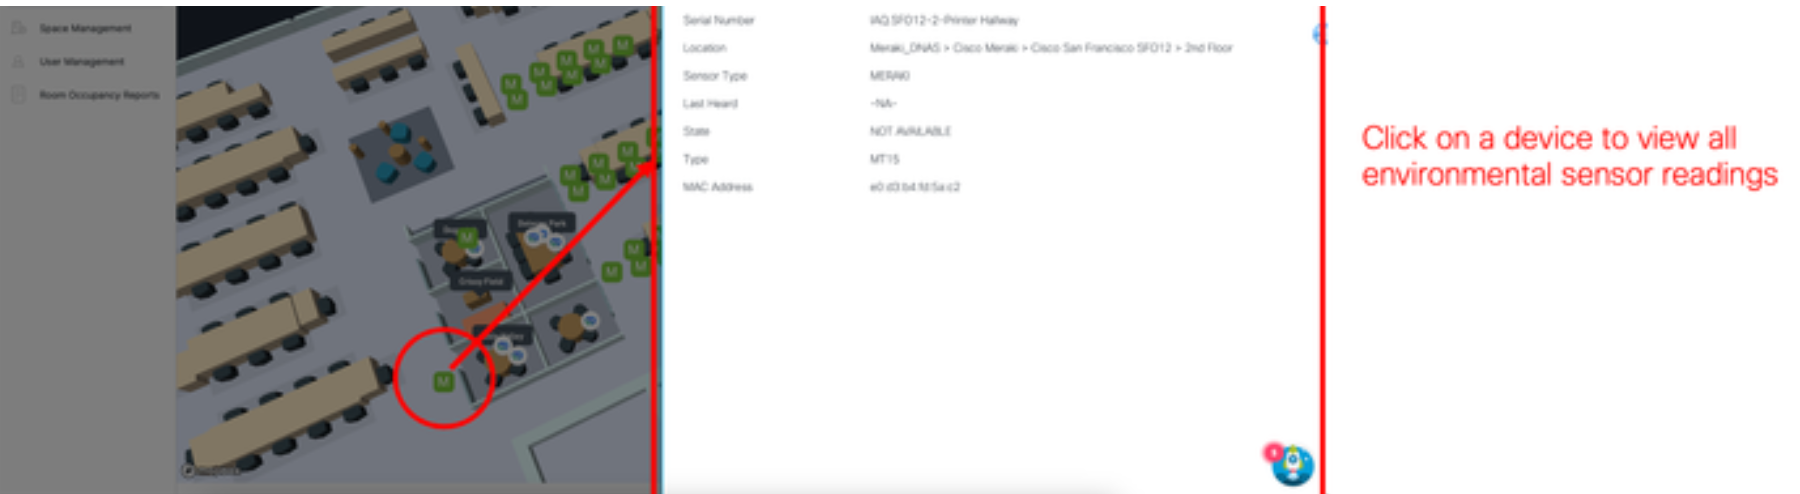
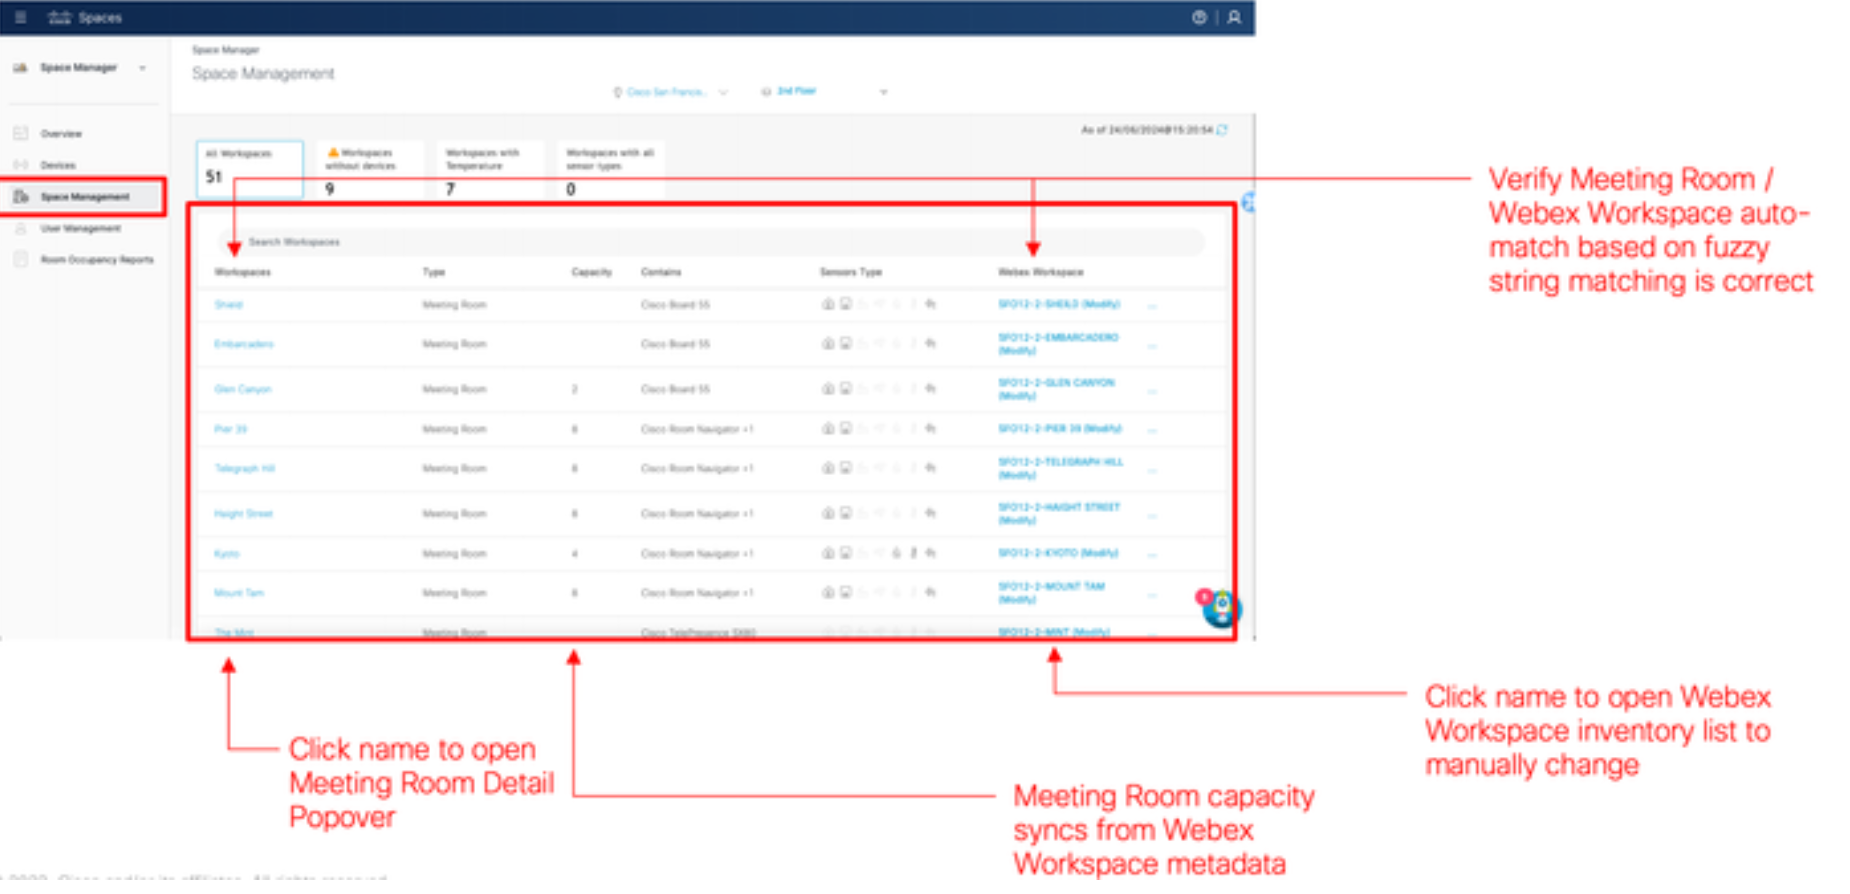
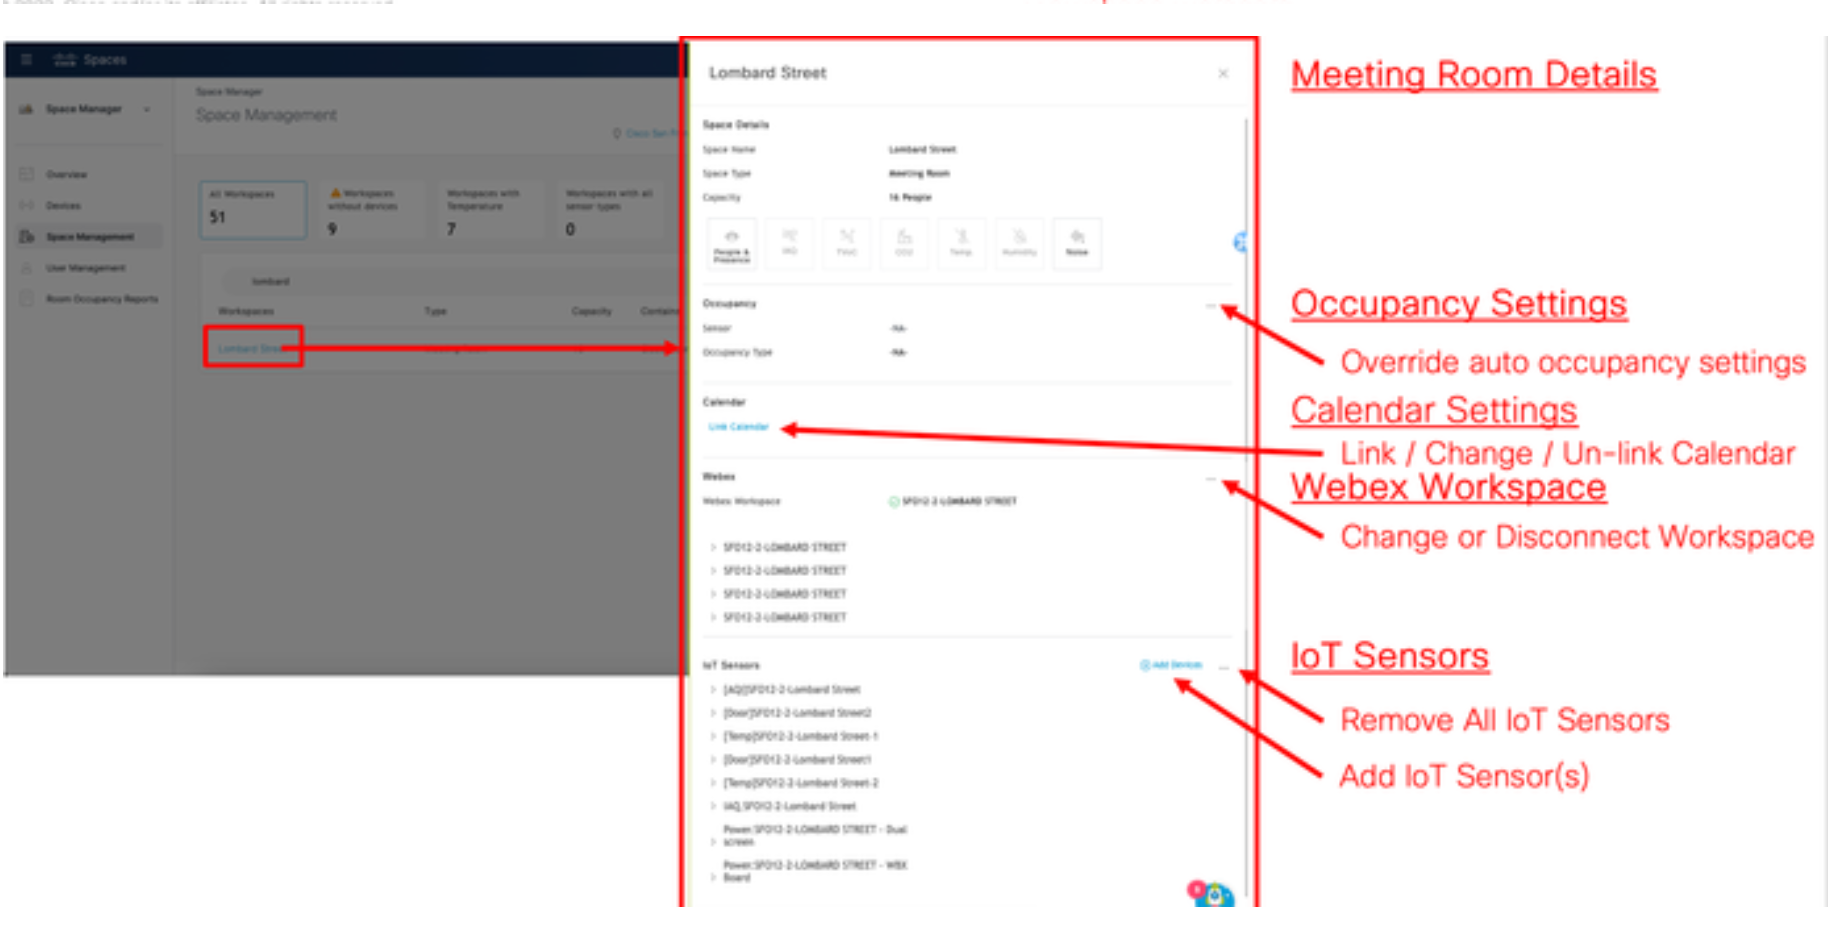
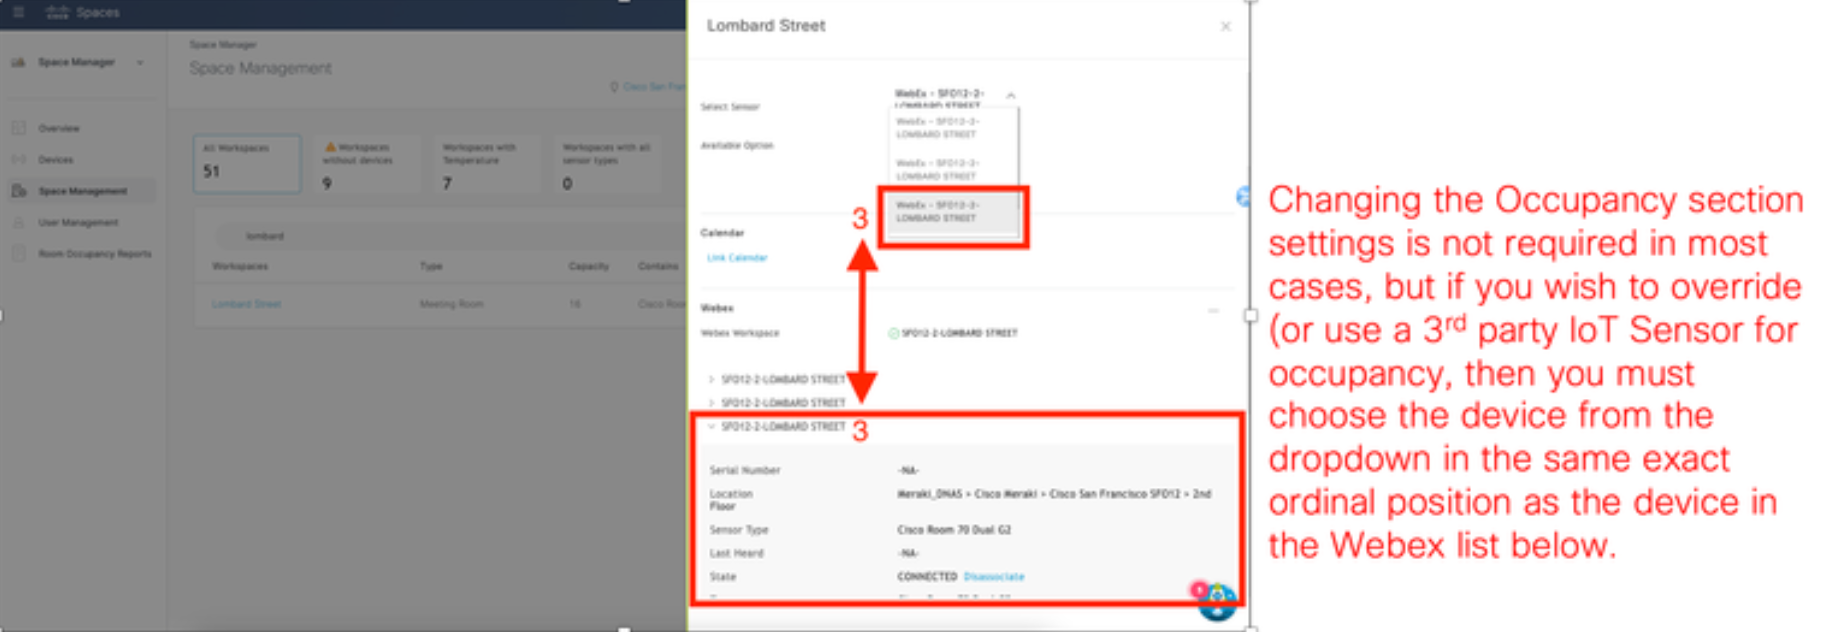
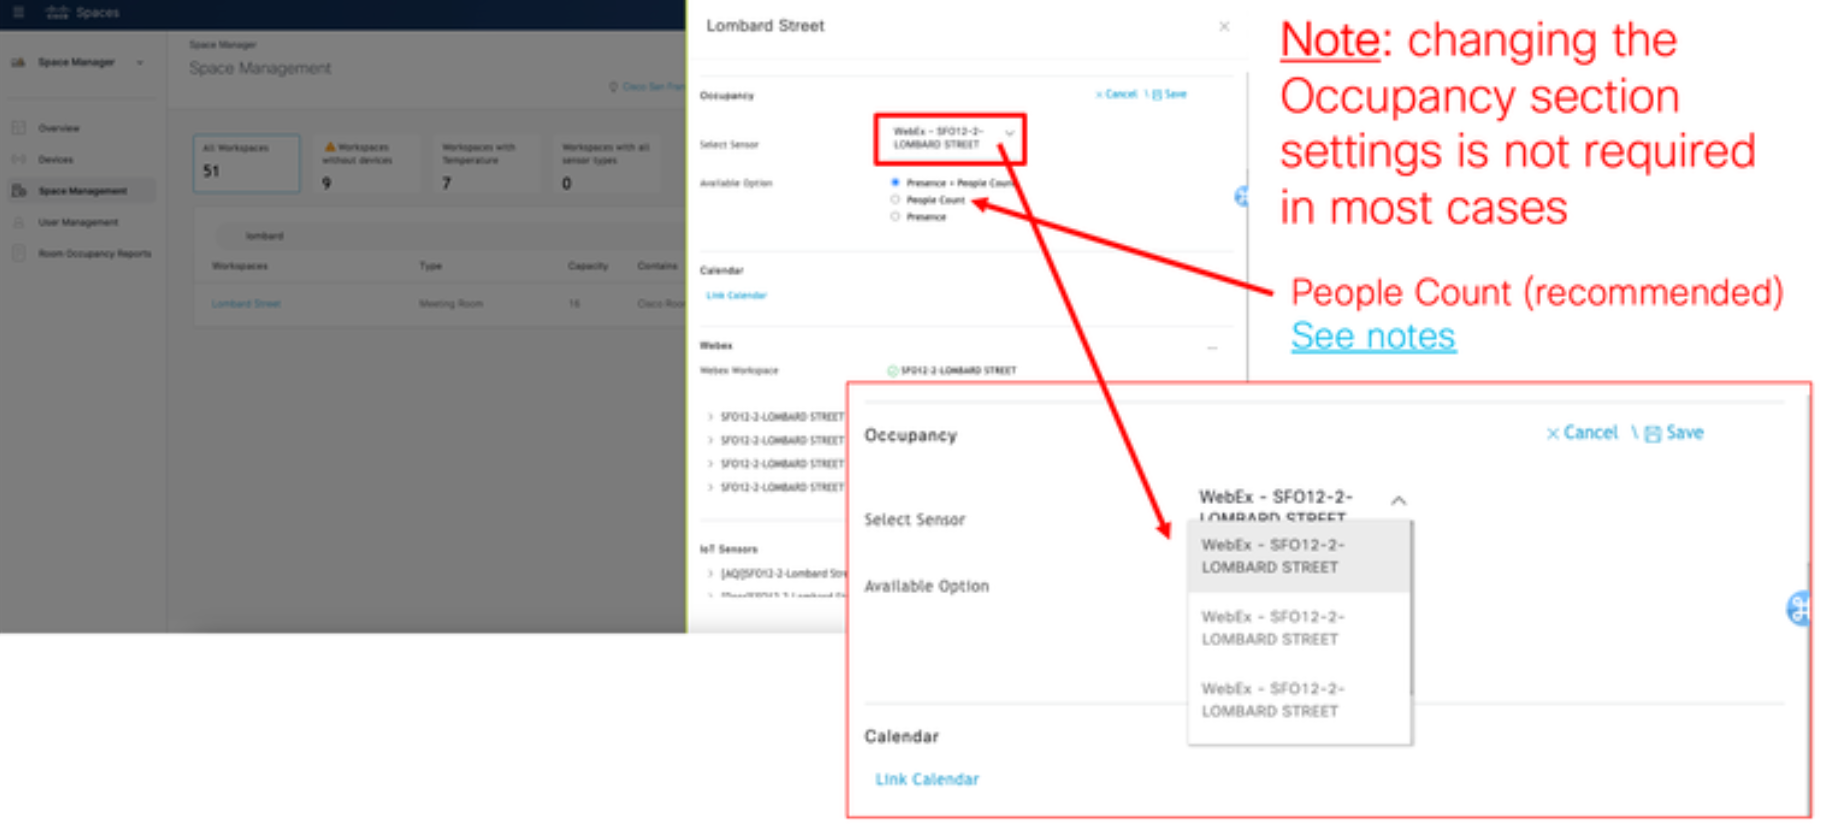
Configuring Meeting Room Settings in Space Manager
REFERENCES
Caveats & Tips
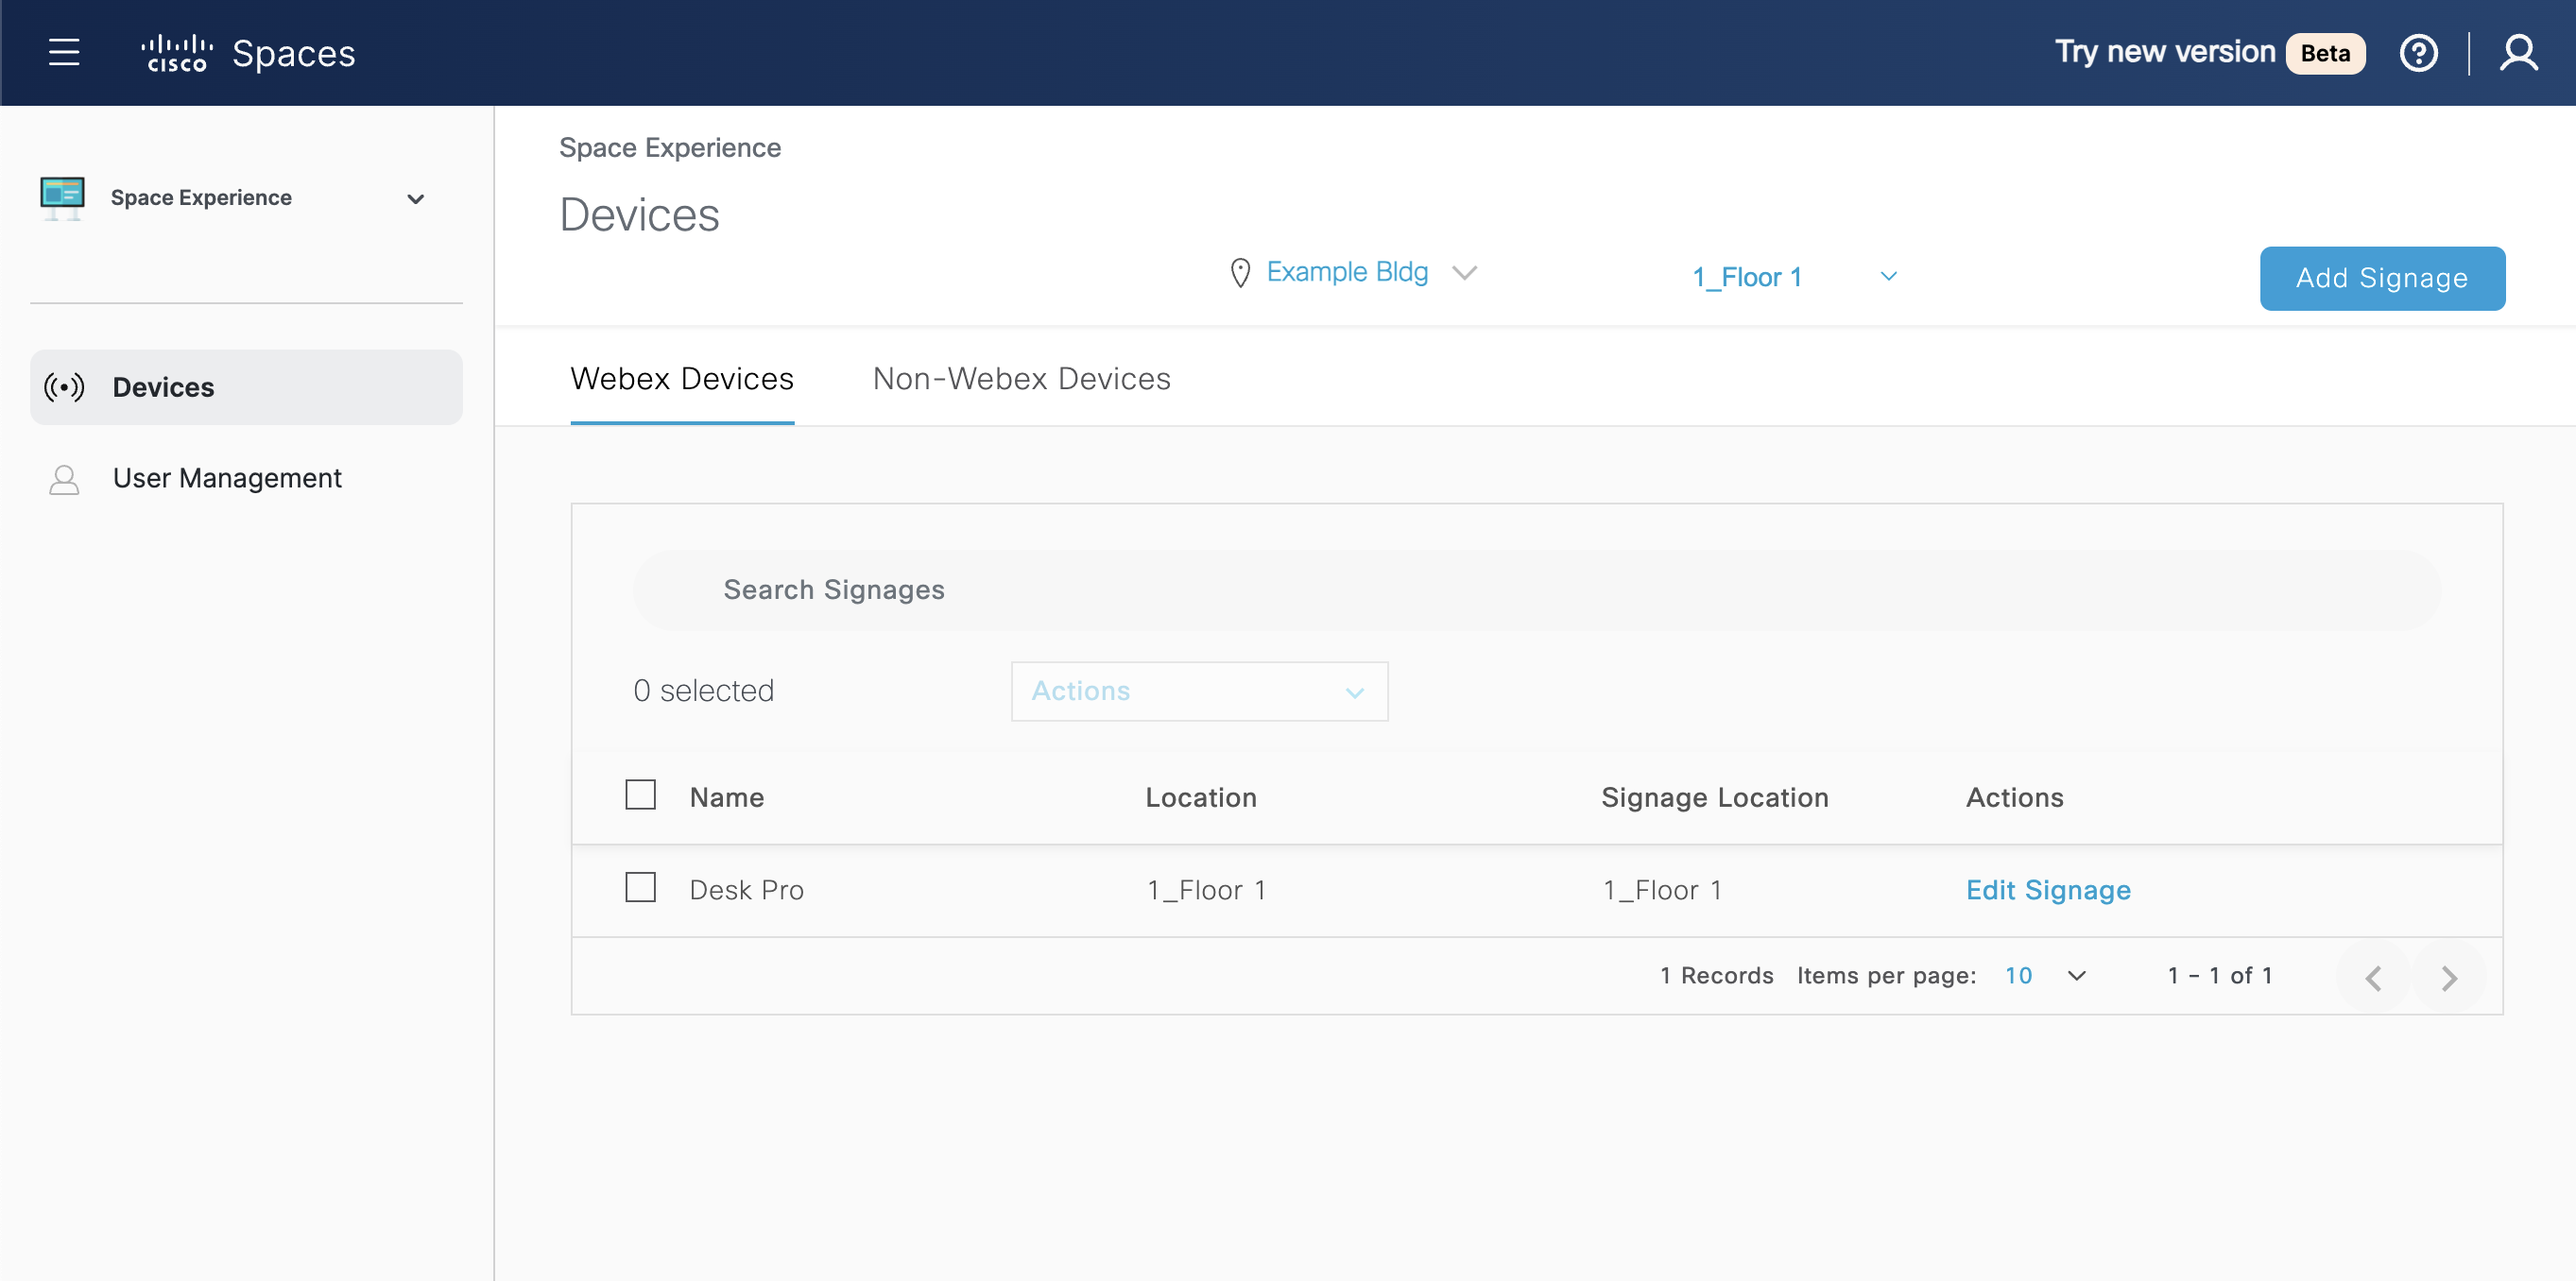
1. Troubleshooting Cisco Collaboration device configured in Digital Signage mode in Webex Control Hub, but not appearing in Space Experience > Devices > Webex Devices list view for configuration
In some cases, the display may appear stuck, frozen, or otherwise unresponsive/non-responsive on this application screen, and the device is not appearing in Spaces to Configure.
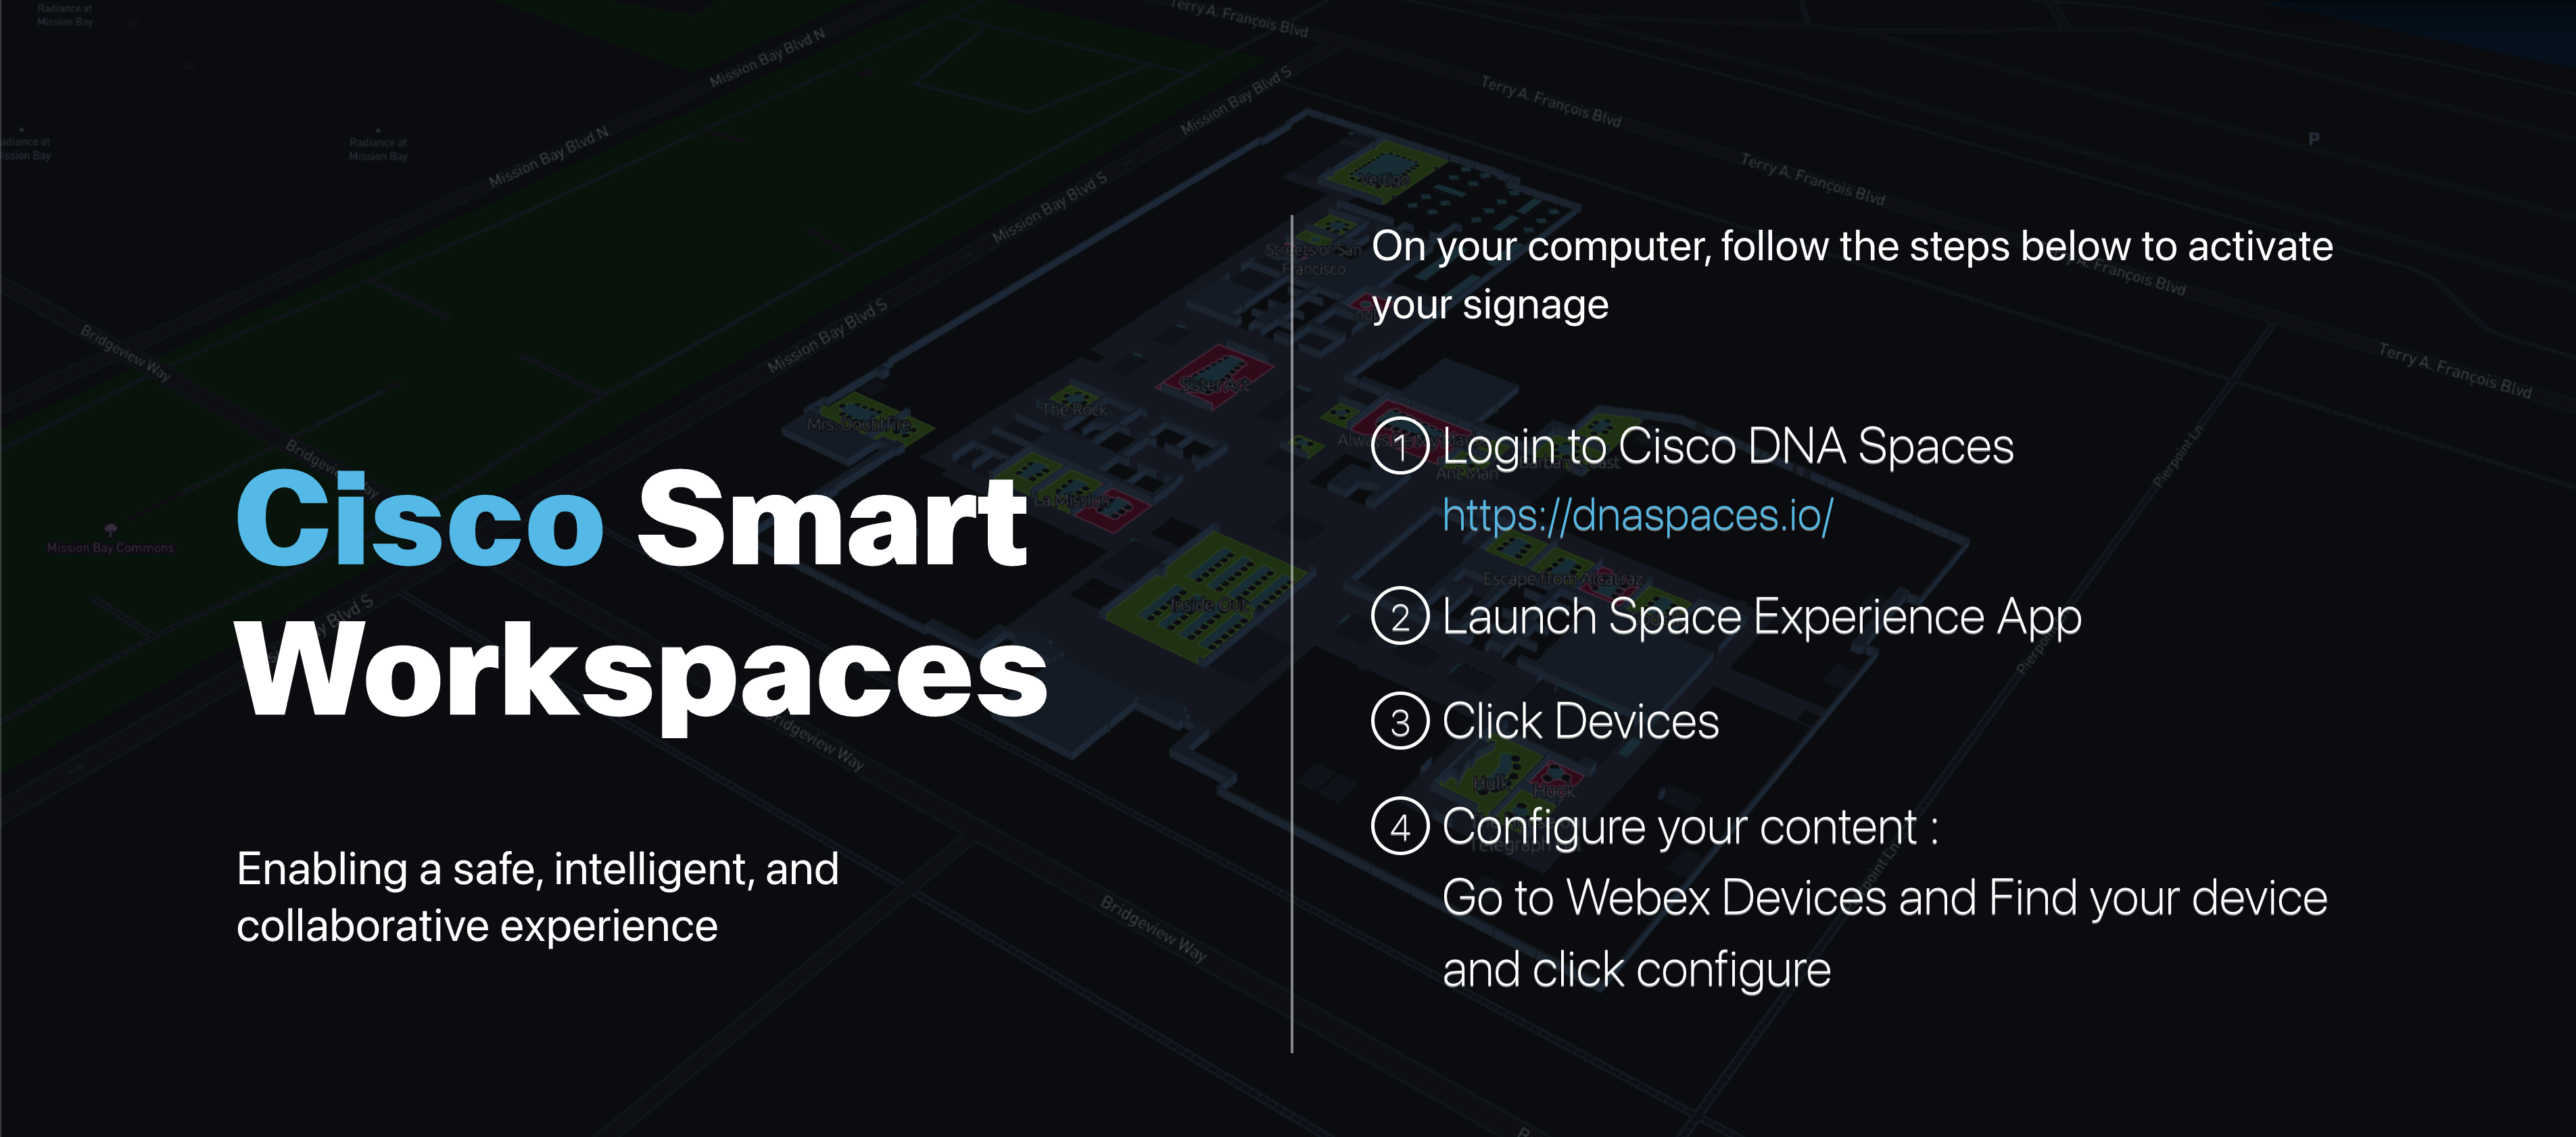
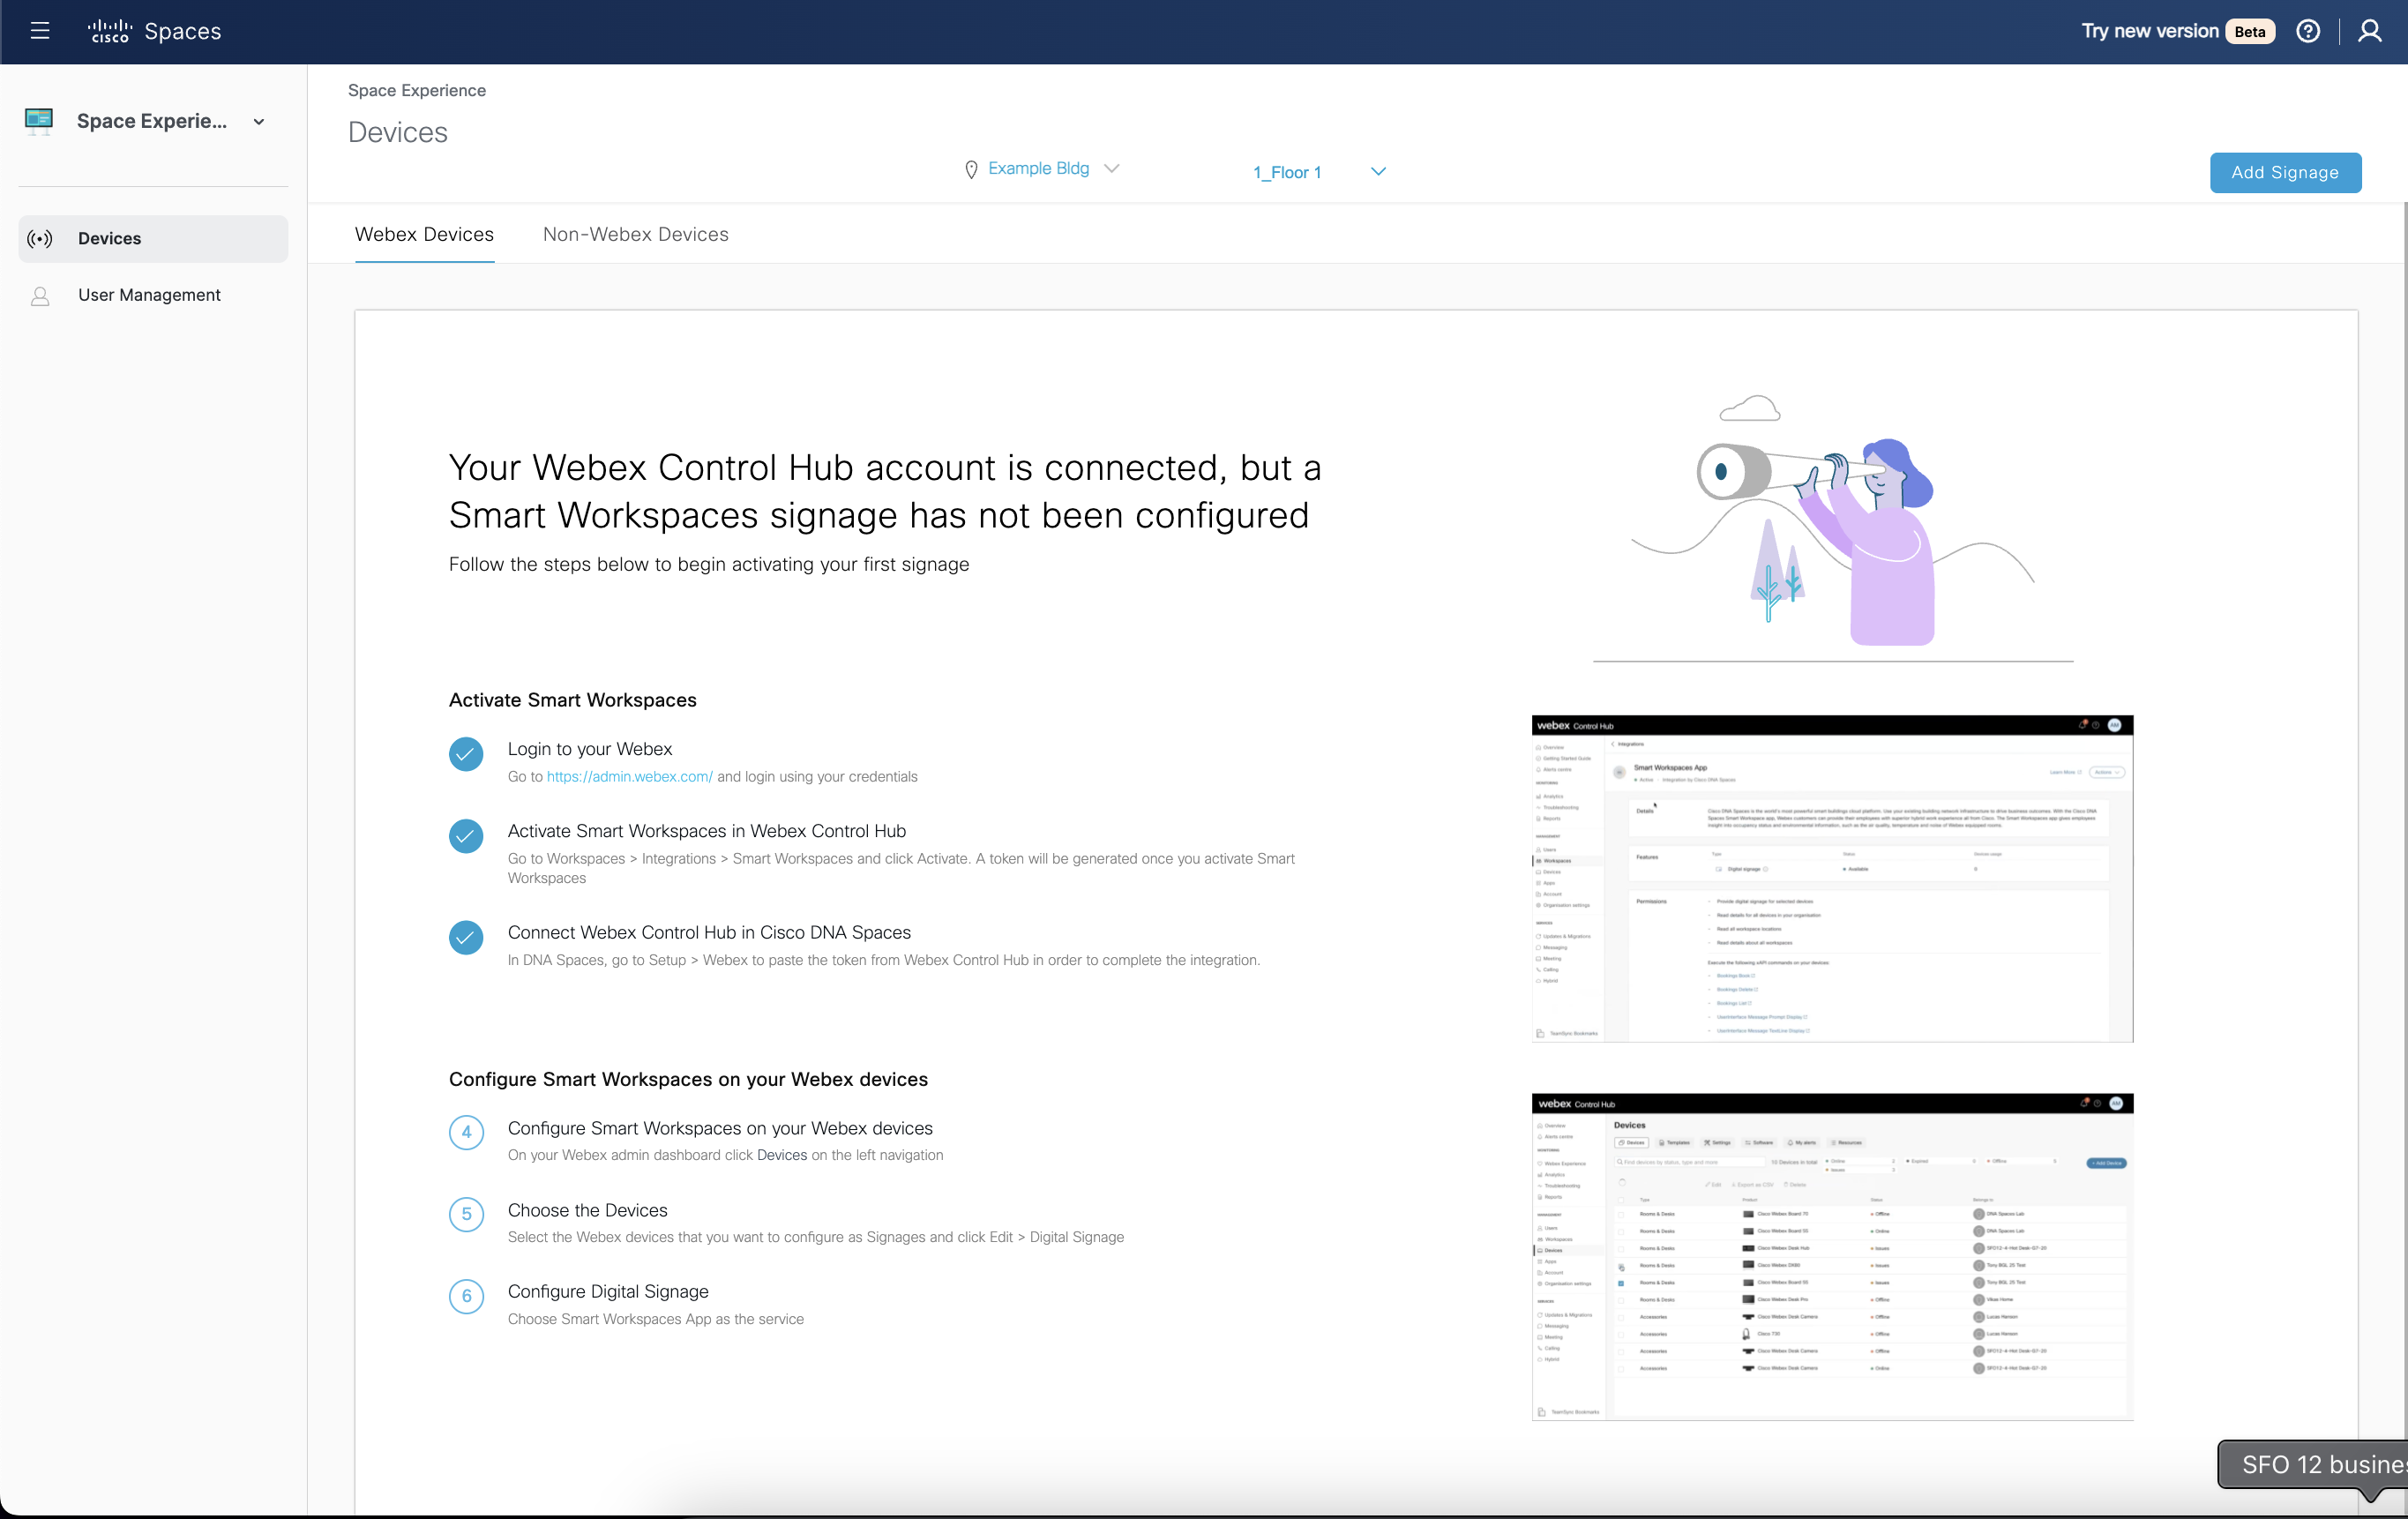
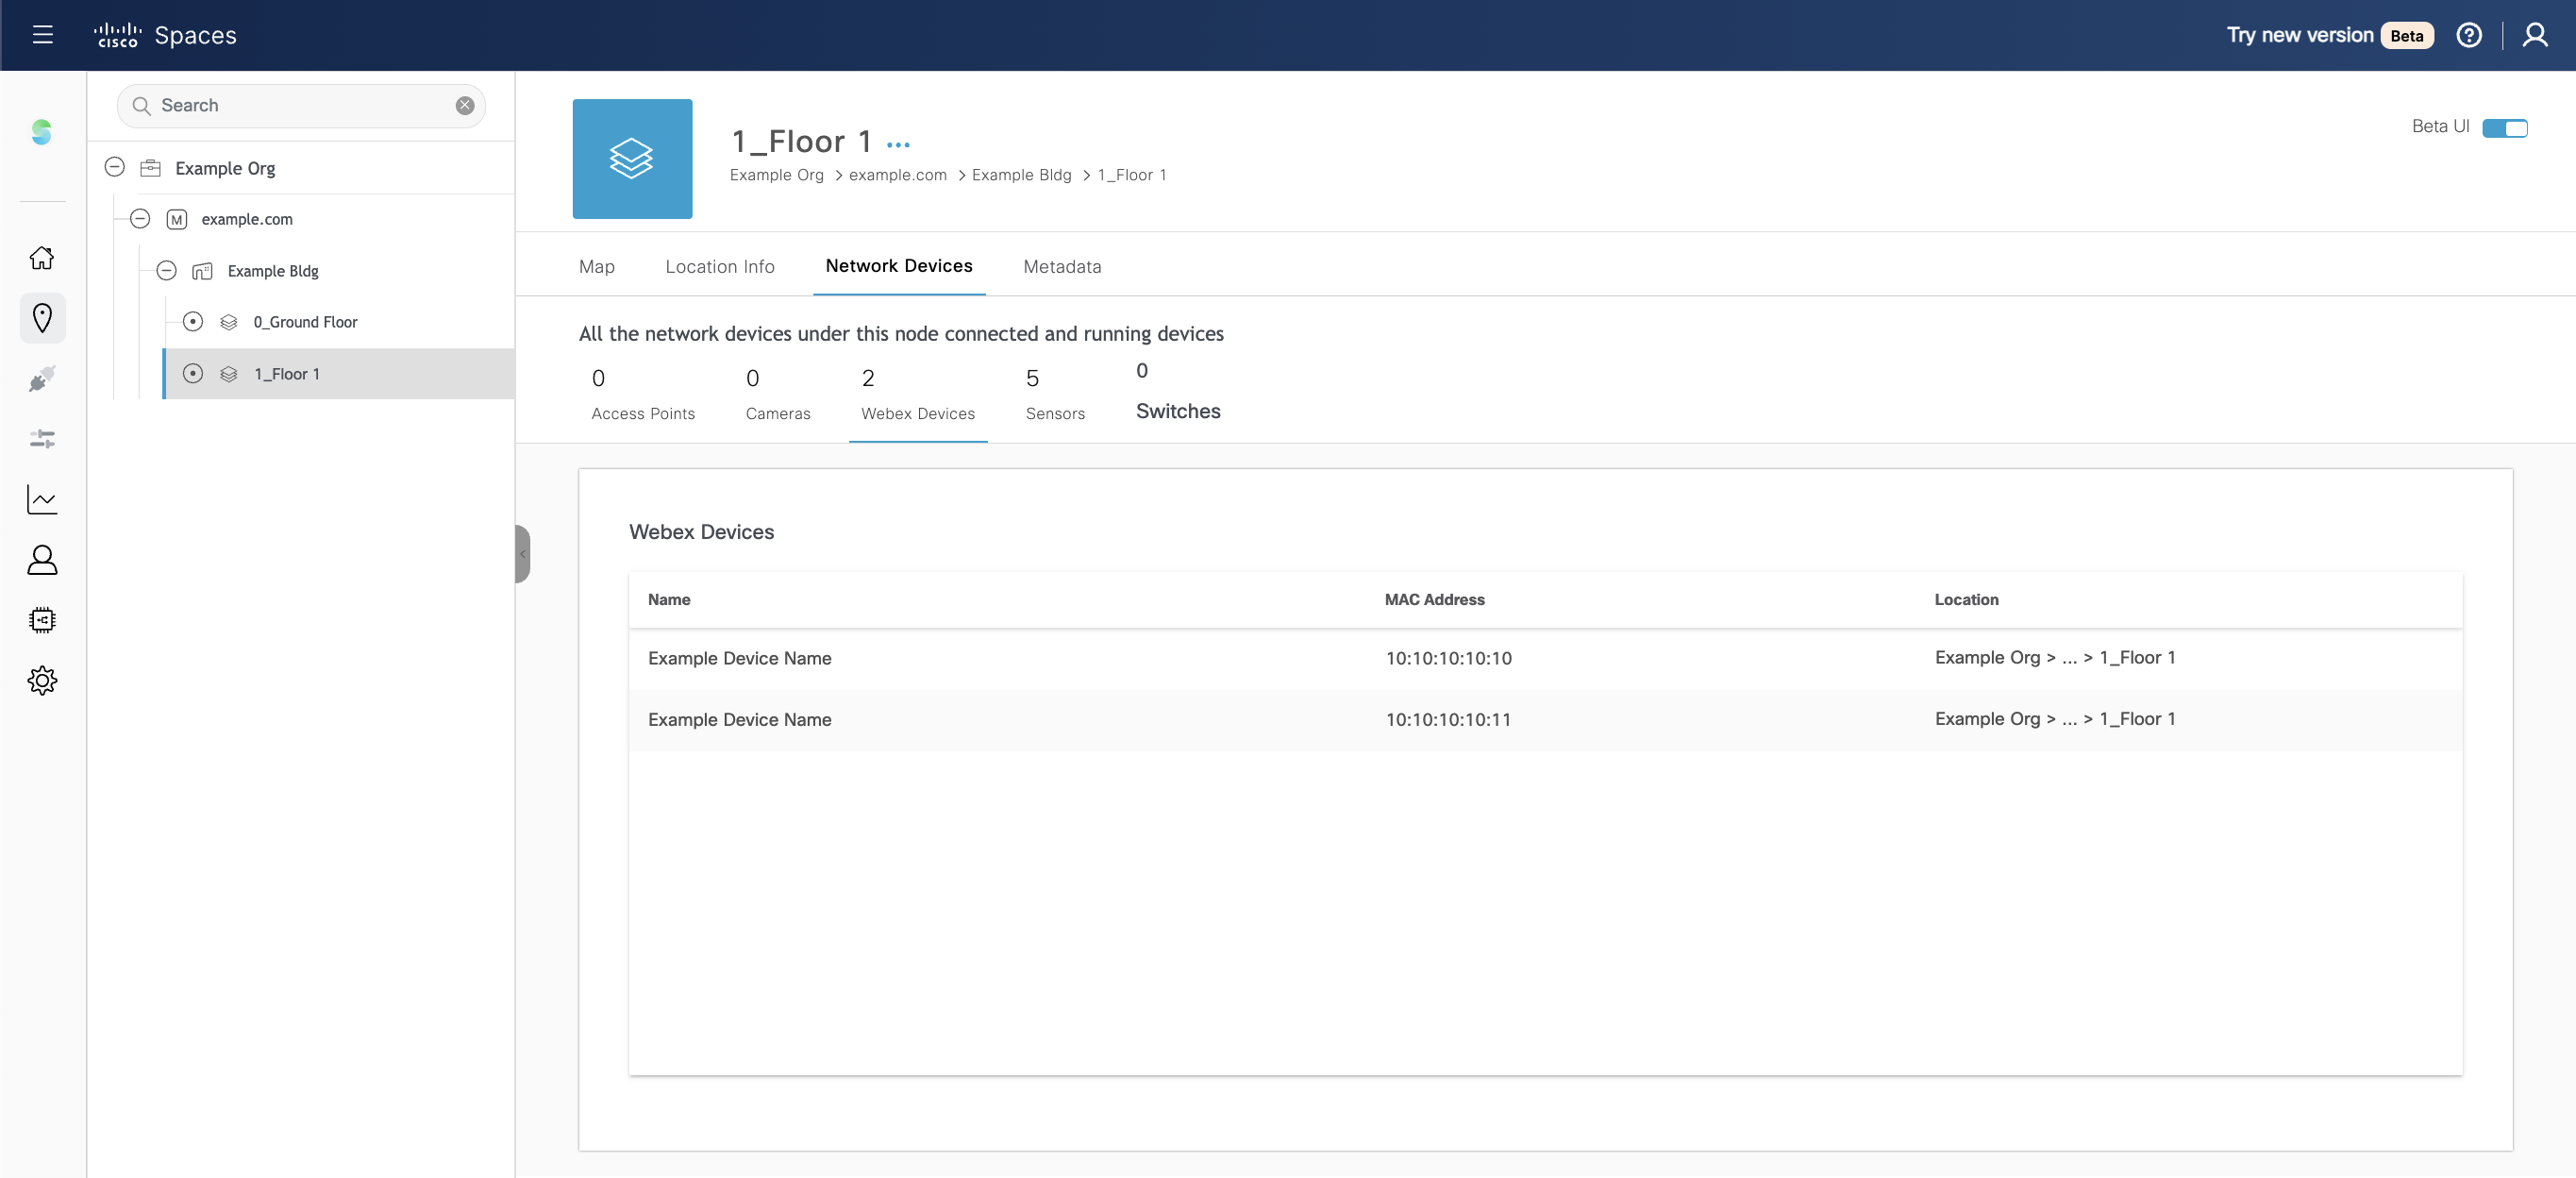
First, check to make sure the Webex Device is assigned to the exact Location+Floor in Control Hub that is merged into the Cisco Space Location Hierarchy, and that the device appears under the list of Webex Devices.
Second, confirm that the radio button configuration is correct in Control Hub (Devices > Digital Signage), and that WebGL is enabled in All Configurations.
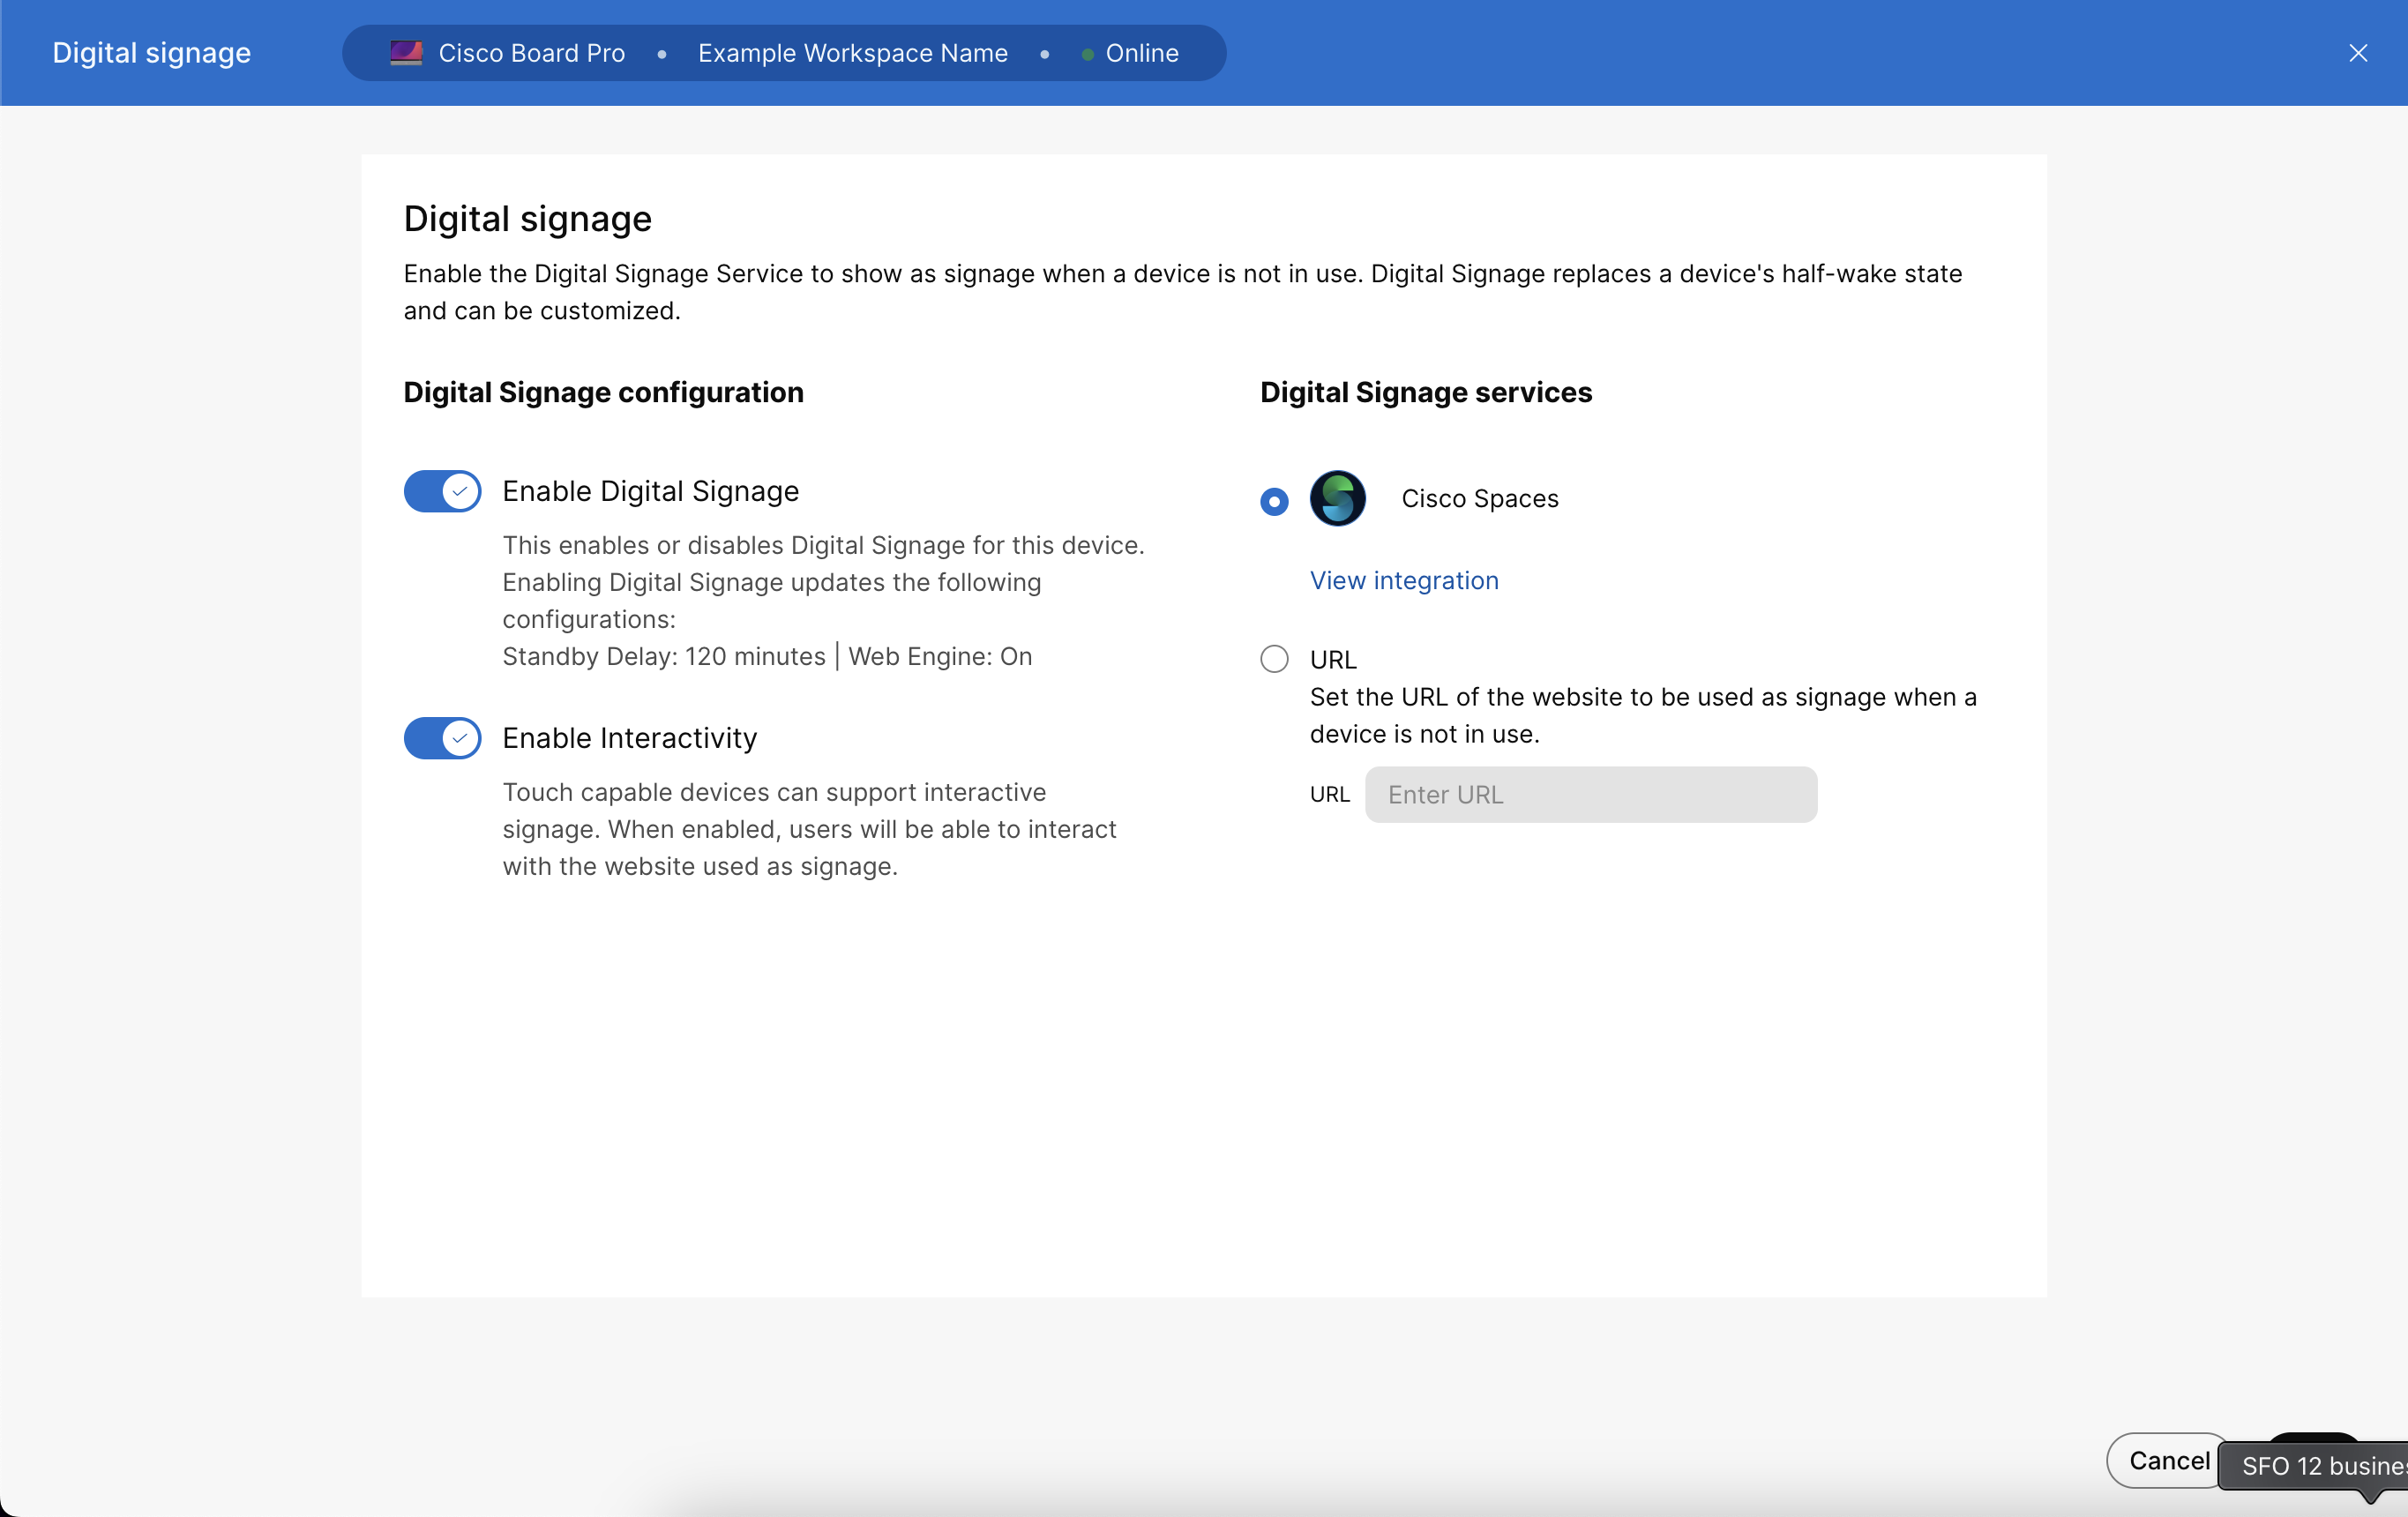
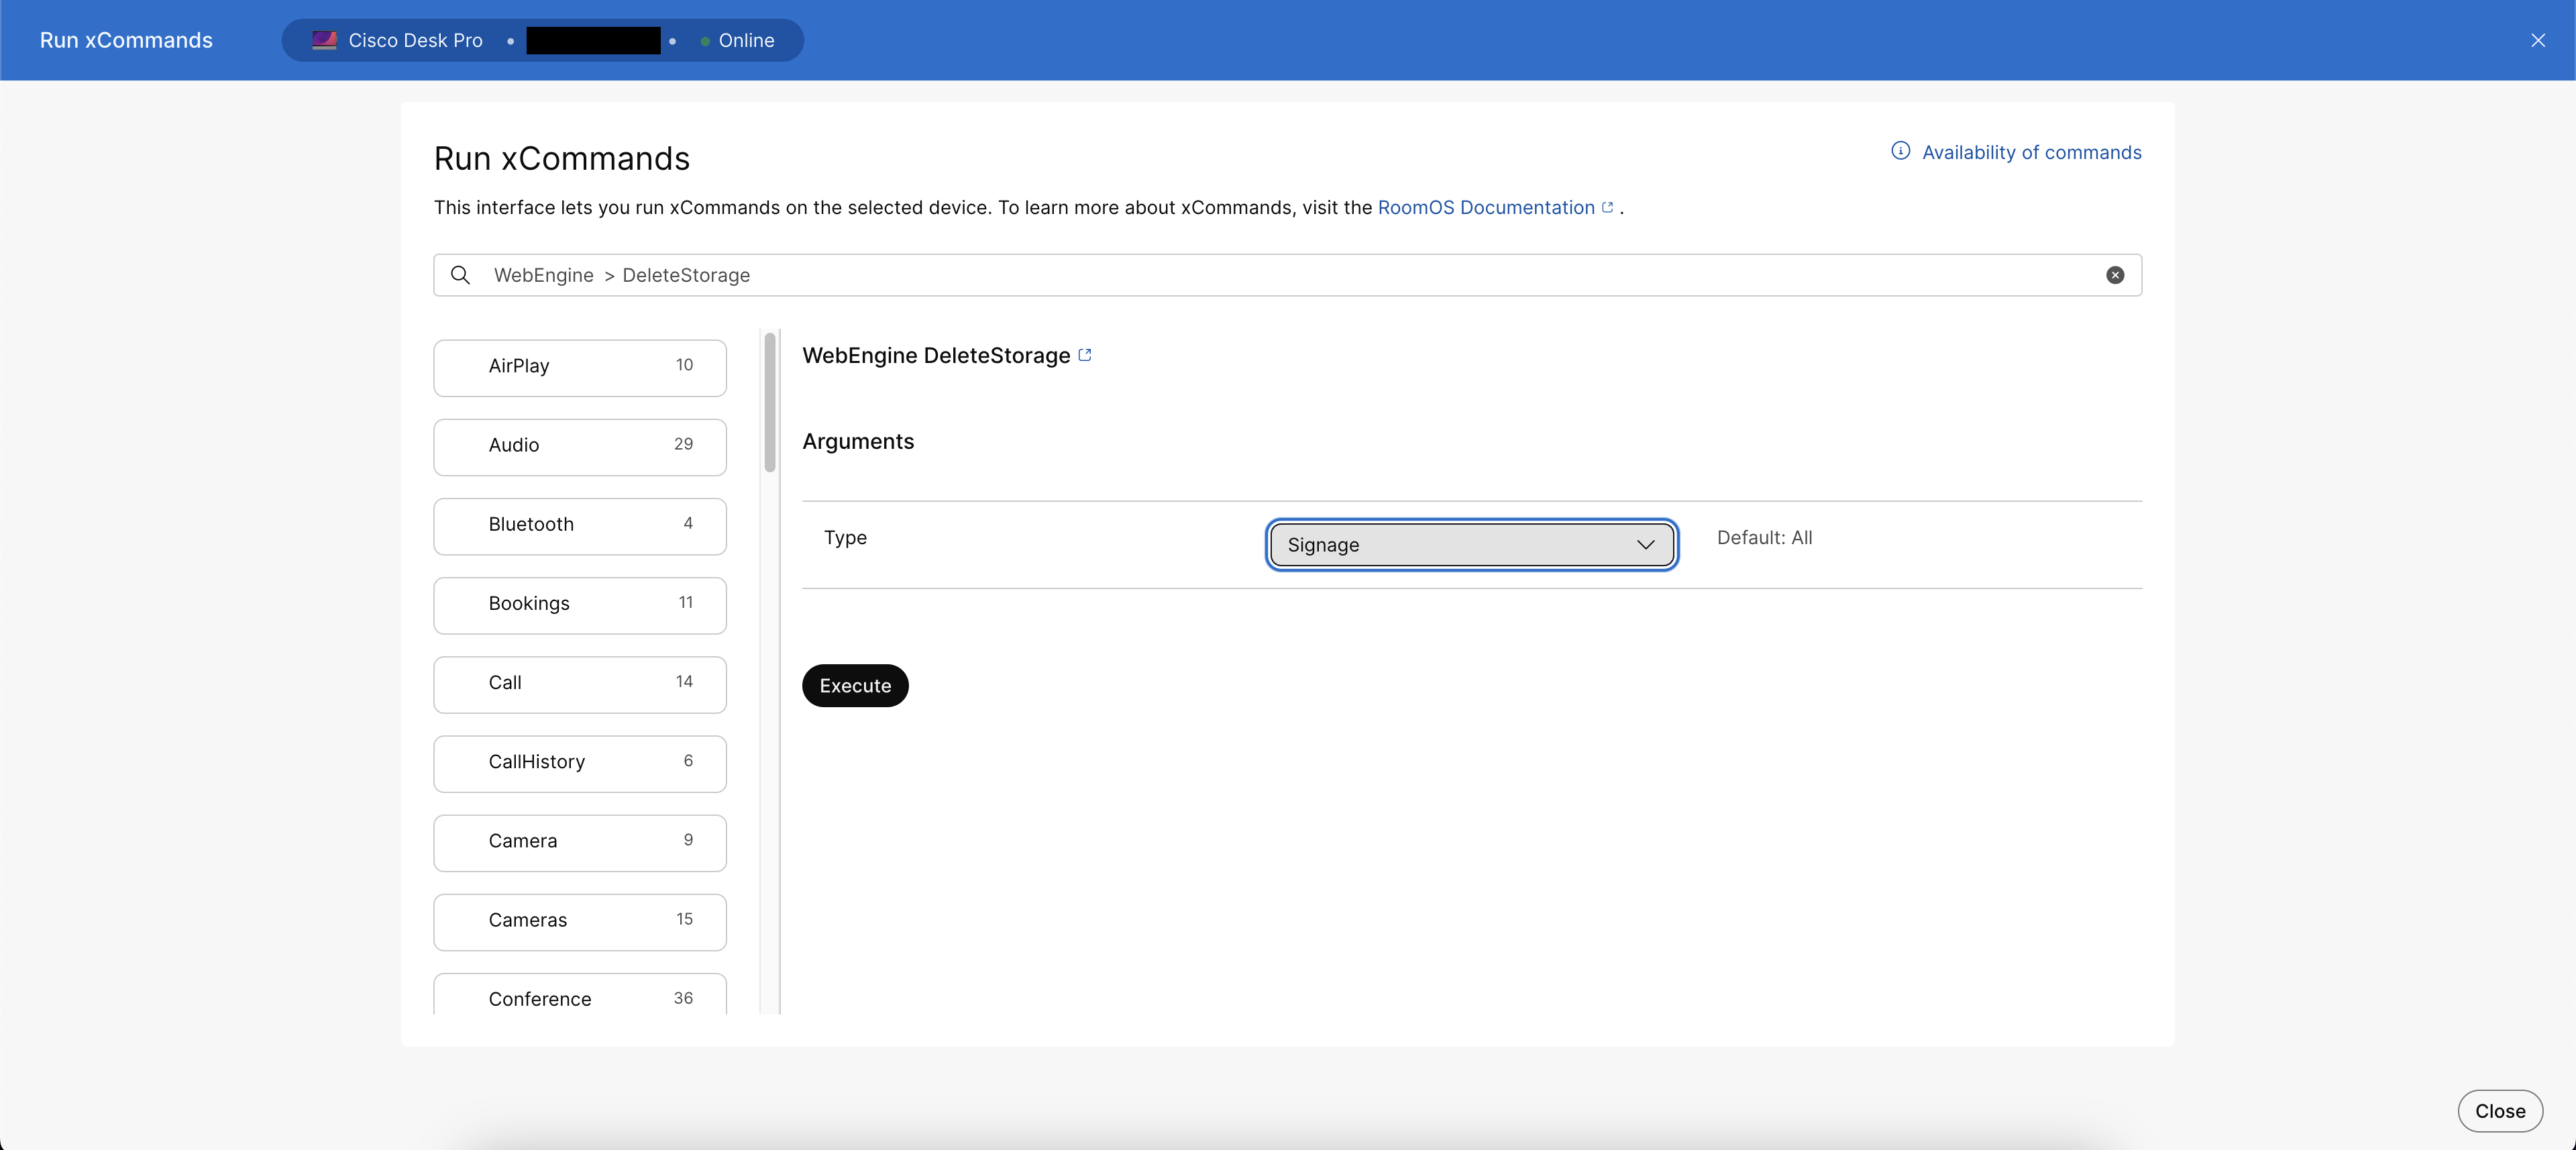
Third, try clearing the device cache via the WebEngine > DeleteStorage > Type > Signage, following these steps:
(a) [on the device page] open the Actions menu (top right)
(b) select "Run xCommand"
(c) search for "WebEngine"
(d) select "DeleteStorage"
(e) click on "DeleteStorage" in the page
(f) choose "Signage" from the Type dropdown
(g) click "Execute”
(h) try disabling Digital Signage mode and then re-enabling
Finally, the device should appear on the list in Space Experience > Devices > Webex Devices
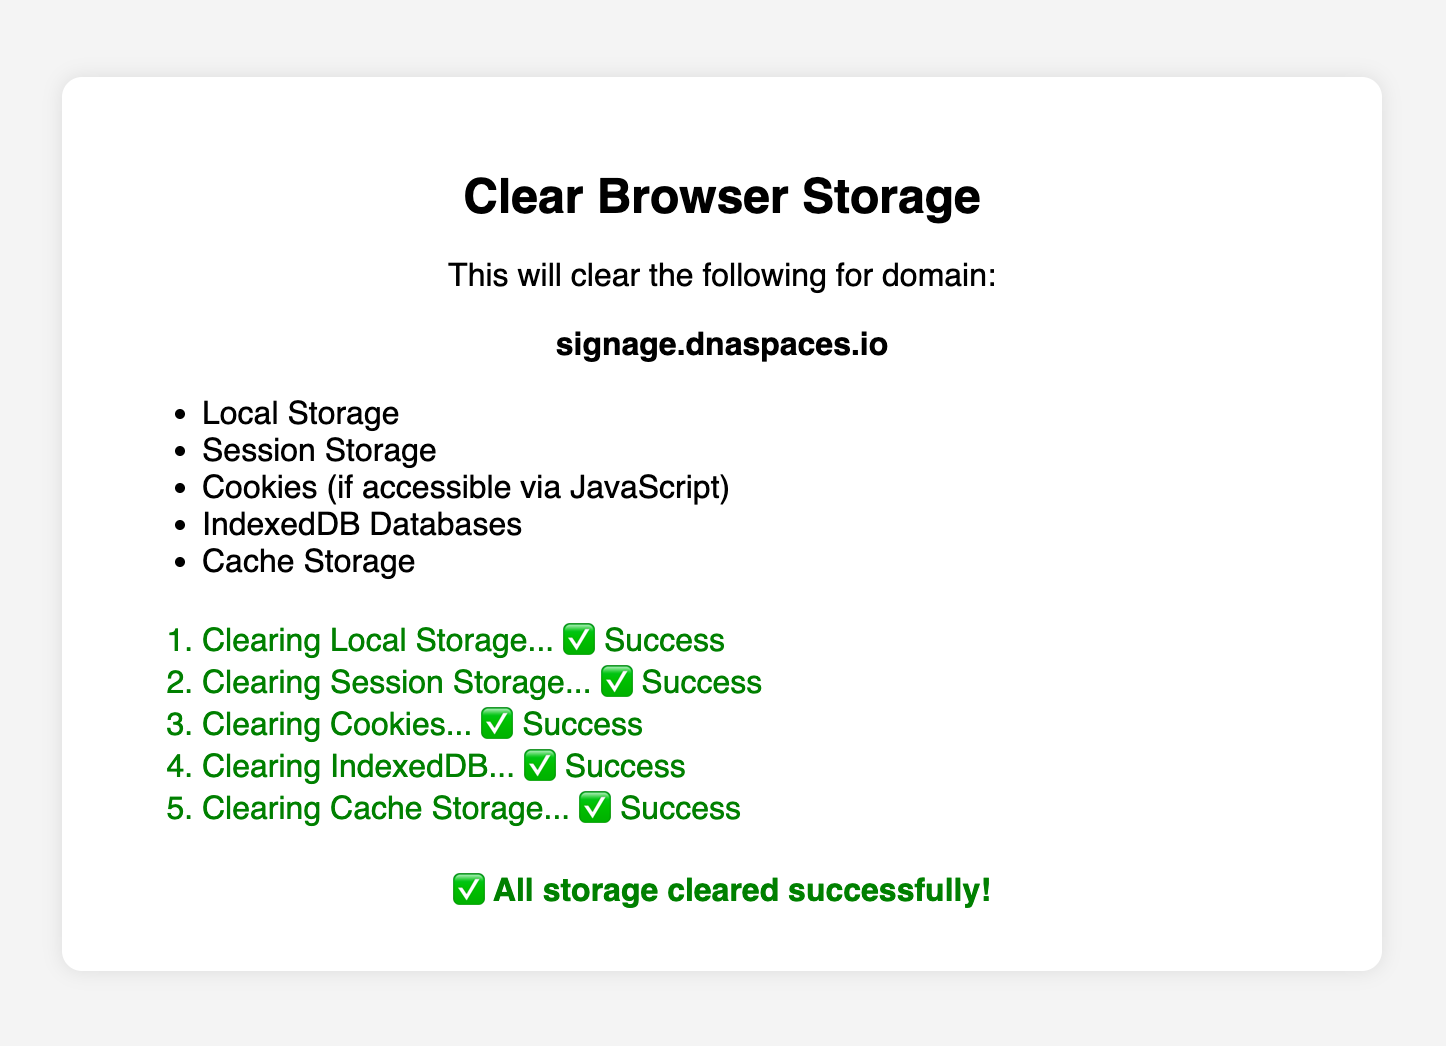
Additionally, if the troubleshooting workflow above does not work, you may need to clear the local storage and cache using the following URL (different per region) to fully reset the web application config.
These are mainly relevant to resetting the browser for a “Token URL”
(a) US and rest of world: https://signage.dnaspaces.io/cleardevicestorage/clear.html?clear=true
(b) EU: https://signage.dnaspaces.eu/cleardevicestorage/clear.html?clear=true
(c) SG: https://signage.ciscospaces.sg/cleardevicestorage/clear.html?clear=true
2. If you are not able to configure a “Where am I?” character (i.e. “Spot” - the Cisco Spaces mascot) on a floor view.
Check whether the Webex Device (using the native Cisco Spaces Digital Signage mode in Control Hub) or Non-Webex Device (using the URL method) is correctly assigned to a specific floor in the Location Hierarchy. The floor assignment MUST be on the exact same floor that you want to position the “Where am I?” character.
Webex Device method, assign the device to a Location+Floor in Webex Control Hub, make sure it is merged correctly into the Cisco Spaces Location Hierarchy, and appears under Location Hierarchy > Network Devices > Webex Devices
Non-Webex Device/URL method, in the very first step after clicking Add Signage, click through the Location Hierarchy to choose a floor, NOT a location.
FAQ
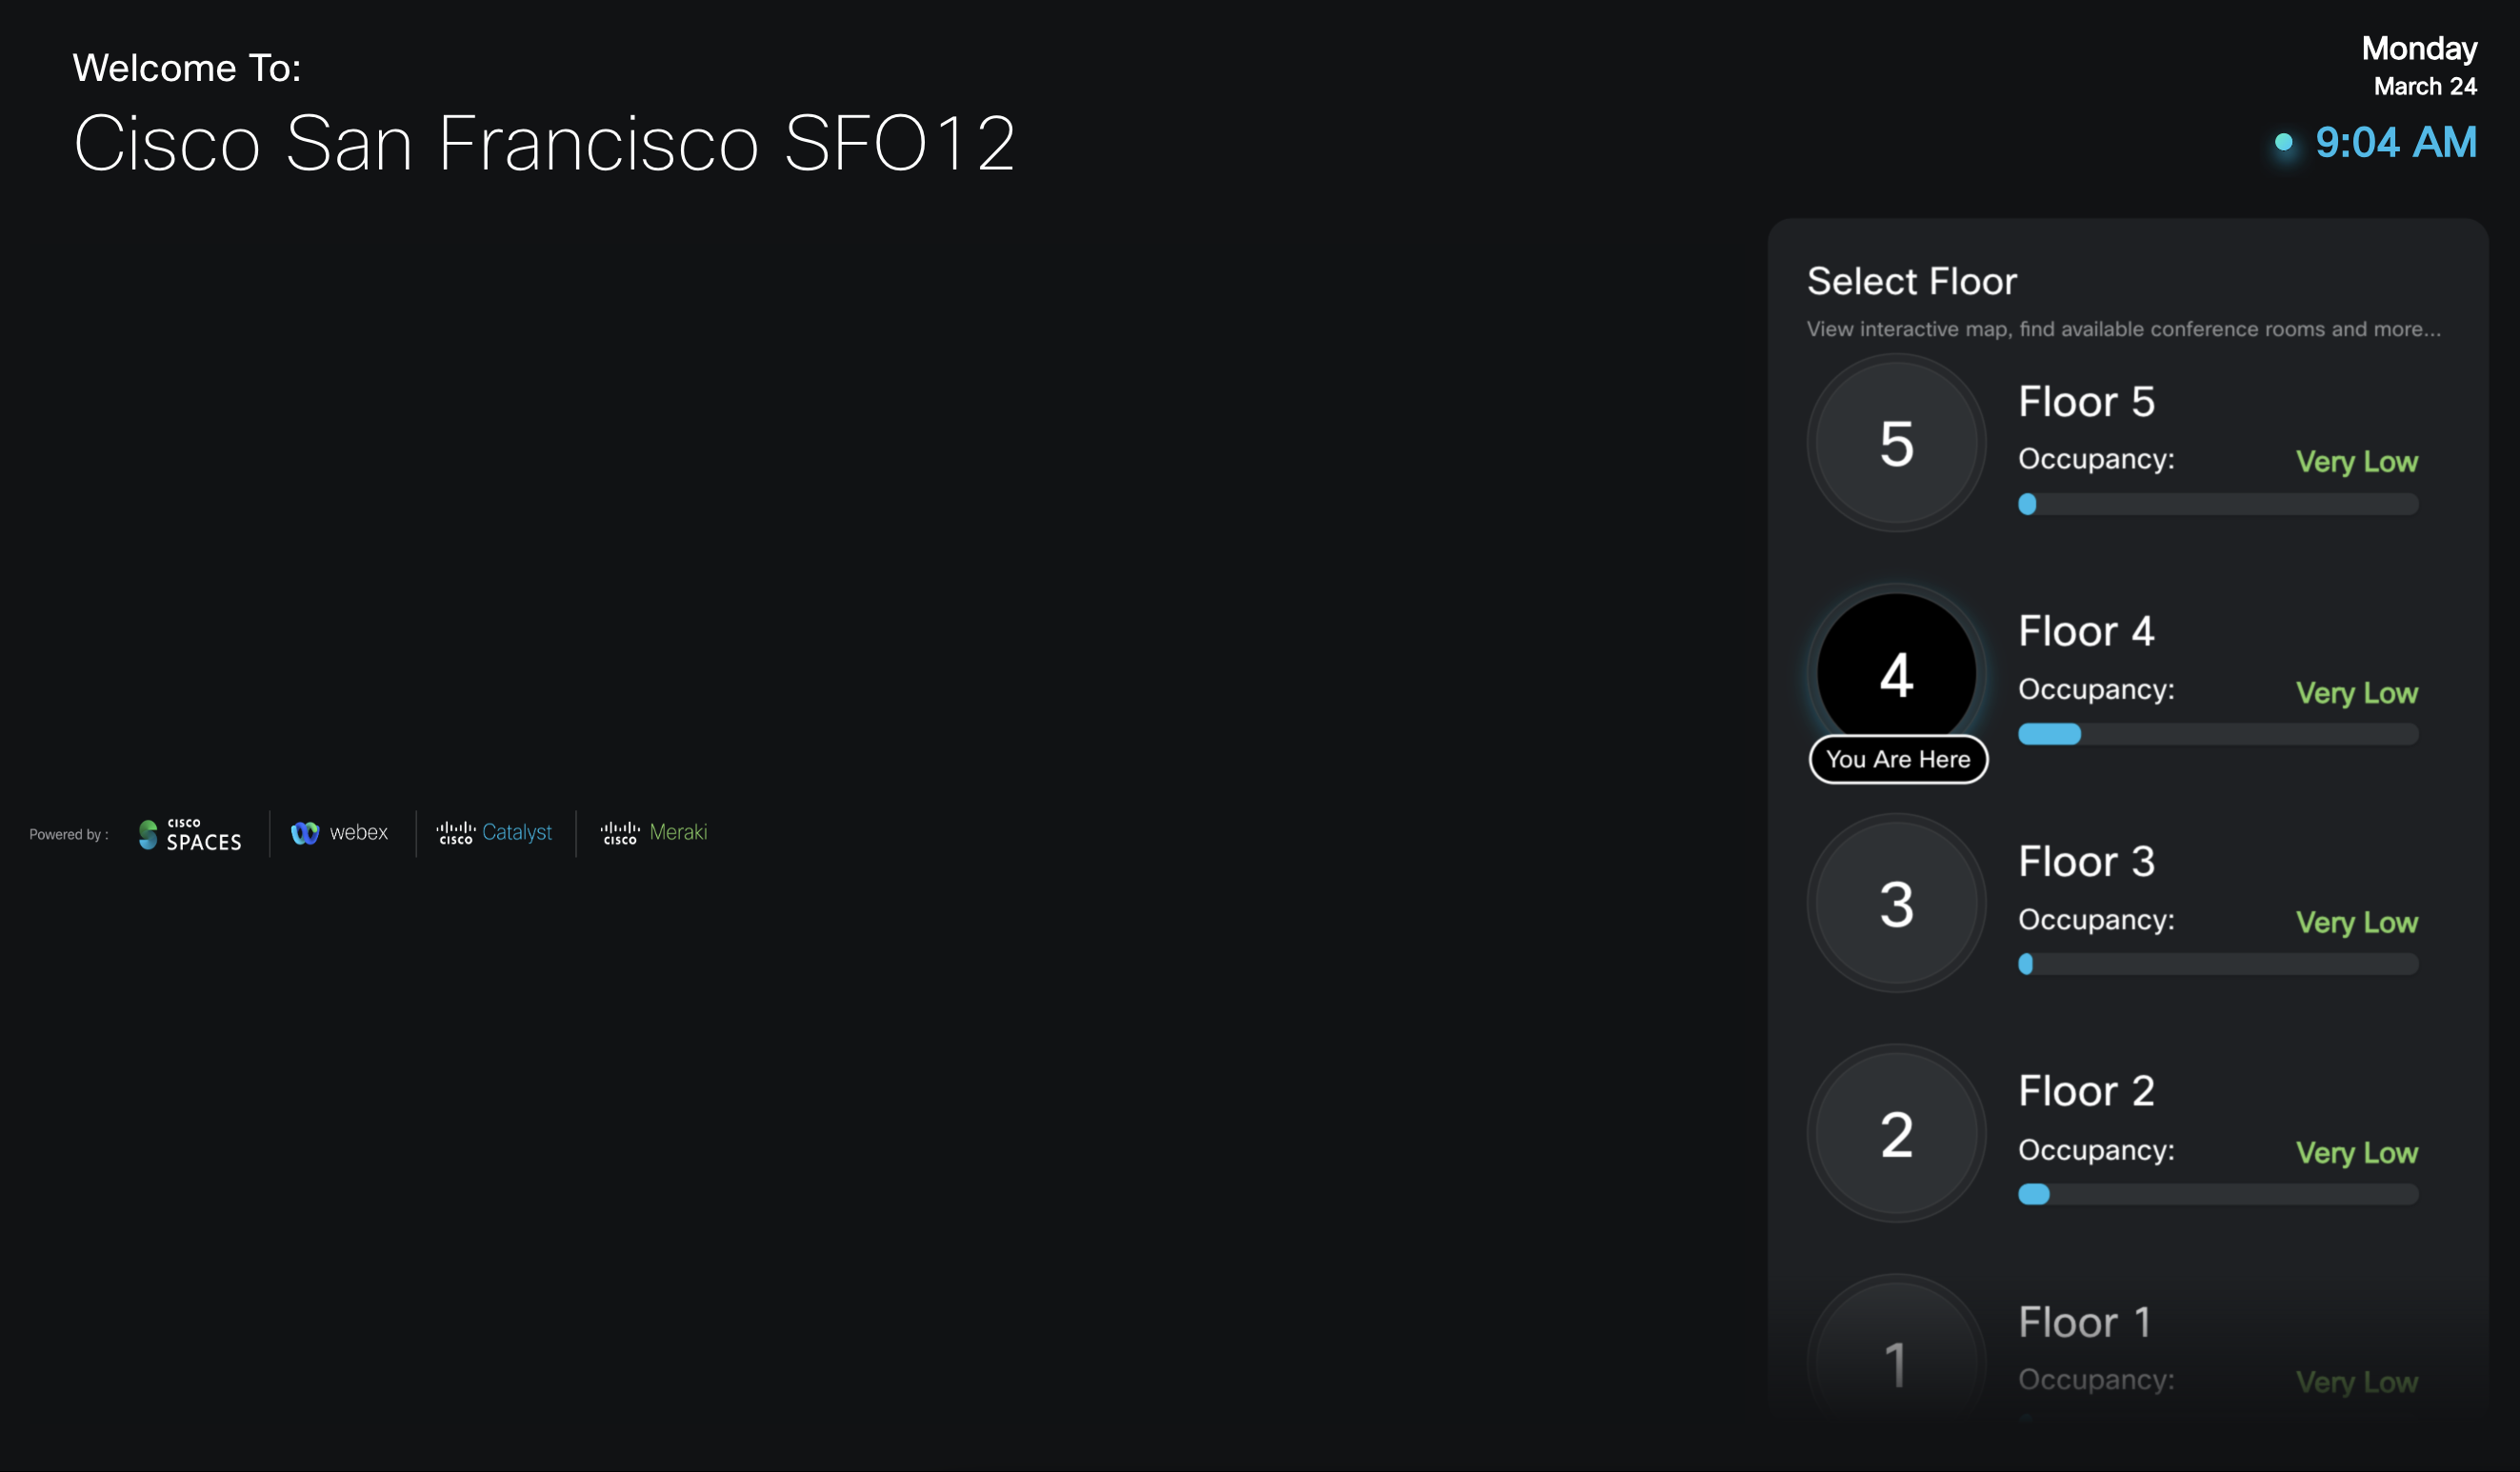
How does the Space Explorer > Signages setup workflow affect the Space Explorer - Kiosk app Building view?
Building View scenarios in the table below (not exhaustive)
|
Scenario / Description |
Space Experience Configuration |
Space Explorer - Kiosk UI |
|---|---|---|
|
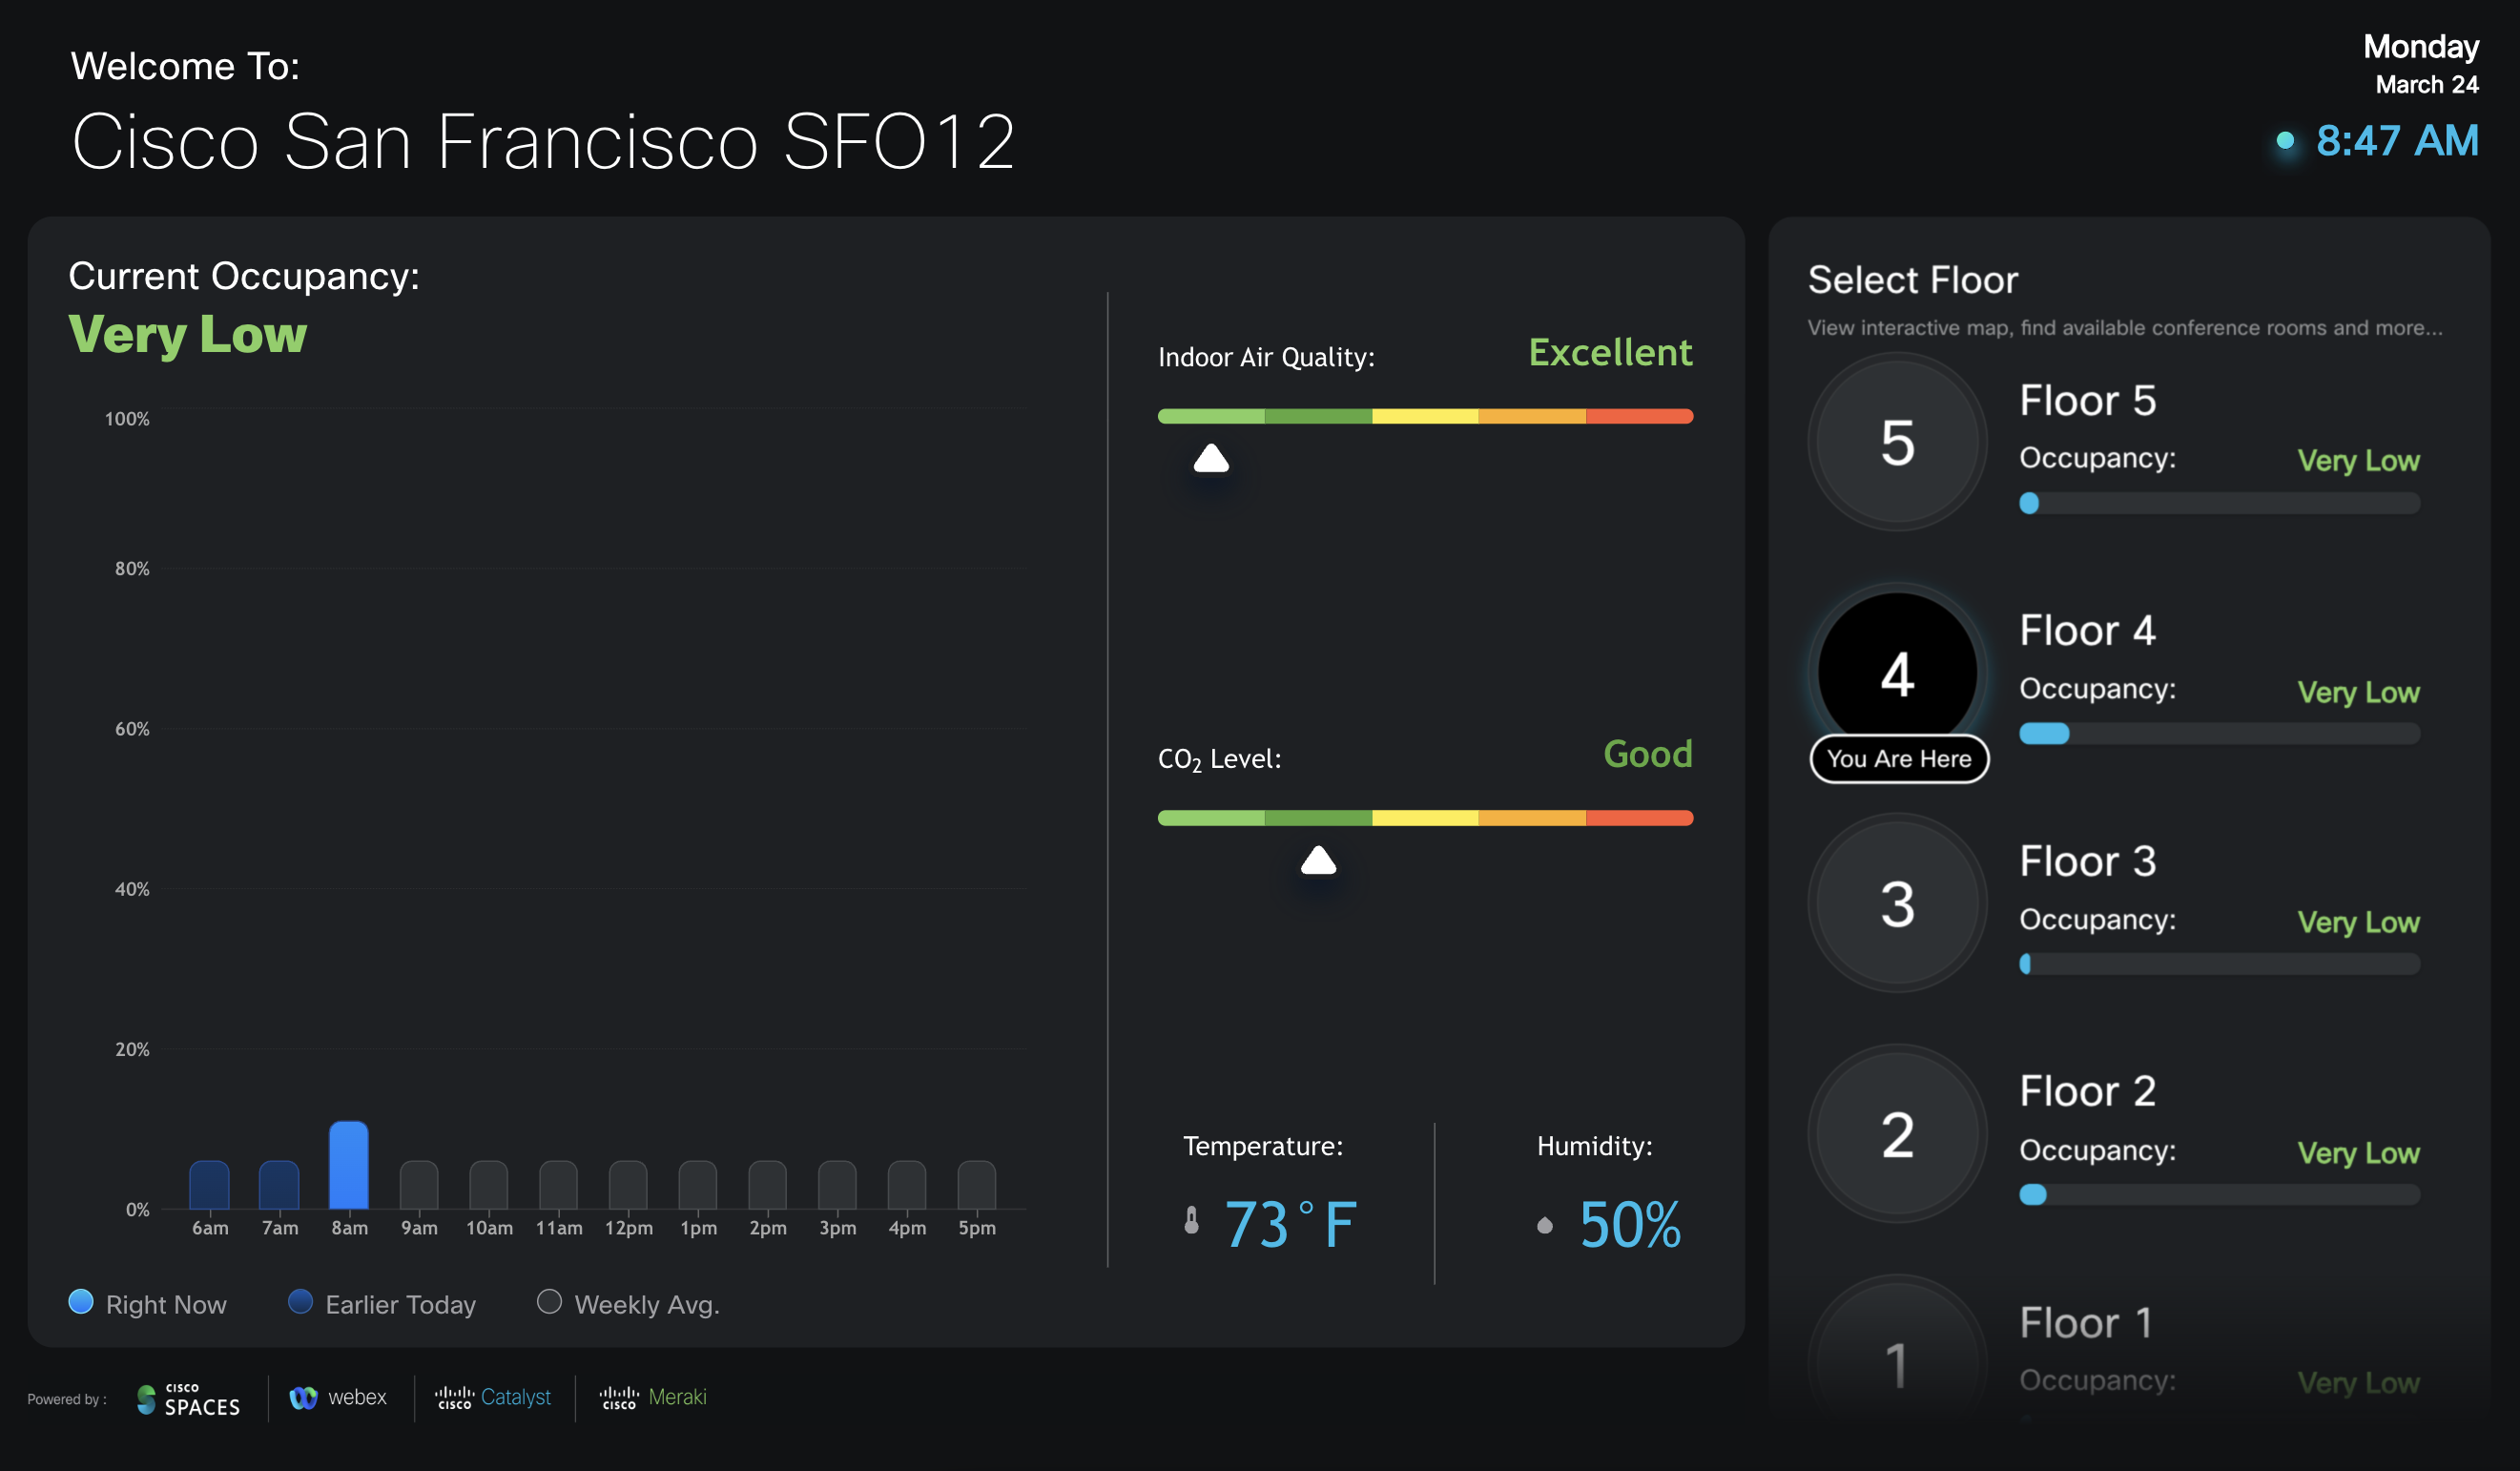
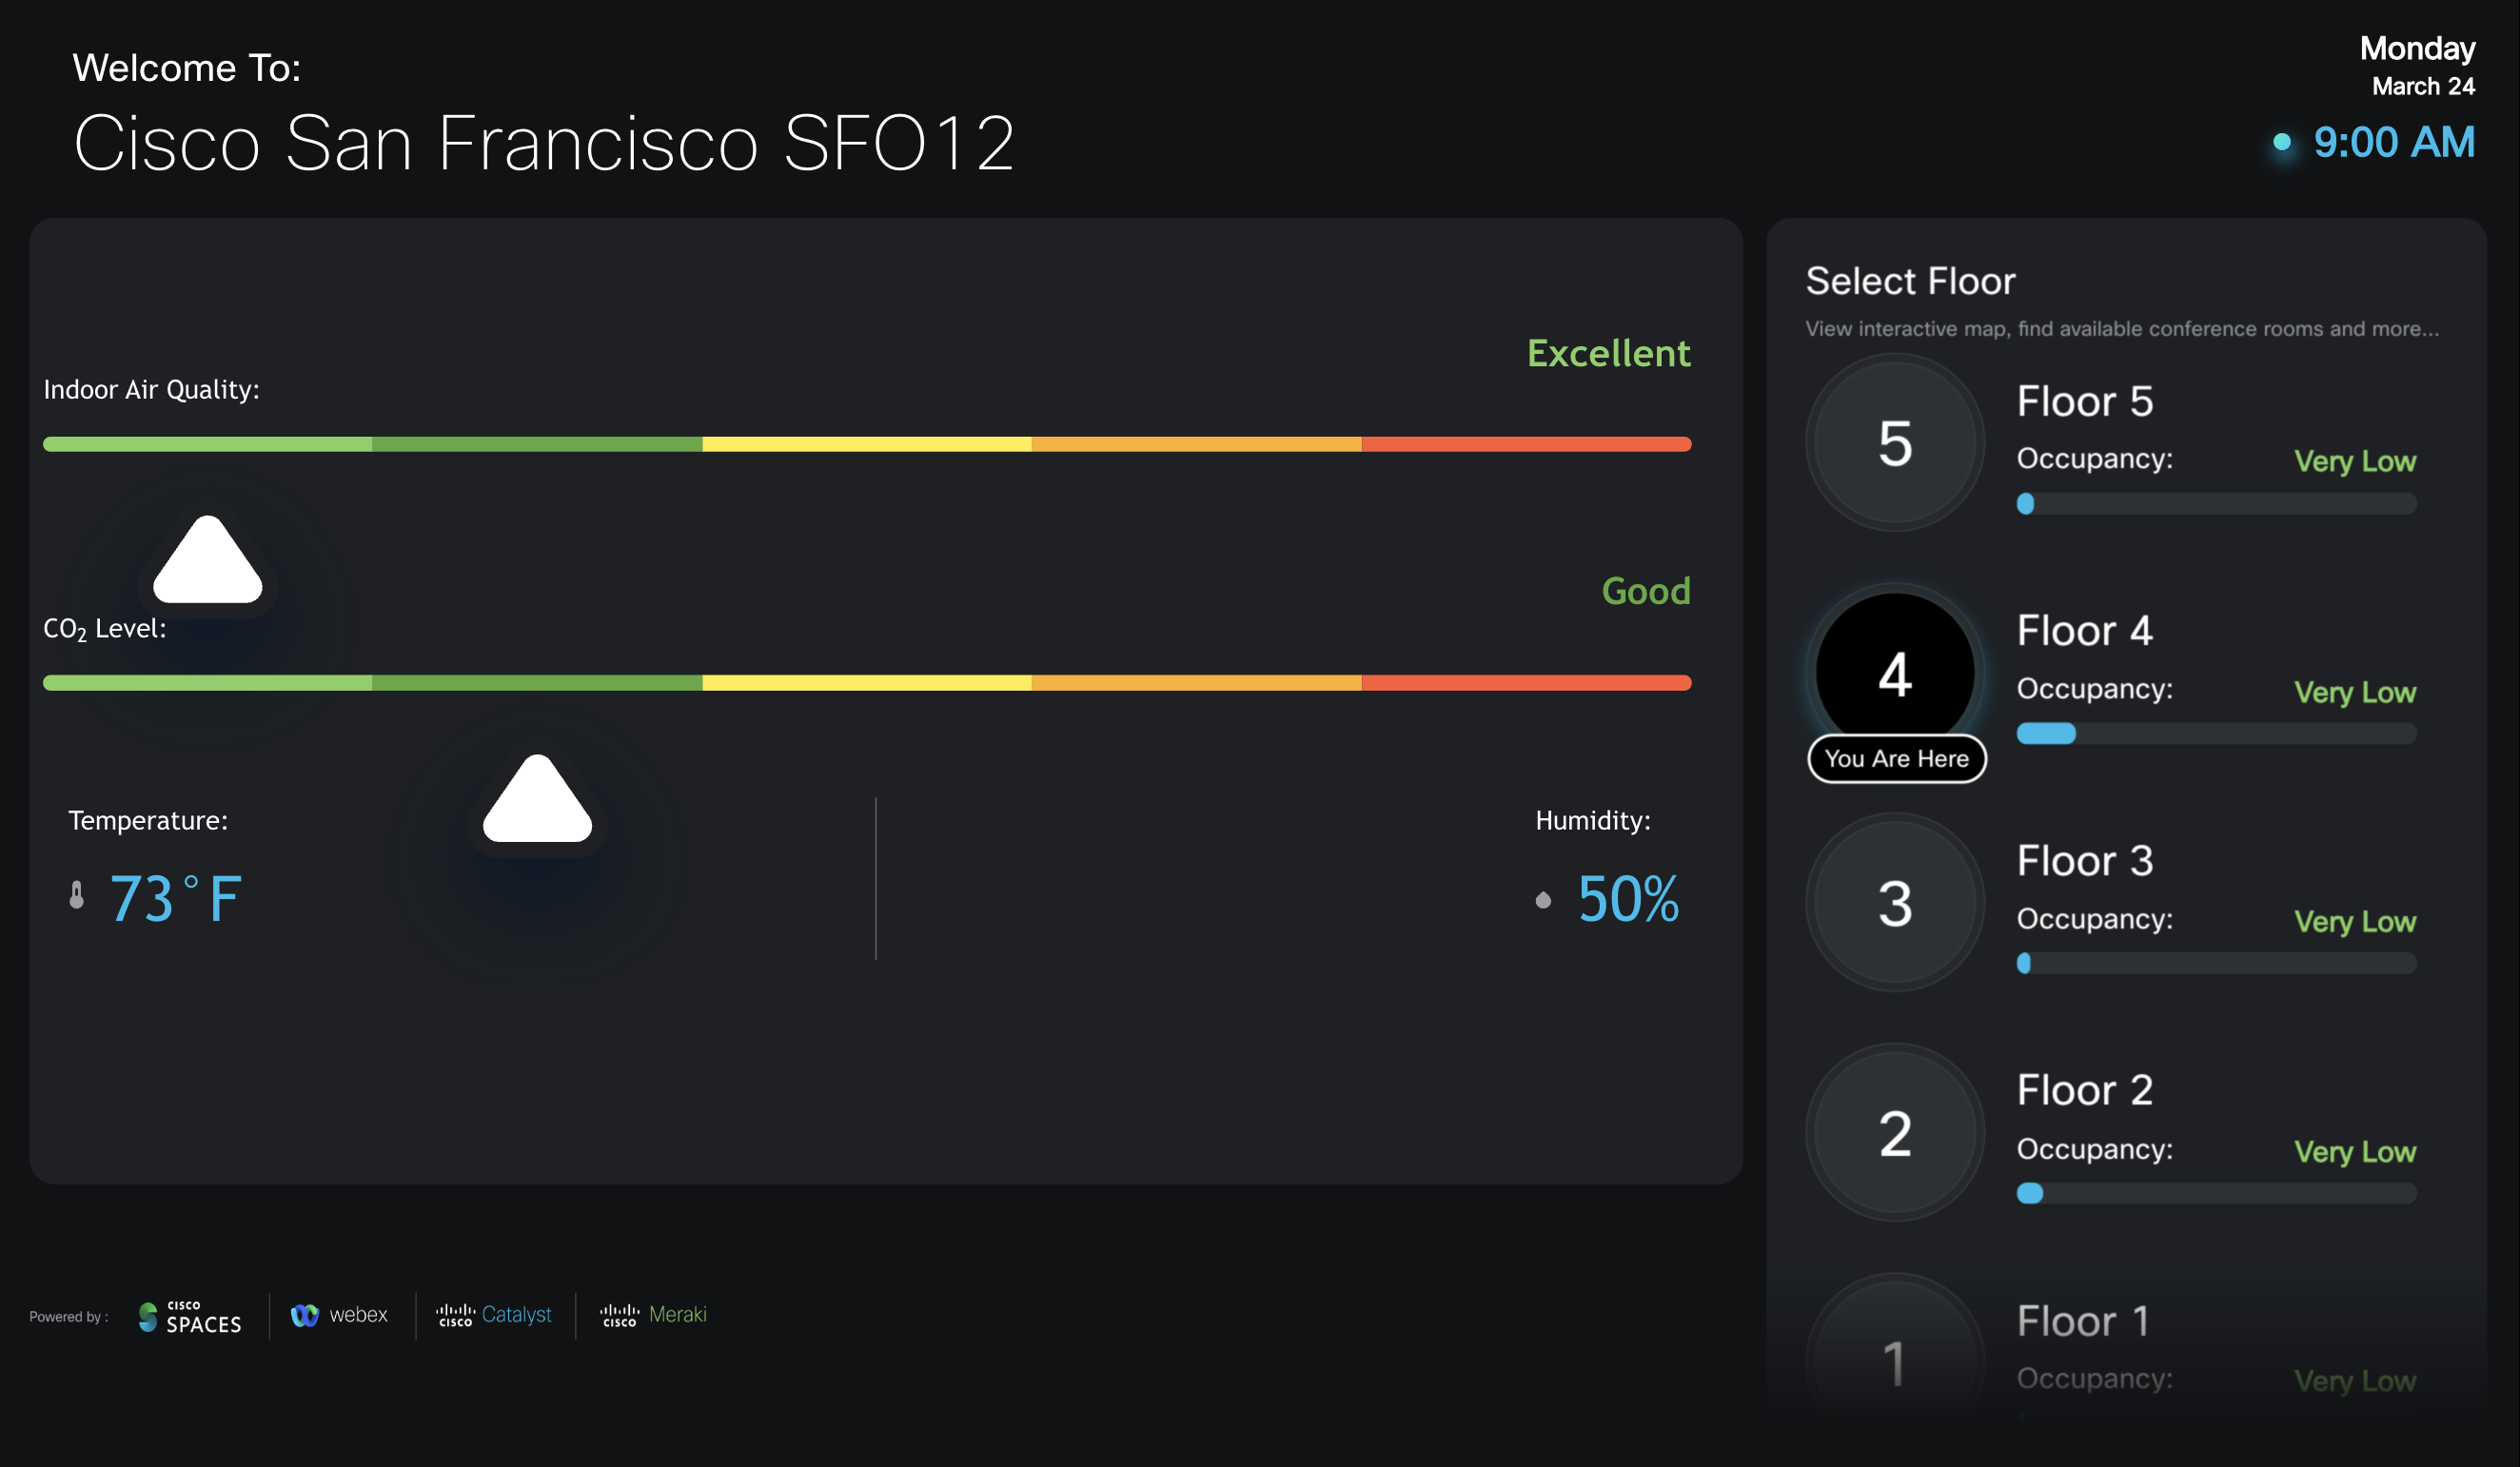
Step 2: Configure Widgets All widgets enabled
The building and floor occupancy widgets are on a scale from 0-100% (if over 100% utilization the vertical bar chart will expand, but floors will be capped at 100%). Building and floor occupancy are identical to “Live Occupancy” dashboard app and are derived from wireless client counts relative to building and floor max capacity values in the Location Hierarchy metadata. Temperature, humidity, Indoor Air Quality (IAQ), CO₂, and Ambient Noise are aggregated at the building level and average across all devices providing each metric. The Point of Interest (POI) option refers to the Quick Access POI menu on the floor view. |
|
|
|
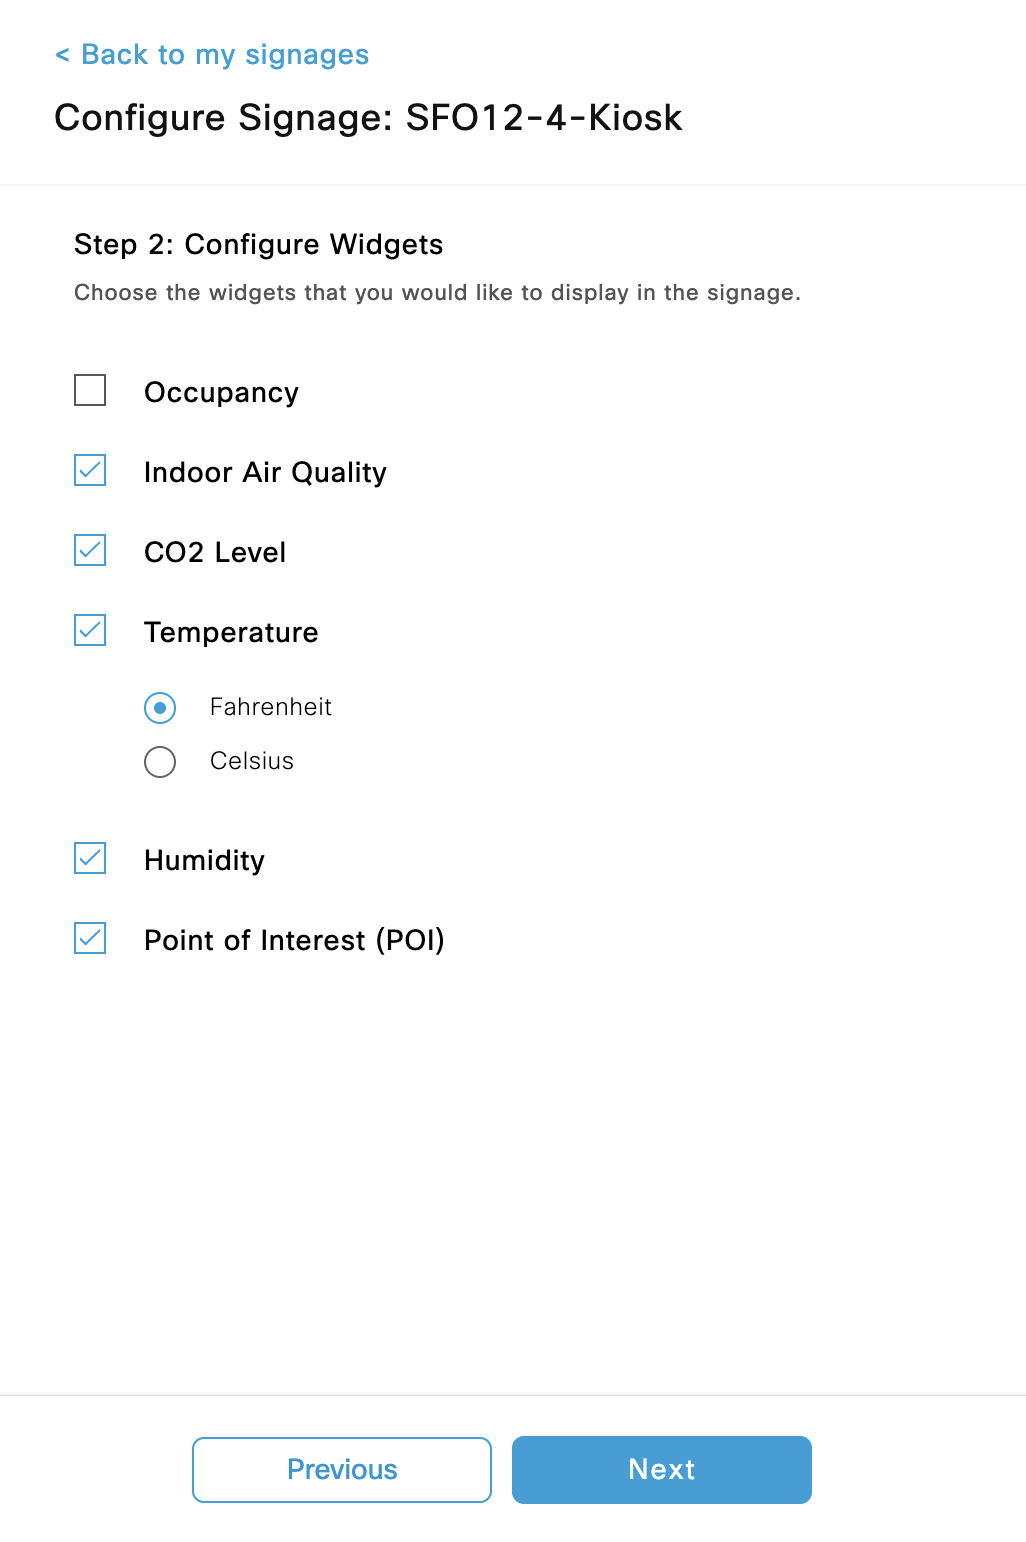
Step 2: Configure Widgets Occupancy widget disabled
Occupancy widget disabled will hide the vertical building occupancy graph and the individual floor percentages (note: the screenshot here does not correctly reflect hidden floor occupancy widgets). |
|
|
|
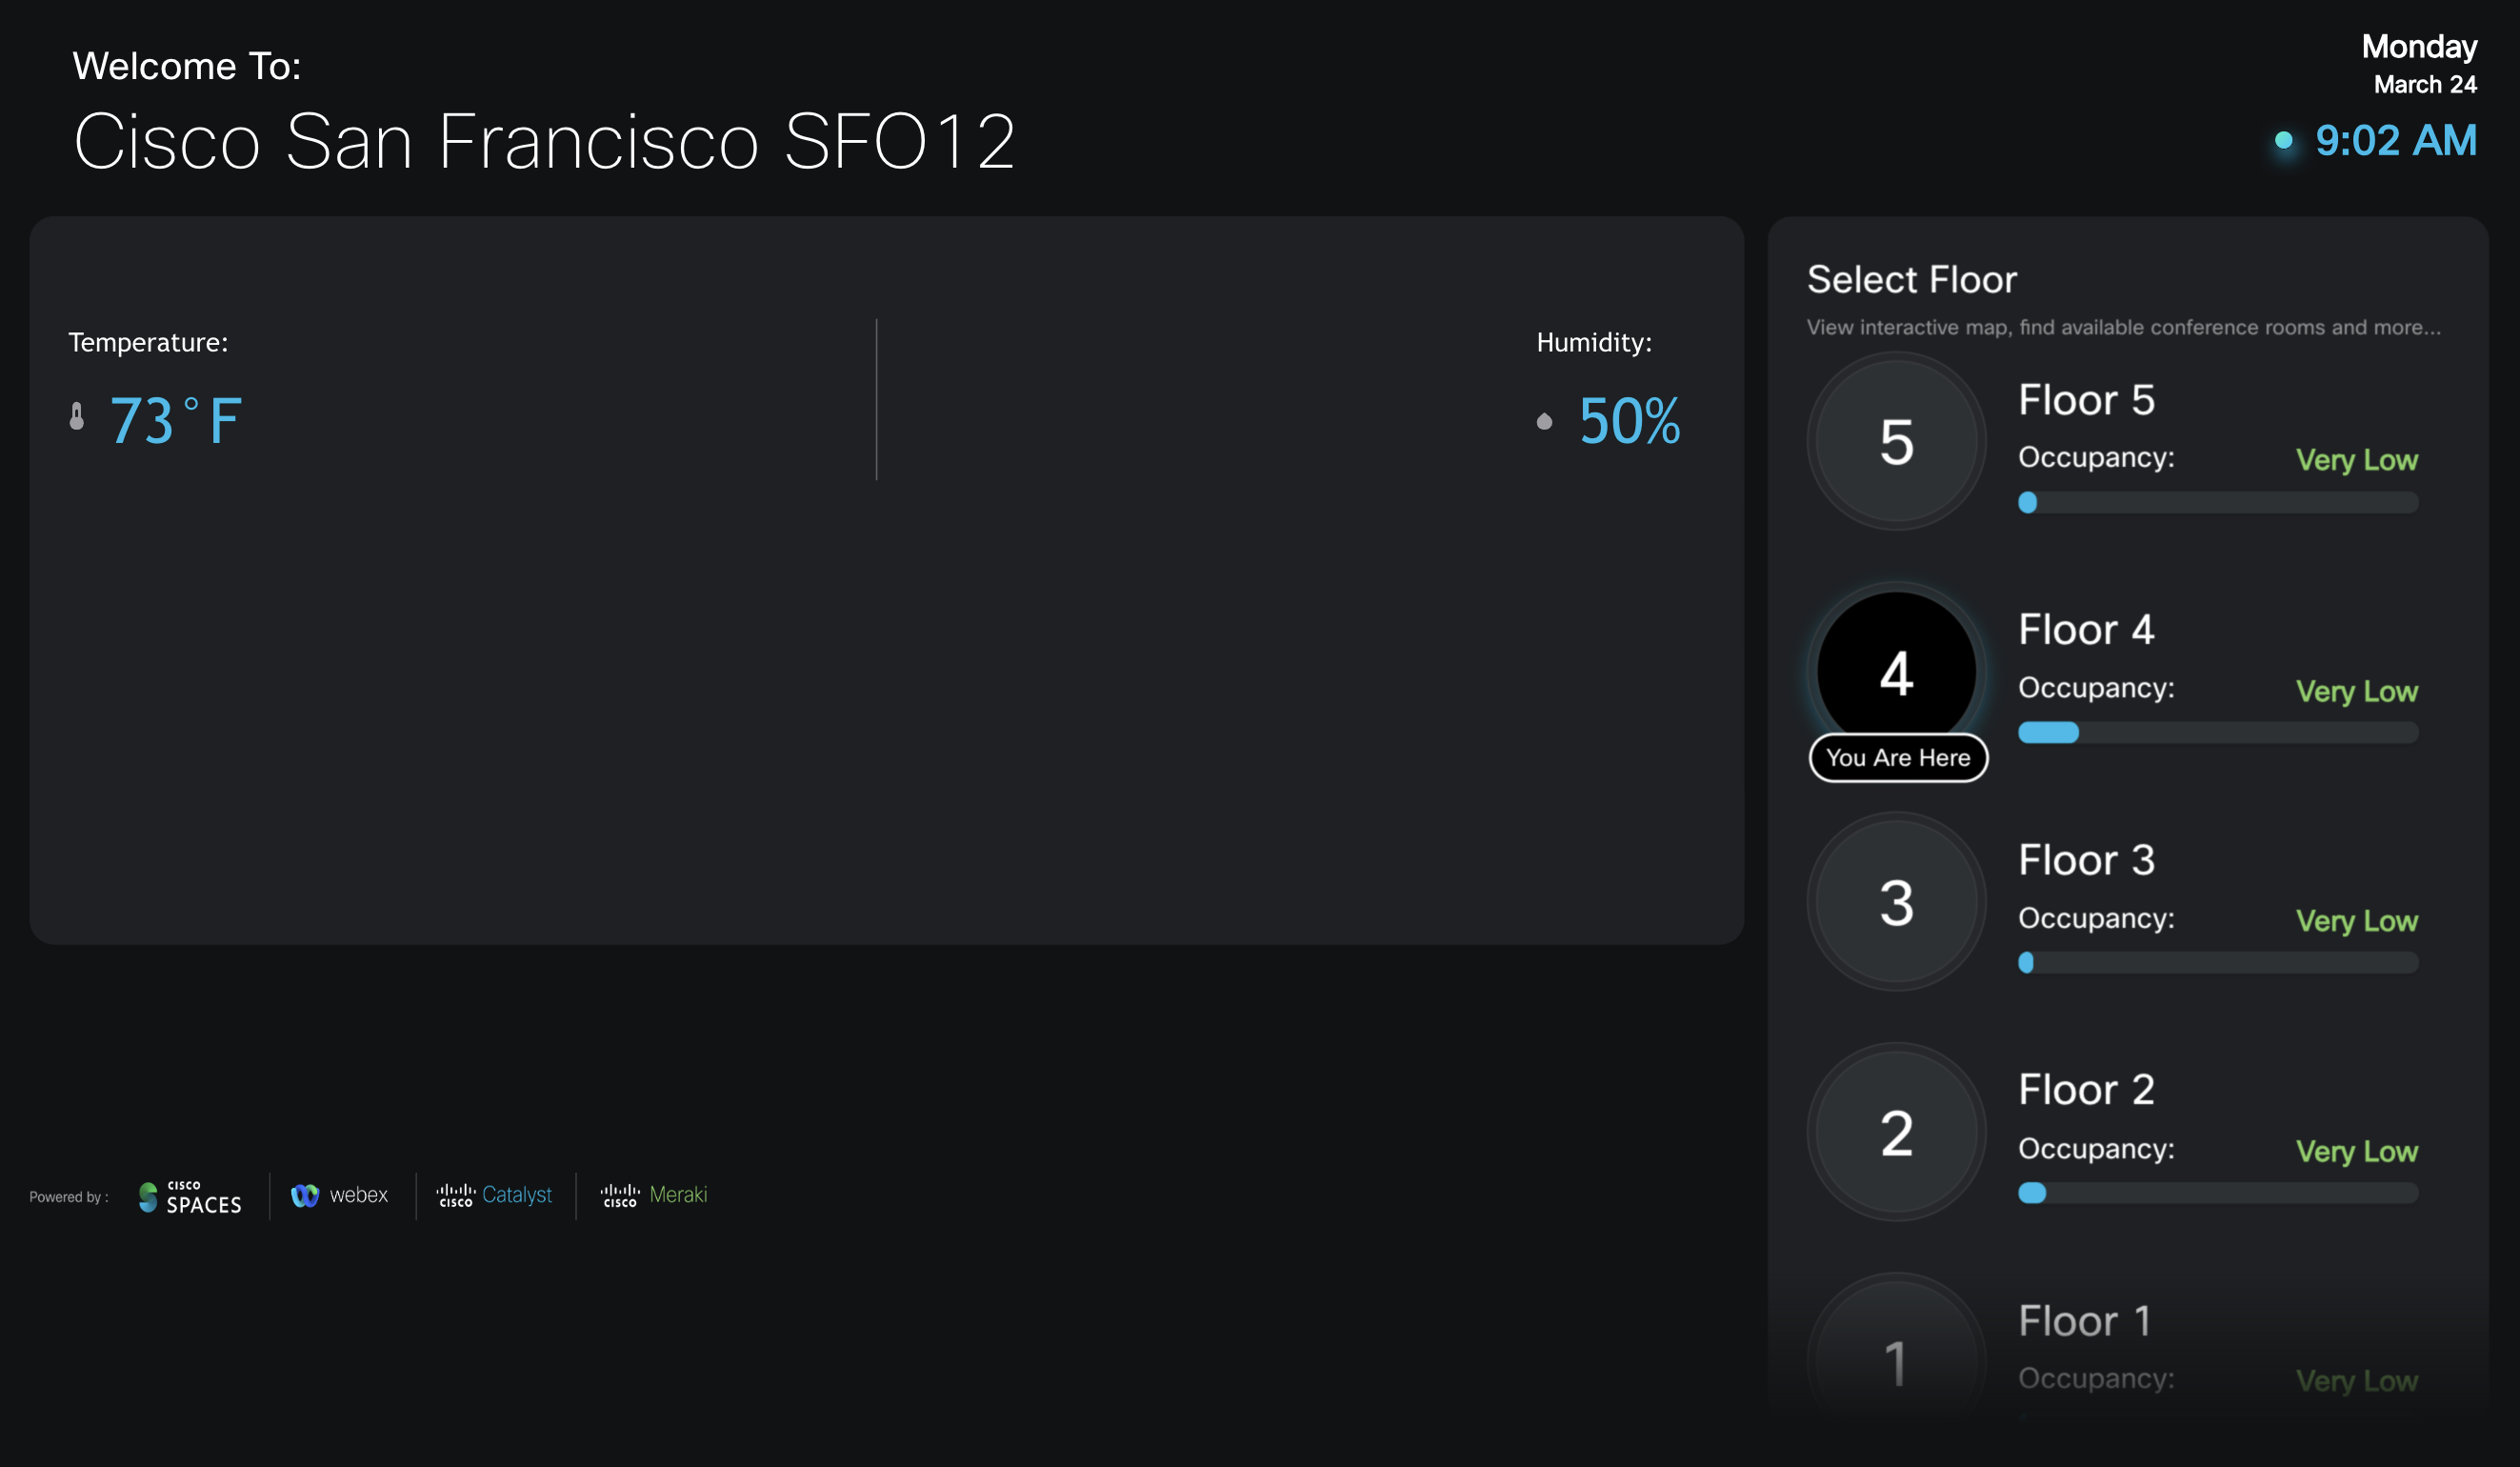
Step 2: Configure Widgets Occupancy and air quality widgets disabled |
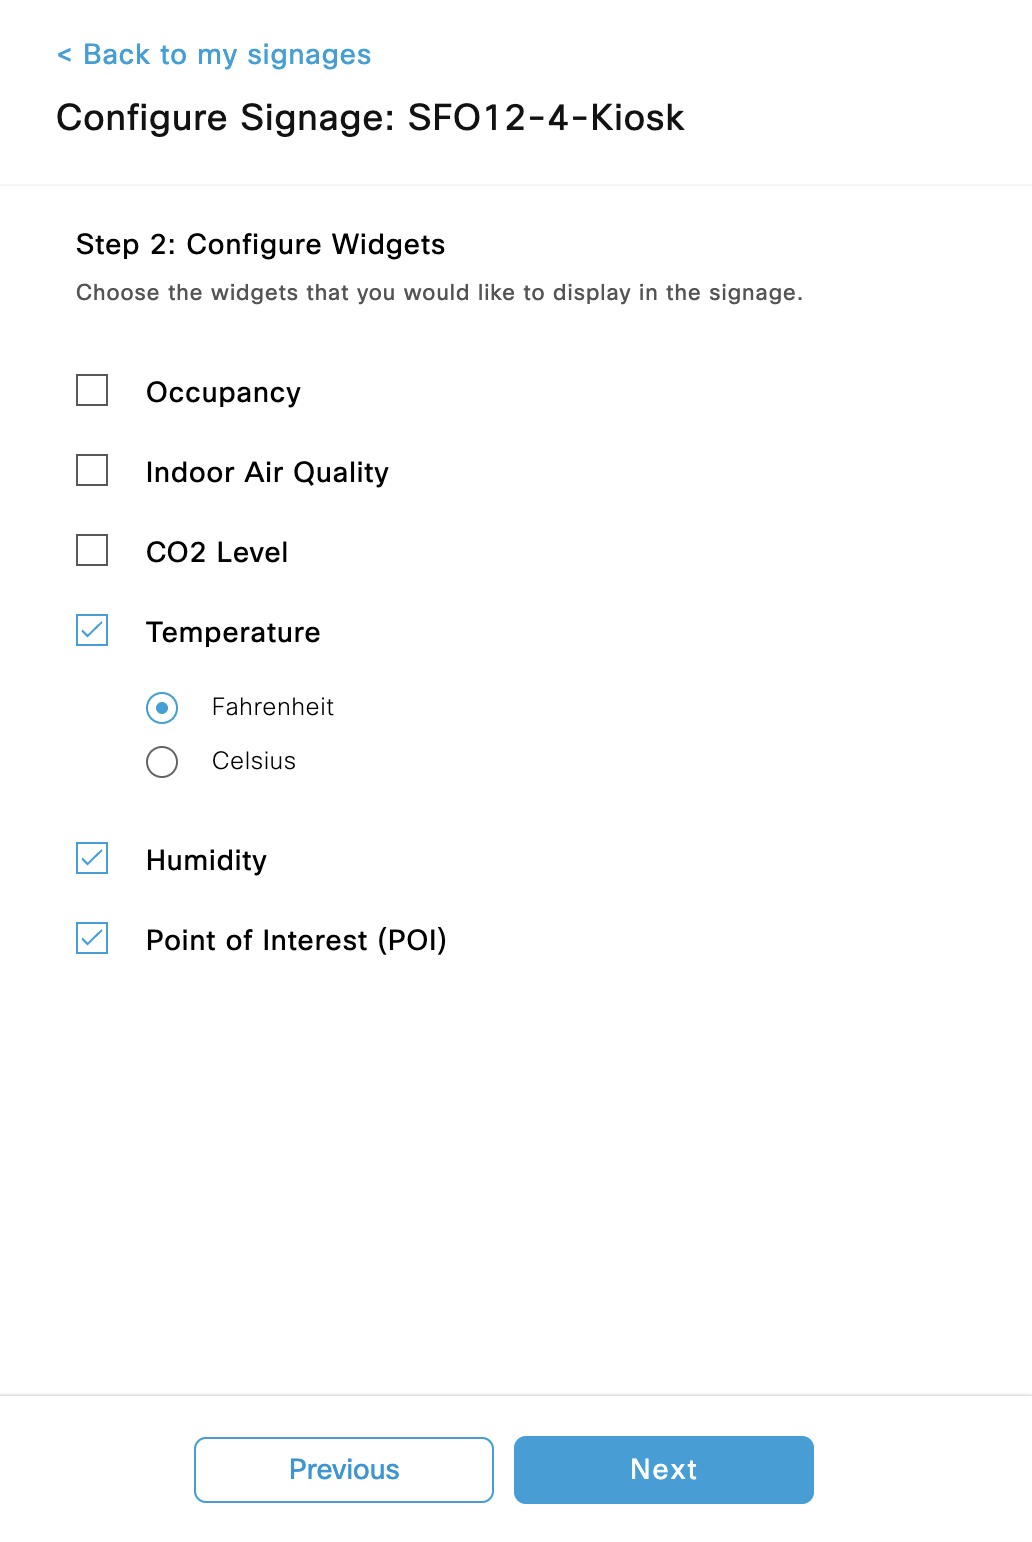
|
|
|
Step 2: Configure Widgets Occupancy, air quality, and comfort widgets disabled |
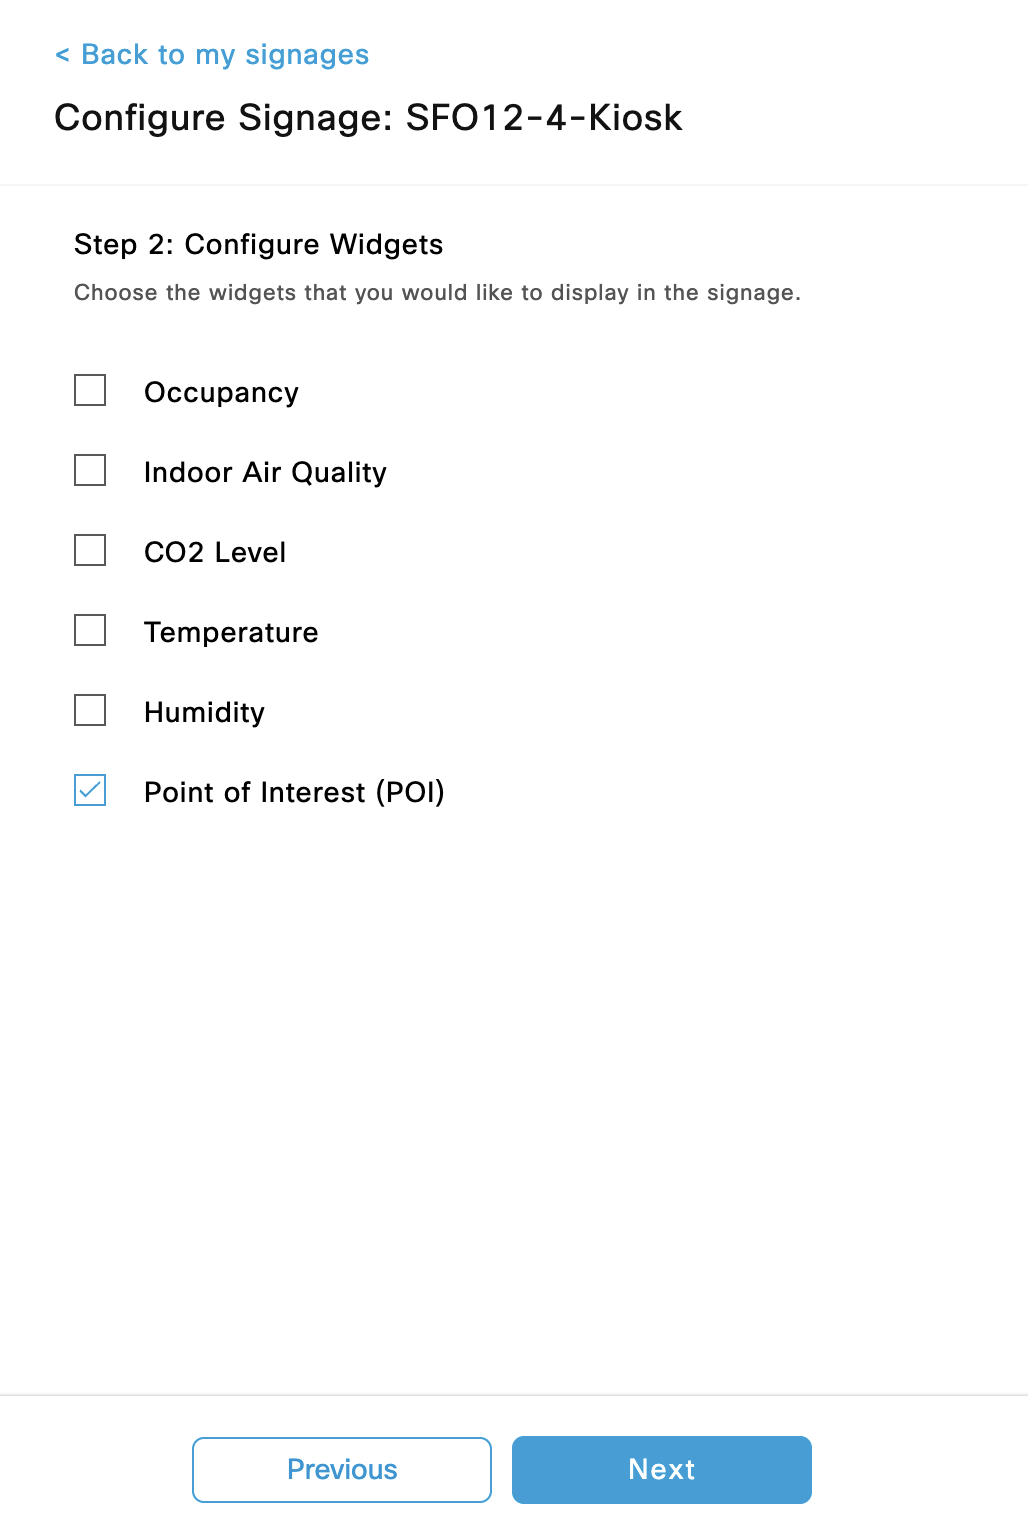
|
|
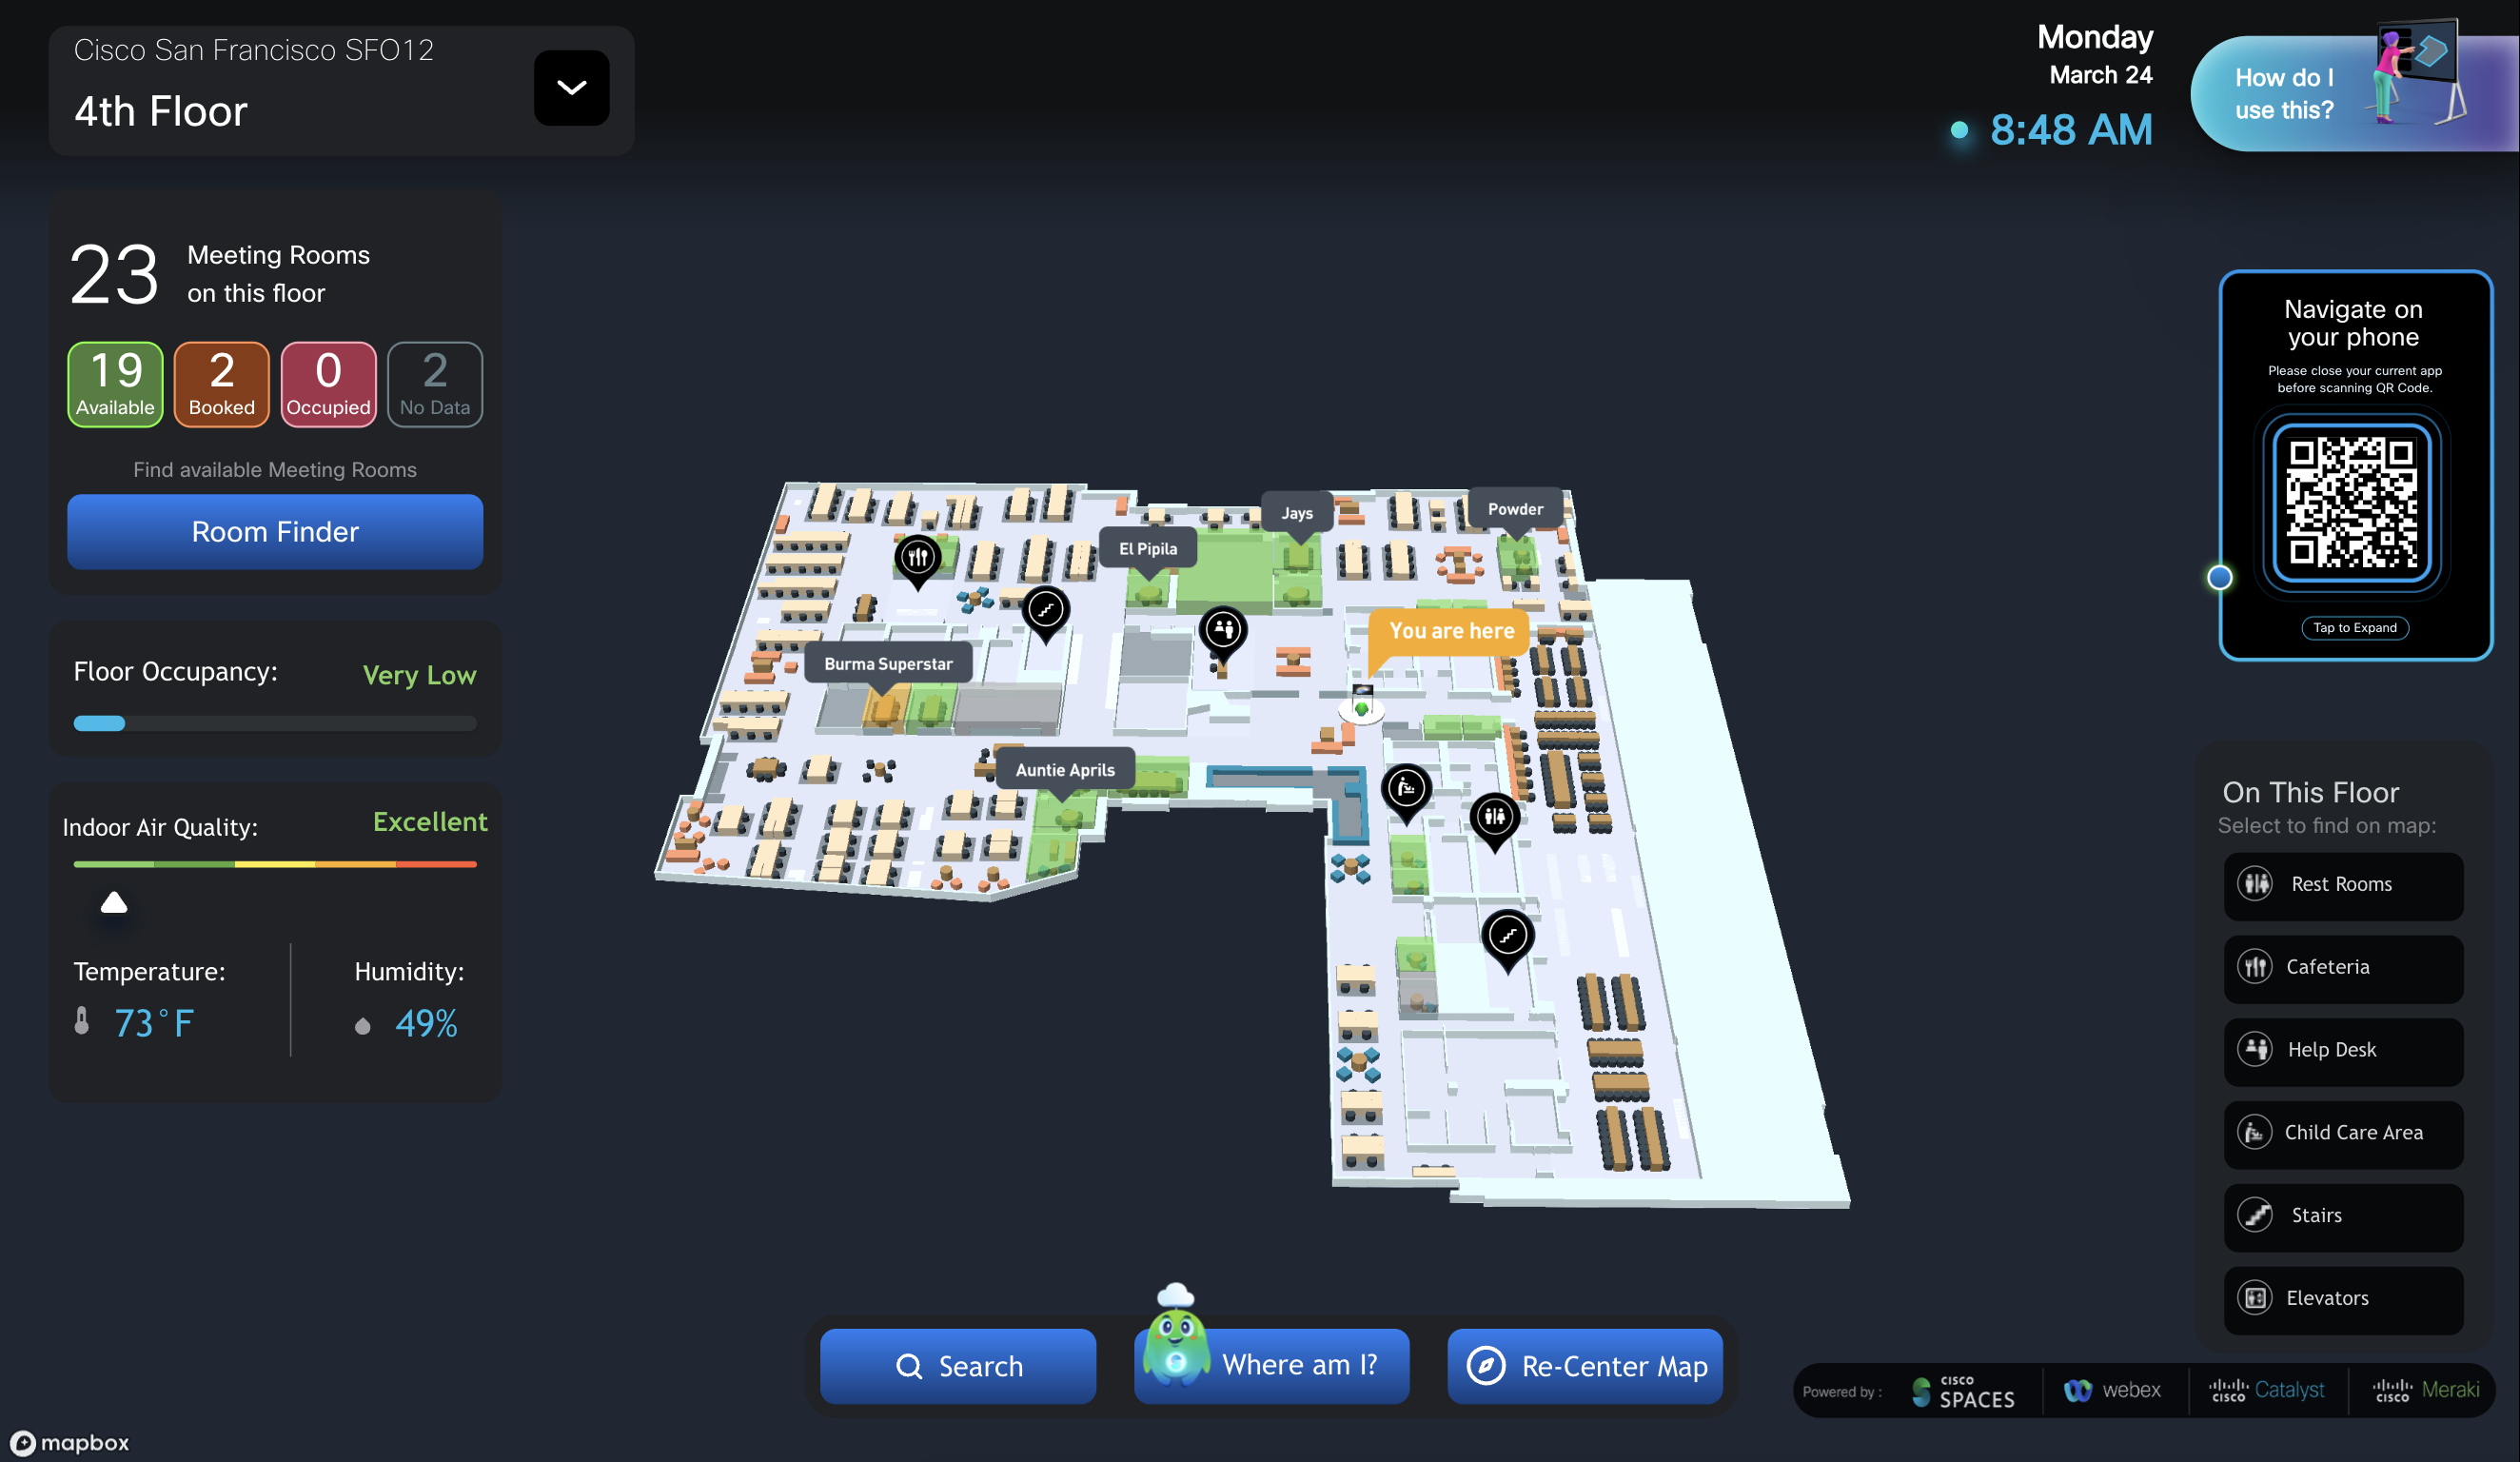
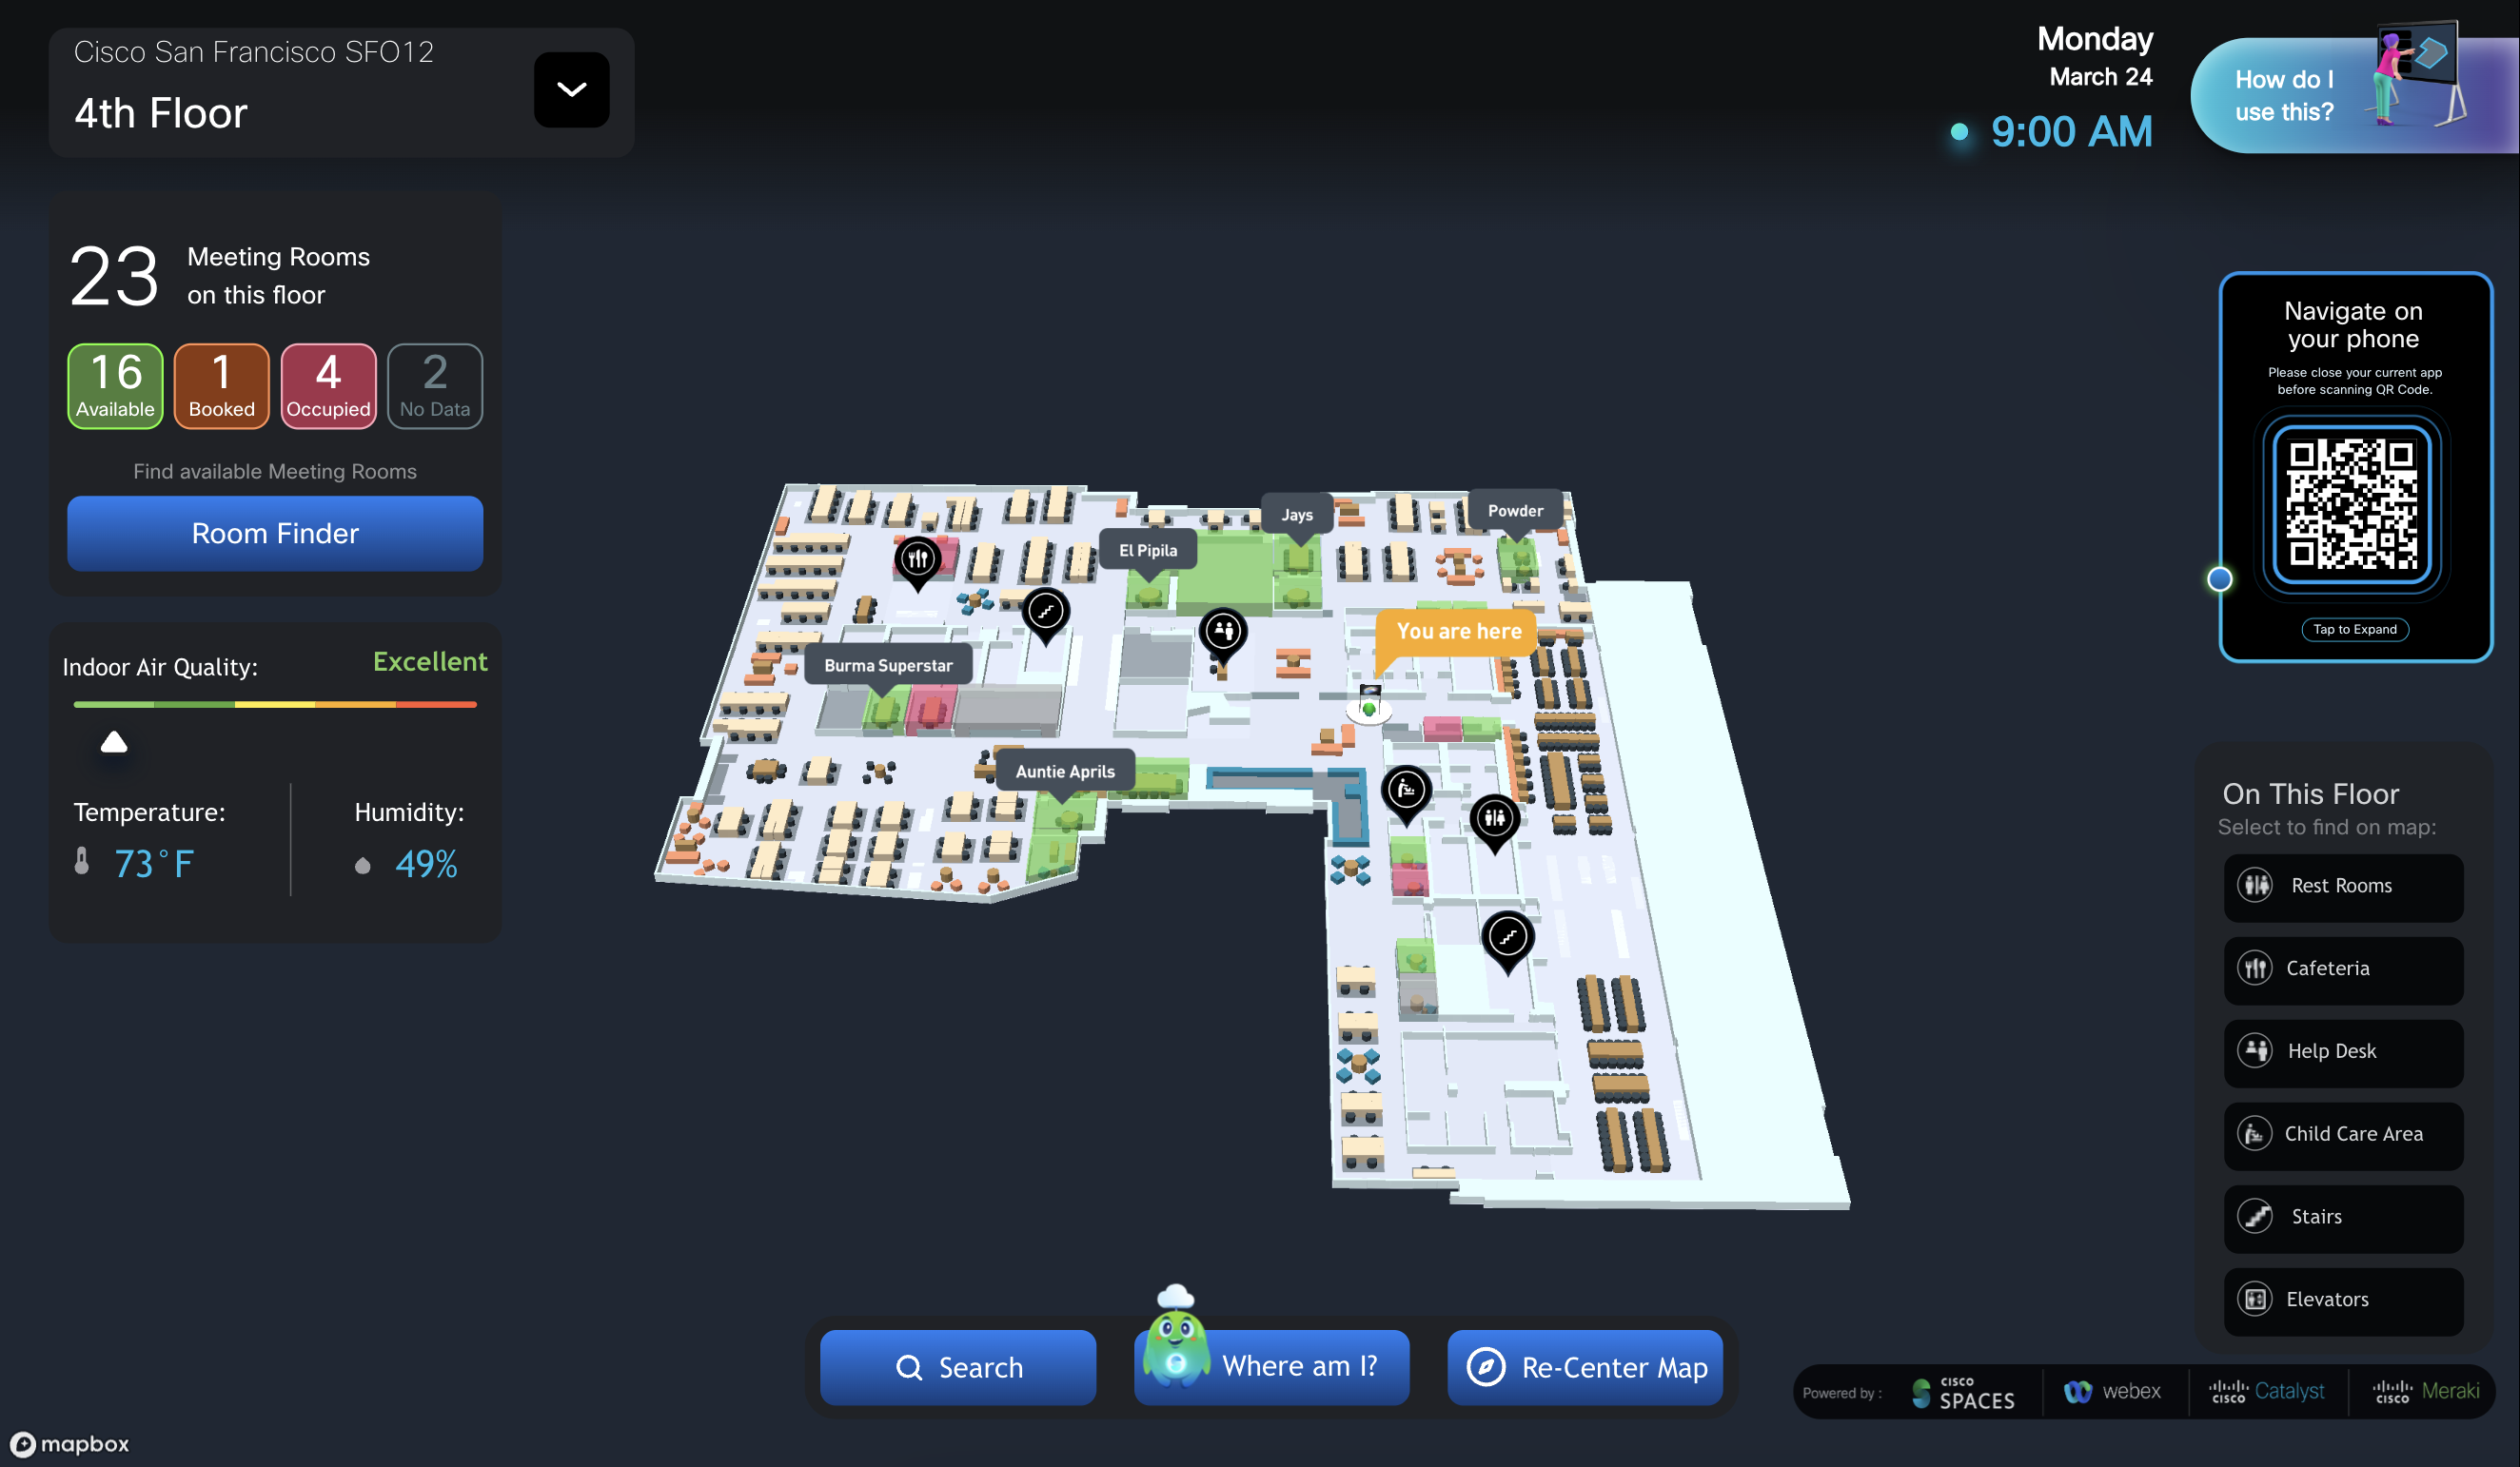
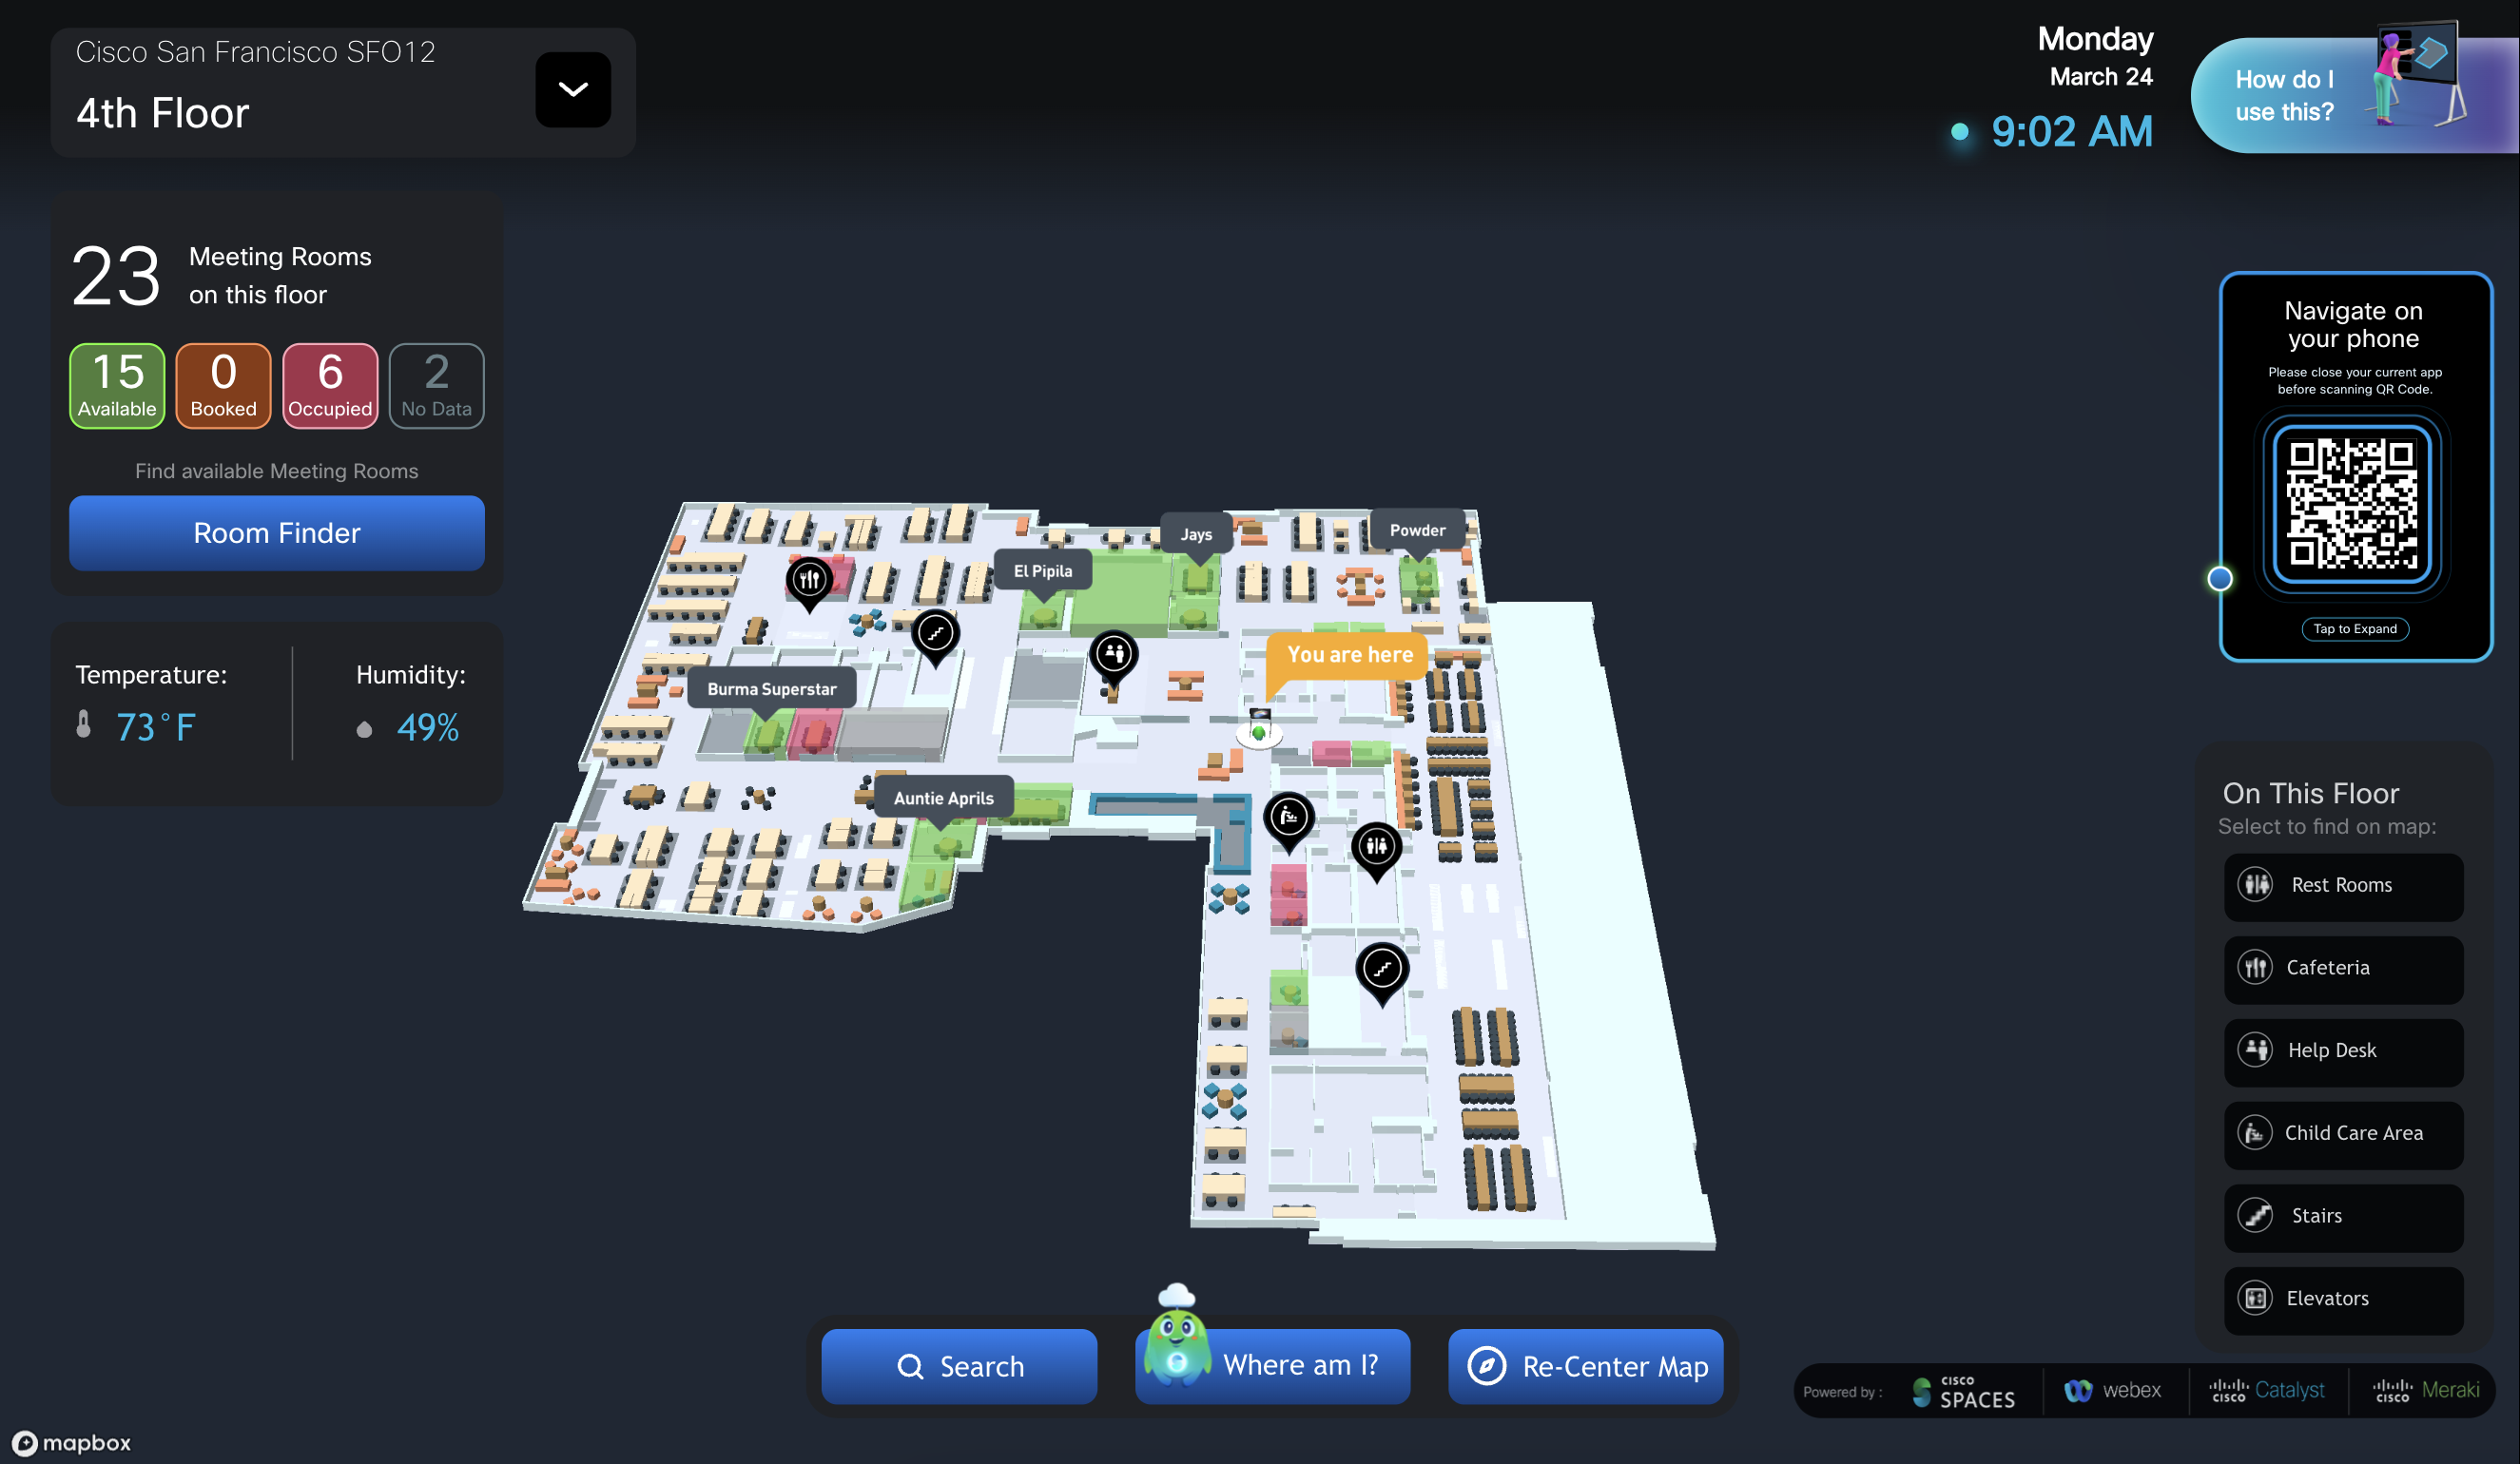
How does the Space Explorer > Signages setup workflow affect the Space Explorer - Kiosk app Floor view?
Floor View scenarios in the table below (not exhaustive)
|
Scenario / Description |
Space Experience Configuration |
Space Explorer - Kiosk UI |
|---|---|---|
|
Step 2: Configure Widgets All widgets enabled
The floor occupancy widgets are on a scale from 0-100% (if over 100% utilization the floors will be capped at 100%). Floor occupancy are identical to “Live Occupancy” dashboard app and are derived from wireless client counts relative to floor max capacity values in the Location Hierarchy metadata. Temperature, humidity, Indoor Air Quality (IAQ), CO₂, and Ambient Noise are aggregated at the building level and average across all devices providing each metric. The Point of Interest (POI) option refers to the Quick Access POI menu on the floor view. |
|
|
|
Step 2: Configure Widgets Occupancy widget disabled |
|
|
|
Step 2: Configure Widgets Occupancy and air quality widgets disabled |
|
|
|
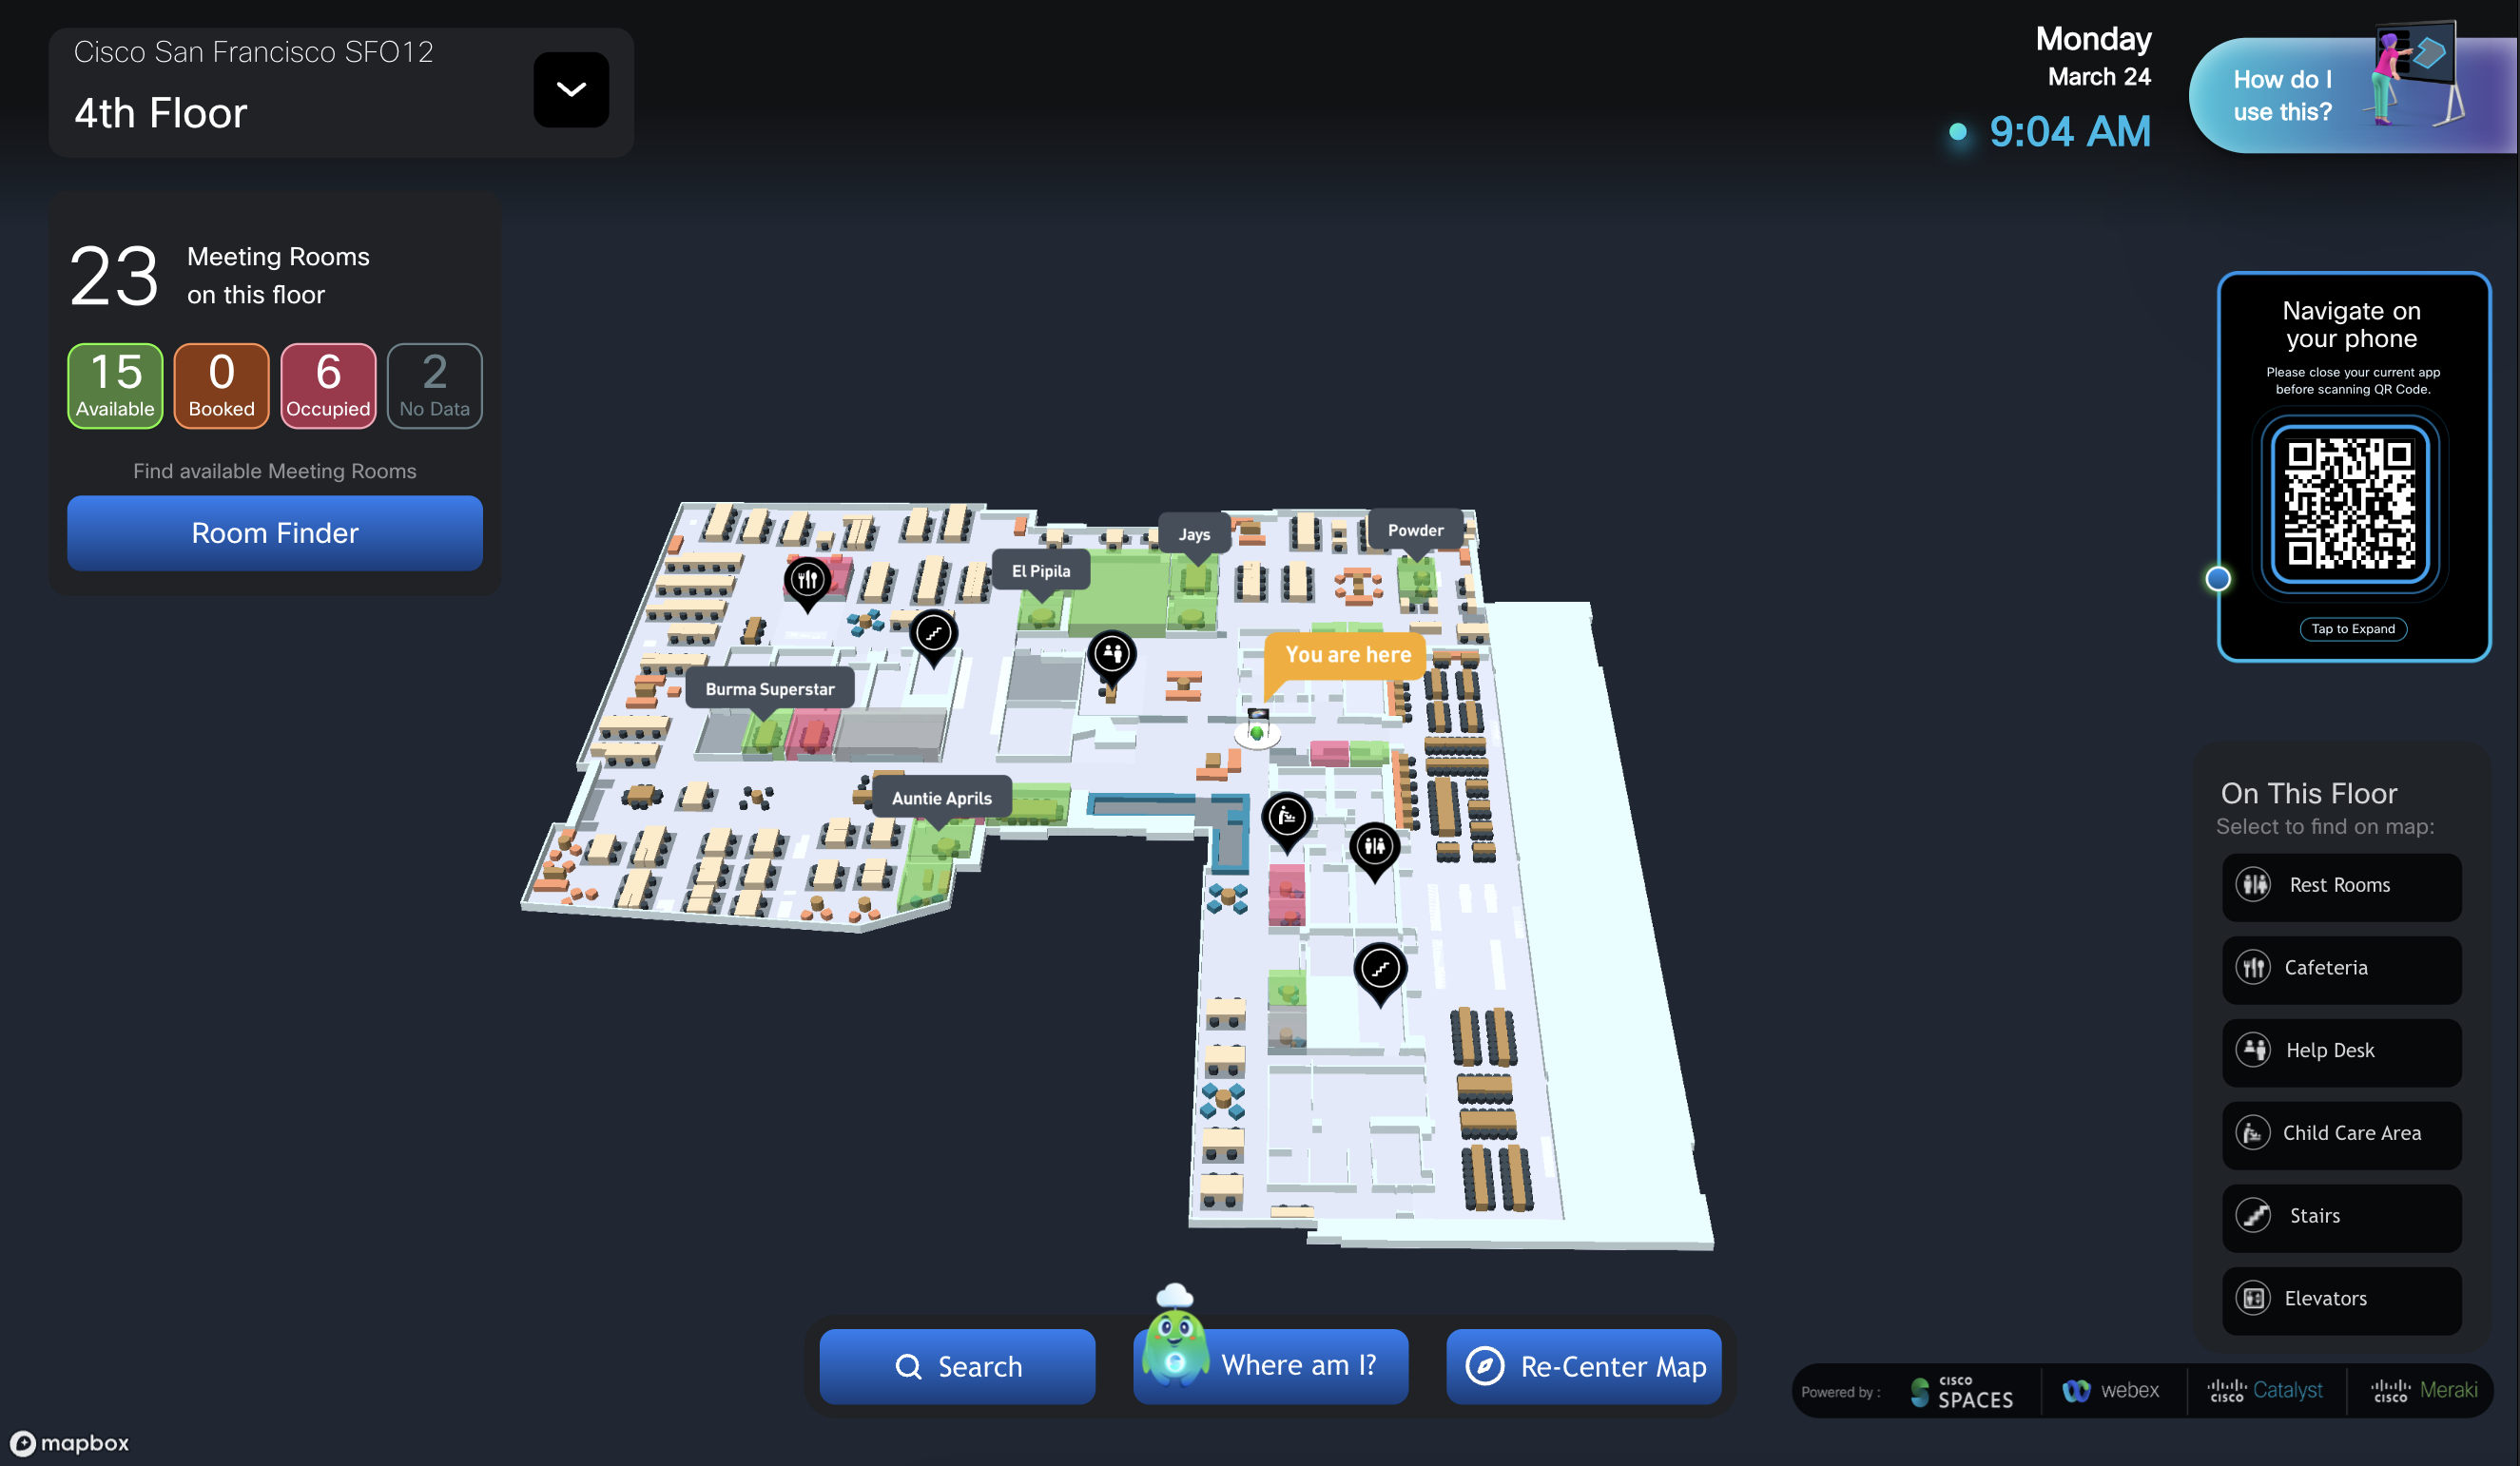
Step 2: Configure Widgets Occupancy, air quality, and comfort widgets disabled |
|
|
|
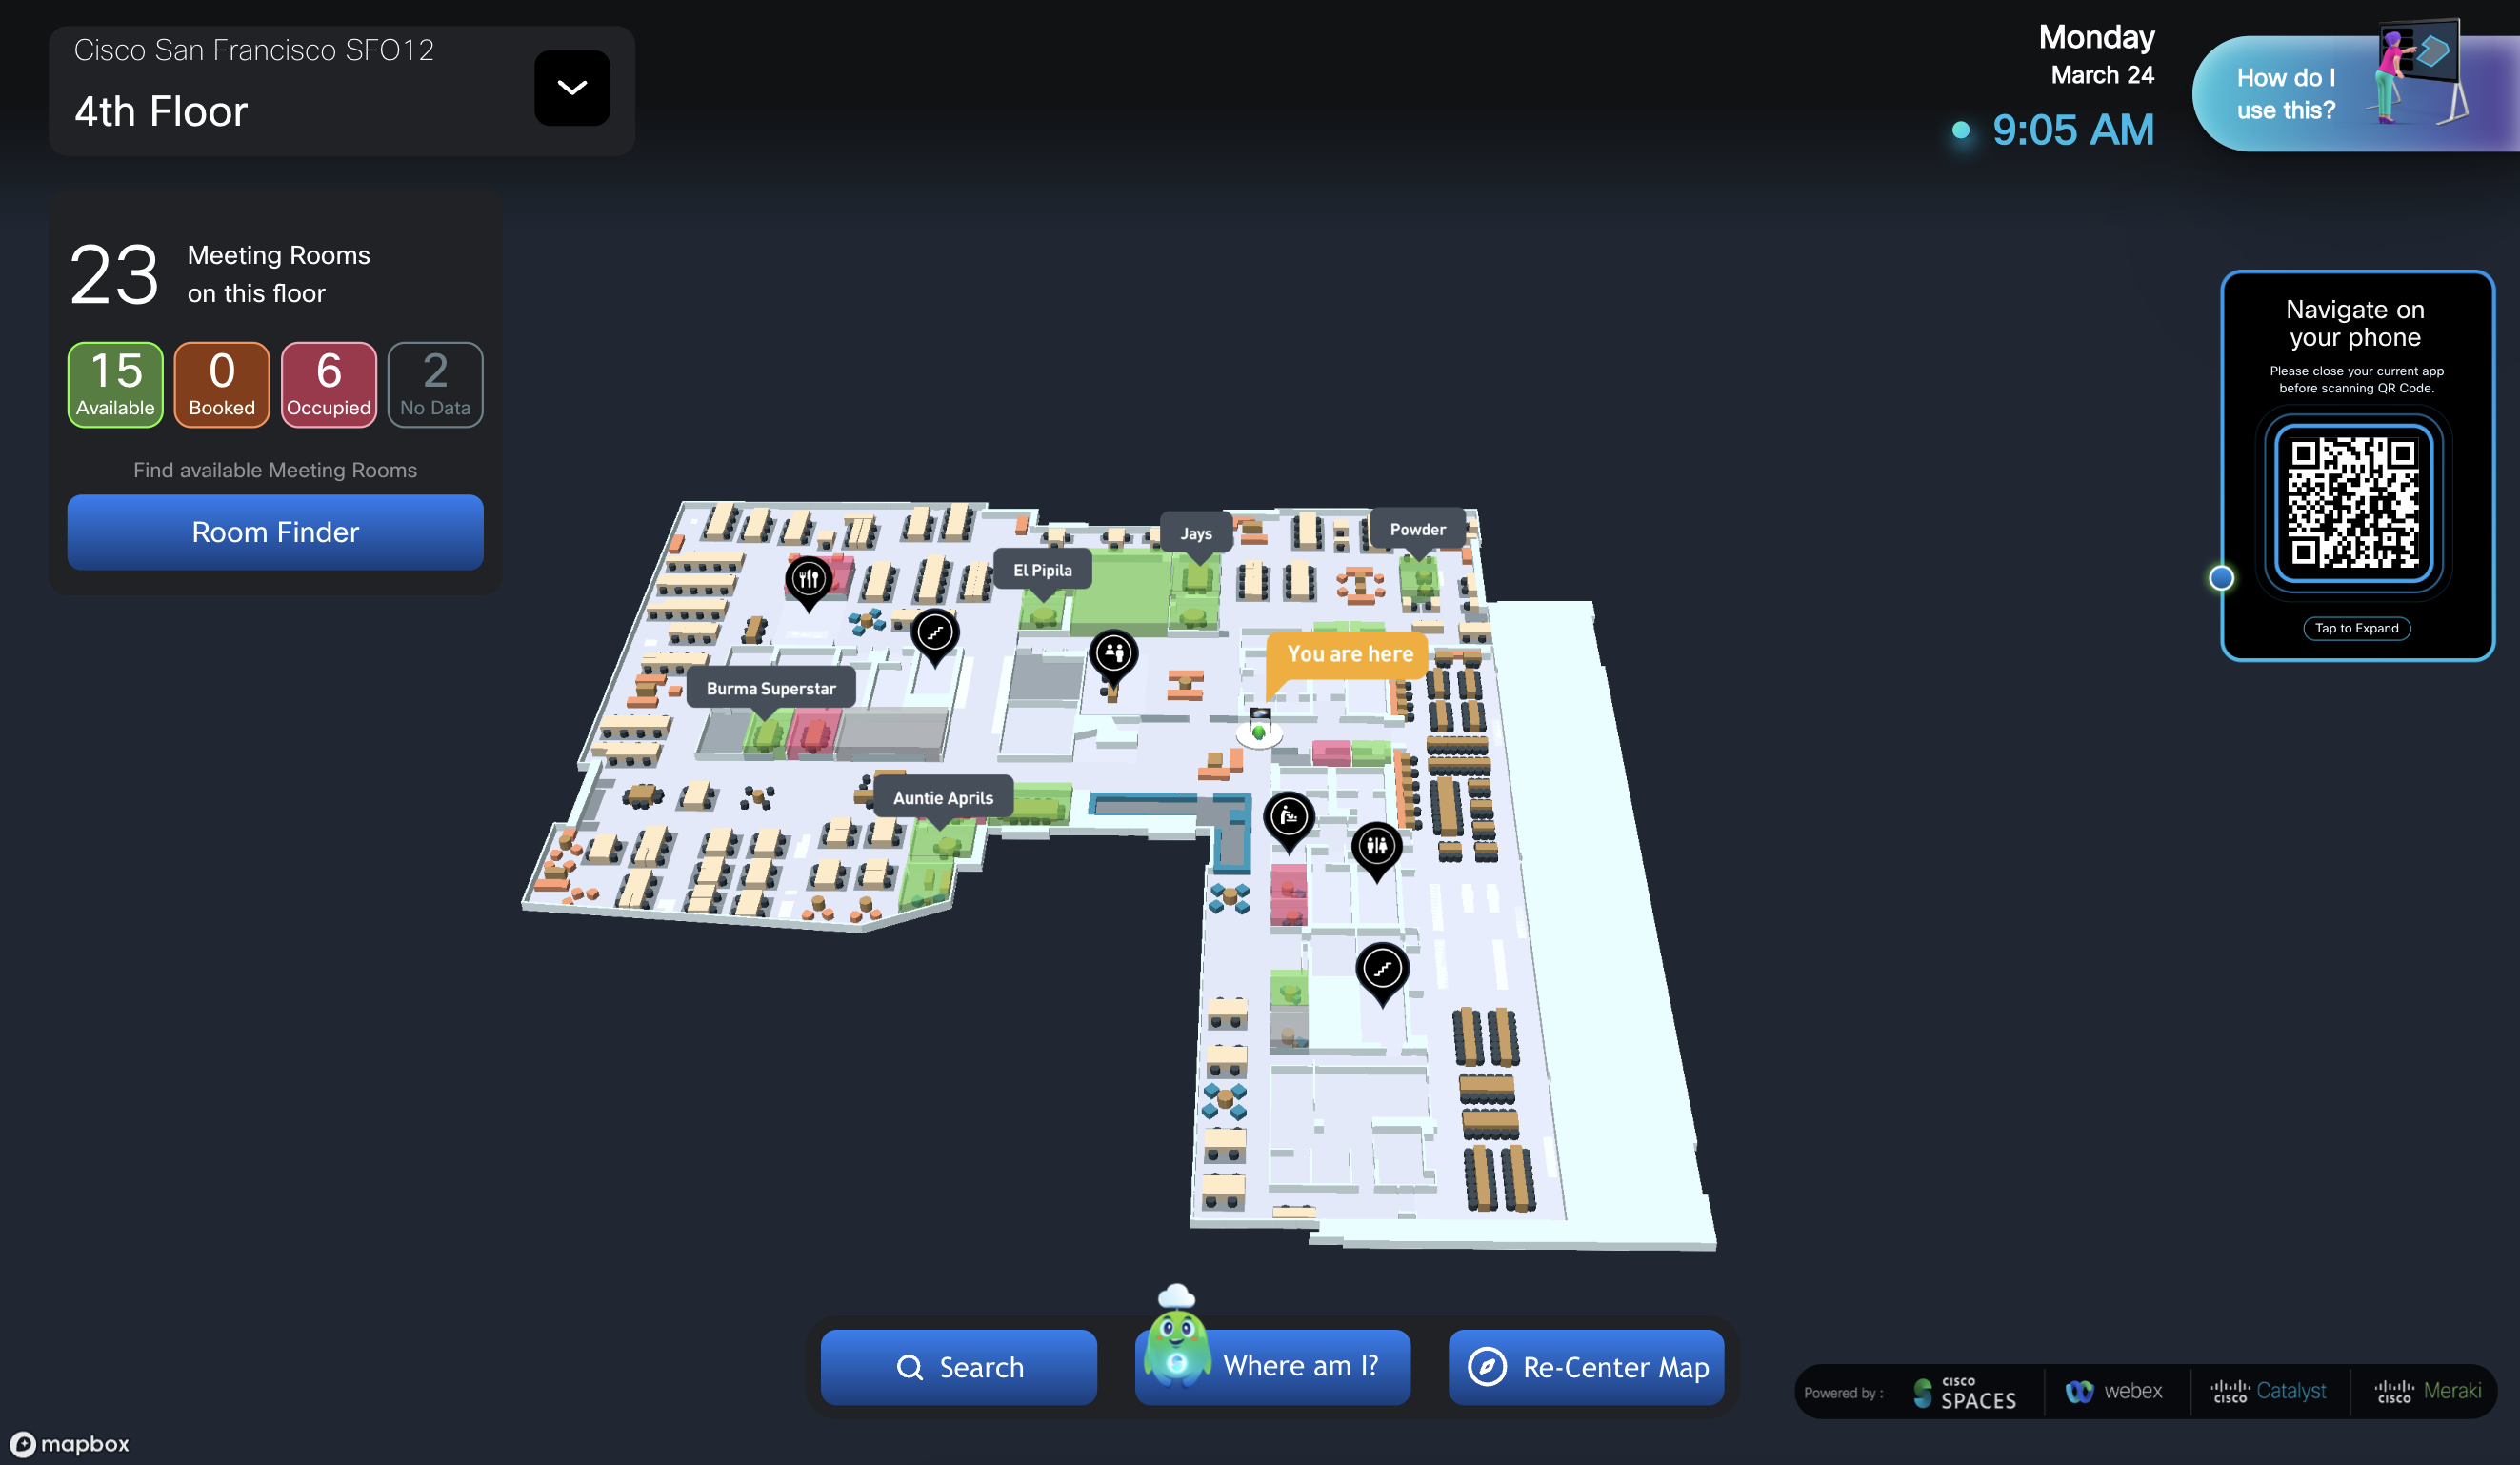
Step 2: Configure Widgets All widgets disabled |
|
|
How does the Space Explorer > Signages setup workflow affect the Space Explorer - Kiosk app Room Details popup?
Room Details popup scenarios in the table below (not exhaustive)
|
Scenario / Description |
Space Experience Configuration |
Space Explorer - Kiosk UI |
|---|---|---|
|
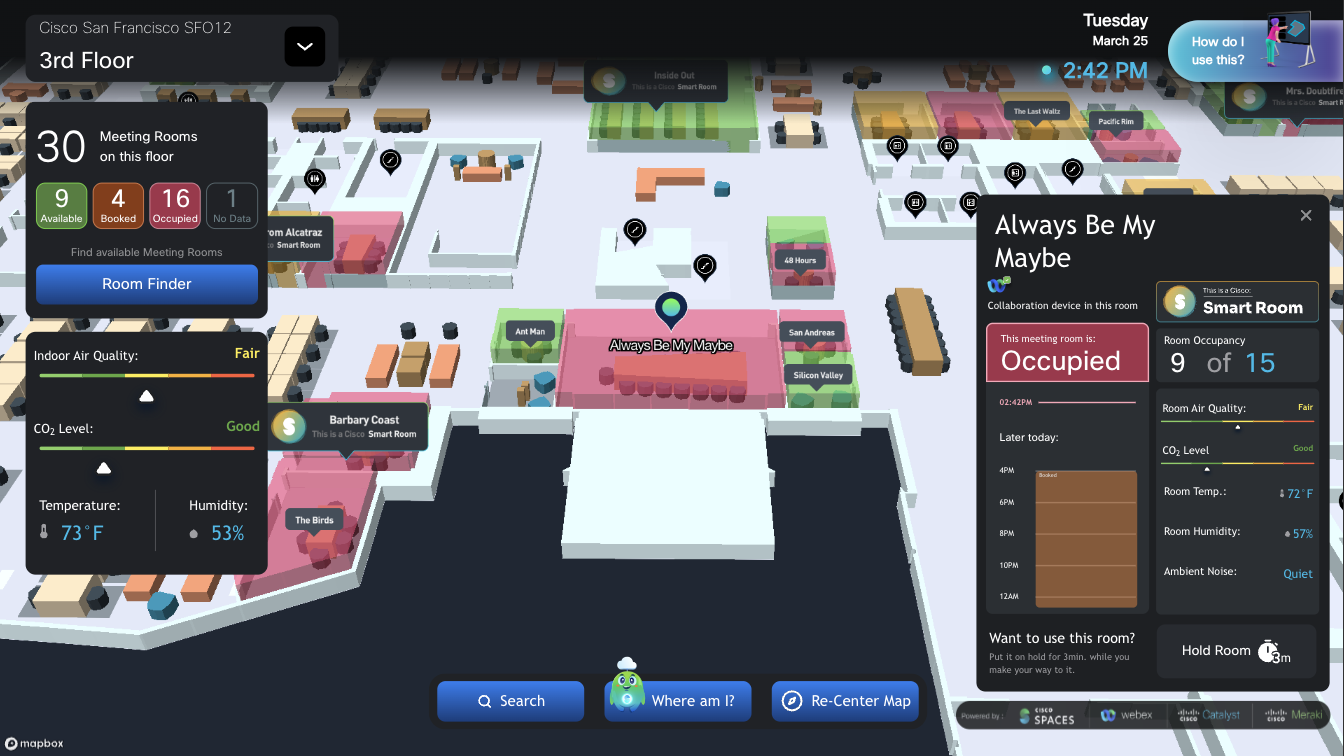
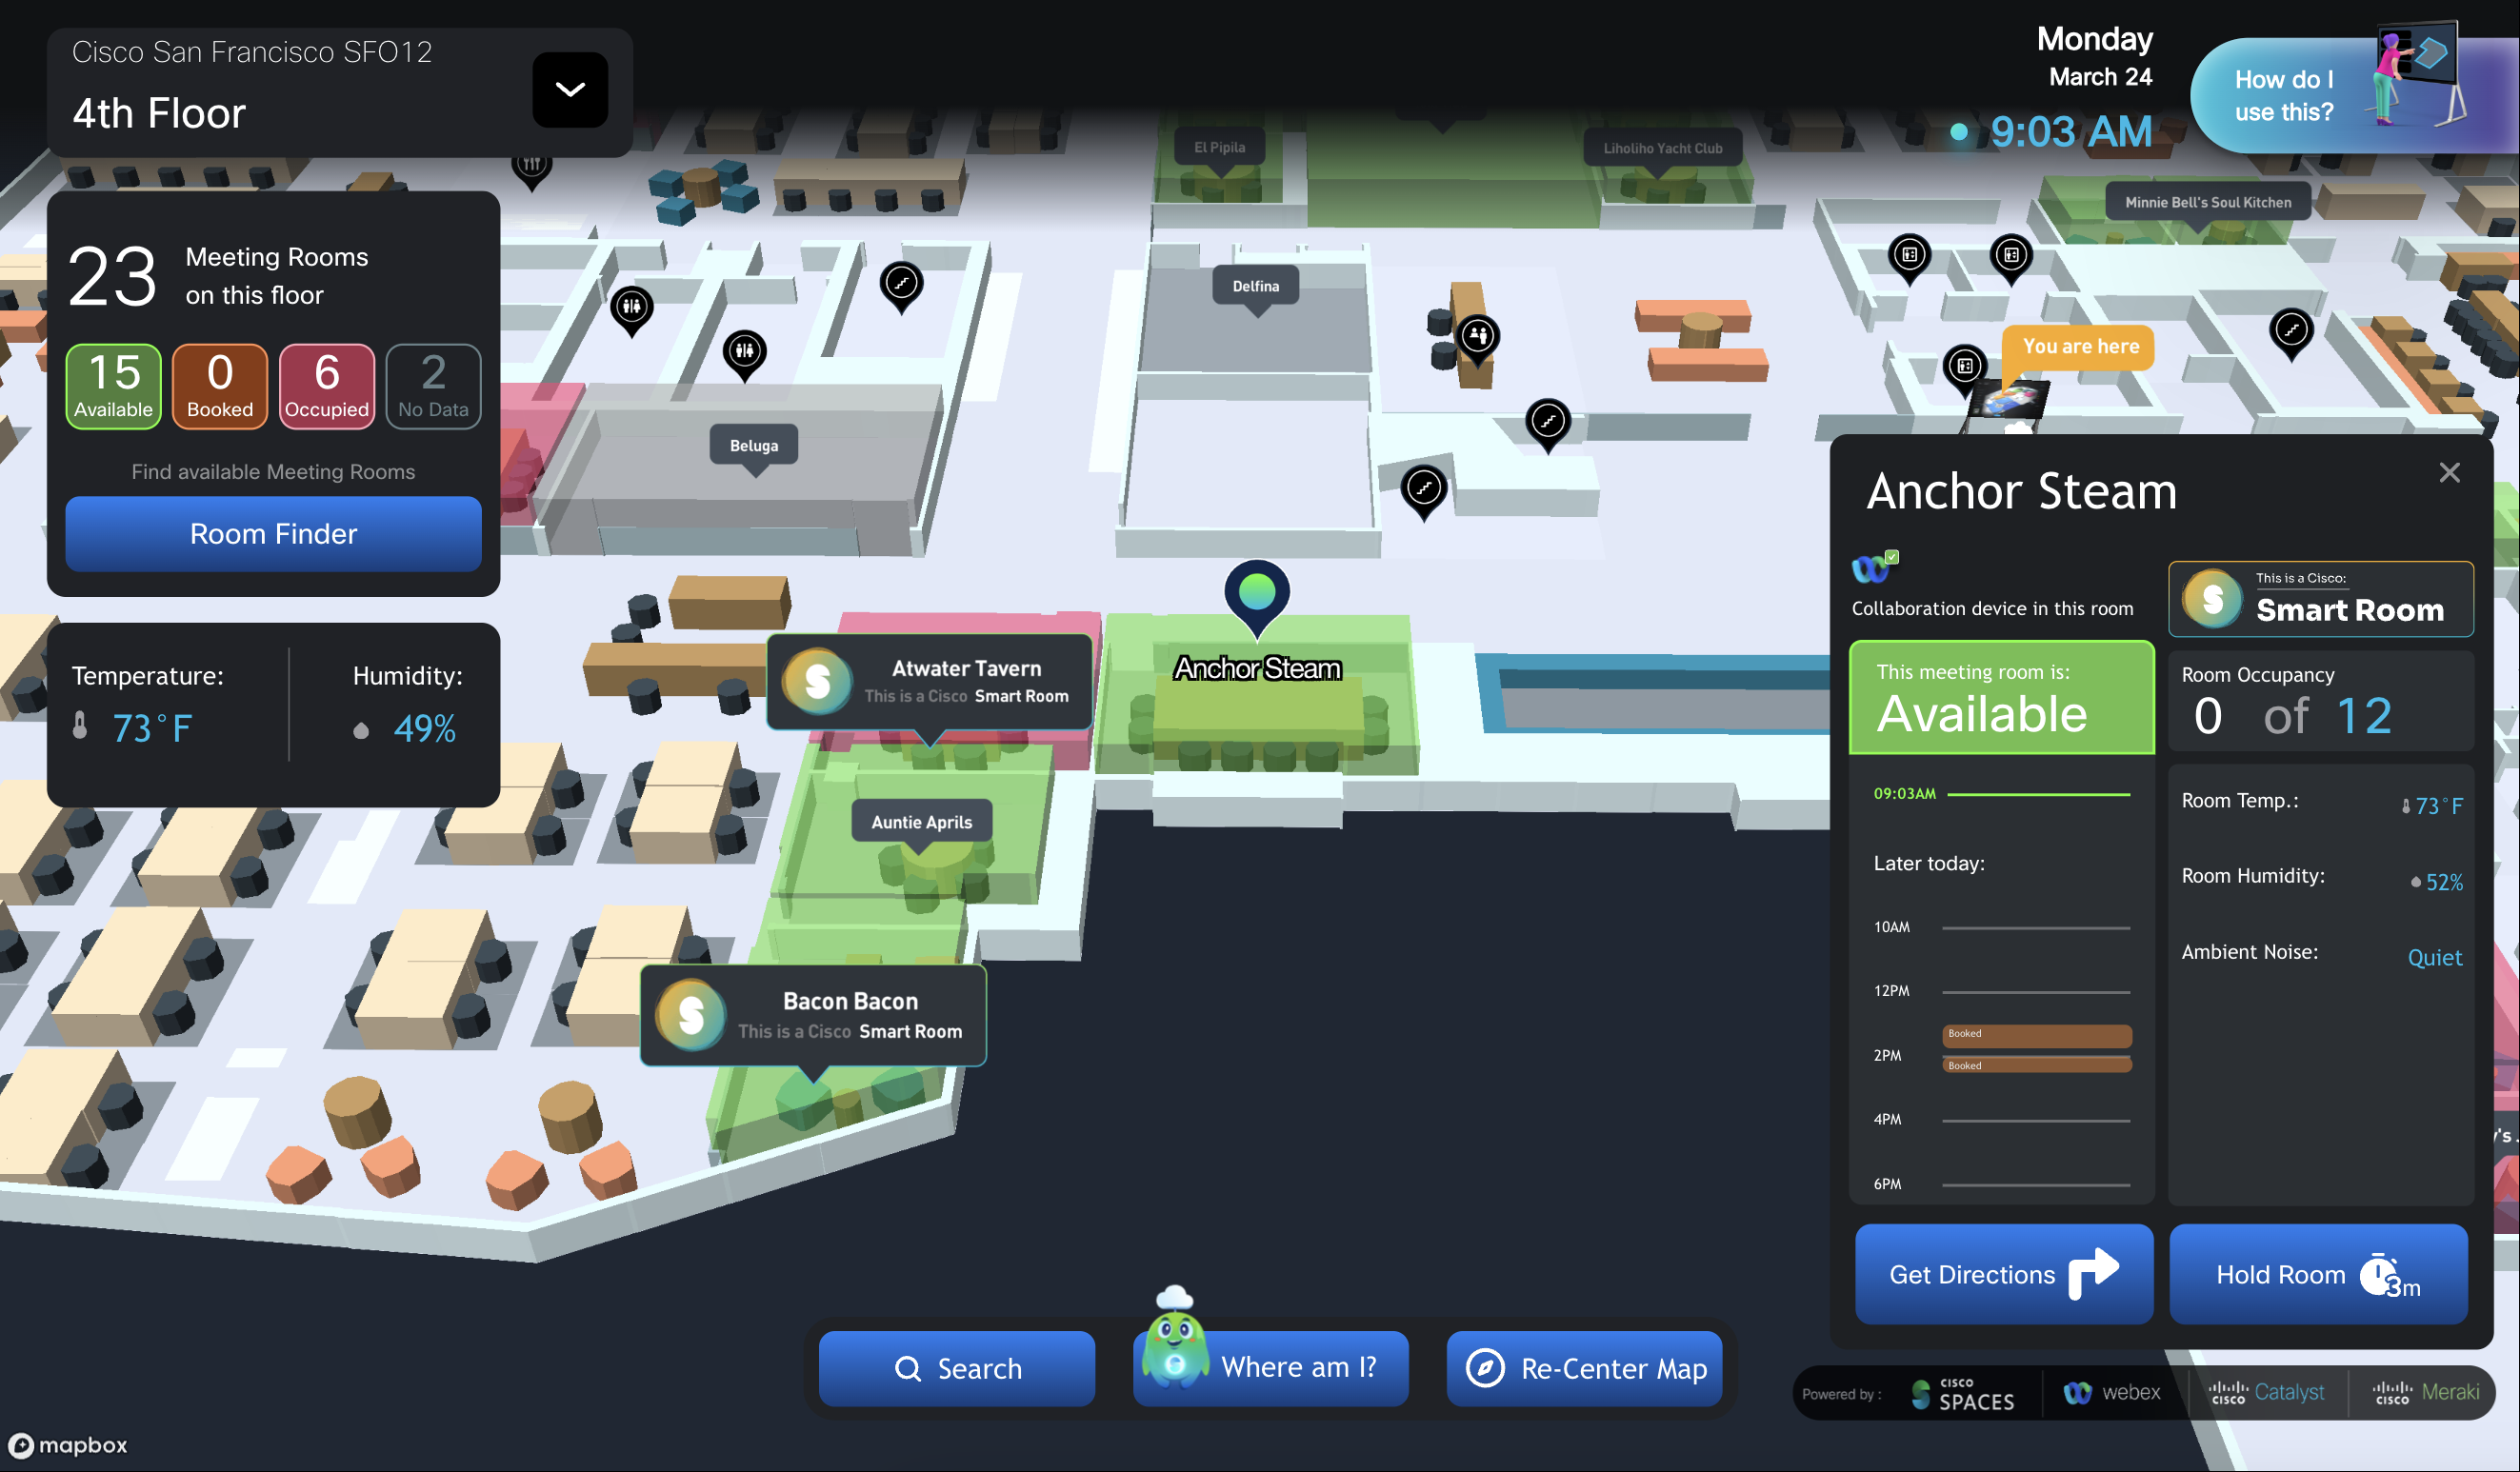
Step 2: Configure Widgets All widgets enabled
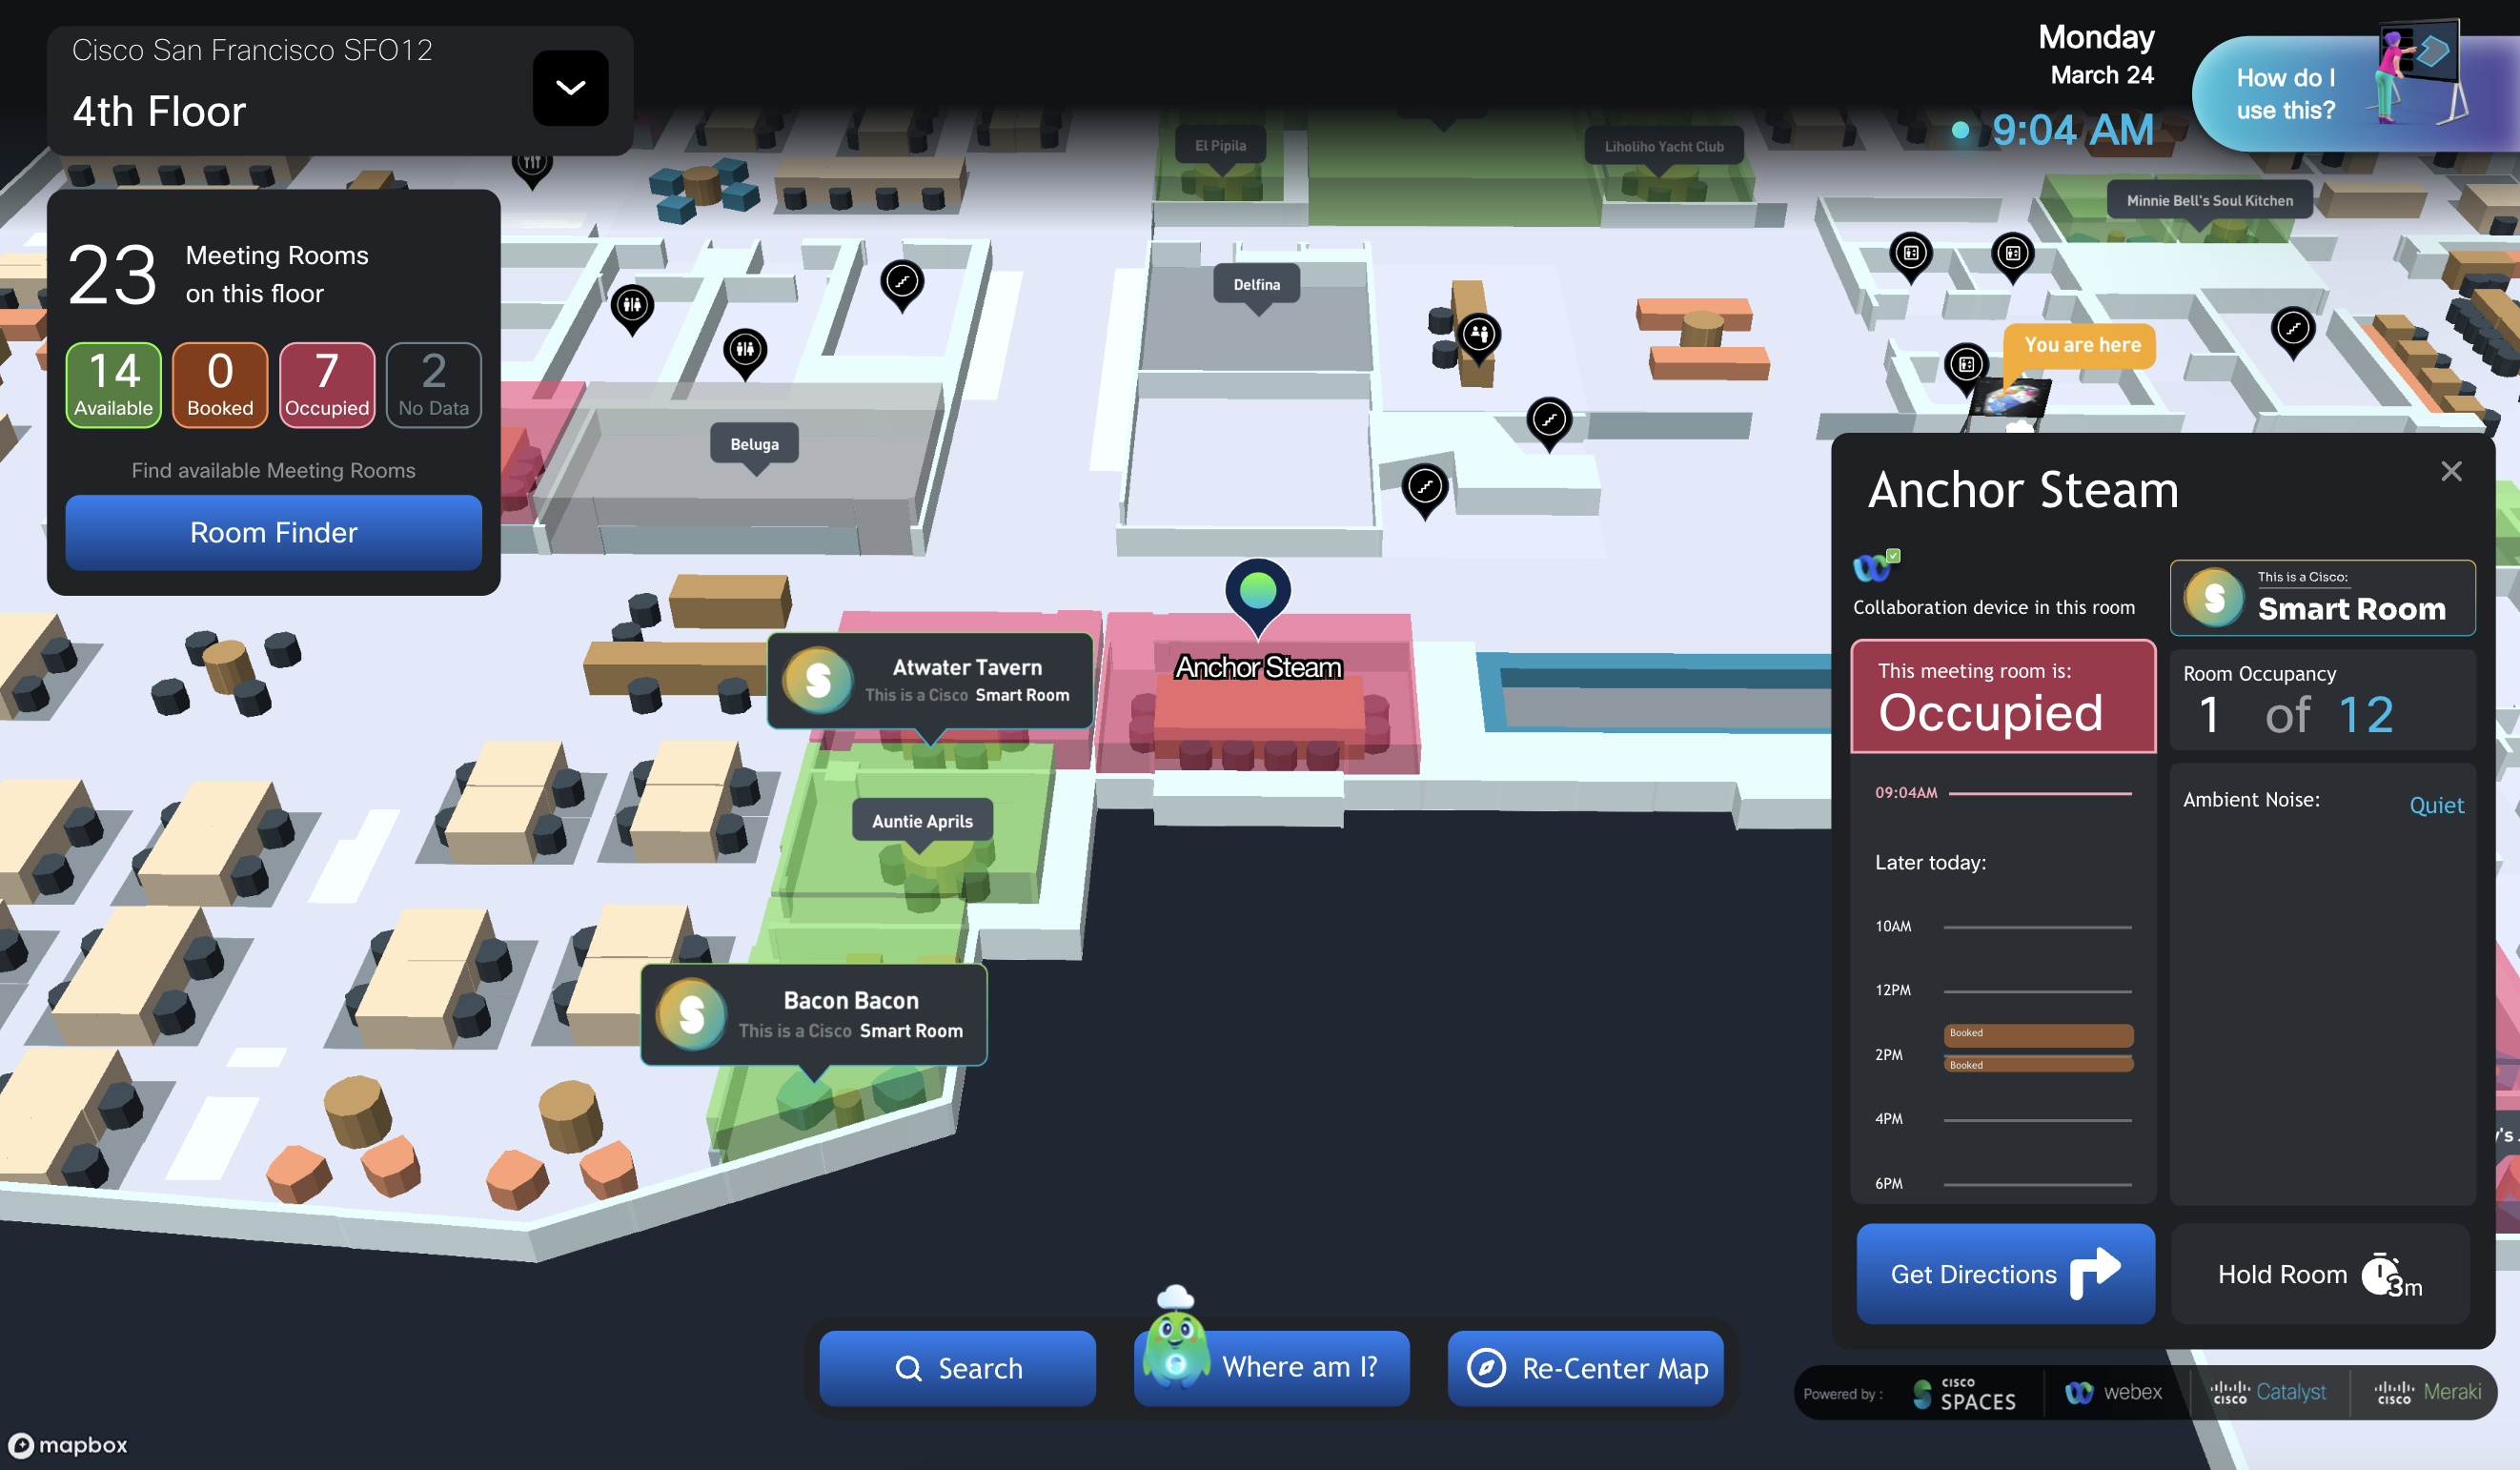
Disabling Occupancy widgets does not affect individual meeting room occupancy status. The room status setting can be managed in Space Manager in a future update. |
|
|
|
Step 2: Configure Widgets Occupancy and air quality widgets disabled |
|
|
|
Step 2: Configure Widgets Occupancy, air quality, and comfort widgets disabled |
|
|