
OVERVIEW
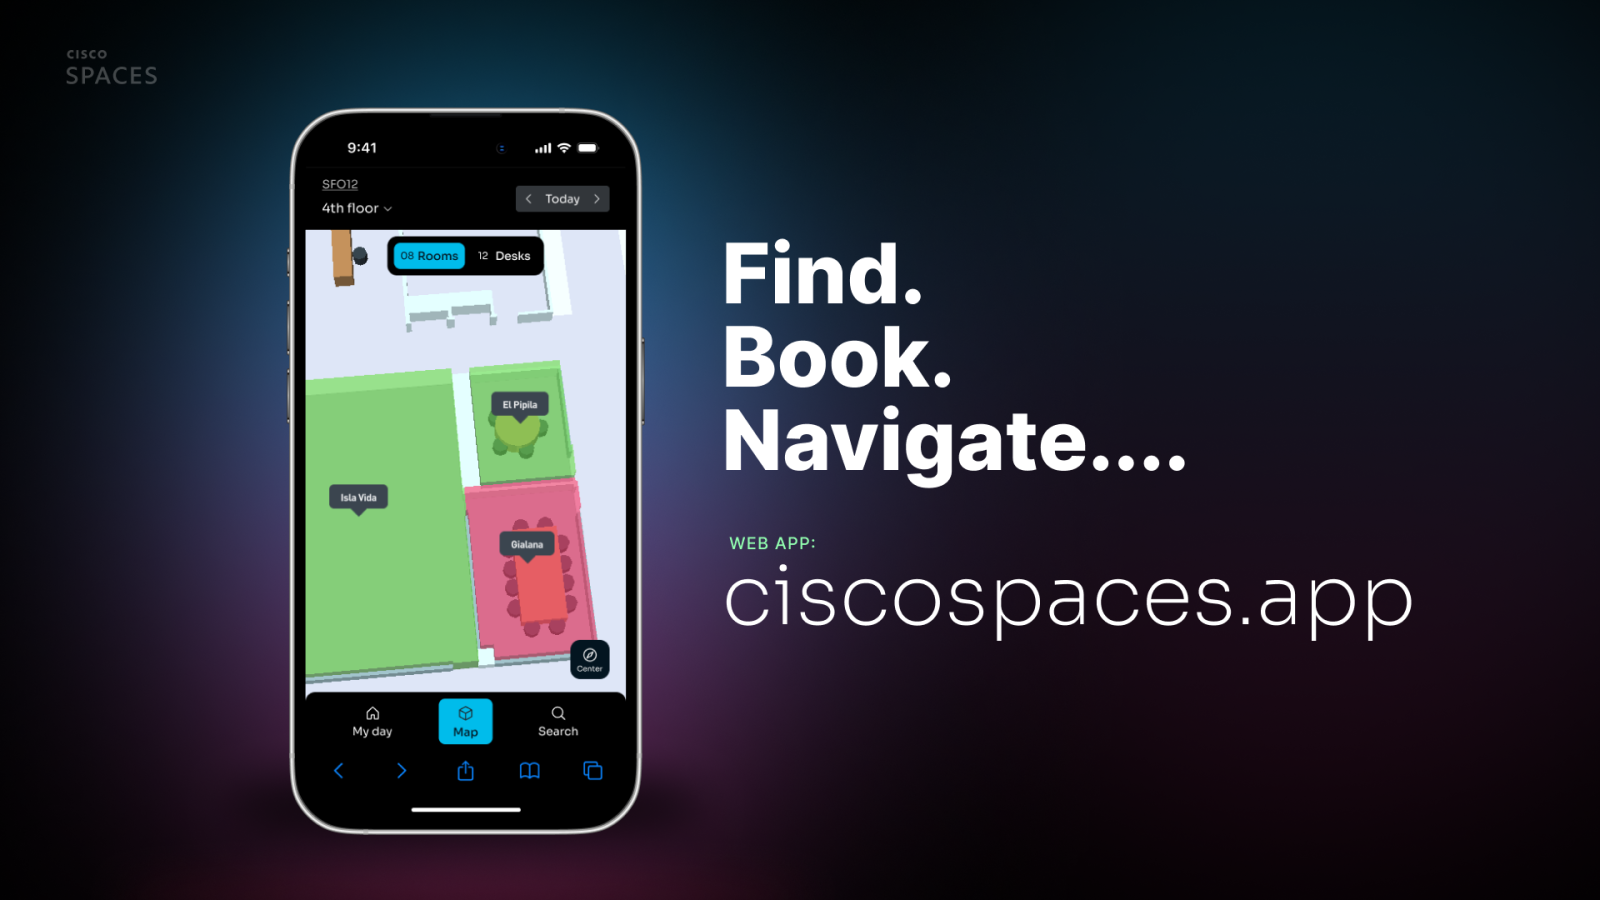
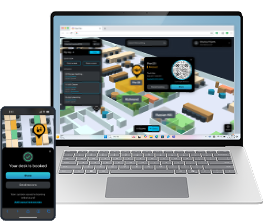
The Space Explorer Web App allows flexible access with SSO login (via Webex, Microsoft, and Google Login - more details below) to authenticate end users. The Web App is complementary to the Space Explorer Kiosk app meant to be displayed on a lobby display. In addition to room occupancy and calendar status, the Space Explorer Web App adds Smart Desking functionality to Cisco Spaces workplace experience applications. It is a flexible workspace solution that allows employees to reserve dynamically allocated desks (“Hot Desks”) instead of having assigned seating. It is a key part of hybrid work models and is commonly managed through IoT, AI, and cloud-based platforms.
SUPPORT AND ONBOARDING
Please follow the link below to find out about the different ways to get support for Cisco Spaces.
PREREQUISITES
This runbook should only be used as a follow on from the Spaces OS Runbook. Please refer to that document before progressing here.
|
|
Prerequisites |
|
Single Sign On (SSO) Support |
|
|
Spaces Infrastructure |
|
|
|
|
Spaces Infrastructure Readiness
Licensing Requirements
Individual Workstations/Desk Spaces are NOT licensed, but:
-
Sufficient licensing for mapped square footage is required.
-
Meeting Room real-time status visibility needs at minimum Spaces ADVANTAGE (ACT or UNLIMITED) in the current production environment.
-
SPACES-C-PRM (Spaces Premier for Collaboration & Wireless) license is needed to access the Space Explorer Web App for desk & room booking when these features move to Limited Availability (LA) followed by General Availability (GA), including Webex Desk & Phone Series device integration.
Mapping & Desk Identification
Digital Map Pro (3D Rich Map) Setup:
-
Desk IDs must be included in a CAD file to create a Workstation space type.
-
CAD files are processed into Digital Maps Pro (must be Published under Setup > Locations & Maps > Digital Maps)
-
Workstation space types auto-added to Space Manager > Manages Desks (requires a Cisco Spaces PM enabling a feature flag).
-
Workstations must be added to bookable inventory from Space Manager > Manages Desks
Desk Management in Space Manager (requires feature flag by Cisco Spaces PM team)
Link: Space Manager Setup
Hot Desk Setup:
-
Admins can designate "hot desks" for booking.
-
Workstations marked as hot desks will be assigned a Cisco Spaces proprietary calendar:
-
Users can book for the whole day and cancel their booking
-
Only one booking per user
-
Desk bookings reset at midnight local time
-
Single Sign On (SSO) Readiness
End-User SSO Login (not via CCI)
Users log in using:
-
Webex Login
-
Microsoft 365 Login (admin consent required)
-
Google Login
Enables seamless authentication for employees using existing SSO login flow.
Desk Booking Process
Booking via Companion Web App
-
Users login via SSO (Microsoft 365 or Google)
-
They visually scan the digital map for available desks
-
They click on a desk/space
-
They click “Book This Desk” to book it instantly
Firewall / Proxy Readiness
For Space Explorer Web App and Cisco Spaces Navigator PWA for desk booking.
Ports: 443 for all domains / endpoints listed below
|
IO ✅ SUPPORTED ✅ |
EU ⚠️ ROADMAP ⚠️ |
SG ⚠️ ROADMAP ⚠️ |
|
Highly recommended to add these wildcards:
|
Highly recommended to add these wildcards:
|
Highly recommended to add this wildcard:
-- |
|
Required |
||
|
|
|
|
|
Optional |
||
|
non-blocking: |
non-blocking: |
non-blocking: |
IMPLEMENTATION
Implementation Quick Start
Minimum of Spaces Advantage (ACT, Unlimited) licensing required for basic map view and optionally real-time room occupancy.
-
(Required) Setup Location Hierarchy, Merge Locations/Floors, and upload / process / publish CAD into Digital Map Pro (go to: Configuring the Location Hierarchy & Digital Map Creation & CAD File Upload)
-
(Optional) In Space Manager, connect Webex Workspaces, IoT Devices, and/or Calendars
-
If setting up Rooms, add room occupancy devices and calendars under Space Manager > Manage Rooms. (go to: Configuring Meeting Room Settings in Space Manager)
-
If setting up Desks (requires Spaces Premier licenses), create bookable desks add Webex Workspaces under Space Manager > Manage Desks. (go to: Space Manager Setup - Adding Bookable Desks)
-
-
(Required) Domain-to-Cisco Spaces Tenant mapping on backend (performed by Cisco team) (go to: Tenant-to-Domain Mapping)
-
If using Webex Login, ensure Cisco Spaces <> Webex integration is not blocked in Control Hub. (go to: Webex Login - Admin Permissions)
-
If using Microsoft Login, Microsoft Entra admin must login and grant permissions first. (go to: Microsoft 365 Login - Admin First Time)
-
Setup > Location & Maps > Digital Maps
-
Open the Cisco Spaces dashboard
-
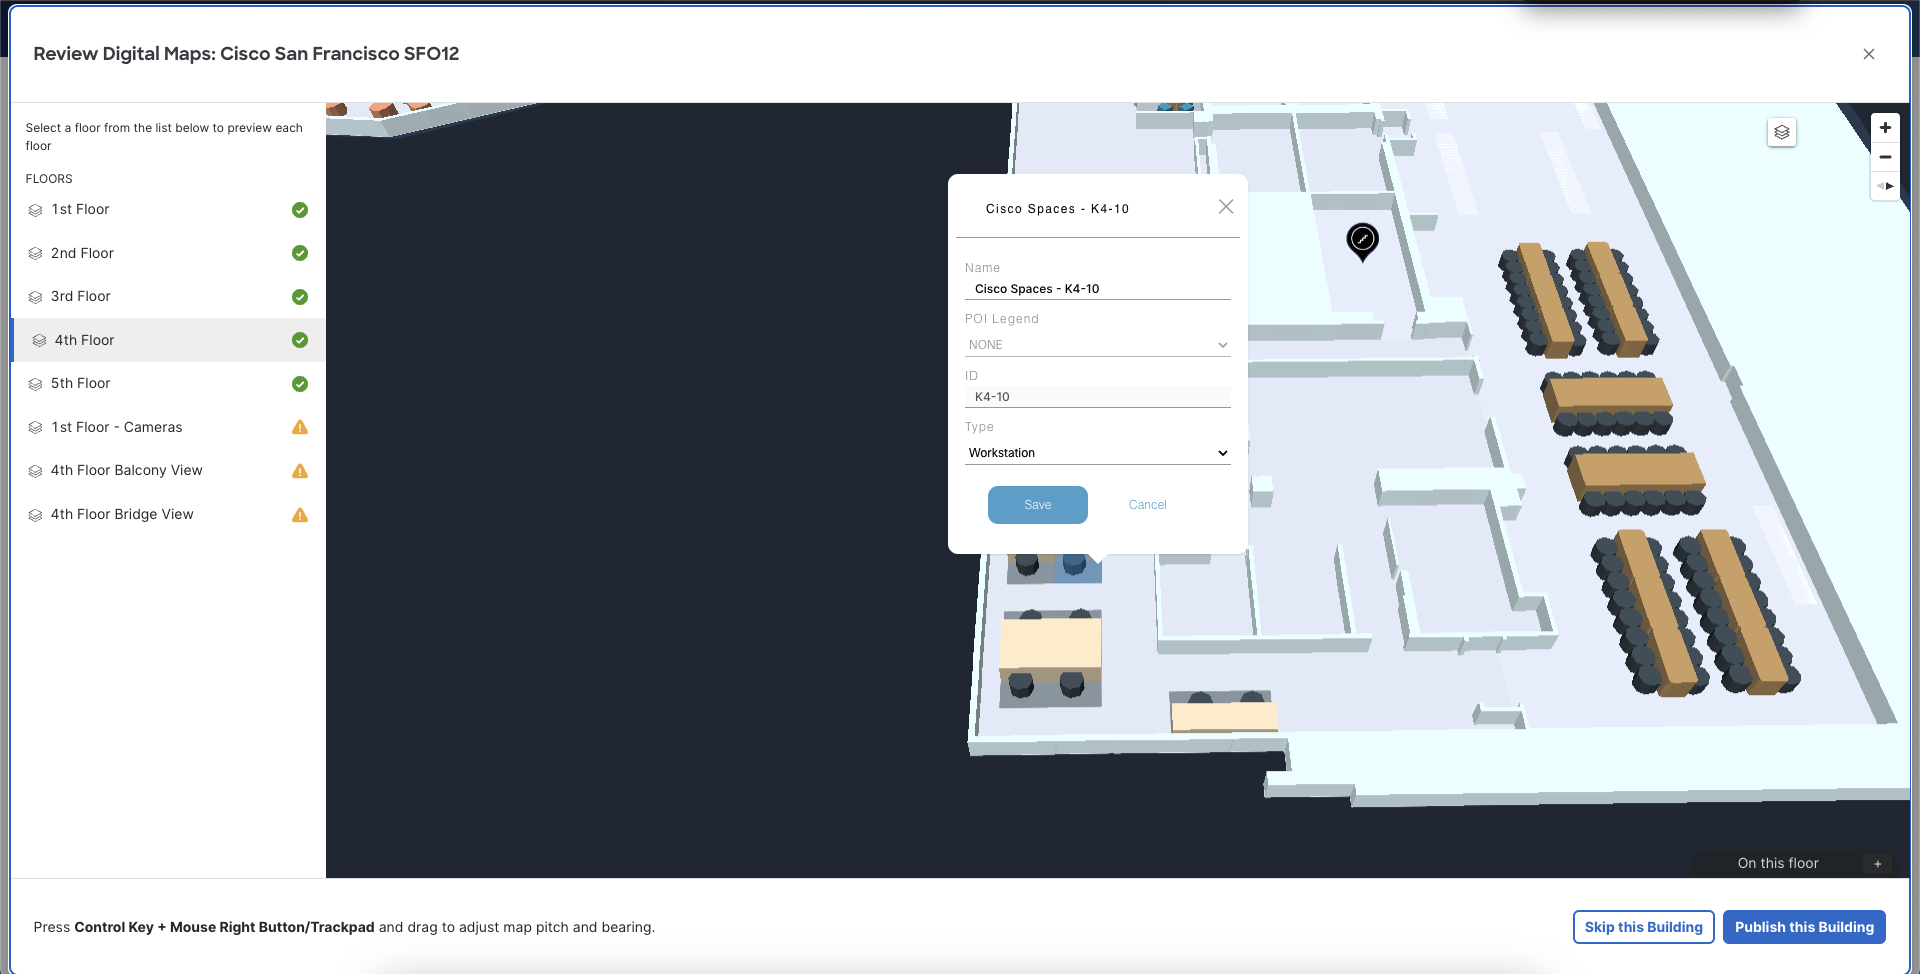
Navigate to Setup > Locations & Maps > Digital Maps > View/Edit
-
Check Meeting Rooms and make sure all room names/IDs are present and unique
-
Check Workstations and make sure all desk names/IDs are present and unique
-
If any bookable desks/private offices are not clickable and editable, then a new CAD file with desk IDs may be needed.
Space Experience Setup
-
Open the Cisco Spaces dashboard
-
Navigate to Space Experience app
-
Go to Devices
-
Go to Non-Webex Devices
-
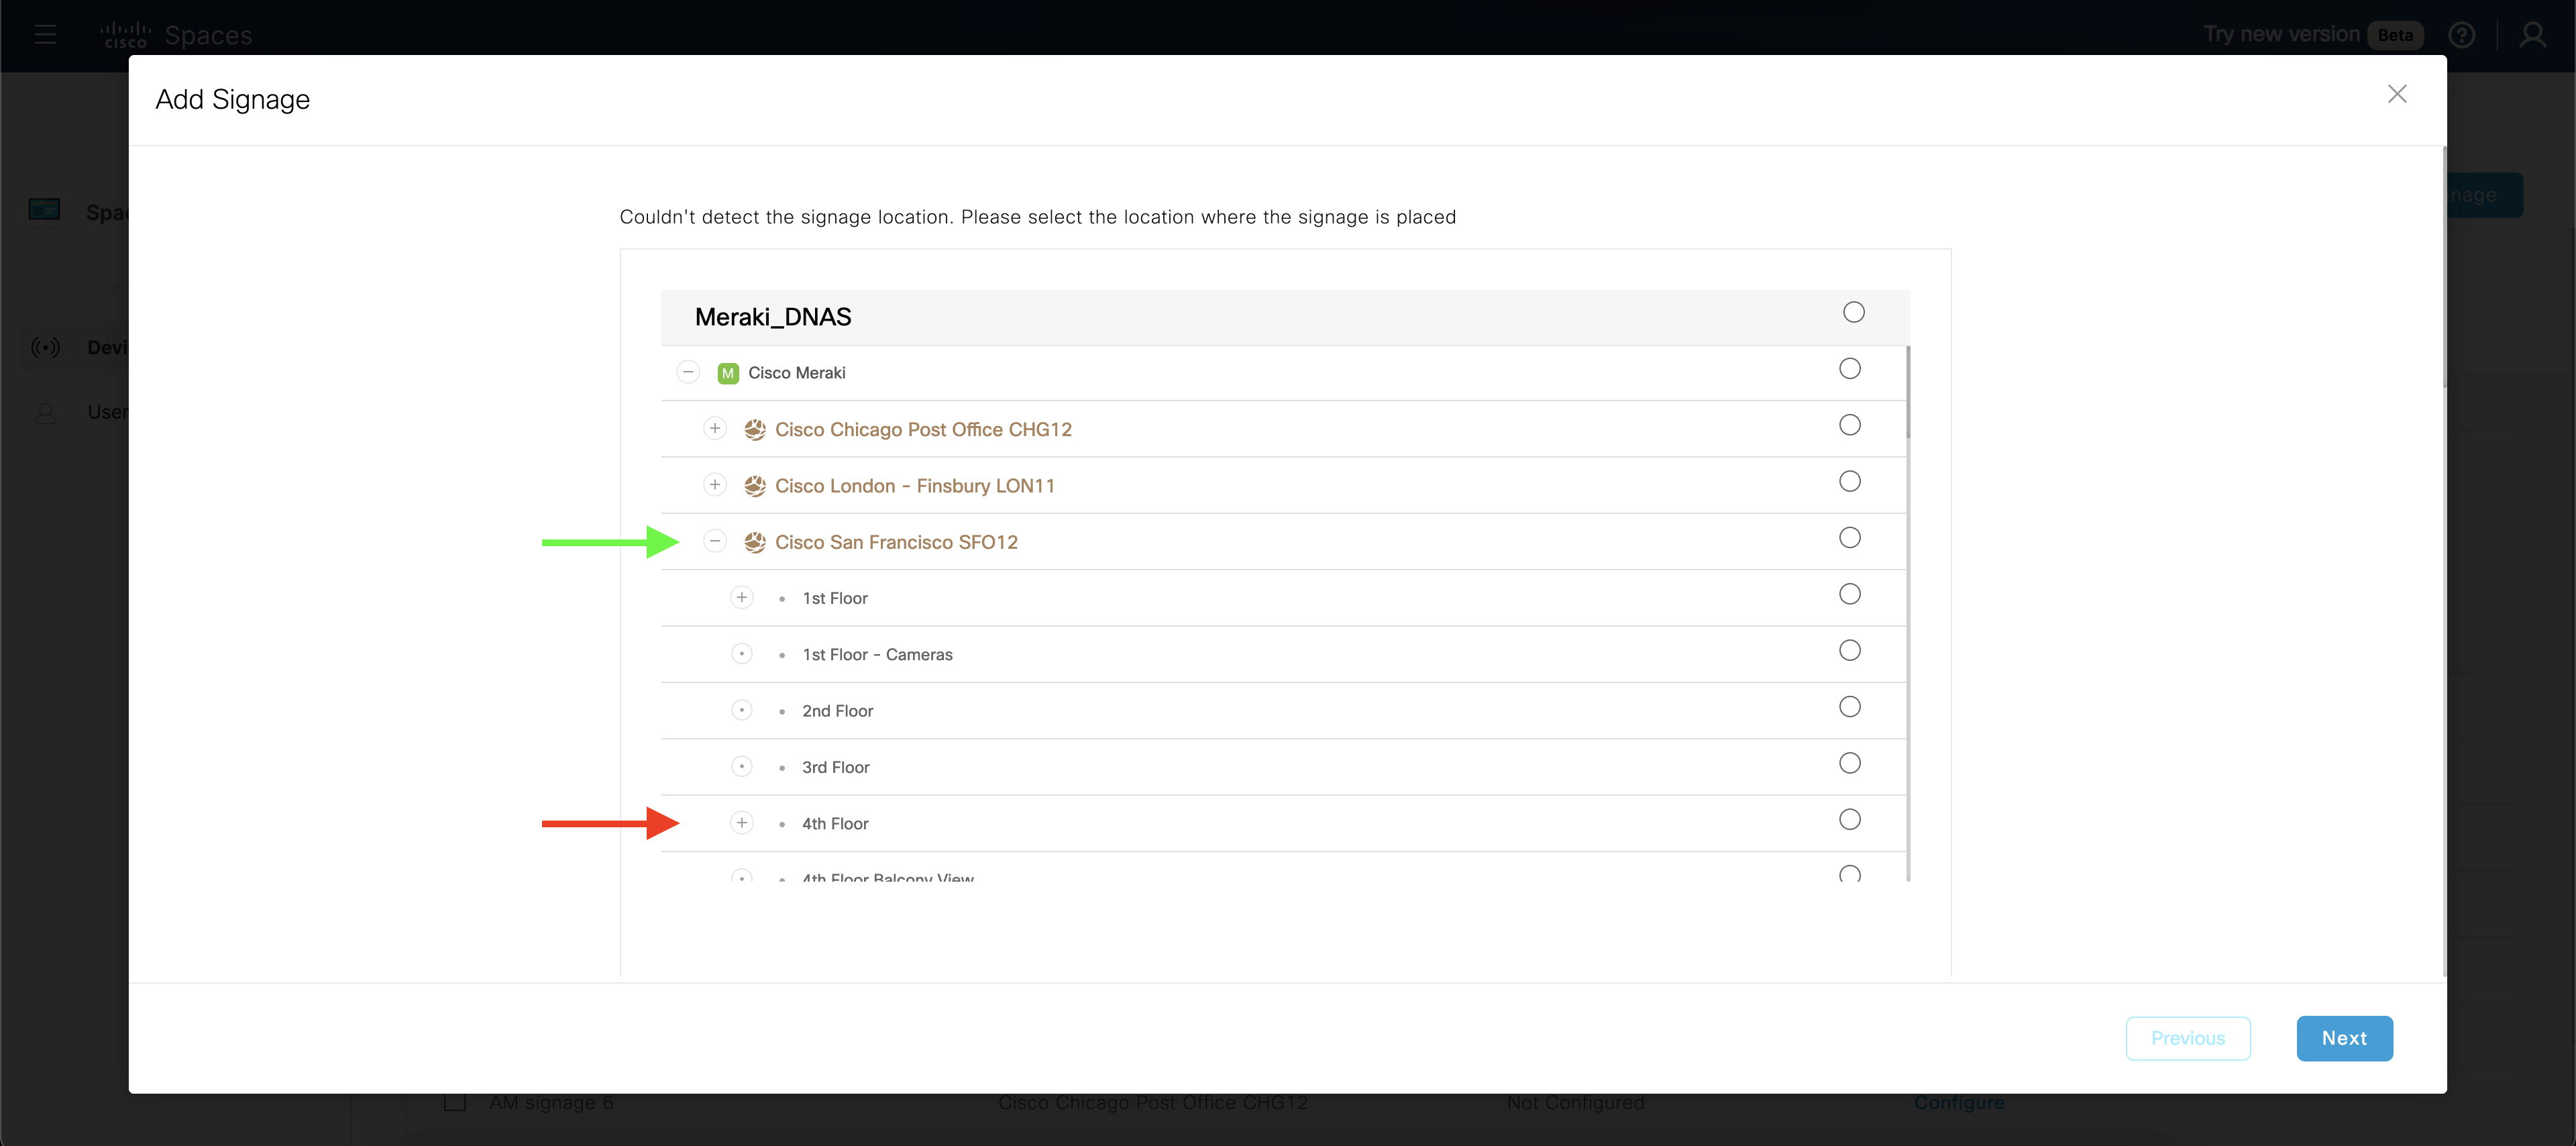
Click Add Signage (blue button in top left)
-
Expand each row of the Location Hierarchy until you find the Location/Building you want to add to the Space Explorer web app
-
Click the radio button on the right side of the Location/Building row - green arrow in the screenshot below (NOT the Floor or any other level - red arrow in the screenshot below)
-
Click Next (blue button in bottom right)
-
Expand “Can't see the activation code?”
-
Copy the URL and paste into an Incognito Browser Window
-
Look for and memorize the 4-digit code that loads on the page
-
Type the 4-digit code under Activation code
-
Type a name under Name your signage
Tip: Give other admins context for what this Kiosk is for so they do not accidentally delete it. For example: Space Explorer Web App Building Token
-
Click Save (blue button in bottom right)
-
On the Space Experience > Devices > Non-Webex Devices list view, click Configure on the signage just created
-
Go through the configuration steps as normal (this won’t be deployed on a Kiosk, it is only to create a token on the backend)
Note: While most settings are not important during the configuration workflow, temporarily the Space Explorer Web App will use this Kiosk’s specific pitch, bearing, zoom, and center point of the floor map as the default view on first load of each Location/Building. It is also good practice to start setting up a Location’s default map view under Setup > Locations & Maps > Digital Maps > “3 dots menu in the locations list” > Set default map view
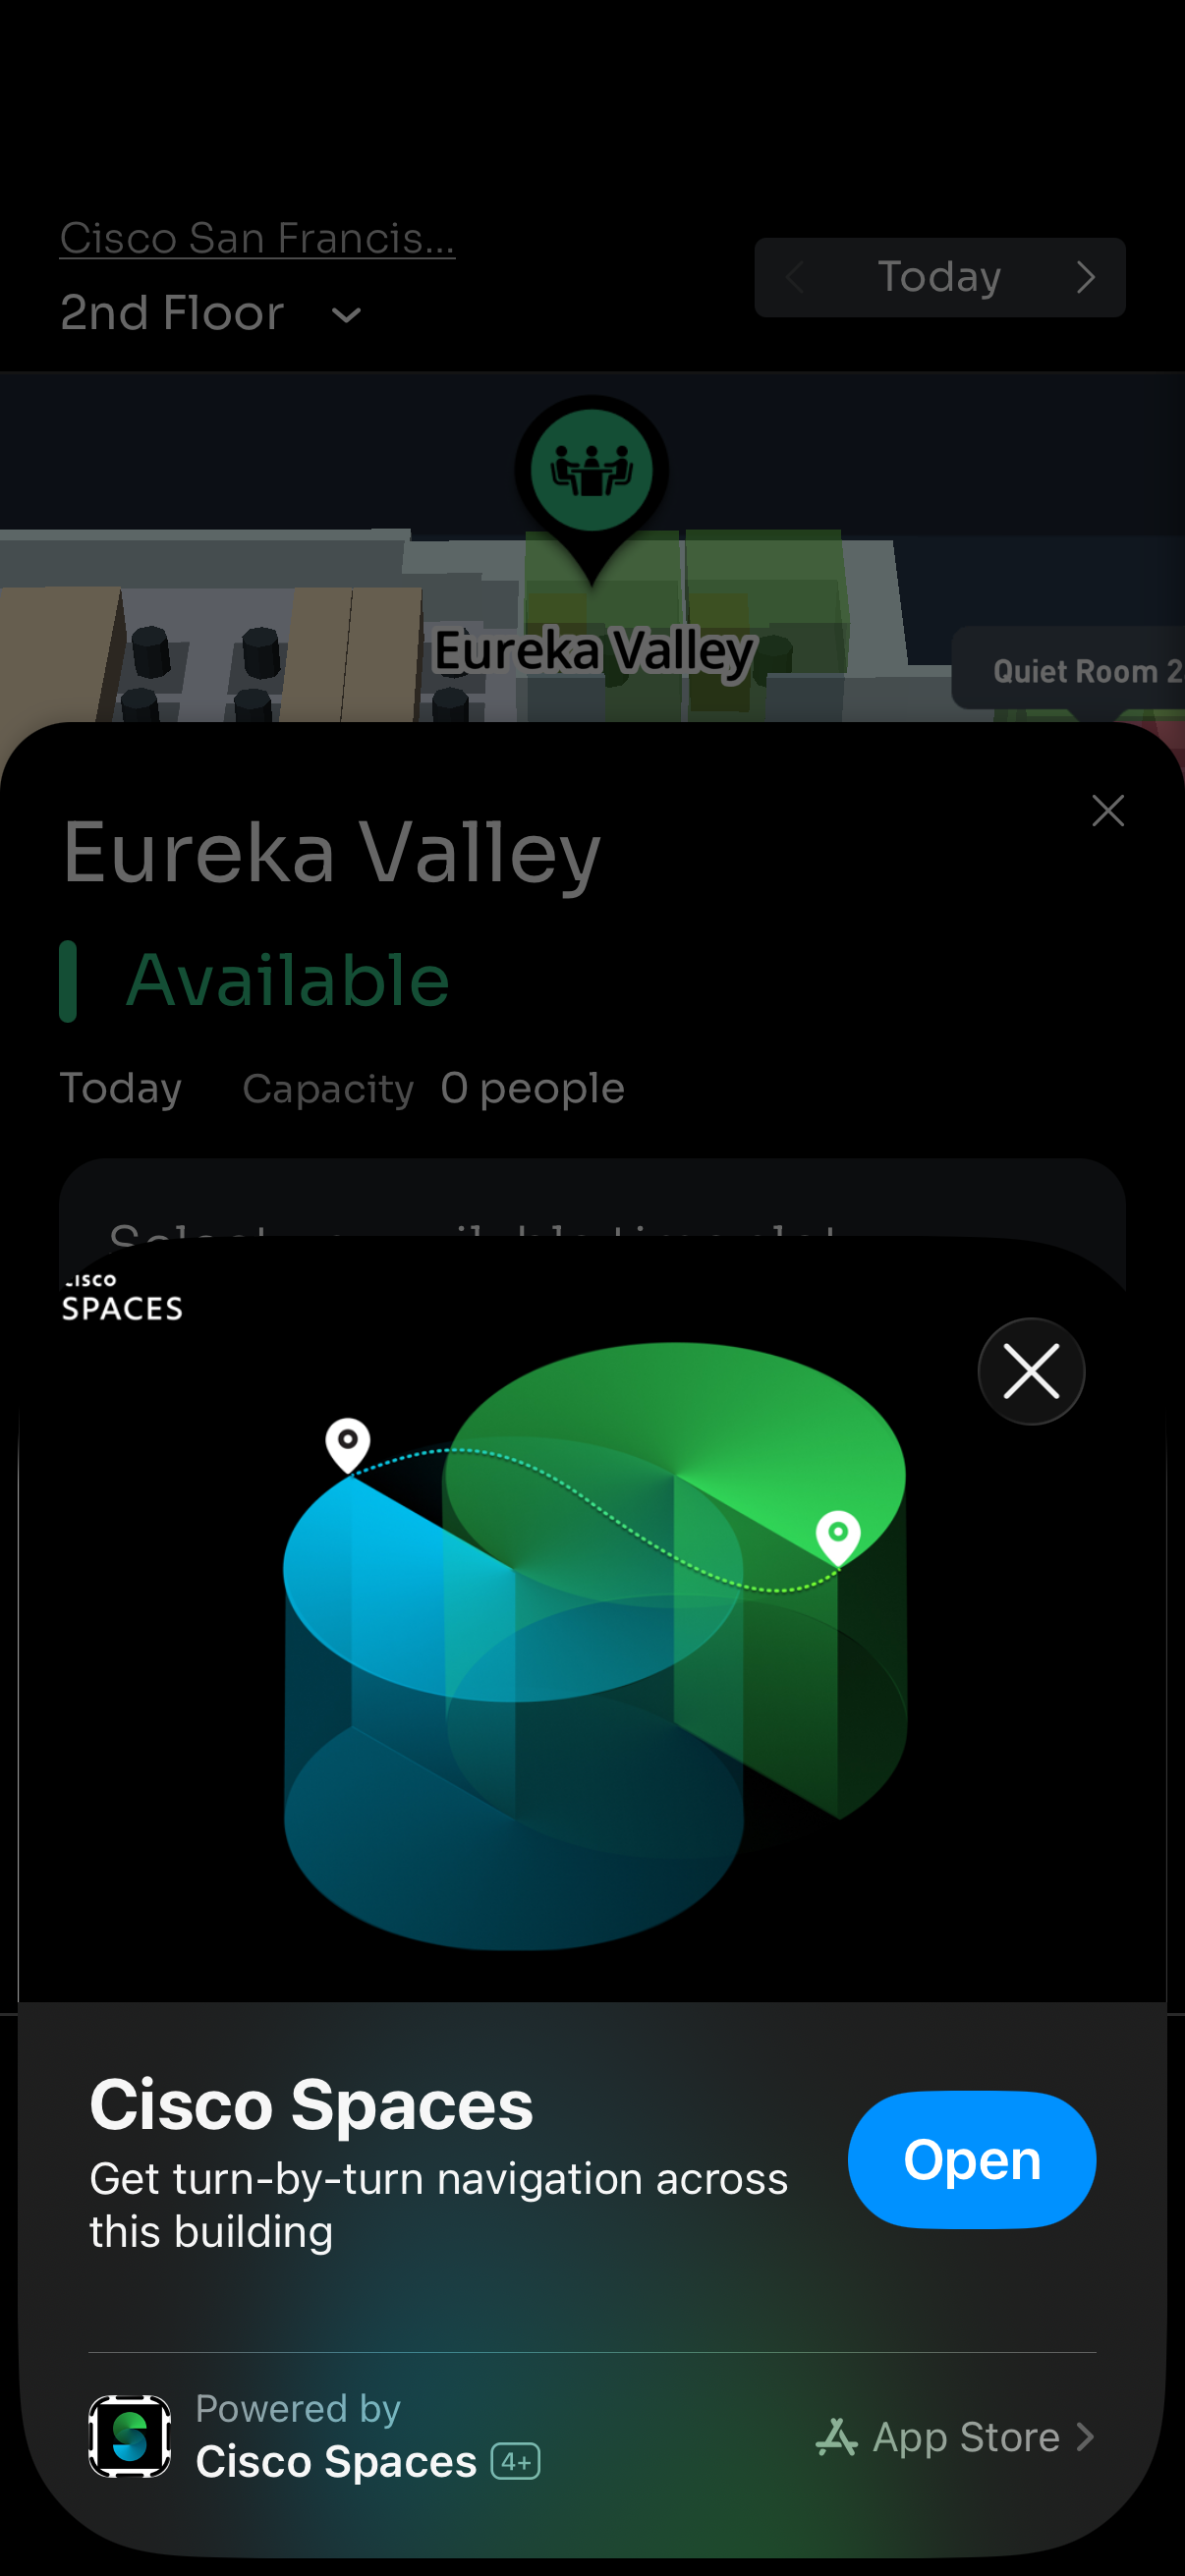
Additionally, enabling the Wayfinding checkbox (or backend feature flag applied by Cisco Spaces product team) for this Kiosk is required to enable Wayfinding cross-launch from the Space Explorer Web App and the Cisco Spaces Wayfinding iOS App Clip and Android Google Play App (or the pathdrawing fallback web app).
Step 2: Widgets and Step 4: “Where am I?” have no impact on Space Explorer Web App features or functionality.
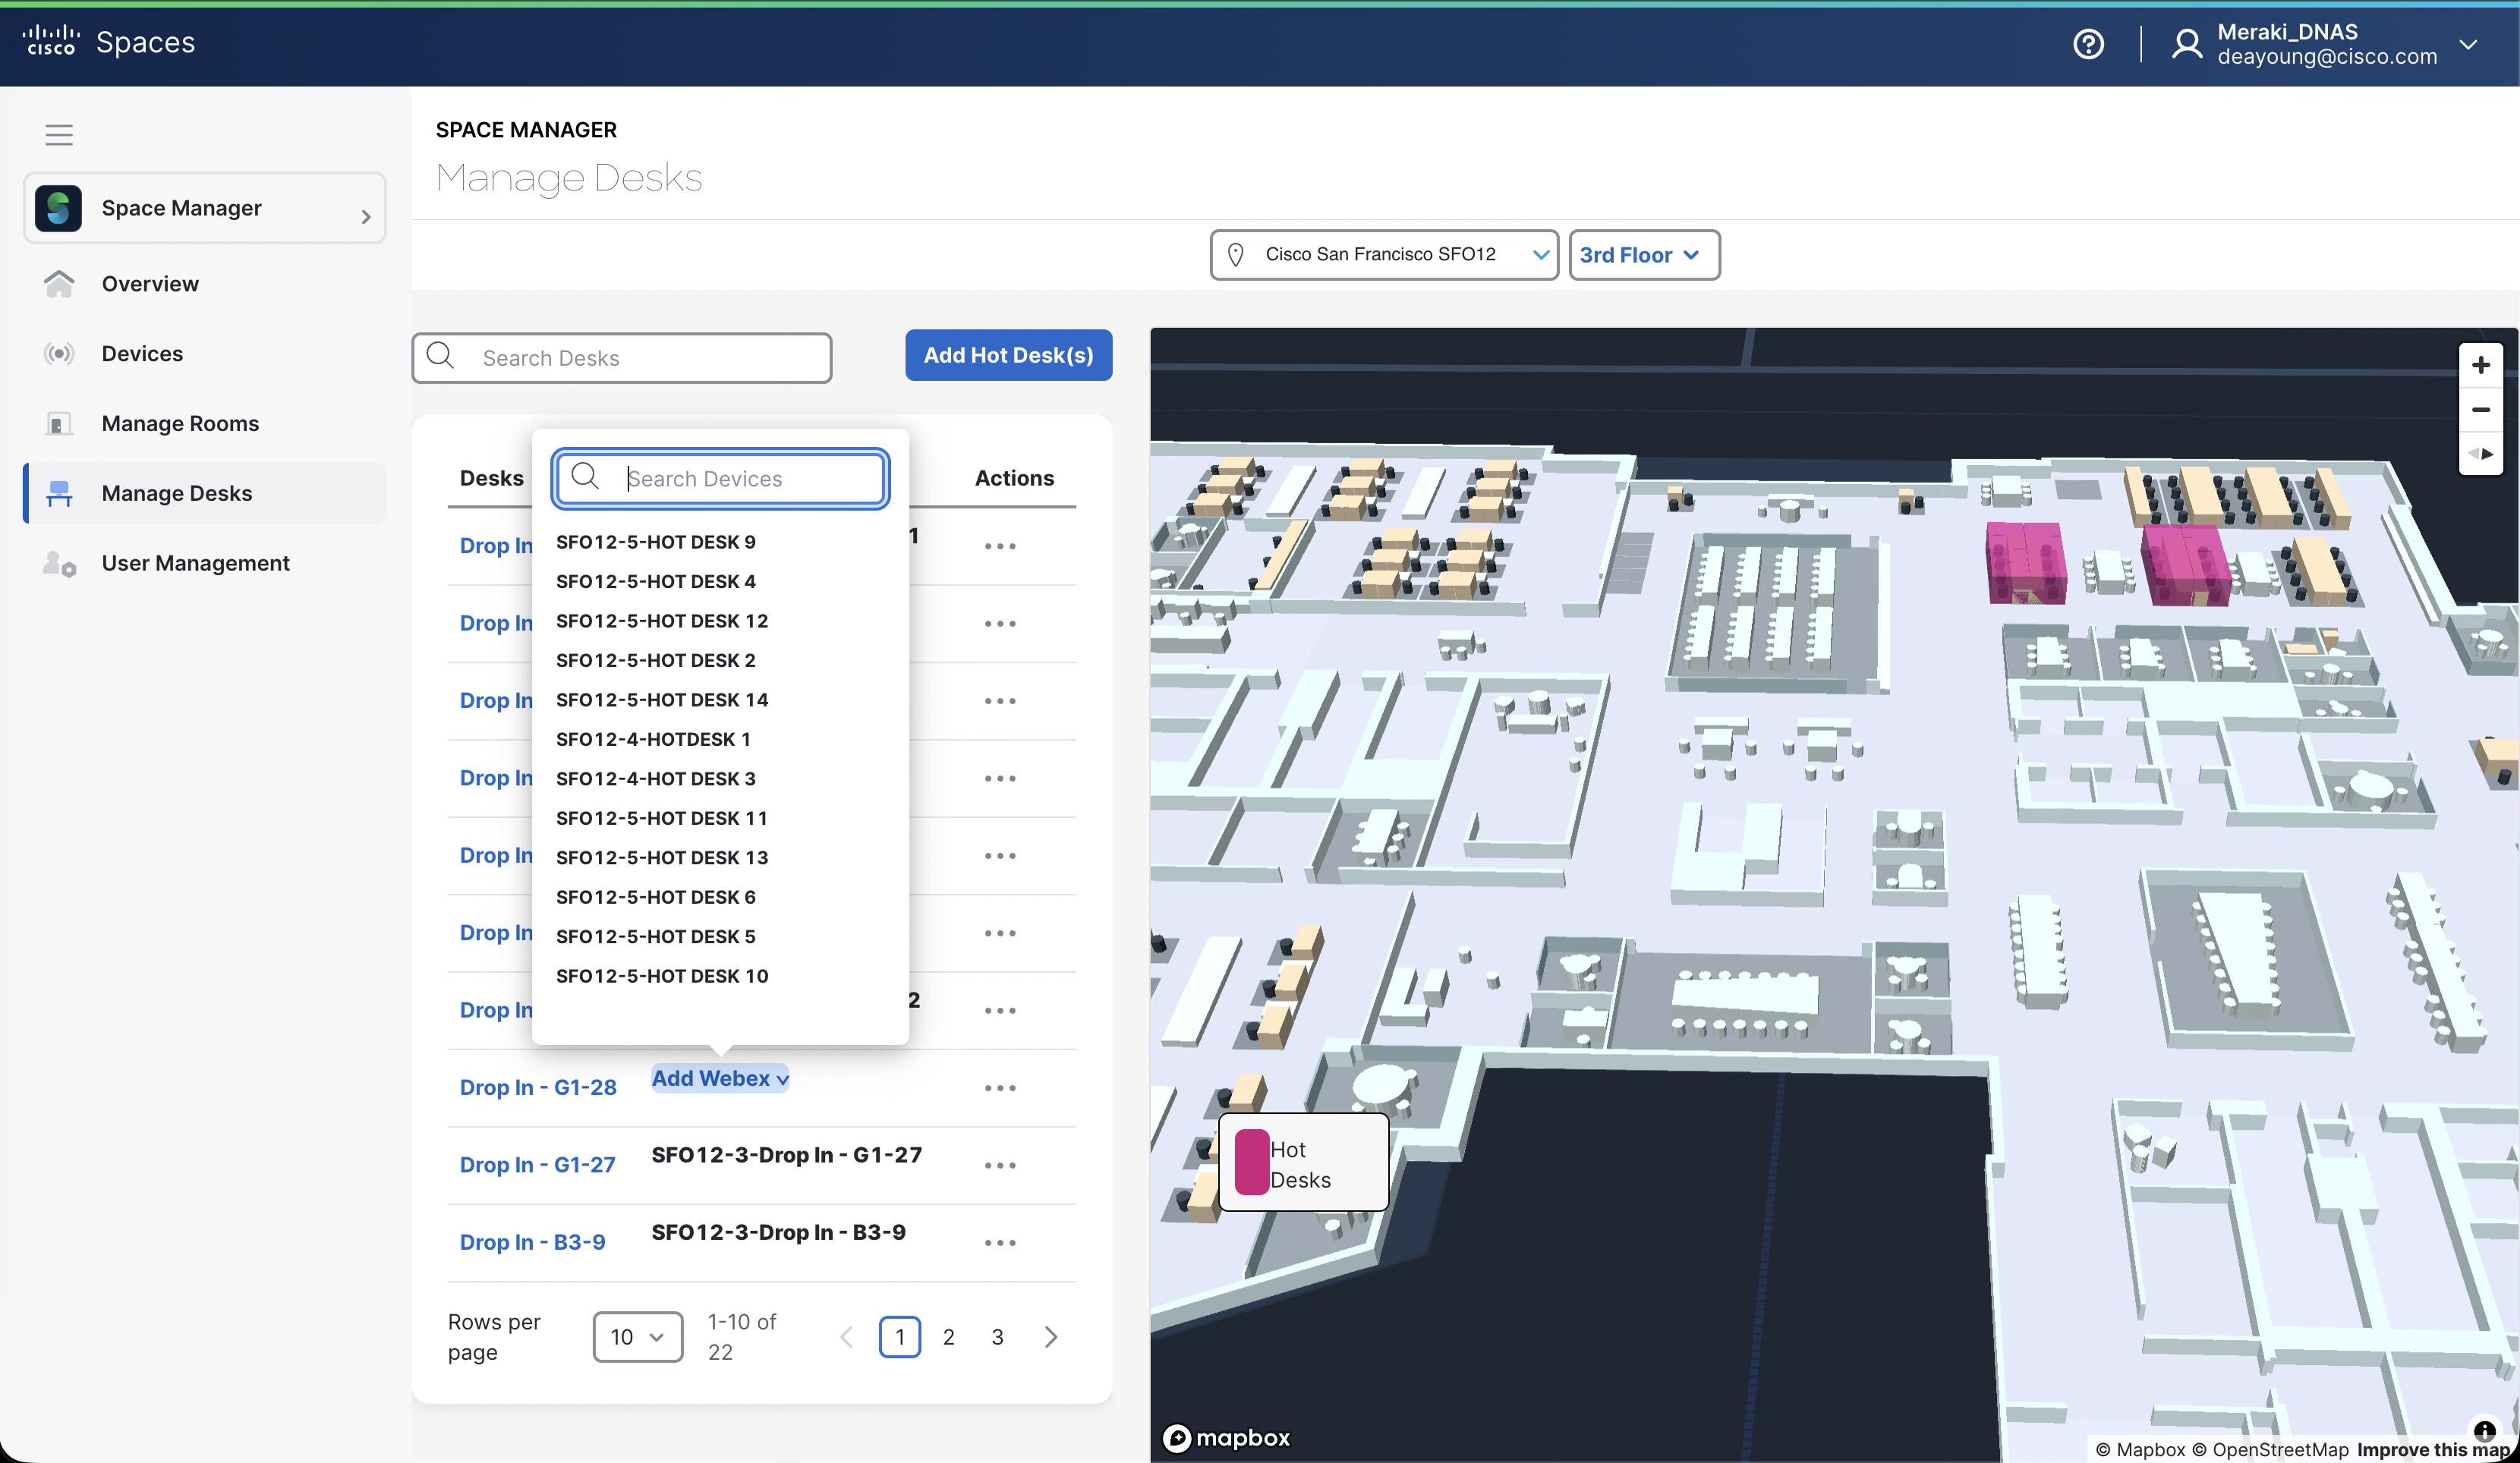
Space Manager Setup
Turning Workstations from Digital Maps into Bookable (“Hot”) Desks
Spaces PM team or Dev team needs to toggle a feature flag in Space Manager to reveal Space Manager > Manage Desks page while in EFT phase.
-
Open the Cisco Spaces dashboard
-
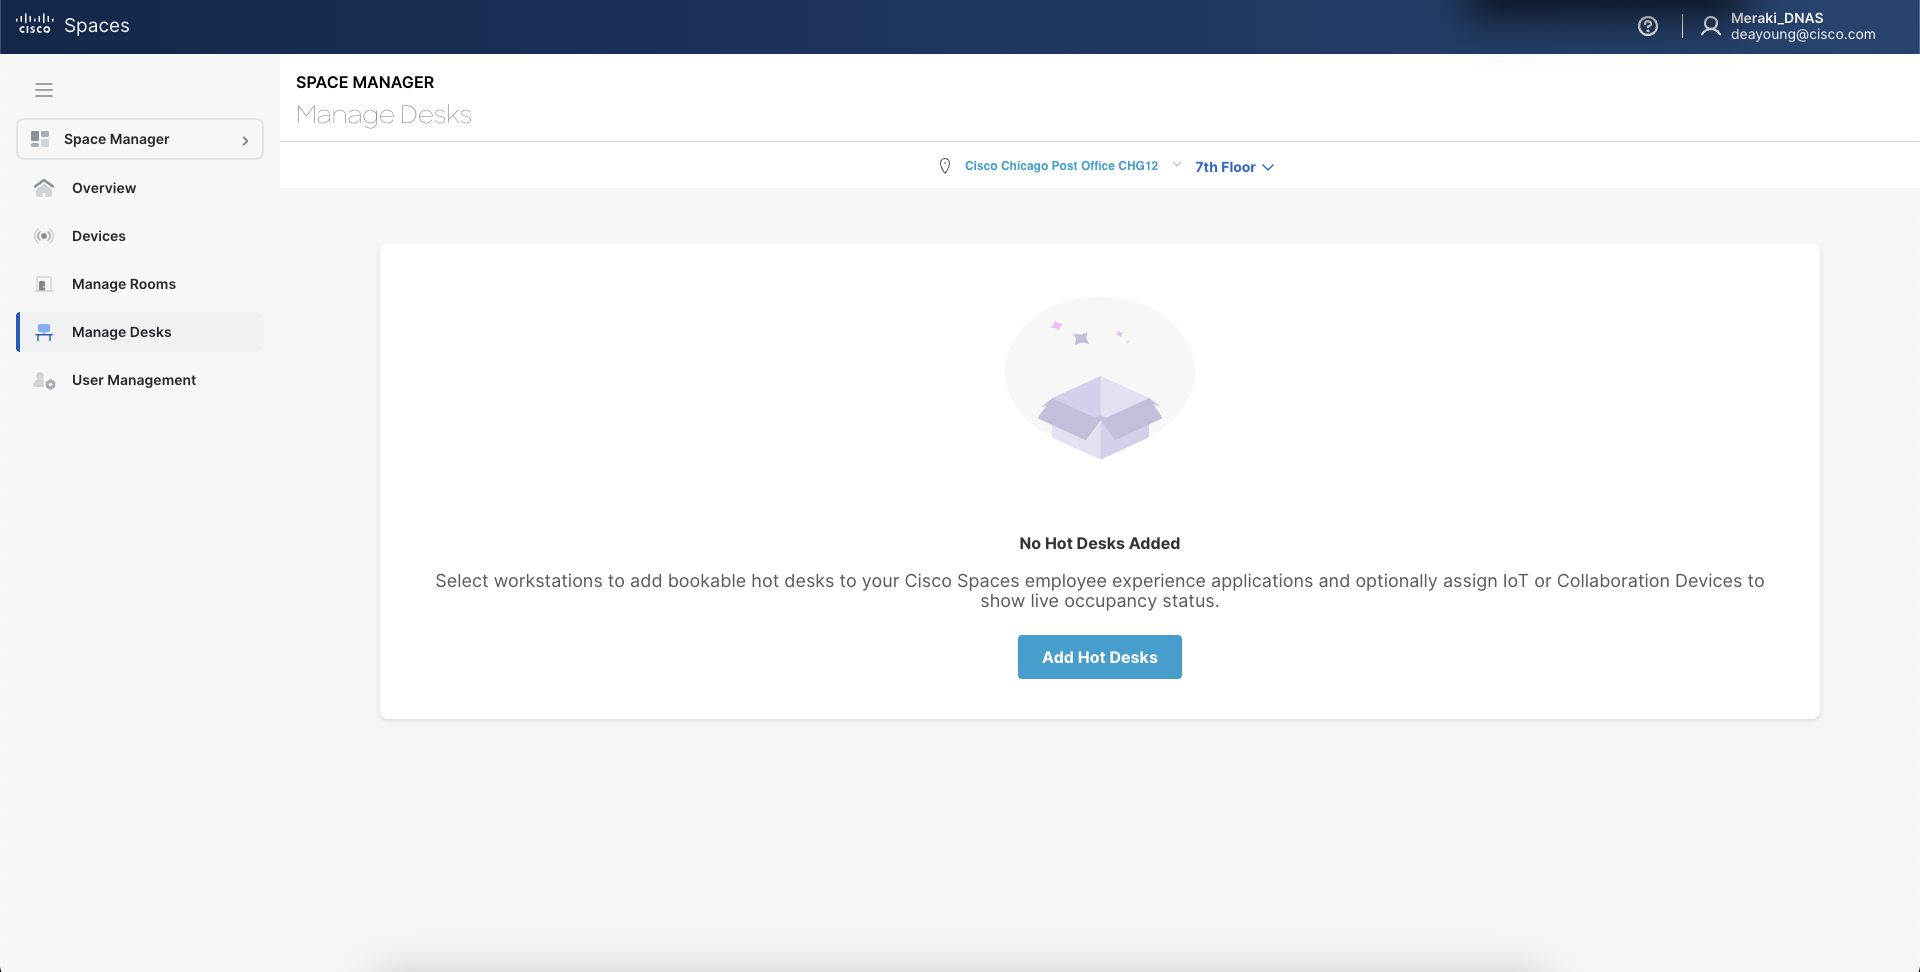
Navigate to Space Manager app
-
Go to the Manage Desks (if you do not see this page, work with a Spaces PM to enable the feature flag)
-
Choose a Location and Floor from the dropdowns at the top-center of the page
-
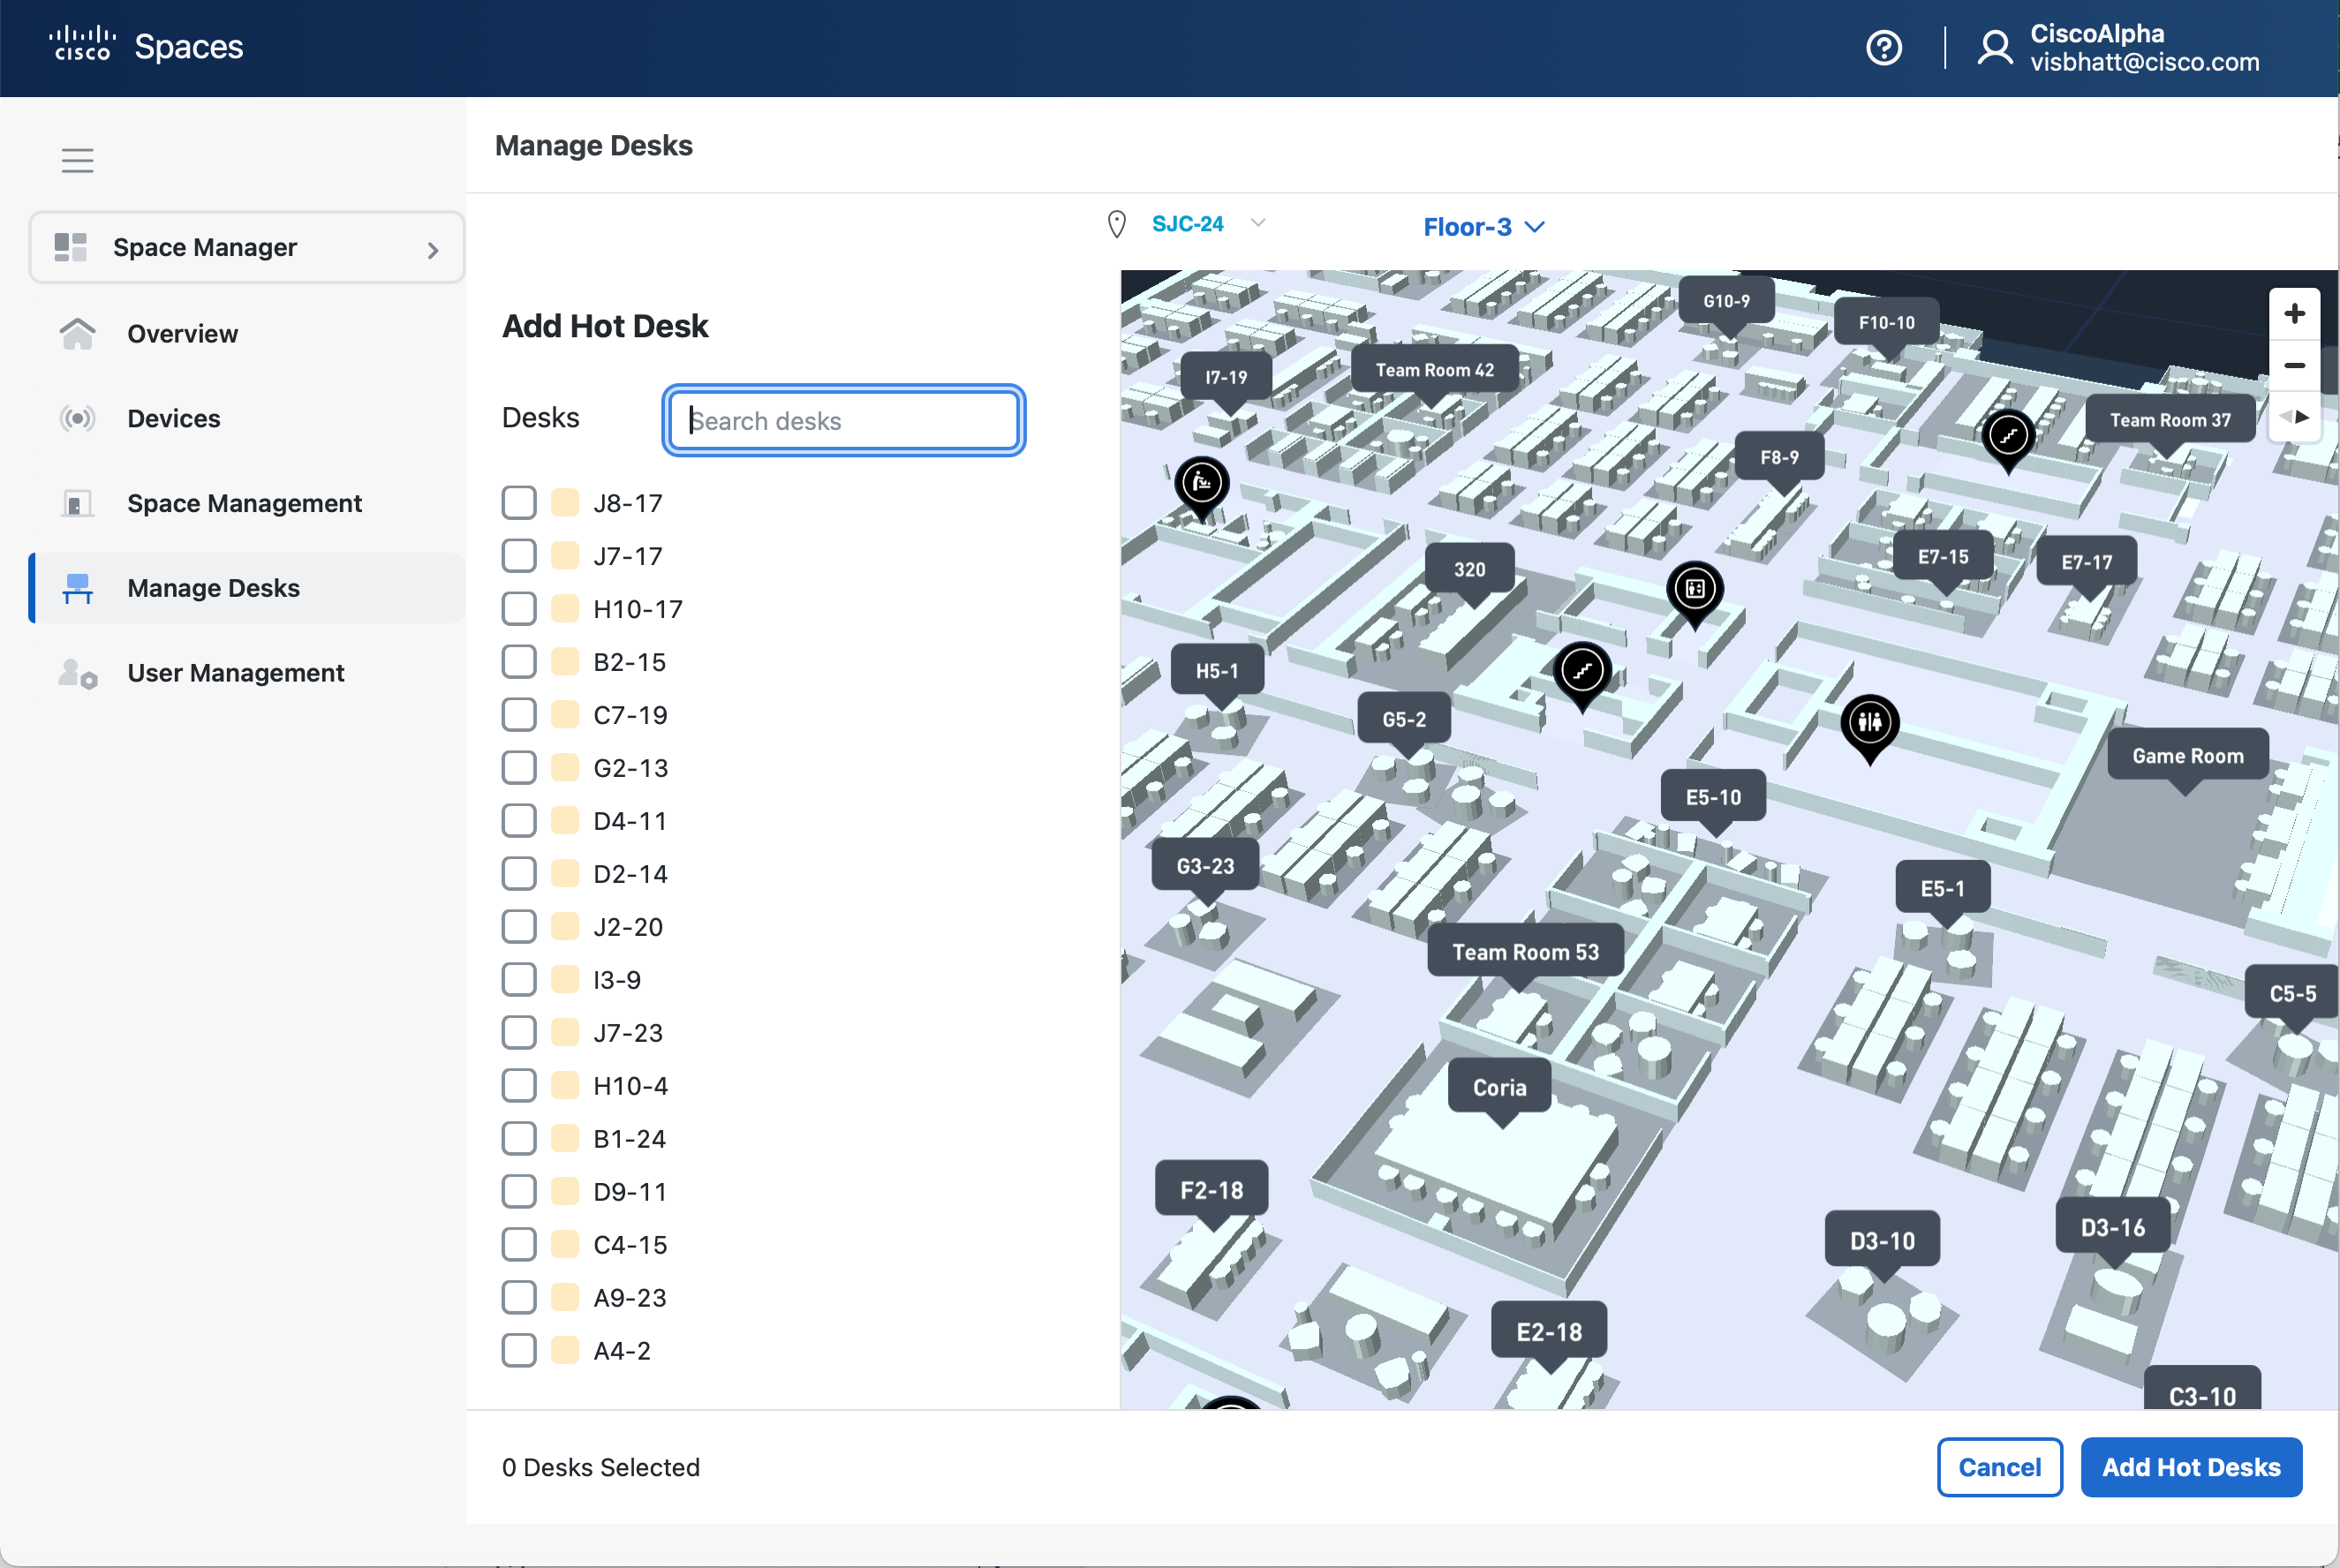
Click on Add Hot Desks and the list of all Desks/Workstations from the Digital Maps Editor will appear along with the Map on the right-hand side.
-
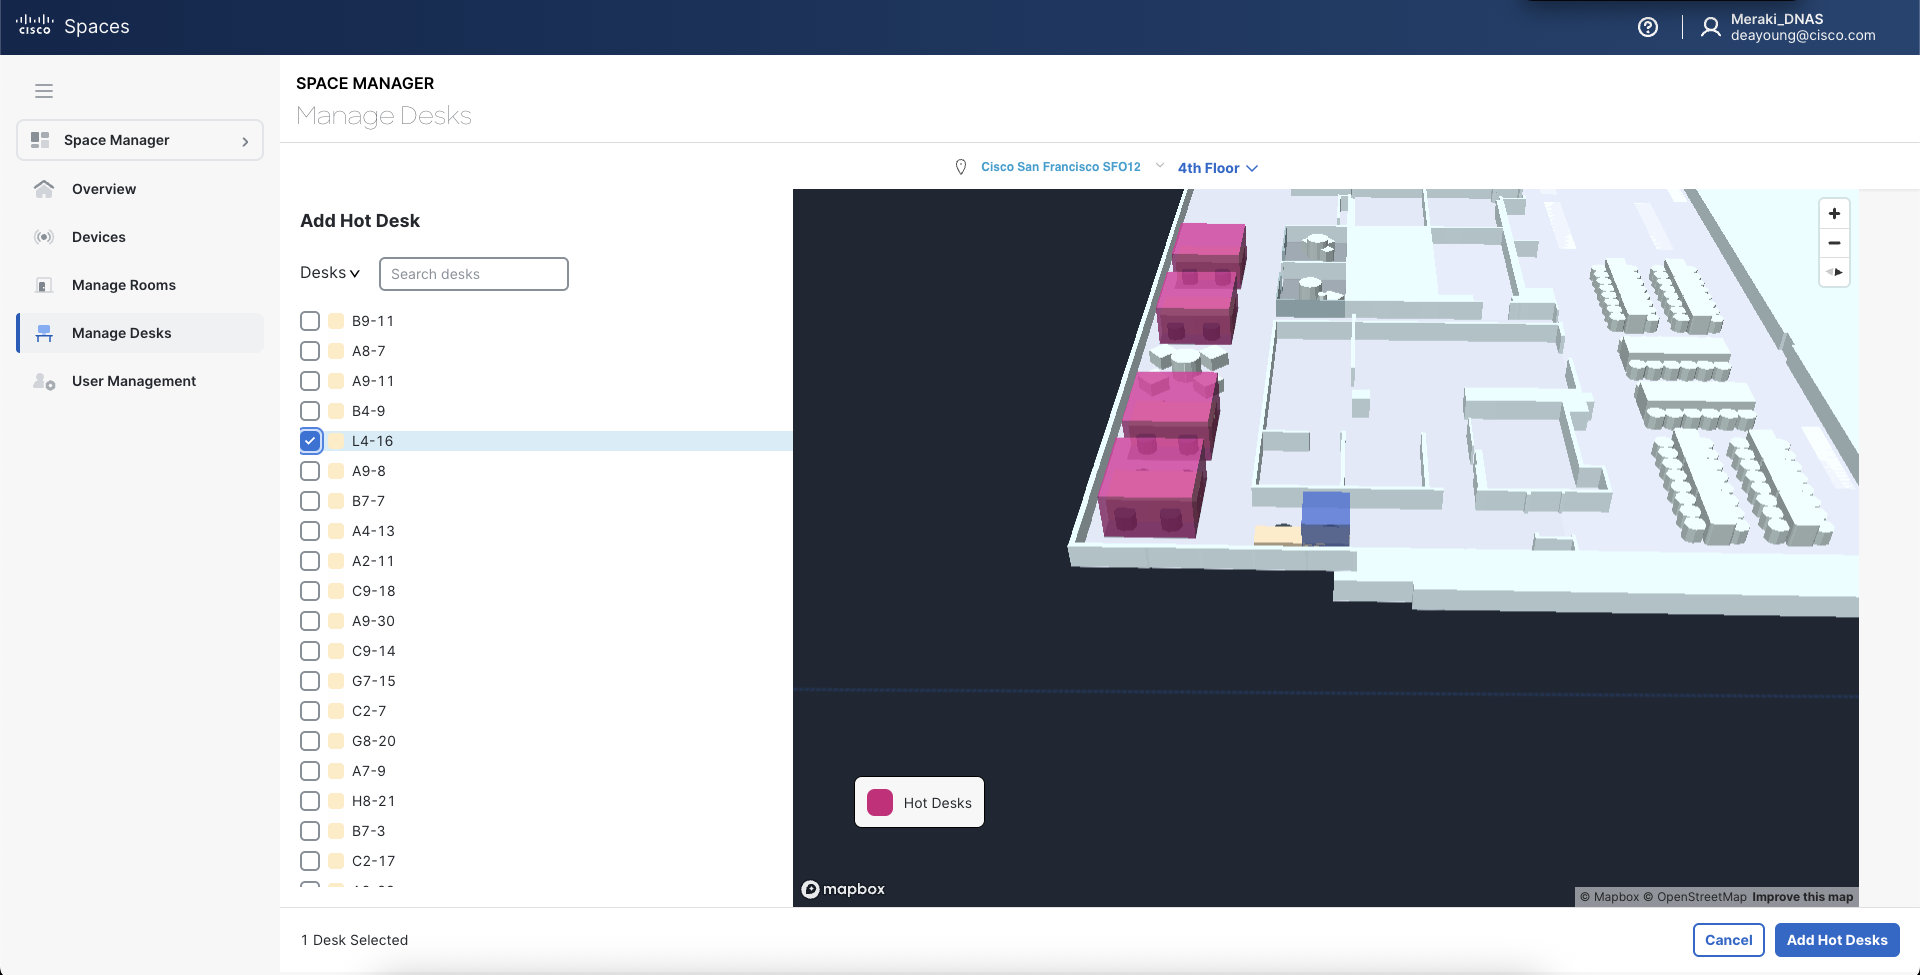
Select the Workstation ID check boxes you want to add as bookable desks, then click on the Add Hot Desks button in the bottom right. The desk space will be highlighted in a light blue box on the map panel.
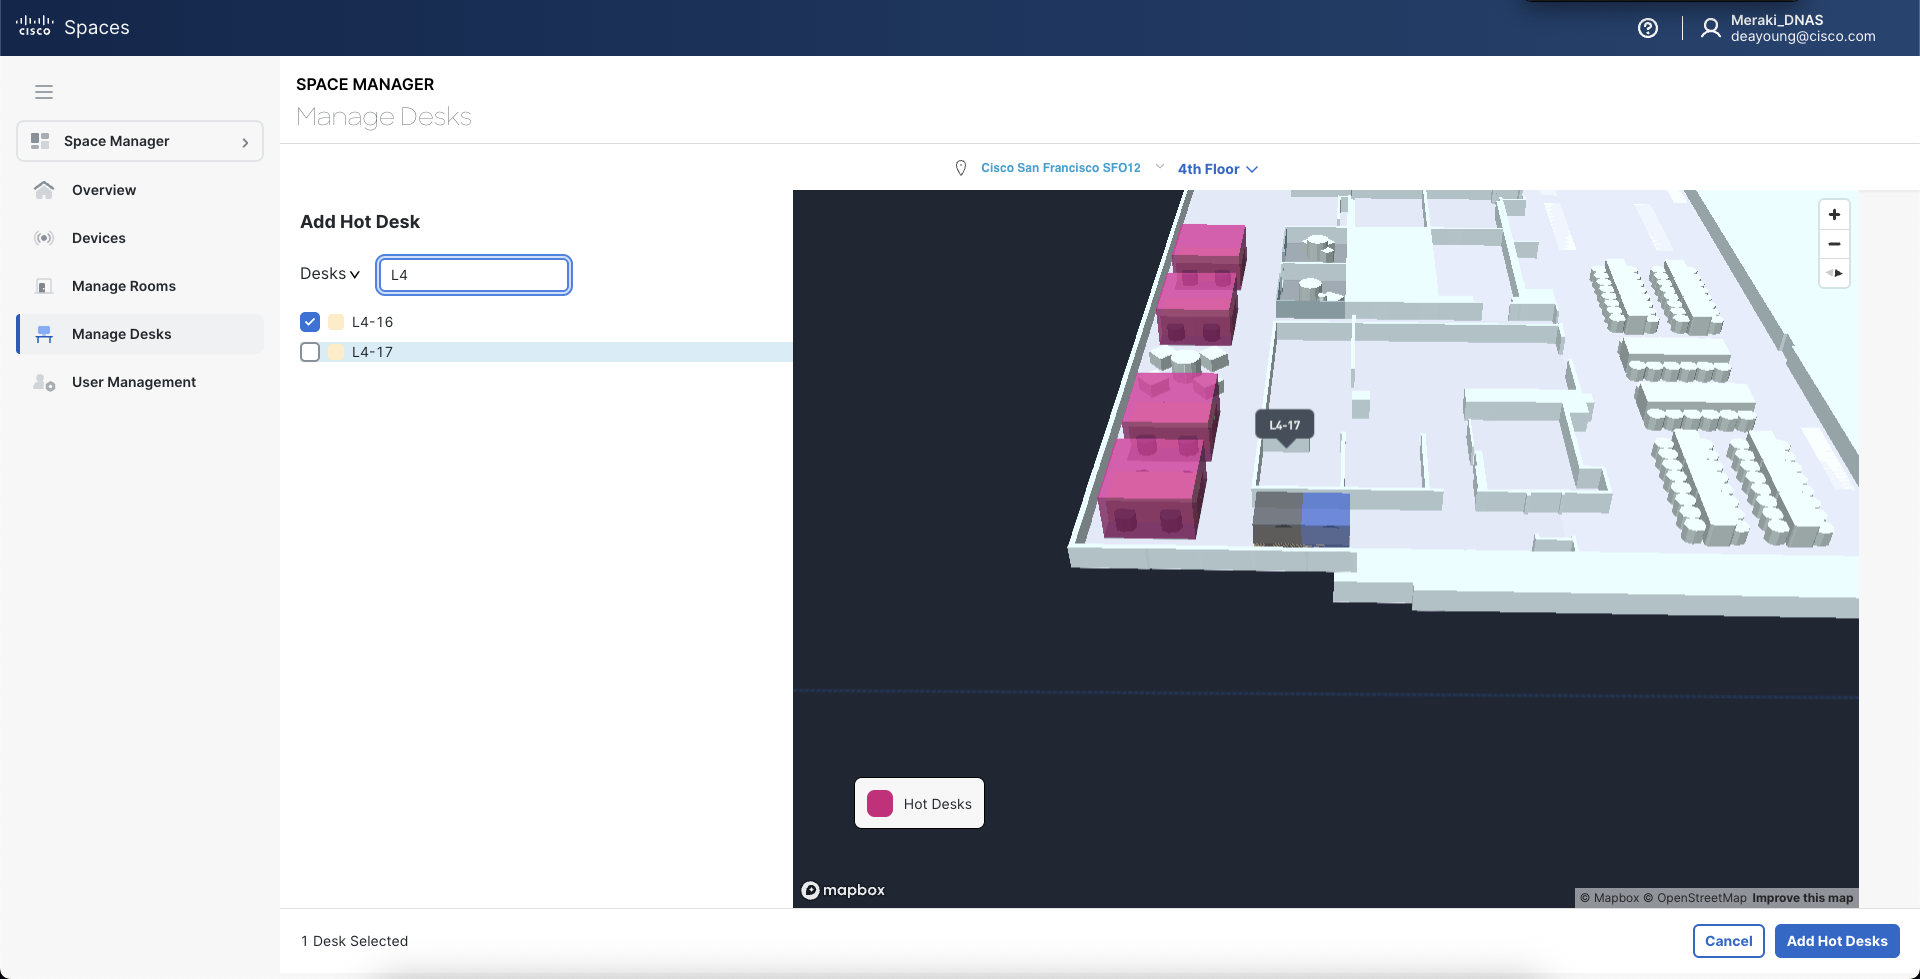
Tip: type text in the “Search desks” field to filter desks in the list or to find neighborhoods of desks by name. Typical office space CAD files use an alphanumeric grid pattern to name Workstations.
-
Once you have added Hot Desks, the List of all selected Hot Desks should appear under the Manage Desks view. In the map panel, Hot Desks are highlighted in a 3D magenta box.
Desk Booking Options
When designing a desk booking experience for our end users, you have options that meet different user experiences, price points, effort levels, and maintenance/lifecycle management requirements. They range from a Cisco Spaces “map only” experience to a fully integrated Collab experience with a Desk Series device on a desk for power, external monitor, camera, and meeting platform experience.
Desk Booking Options Support Matrix
|
Option |
Example |
Hardware Price Range |
Advantages |
Considerations |
|---|---|---|---|---|
|
Cisco Spaces Web App (ciscospaces.app map-only experience) |
|
n/a |
Quick and easy to setup and start desk booking. Option to expand and build on the core desk booking experience later. Supports desk booking up to 14 days in advance. |
It can be confusing to end users which desks are booked and ciscospaces.app may not be discoverable. Effort required to build awareness around desk booking culture/policy. Does not sync with Outlook/Gcal calendar and does not work with Webex App user check-in. |
|
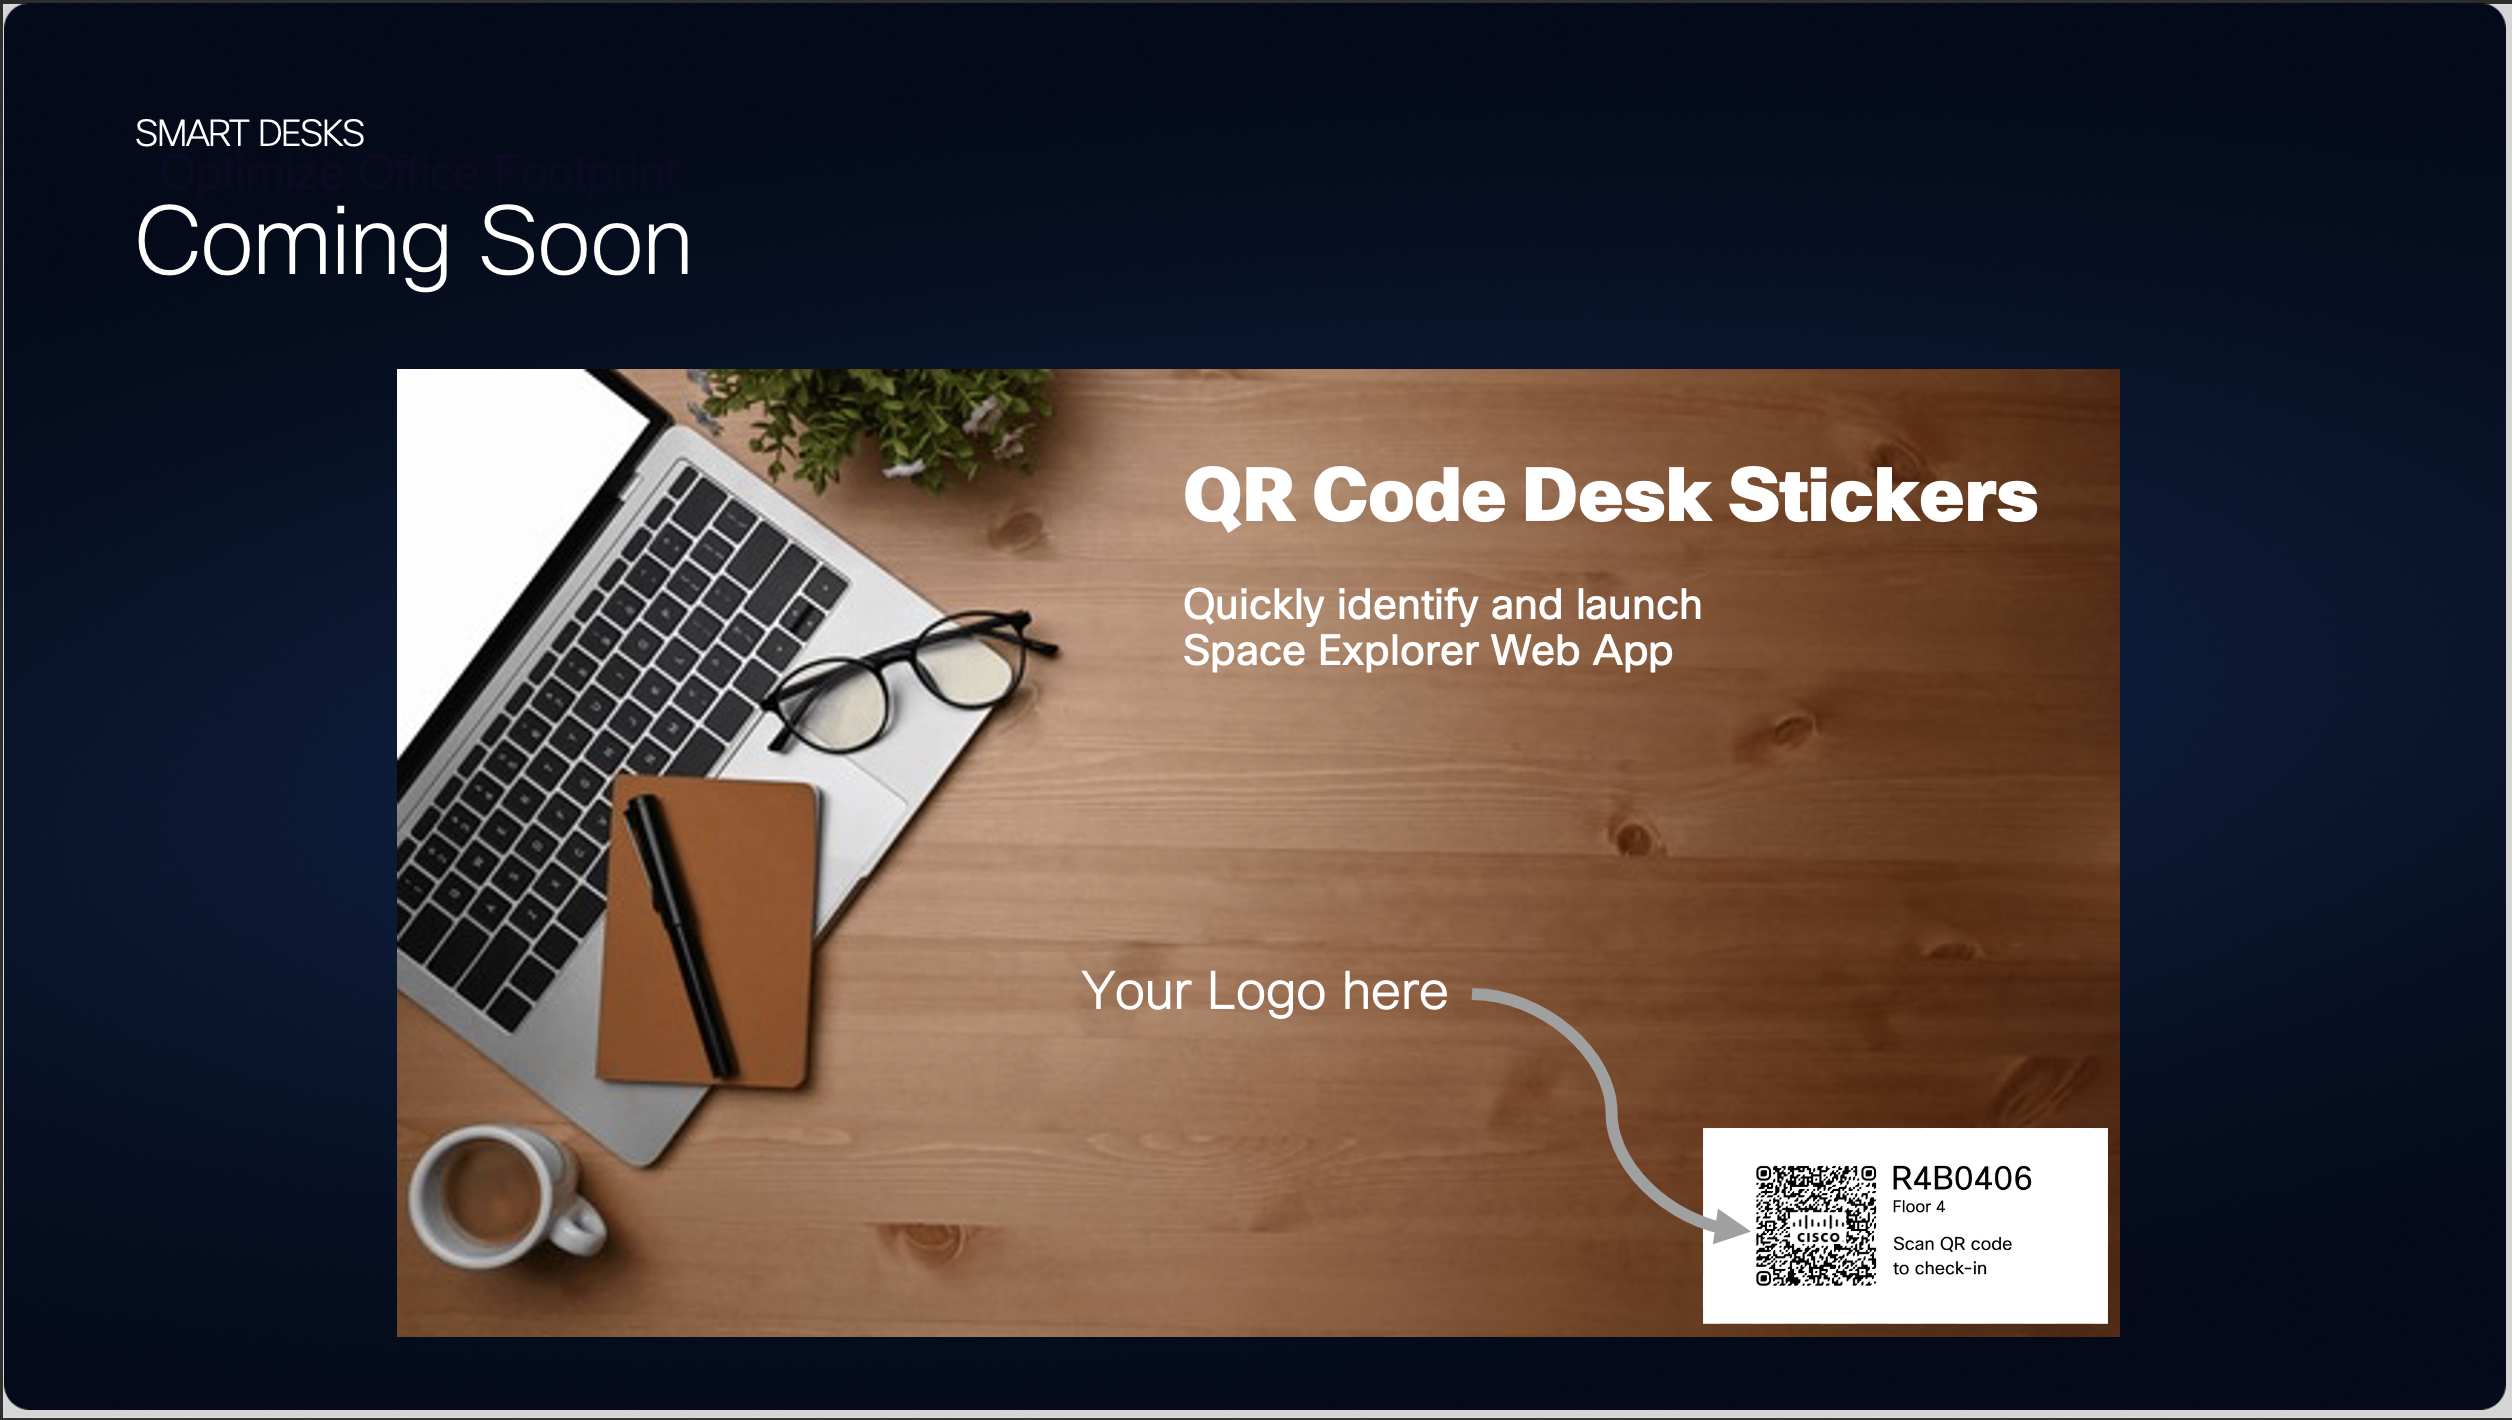
⚠️ ROADMAP ⚠️ Printed QR codes on desks |
|
$ |
Least expensive option to make desk booking discoverable on each desk and to distinguish bookable vs. non-bookable desks. QR code deep-links and launches a booking experience in ciscospaces.app directly to the assigned desk on the Digital Map (including SSO login flow). Supports desk booking up to 14 days in advance. |
No real-time booking status indicator to give passersby an indication of other users intending to use the desk. Establish a consistent and concrete naming convention and stabilize Digital Map content before committing to a large number of printed QR codes. Otherwise, it will incur additional cost to re-print. Consider a flexible attachment mechanism to allow updating vs. permanently affixing the QR code to the desk. Does not sync with Outlook/Gcal calendar and does not work with Webex App user check-in. |
|
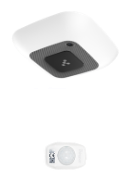
⚠️ ROADMAP ⚠️ 3rd Party IoT Sensor (e.g. Haltian Thingse Presence PIR)
|
|
$$ |
Provides real-time and historical “true occupancy” status for desk occupancy visibility on Kiosk or Web App and for analytics. |
Without an accompanies desk booking, there are no “signs of life” indicators from these sensors. Prone to false positives and negatives as occupants walk by or get up and walk away from the desk to attend meetings, go to lunch, etc. but plan to return. Does not sync with Outlook/Gcal calendar and does not work with Webex App user check-in. |
|
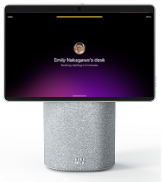
Cisco Desk 9800 Series & 8875 (does not include 9811 or 9821) |

|
$$ |
Provides real-time visual feedback via built-in LED bar (depends on model) or LCD screen content. Maintains checked-in (occupied) status even without physical presence to ensure others are aware of the booking and/or checked-in status, including user’s name and optionally profile photo (if configured in Webex User Profile). Supports Webex App user check-in. |
Does not provide “true occupancy” for real-time visibility of physical presence or historical analysis. A phone can be used for “hot desk” only, but the presence of a handset phone may be confusing in some environments. Limited to “day of” / current day desk booking only. Currently, cannot be booked days in advance. Does not sync with Outlook/Gcal calendar. |
|
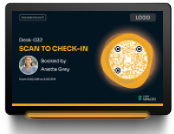
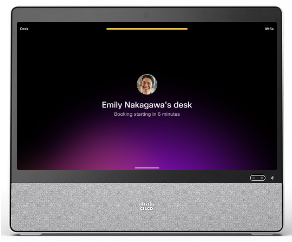
Smart Desk Navigator (Cisco Spaces desk PWA) |
|
$$$ |
Provides real-time visual feedback via on-screen content. Maintains checked-in (occupied) status even without physical presence to ensure others are aware of the booking and/or checked-in status, including user’s name and optionally profile photo (if configured in Microsoft, Google, or Webex User Profile). Supports desk booking up to 14 days in advance. |
Does not sync with Outlook/Gcal calendar and does not work with Webex App user check-in. |
|
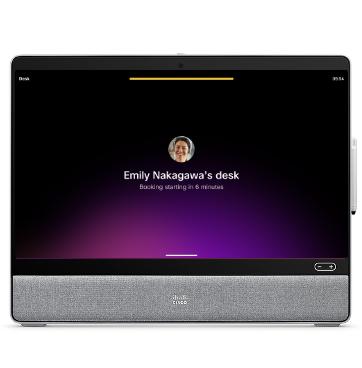
⚠️ ROADMAP ⚠️ (RoomOS) |

|
$$$ |
Provides real-time visual feedback via on-screen content. Maintains checked-in (occupied) status even without physical presence to ensure others are aware of the booking and/or checked-in status, including user’s name and optionally profile photo (if configured in Webex User Profile). Provides Outlook/Gcal calendar syncing via Webex Hybrid Calendar. Supports Webex App user check-in. |
Limited to “day of” / current day desk booking only. Currently, cannot be booked days in advance due to on-device calendar sync limits (current day + 8 hours). |
|
$$$ |
Provides real-time visual feedback via on-screen content. Maintains checked-in (occupied) status even without physical presence to ensure others are aware of the booking and/or checked-in status, including user’s name and optionally profile photo (if configured in Webex User Profile). Includes camera for meetings. Provides Outlook/Gcal calendar syncing via Webex Hybrid Calendar. Supports Webex App user check-in. |
Limited to “day of” / current day desk booking only. Currently, cannot be booked days in advance due to on-device calendar sync limits (current day + 8 hours). |
|
|
$$$$ |
Provides real-time visual feedback via on-screen content. Maintains checked-in (occupied) status even without physical presence to ensure others are aware of the booking and/or checked-in status, including user’s name and optionally profile photo (if configured in Webex User Profile). Provides laptop charging power and external monitor via USB-C. Includes camera for meetings. Provides Outlook/Gcal calendar syncing via Webex Hybrid Calendar. Supports automatic check-in via USB-C with Webex App running on the connected laptop. Supports Webex App user check-in. |
Limited to “day of” / current day desk booking only. Currently, cannot be booked days in advance due to on-device calendar sync limits (current day + 8 hours). |
Assigning Webex Workspaces to Bookable (“Hot”) Desks
Adding a Webex Workspace to a bookable desk will associate the device to the Web App (ciscospaces.app) frontend so the logged in user adds their Webex User Profile to the device configured under Scheduling > Hot Desking mode in Control Hub Workspaces settings. The user’s email gets added as the “Organizer” when booking the desk (regardless of SSO method into ciscospaces.app - Webex, Microsoft, or Google Login) and the device displays the Webex User Profile name and photo.
-
In Space Manager > Manage Desks page, choose the Building and Floor from the dropdowns at the top center of the page.
-
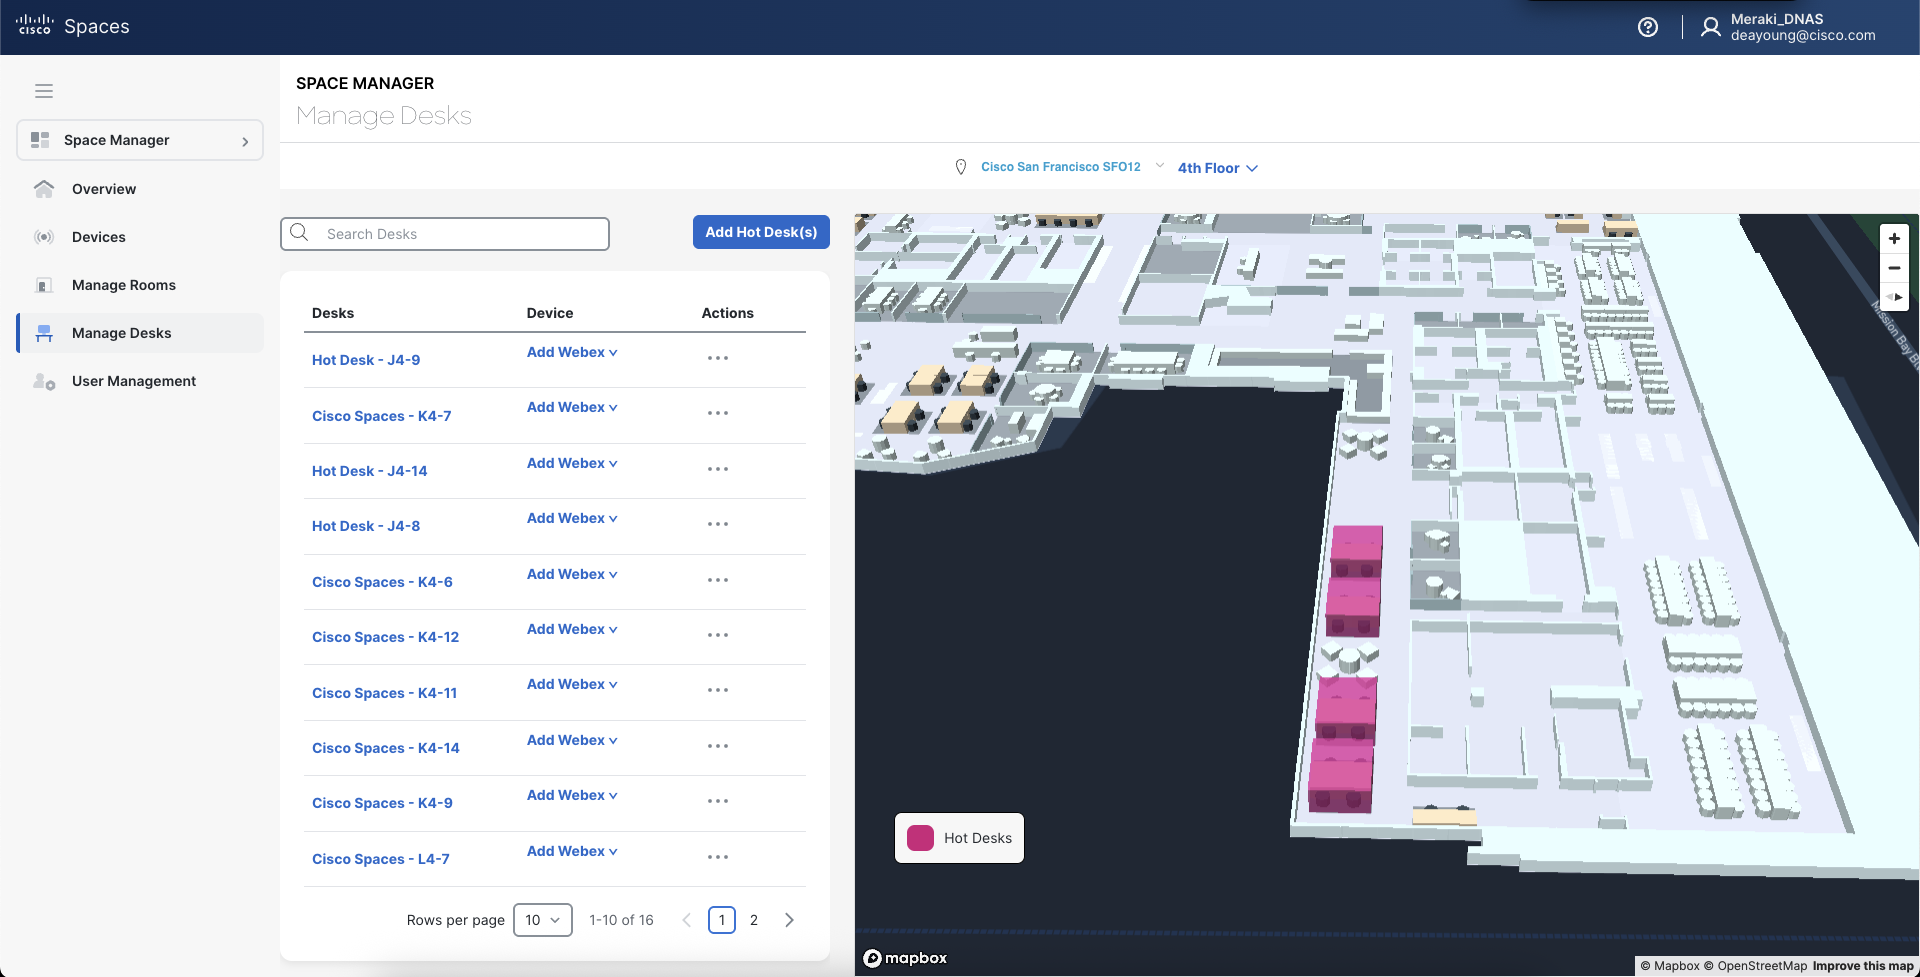
Before setting up the first bookable desk, the page will prompt to add a “hot desk”. After setting up, there is a list view of desks and a map view for context.
-
Under the Device column, there is an Add Webex v dropdown that will display Webex Workspaces that have been configured in Control Hub as the Desk space type. Only Desk spaces types are listed in the dropdown.
-
Choose the Webex Workspace to associate the device with the bookable Workstation (i.e. desk) in ciscospaces.app
-
The backend calendar will switch from Cisco Spaces backend proprietary calendar service to the on-device calendar or Webex Hybrid Calendar (events synced on-device and available via xAPI webhooks to Cisco Spaces backend).
Special Case: if upgrading the RoomOS Standalone Navigator to the Cisco Spaces Smart Desk Navigator desk PWA, a Webex Control Hub admin must follow these instructions to factory reset and onboard the Navigator as a Persistent Web App device.
-
Onboard a Cisco Standalone Navigator. Learn more: https://help.webex.com/en-us/article/iq6aw6/Room-Navigator-as-a-standalone-device
-
Under Step C of Persistent web app mode:
Turn on Enable persistent web app and enter a URL.→ Instead of entering a URL, choose the Cisco Spaces radio button option.-
This automated step is a ⚠️ ROADMAP ⚠️ feature. For now, choose URL and work with the Cisco Spaces PM team to generate the URL for each Navigator for this step.
-
Assigning 3rd Party IoT Sensors to Bookable (“Hot”) Desks
⚠️ ROADMAP ⚠️ feature. Not supported at this time.
Making Meeting Rooms from Digital Maps Bookable
⚠️ ROADMAP ⚠️ feature. Not supported at this time.
Pre-requisite: Verify that the Meeting Room has a Webex Workspace with compatible Cisco collaboration device connected (optional: Hybrid Calendar setup in Control Hub), which can be setup with a Microsoft Calendar (or Google Calendar) resource integrated.
Note: O365 & Gcal direct integration calendar rooms, calendar-only rooms, and Cisco Standalone Navigators are not currently supported for Meeting Room booking and real-time status. They may work intermittently and show the room as booked during the meeting event’s time window, but may not be visible on the map between events if no occupancy telemetry is available.
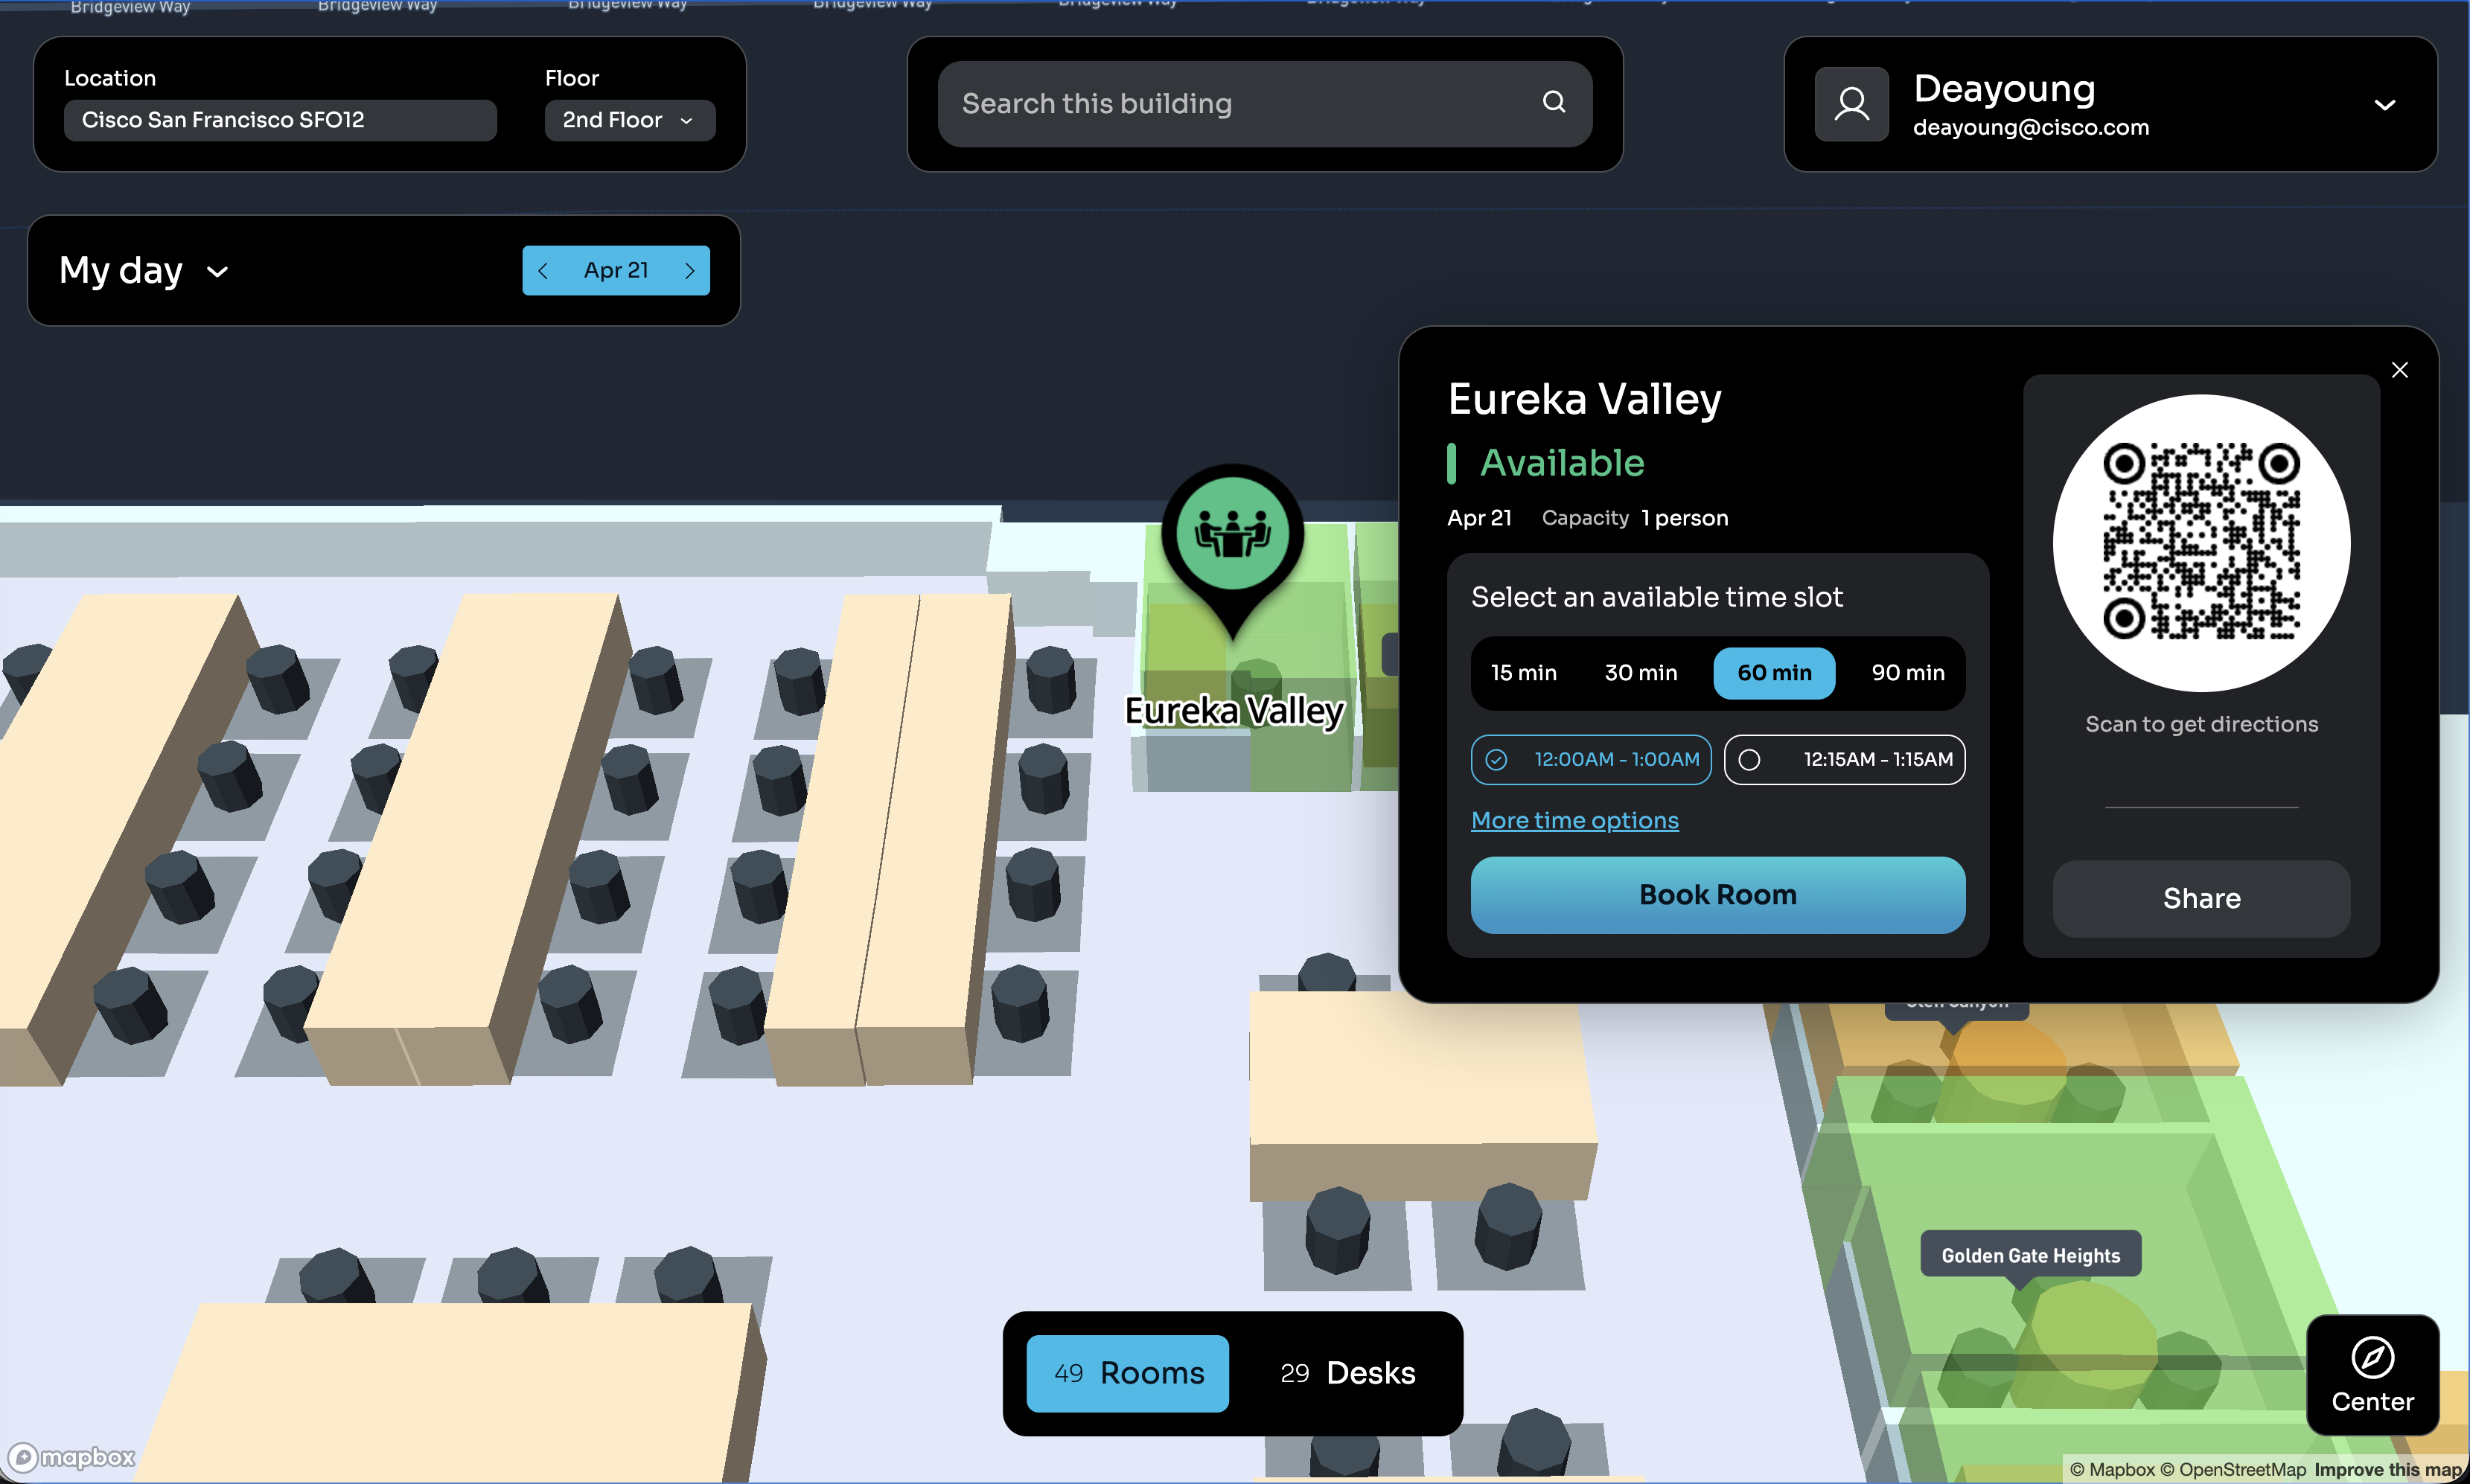
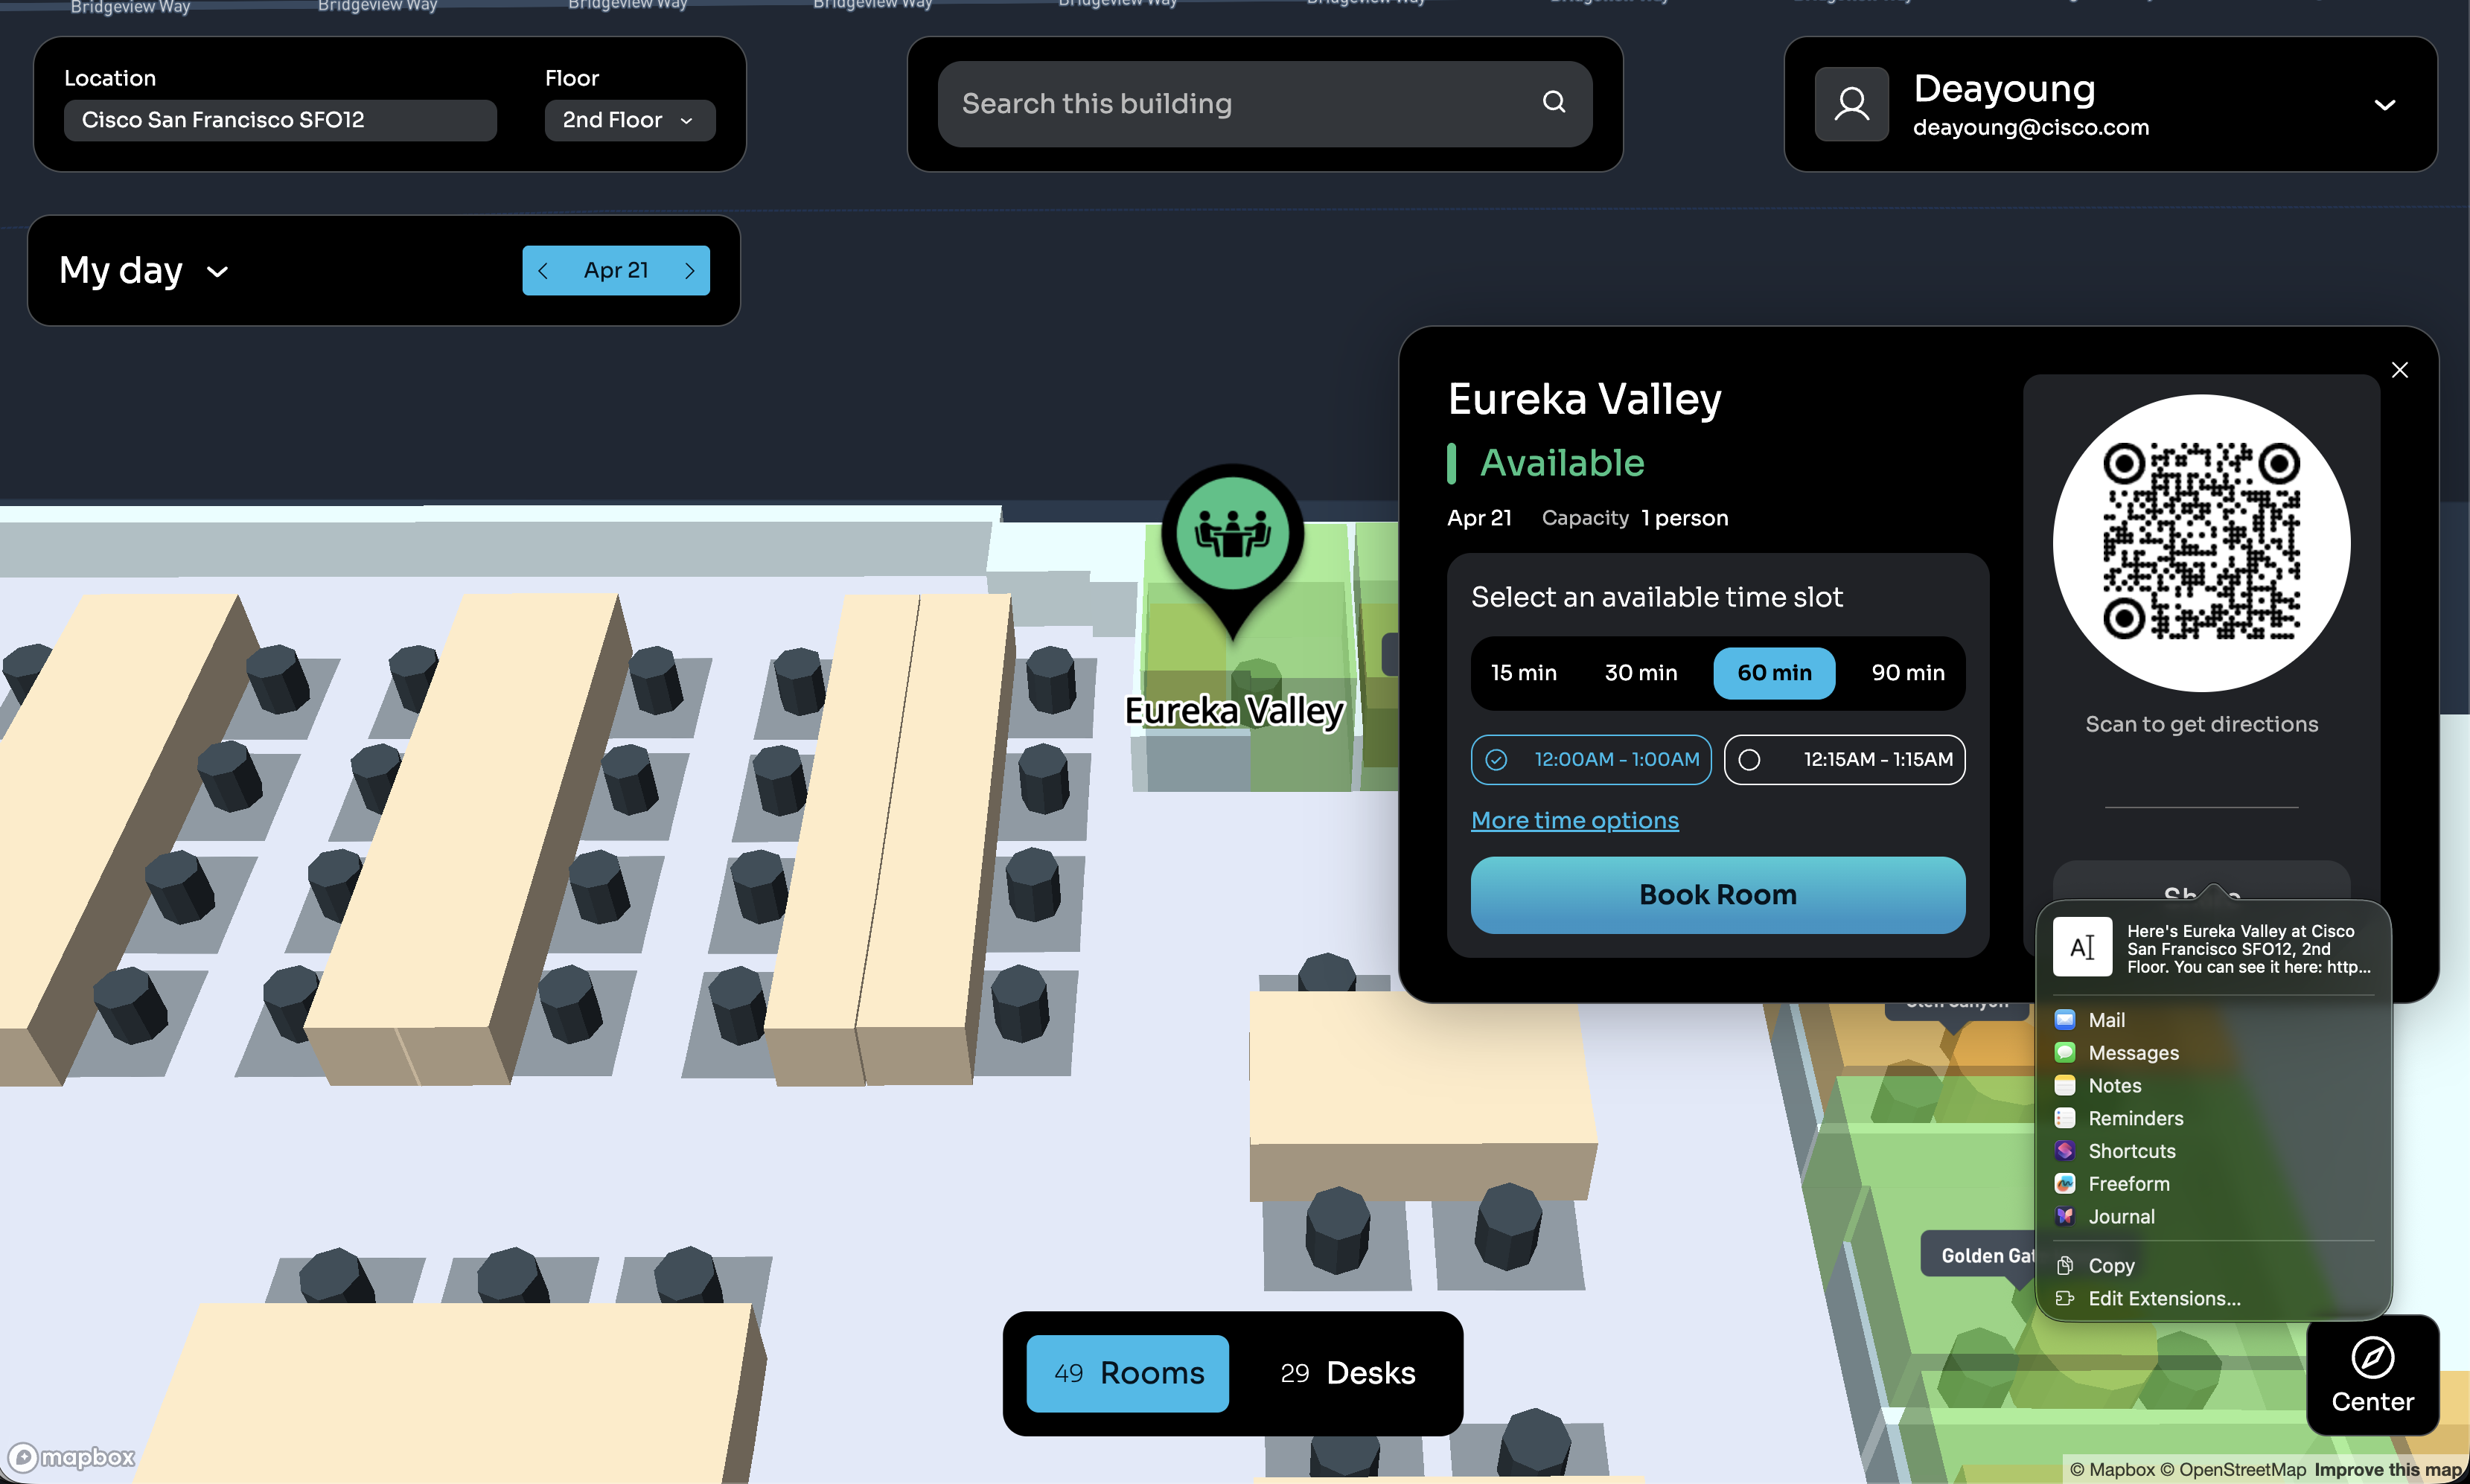
Room Booking Feature Description
Room booking in the Space Explorer Web App allows employees to book enabled meeting rooms using the familiar map interface. Alongside predefined desk booking time slots, the room booking interface provides more flexibility. The booking workflows and options available in Space Explorer Web App are intended for quickly finding an available room and booking it to block the calendar, map-based room search and booking, or to forward an upcoming calendar event to a meeting room so that someone can join a virtual meeting from a Cisco collaboration device. This interface is not intended for recurring meetings, multiple invitee schedule coordination, proxy or admin approved rooms, and other advanced use cases built into Outlook and other calendar clients.
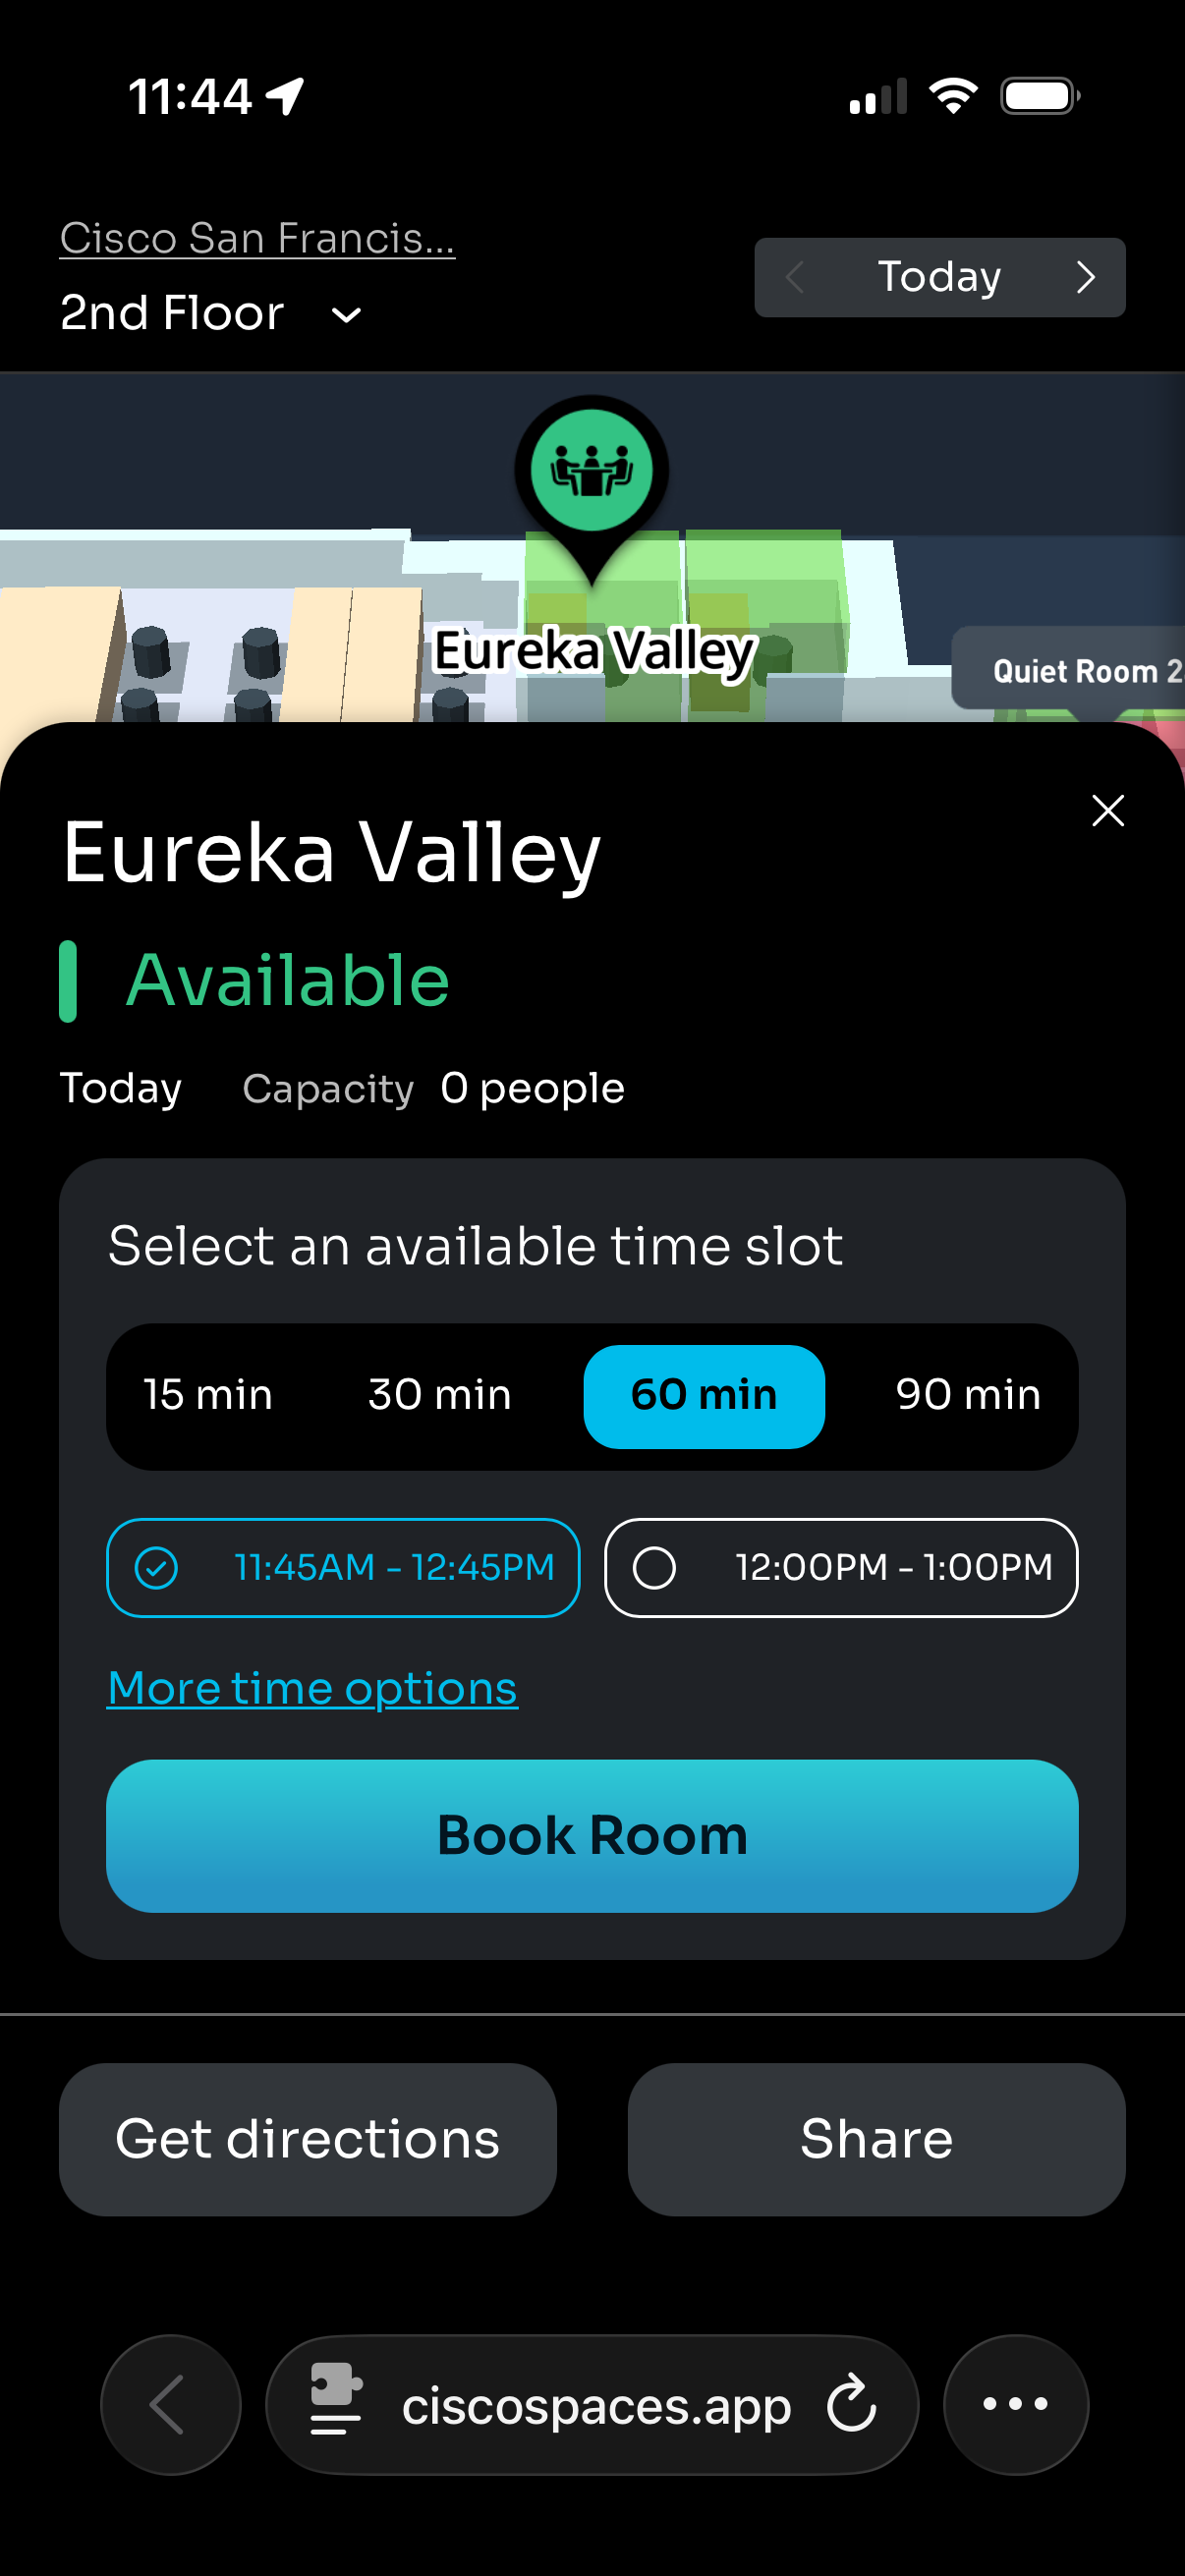
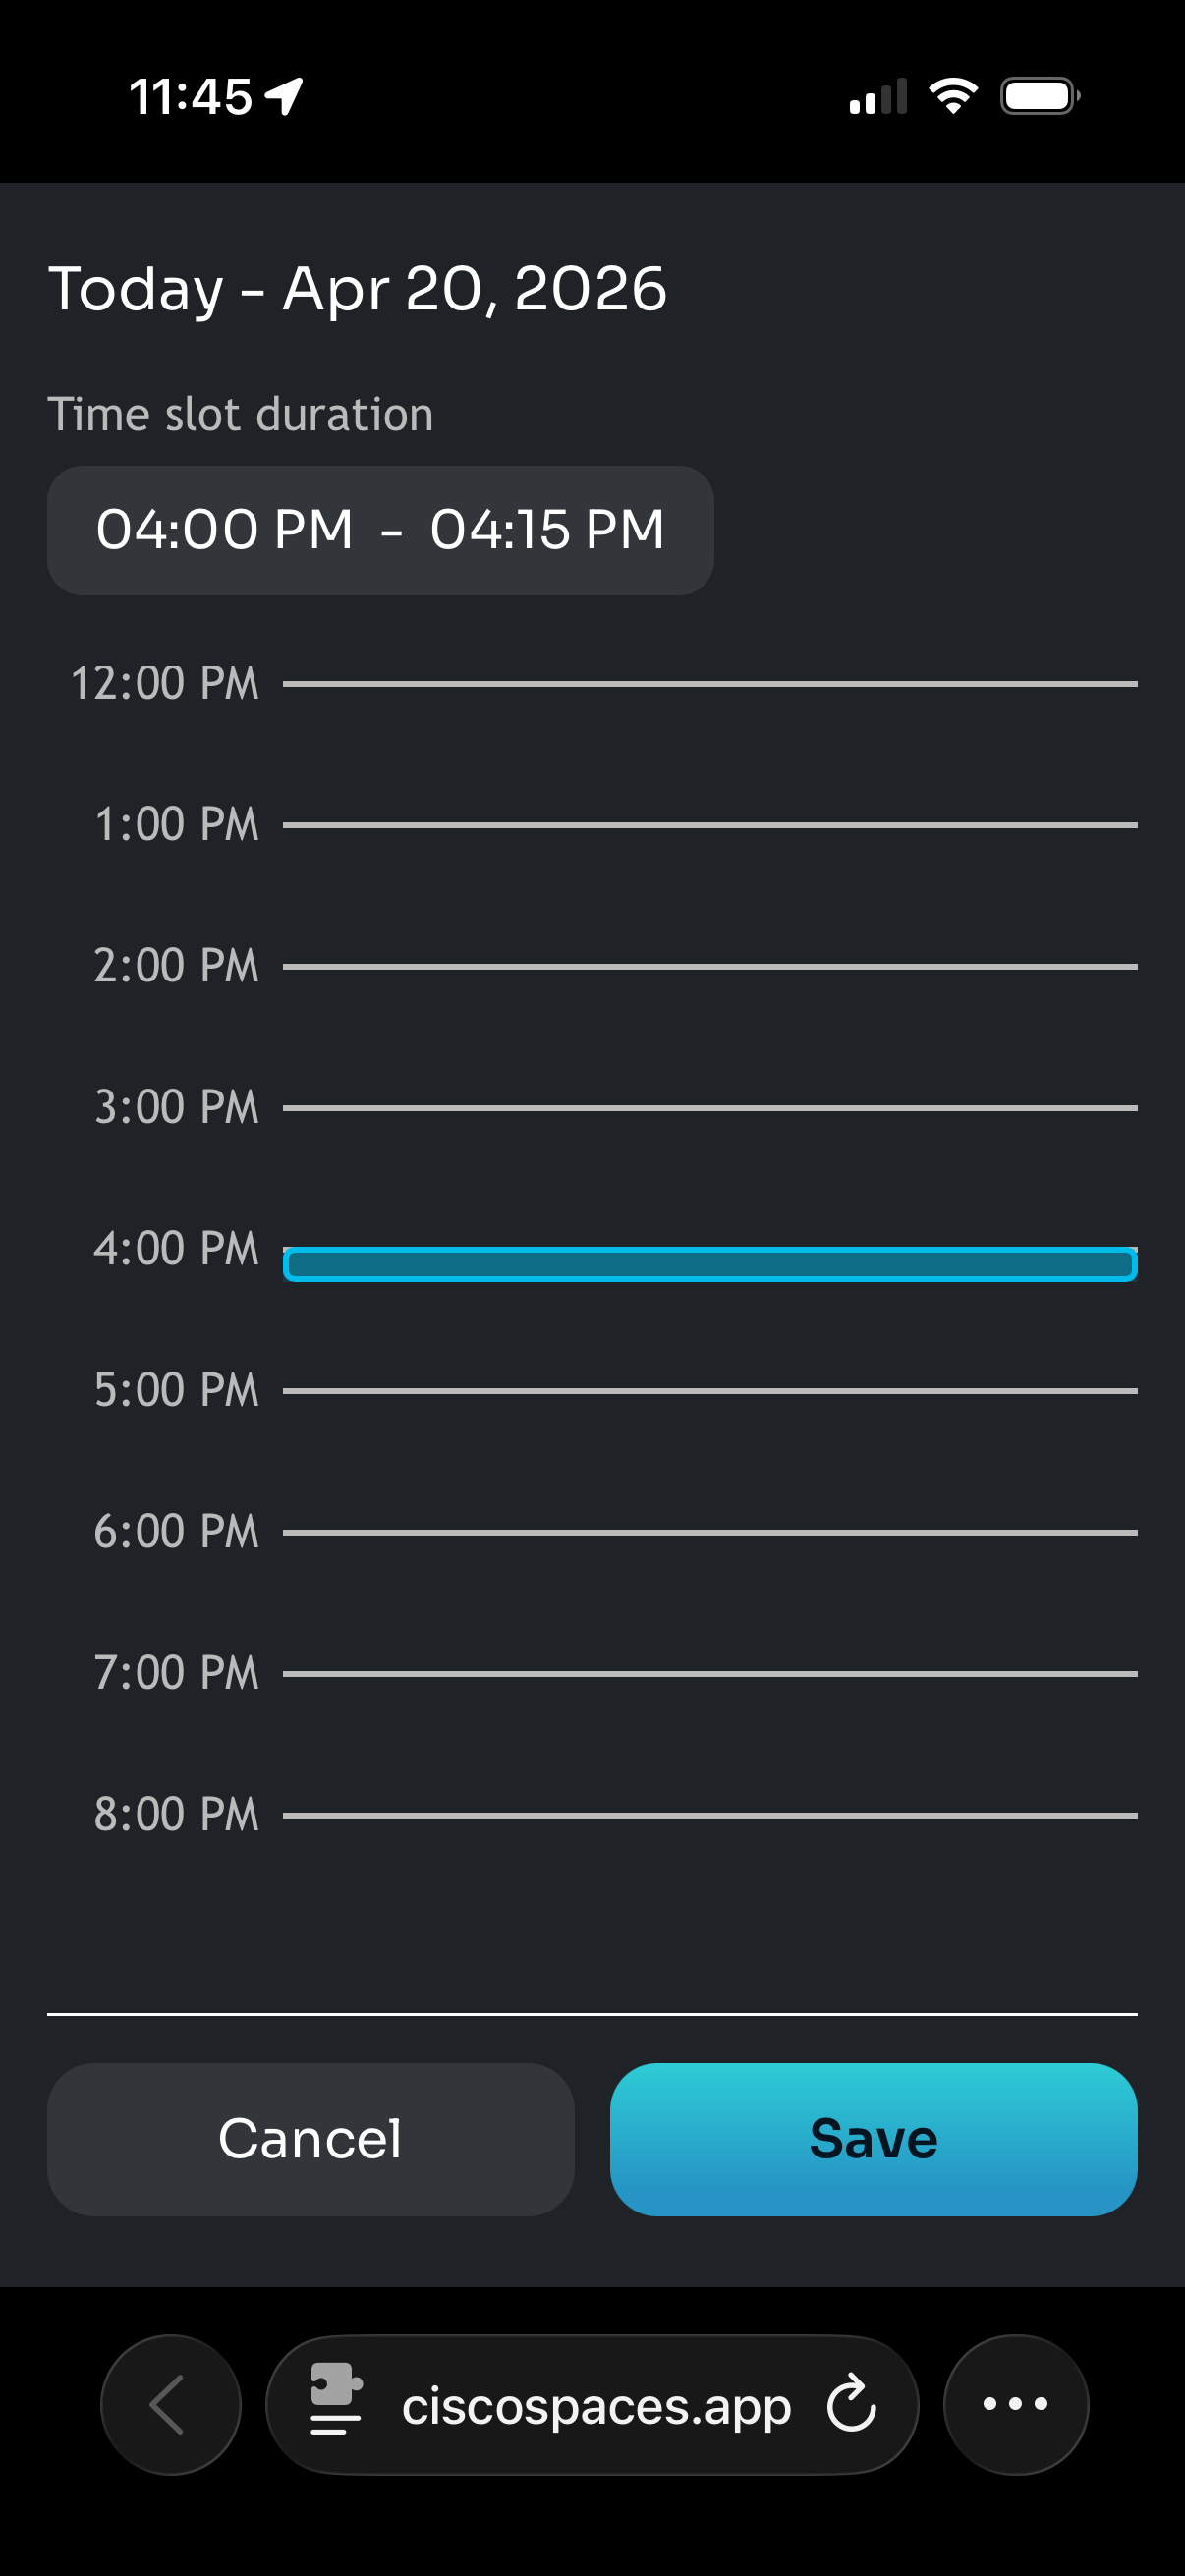
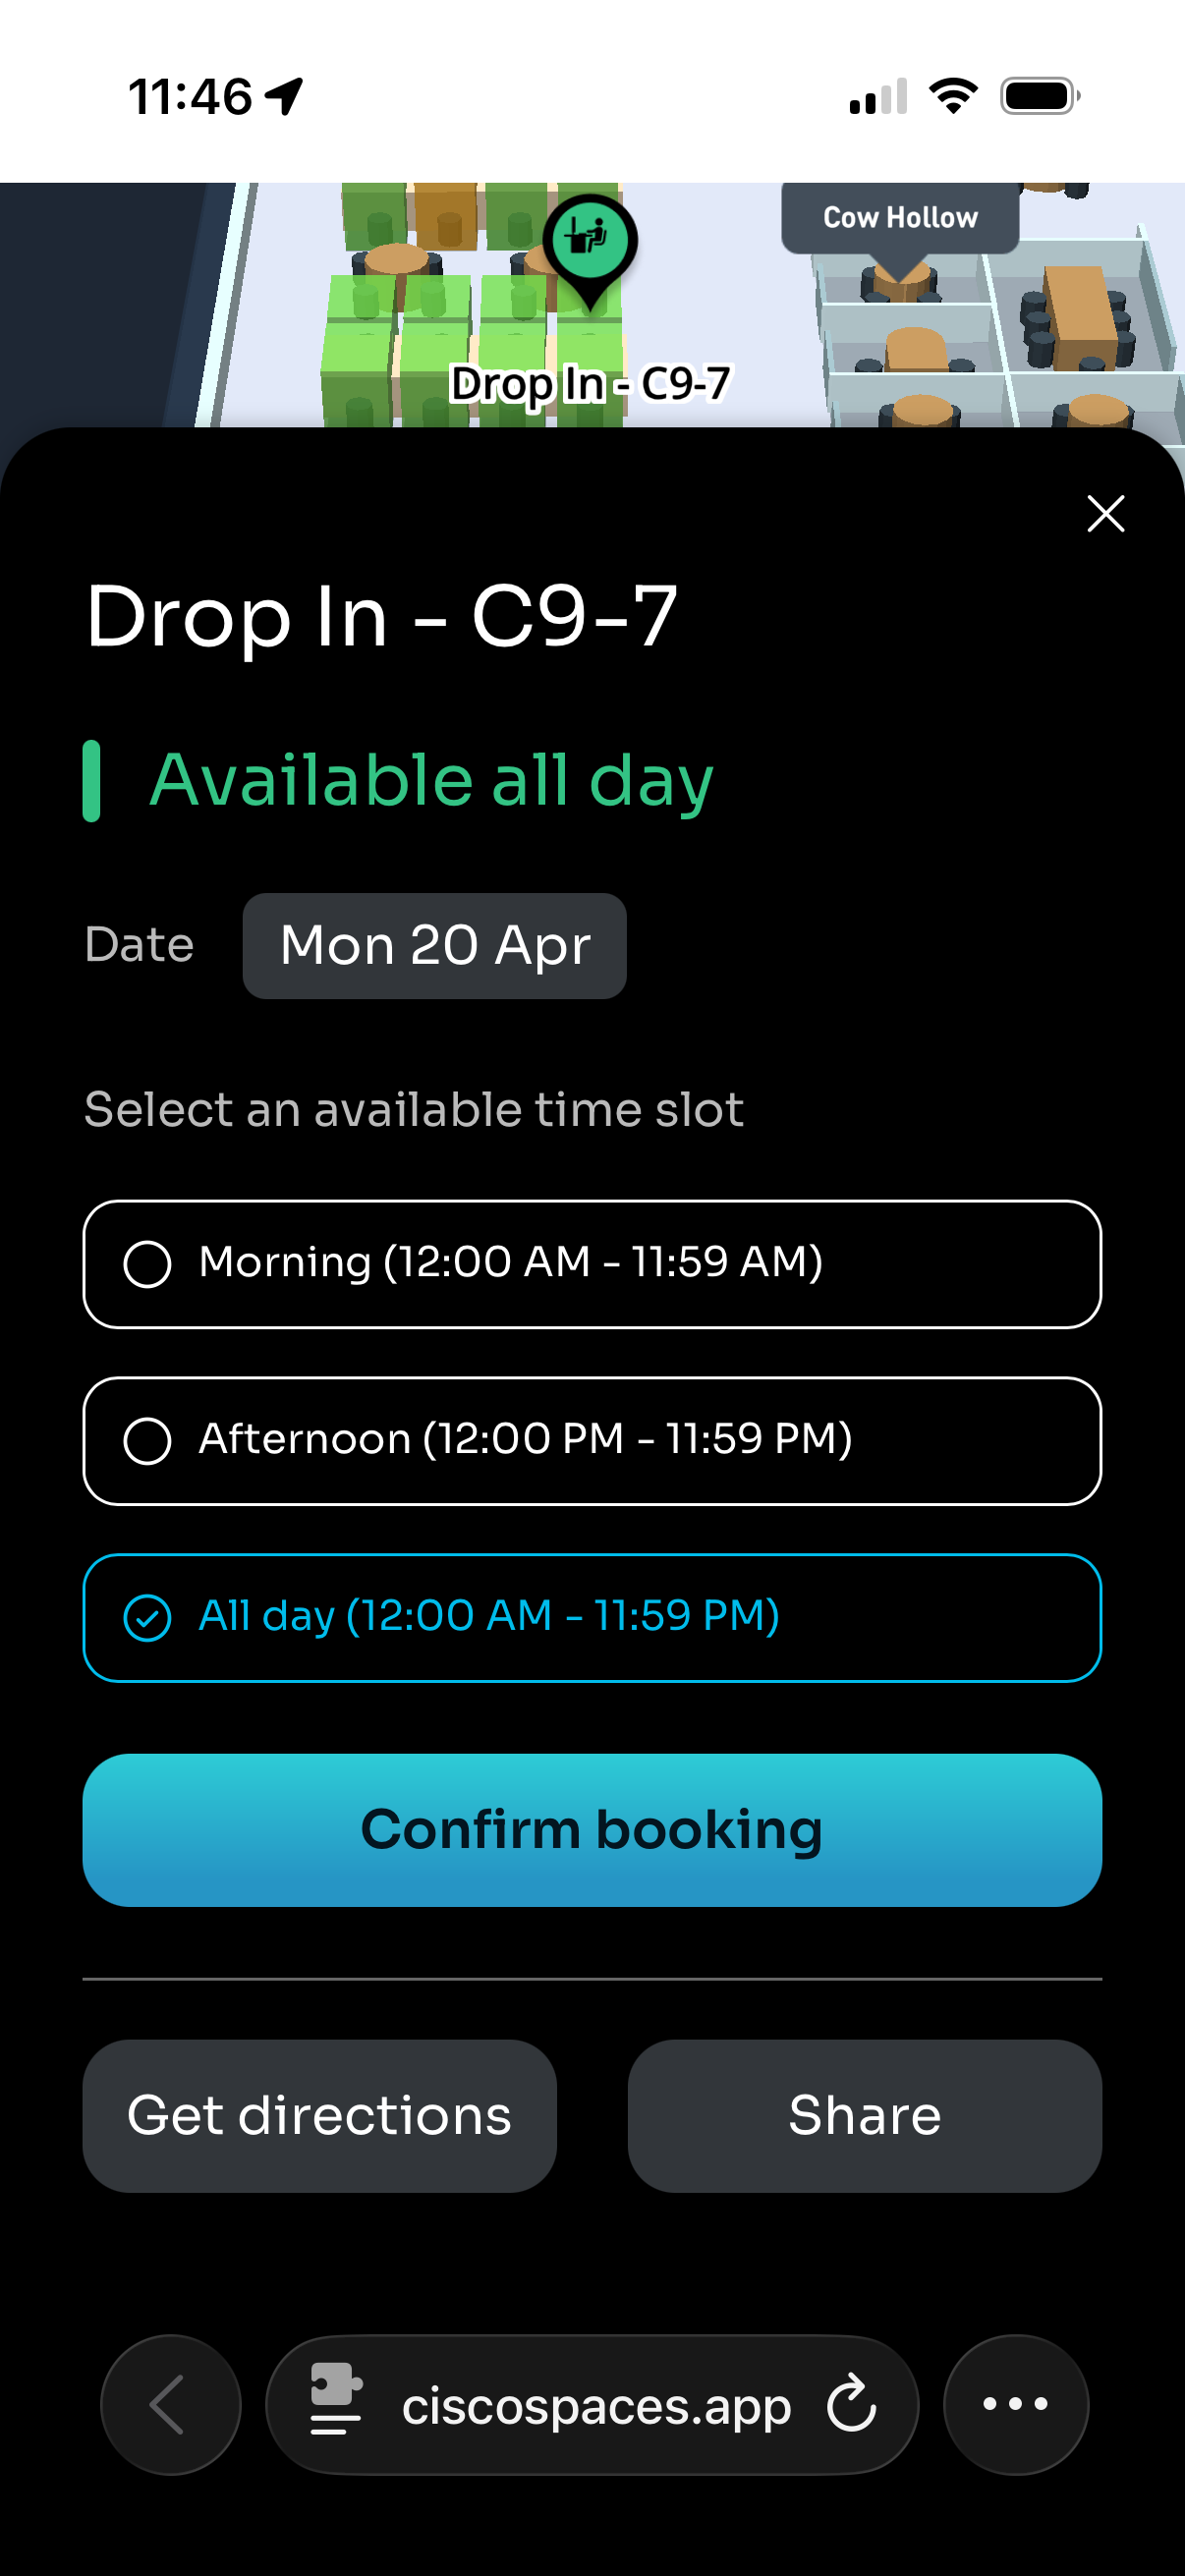
Booking Options
-
A user can choose a time window (15, 30, 60, or 90 minutes), which updates the two next available time slots for faster booking.
-
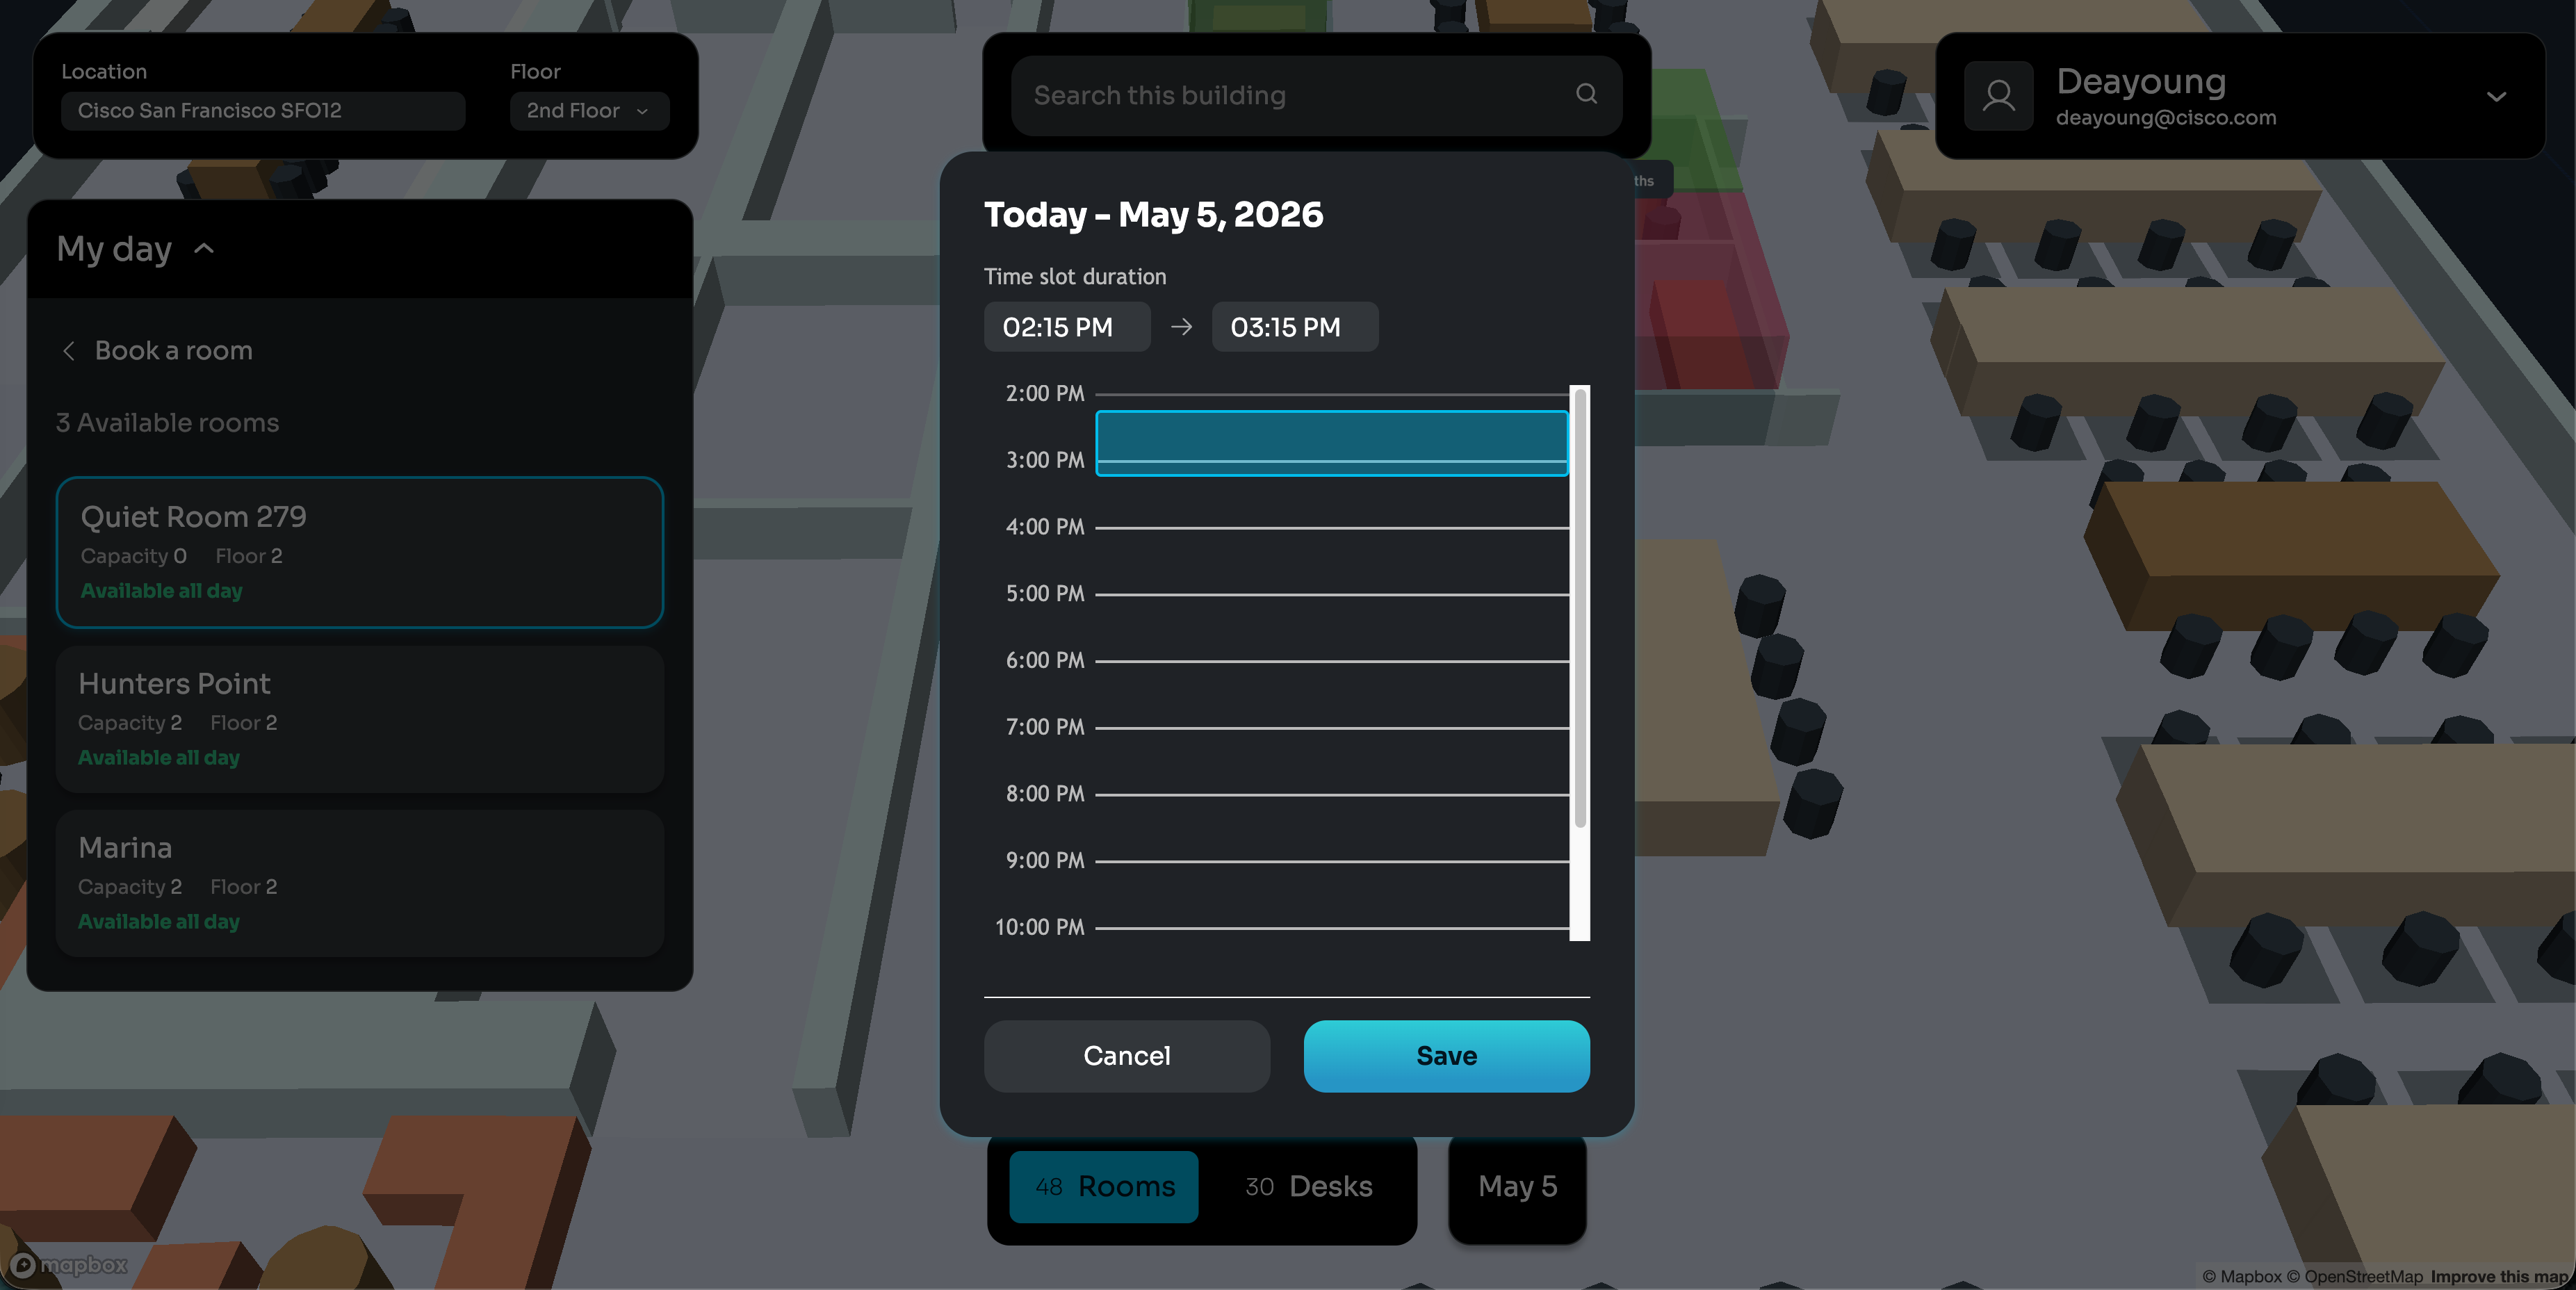
A user can also click into “More time options” to see the full day’s calendar or to choose custom start and end times (in 5 minute increments)
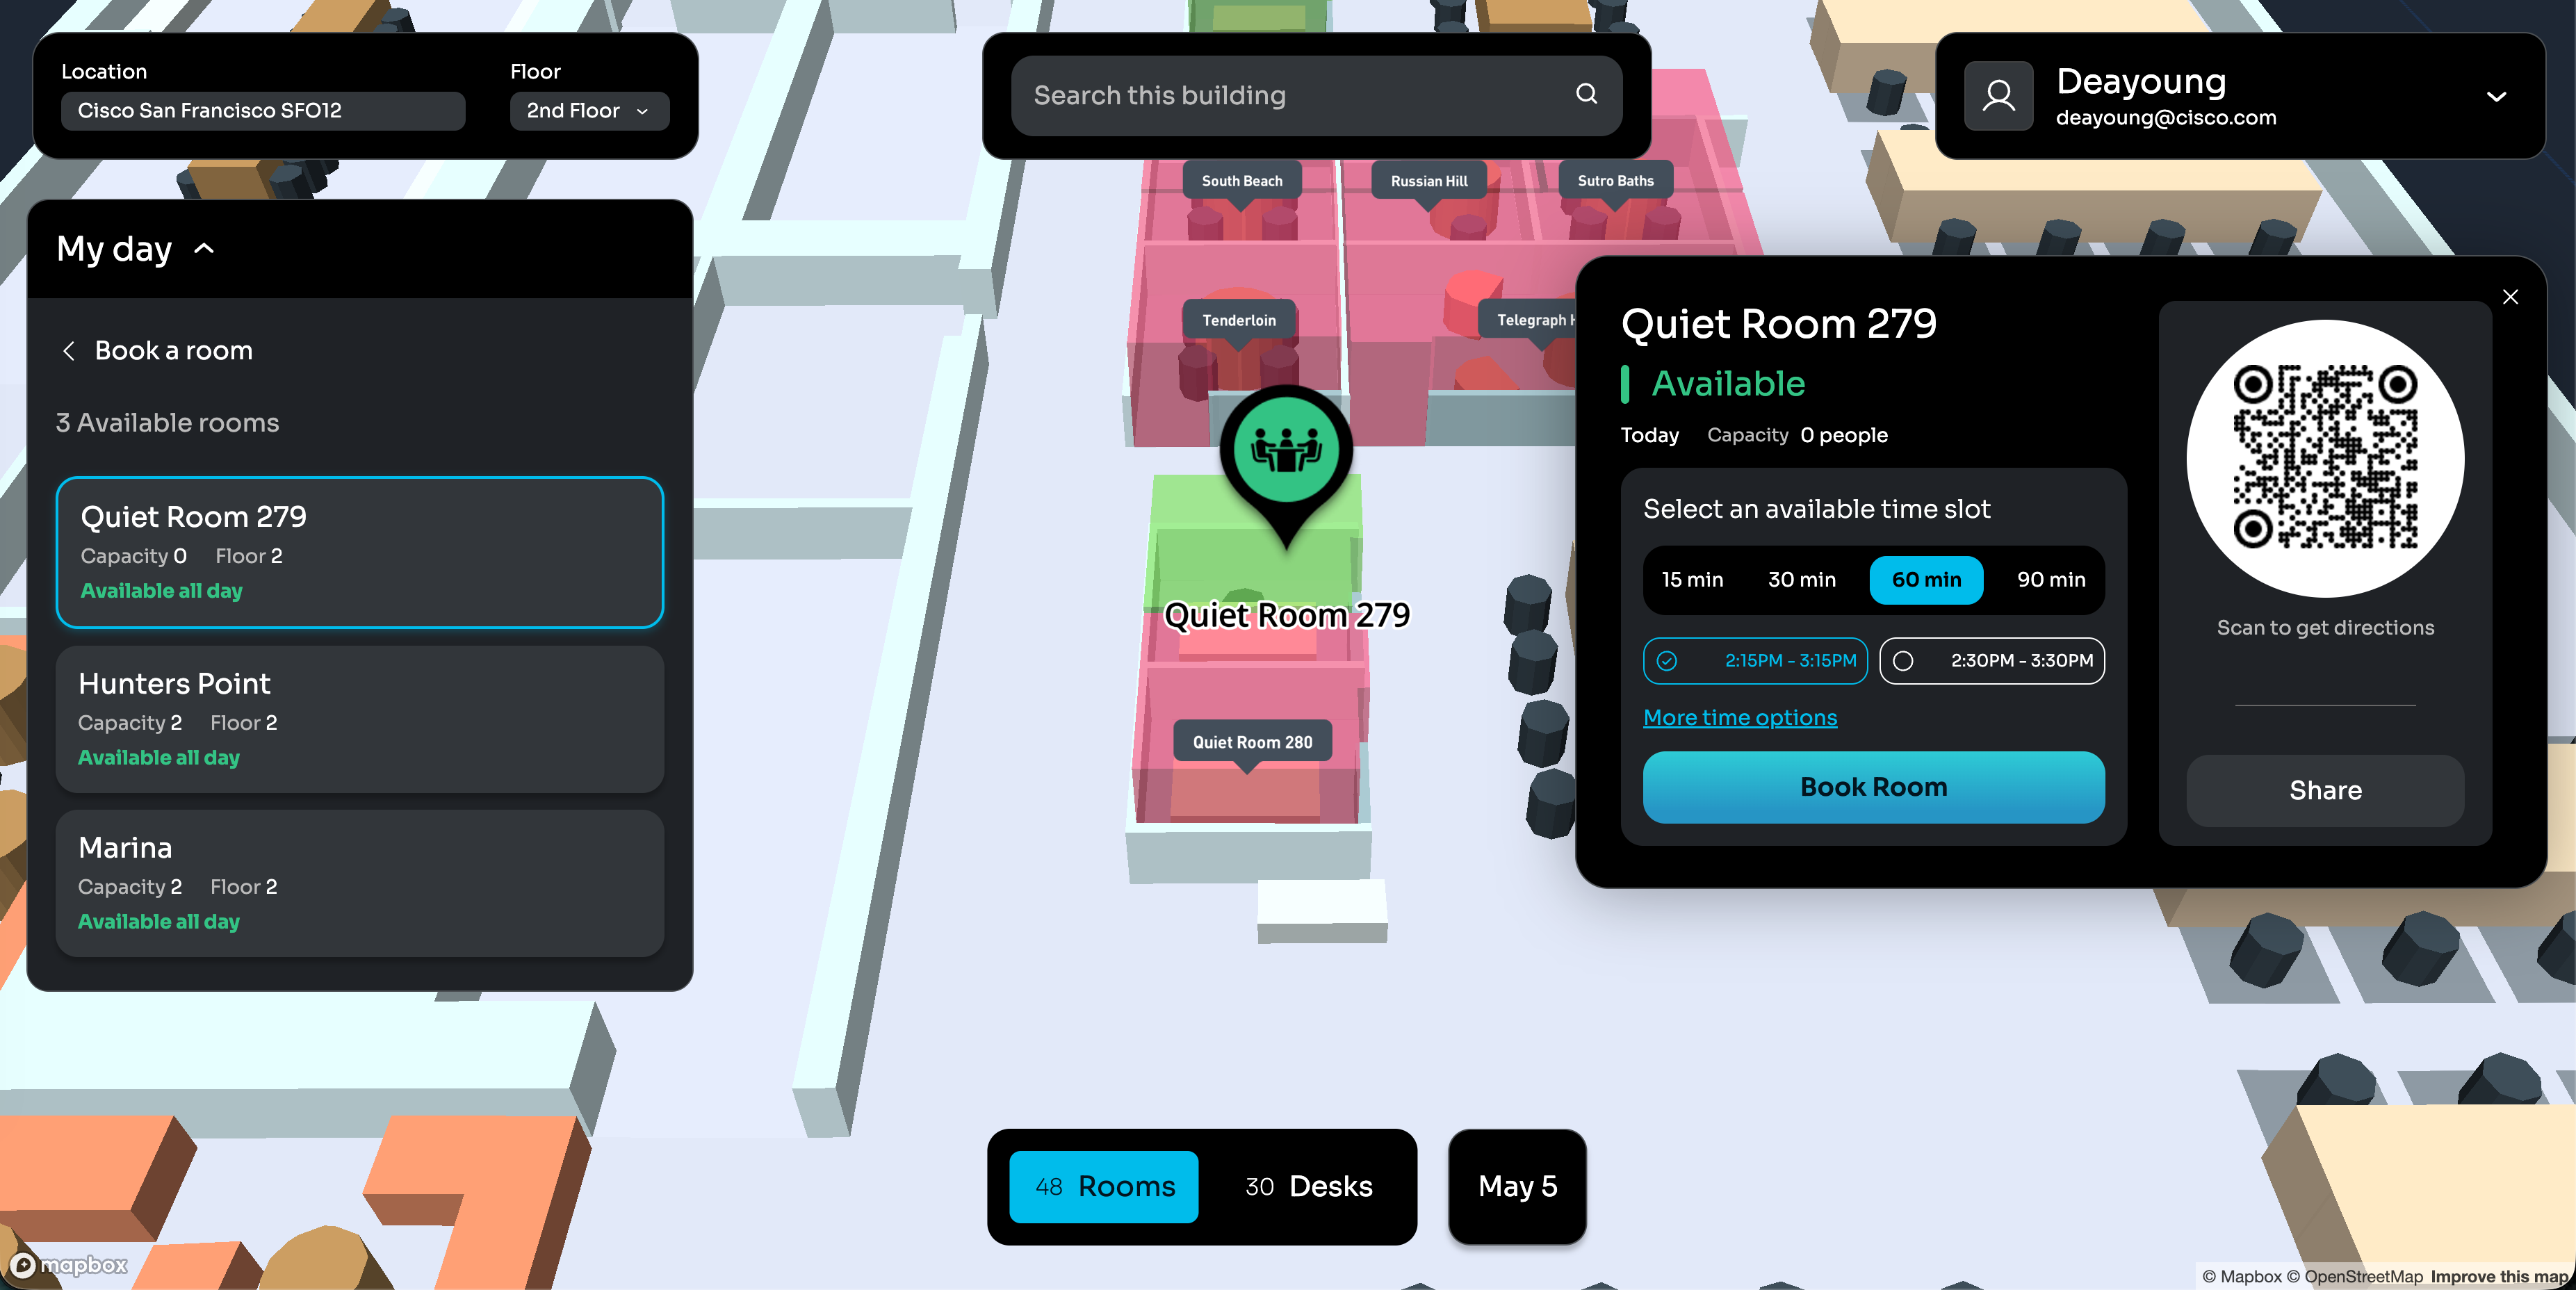
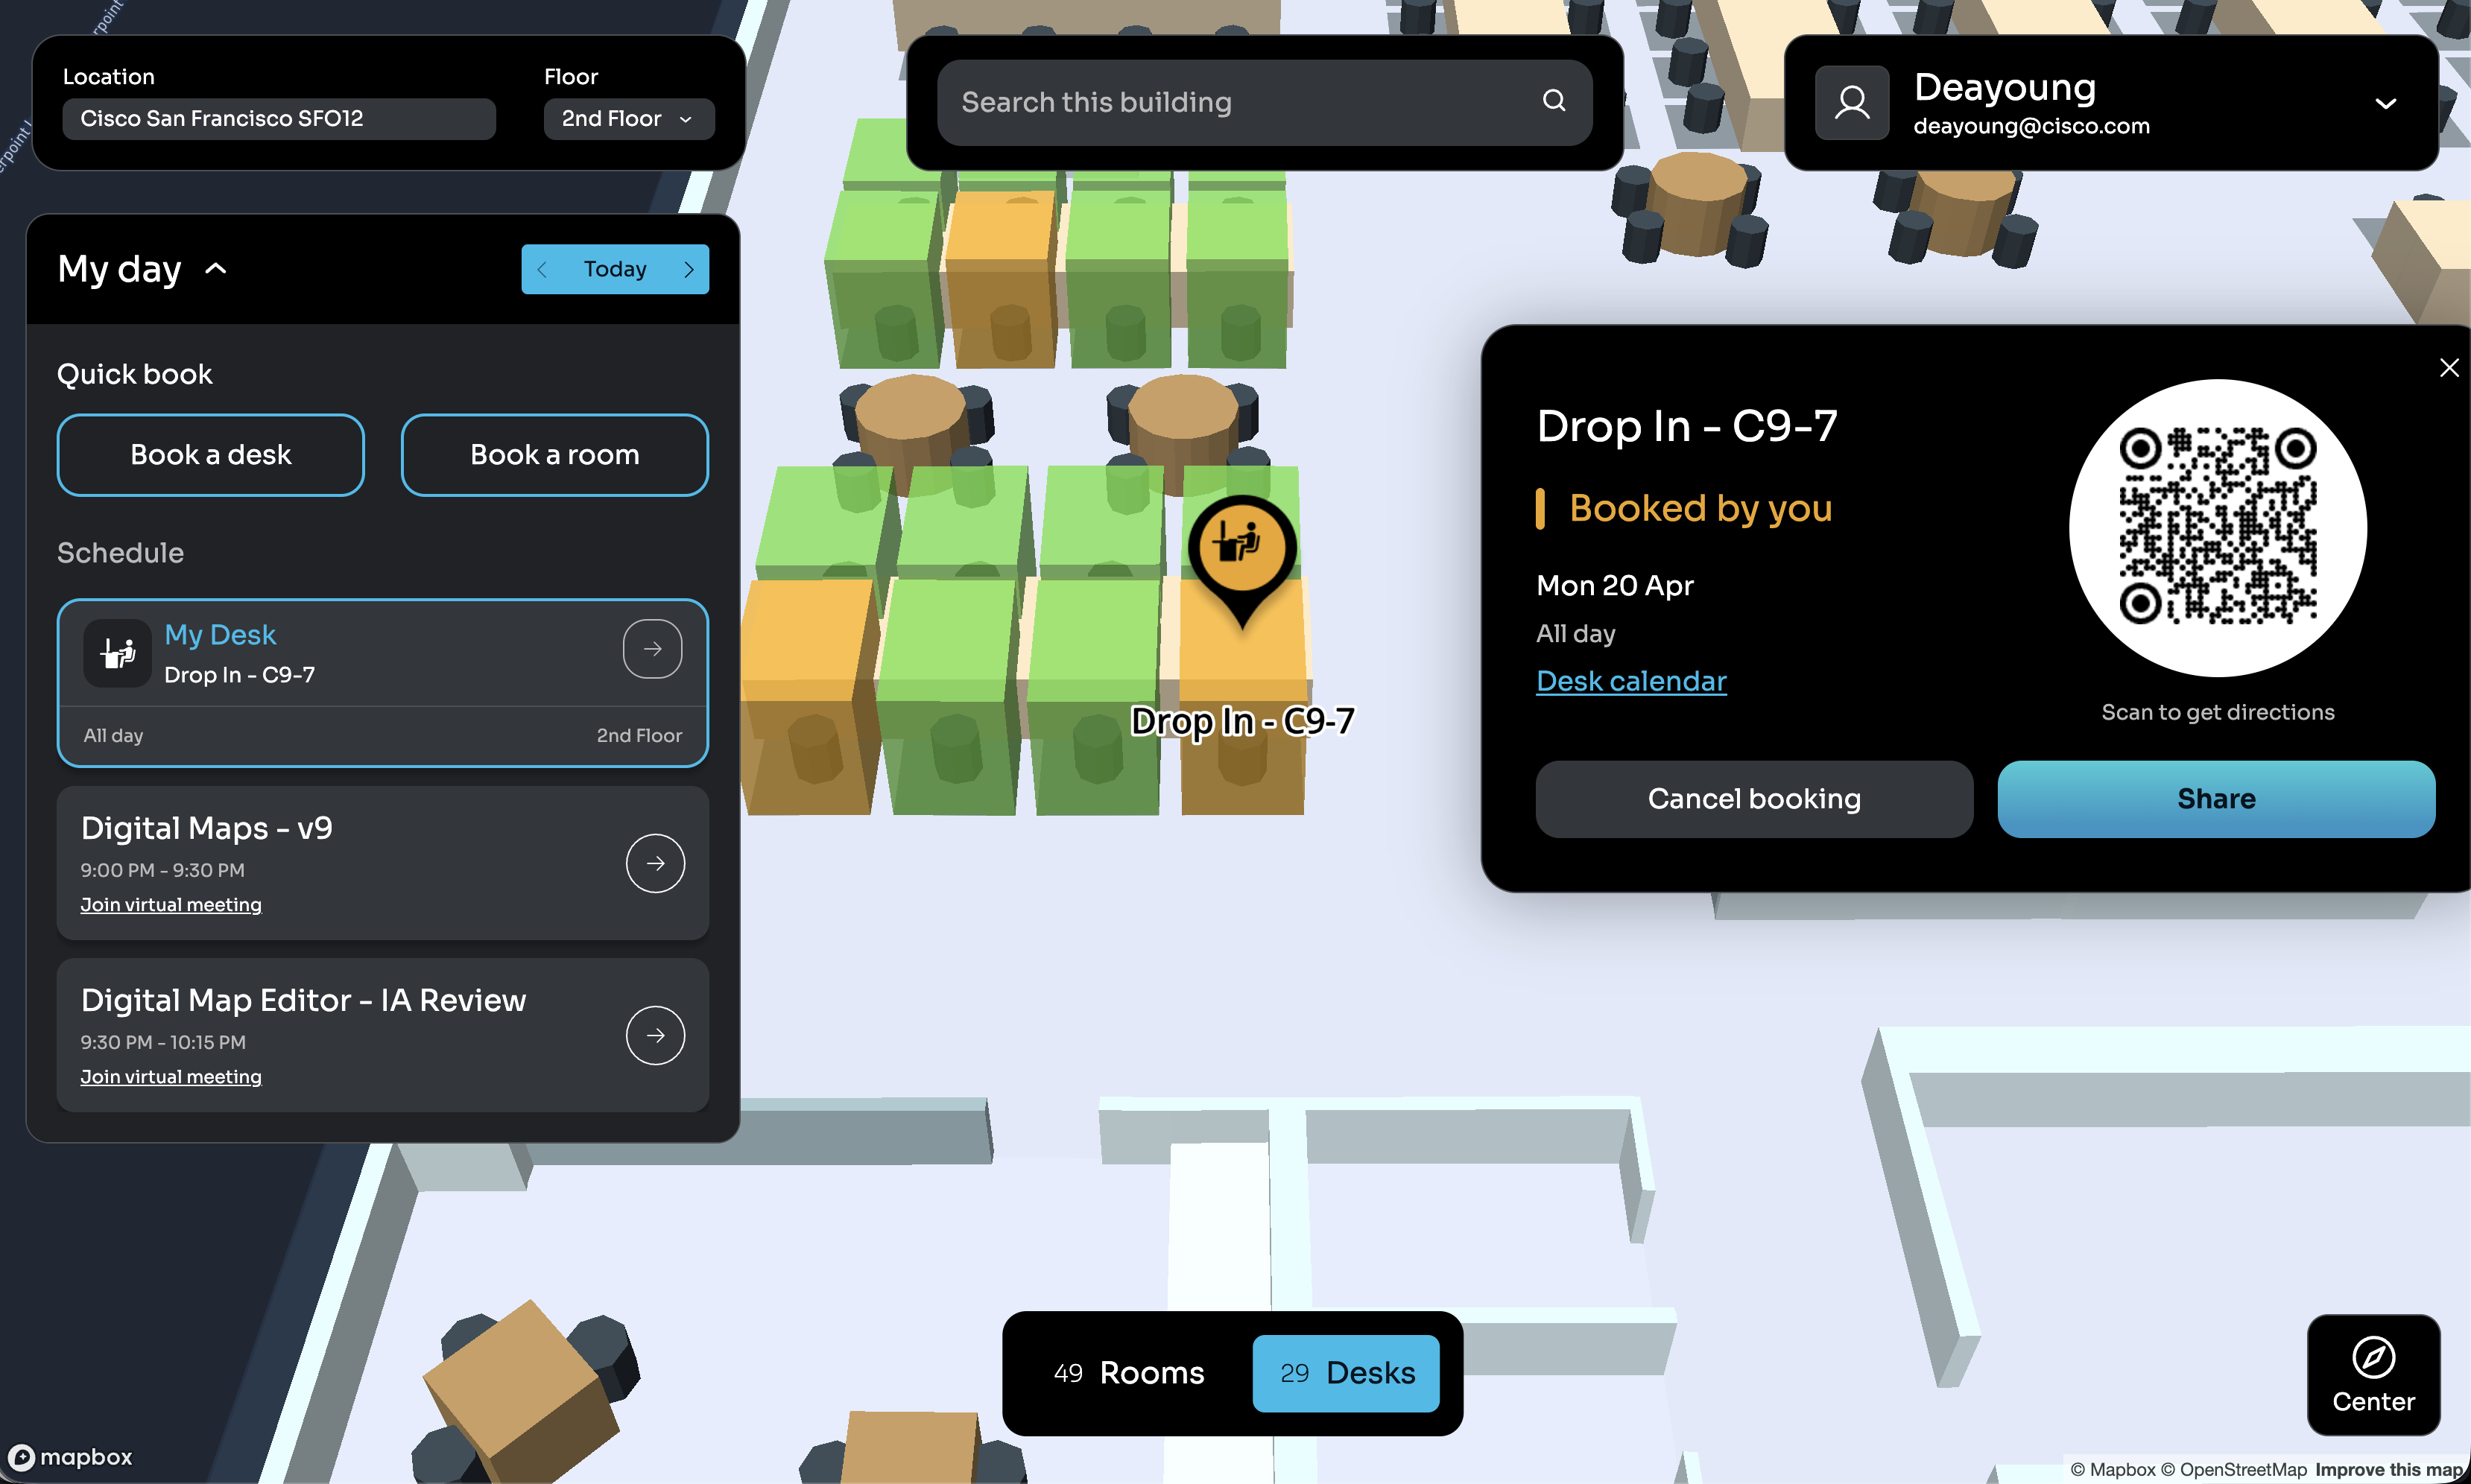
Booking Workflows
-
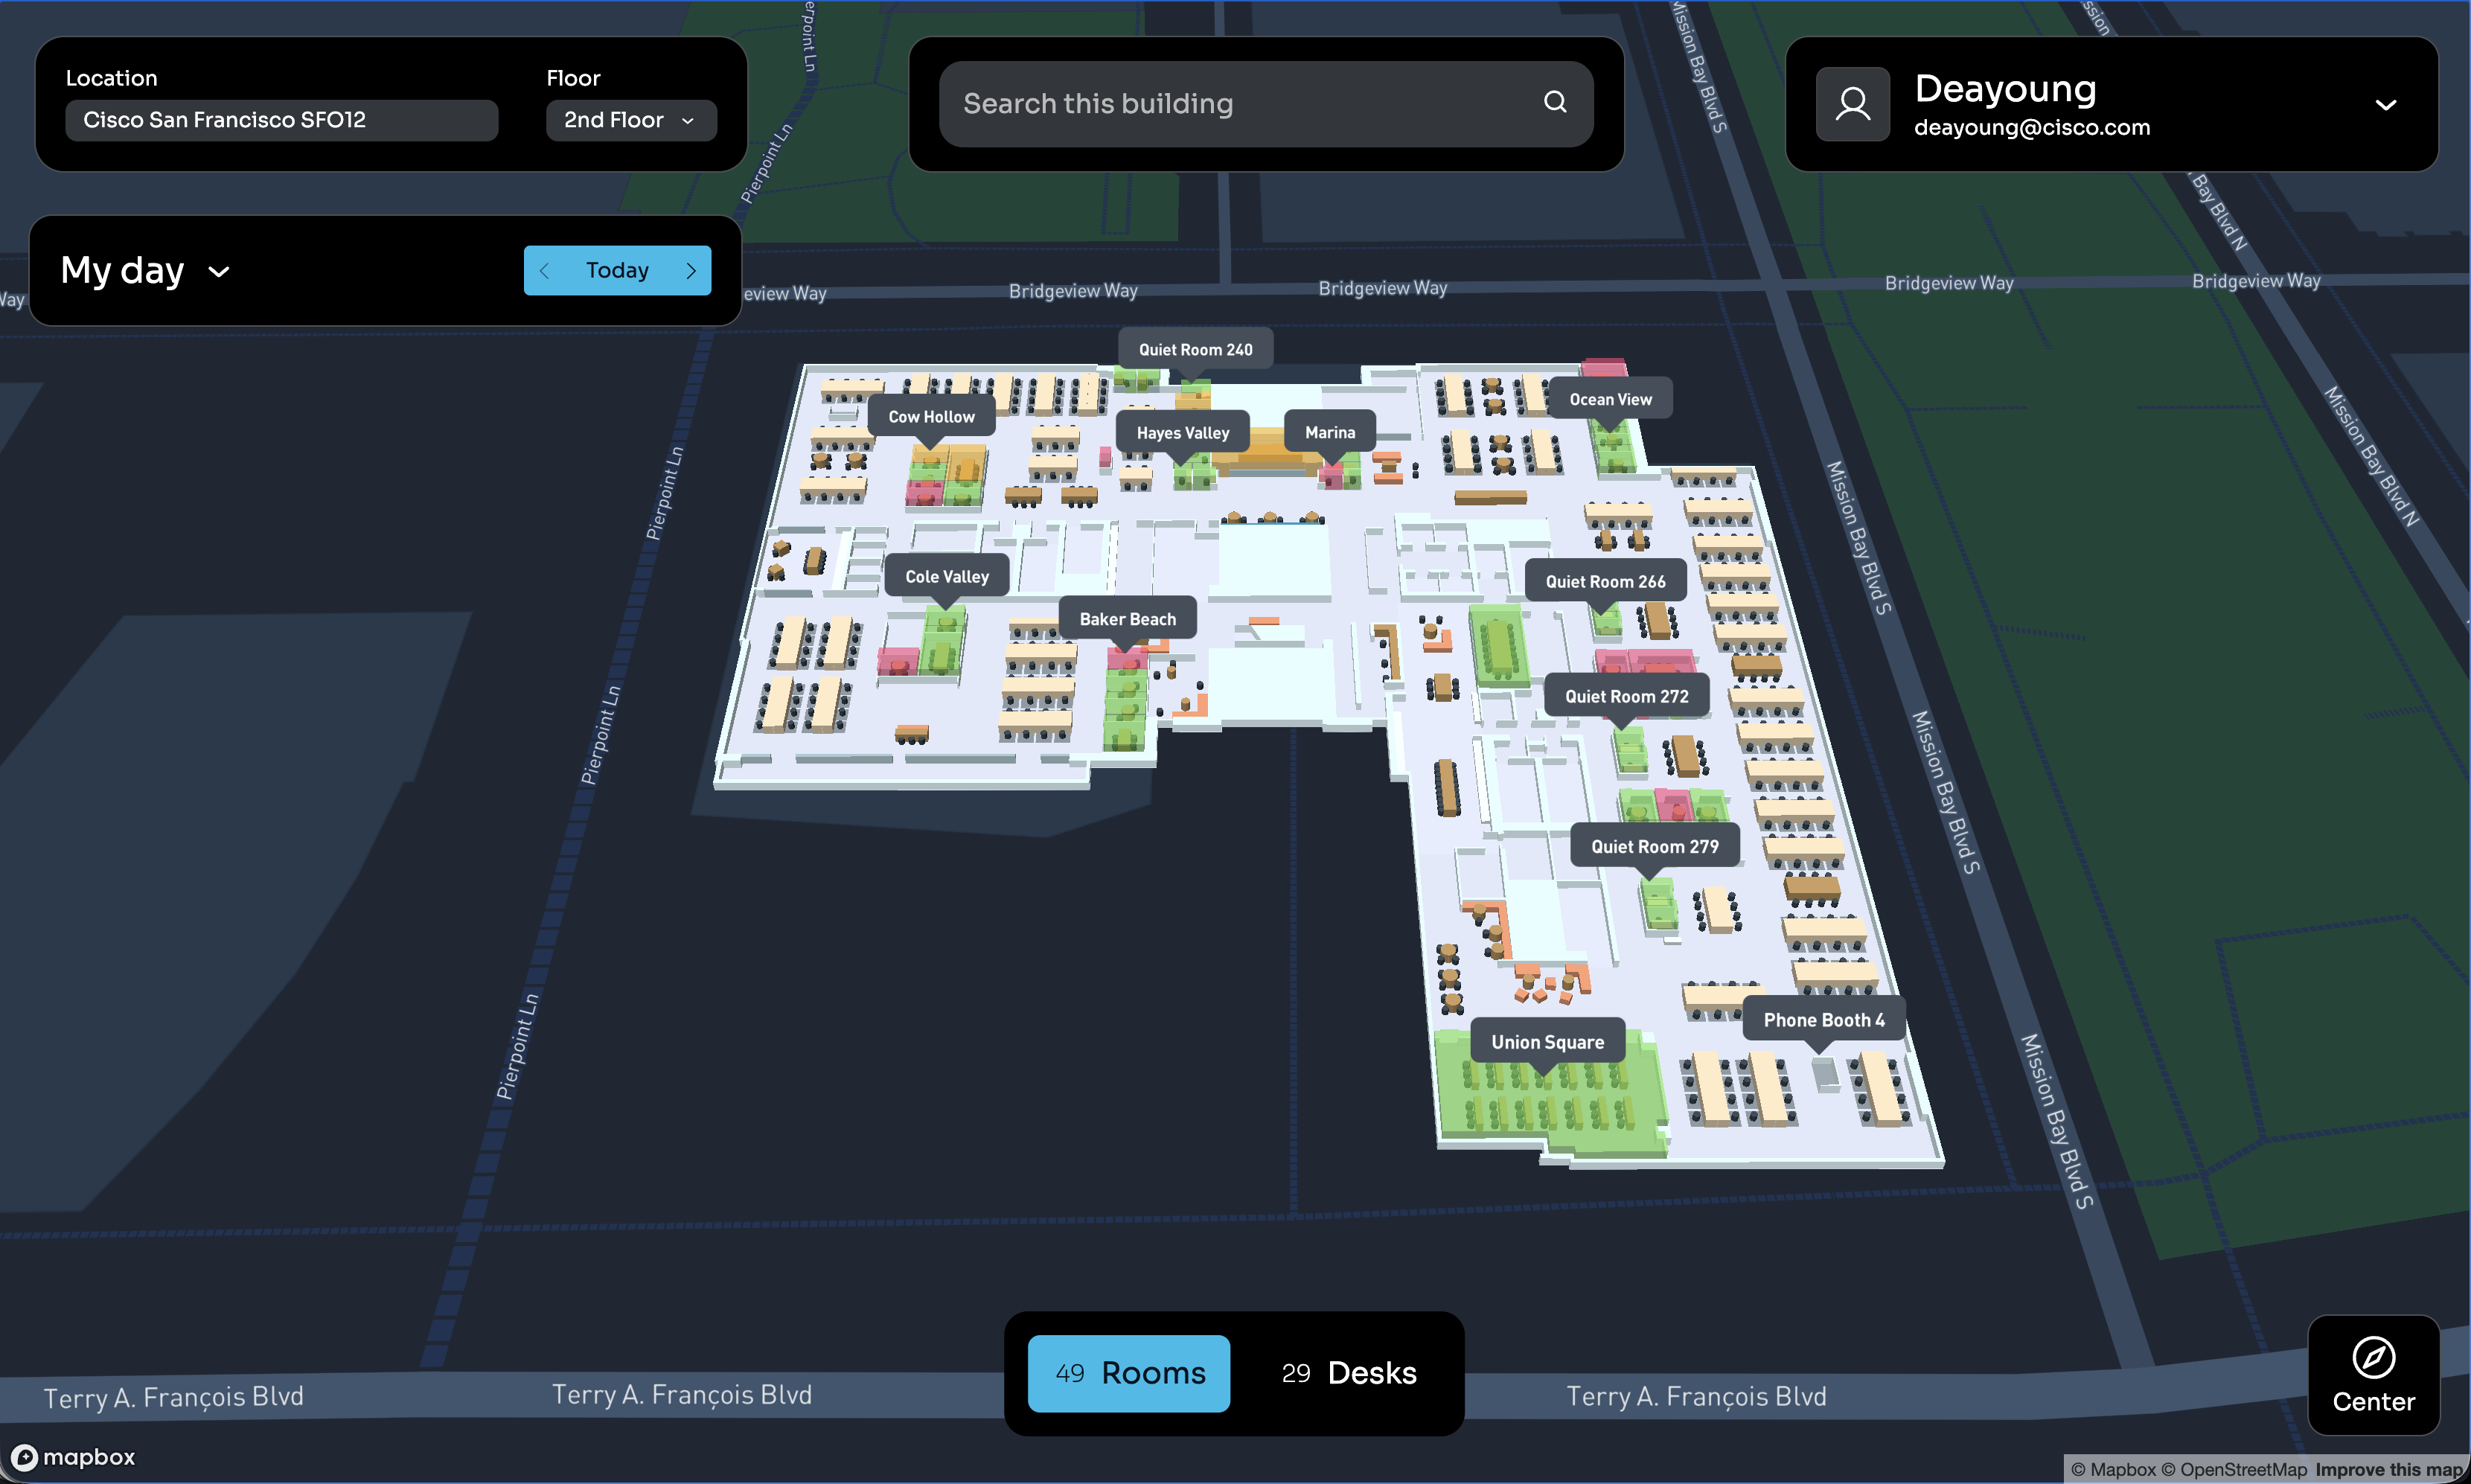
Clicking on a room on the floorplan map shows an individual room’s booking options.
-
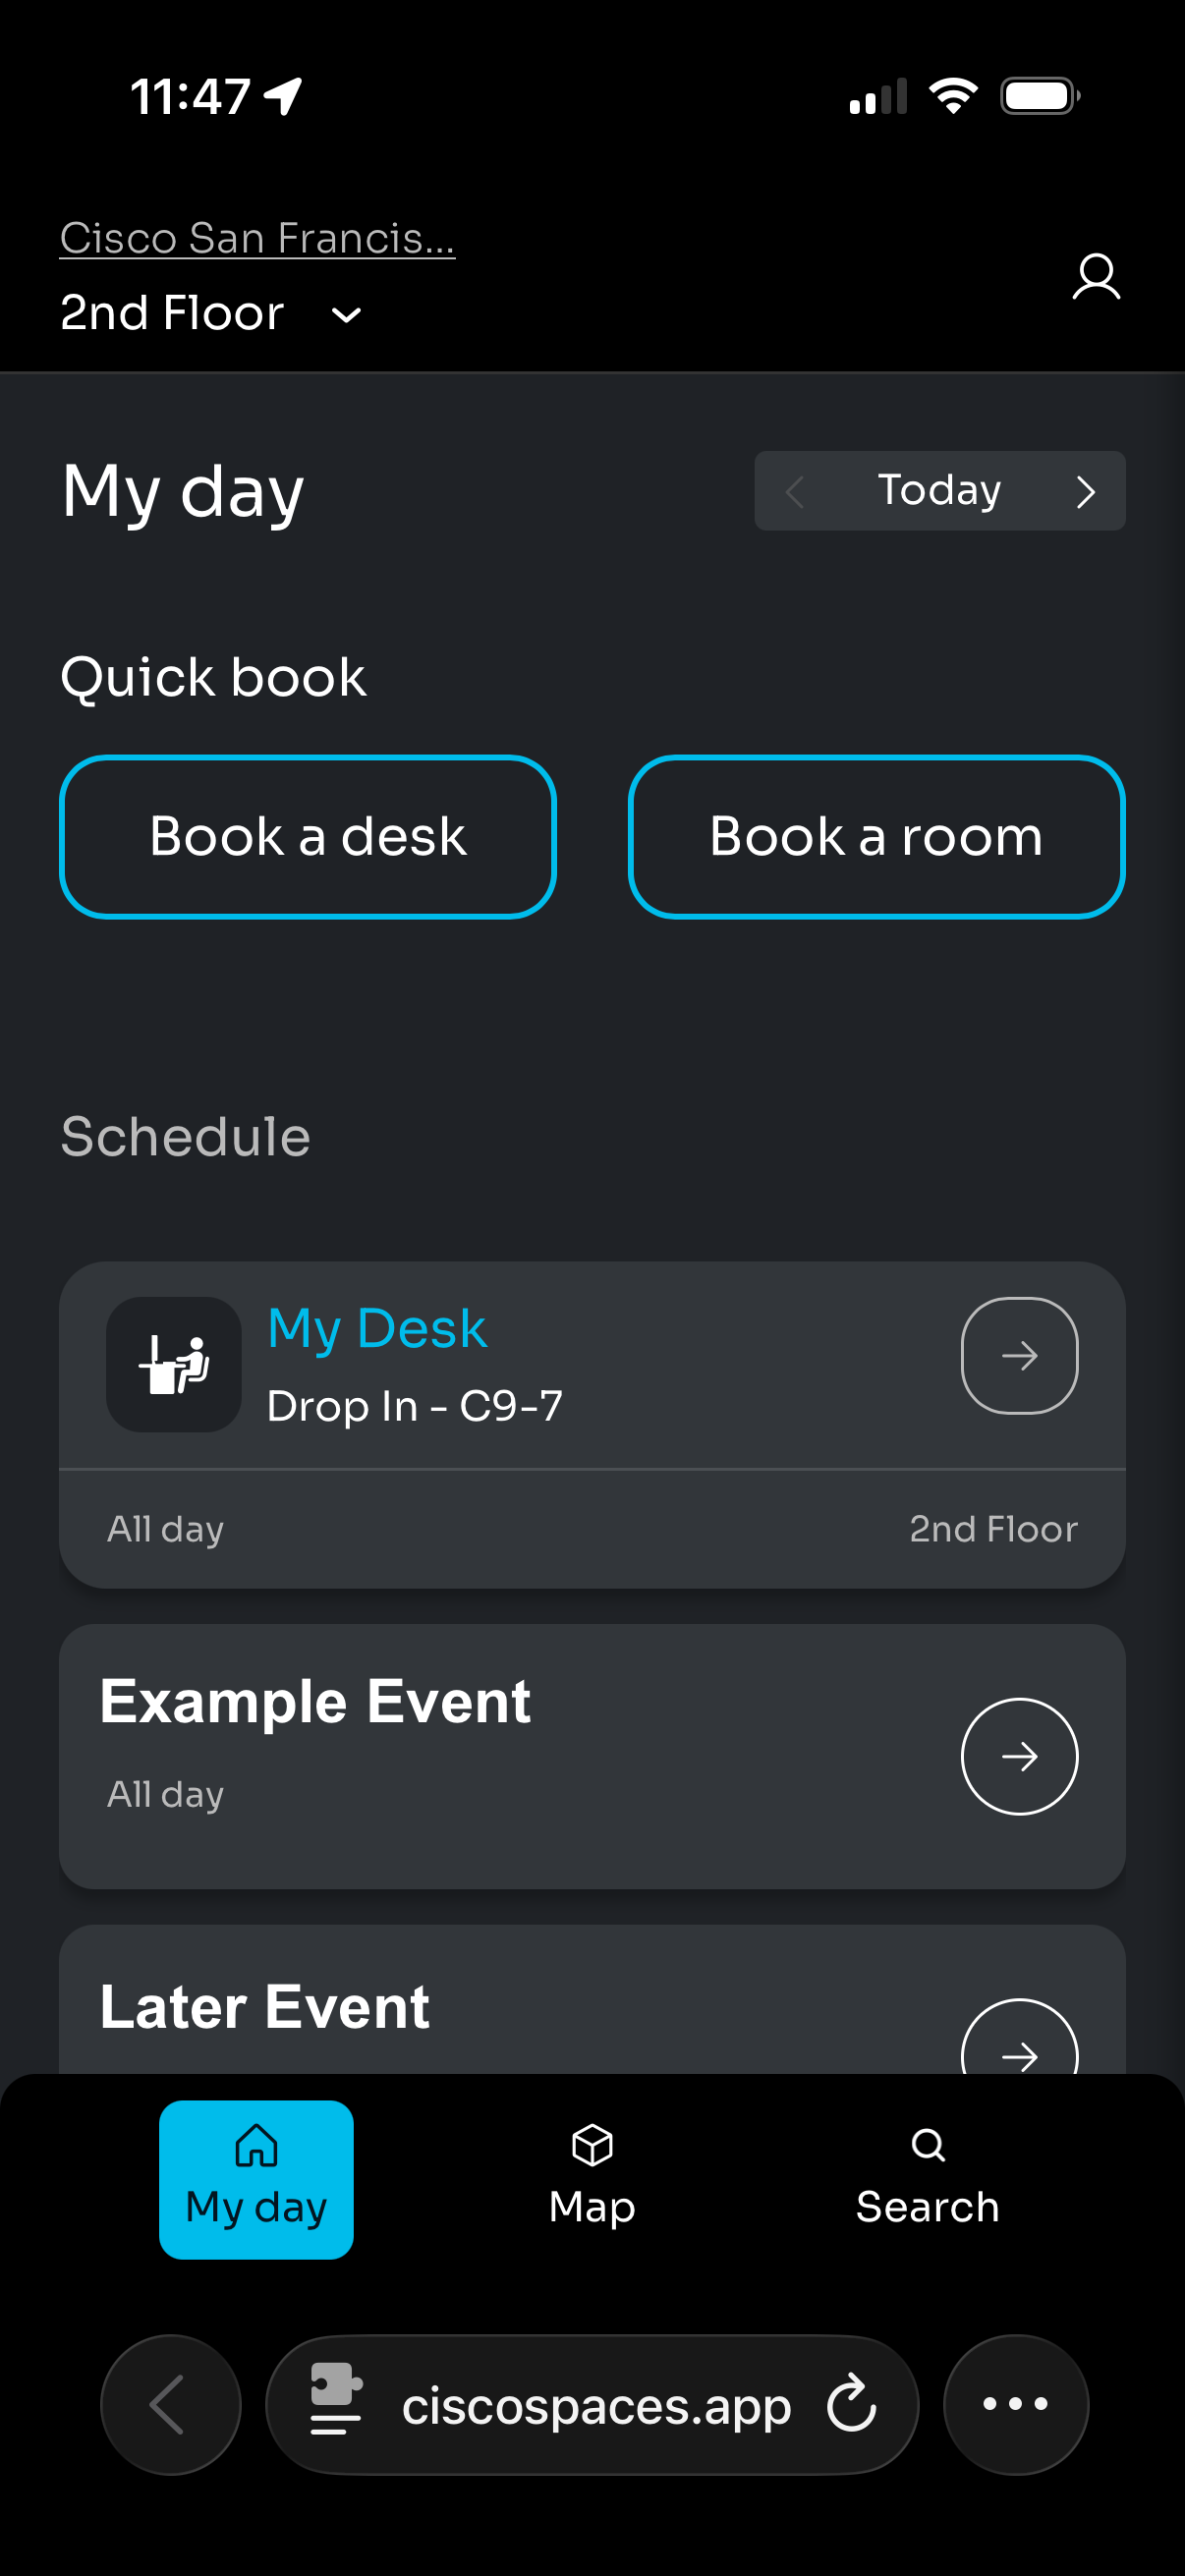
In the “My day” widget/tab, clicking Quick Book > Book a room presents several currently available rooms ready to book.
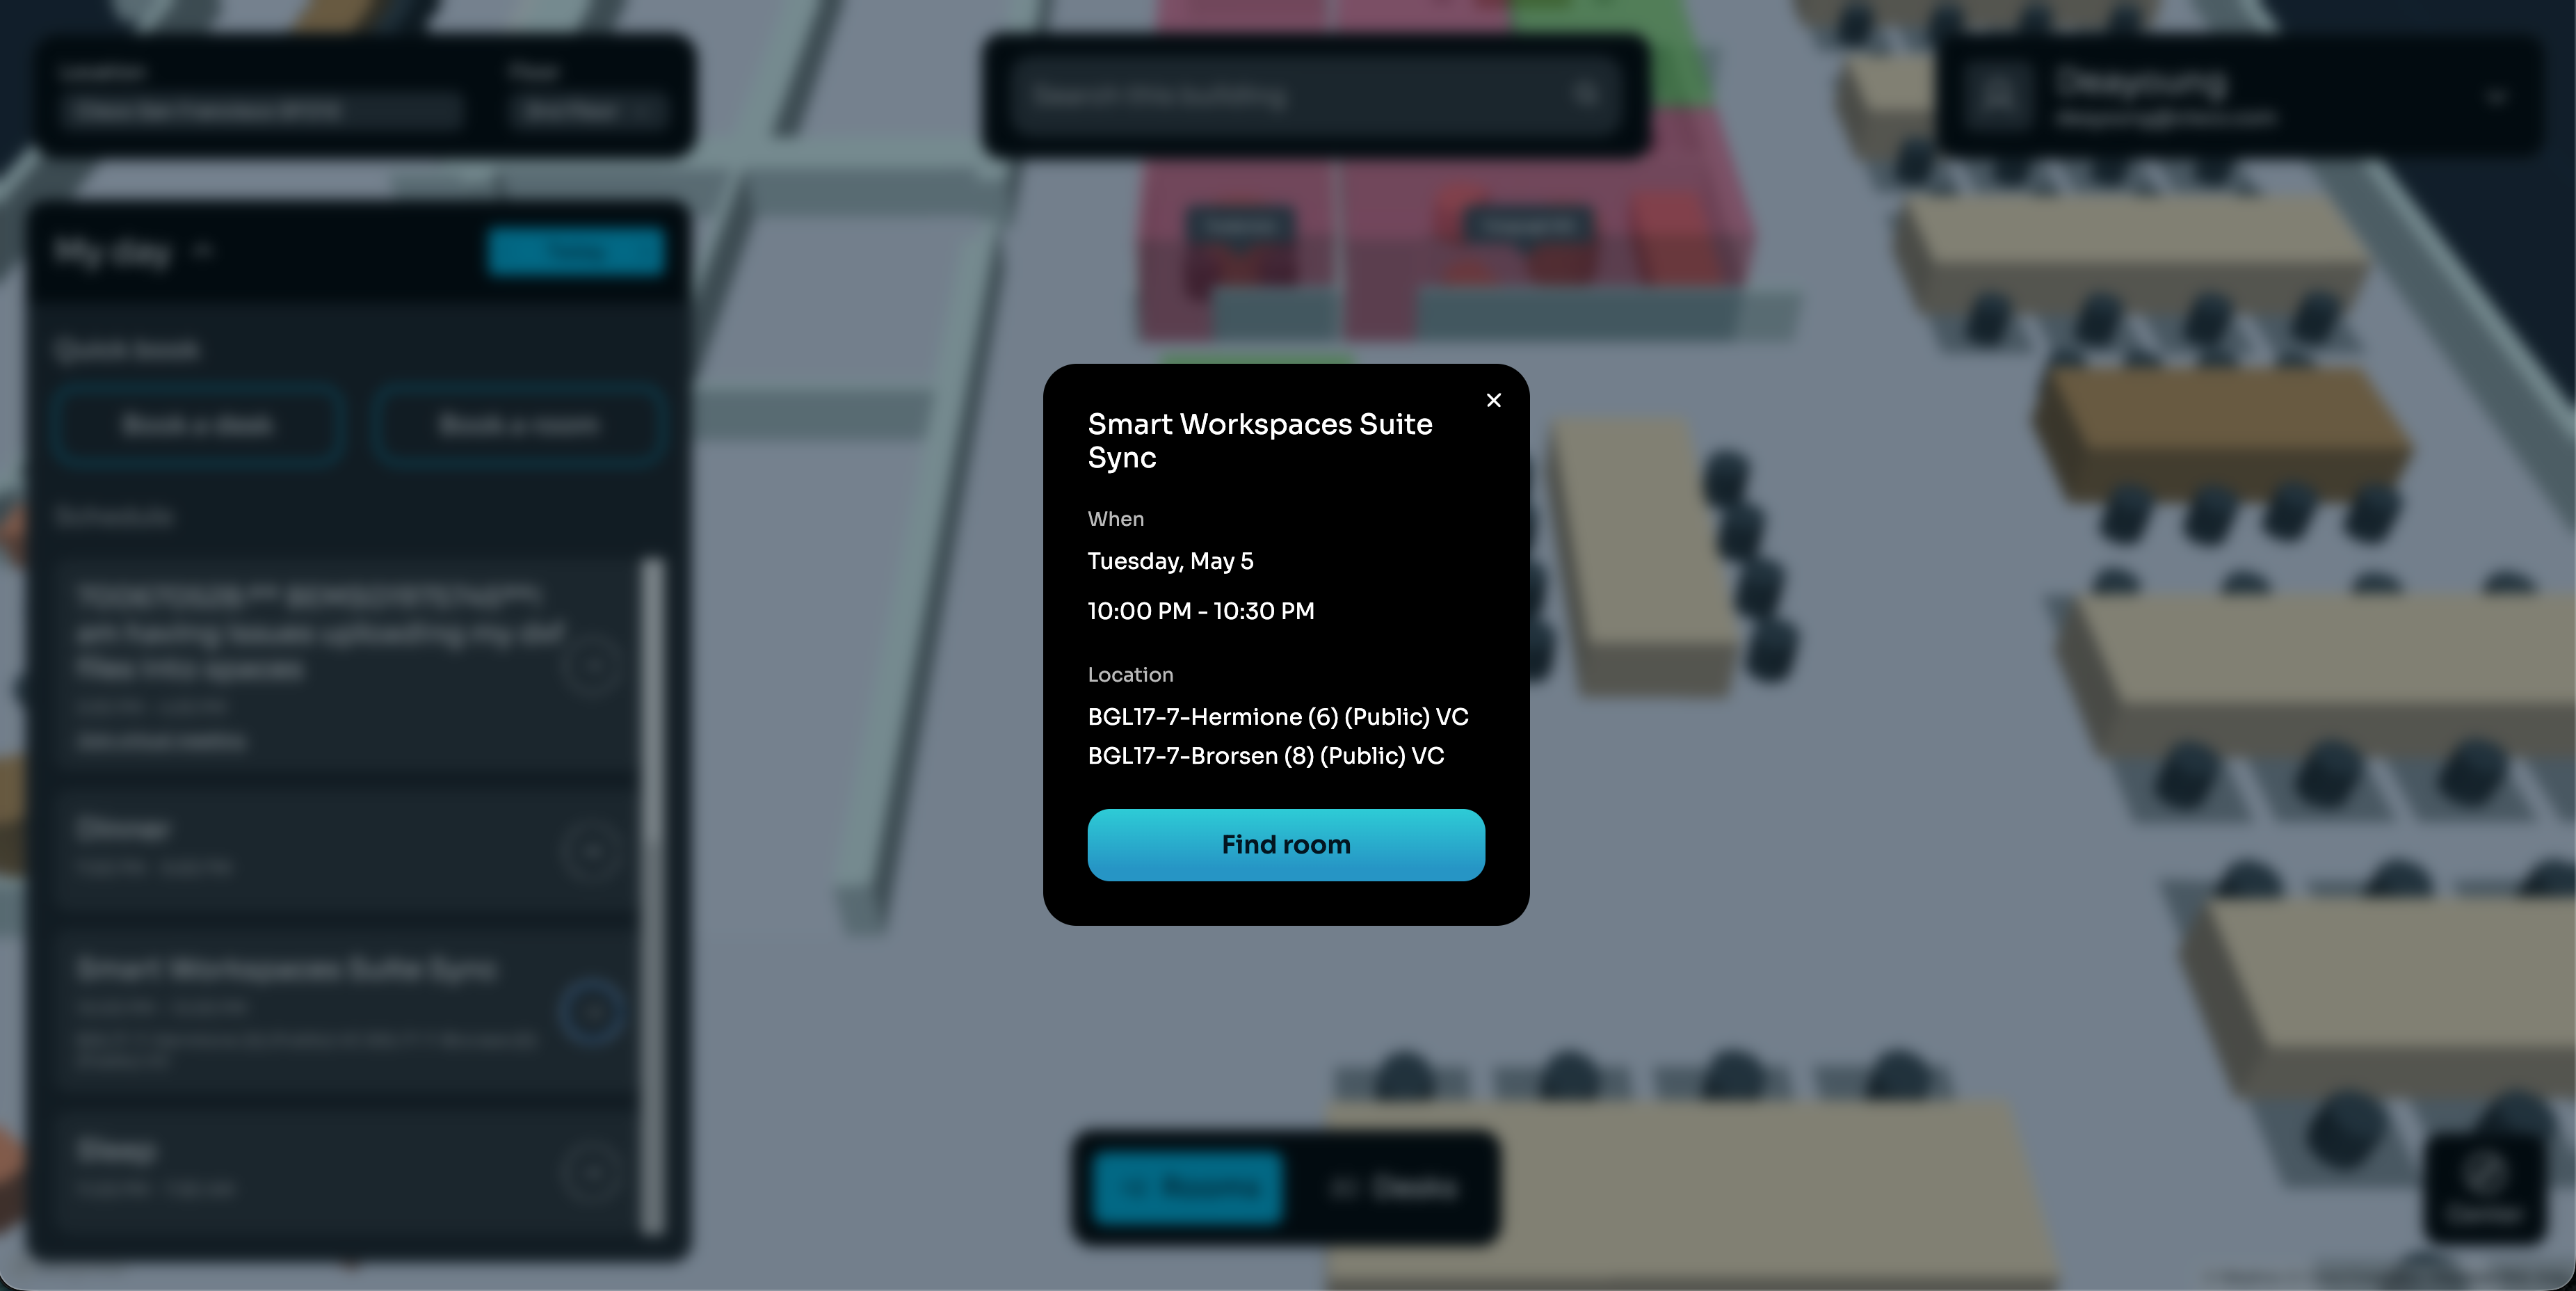
-
In the “My day” widget/tab, clicking on a calendar event’s arrow icon (

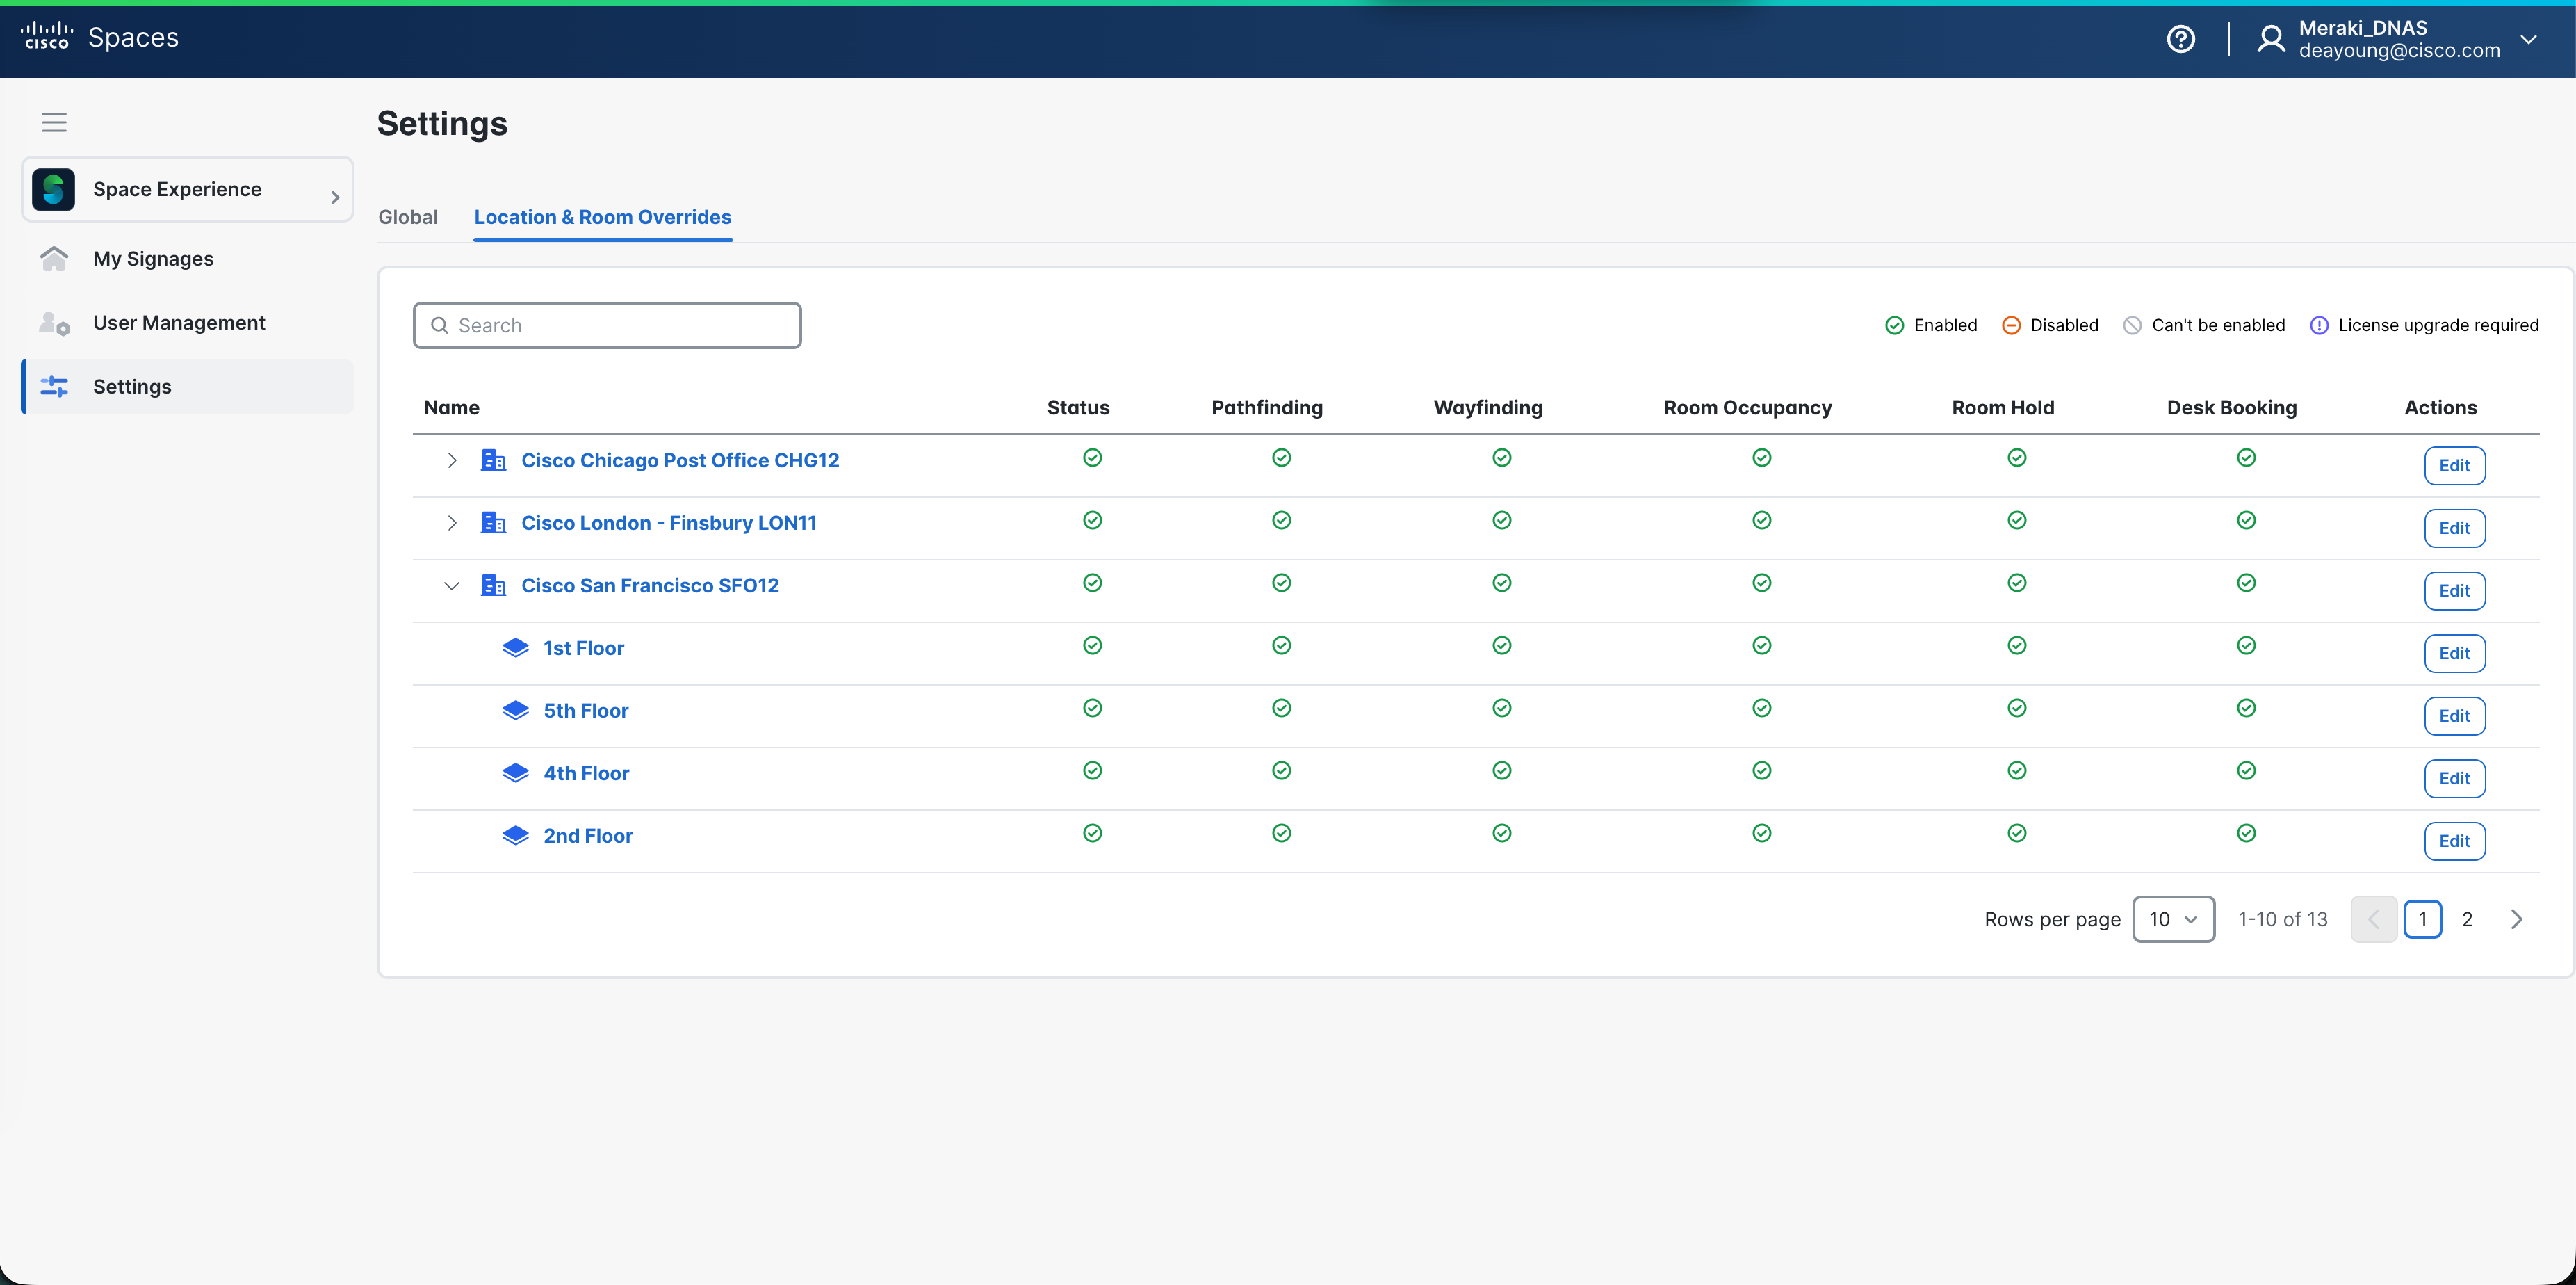
Steps to enable Room Booking
-
Open the Cisco Spaces dashboard
-
Navigate to Space Experience app
-
Go to the Settings page
-
Click on the Location & Room Overrides tab
-
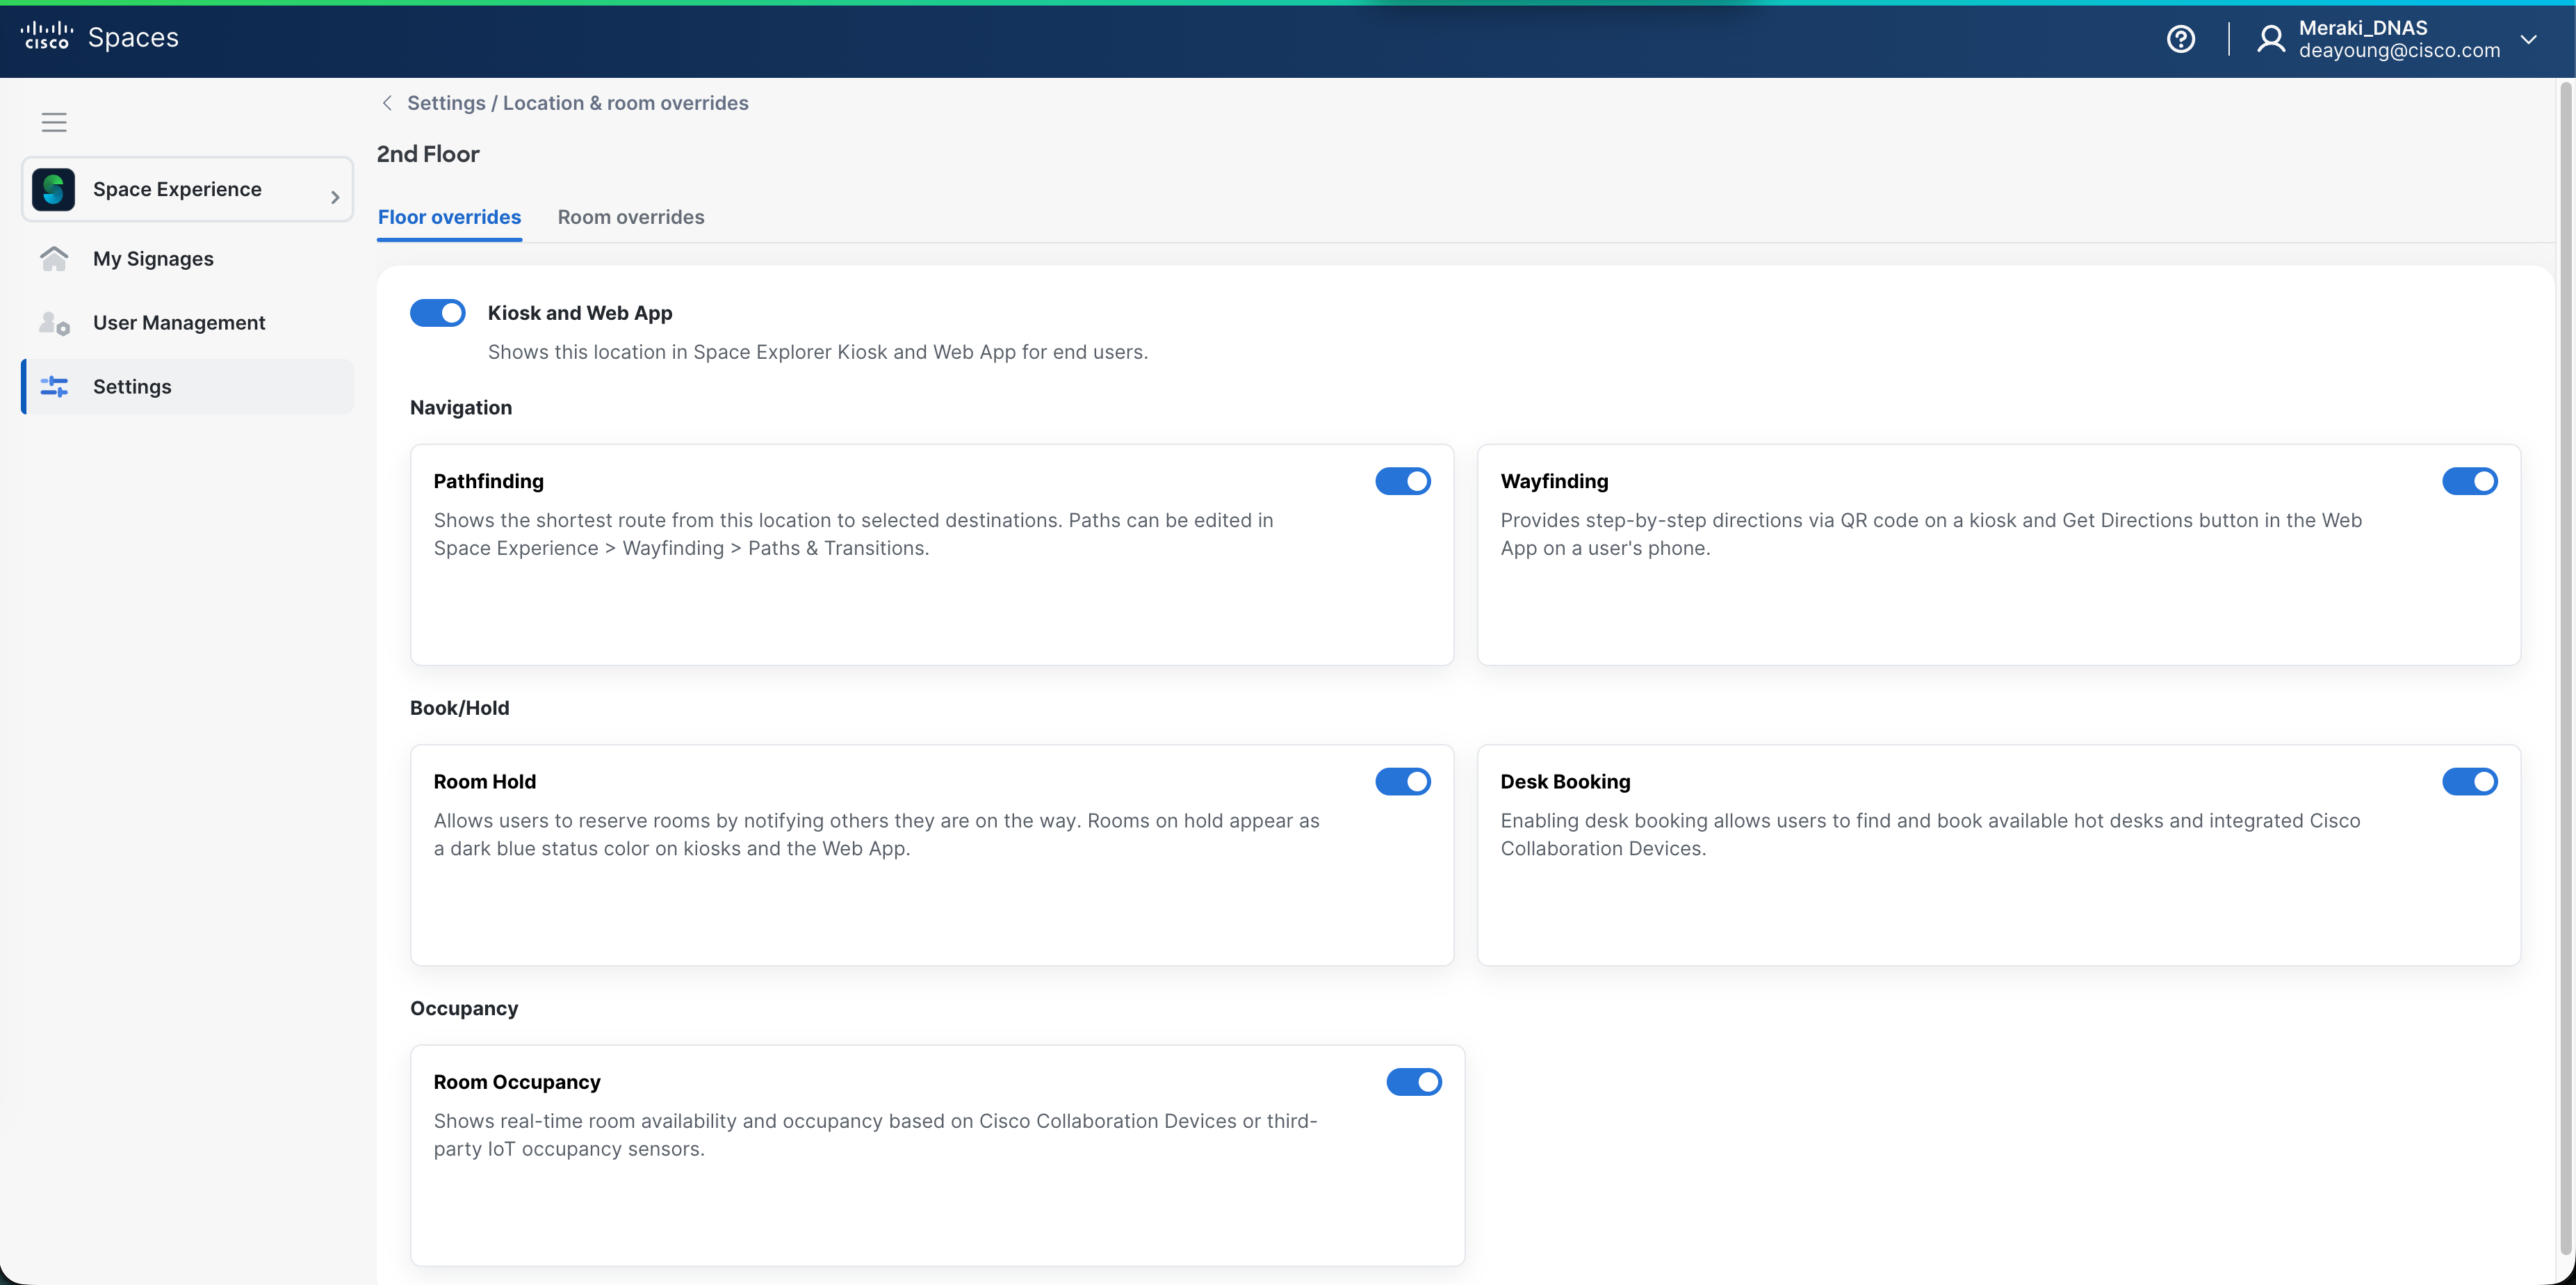
On the rows for Building(s) and Floor(s), click Edit to enable or disable these features (dependent on licensing): Status, Pathfinding, Wayfinding, Room Occupancy, Room Hold, Desk Booking.
-
Optional: click the building name for toggles.
-
Building and/or Floor overrides. Great for quickly enabling/disabling an entire feature without having to change individual room settings.
-
|
Option |
Description |
|---|---|
|
Status |
Enable/disable an entire building or floor in Space Explorer Kiosk & Web App. For example, useful for disabling specific floors while under construction. |
|
Pathfinding |
Enable/disable pathfinding at a building or floor level. For example, useful for setting up paths and transitions without deploying to live kiosks until ready to release to end users. |
|
Wayfinding |
Enable/disable wayfinding at a building or floor level. For example, useful for setting up paths, transitions, and beacons without deploying to live kiosks until ready to release to end users. |
|
Room Occupancy |
Enable/disable room occupancy status at a building or floor level. For example, useful for quickly shutting down occupancy telemetry to limit Space Explorer Kiosk & Web App to map content only. |
|
Room Hold |
Enable/disable Hold button at a building or floor level. Room booking settings are only available in per room settings (see below). |
|
Desk Booking |
Enable/disable desk booking at a building or floor level. For example, useful for setting up desks while Space Explorer Kiosk & Web App are deployed until ready to release to end users. |
-
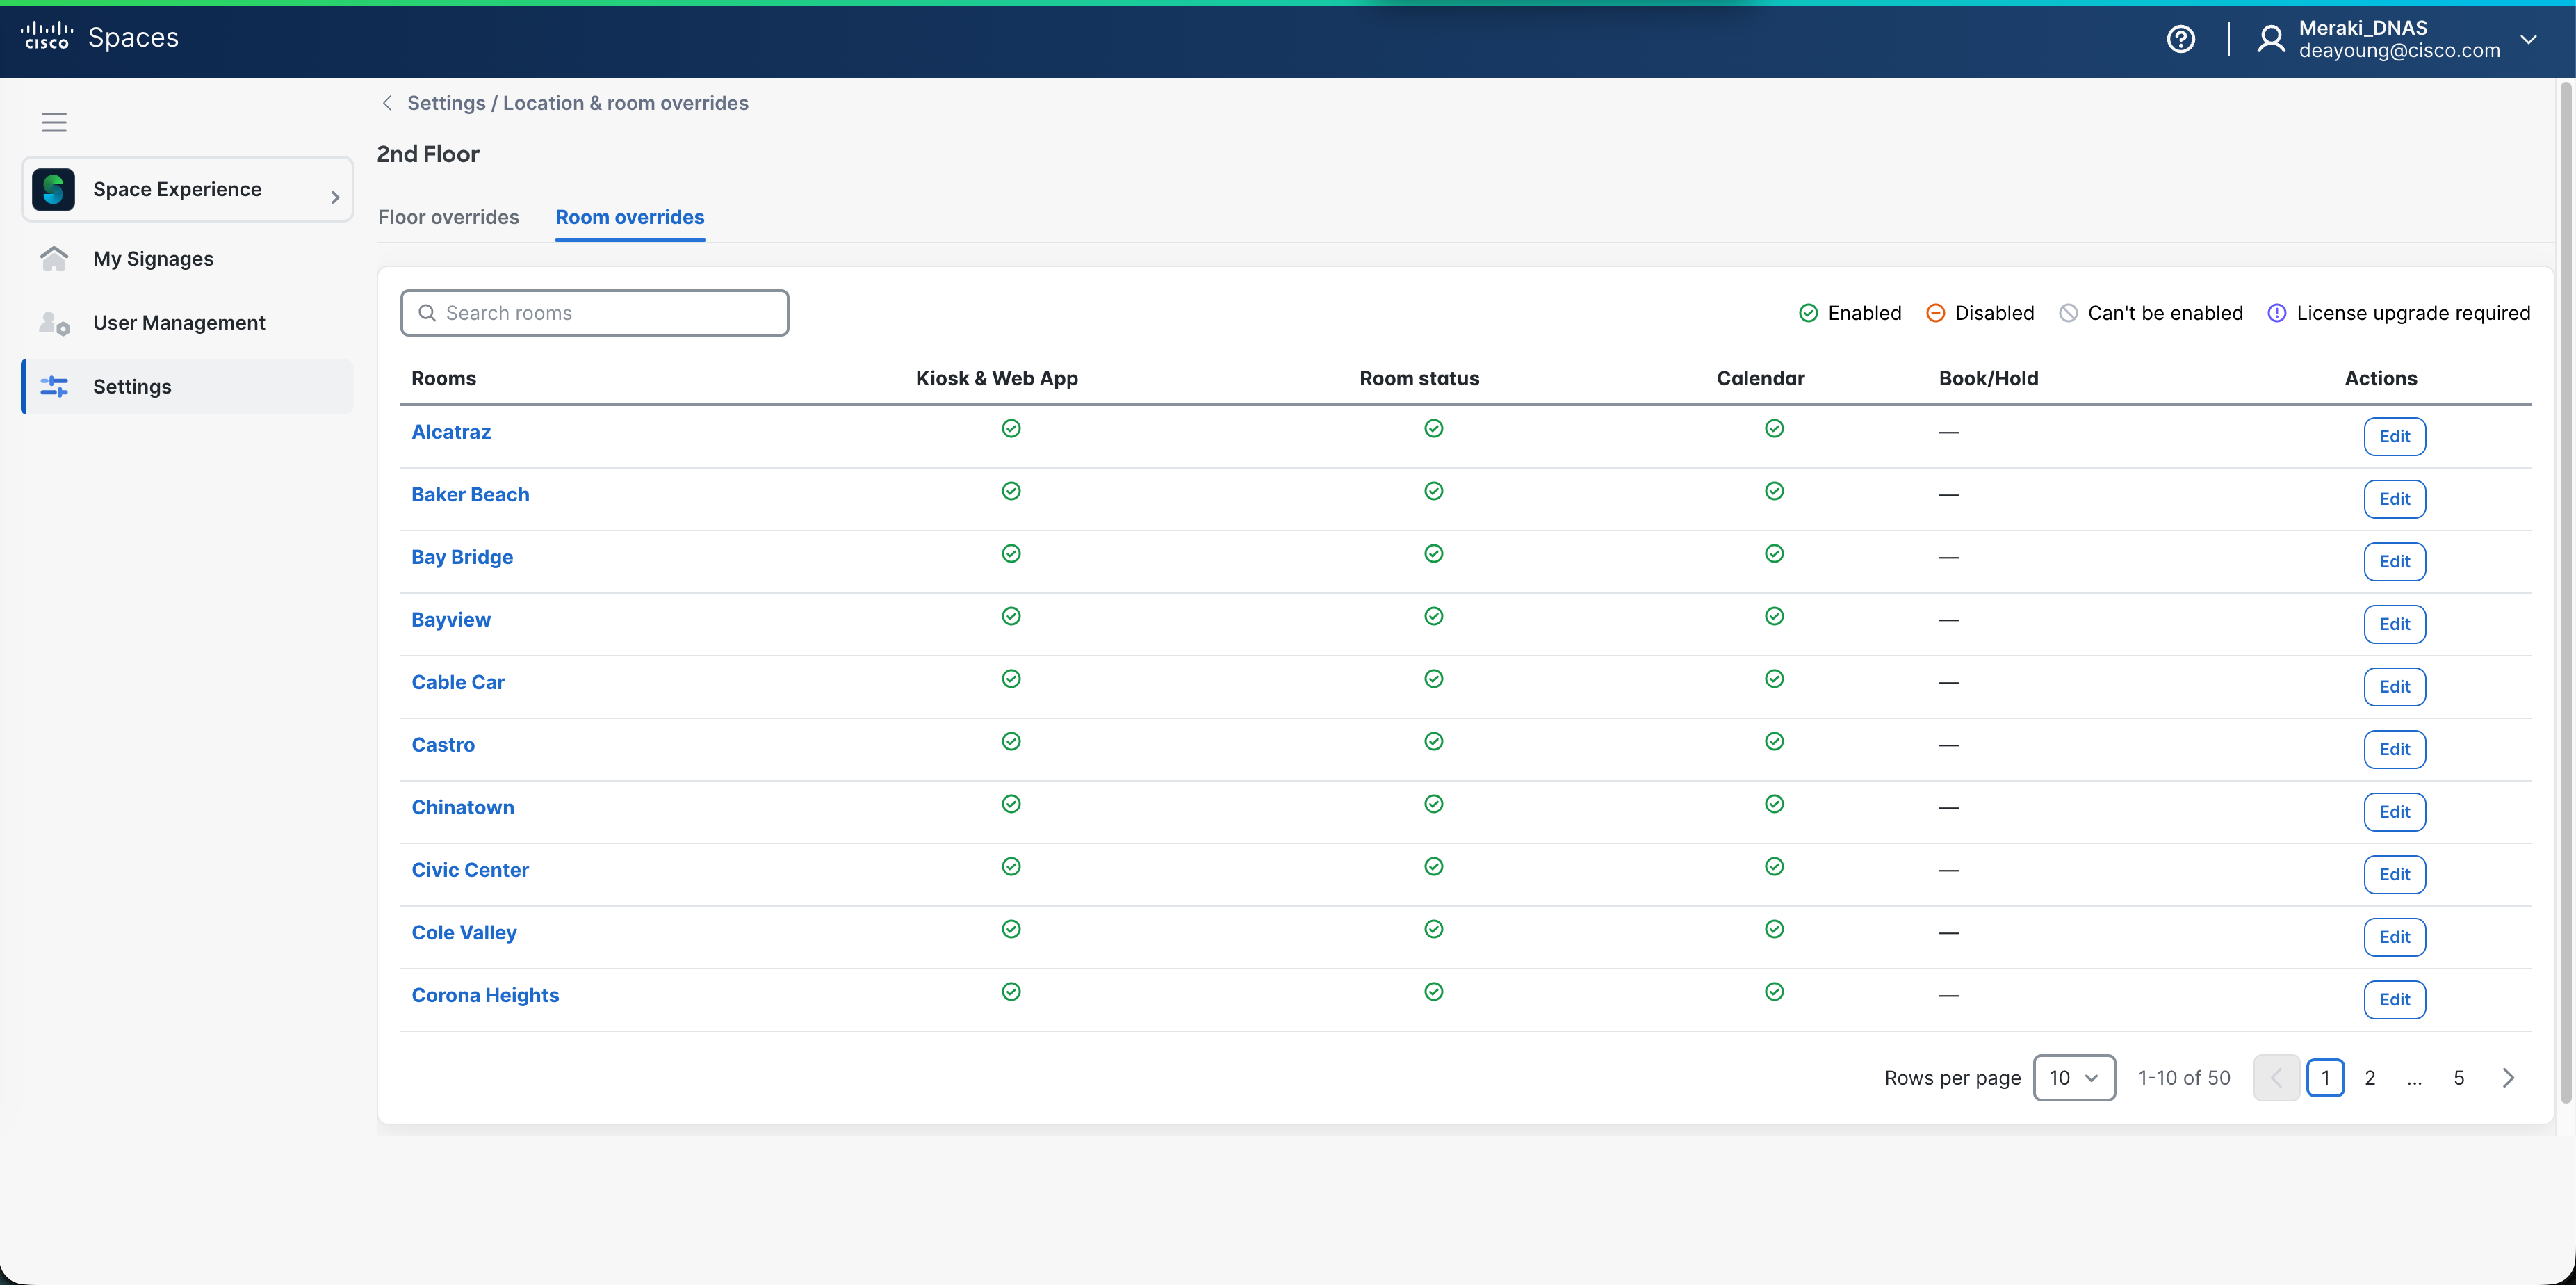
Expand a building and click on a Floor name
-
Click on Room overrides tab
-
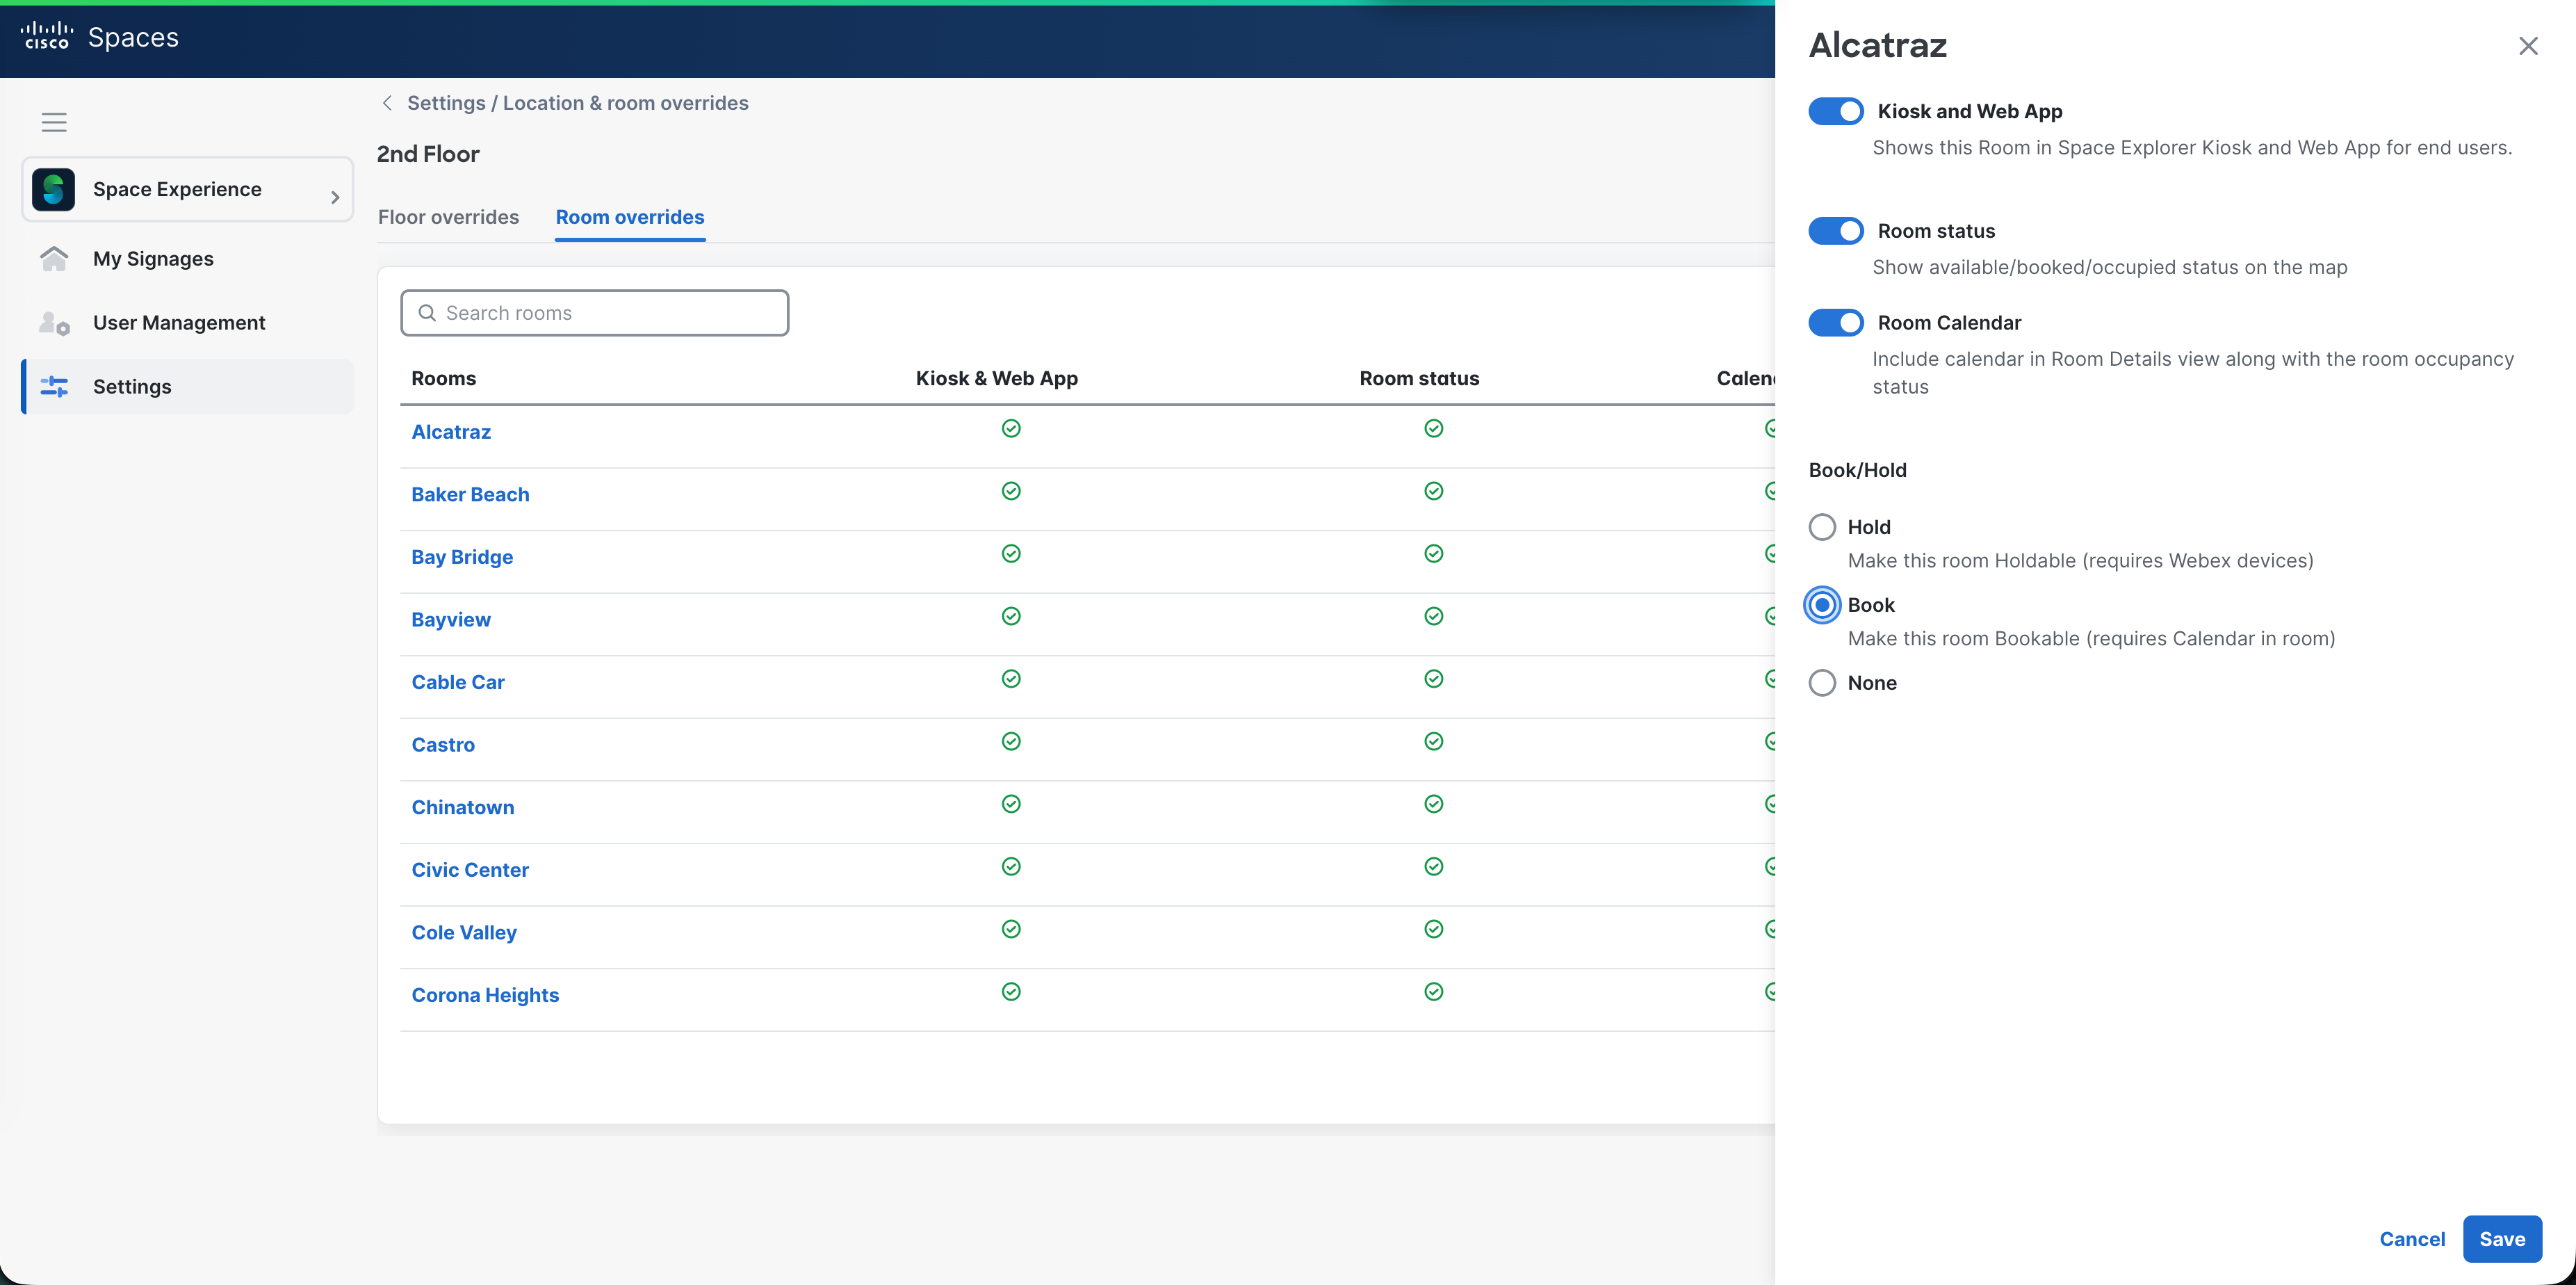
On the rows for the Room(s), click Edit to configure the following features (dependent on licensing): Kiosk & Web App, Room status, Calendar, Book/Hold.
|
Option |
Description |
|---|---|
|
Kiosk & Web App |
Enable/disable a single room in Space Explorer Kiosk & Web App. |
|
Room Status |
Enable/disable a single room’s real-time occupancy and booking telemetry. For example, useful for hiding a room’s occupancy on Space Explorer Kiosk & Web App while still collecting telemetry in Space Utilization app for historical occupancy analytics. |
|
Calendar |
Enable/disable a single room’s calendar on space Explorer Kiosk & Web App. For example, useful for hiding the calendar (and subsequently disabling the room booking option) on an ad hoc use meeting room, such as a call booth, focus room, or huddle room. This setting hides the calendar view in the room details popup. |
|
Book/Hold |
Choose among button options to show to end users on Space Explorer Kiosk & Web App:
|
Tenant-to-Domain Mapping
Spaces PM team or Dev team needs to add a Tenant-to-domain mapping for new customers in our system to support Authorization required for desk booking. This requirement is temporary until the self-serve admin interface is available in the Space Experience app.
Data Required from Customer
|
Data List |
Example Information for Reference |
|---|---|
|
Tenant ID |
16305 |
|
Account Name |
CiscoAlpha |
|
Region(s) Supported |
IO |
|
Email Domain(s) |
meraki.net, cisco.com |
|
Authenticator App Preference |
Google, Microsoft |
Space Explorer Web App supports a many-to-many-to-many mapping of Tenant ID(s) to domain(s) to Microsoft/Google tenant(s). In other words, it is possible to map Tenants 12345 and 67890 to domains example1.com and example2.com each with their own Microsoft Entra or Google Workspace account. End users from multiple organizations can login and see a unified Location list and maps from multiple Cisco Spaces Tenants with users on multiple email domains, and (⚠️ ROADMAP ⚠️) even across Cisco Spaces data regions (e.g. .io, .eu, and .sg).
IT Admin Consent
Webex Login - Admin Permissions
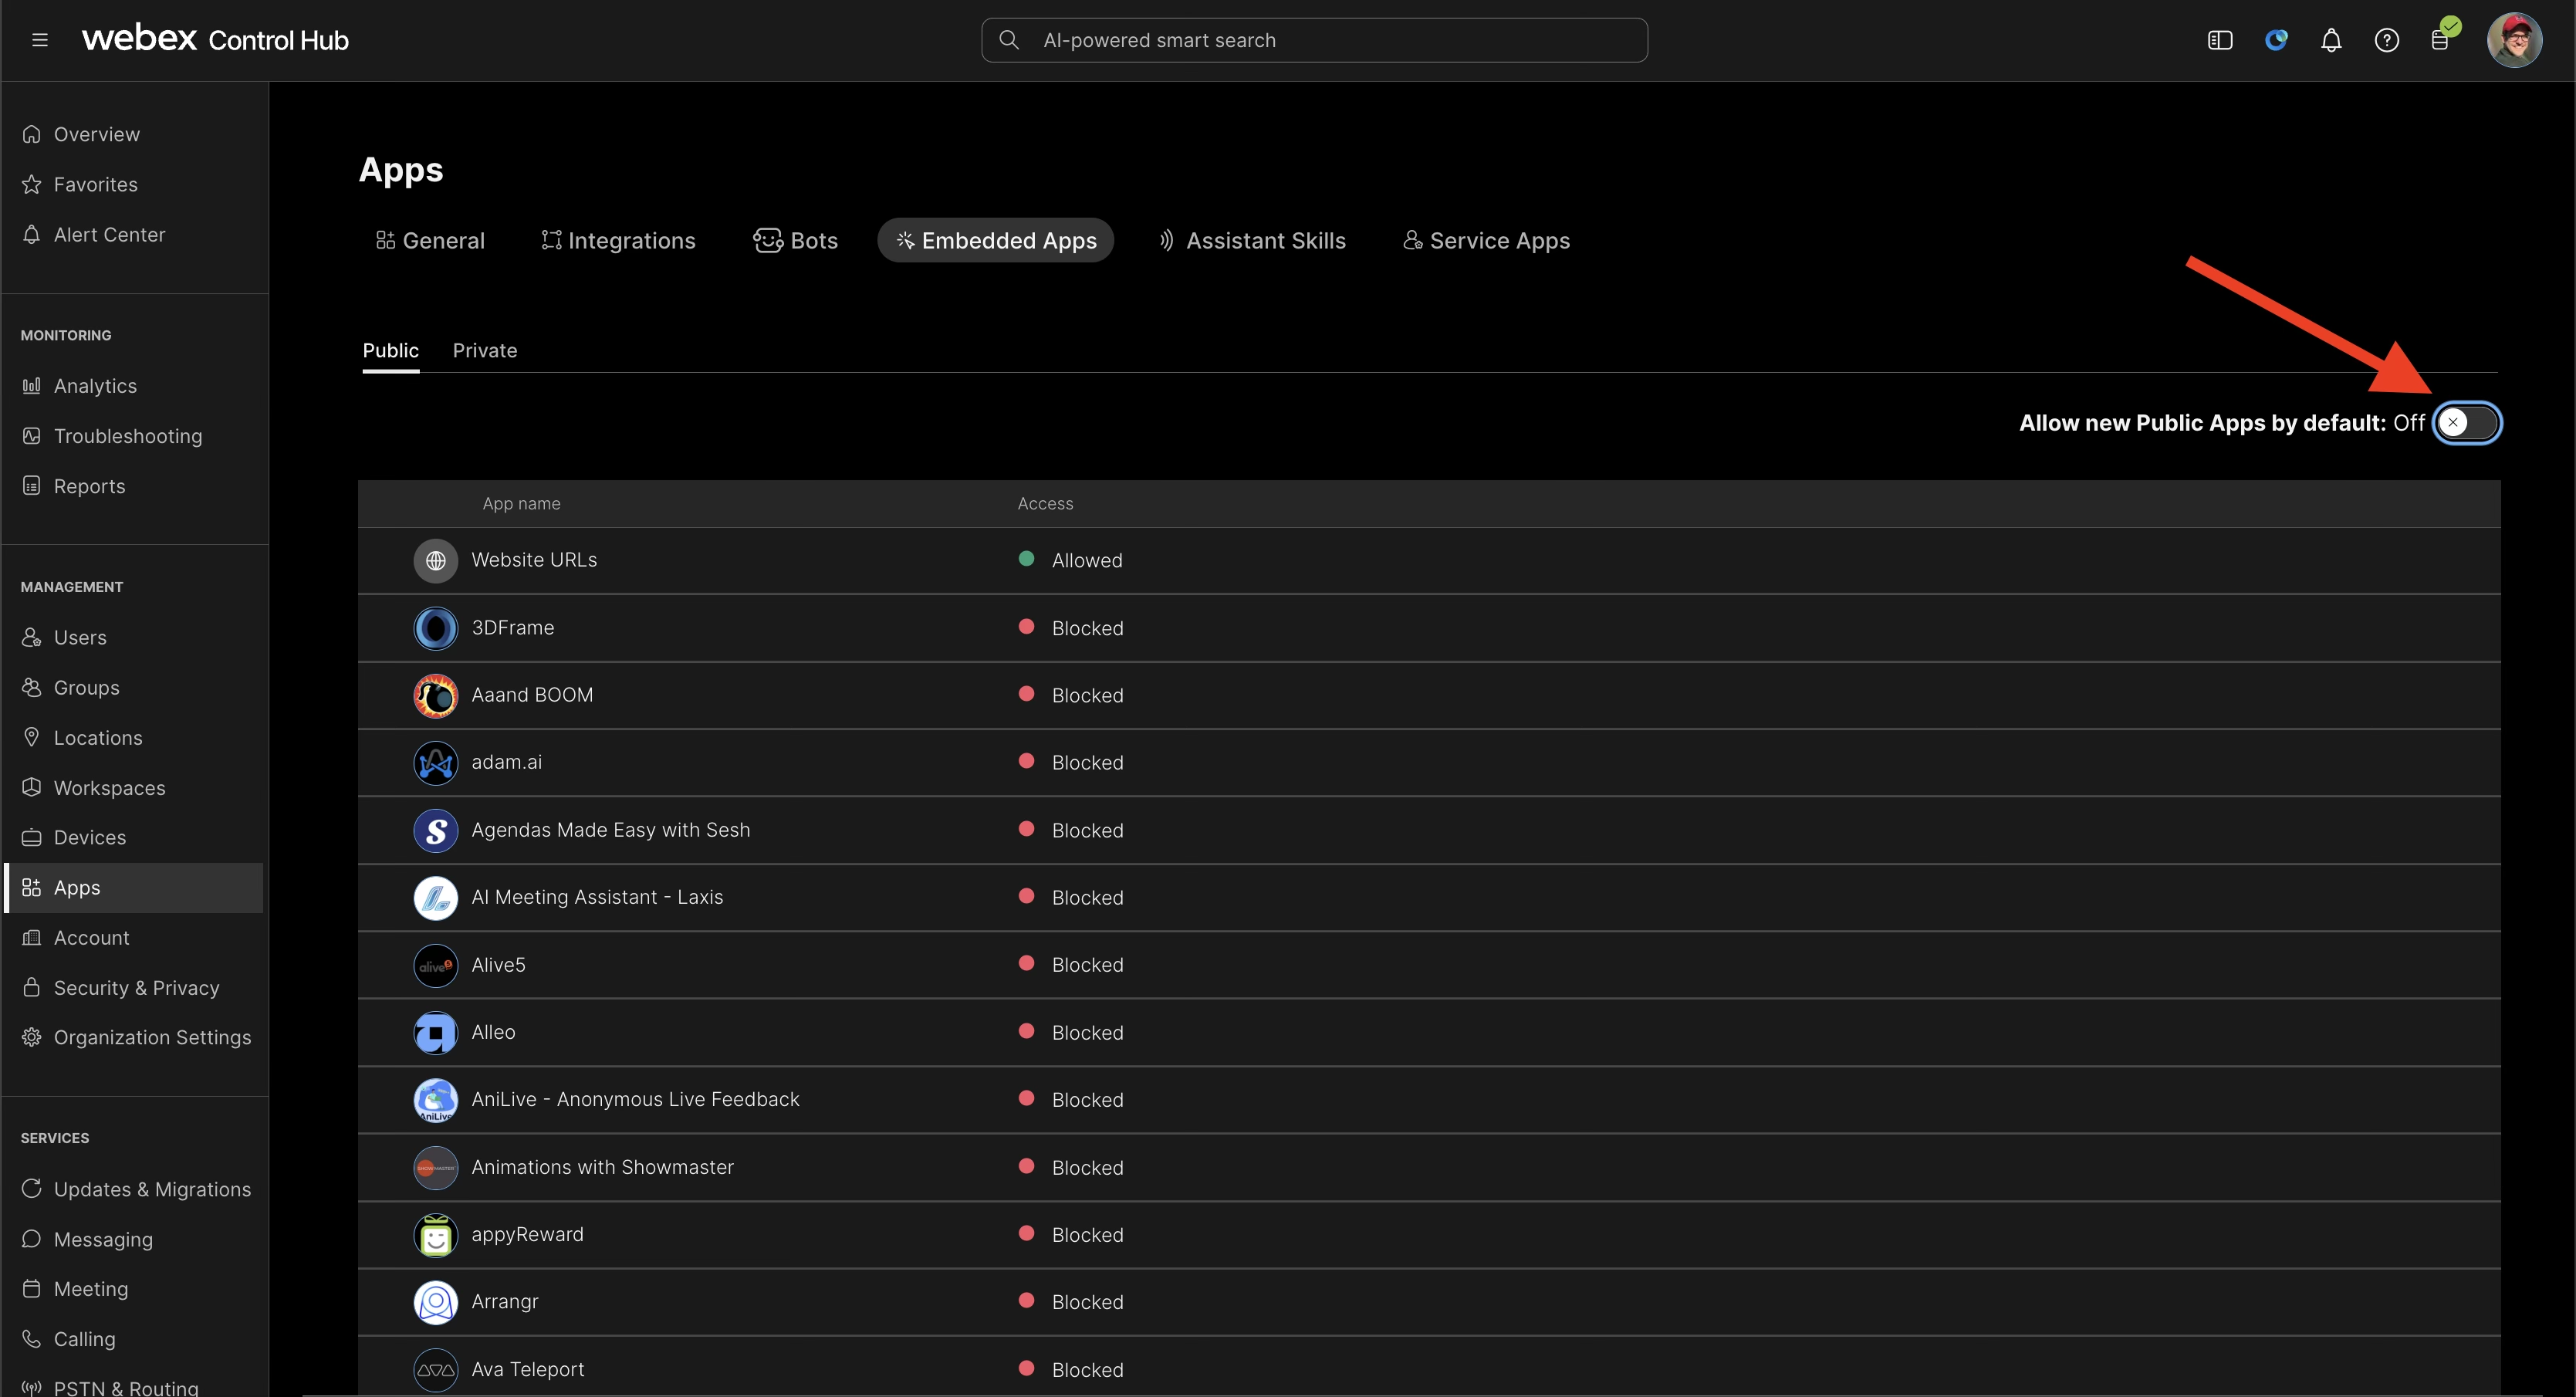
For Webex Login, if an admin has blocked apps, then a Control Hub admin will need to manually approve the Cisco Spaces app.
App ID: Y2lzY29zcGFyazovL3VzL0FQUExJQ0FUSU9OL0M3MGIwMDJmOWVhNGI3MGFiNGU5MjgyYzUyOTU2Njg2ZGQxODE0YjRmYzVkYjM4NjFmNmE2OWRmZDY0YTgxMWQw
Google Login - Admin Permissions
For Google Login no admin consent is required.
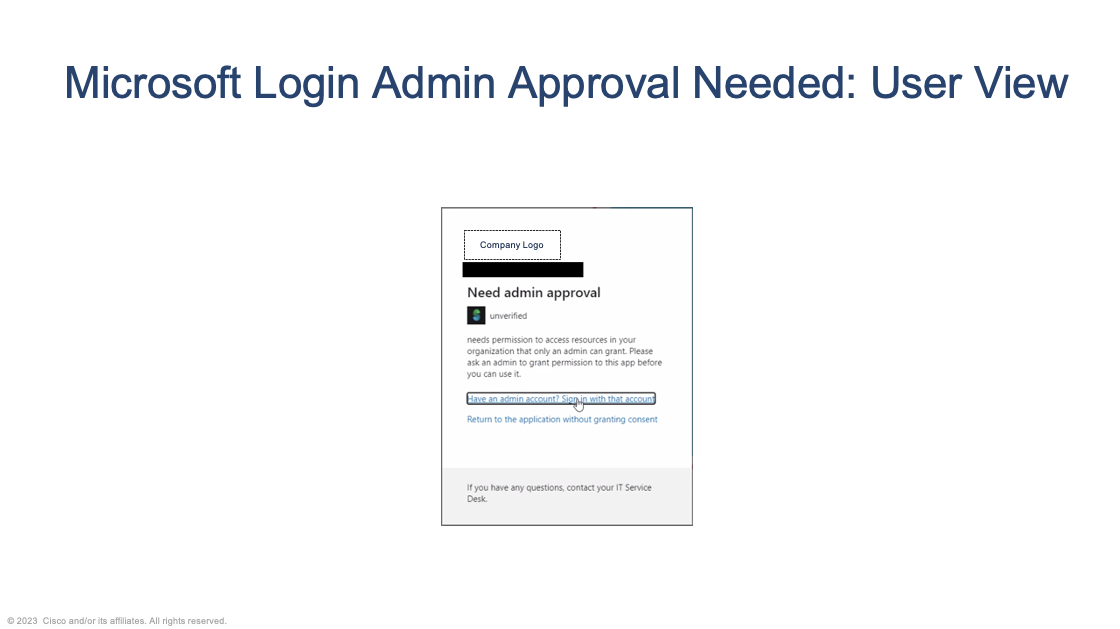
Microsoft 365 Login - Admin First Time
Background and details on Admin Consent: https://learn.microsoft.com/en-us/entra/identity/enterprise-apps/admin-consent-workflow-overview
-
Customer Microsoft 365 admin goes to https://booking.dnaspaces.io
-
Click on “Microsoft” button

-
First time only, a customer will see an “Need admin approval” screen. As a Microsoft 365 full admin, click through “Have an admin account? Sign in with that account.”
-
Review the scopes/permissions, check the consent box, and Accept

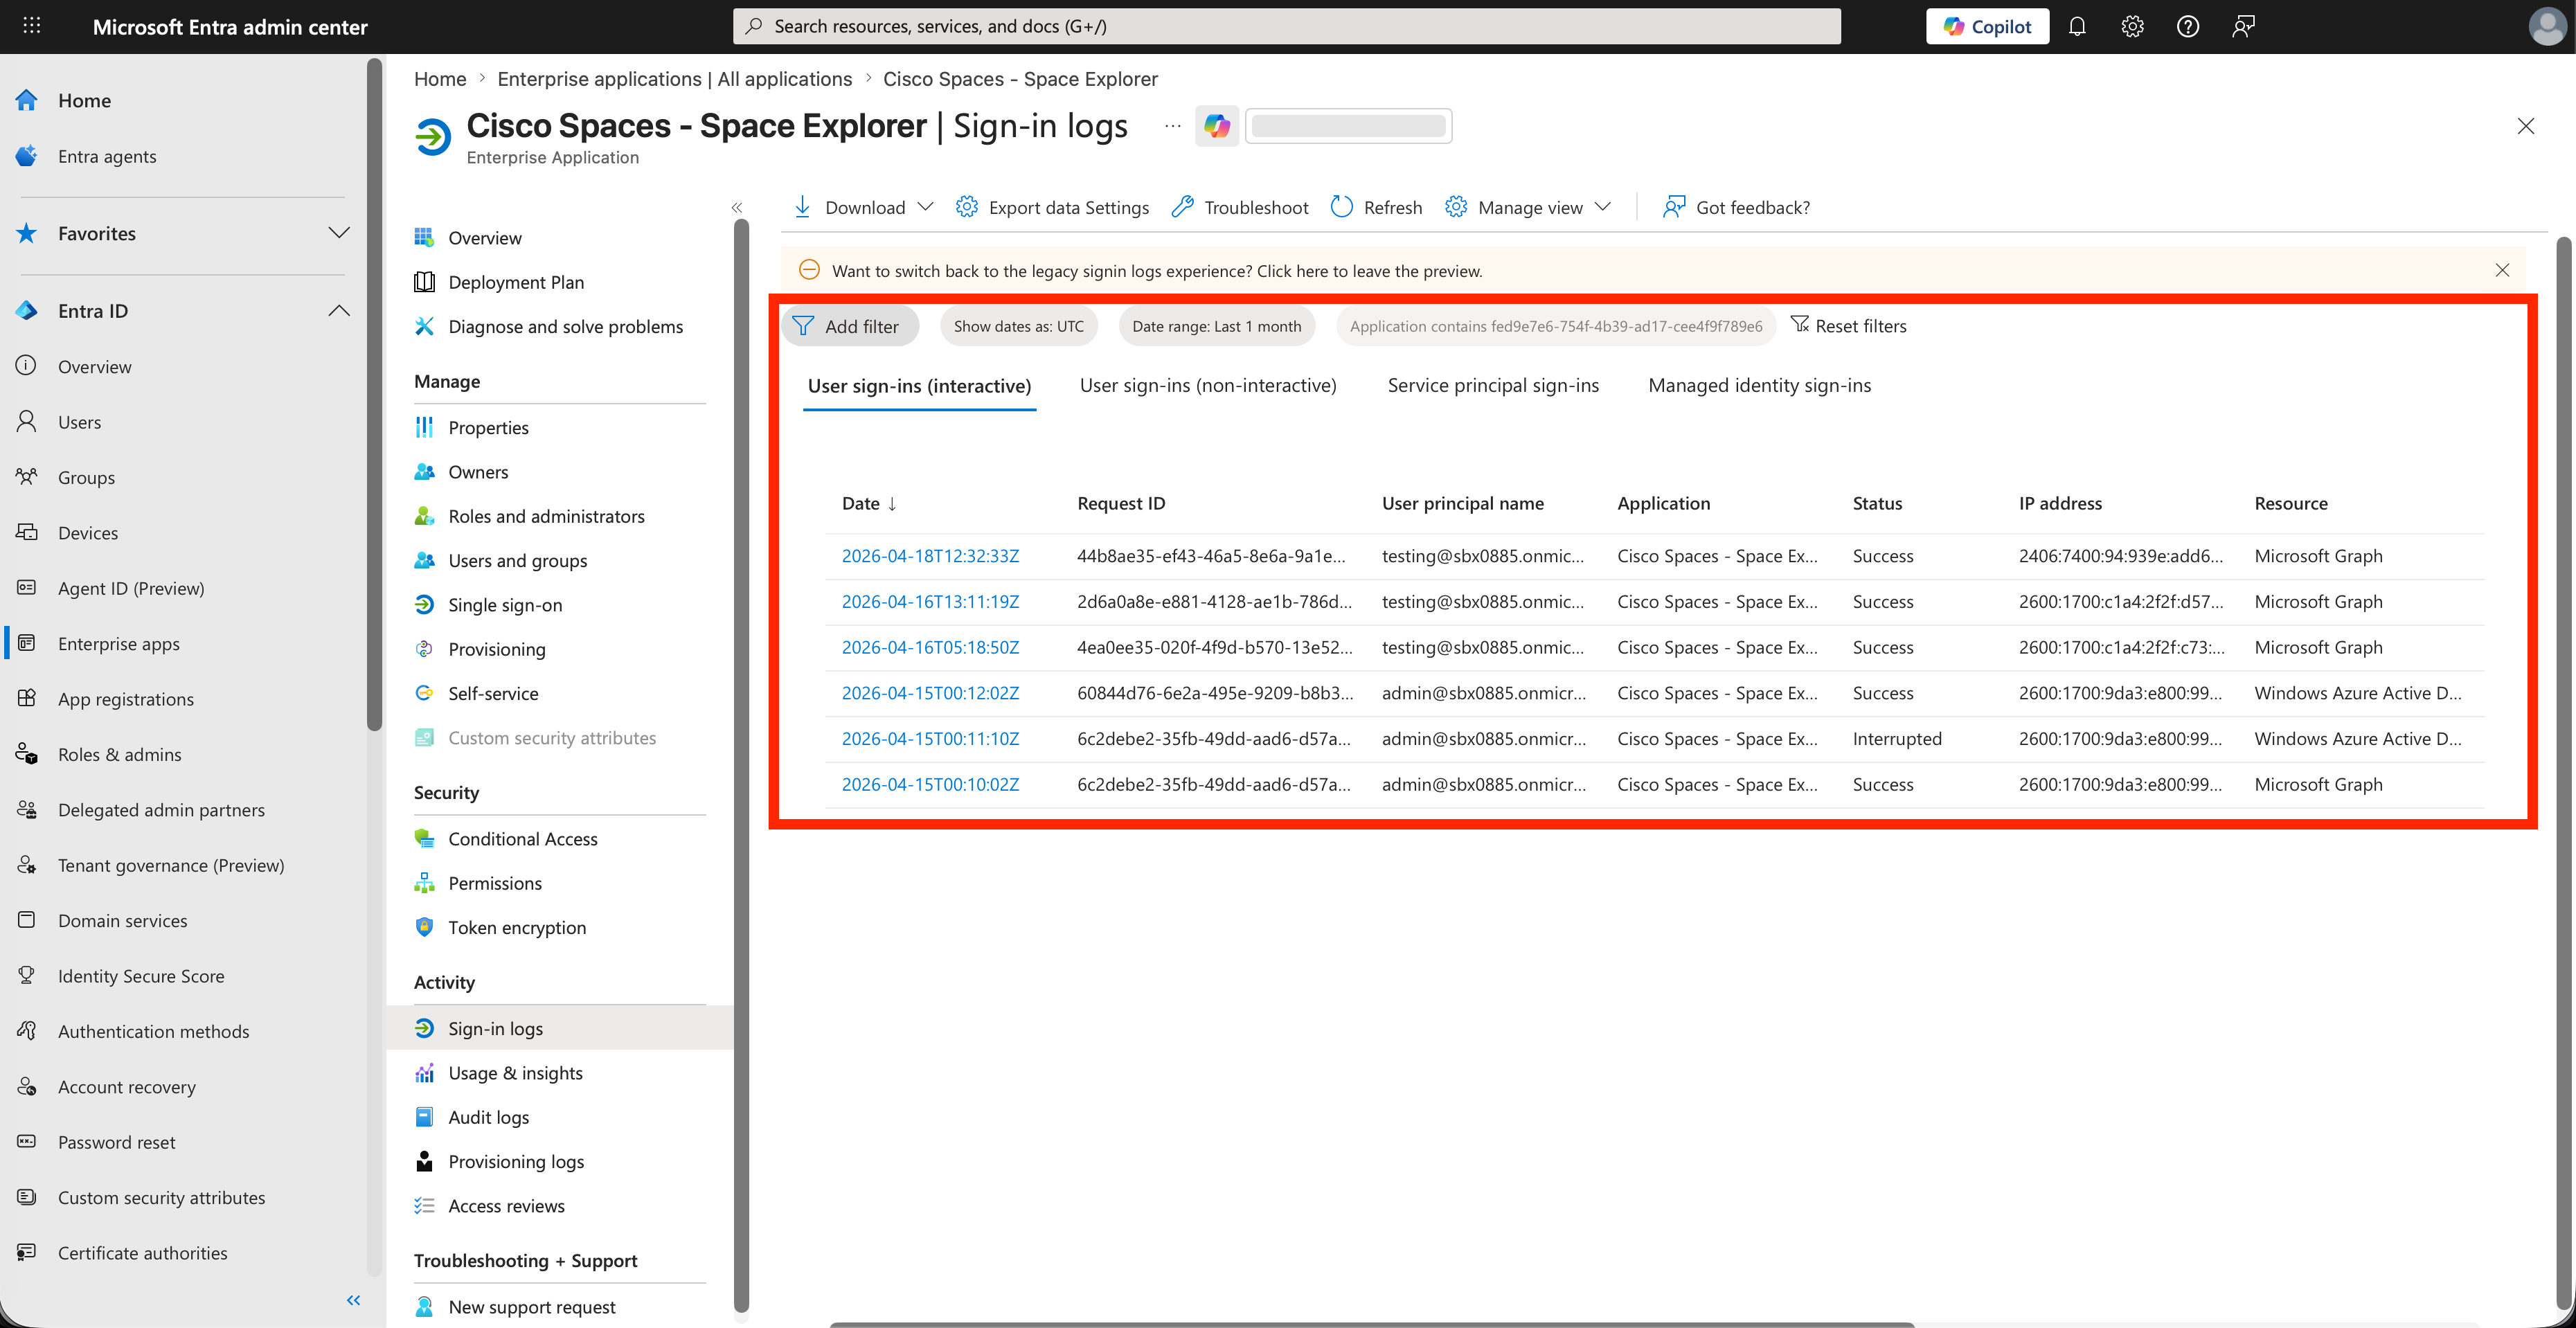
Additional Microsoft Entra admin center Details
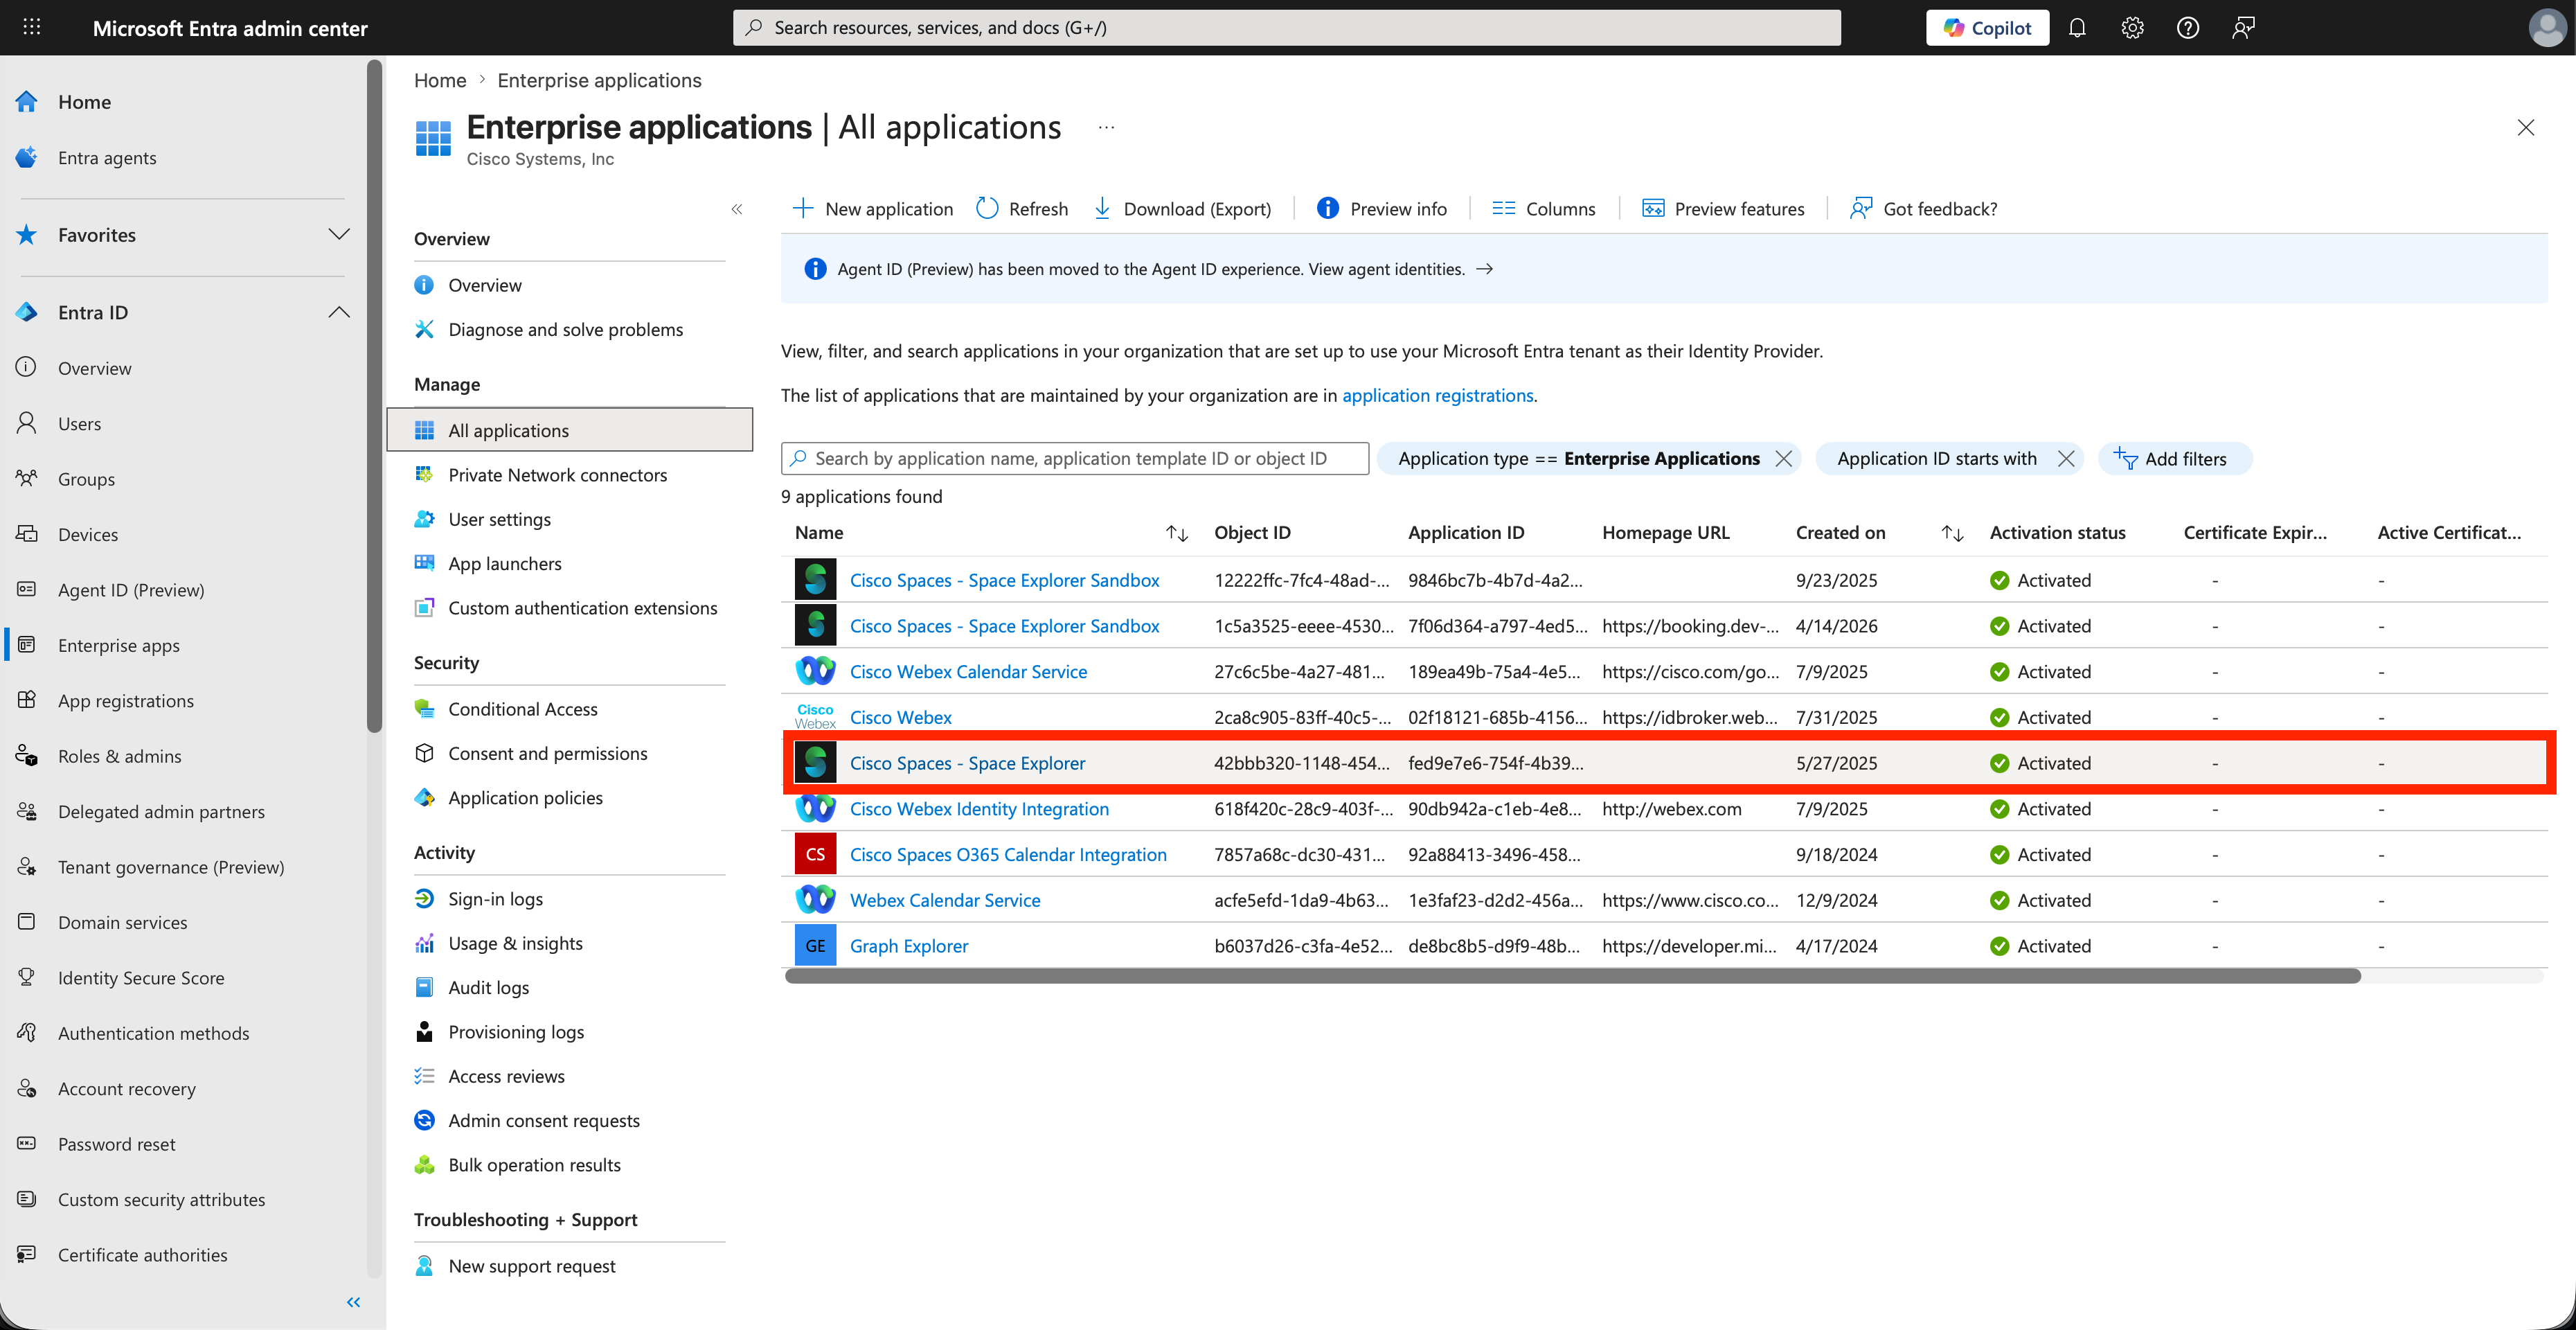
Microsoft Entra admin center (https://entra.microsoft.com/) provides multiple capabilities for managing the “Cisco Spaces - Space Explorer” Web App integration and troubleshooting Microsoft Login issues. Once logged into Microsoft Entra admin center, navigate to Enterprise apps, then search or look for “Cisco Spaces - Space Explorer” in the list of apps.
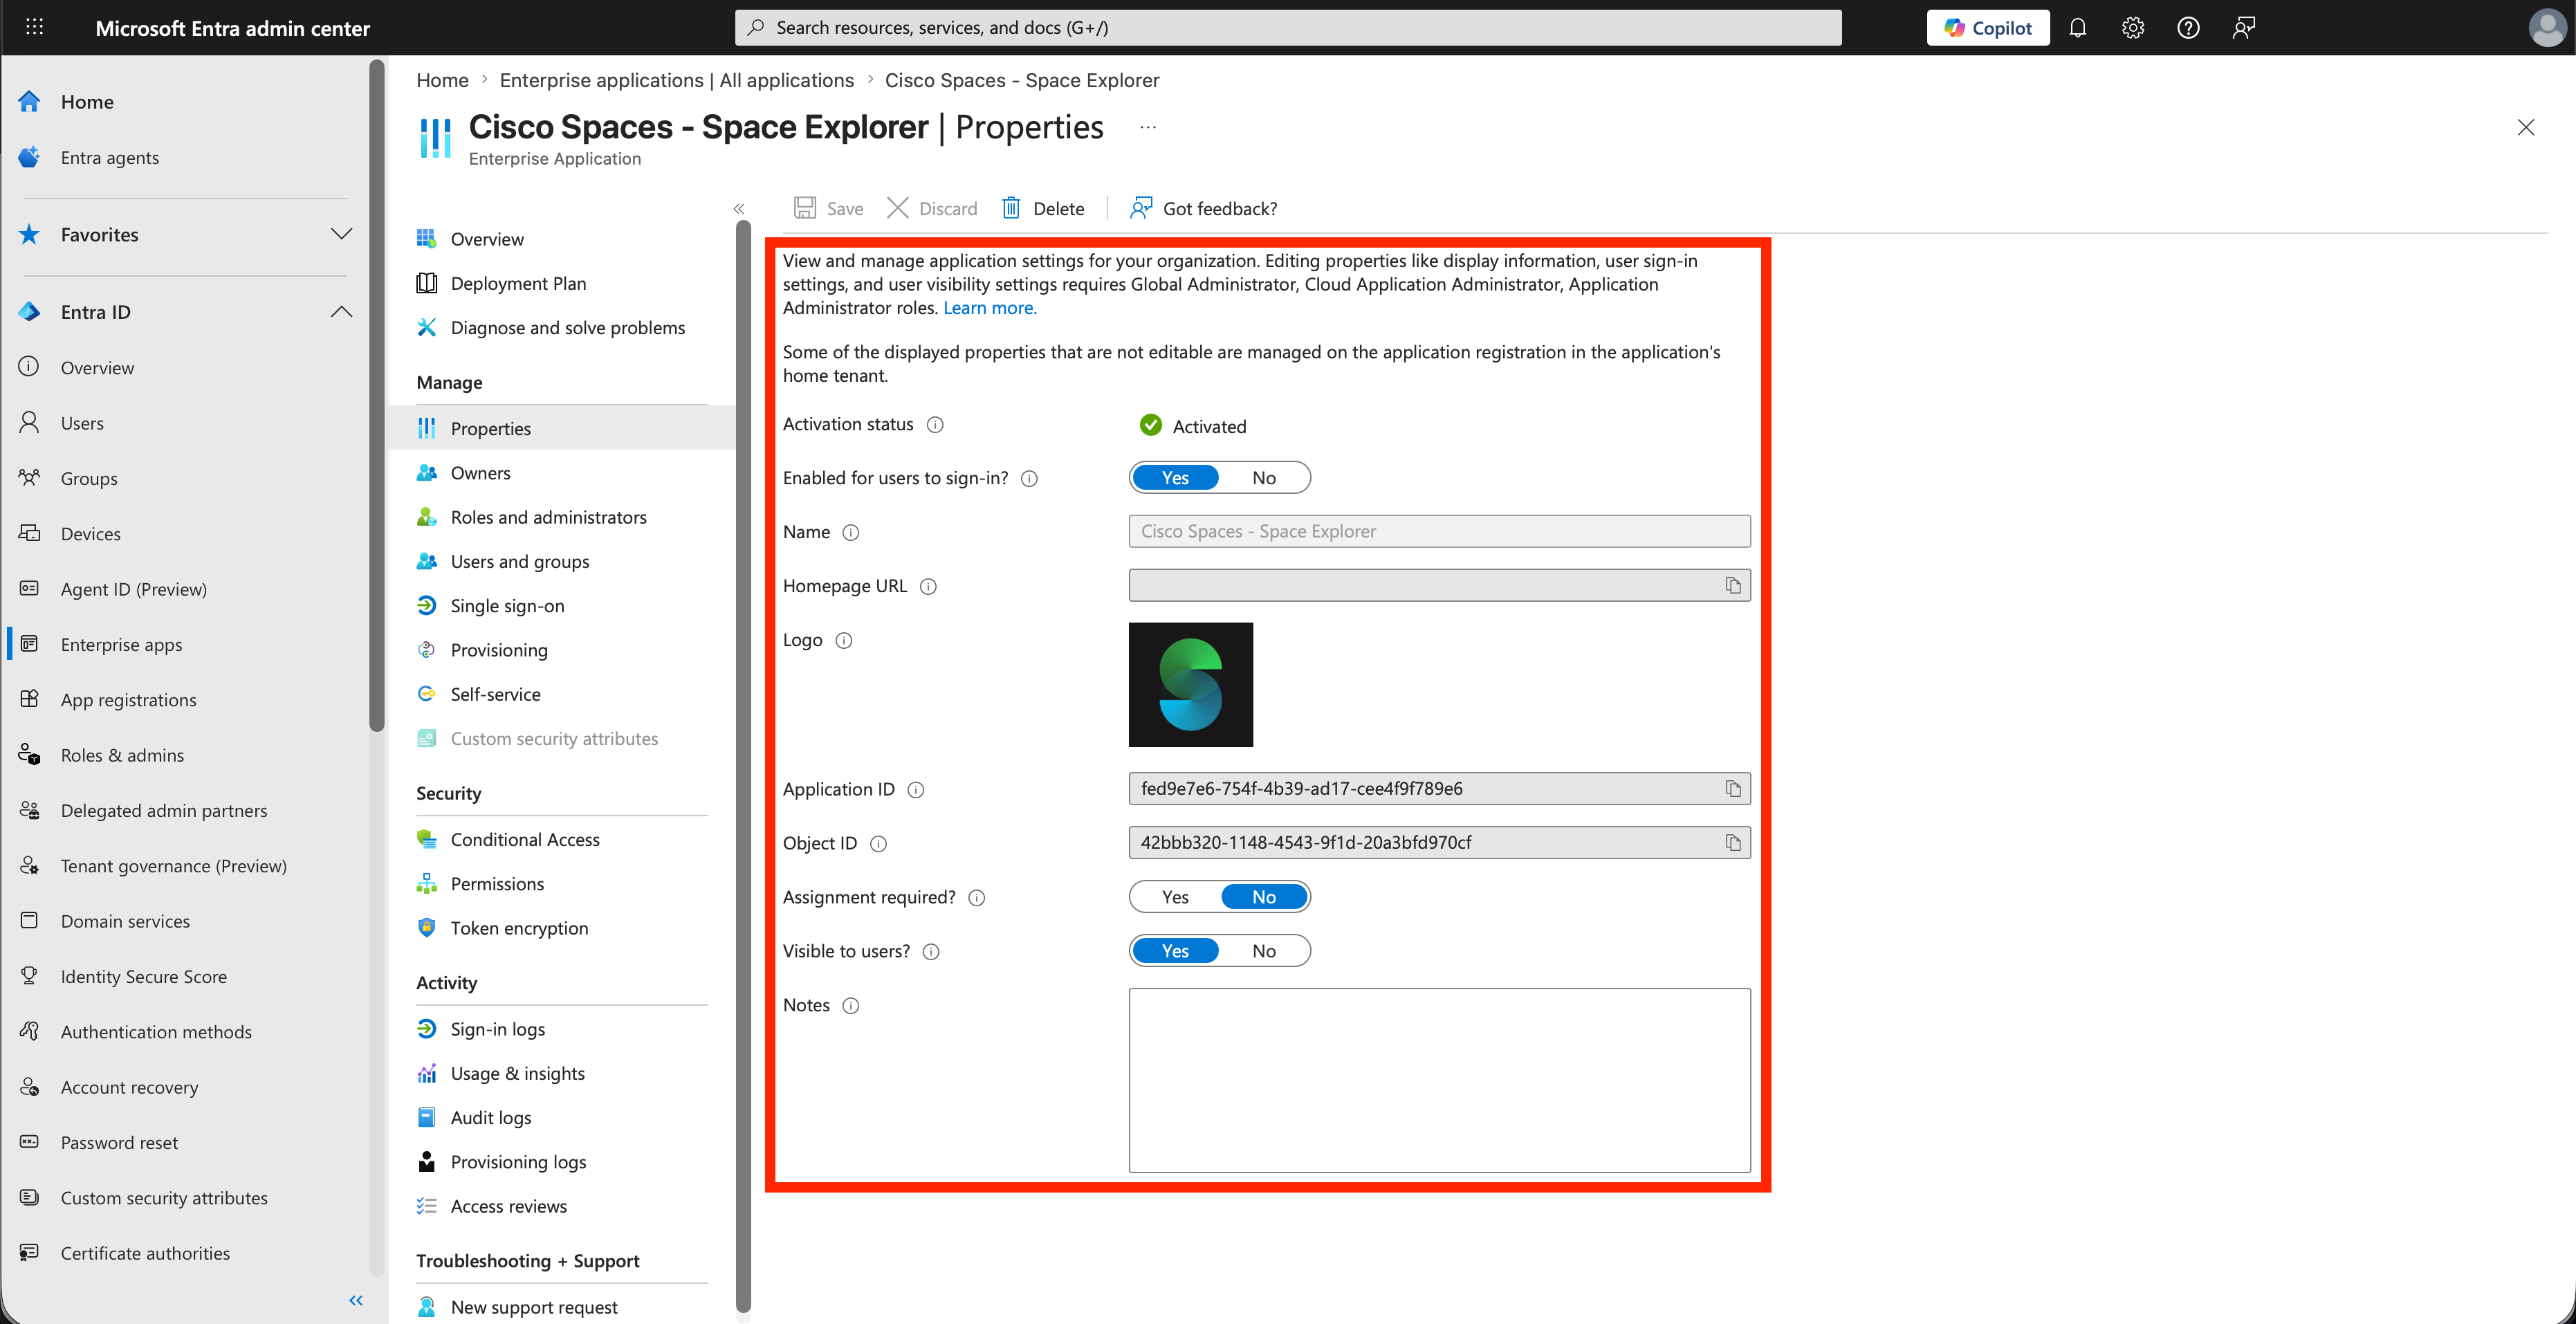
After clicking into the “Cisco Spaces - Space Explorer” list item, go to Manage > Properties to ensure sign-in is enabled and the app is visible to users.
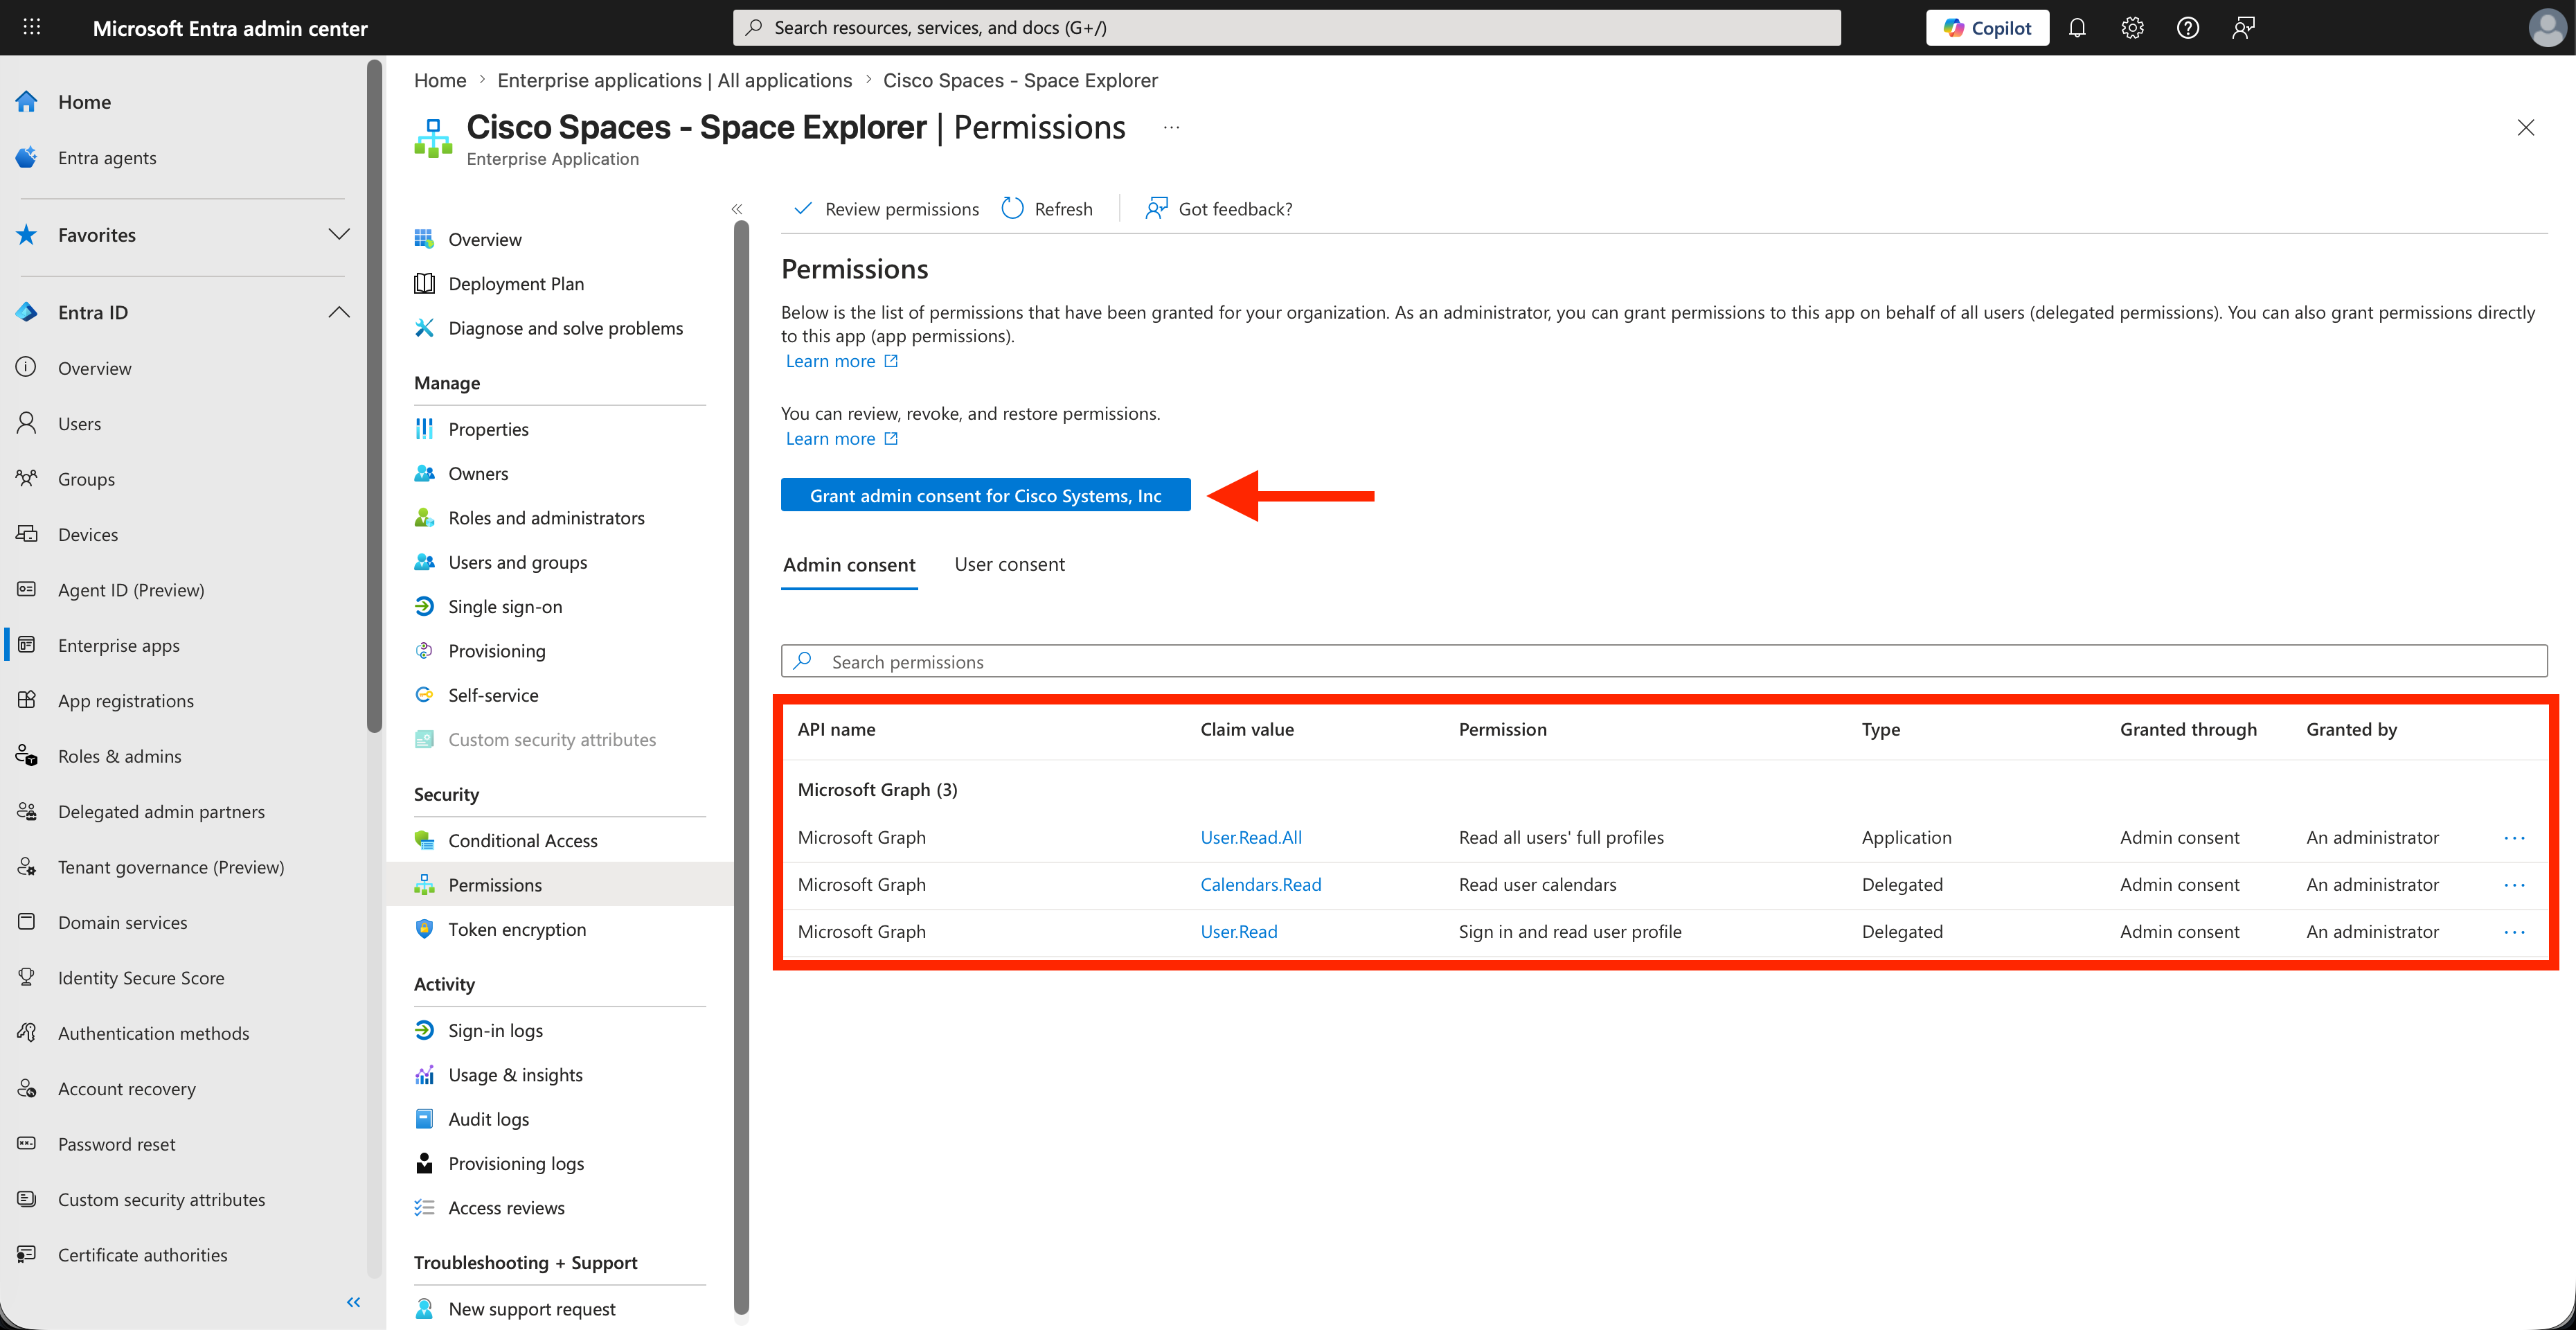
Visit the Security > Permissions page to check the app permissions and Microsoft Graph APIs are granted. A Microsoft Entra admin can always grant permissions to restore access to the requested Microsoft Graph APIs using the blue button “Grant admin consent for Cisco Systems, Inc.” which presents the same popup prompts under Microsoft 365 Login - Admin First Time (above).
|
Microsoft Graph Permission |
Type |
Reason for Requesting / Use Case |
|---|---|---|
|
Required |
||
|
User.Read.All |
Application |
Retrieve details about the user logging in, such as username/email for identity. |
|
User.Read |
Delegated |
Retrieve details about the user logging in, such as username/email for identity. |
|
Optional Requires onboarding help from Cisco Spaces team. |
||
|
Calendars.Read |
Delegated |
Retrieve user’s personal work calendar events to display in Space Explorer Web App “My day” section. Used to enable quickly adding meeting rooms to events without rooms (requires licensing for room booking) or for quickly opening virtual meeting URLs. https://learn.microsoft.com/en-us/graph/api/resources/calendar |
Visit the Activity > Sign-in logs page to review sign-in attempts and error types.
Space Explorer Web App - End User Application
End User - Webex Login
-
Click on Webex Login option
-
Enter email address and the follow prompts to complete your organization’s SSO flow

-
Accept permissions

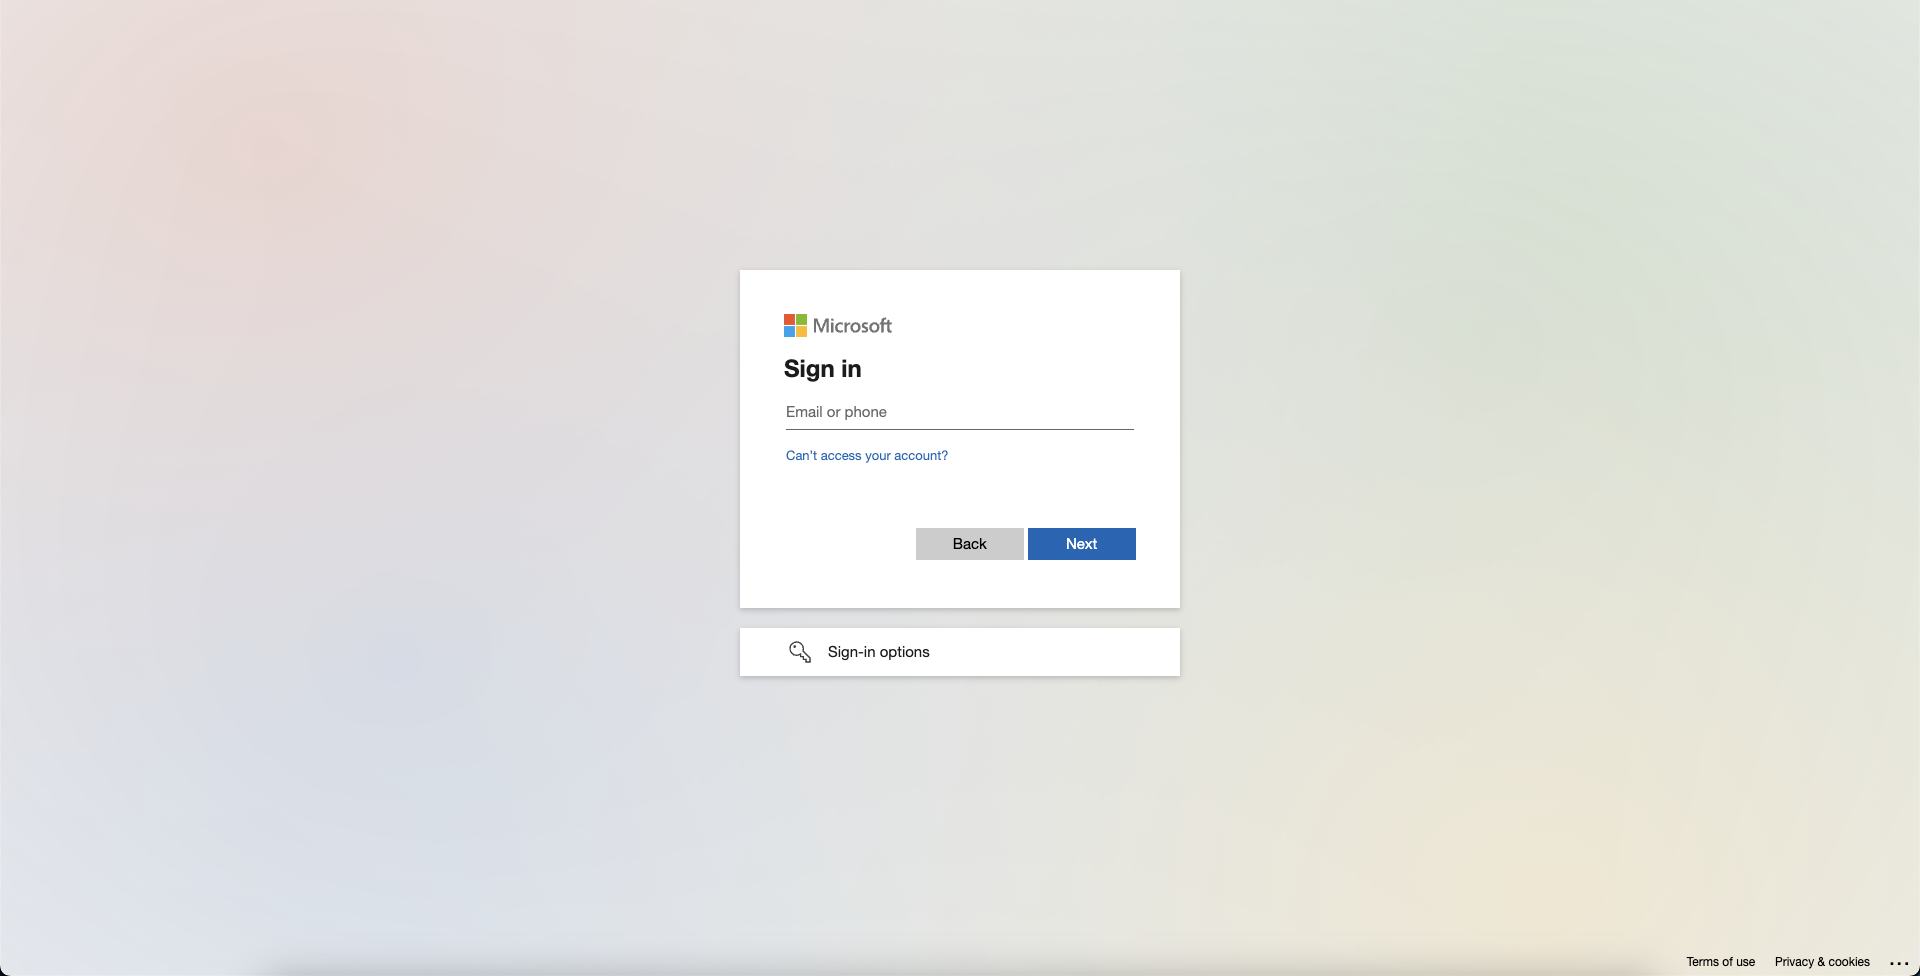
End User - Microsoft 365 Login
Organizations relying on Microsoft 365 Login for their employees must make sure they grant admin consent for the Cisco Spaces - Space Explorer web app to allow users to login. To grant admin consent, a Microsoft 365 admin user with full admin privileges should login to web app using the Microsoft 365 button.
-
Click on Microsoft Login option
-
Enter email address and the follow prompts to complete your organization’s SSO flow
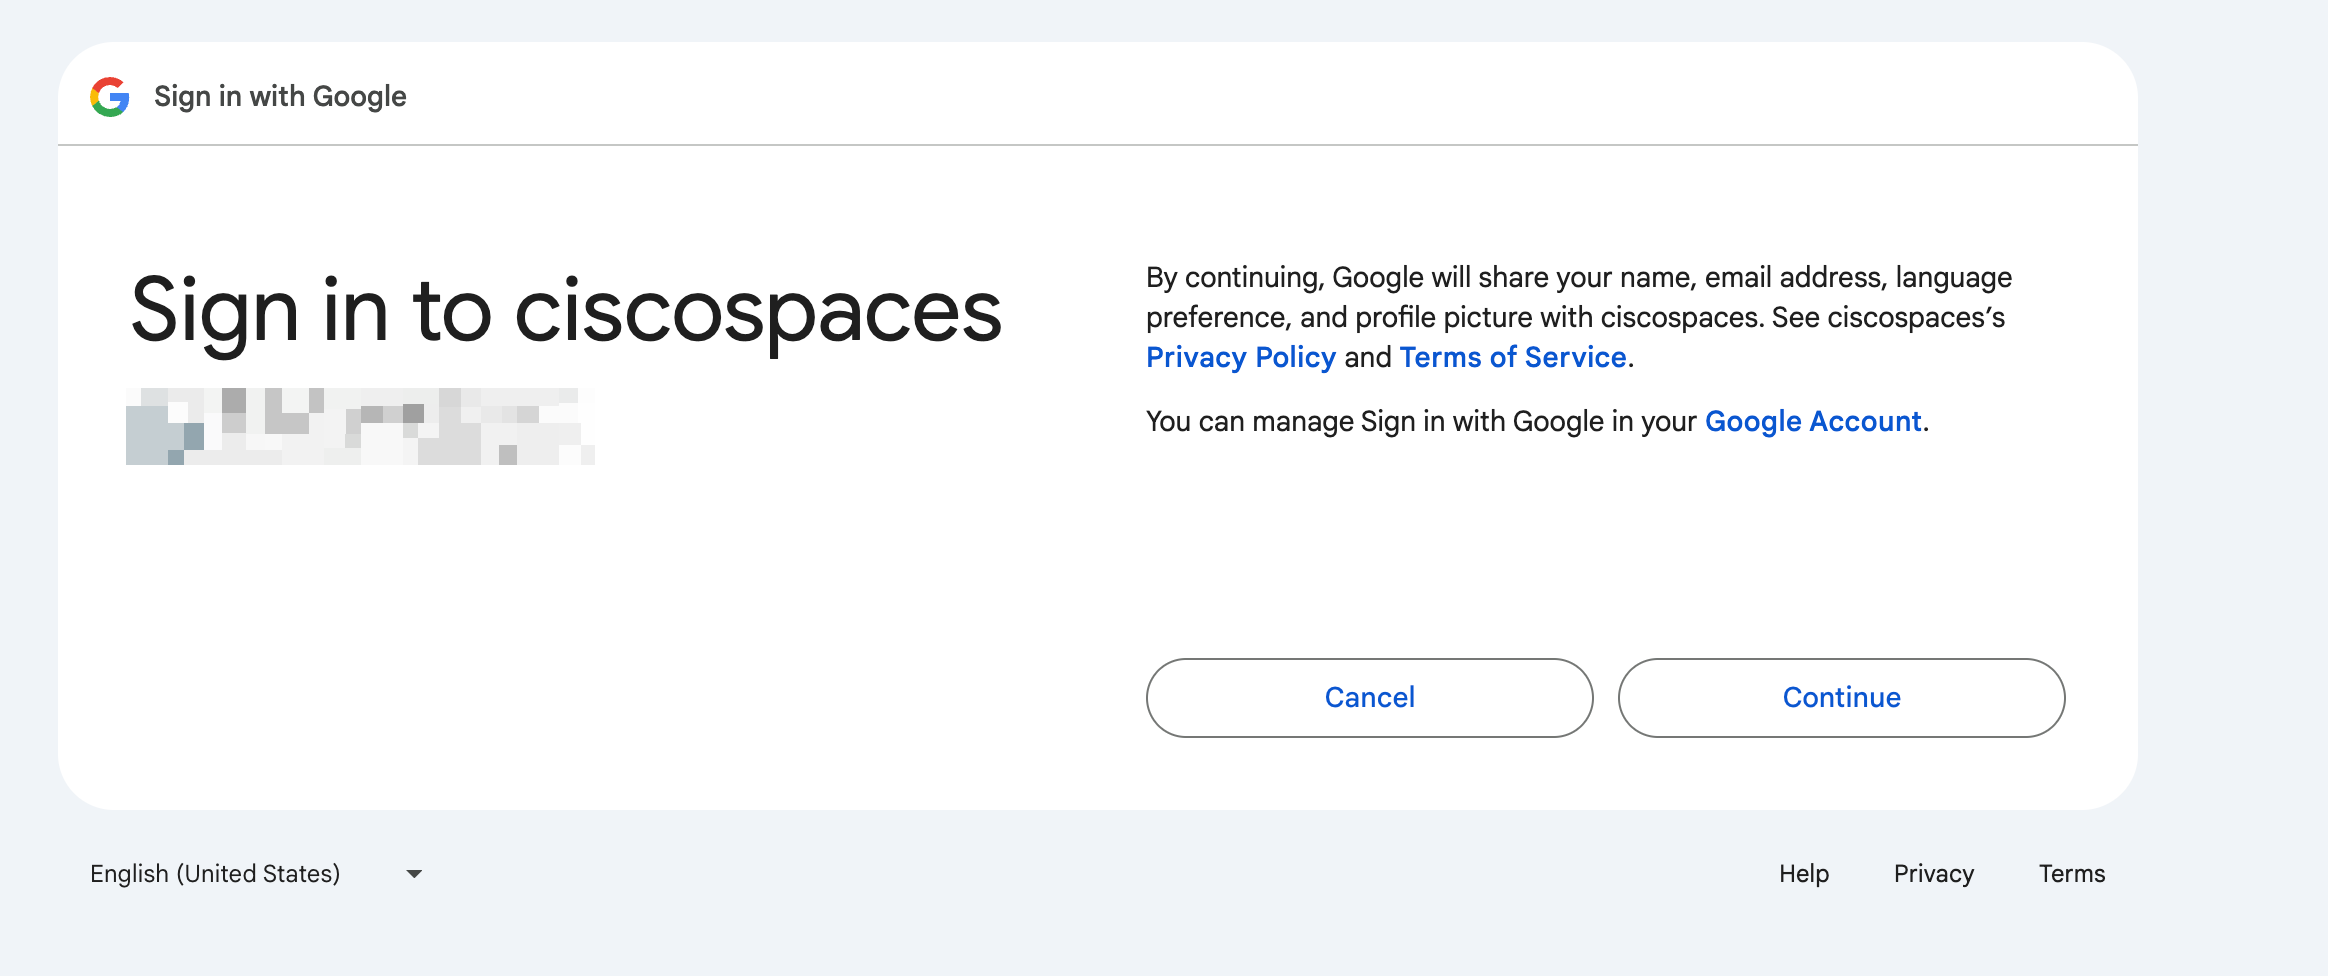
End User - Google Login
-
Click on Google Login option
-
Enter email address and the follow prompts to complete your organization’s SSO flow
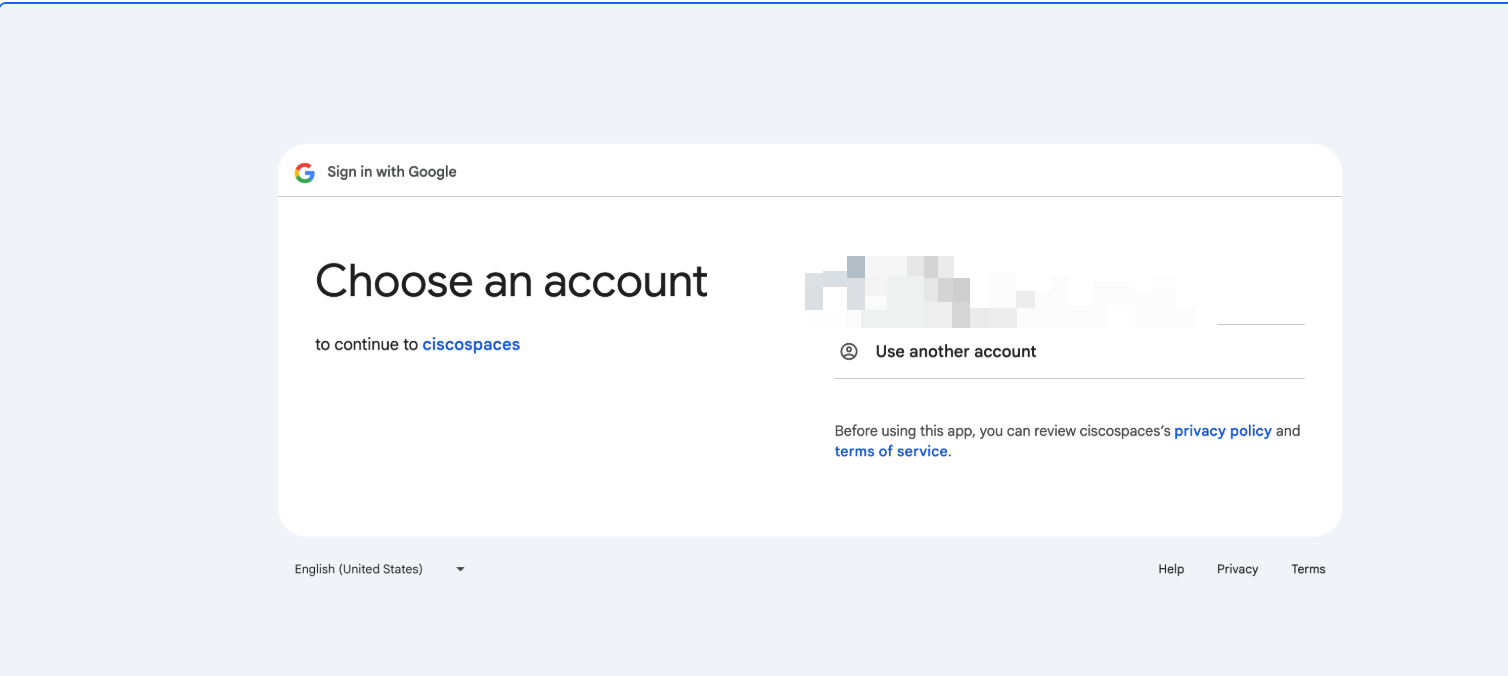
-
Click on Continue to access Space Explorer
Space Explorer Web App Screens
|
View and Feature Description |
Computer |
Mobile |
|---|---|---|
|
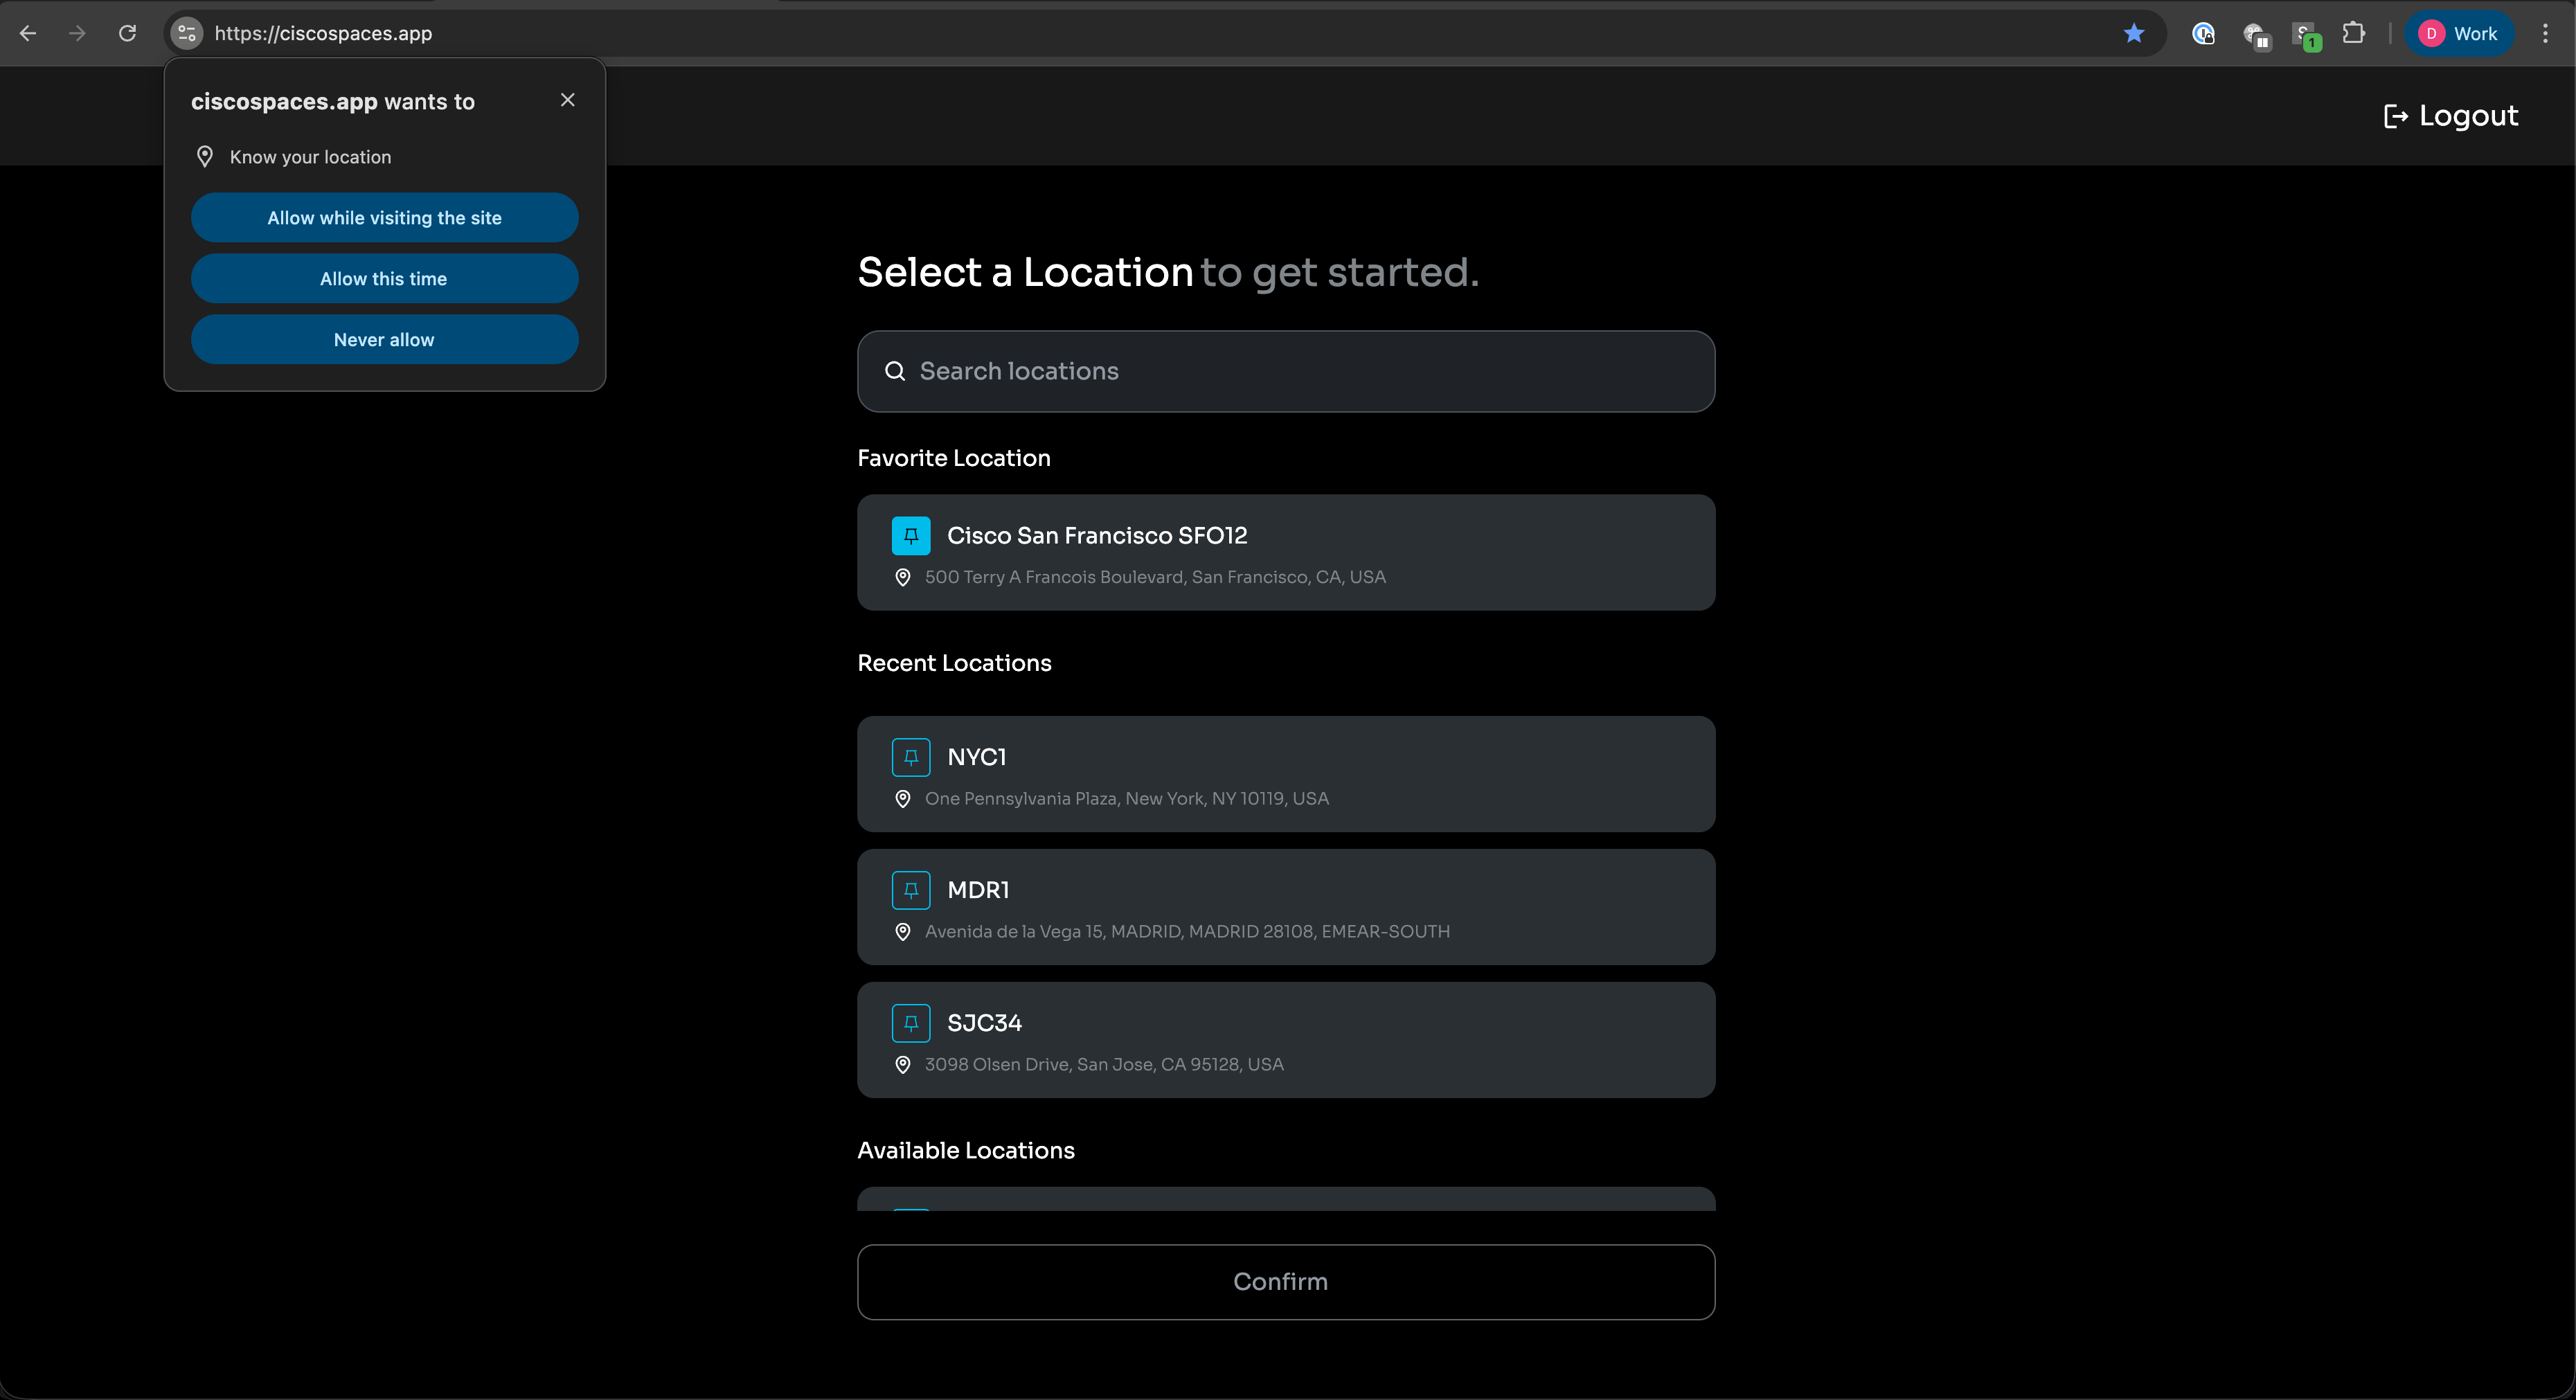
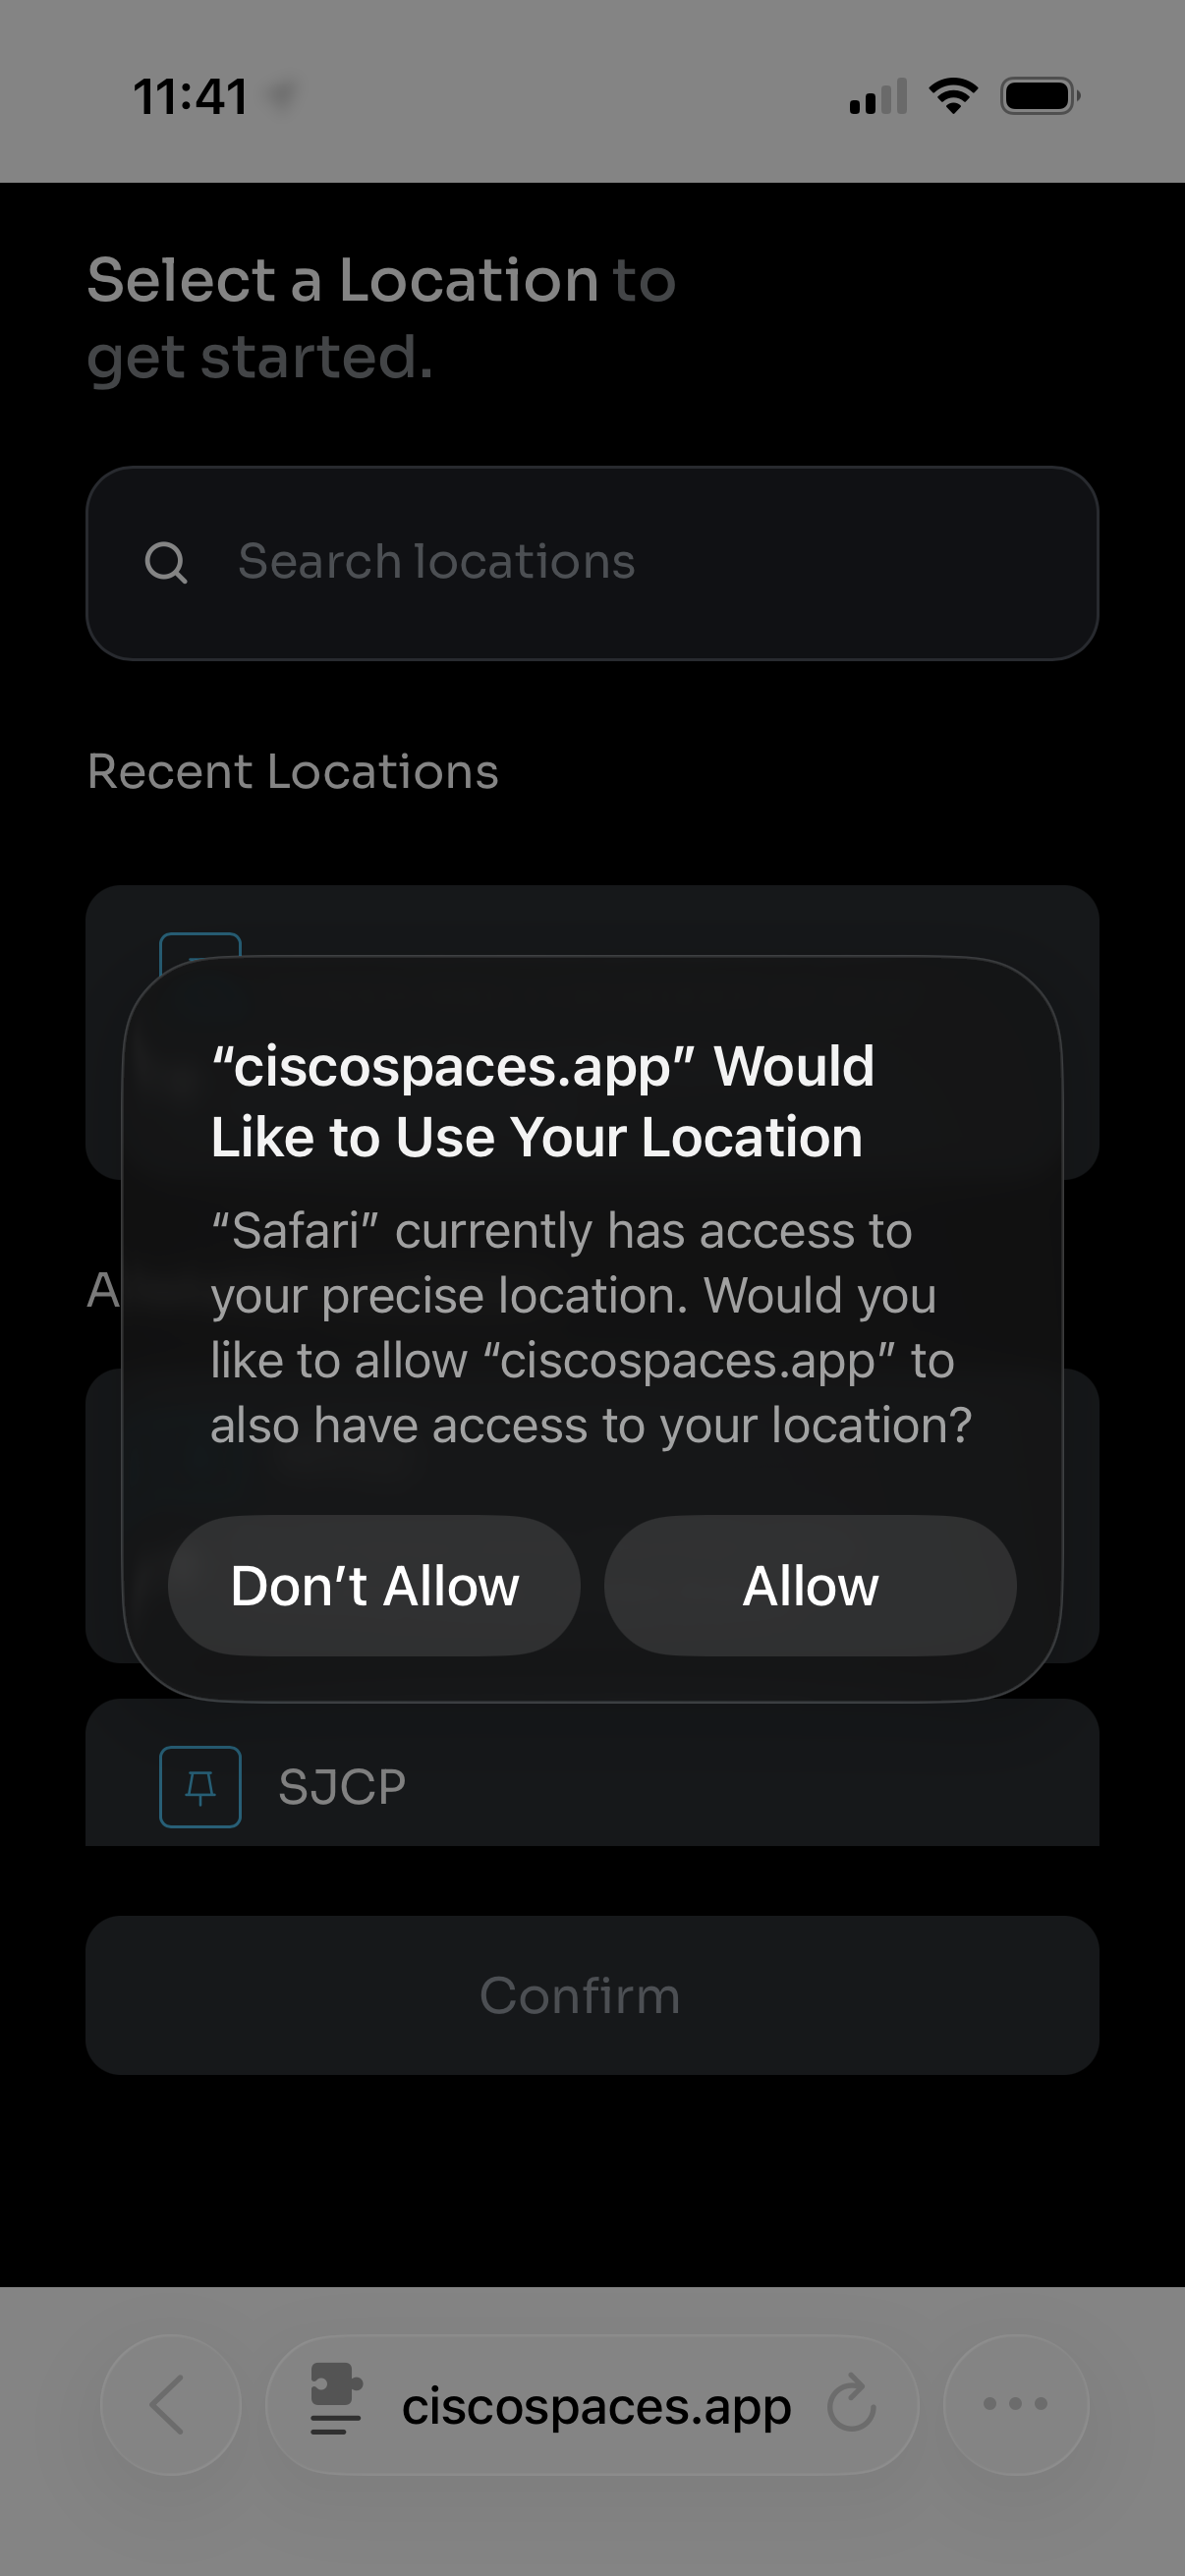
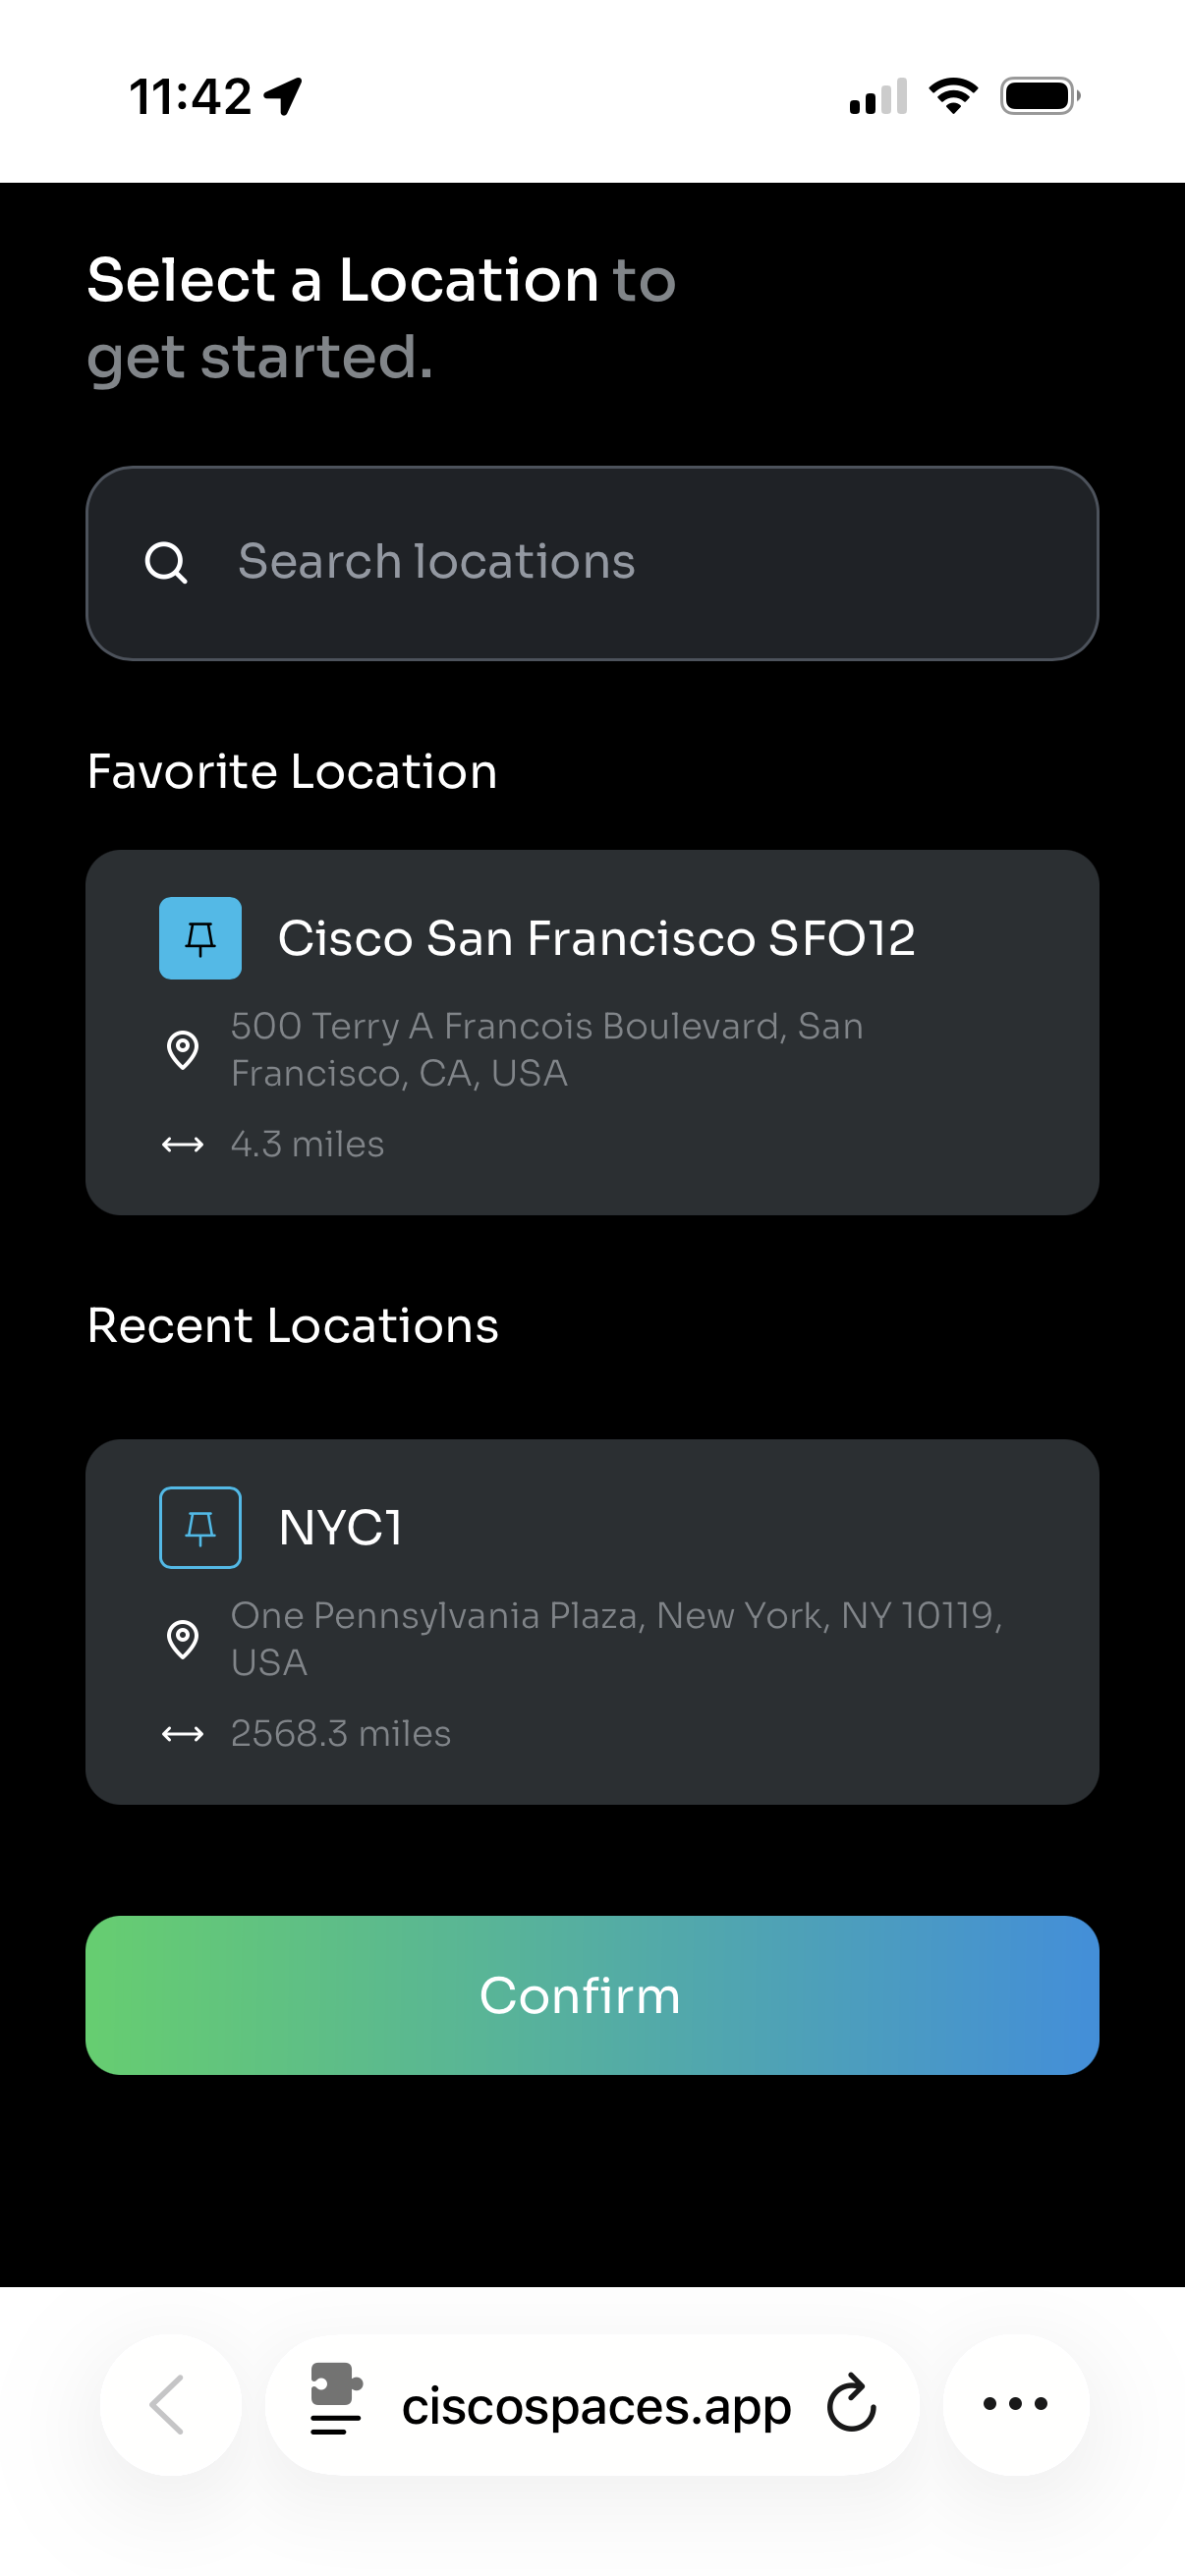
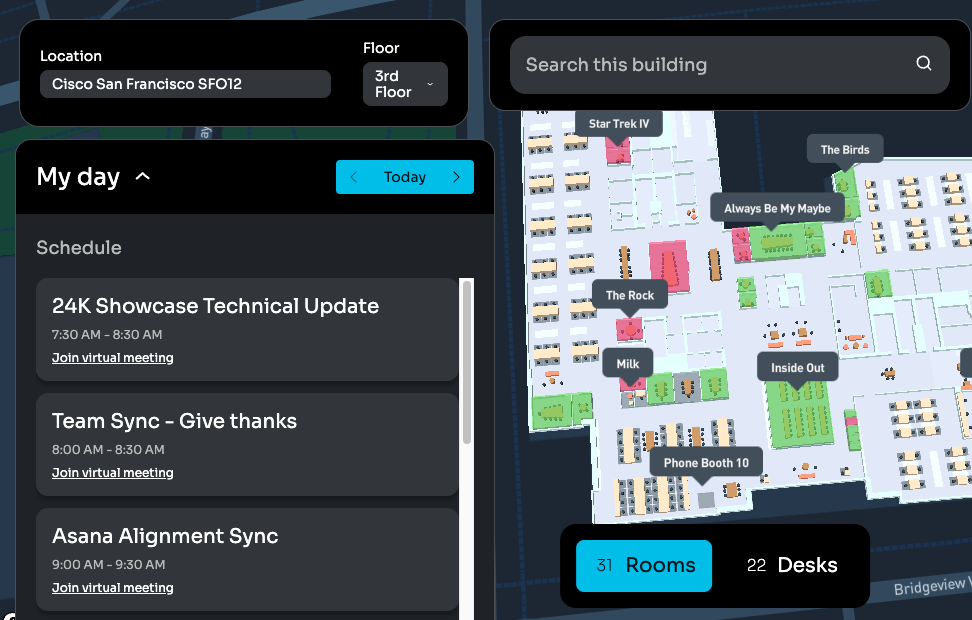
Location list
|
|
|
|
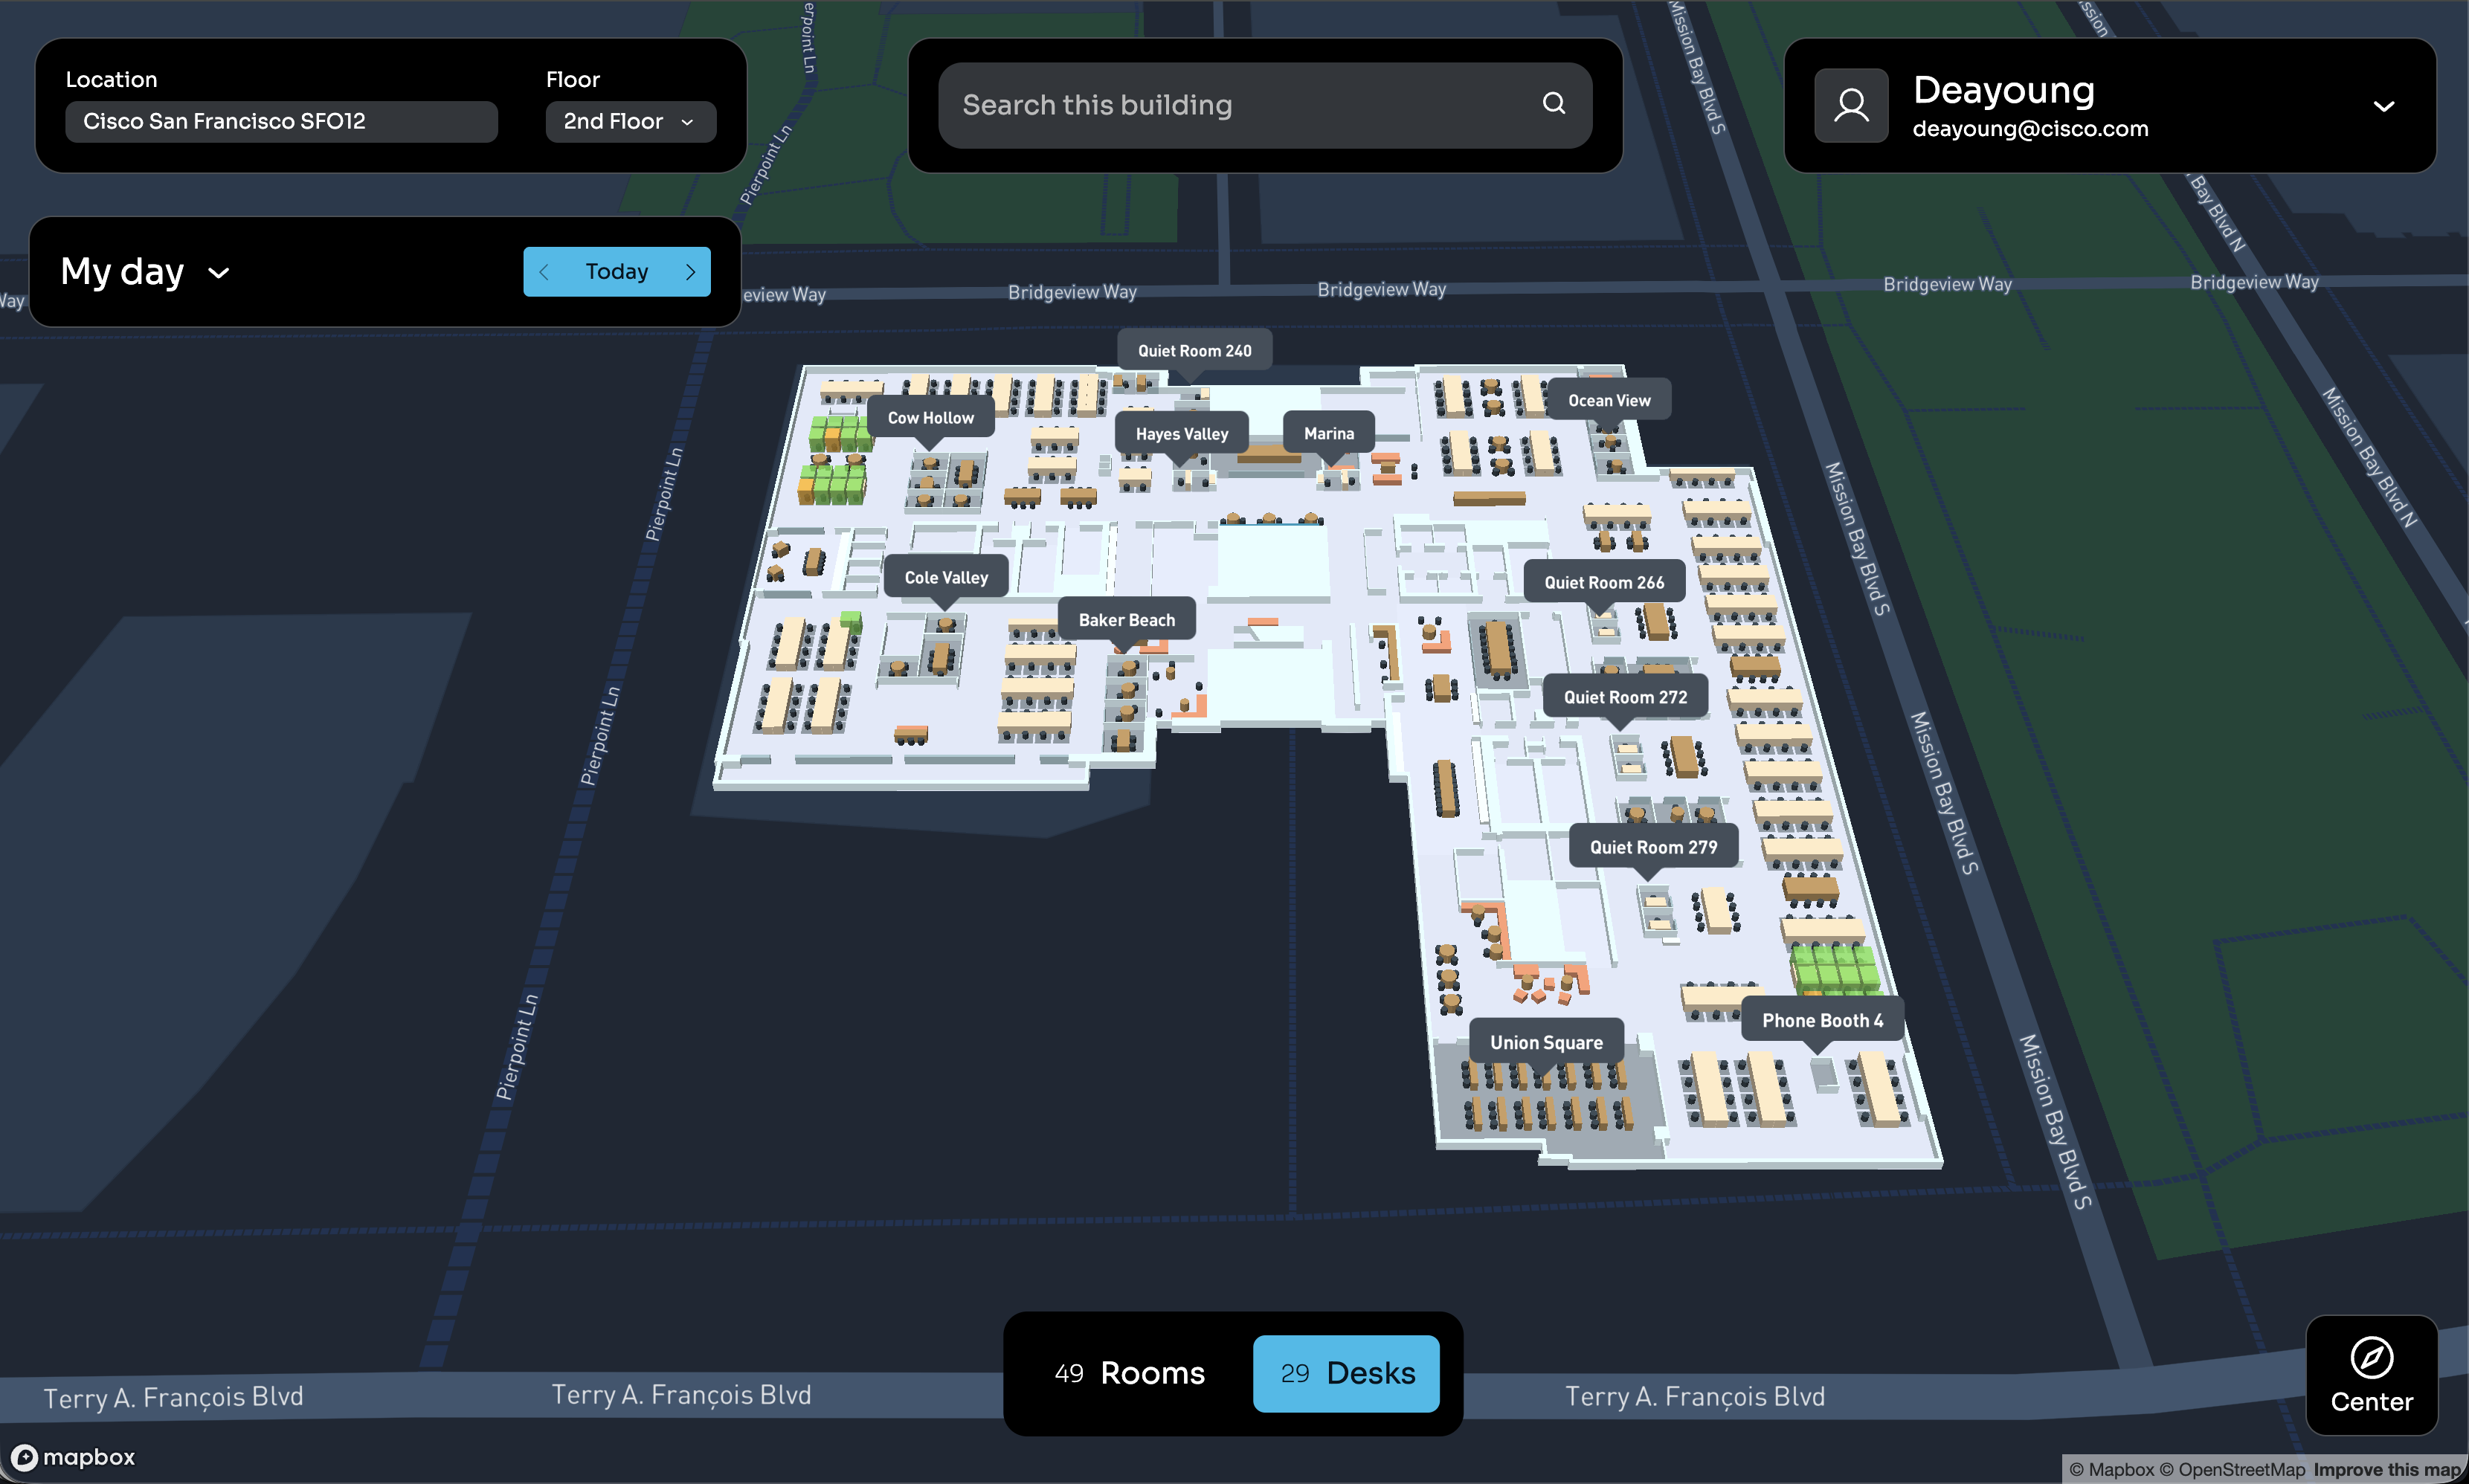
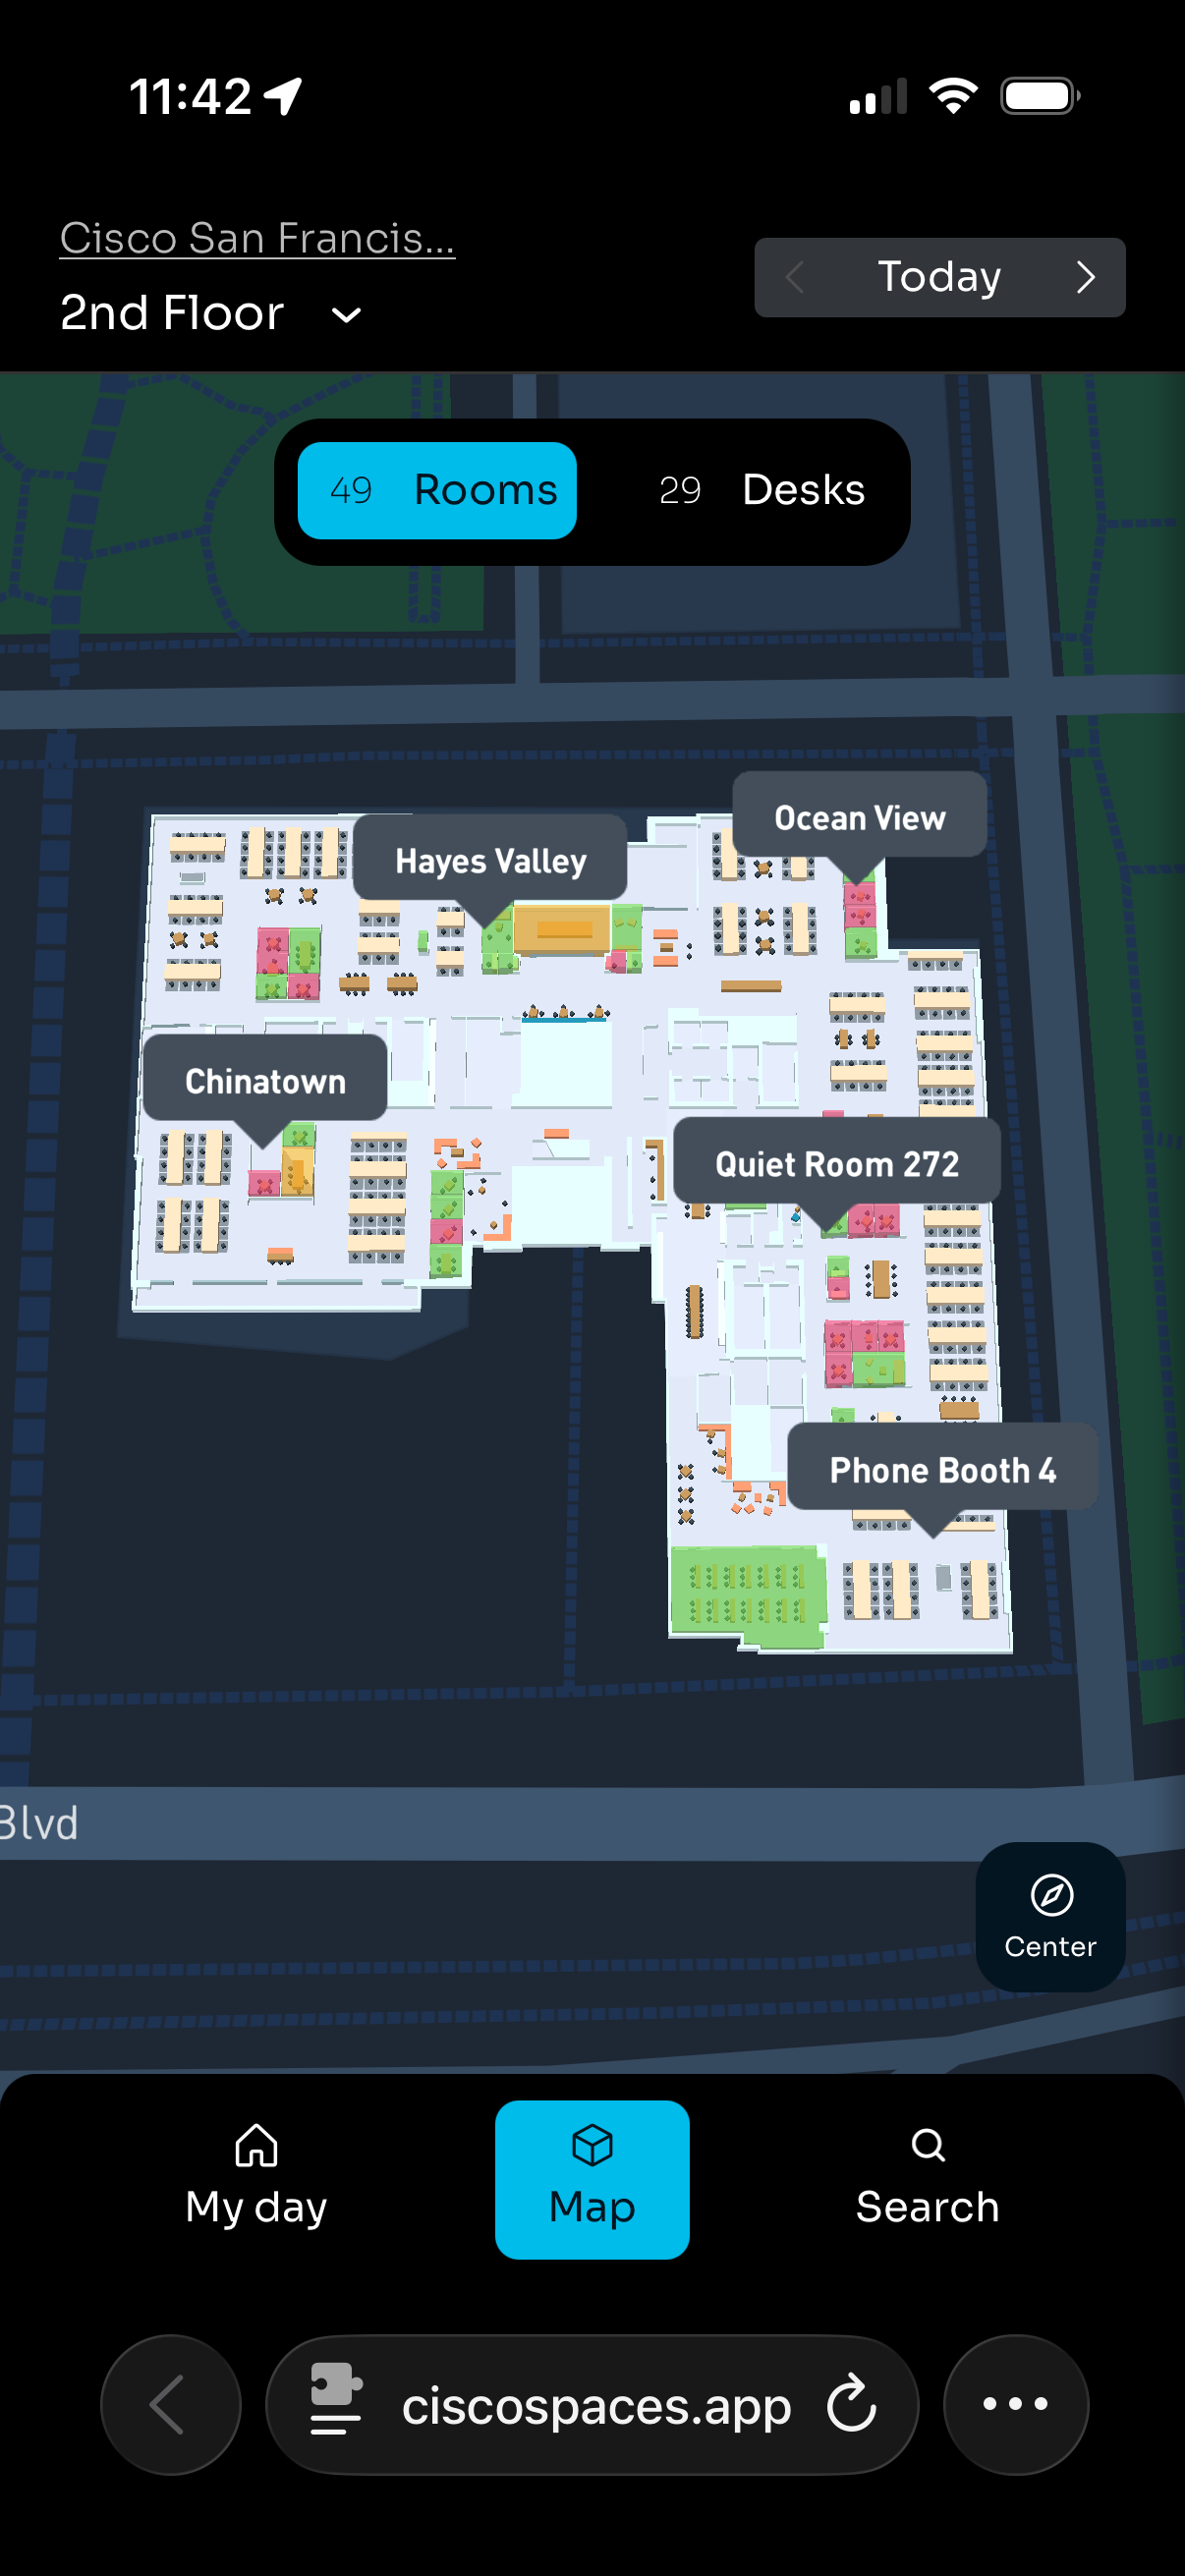
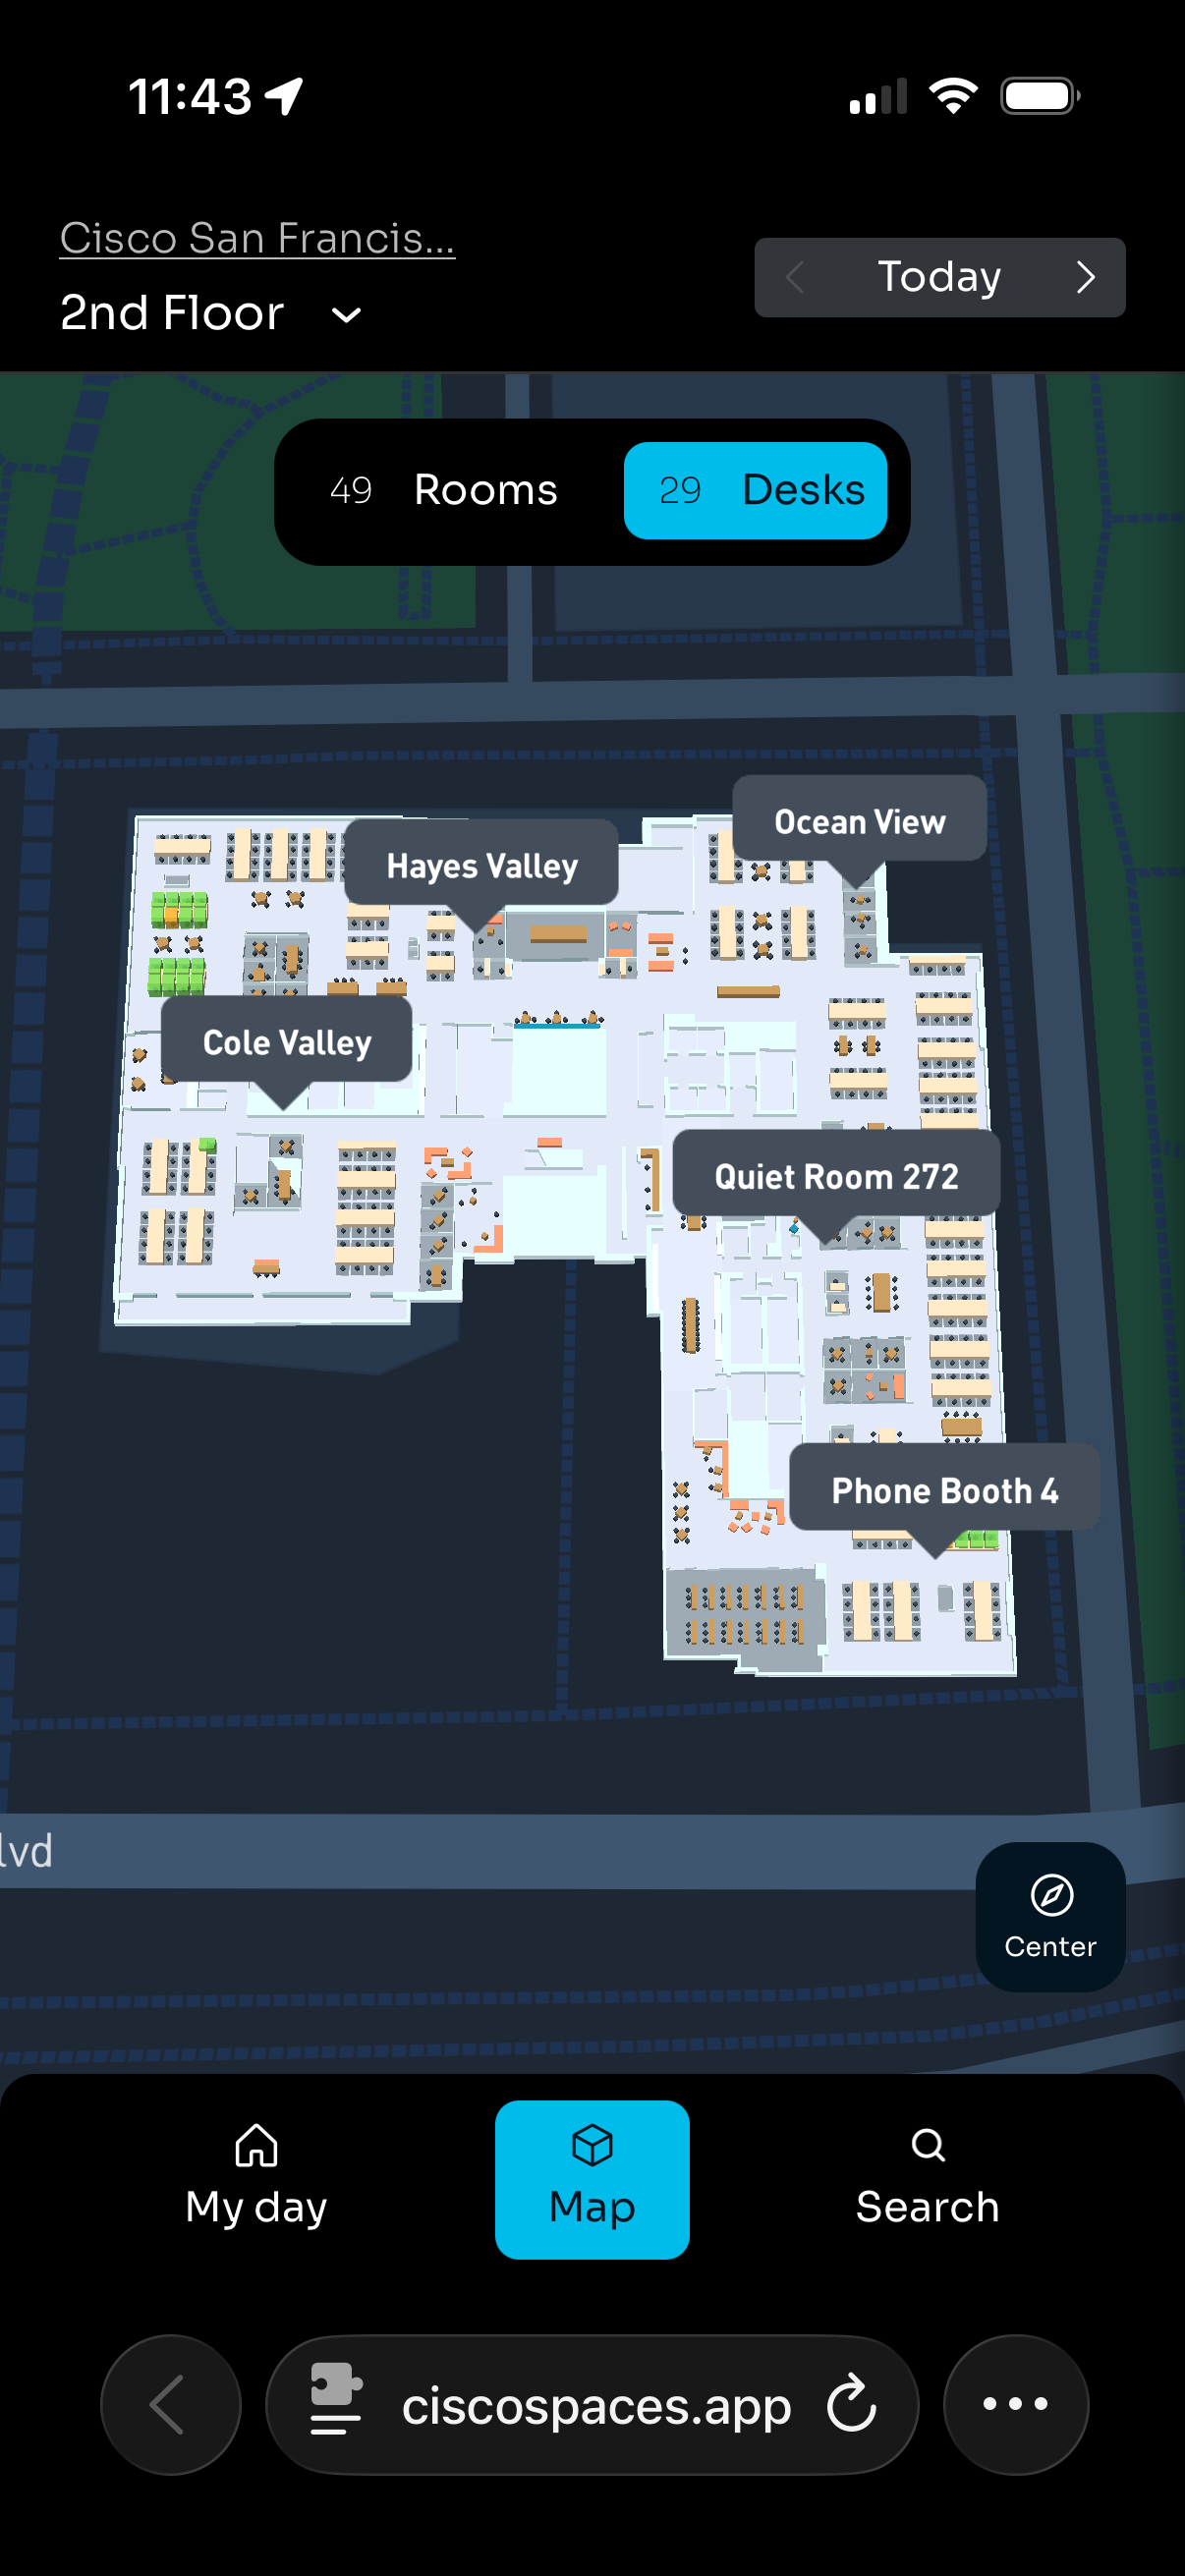
Map (tab)
|
|
|
|
Room details and Wayfinding
|
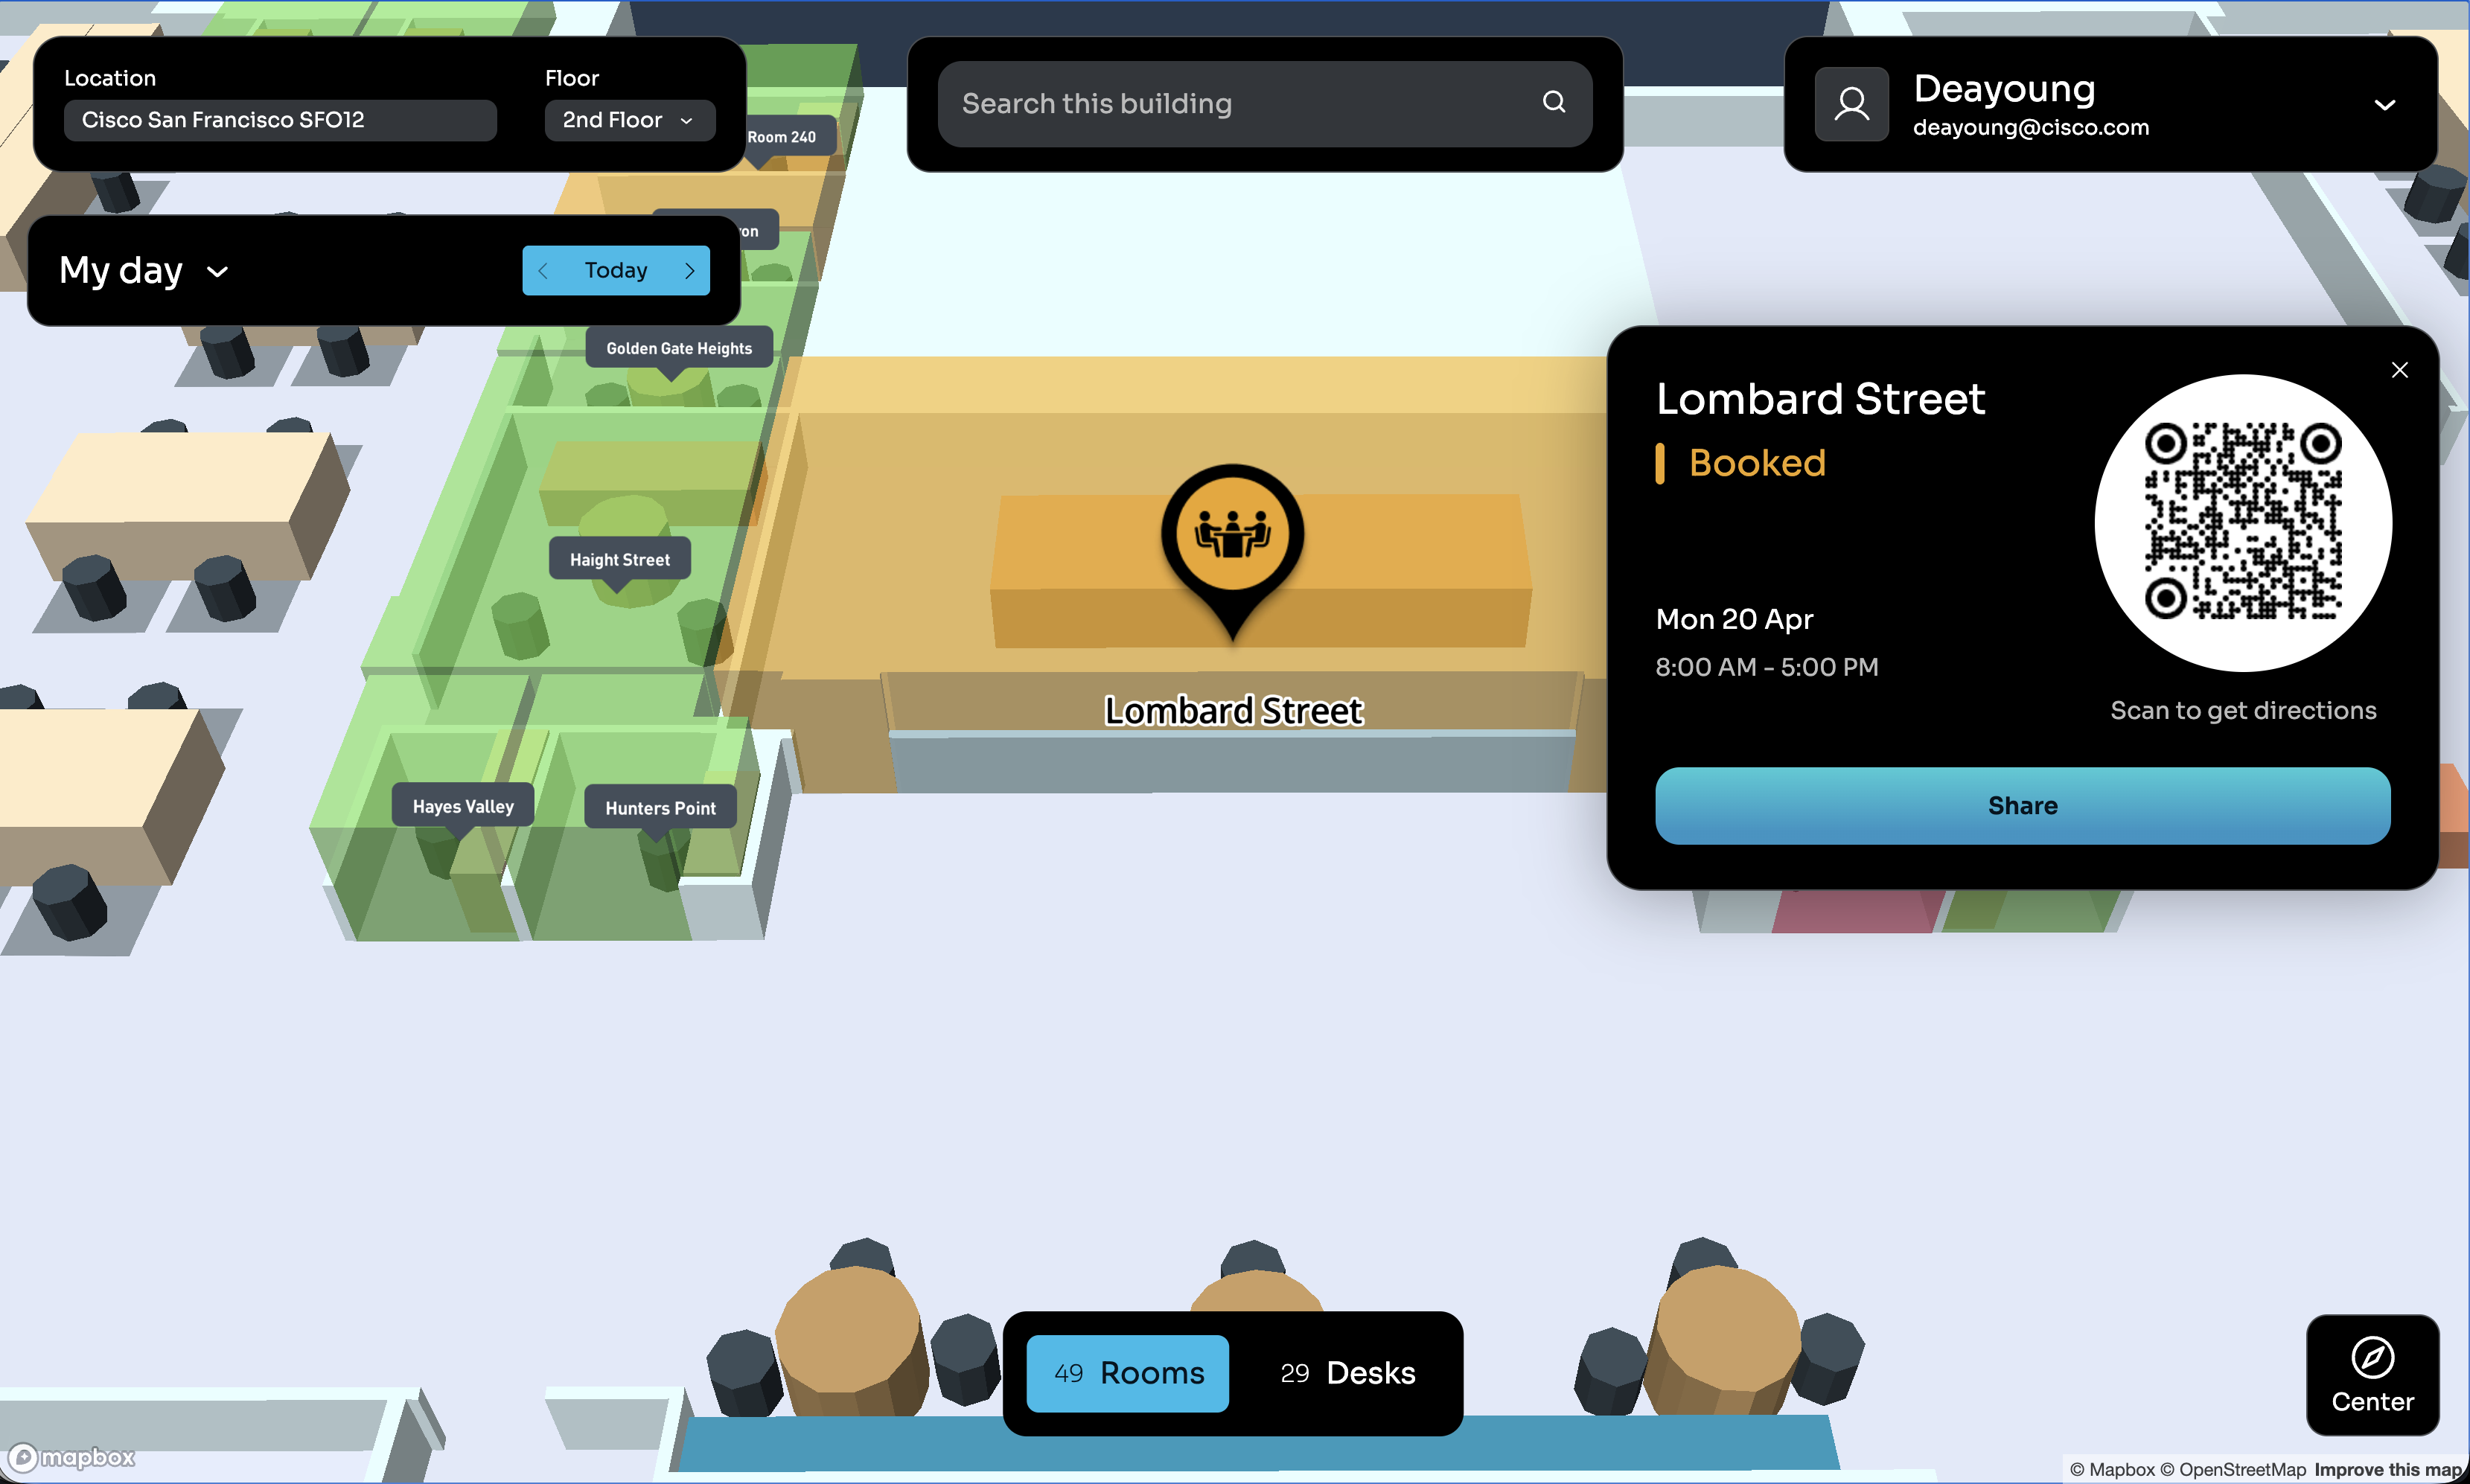
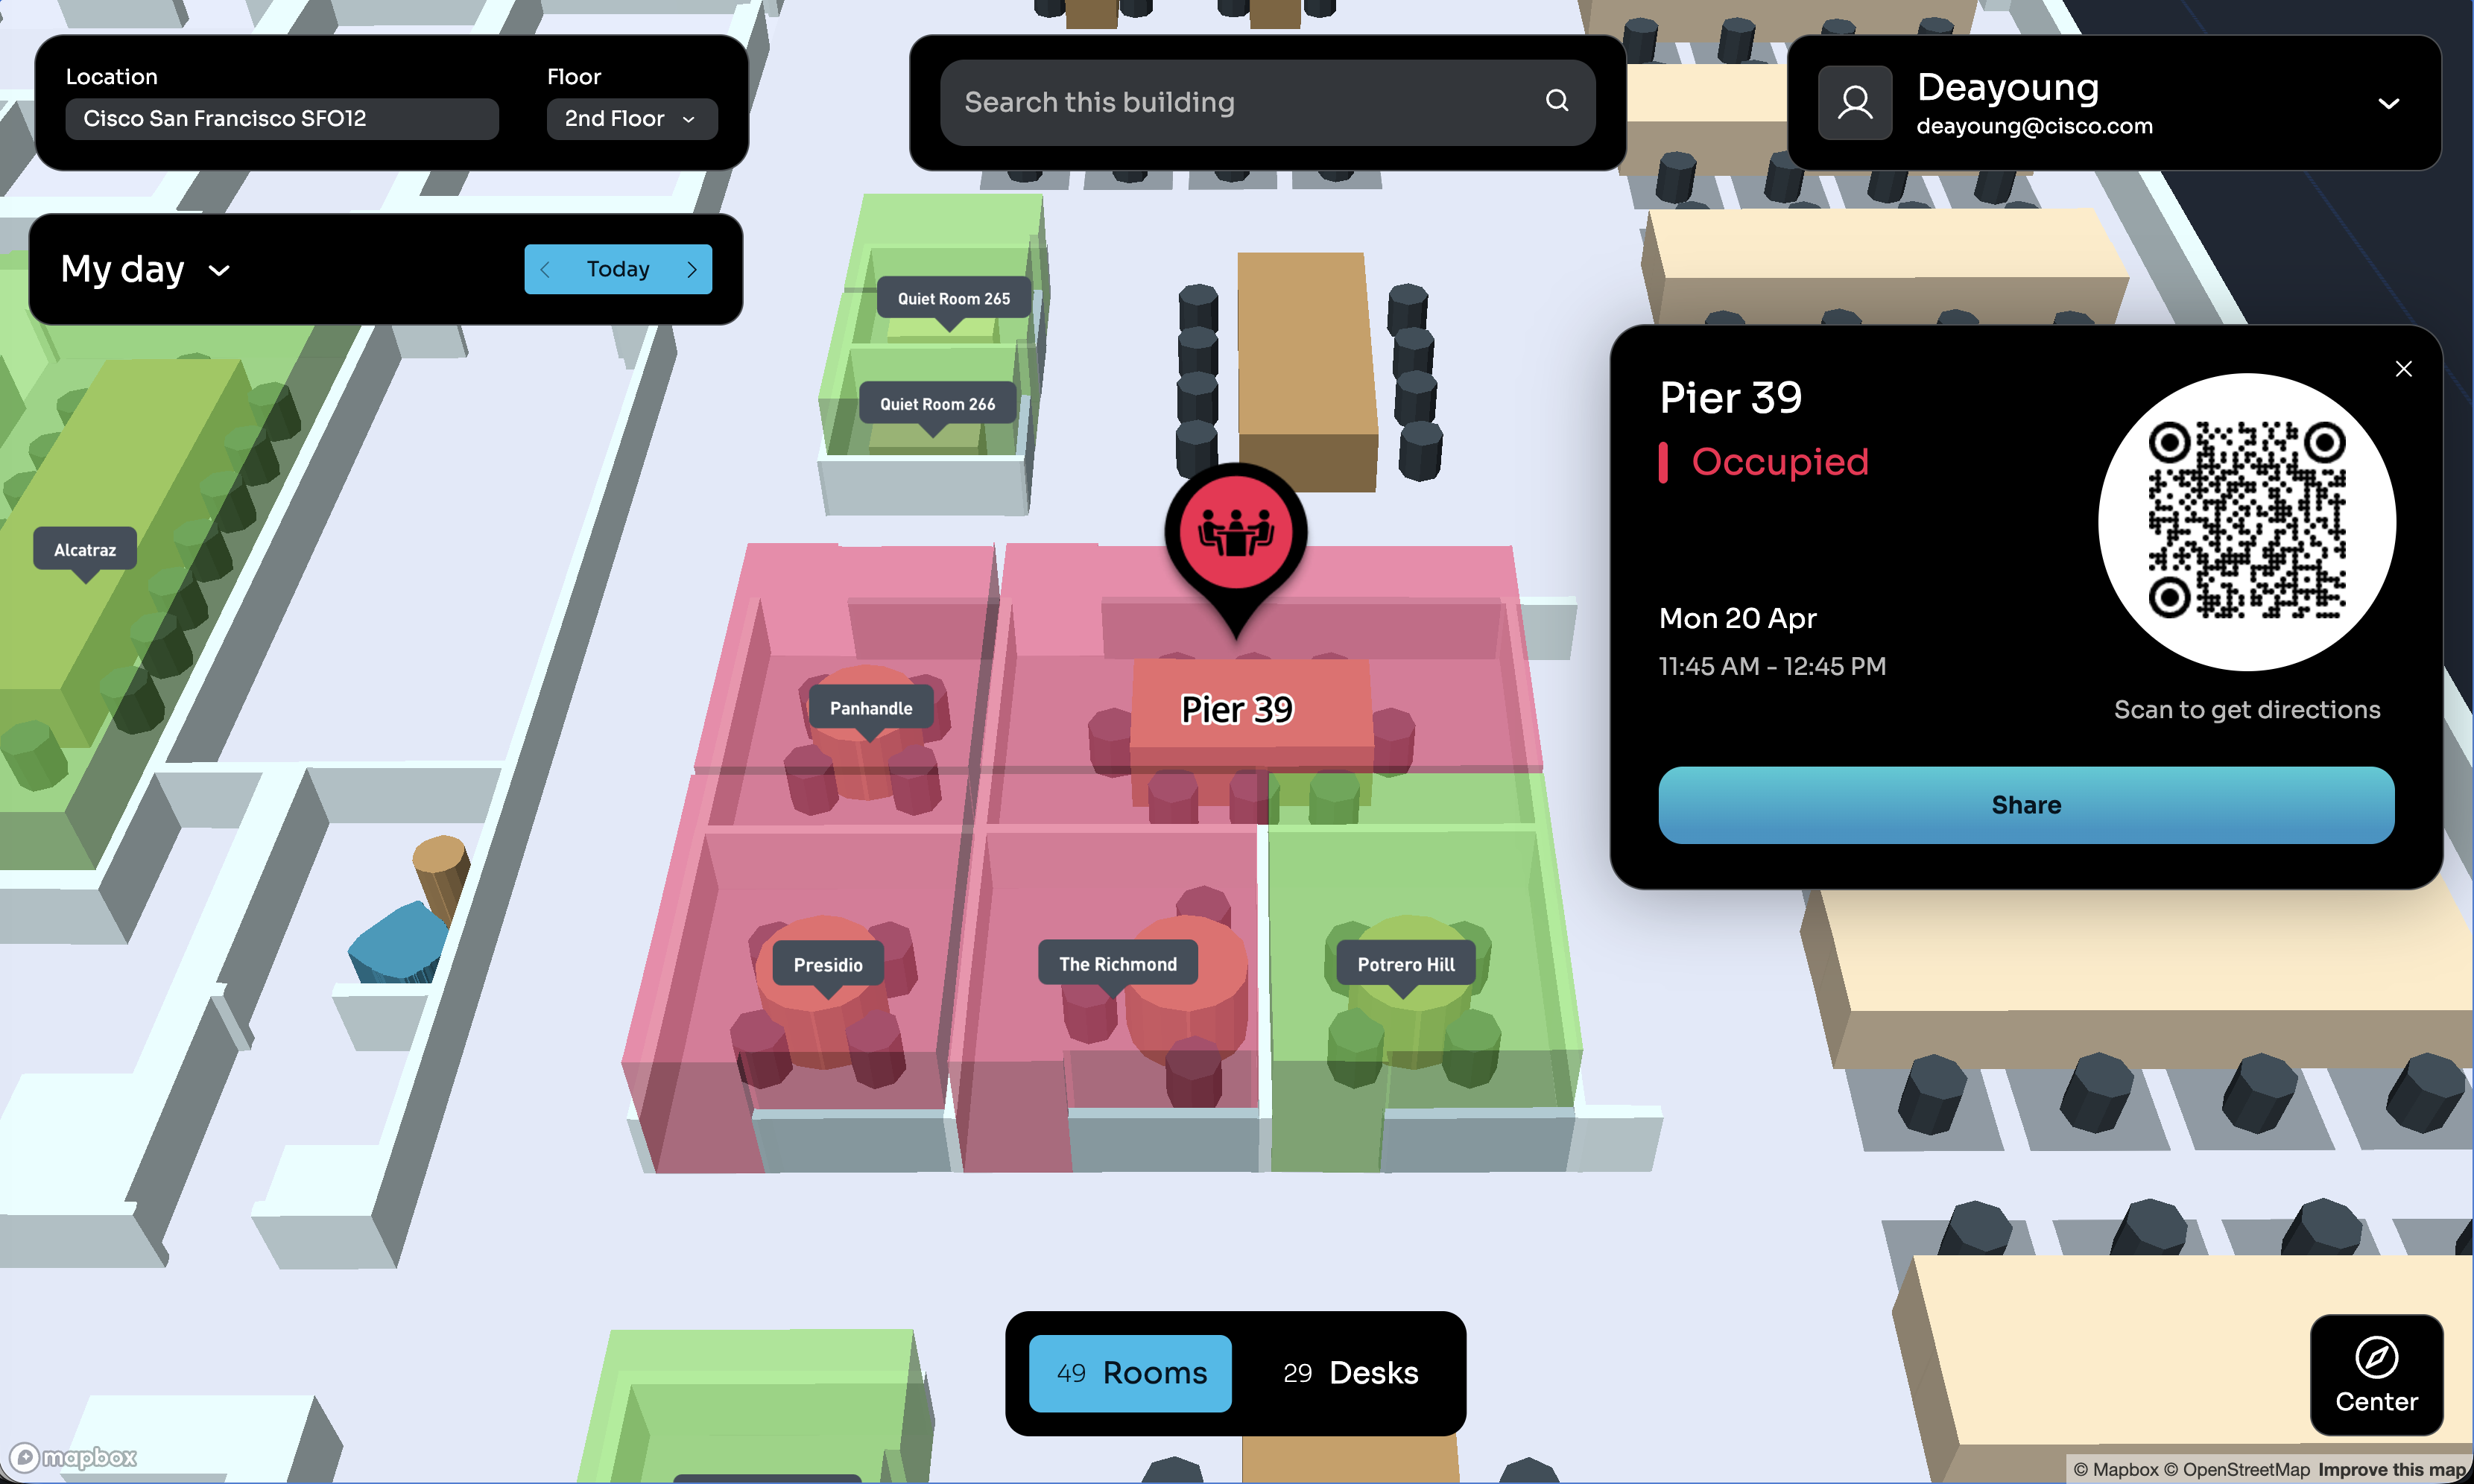
|
|
|
Room and Desk Share button
|
|
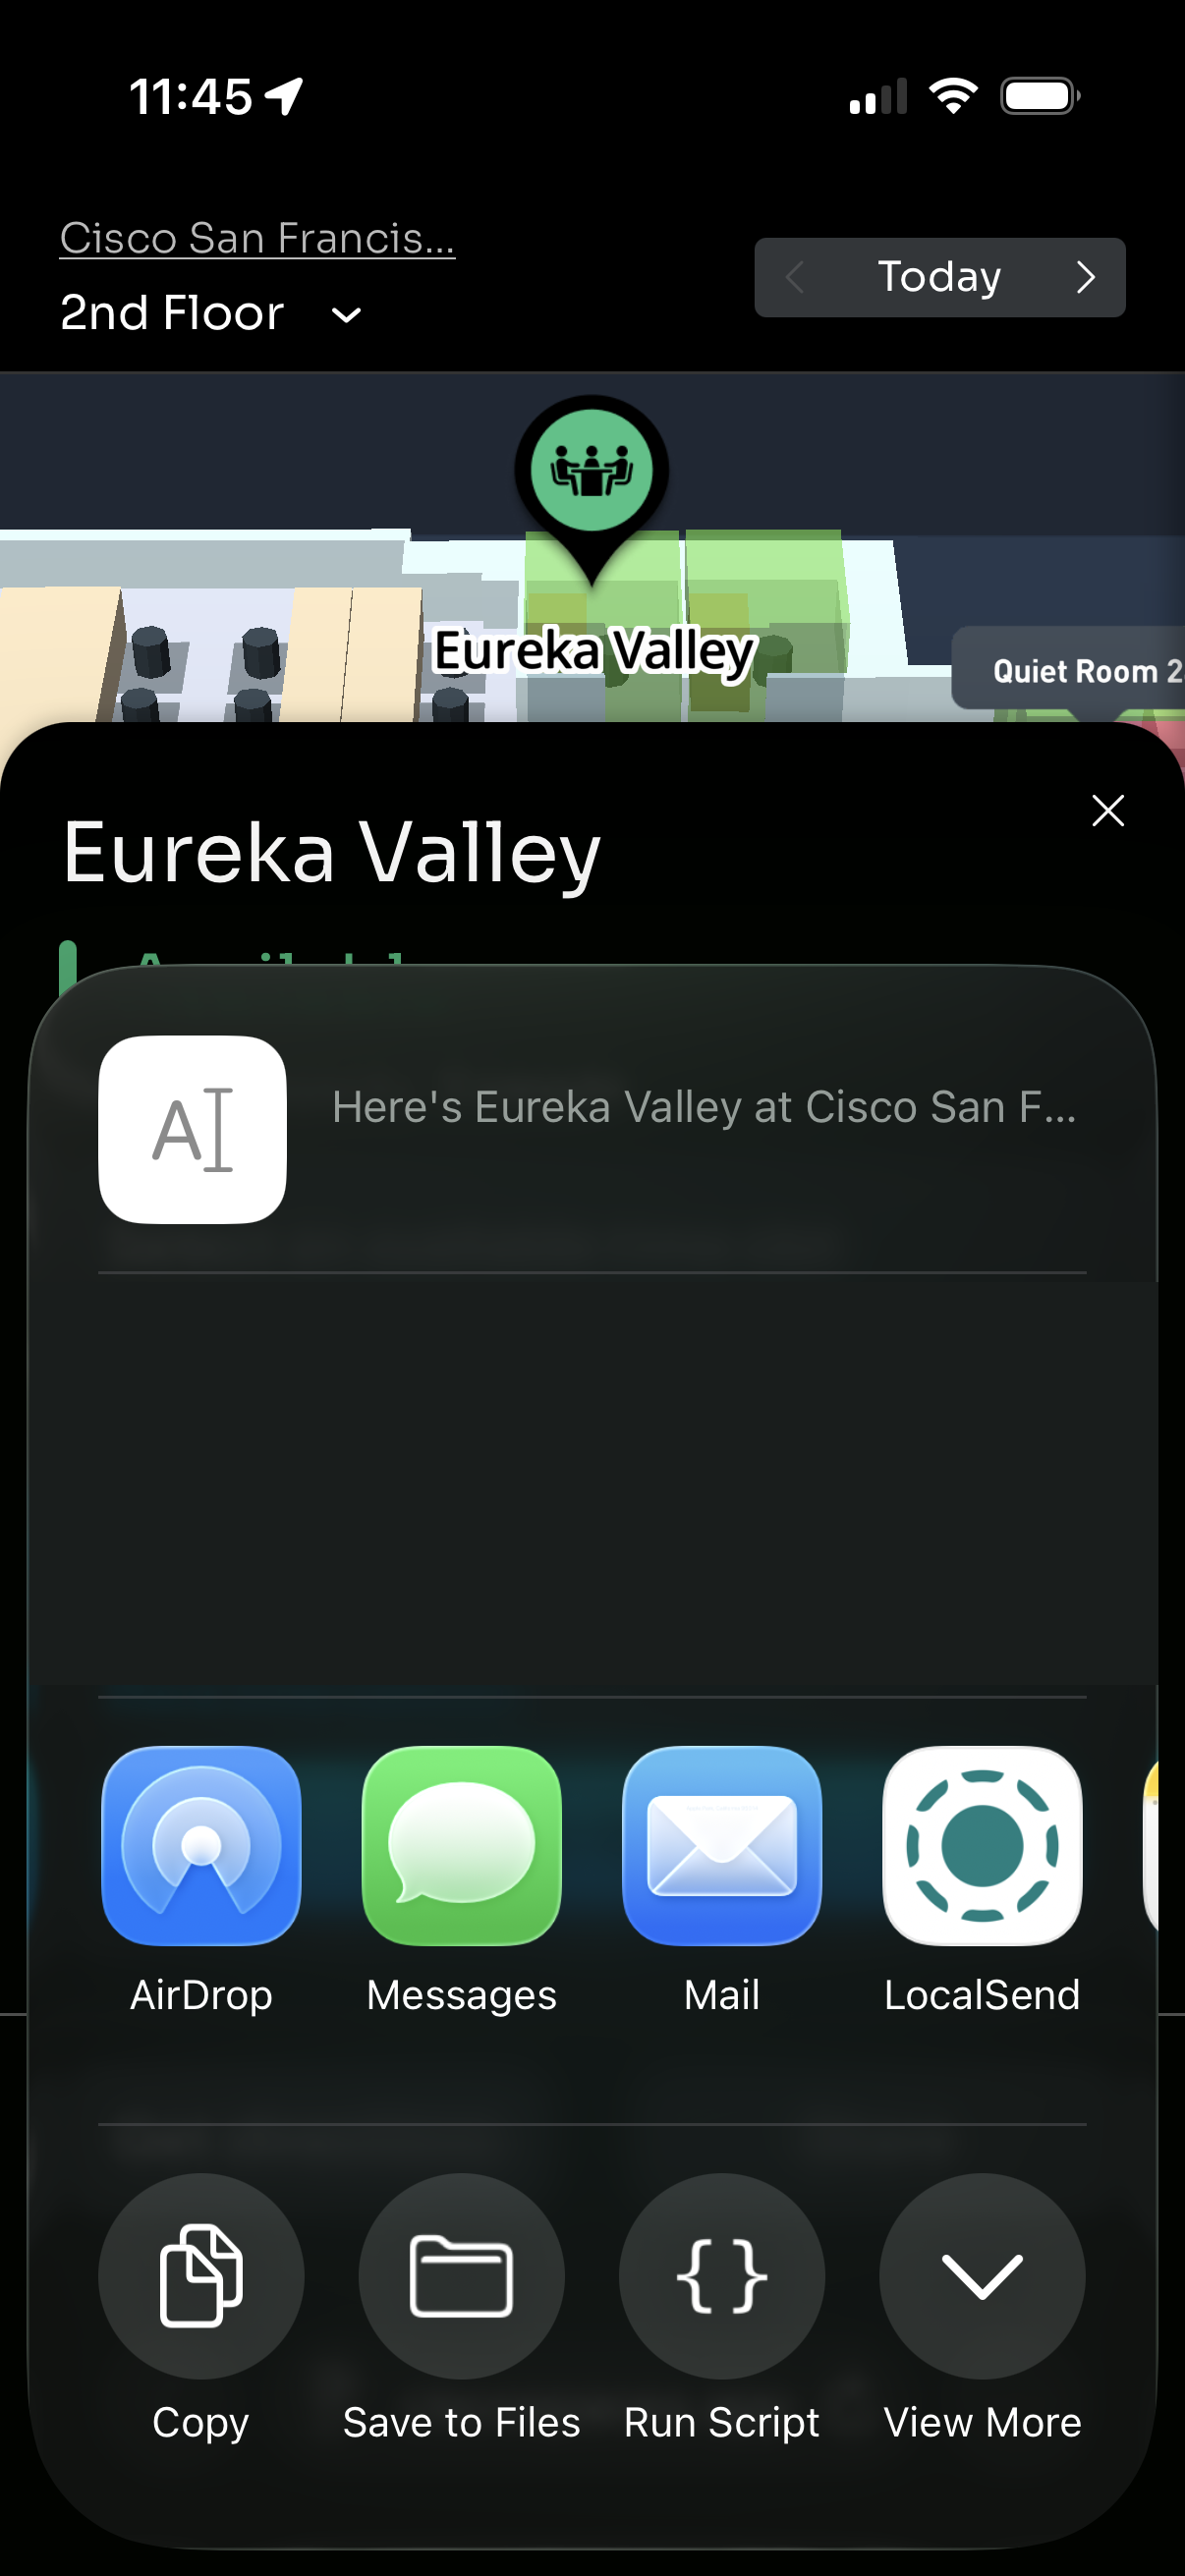
|
|
Room Booking Calendar
|

|
|
|
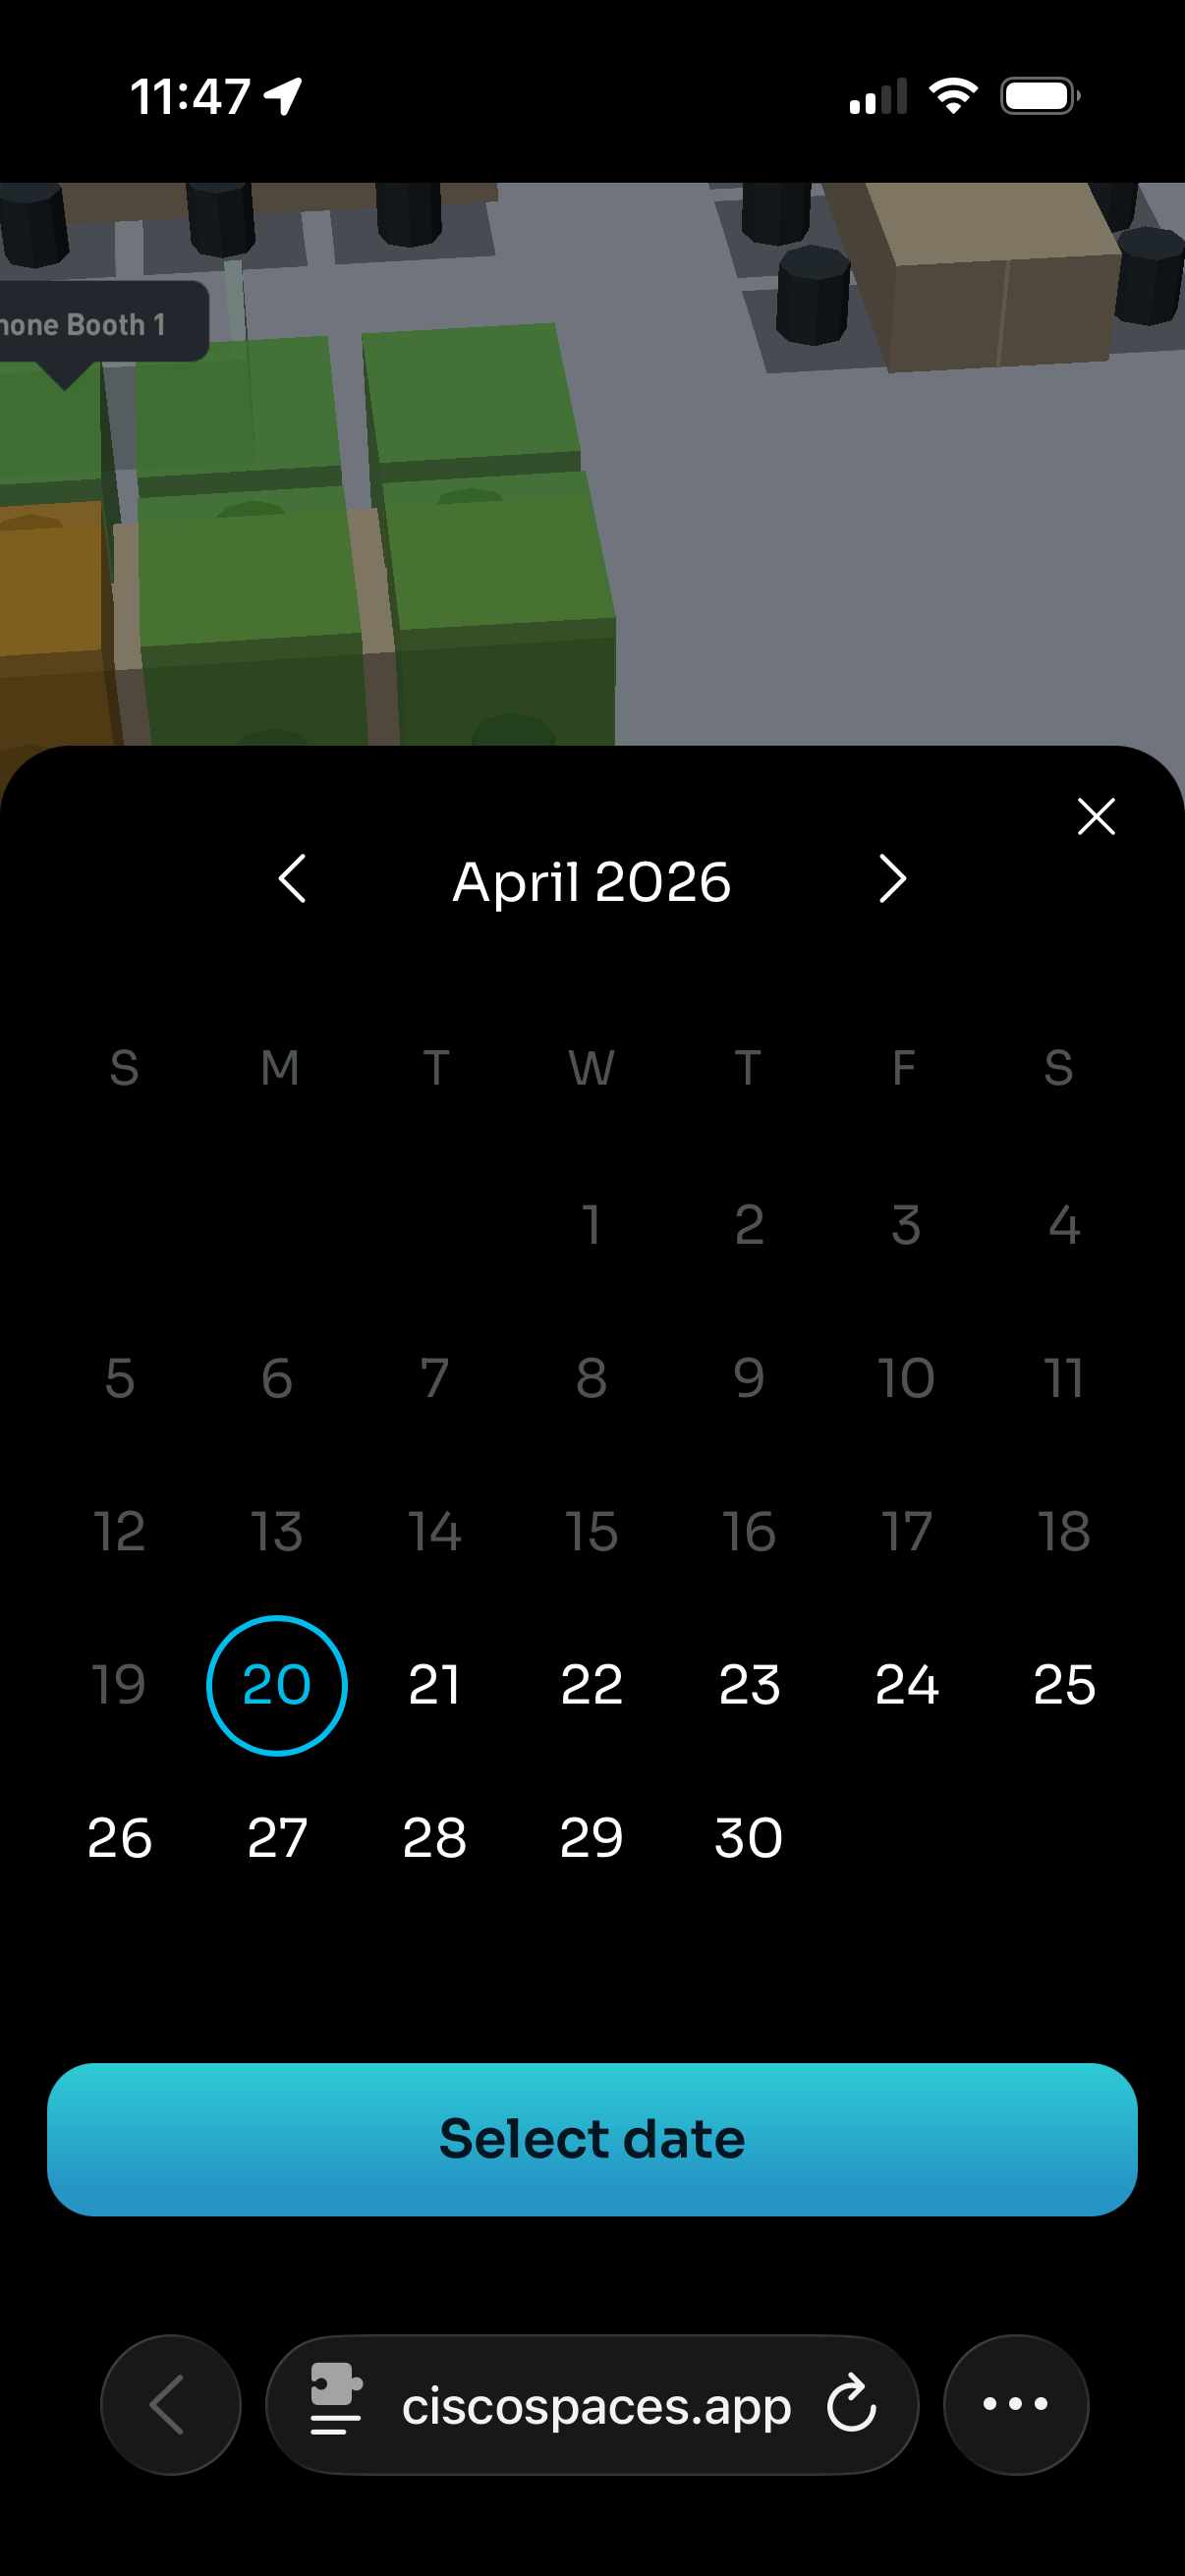
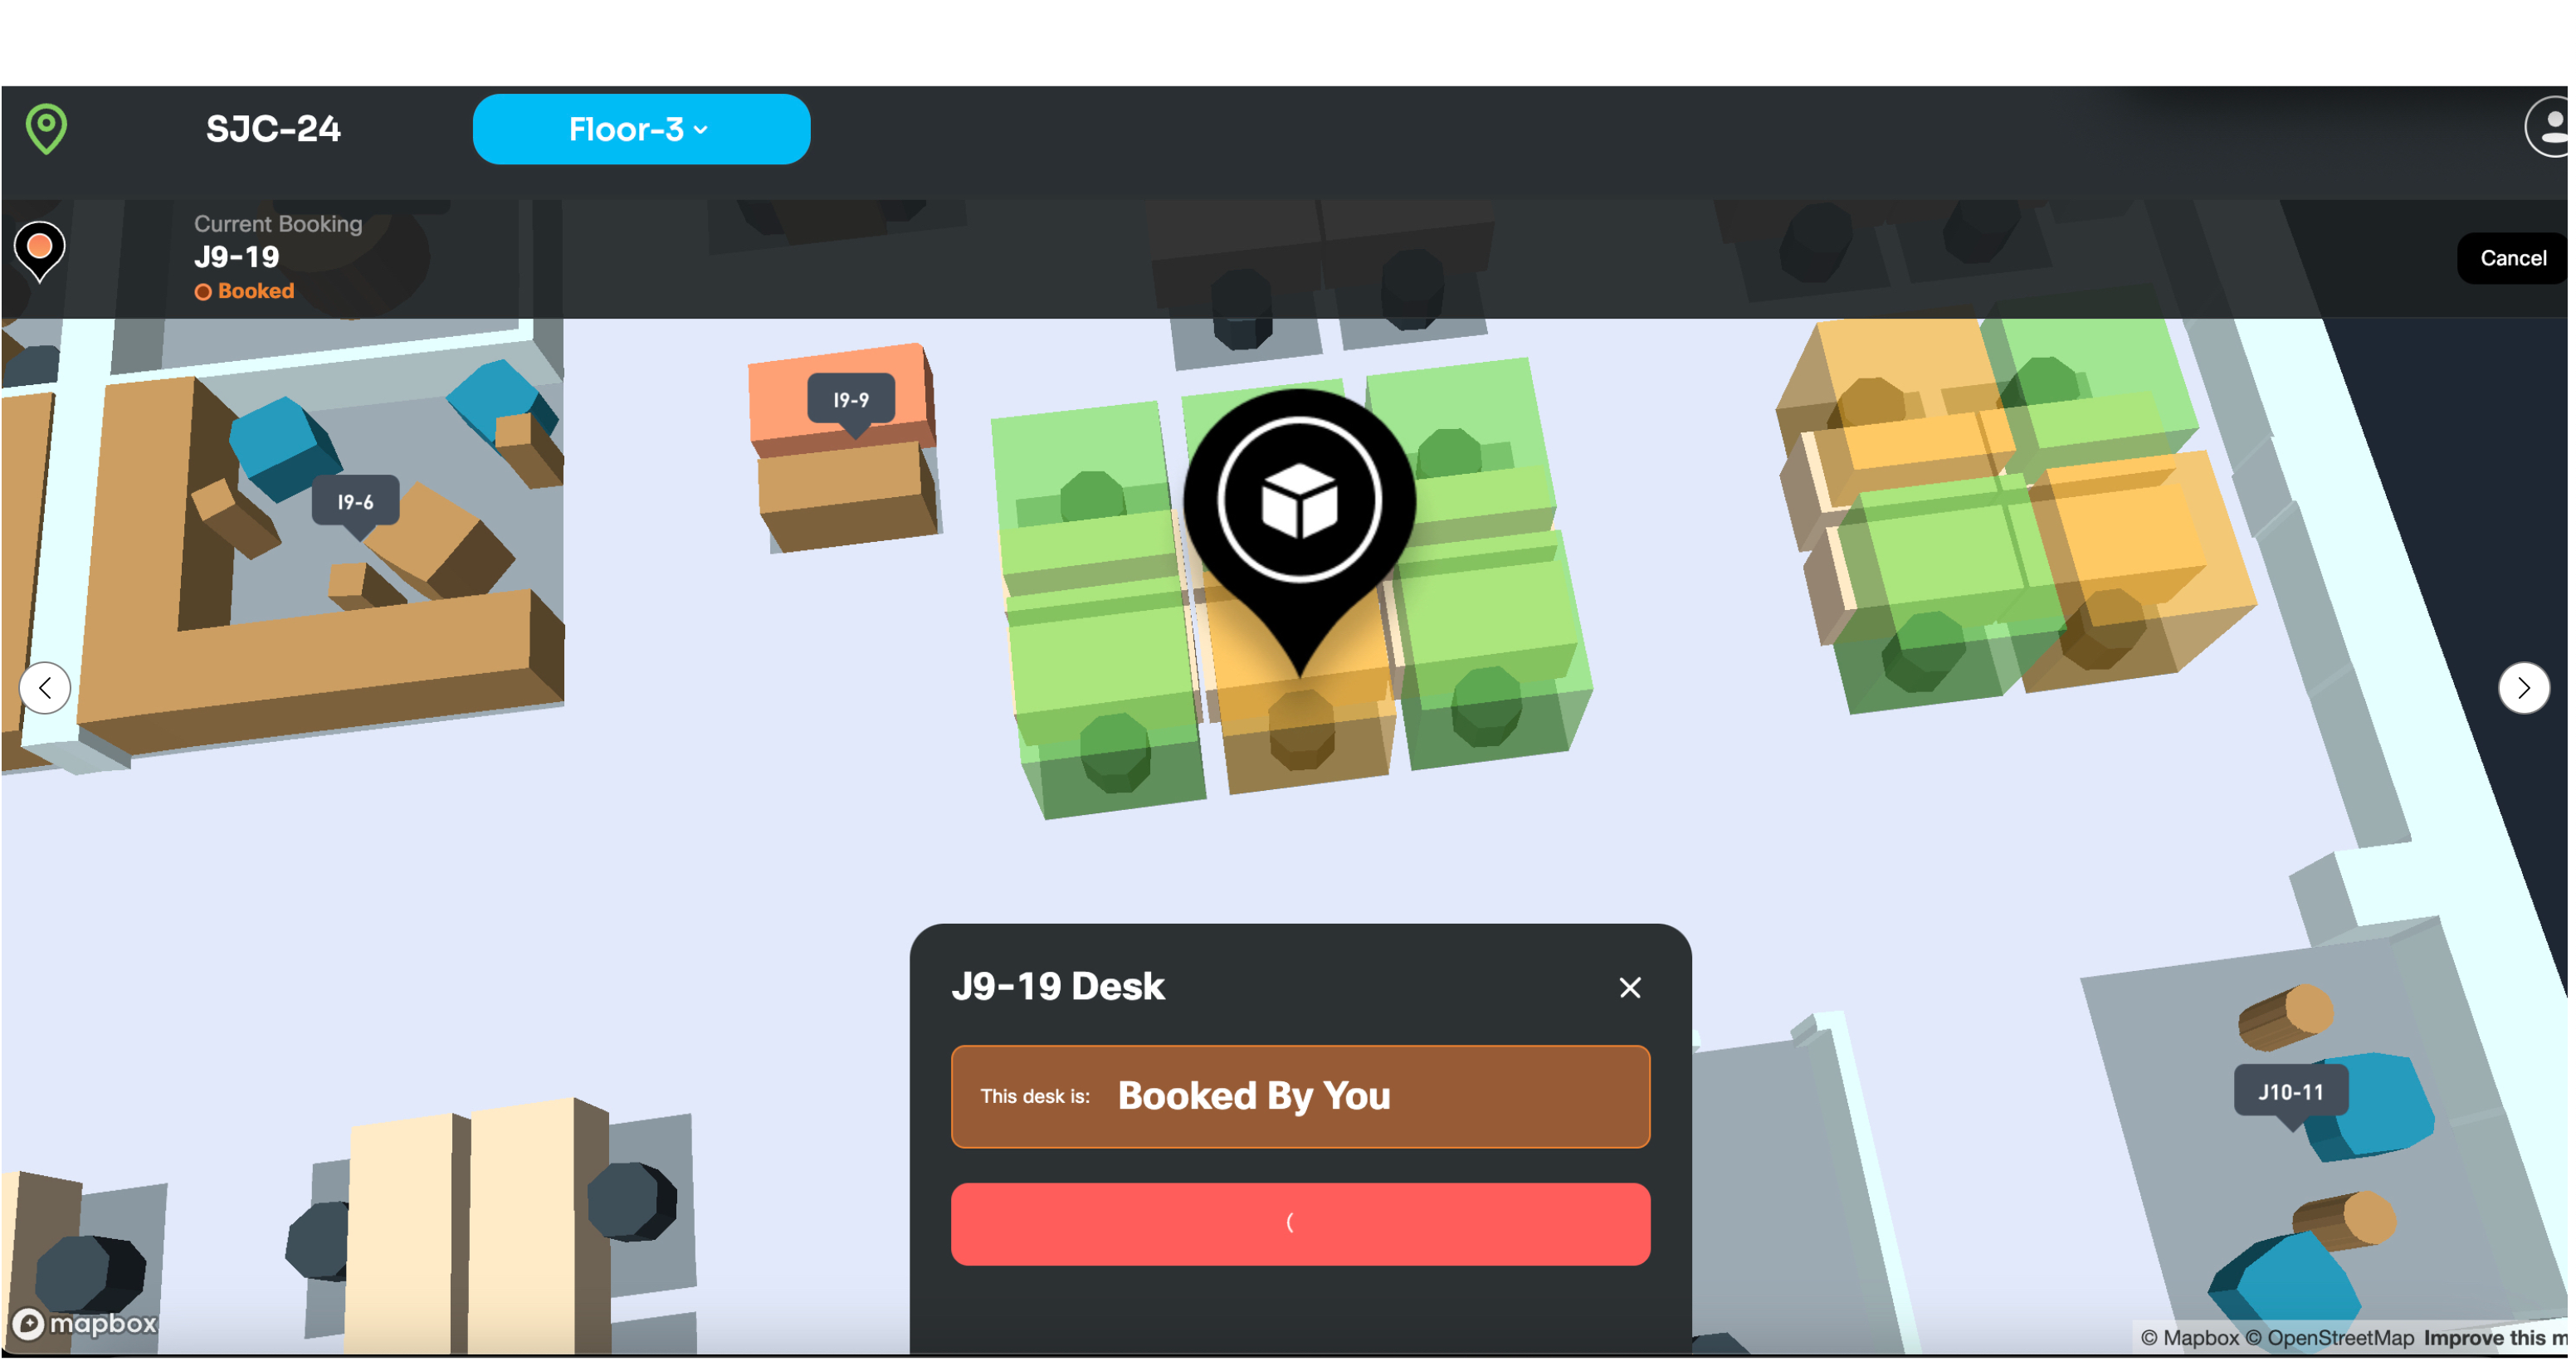
Desk Booking
|

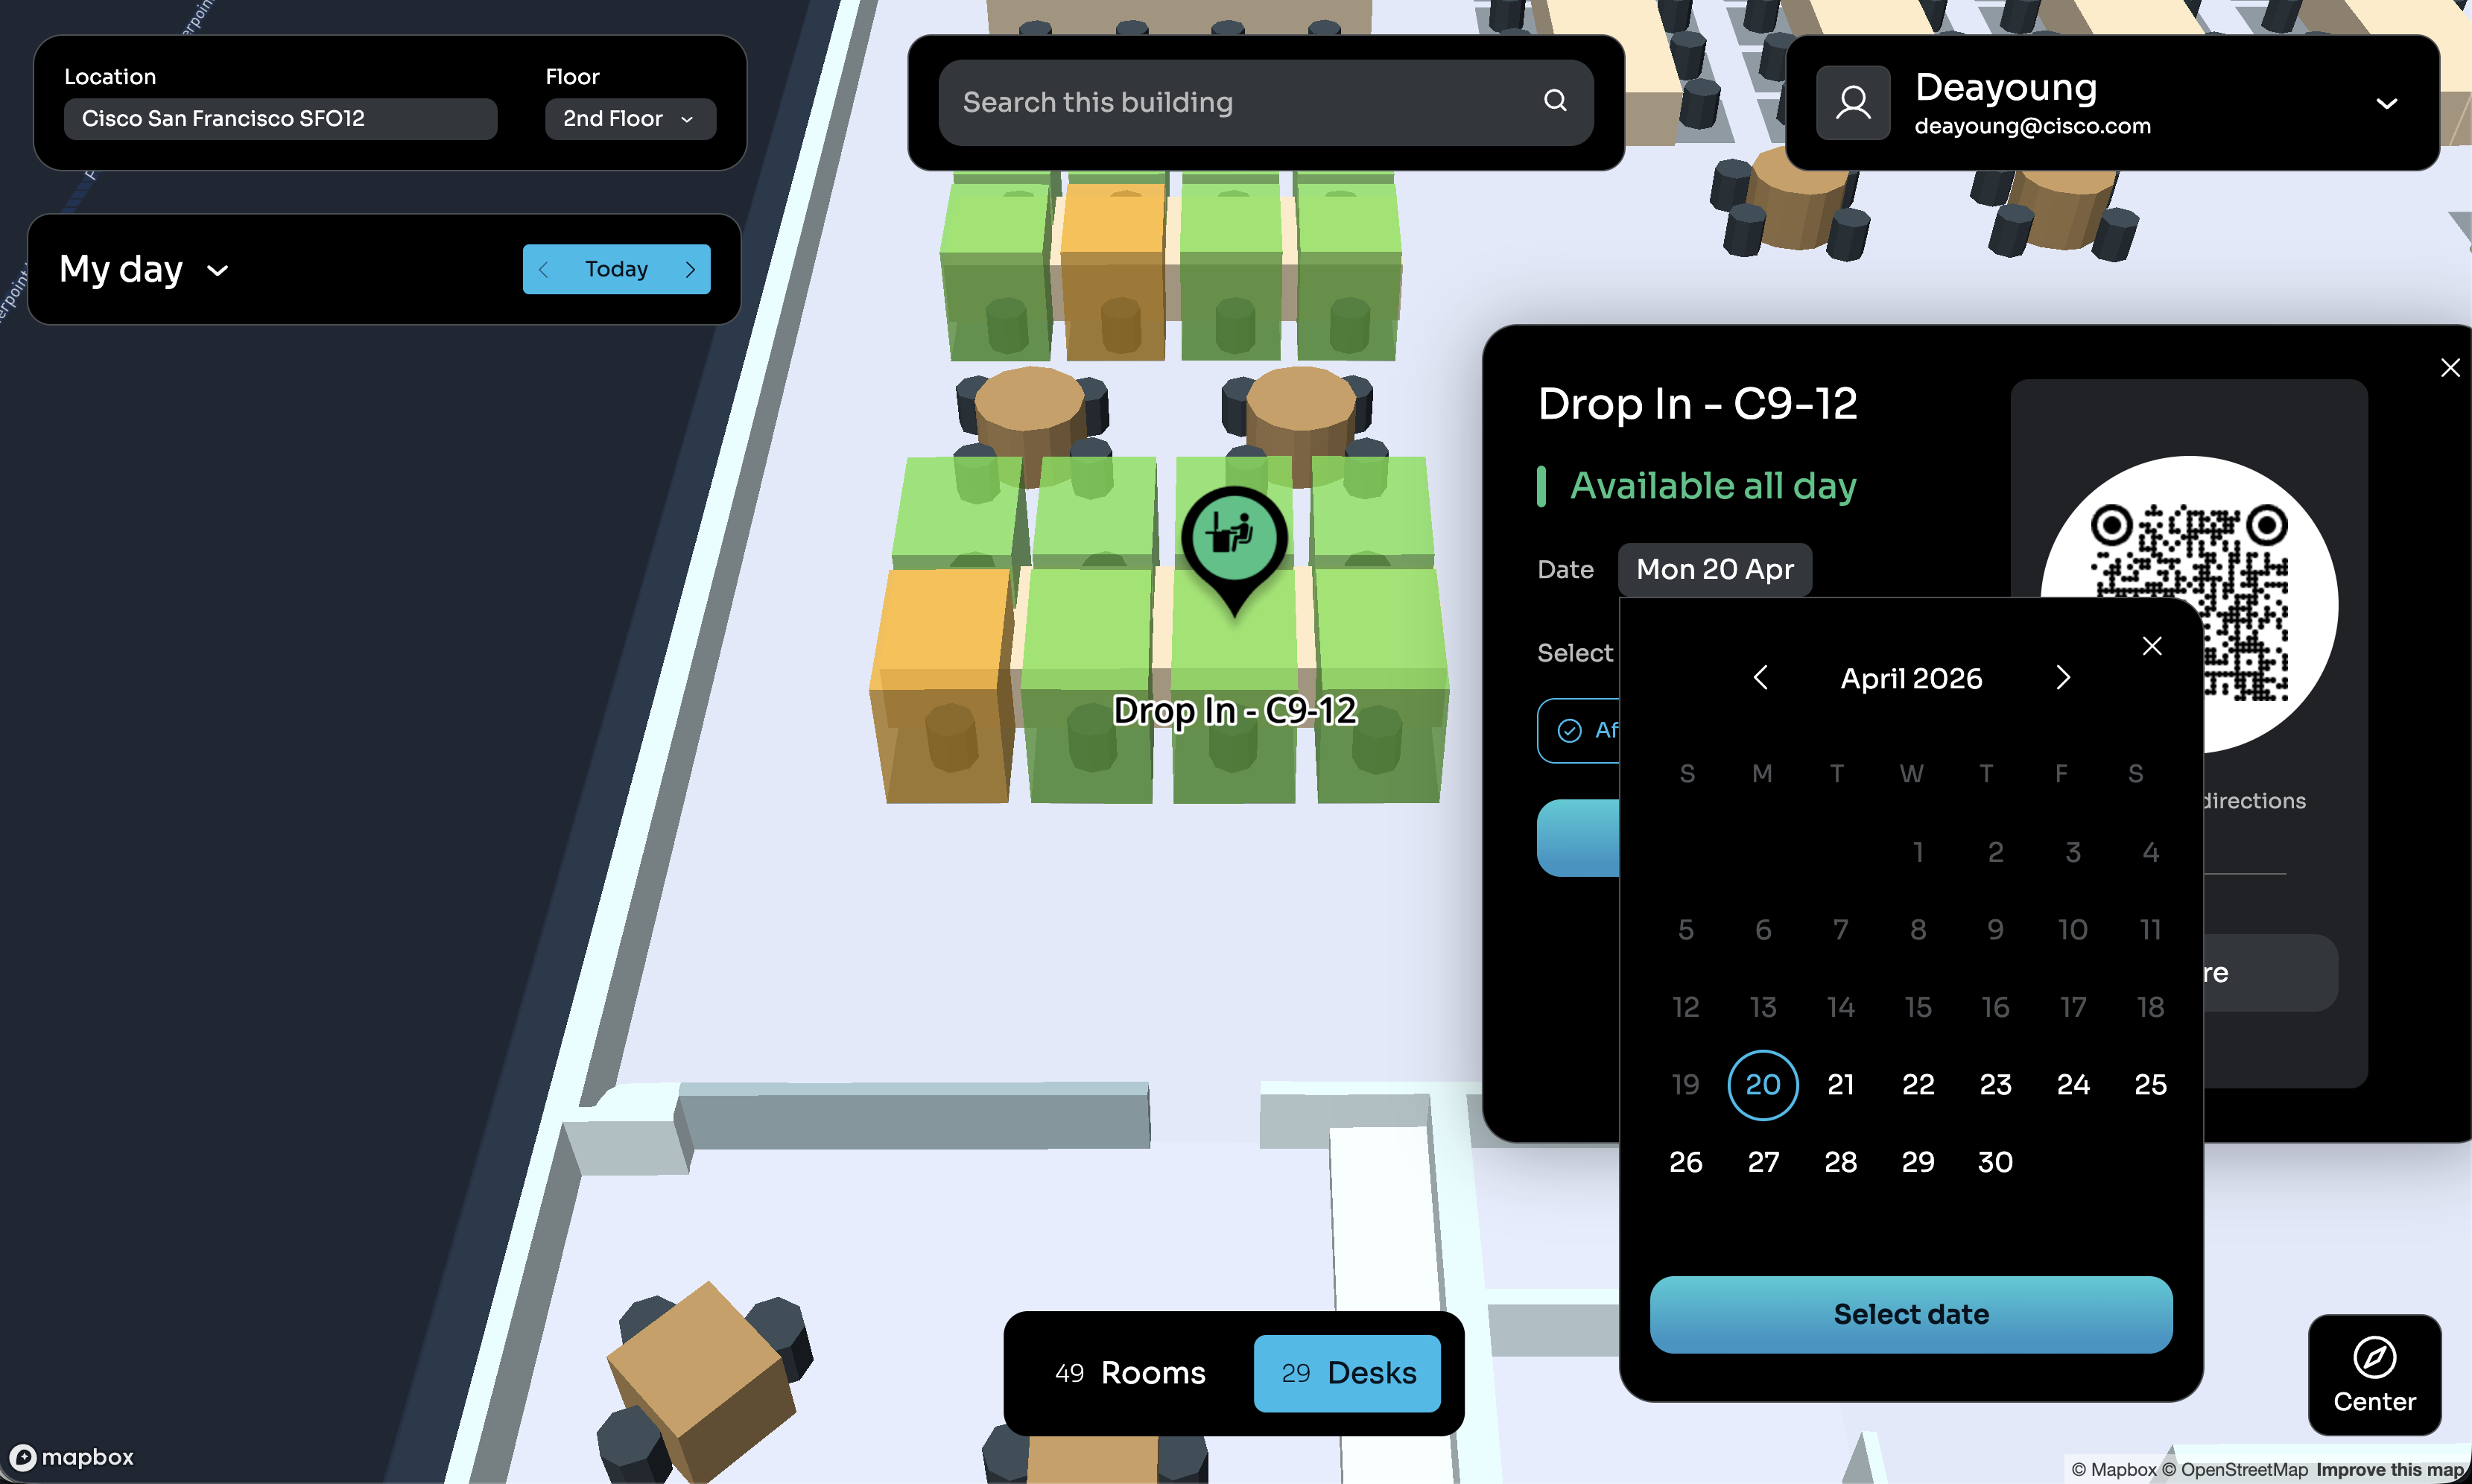
|
|
|
My day (widget | tab)
|
|
|
|
Search (widget | tab)
|
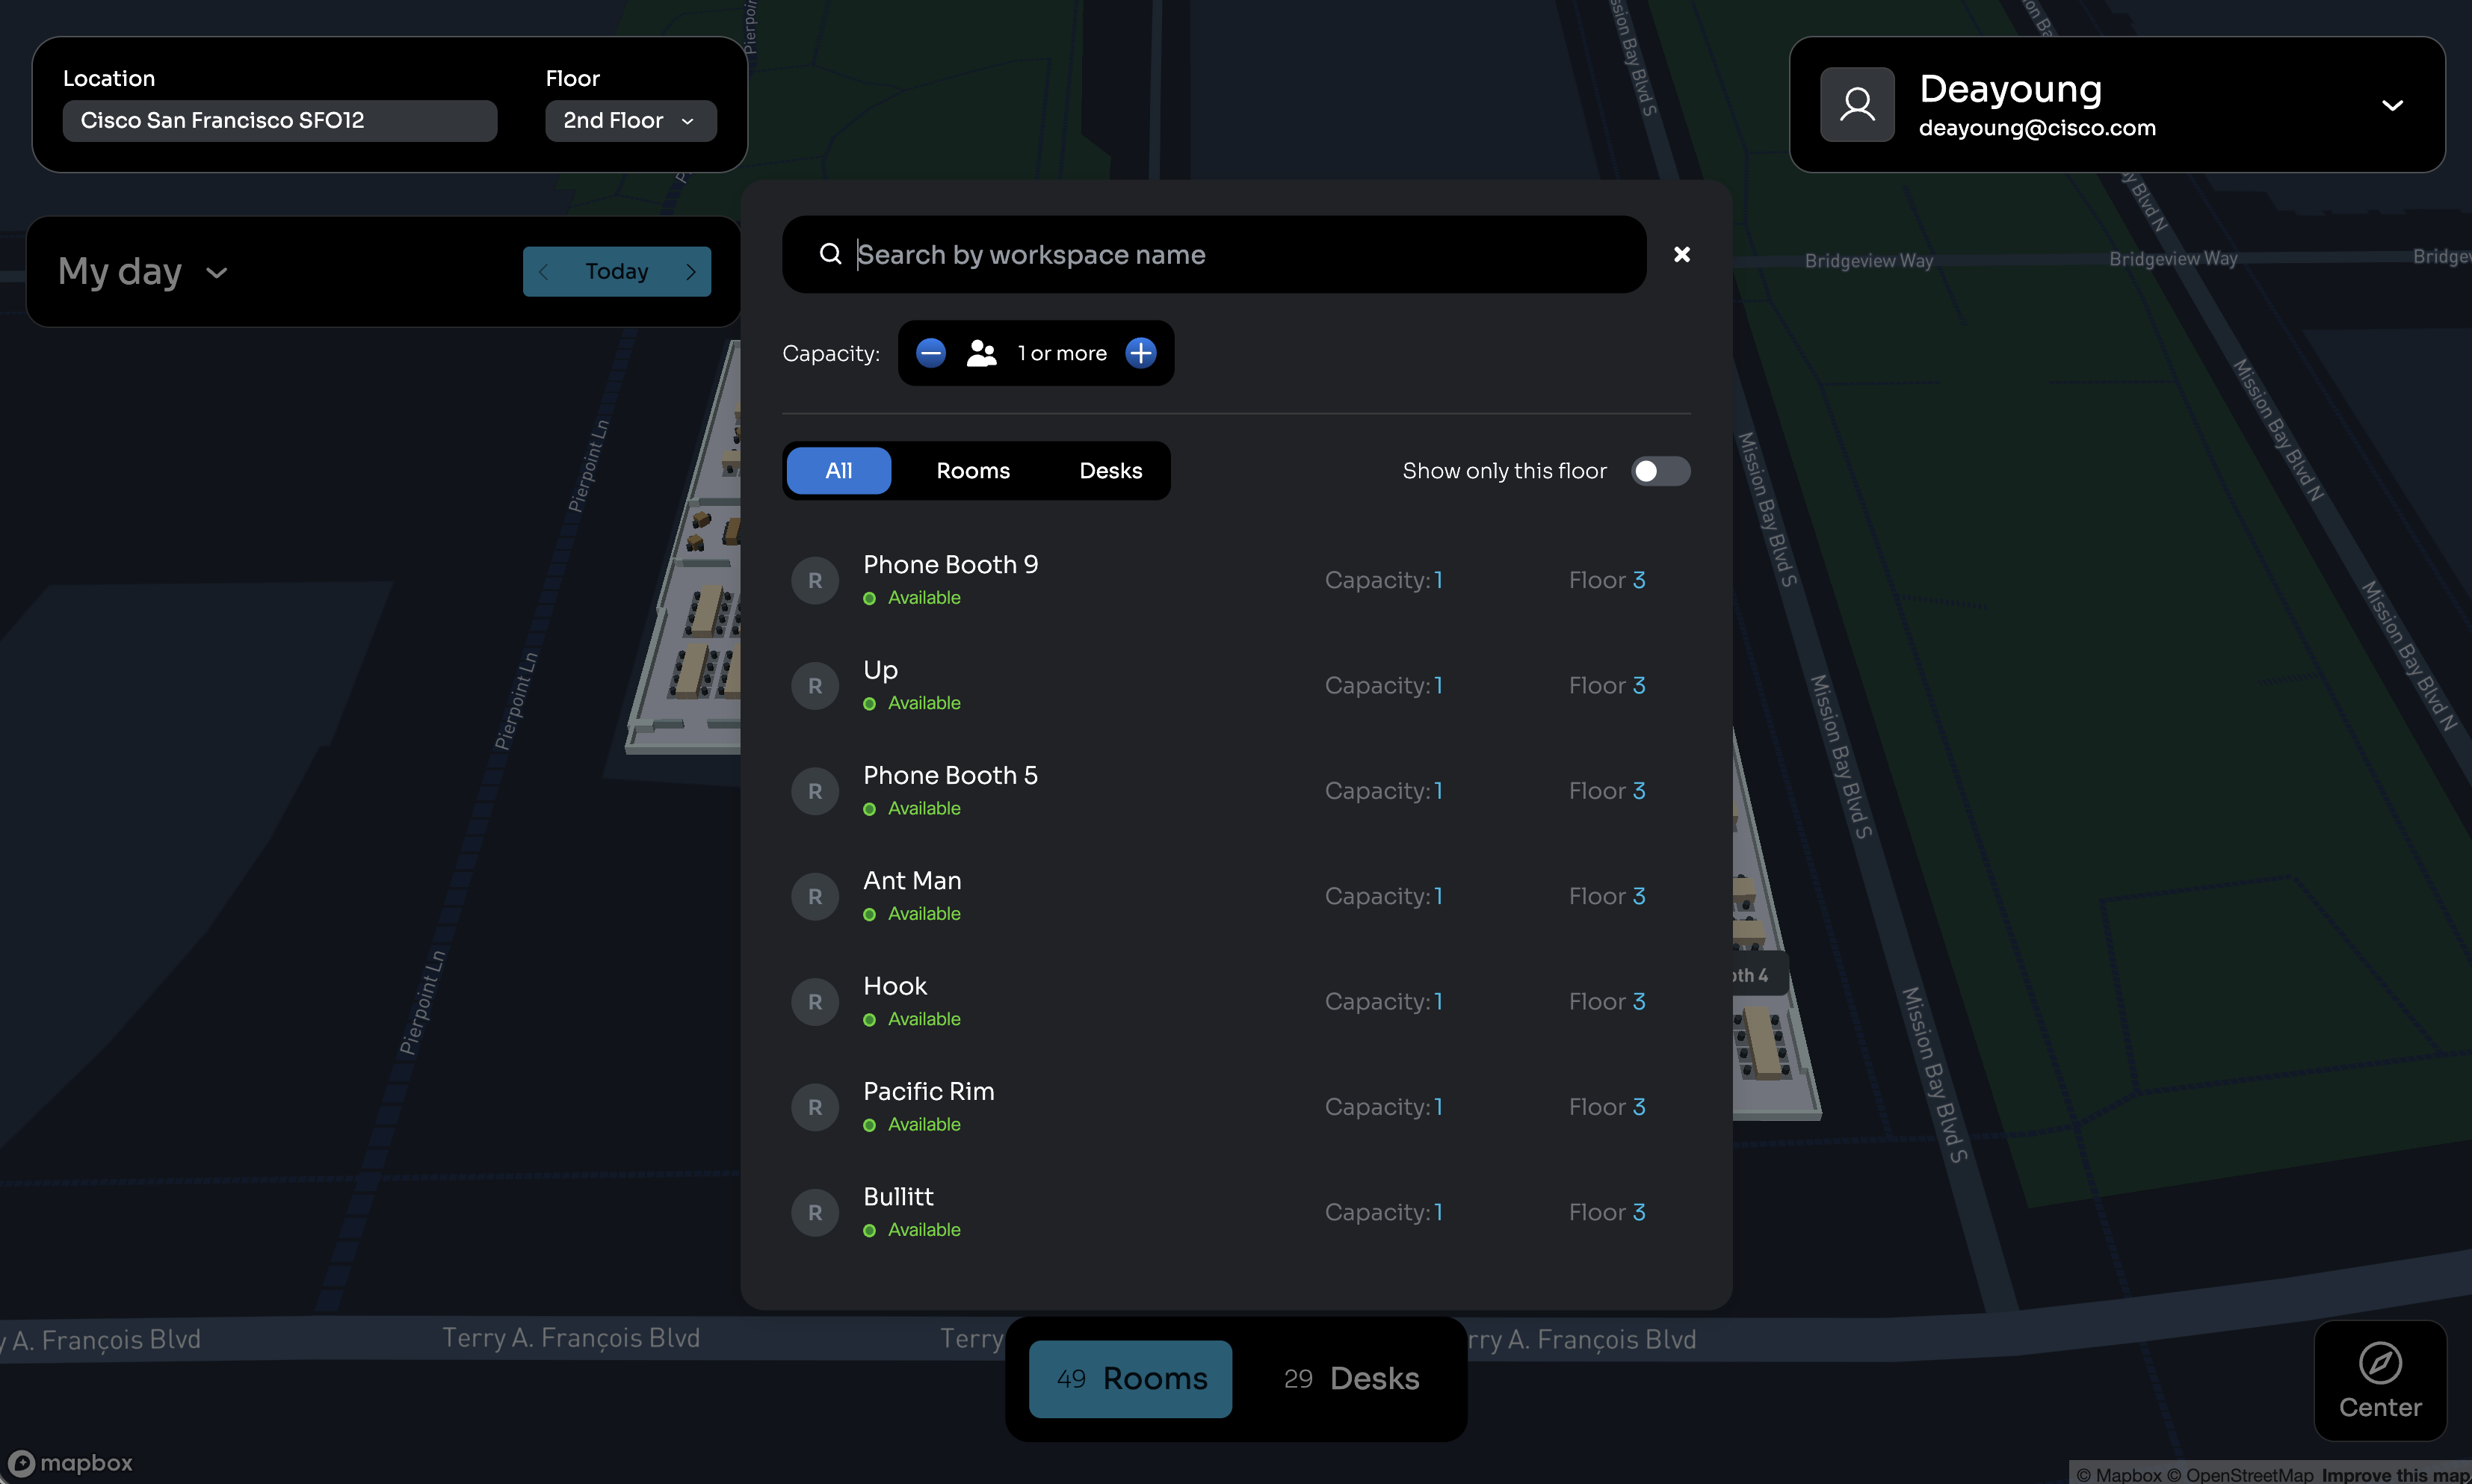
|
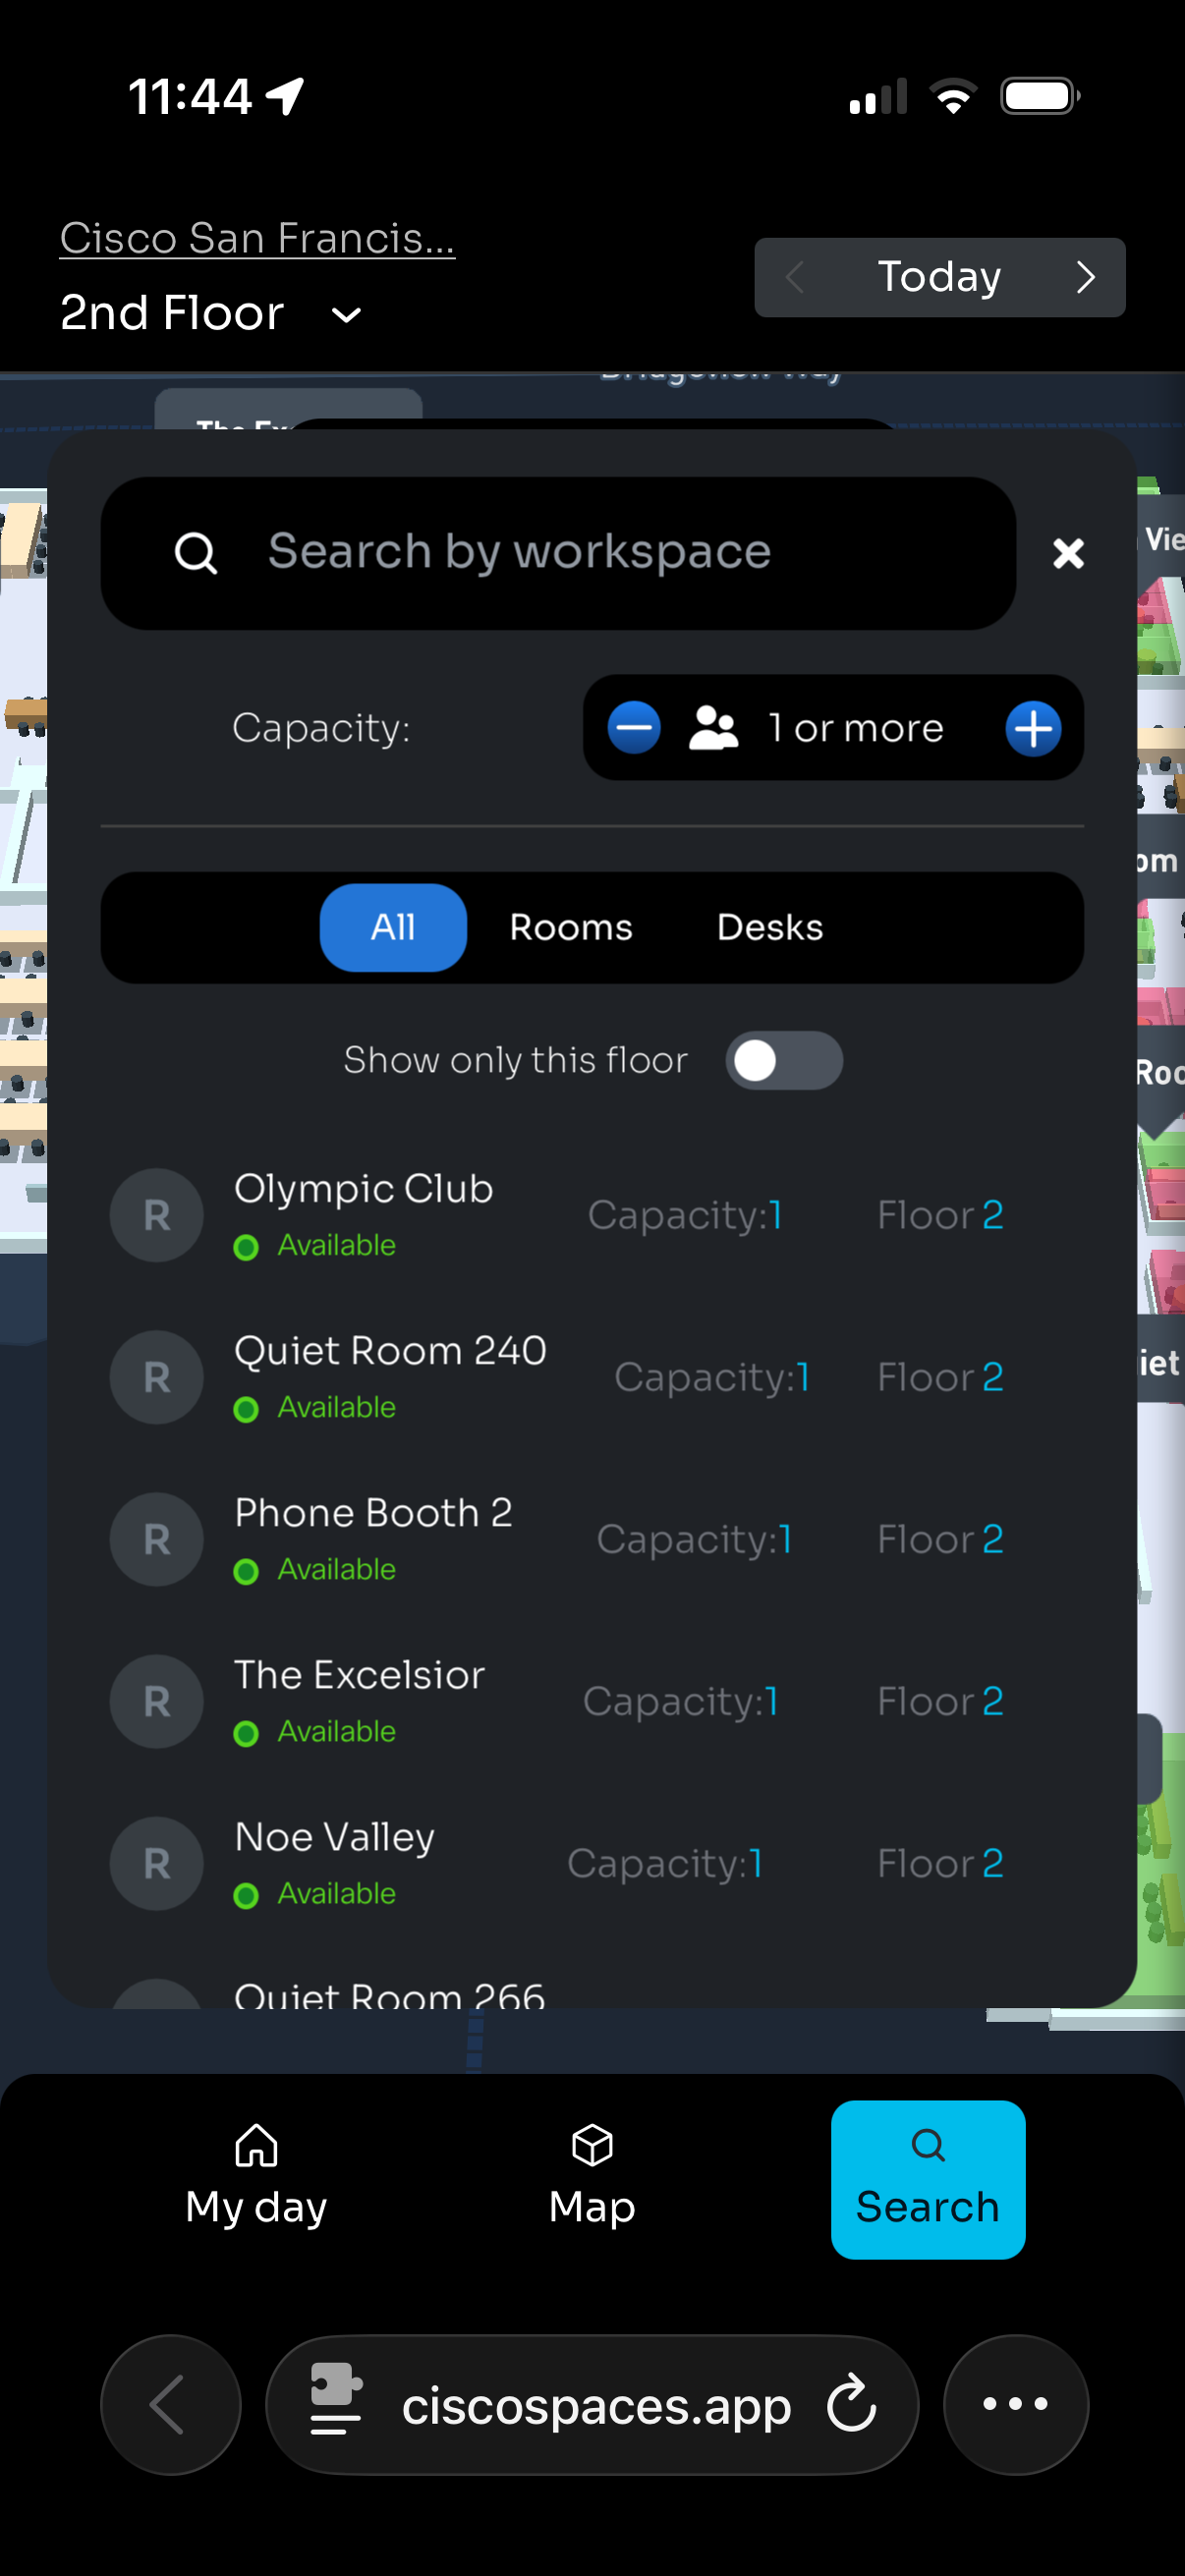
|
|
Profile Settings
|
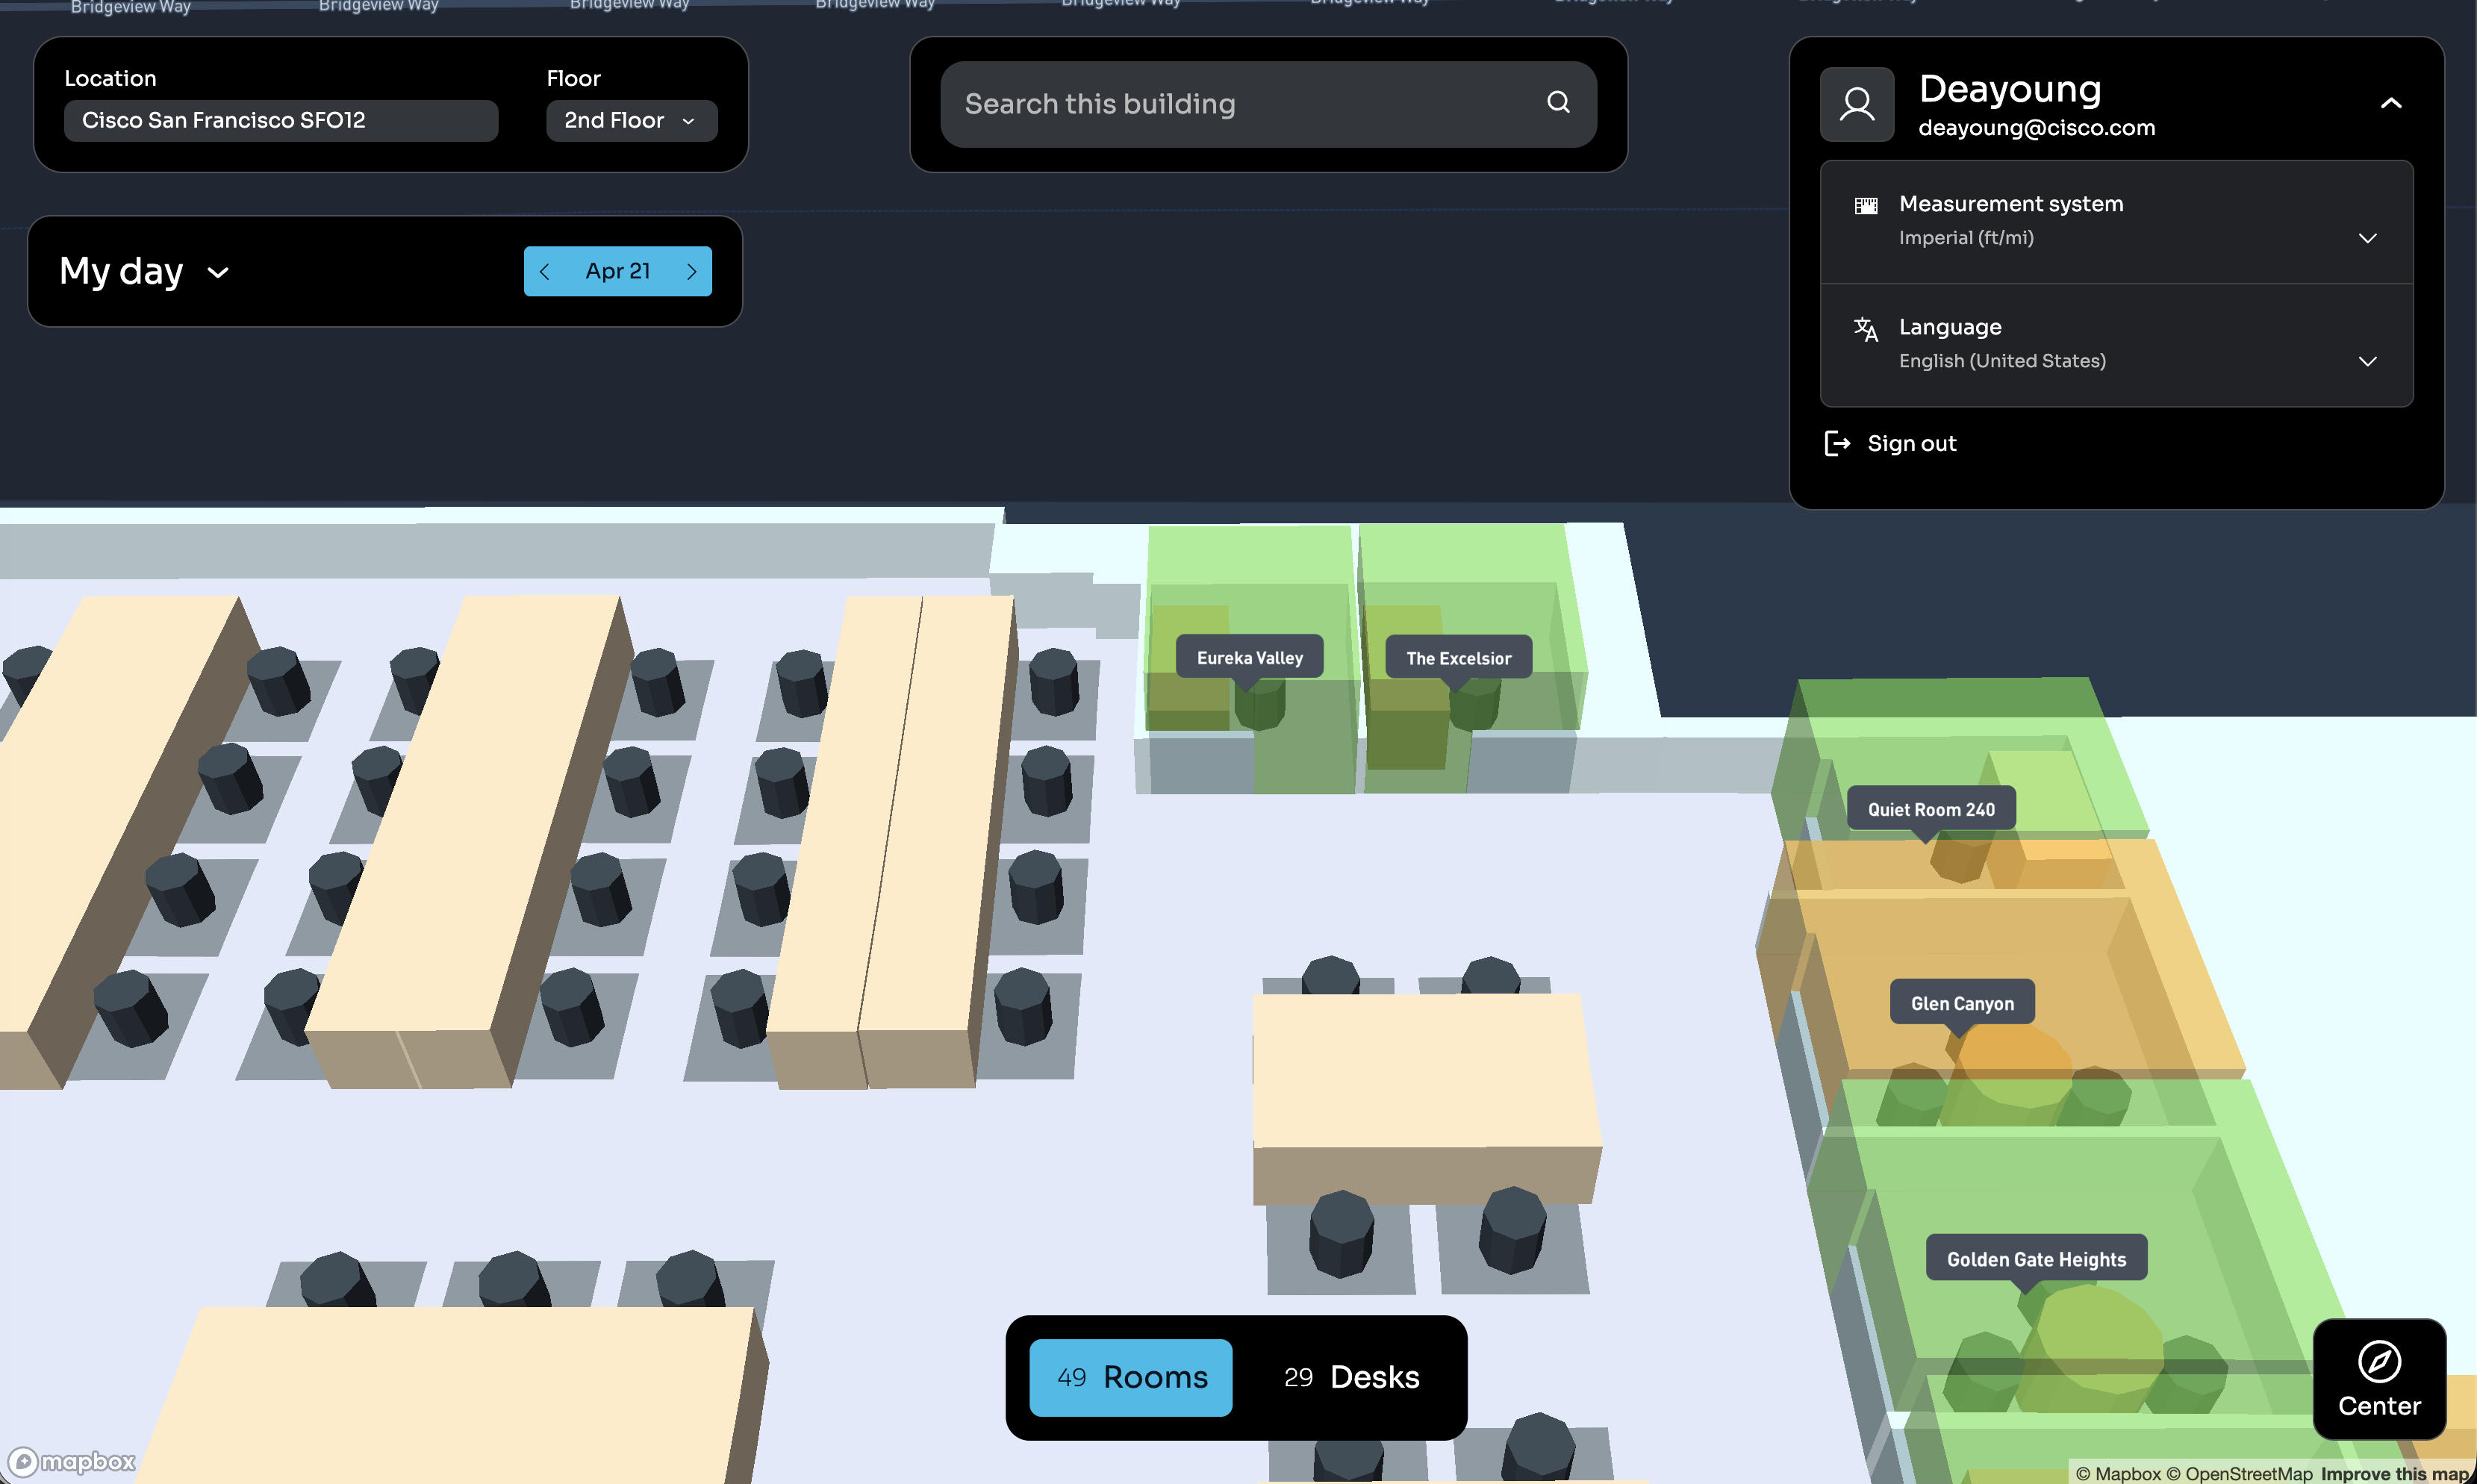
|
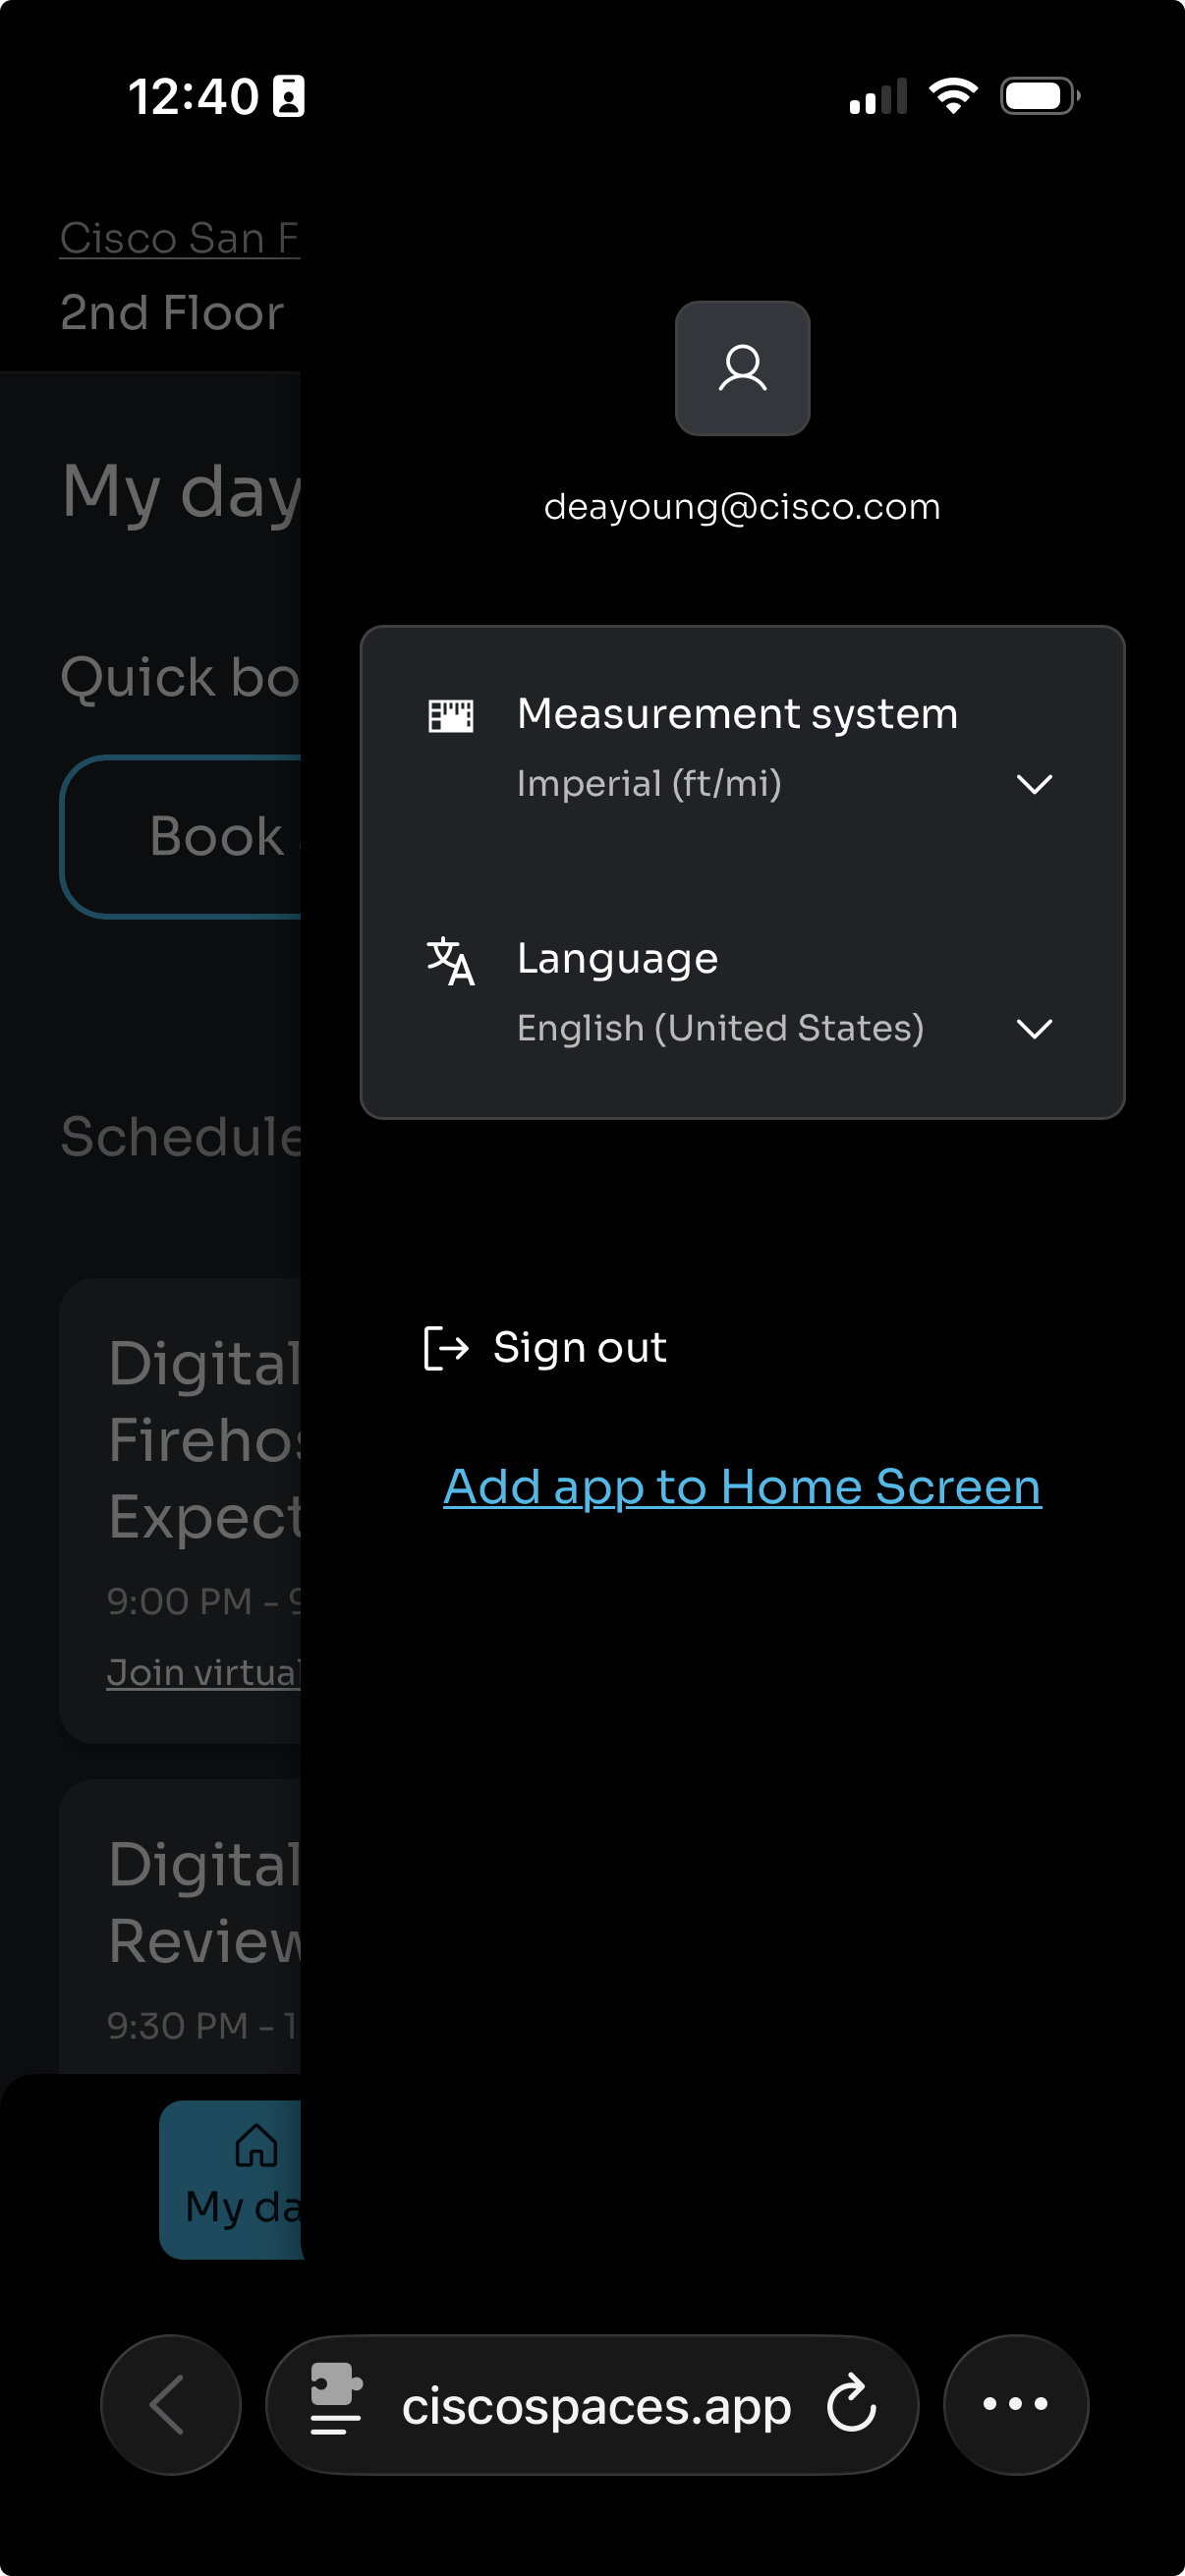
|
CAVEATS AND TIPS
-
When using Microsoft 365 and Okta for SSO end user login, especially on mobile devices, please ensure Mobile Device Management (MDM) is setup to allow access to https://booking.dnaspaces.io
-
Book This Desk gets stuck and a spinner shows indefinitely. Logout and login to try again. Force quit the PWA on iOS or Android and login to try again. The user session may have expired.
-
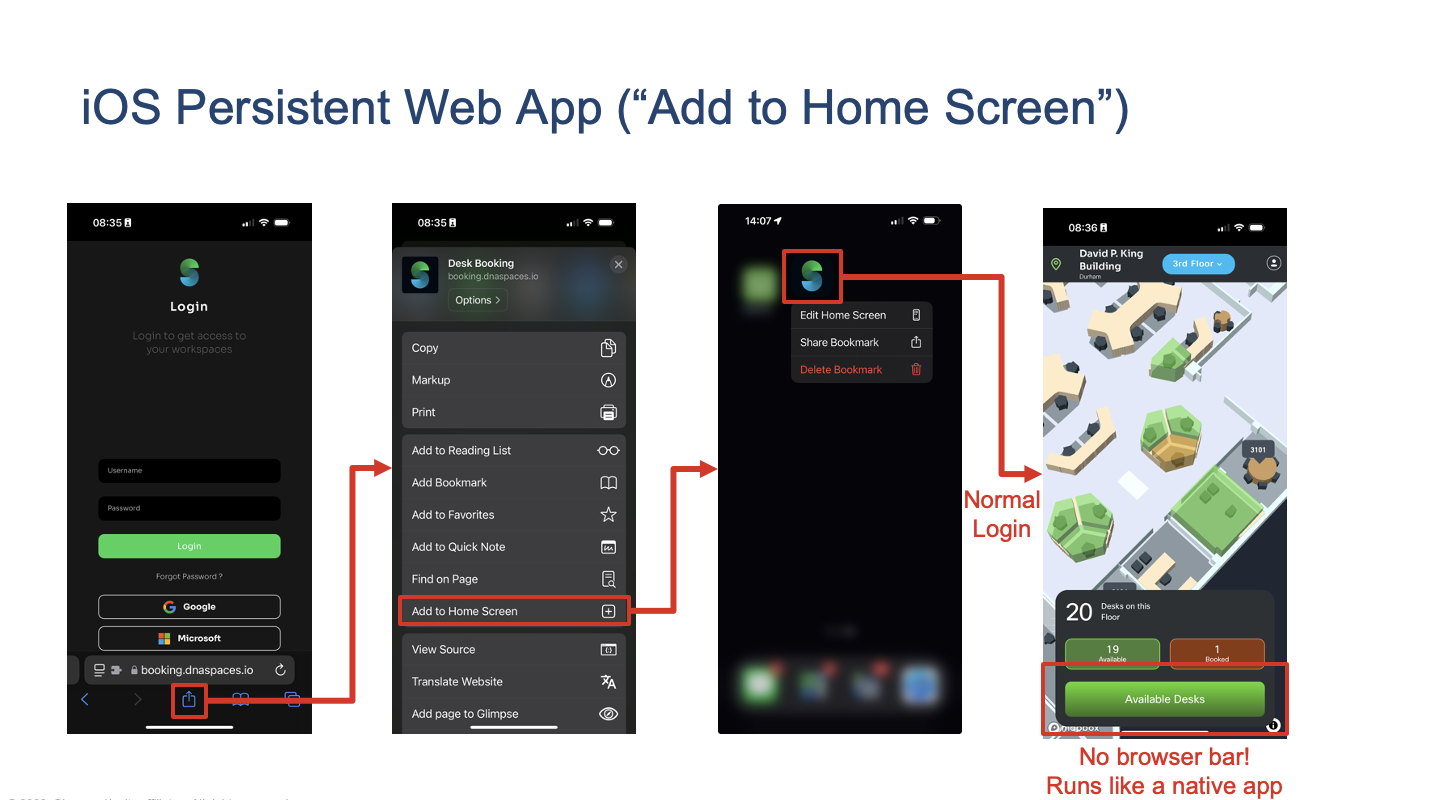
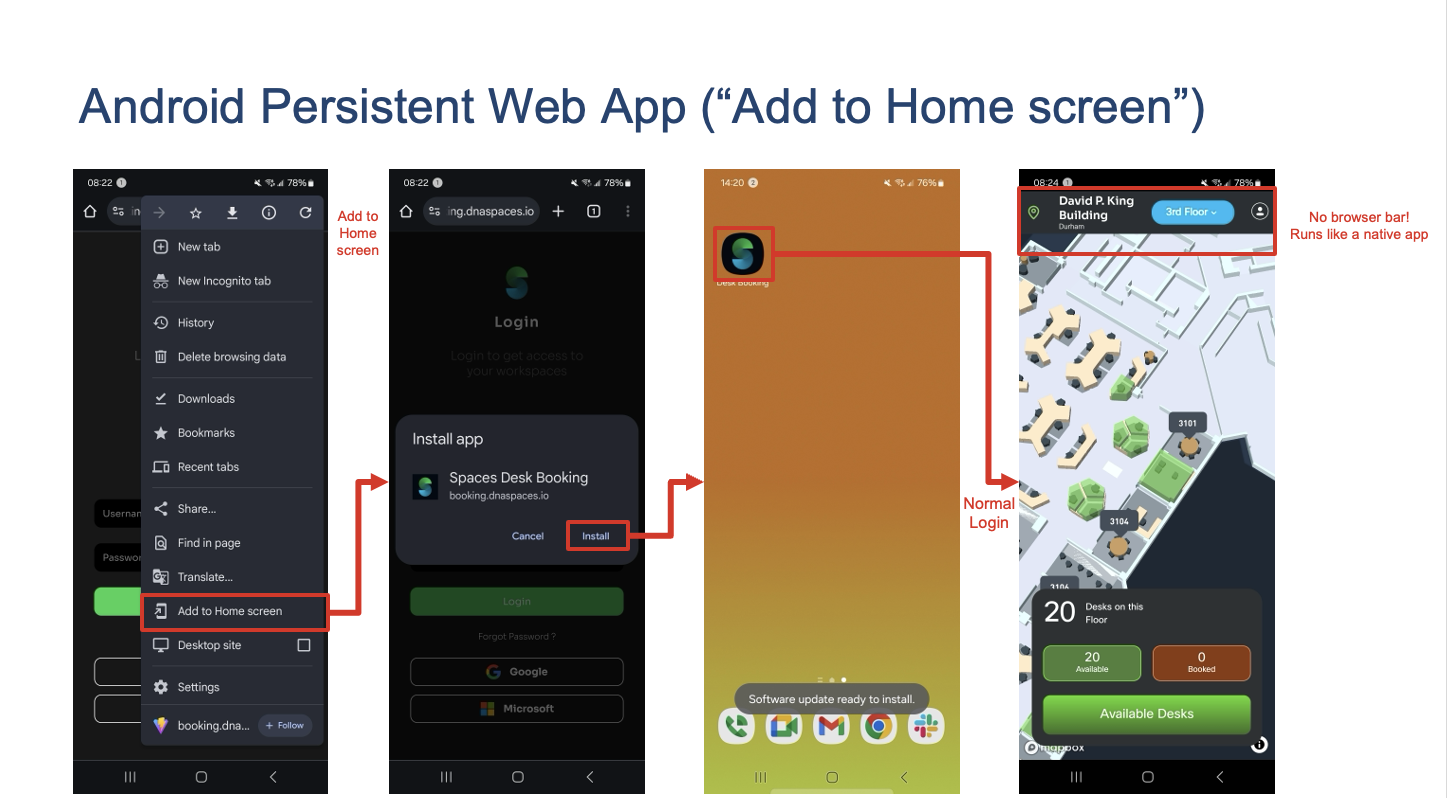
Save Space Explorer Web App as a home screen bookmark (i.e. PWA) on iOS and Android for easy access
-
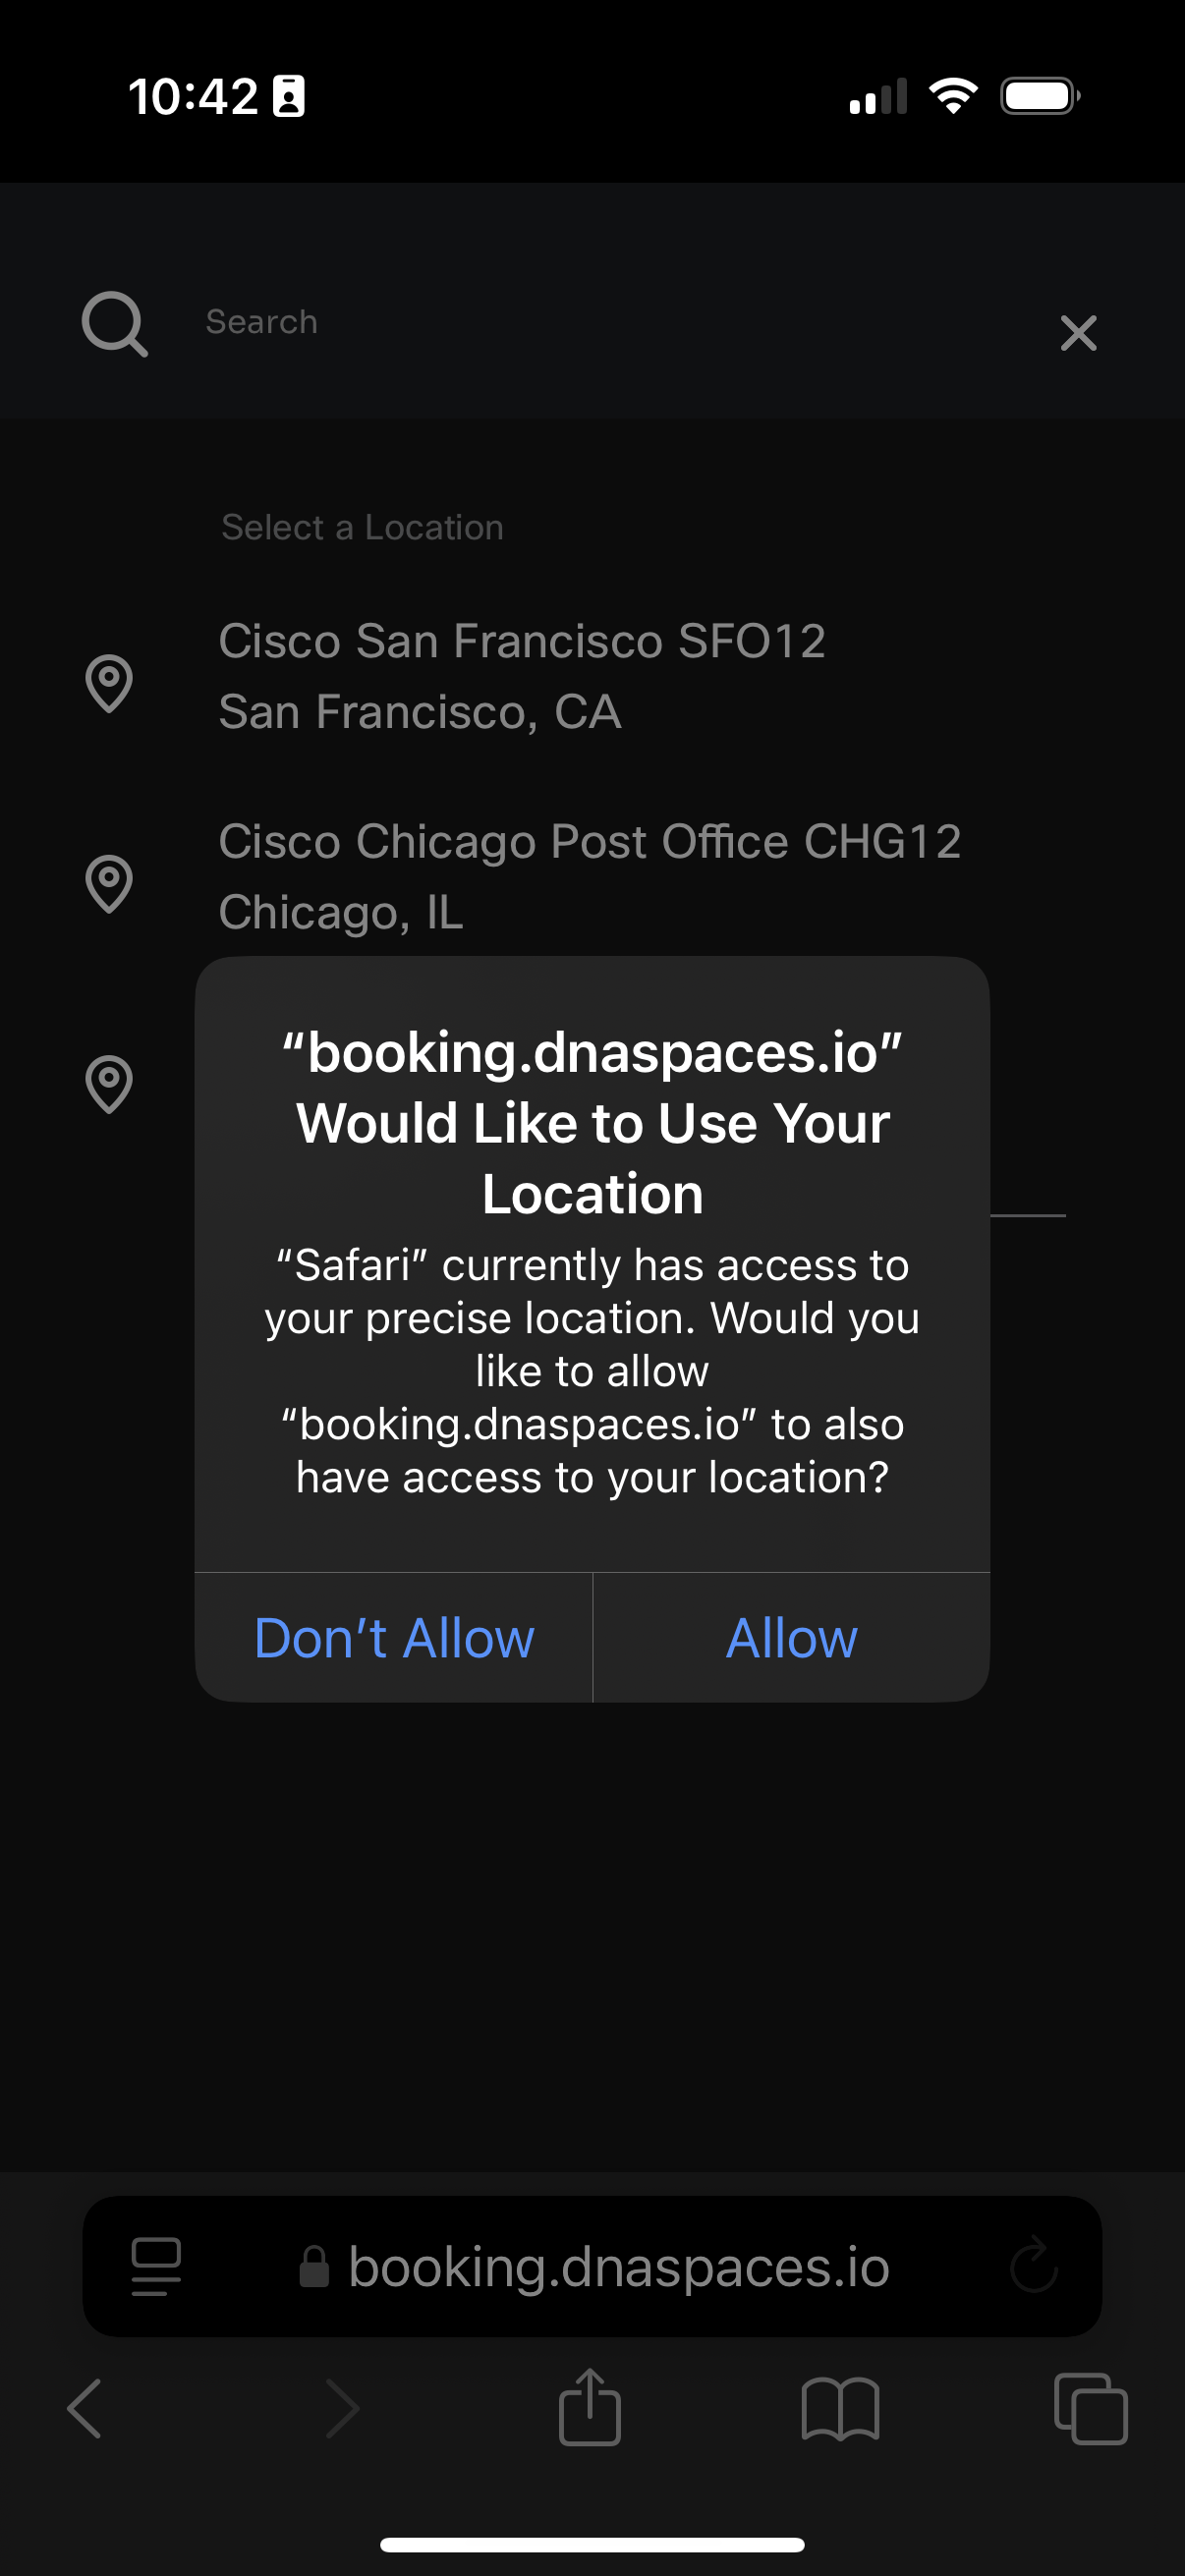
Location permissions on the Location list view are optional. The Space Explorer Web App uses location to calculate distance to each building and sorts them by closest to furthest. Otherwise, the list is in alphanumerical order.
-
Outlines for Workstation types in the CAD file produce easily identifiable spaces.
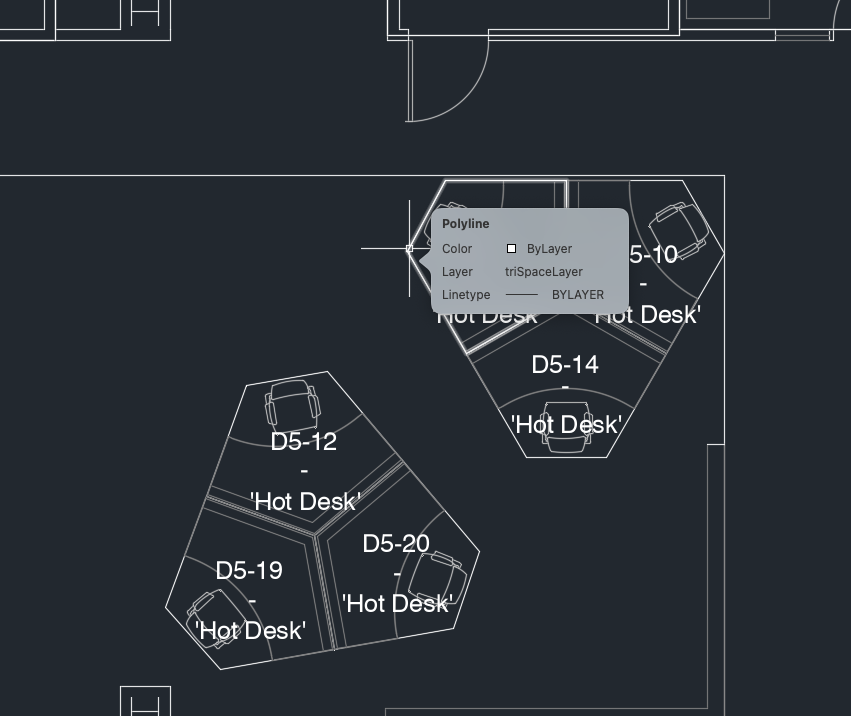
-
Workstation/Desk IDs (or names) must be included in the CAD file layers.
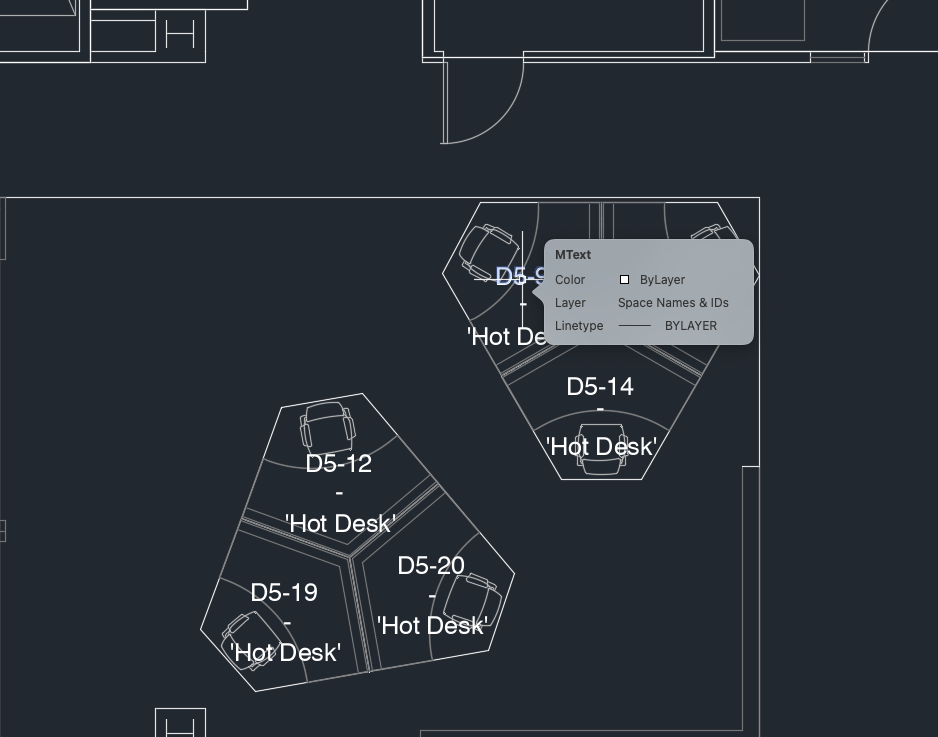
-
Workstation furniture is highly recommended
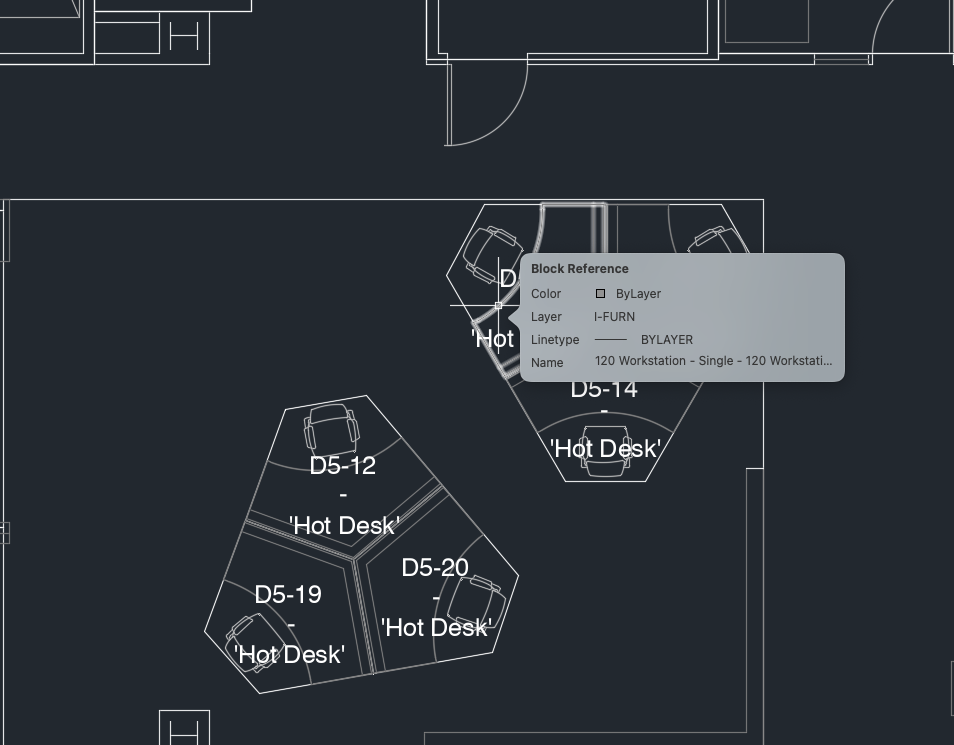
-
No outlines and IDs/names will result in no editable workstations in the Digital Map Editor. They cannot be turned into bookable desks.

-
In case of Using a MDM solution for devices
Whitelist the Booking App or associated booking URLs (ex. booking.dnaspaces.io)
Allow required domains used for SSO login (ex.microsoftonline.com,accounts.google.com,webex.com).
Permit browser-based authentication and app access in the MDM configuration profile.
Confirm that the user devices can:-
Reach required endpoints over HTTPS (port 443).
-
Launch the booking app without restrictions from corporate firewalls or MDM policy.
-
Re-test access after applying policy updates.
-
-
Calendar option in the UI:
Currently only works with Microsoft Login by reading user's work calendar through Microsoft Graph APIs.
⚠️ ROADMAP ⚠️: Webex Login user work calendar and Google Workspace Login user work calendar.
REFERENCES