
OVERVIEW
This Occupancy runbook is meant to be the source of truth for all outcomes involving occupancy, regardless of technology. Rather than have multiple guides that are separated out by wireless, collab, or any other technologies, this guide is focused on customer outcomes.
The runbook begins with methods and means to get support for the features ranging from proof of value, free trial customers, paid customers, as well as onboarding activities.
Section 2 contains general requirements that are a set of standards that should be deployed in most situations. Items such as the Location Hierarchy and maps should be consistent not only for occupancy outcomes but for all outcomes.
Occupancy has varying levels of definition. Some customers are looking for just campus, building, or even floor level. Others may want room level outcomes. Some may want all levels. Section 3 is organized to get the specific requirements needed for any level of outcome the use case calls for.
Finalizing the runbook are two sections. First one contains caveats and tips which is meant to organize information throughout the runbook and beyond to provide recommendations and pitfalls to avoid. The last section contains the FAQ which will have commonly asked questions with answers provided.
Support & Onboarding Info
Please follow the link below to find out about the different ways to get support for Cisco Spaces.
PREREQUISITES
Spaces OS
This Cisco Validated runbook is designed only as a follow on from the Spaces OS Runbook. It is the base installation for Cisco Spaces and is a prerequisite for this outcome. Please refer to the Spaces OS runbook for guidance on fulfilling this requirement.
OCCUPANCY APPS & OVERVIEW
Overview
Cisco Spaces occupancy outcomes can provide real-time and accurate occupancy data. These outcomes utilize advanced technologies such as sensors, beacons, or Wi-Fi and provides accurate and reliable data.
Occupancy outcomes can be acquired at various levels of the location hierarchy. The hierarchy in Cisco Spaces is as follows:
-
Organization
-
Campus
-
Building
-
Floor
-
Zone
-
Room
-
Desk
Details of these differences, requirements, and applications will be provided in the subsequent sections.
App/Technology Dependency Matrix
|
|
Right Now |
Location Analytics |
Behavior Metrics |
Space Manager |
Space Utilization |
Detect & Locate |
|---|---|---|---|---|---|---|
|
Campus |

|
|
|
|
|
|
|
Building |
|
|
|
|
|
|
|
Floor |
|
|
|
|
|

|
|
Zone |
|
|
|
|
|
|
|
Room |
|
|
|

|
|
|
|
Desk |
N/A
|
N/A |
N/A |
N/A |
N/A |
N/A |
Spaces Applications
Space Utilization
Empowering real estate and facilities teams with occupancy analytics across buildings, floors, and rooms. This app helps optimize space usage, reduce real estate costs, and plan for hybrid workplace demands.
For more detailed information and/or configuration options please refer to our Configuration Guide for the Space Utilization app.
Use Cases & Value
-
Wireless-Based Occupancy Trends (for Campuses, Buildings, Floors, and Zones)
-
Capture real-time occupancy data to build up historical utilization data across your portfolio, campuses, buildings, and floors.
-
Value Delivered : Historical building occupancy for real estate and workplace decision making.
-
Useful For : Facilities, Real Estate, and Workplace teams
-
-
-
Room-level Utilization Trends
-
Combine Webex device, IoT Sensor telemetry, and calendar event data for room occupancy metrics, ghost booking rates, and more.
-
Value Delivered : Room booking and peak people count data combined for workplace decision making.
-
Useful For : Facilities, Real Estate, and Workplace teams
-
-
Space Utilization does not support any vertical other than workspaces.
Exception 1: Administrative buildings non-workspace environments like retail, healthcare, or education.
Exception 2: Rooms which are vertical agnostic.
Right Now
Right Now provides a real time count of the number of people within a physical space & how it compares with the historical average.
For more detailed information and/or configuration options please refer to our Configuration Guide for the Right Now app.
Use Cases & Value
-
Active count of visitors
-
Count of devices/people who were spotted in the location during the last 10 minutes
-
-
Total count of visitors
-
Count of visitors that were present during the past X hours (X being the threshold defined across individual verticals). For example this could be 3 hours for Retail and 8 Hours for Workspaces
-
-
Density Trigger
-
It also allows users to set limits beyond which a trigger is activated. A feature that is becoming increasingly important in the post Covid world
-
-
Associated device count
-
Right Now app currently counts only associated devices. Associated Devices: No. of devices associating with network.
-
-
Protocol Compliance
-
Real time warning when the number of people at a location/sub-location exceed a previously defined threshold. Threshold could be absolute (number of people) or density (number of people per sq.ft.)
-
Behavior Metrics
The Behavior Metrics App enables vertical specific insights into the behavior of people within a physical space. Eg, Time spent by a shopper at a store, Time spent by employees at the workplace, frequency of visits of students to the library.
For more detailed information and/or configuration options please refer to our Configuration Guide for the Behavior Metrics app.
Use Cases Value
-
Get vertical specific behavior insights
-
Get insights into employee, student, customer or patient behavior, entry/exit times, time spent, visit frequency etc
-
-
Benchmark performance of business locations
-
Compare and benchmark the performance of locations historically, against other locations within the org or with the category, industry which they operate
-
-
Understand people distribution density
-
Understand trends in occupancy over different time periods and optimize space utilization based on the data
-
-
Correlate behavior data with other data sources
-
Run correlations with other data sources such as revenue, POS data, CRM, weather, academic performance (universities), HR outcomes (workspaces), HVAC to optimize processes. Integrate presence data with HVAC data to save energy costs
-
Location Analytics
The Location Analytics app enables to create various reports related to the no. of visitors and visits. Create custom widgets by filtering data based on location, date range or SSIDs.
For more detailed information and/or configuration options please refer to our Configuration Guide for the Location Analytics app.
Use Cases Value
-
Create custom reports for specific business needs
-
Dive deeper into the data to get a granular understanding of peoples behavior. Get insights for specific locations or time periods.
-
Value Delivered: Improved decision making
-
Useful to: Operations, HR, Marketing teams
-
-
-
Compare peoples behavior across locations
-
Measure behavior of employees, customers, guests or students across different offices, campuses floors
-
Value Delivered: Improved decision making
-
Useful to: IT teams, Operations, HR
-
-
-
View visitor count and visit patterns
-
Measure customer loyalty, student or employee engagement by understanding patterns of behavior new vs repeat visitors. Target these segments with specific actions.
-
Value Delivered: Improved retention loyalty
-
Useful to: HR and Admin teams, Sales Marketing.
-
-
-
Understand average dwell time
-
Measure the impact of dwell time by correlating it with sales and revenue, employee attrition or student performance data. Make informed decisions based on this data.
-
Value Delivered: Increased sales, Improved student or employee productivity
-
Useful to: HR, Campus Faculty, Sales Marketing
-
-
Space Manager
For more detailed information and/or configuration options please refer to our Configuration Guide for the Space Manager app.
Use Cases Value
Experience a comprehensive overview of the workplace within a single, real-time view of floor occupancy (and with 24-hour playback). In a captivating 3D virtual environment, visualize and discover how people and things come together in indoor spaces. Identify gaps in coverage, manage new and existing IoT devices, link Wireless Access Points and Webex devices to workspaces, and much more.
-
Workplace Occupancy and Utilization
-
View real-time Floor and Room utilization
-
24-hour playback of occupancy heat map data
-
Overlay WiFi occupancy Heat Maps on Rich Maps
-
Real-time metrics (building, floor, room)
-
Value Delivered: space optimization, facilities services and real estate management
-
Useful to: Facilities, Real Estate and IT
-
-
-
Room Occupancy Reports
-
Configure, view, and download Room Occupancy Reports for a floor or building.
-
Export standardized room occupancy data based on Cisco Space Digital Maps Pro to a CSV file for further analysis
-
Set date and time ranges to analyze specific or recurring reports
-
Filter room occupancy data by day of week, hour of day, room capacity, and optionally exclude empty rows with no people detected
-
The output CSV provides aggregated peak people count every 15, 30, or 60 minutes per room
-
Import into Excel, PowerBI, Tableau, or an analytics tool of choice to create custom graphs
-
Value Delivered: Build custom dashboards to visualize and analyze occupancy data by importing the CSV export into PowerBl, Tableau, etc., which allows users to make informed real estate and workplace decisions.
-
Useful to: Facilities, Real Estate and IT
-
-
-
Environmental Monitoring
-
Real-time metrics (indoor air quality, TVOCs, CO2, temperature, humidity, ambient noise, and more)
-
Value Delivered: Provides insights into comfort, safety, and sustainability metrics in the workplace
-
Useful to: Facilities, Real Estate and IT
-
-
-
Manage Devices
-
Associate Webex, Meraki and 3rd party IoT devices to Rich Map
-
Manage sensors Add, Edit or Remove devices on the Workspace Management page
-
Manage workspace metadata (e.g.: name, type, capacity)
-
Value Delivered: Assign devices to workspaces and check their status with real-time information.
-
Useful to: Facilities, Real Estate and IT
-
-
-
Visualize/Find Devices
-
See device locations on the floorplan
-
Identify gaps in device coverage
-
Distinguish device types and data sources on Rich Maps
-
Value Delivered: Visualization of data sources
-
Useful to: Facilities, Real Estate and IT
-
-
Hierarchy for Occupancy Overview
Campus Overview
Campus level occupancy details provides a very high level of observations based on how campuses are defined in the hierarchy. This could be based on geographic locations where buildings may be clustered in areas. It could also be based on separation of business entities with an organization.
Campus level occupancy data can be acquired using WiFi technology. Subsections under the Campus level in the Location Hierarchy will provide more granular occupancy outcomes.
Building Overview
Generally, buildings will be some individual structure that contains one or more floors in the hierarchy. This level of occupancy data is aggregated from all floors contained to a single building to illustrate the outcomes associated with it.
Building level occupancy data can be acquired using WiFi technology. Subsections under the Building level in the Location Hierarchy will provide more granular occupancy outcomes.
Floor Overview
Floor occupancy provides granular insights into how specific floors within a building are utilized, allowing for a more detailed level visibility than building occupancy. While building occupancy gives an overall view of how many people are present across the entire structure, floor occupancy focuses on individual floors, highlighting variations in usage between different areas. This enables more precise space optimization, resource allocation, and safety measures. It also allows businesses to understand patterns at a finer scale, such as which floors experience higher traffic, compared to the broader insights offered by building-wide data.
Zone Overview
Zone occupancy offers even more granular insights by focusing on specific areas or sections within a floor, providing a detailed understanding of how different zones are used. While floor occupancy looks at overall activity across an entire floor, zone occupancy pinpoints usage within designated areas like workspaces or corridors. This allows for targeted optimization of resources. Zone-level data helps identify high-traffic or underutilized spaces, enabling precise decisions on space planning and ensuring safety compliance in more confined areas compared to the broader analysis provided by floor or building occupancy.
Configuring Zones (Zone level occupancy only)
Please refer to our Configuration Guide for detailed steps for creating Zones.
Wired 802.11x Occupancy
Wired 802.1X occupancy extends Cisco Spaces occupancy outcomes to employees who connect through authenticated wired access ports. When wired and Wi-Fi identities use a consistent format, Cisco Spaces can correlate presence across both connection types and avoid counting the same person twice during a network transition.
Use this section to qualify a Catalyst wired deployment, onboard the switch through the Cisco Spaces Connector, enable wired counting, and validate combined wired and wireless occupancy.
Supported deployment
Use wired occupancy when all of the following conditions are met:
-
The location has a significant number of employees who connect through wired docking stations.
-
Cisco Catalyst 9300 or 9400 Series switches provide the wired access layer.
-
IEEE 802.1X authentication is enabled globally and on every access port that should contribute to occupancy.
-
Wired and wireless authentication return user identities in the same format.
-
At least one Wi-Fi network at the test location is already onboarded to Cisco Spaces.
-
A customer network administrator is available to configure the switch and support validation.
Desktop-only connections, Meraki switches, other Catalyst switch families, and authentication methods other than 802.1X are outside the supported scope of this workflow.
Important: Begin with one switch and one floor. Expand the deployment only after the wired-only, Wi-Fi-only, and transition scenarios pass validation.
Prerequisites
Complete the Cisco Spaces OS Runbook before beginning this procedure. The following foundation must already be available:
-
A Cisco Spaces Connector is deployed and displays an Active status.
-
The Connector can reach the management address of the target switch.
-
TCP 830 is permitted for NETCONF and TCP 8014 is permitted for telemetry between the required components.
-
The target building and floor exist in the Cisco Spaces Location Hierarchy.
-
The building time zone is configured correctly.
-
The wireless LAN controller and test access point are onboarded, mapped to the correct floor, and available for transition testing.
-
An 802.1X-enabled test SSID and an 802.1X-enabled wired access port are available.
-
The test user returns the same identity format on wired and wireless authentication.
Before implementation, record the test location, target switch, access port, test device, corporate SSID, expected user identity, and expected occupancy result.
Implementation
1. Verify Connector readiness
-
In Cisco Spaces, navigate to Setup > Wired Networks.
-
Confirm that the Connector assigned to the target location displays an Active status.
-
Confirm that the Connector can reach the switch management IP.
-
Confirm that the required NETCONF and telemetry ports are permitted between the Connector and the switch.
Do not continue until the Connector is healthy and network reachability has been verified.
2. Prepare the switch
The customer network administrator completes this configuration on the target switch.
-
Enable
netconf-yang. -
Configure credentials with privilege level 15 by using the approved local or AAA method.
-
Allow SSH access from the Cisco Spaces Connector.
-
Enable 802.1X globally.
-
Enable 802.1X on every target wired access port.
Important: A device connected through an access port without 802.1X does not contribute to wired occupancy.
3. Install the IoT Wired Service
-
In Cisco Spaces, navigate to Setup > Wired Networks > View Connectors.
-
Select the Connector assigned to the test location.
-
Add the IoT Wired Service.
-
Allow approximately 15 minutes for the service to download and start.
-
Confirm that the service container displays a Running status.
-
Confirm that the telemetry subscription is active.
4a. Add the switch to Cisco Spaces
-
From the same Connector, select the option to add a switch.
-
Enter the switch name and management IP.
-
Enter the NETCONF username and password.
-
Save the configuration.
-
Confirm that the switch displays an Active status and is manageable in Cisco Spaces.
4b. Import multiple switches from a spreadsheet
Use bulk import when multiple switches must be onboarded together, the deployment spans multiple floors or buildings, standardized credentials or configuration are available, or speed and consistency are important. Bulk import changes only the switch onboarding method; the Connector, switch preparation, and 802.1X requirements remain the same.
-
In Cisco Spaces, navigate to Setup > Wired Networks.
-
In the Add Switch step, select Add Switches.
-
Select the Connector that will manage the switches.
-
Select Import switches from spreadsheet.
-
Download the spreadsheet template.
-
Add one row for each switch and complete the following fields:
-
switchName
-
IP Address
-
Username
-
Password
To map a switch to a specific floor during import, also complete Location Path (Optional). Otherwise, leave this field blank and map the switch after onboarding.
-
Upload the completed spreadsheet.
-
Review the configuration preview and validation results.
-
Correct any invalid entries in the spreadsheet and upload it again.
-
When all required entries are valid, proceed with the upload.
-
Confirm that each imported switch displays an Active status and is manageable in Cisco Spaces.
5. Map the wired and wireless infrastructure
-
Map the switch to the correct building and floor in the Location Hierarchy.
-
Confirm that the wireless LAN controller and test access point resolve to the same test floor.
-
Confirm that the building time zone is correct.
For detailed Location Hierarchy guidance, refer to the Cisco Spaces configuration guide.
6. Enable wired devices in Live Occupancy
-
Open Live Occupancy.
-
Open Settings.
-
Enable Include Wired Devices.
-
Select the test location and confirm that the setting is applied.
Authenticated wired users can now contribute to occupancy for the mapped location.
Validation
Validate identity correlation and occupancy behavior before expanding the deployment.
Confirm the wired connection
-
Connect the test device to the 802.1X-enabled access port.
-
On the switch, run
show mac address-tableand confirm that the test device appears on the expected port. -
Run
show dot1x interface <port>and confirm that the device completed 802.1X authentication. -
In Cisco Spaces, confirm that the device appears in Setup >> Wired Network >> View Switches.
-
In Location Hierarchy, confirm that the switch is found at the expected location (building or floor it was placed in).
Validate combined wired and Wi-Fi occupancy
Run each applicable scenario and record the actual result:
|
Scenario |
Expected result |
|---|---|
|
Wi-Fi only |
The authenticated user is present once at the expected location. |
|
Wired only |
The authenticated user is present once at the expected location. |
|
Wi-Fi to wired |
The user remains present during the transition and the person count does not increase. |
|
Wired to Wi-Fi |
The user remains present during the transition and the person count does not increase. |
|
Simultaneous Wi-Fi and wired |
The same user is counted once. |
|
Laptop on wired plus mobile on Wi-Fi |
The result follows the configured identity and de-duplication policy without inflating occupancy. |
|
VPN enabled |
VPN connectivity does not add another person to the occupancy result. |
|
Corporate SSID to guest SSID |
The user leaves the authenticated occupancy population as expected for the configured SSID policy. |
Validation is successful when the person count remains stable, presence does not flap during connection changes, and the same authenticated identity is not counted twice.
After live validation passes, allow sufficient data to accumulate and confirm that wired and wireless activity appears at the intended campus, building, or floor level in Space Utilization.
Troubleshooting
A wired user does not appear in occupancy
-
Confirm that 802.1X is enabled globally on the switch.
-
Confirm that 802.1X is enabled on the specific access port.
-
Confirm successful authentication with
show dot1x interface <port>. -
Confirm that the device appears in
show mac address-tableon the expected port. -
Confirm that the IoT Wired Service is installed and displays Running.
-
Confirm that the telemetry subscription is active.
-
Confirm that the switch displays Active in Cisco Spaces.
-
Confirm that the switch is mapped to the correct floor.
-
Confirm that Include Wired Devices is enabled in Live Occupancy.
The count changes when a user moves between wired and Wi-Fi
-
Compare the authenticated user identity returned by the wired and wireless networks.
-
Confirm that both networks return the identity in the same format.
-
Confirm that the switch, wireless LAN controller, and access point are mapped to the same physical location.
-
Repeat the transition test with one device and one user before testing multiple devices.
Occupancy appears on the wrong day or location
-
Confirm that the switch is mapped to the intended building and floor.
-
Confirm that the building time zone is correct.
-
Confirm that the wireless infrastructure used for validation is mapped to the same floor.
The switch remains inactive
-
Confirm management-IP reachability from the Connector.
-
Confirm SSH and NETCONF access from the Connector.
-
Confirm the NETCONF credentials and privilege level.
-
Confirm that
netconf-yangis enabled. -
Confirm that required firewall rules permit the Connector and switch to communicate.
Room (Collaboration Occupancy)
Overview
Room-level occupancy outcomes in Cisco Spaces involve using sensors and collaboration devices, such as Webex, to monitor and visualize live meeting room occupancy. This includes detecting room presence and people count. Additionally, other data types can be acquired, such as environmental conditions like air quality, temperature, and humidity. The data collected related to room occupancy helps optimize room usage and enhance employee productivity.
Prerequisites
For a list of supported compatible devices please refer to our Device Supportability Matrix.
Verify hierarchy from Control Hub + Metadata
-
Webex Control Hub integration accurately organized into Locations > Floors > Workspaces > Devices (see section 2 on Location Hierarchy for more details)
Metadata
|
Platform level setting |
|
|
|
1: Pro Maps Upload |
Mandatory for room metric and for heat map feature |
Dashboard level setting: Setup Locations Maps Digital Maps |
|
2: Associating occupancy sensors to rooms |
Mandatory for room metrics |
Space Manager Space Management |
|
3: Defining default device for each room |
Mandatory if rooms have 1 sensor |
Space Manager Space Management click on an individual workplace |
Digital Maps: Room Naming + Collab Device Placement
As mentioned in Section 2 for creating Digital Maps verify that the follow steps have been completed:
-
When CAD files are finished processing (see section on Digital Map and CAD File Upload), edit room names/labels in the Digital Map Editor (under Setup Locations Maps Digital Maps Review)
-
In Space Manager Space Management, assigning Webex devices to Rich Map workspaces
-
Using the Space Experience app to deploy digital kiosk app to a Webex Board or other kiosk display using a browser-based kiosk app
Optional onboarding task: Generate a kiosk app Token URL (not recommended, but sometimes necessary for digital kiosk displays that do not have the proper browser local storage)
Optimizing People Count in Meeting Rooms
Since room-level occupancy relies on the camera sensors in the board, desk, and room devices, sometimes background people may be picked up within the camera frame even if they are not in the room. This may be due to glass walls and windows that may provide complete viewing of the spaces outside of the meeting room. To mitigate occupancy inaccuracies due to this, meeting zones may be configured to define the part of the room where people count will be applied to.
Detailed information about modifying device compatibility and configurations and meeting zones on devices or in Webex Control Hub.
Room Occupancy with Third Party Sensors
This section has been moved to a dedicated runbook. Please refer to the link below for the updated workflow and steps
Follow Cisco Spaces Room Occupancy with Kontakt.io Portal Beam for end-to-end deployment guidance.
Room Presence Using Third Party PIR Sensors
This section has been moved to a dedicated runbook. Please refer to the link below for the updated workflow and steps
PIR sensors are currently supported for room-level presence outcomes only.
Overview
Passive Infrared (PIR) sensors are used to detect motion by sensing infrared energy emitted by people within the sensor’s field of view. In Cisco Spaces, PIR sensors are used for room-level presence detection for spaces such as
-
-
Small meeting rooms
-
Focus rooms
-
Phone rooms
-
Huddle spaces
-
PIR sensors provide a binary occupancy outcome:
-
-
Occupied
-
Available
-
Supported Sensors
The following sensor is supported for Cisco Spaces PIR presence outcomes:
-
Thingsee Presense PIR Sensor
Follow Cisco Spaces Room Presence with Haltian Thingsee PIR Sensor for end-to-end deployment guidance.
Desk
Overview
Currently there are no GA outcomes for Desk Occupancy
REFERENCES
CAVEATS TIPS
Location Hierarchy
Merging Locations
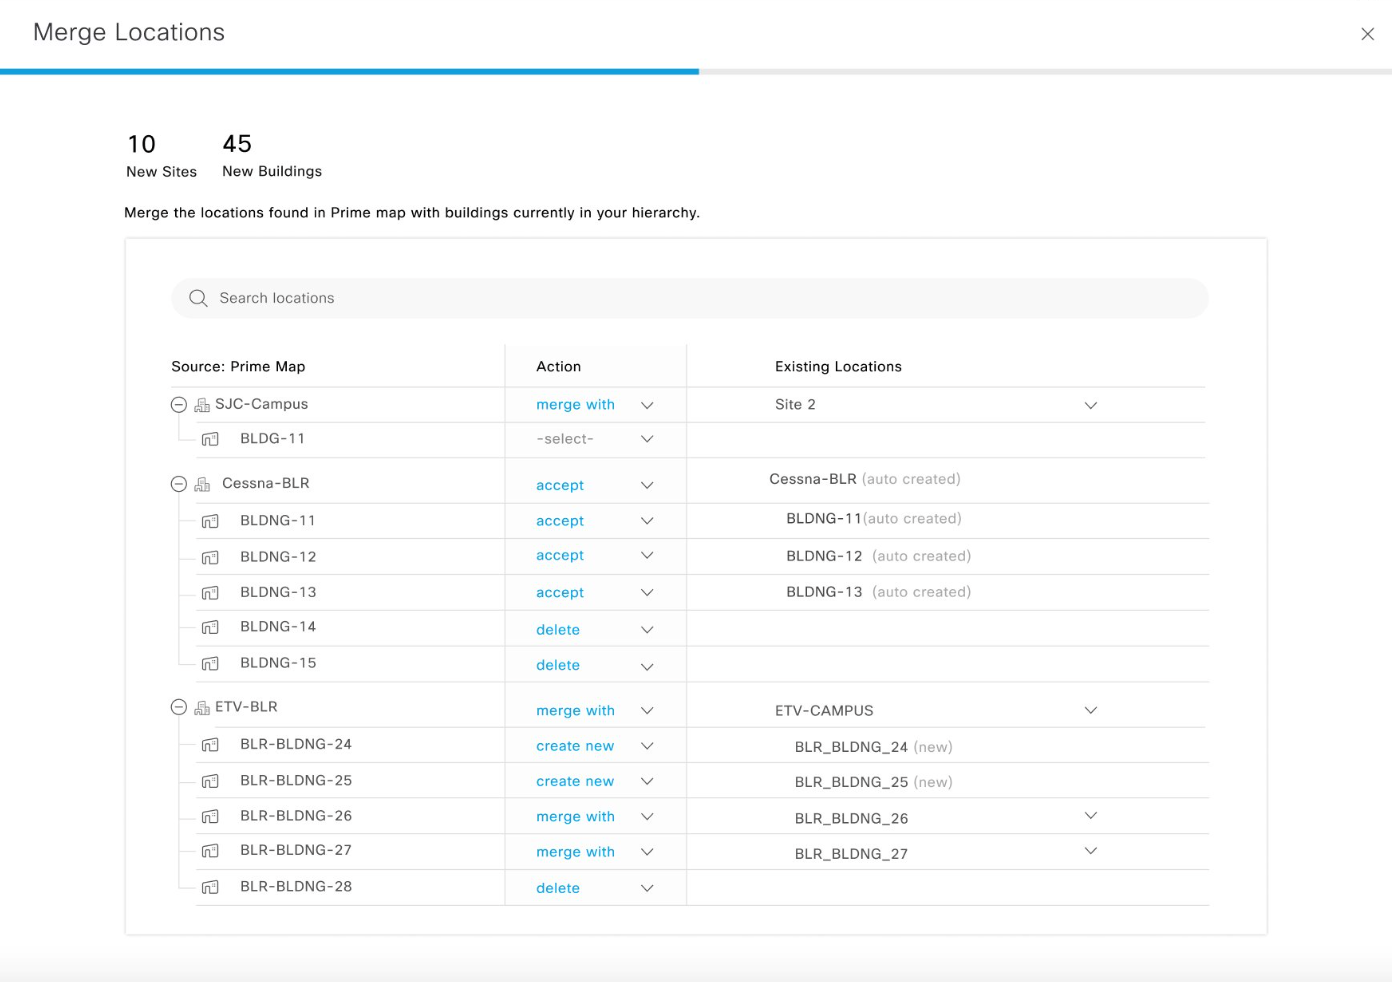
-
Combining multiple hierarchies (e.g. Webex Control Hub and wireless network) adds complexity
-
The merge function de-duplicates locations so that multiple platforms can be combined into a simplified, unified hierarchy
-
For a Meraki Org / Network, always plan to merge the Org level above all the Network levels, and the network maps as floors.
-
Keep in mind that Catalyst Center may have more groups/levels than the Spaces Excel template supports (3), so it may be best to merge Catalyst Center and skip the Excel template.
-
Please reach out to the Cisco Spaces team for more complicated merges.
Cisco Collaboration Integration
Collaboration Devices + Control Hub
-
Webex Devices send telemetry (e.g. people count, temperature, humidity, etc.) on changes to sensor values
-
Control Hub metadata syncs every ~2 hours (e.g. room capacity, moving location / floor)
Occupancy Architecture
How does the end-to-end solution work for occupancy?
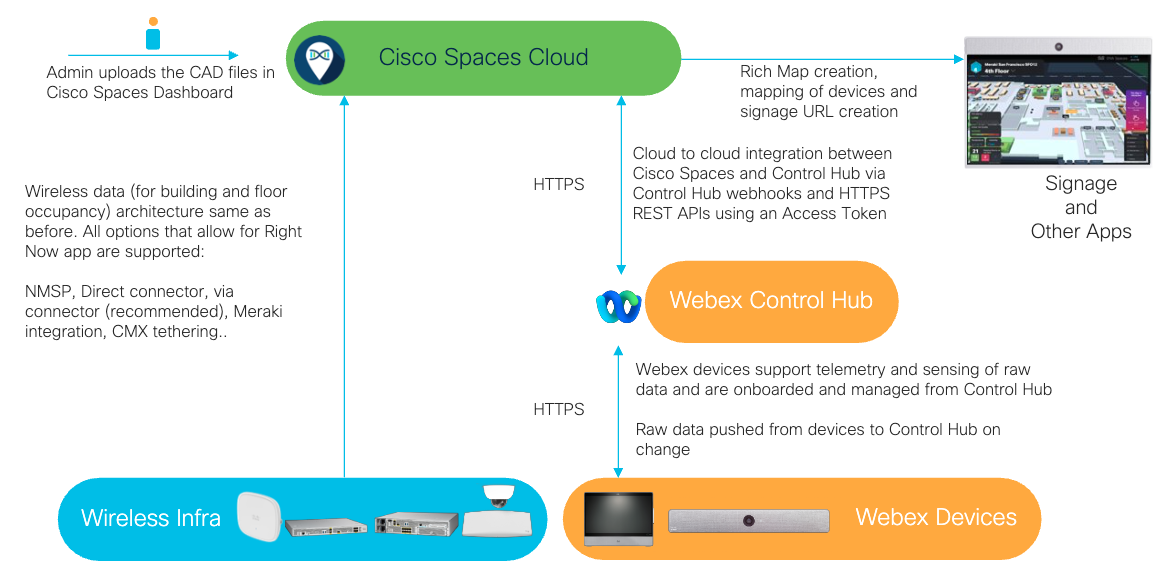
Occupancy Outcome Data
|
Building Floor Occupancy |
Room Occupancy |
|---|---|
|
Signage |
|
|
Streaming API Firehose |
|
|
Batch/CSV Exports |
Room Occupancy Downloads |
|
Right Now |
|
|
Behavior Metrics |
|