OVERVIEW
This Cisco validated runbook is designed only as a follow on from the Spaces OS Runbook. If you have not completed that runbook yet, please go back and ensure that the deployment has been validated against that before continuing here.
With the standard expectation of users to always be connected to the internet no matter where they are, it is paramount that users can be connected securely and seamlessly. Wi-Fi onboarding allows users a frictionless onboarding experience and a seamless handover when roaming between cellular and Wi-Fi.
OpenRoaming enables secure, seamless, and automatic network connectivity by eliminating tedious Wi-Fi guest onboarding processes and the risk of connecting to rogue SSIDs. This is especially helpful for a mobile device user trying to access the internet because OpenRoaming removes the need to choose between multiple SSIDs, or enter insecure, shared credentials on poorly designed captive portals.
This runbook will look at OpenRoaming to onboard customers. For information about integrating with Carrier Offload with Partner Apps (such as AT&T Auto-Attach), please refer to Appendix: Carrier Offload Providers
SUPPORT AND ONBOARDING
Please follow the link below to find out about the different ways to get support for Cisco Spaces.
PREREQUISITES
This runbook should only be used as a follow on from the Spaces OS Runbook. All the prerequisite steps are covered in the Spaces OS runbook and should be completed before progressing here.
Namely, OpenRoaming requires the following prerequisites met:
-
An active Cisco Spaces account.
-
A Cisco wireless network. Both controller-based (Cisco AireOS or Cisco Catalyst wireless controller) and cloud-based (Cisco Meraki) networks are supported.
-
Add the wireless network to your Cisco Spaces account.
-
For controller-based architecture, the Cisco Spaces Connector must be used.
-
For Cisco Meraki networks, add the Cisco Meraki account to your Cisco Spaces account.
-
OpenRoaming Prerequisites
Network Components
|
C9800 WLC*1 |
-16.12.1 or above
|
|
AireOS WLC* |
|
|
Meraki |
-Wi-Fi 7, Wi-Fi 6E, Wi-Fi 6 APs: R31.1.6 and above -Wi-Fi 5, Wave 2 APs: R30.7.2 and above -Admin access required for Meraki Account to activate SSID for OpenRoaming -At least one unconfigured SSID on Meraki Dashboard in “Disabled state” If you do not meet one or more of the above prerequisites, you can manually activate OpenRoaming on your Meraki network by installing a Cisco Spaces Connector. In this scenario, please raise a support case for deployment support and describe your scenario. |
|
Cisco Spaces Connector2 |
Connector version 3.x |
|
CMX Tethering |
Not Supported |
|
AP Support |
All 9100 Series Access Points Catalyst Wave 1 and Wave 2 Access Points All MR Wi-Fi 5 wave 2 (that can be upgraded to at least MR 31.1.6), Wi-Fi 6 and Wi-Fi 6E APs |
1 Embedded Wireless Controller (EWC) on Catalyst 9100 and the Embedded Wireless on Catalyst 9000 switches are NOT supported.
2 Cannot be configured with HTTP/HTTPS proxy enabled.
-
See WLC release notes for supported APs per release
OpenRoaming Client Matrix
|
Device Support |
-Samsung Devices: Android 10 or higher -Google Pixel: Android 11 or higher -Apple devices running iOS 13.3 or higher |
|
OS Support |
-Apple devices running iOS 13.3 or higher -Android phones running Android 9 or higher |
|
Cisco Spaces SDK |
-iOS 13.3 or higher -XCode version 12 or higher -Android 9 or higher |
|
Service Providers (today) |
-T-Mobile -AT&T -Comcast |
SSID broadcasting must be enabled for OpenRoaming to function
OpenRoaming Firewall Rules
In addition to ports opened to allow basic functionality, OpenRoaming will require a security policy configured on the network firewall to allow inbound traffic. By default, all inbound traffic is disallowed.
Connector based deployments
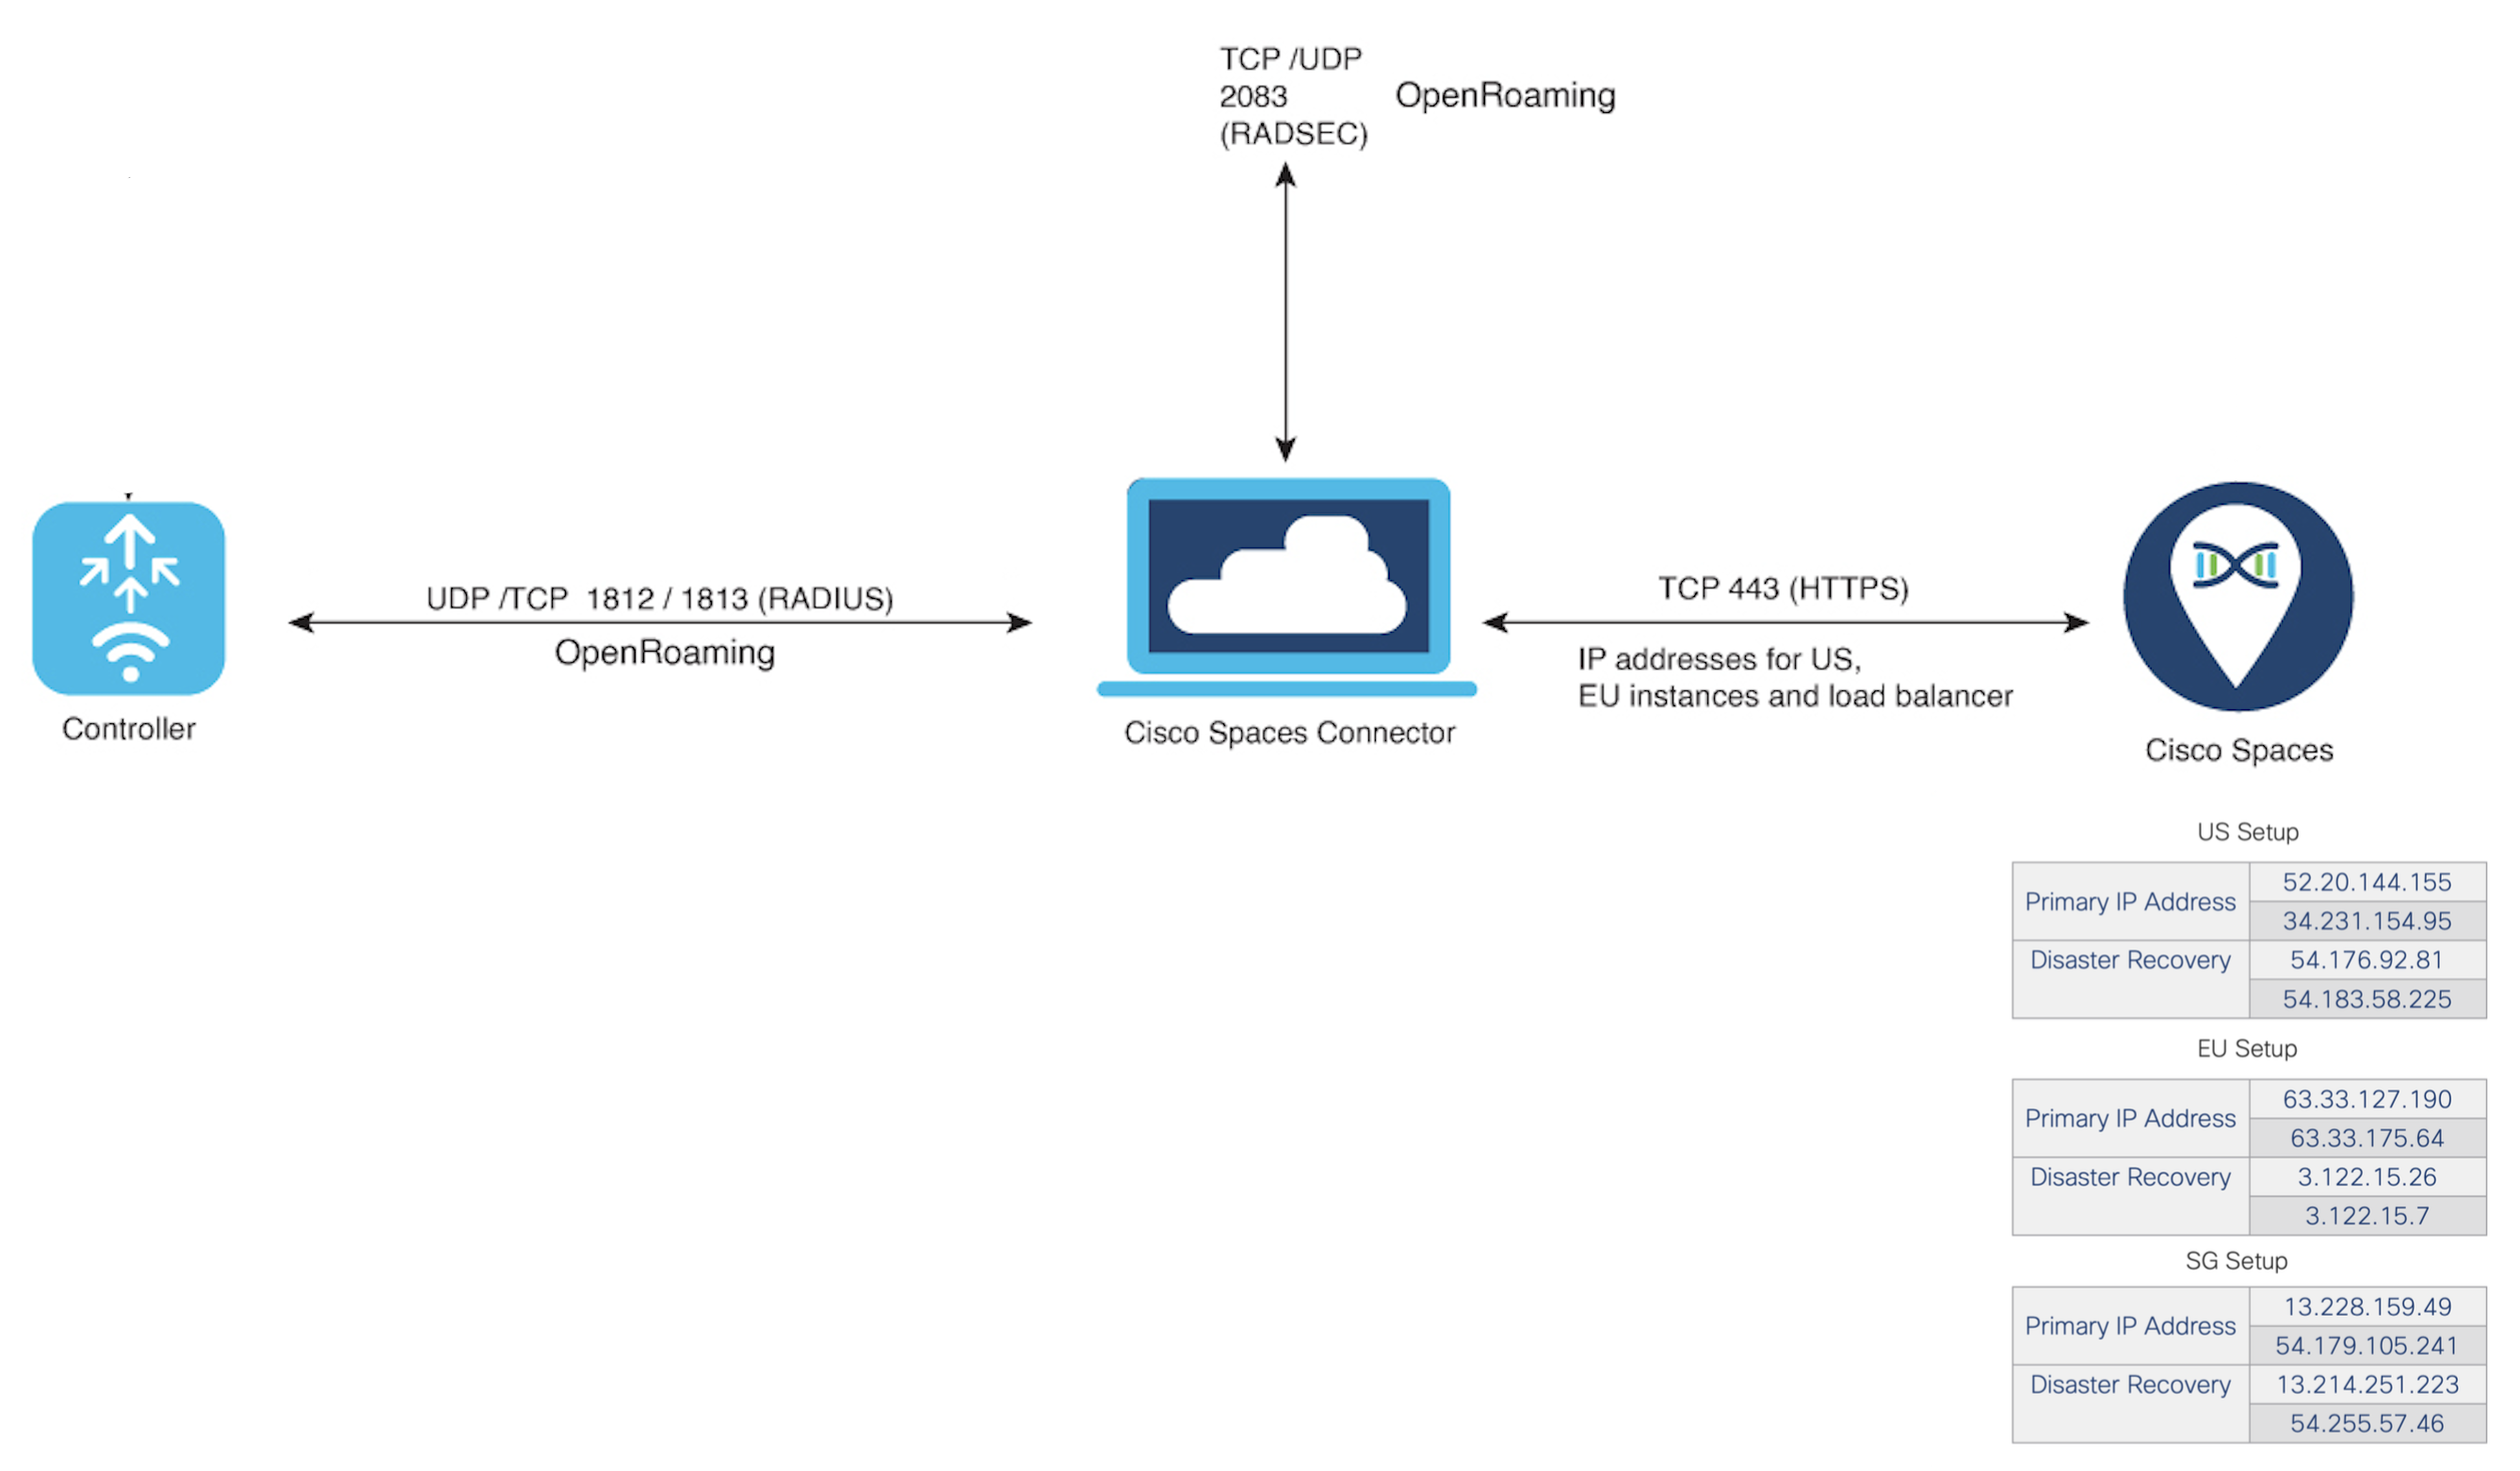
Refer to the table below for all the required Firewall Rules for Open Roaming:
|
Source IP Address |
Destination IP Address |
Direction |
Transport |
Source Port |
Destination Port |
Protocol |
Further Information |
|---|---|---|---|---|---|---|---|
|
Cisco AireOS Wireless Controller IP address |
Connector |
Unidirectional |
UDP and TCP |
Any |
1812, 1813 |
Remote Authentication Dial-In User Service (RADIUS) |
Communication between Connector and Cisco AireOS Wireless Controller for OpenRoaming client’s RADIUS messages. |
|
Connector |
Any |
Unidirectional |
TCP |
Any |
2083 |
RADIUS over TLS (RADSEC) |
Communication between Connector and OpenRoaming Identity Providers |
|
Connector |
Any |
Unidirectional |
TCP |
Any |
443 |
|
HTTPS for CSR signing - OpenRoaming Membership |
IMPLEMENTATION
To complete these steps, an admin will require read/write permissions within Spaces for OpenRoaming and DNA Spaces, as well as read/write access to Meraki Dashboard and/or WLC, and read access to connector for verification.
With the prerequisites covered, implementing OpenRoaming requires four main steps:
-
Create an OpenRoaming Profile
-
Enable Hotspot Connector
-
Configure Network Controller
-
Configure the OpenRoaming SSID
Each of the main steps will be discussed.
Create an OpenRoaming Profile
An OpenRoaming profile contains information about the network SSID and specifies which user identities are allowed to access the guest network. You can also configure carrier offload in the OpenRoaming profile.
To create an OpenRoaming profile, the following substeps need to be performed:
Substep 1: Set Access Policy
Substep 2: Configure an SSID
Substep 3 (Optional): Configure Carrier Offload
Substep 4: Review and Confirm Settings
Click here for a video guided demo
Set Access Policy
Set your policy on who can access your OpenRoaming network.
-
Go to OpenRoaming app within Cisco Spaces Dashboard.
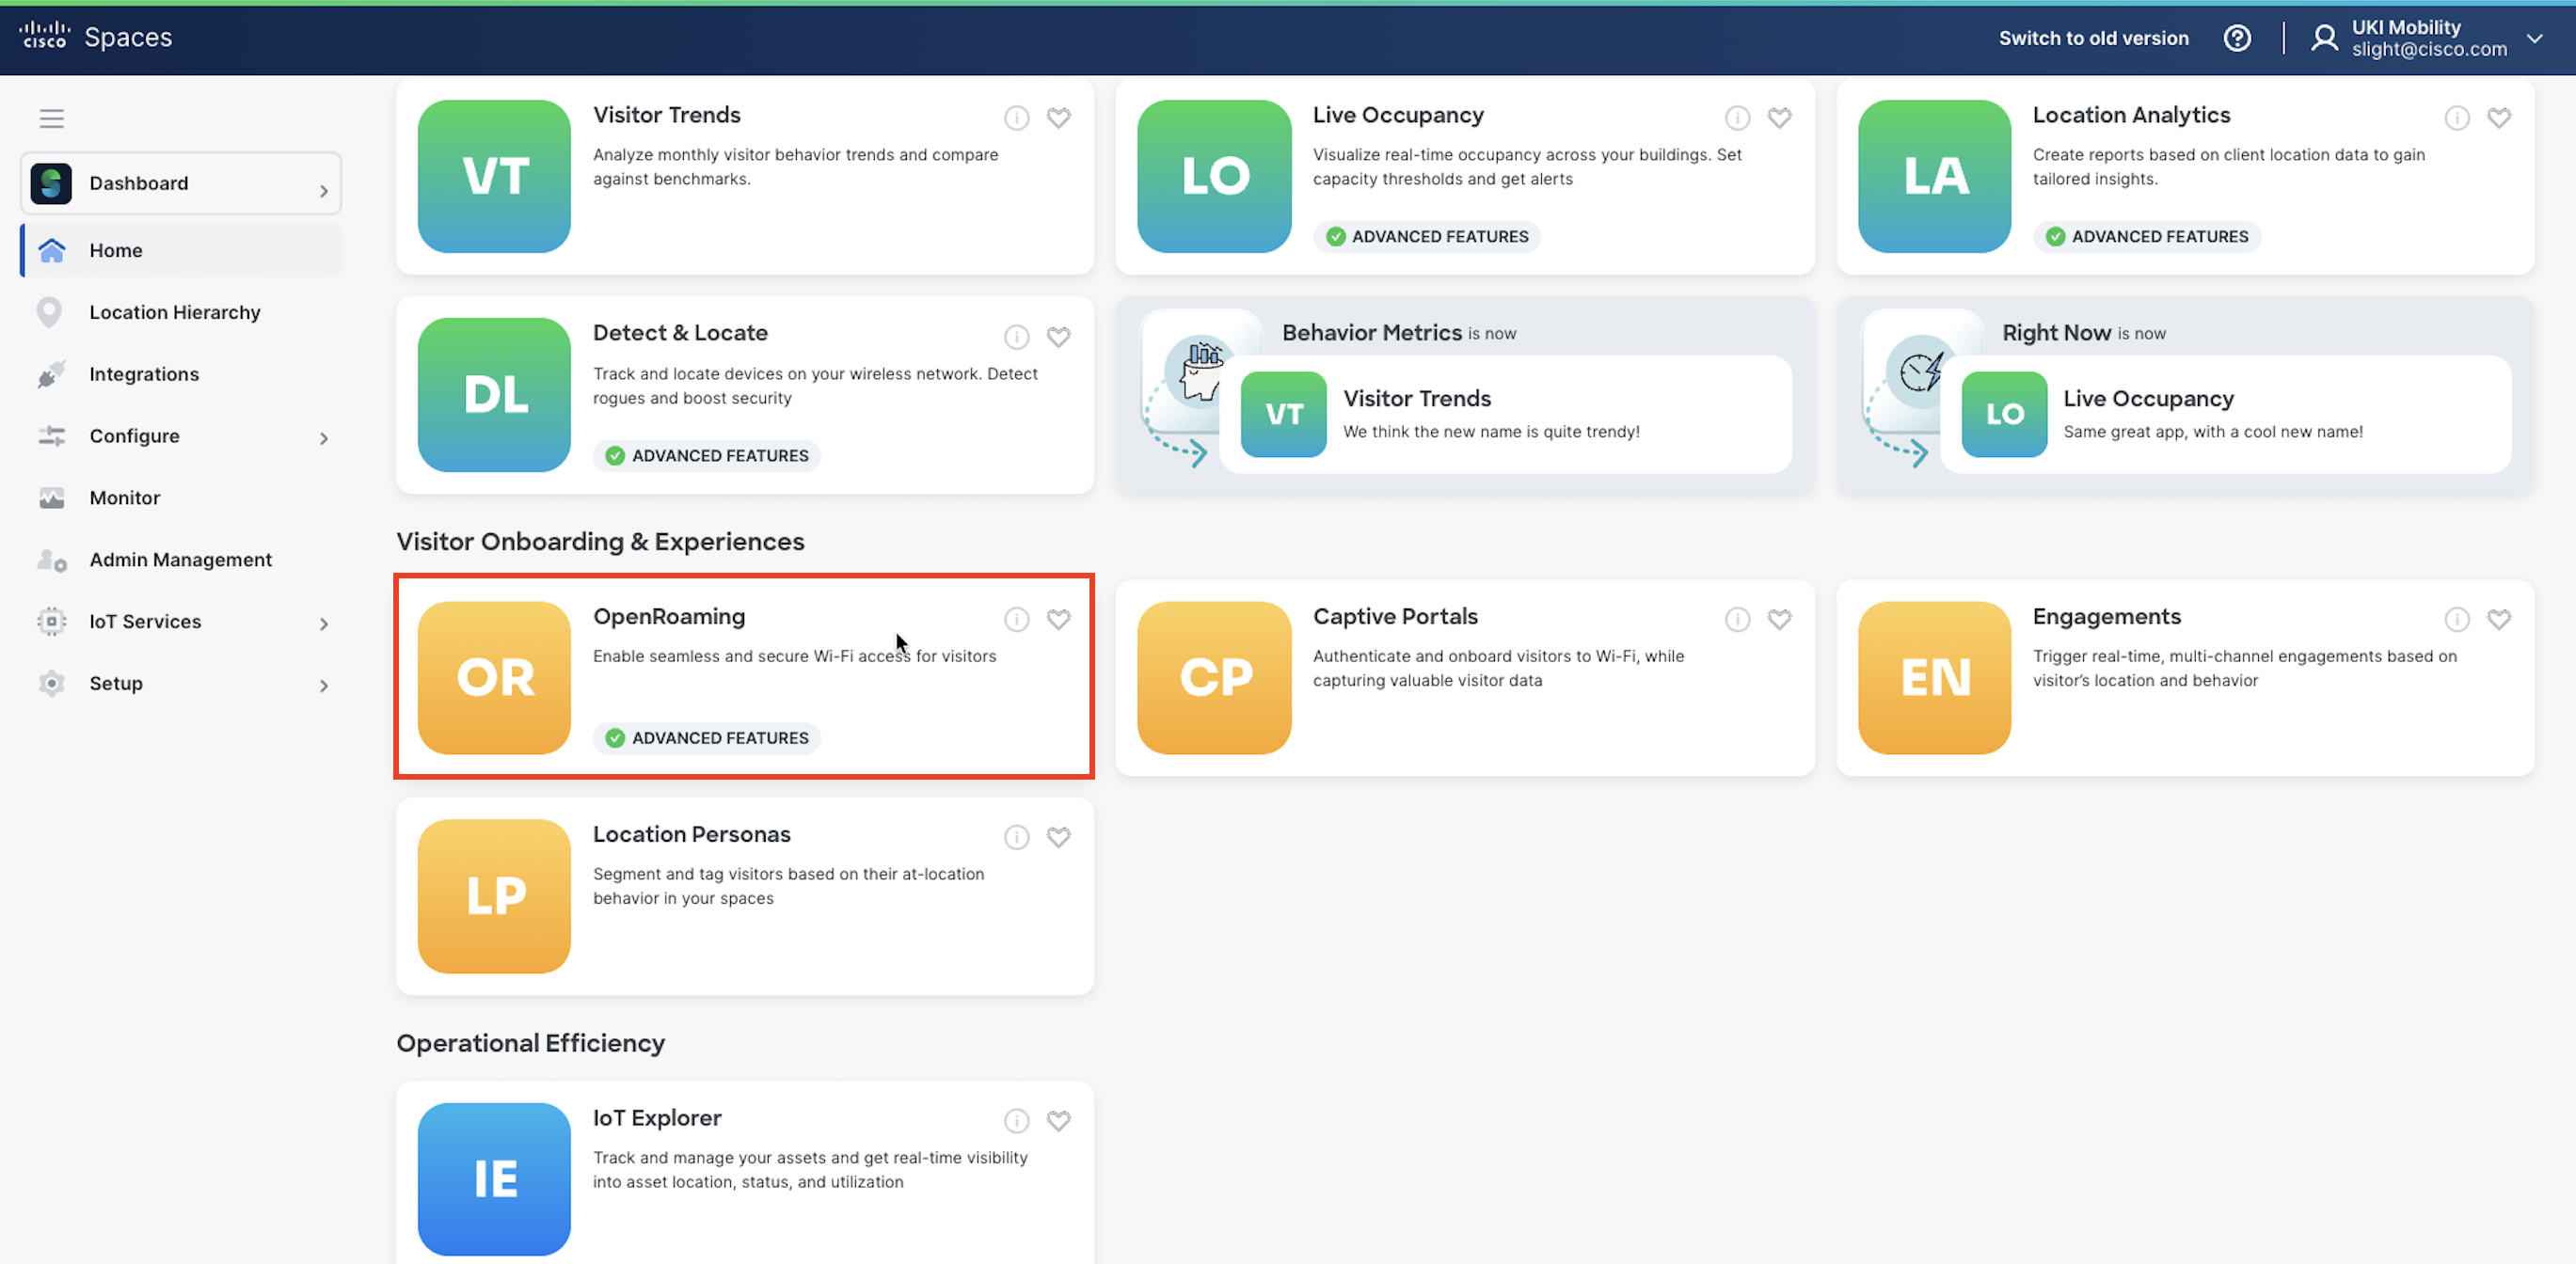
Access the OpenRoaming App
Or alternatively, through the side-menu by clicking the Dashboard drag-down.
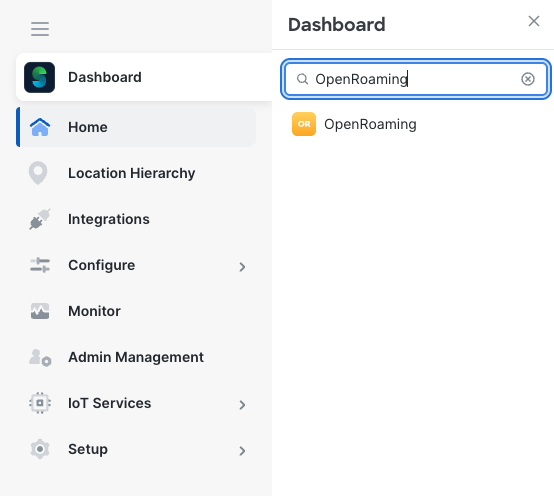
-
Click on Setup. If this is the first time that you are setting up OpenRoaming, when you click Setup, a Terms and Conditions dialog box is displayed. Click I Agree to proceed.
-
In the OpenRoaming Profiles section, click Create OpenRoaming Profile.
The Create an OpenRoaming Profile configuration wizard is displayed.
-
Click Proceed.
-
Under Access Policy, specify who can access your OpenRoaming network. Select the types of identities that can access the OpenRoaming network as well as if real identities are required.
The options available are:
i) Accept all authenticated users: This is the default option.
ii) Accept only users who provide their identity: An example of an accepted identity is a real identity, such as an email ID.
iii) Accept users with specified identity types: Choose the desired identity types from the list that is displayed. Enable the Require real identity knob if you want users to enter their real identities. The identity types chosen here is displayed adjacent to their real or anonymous identity settings, in a table next to this list.
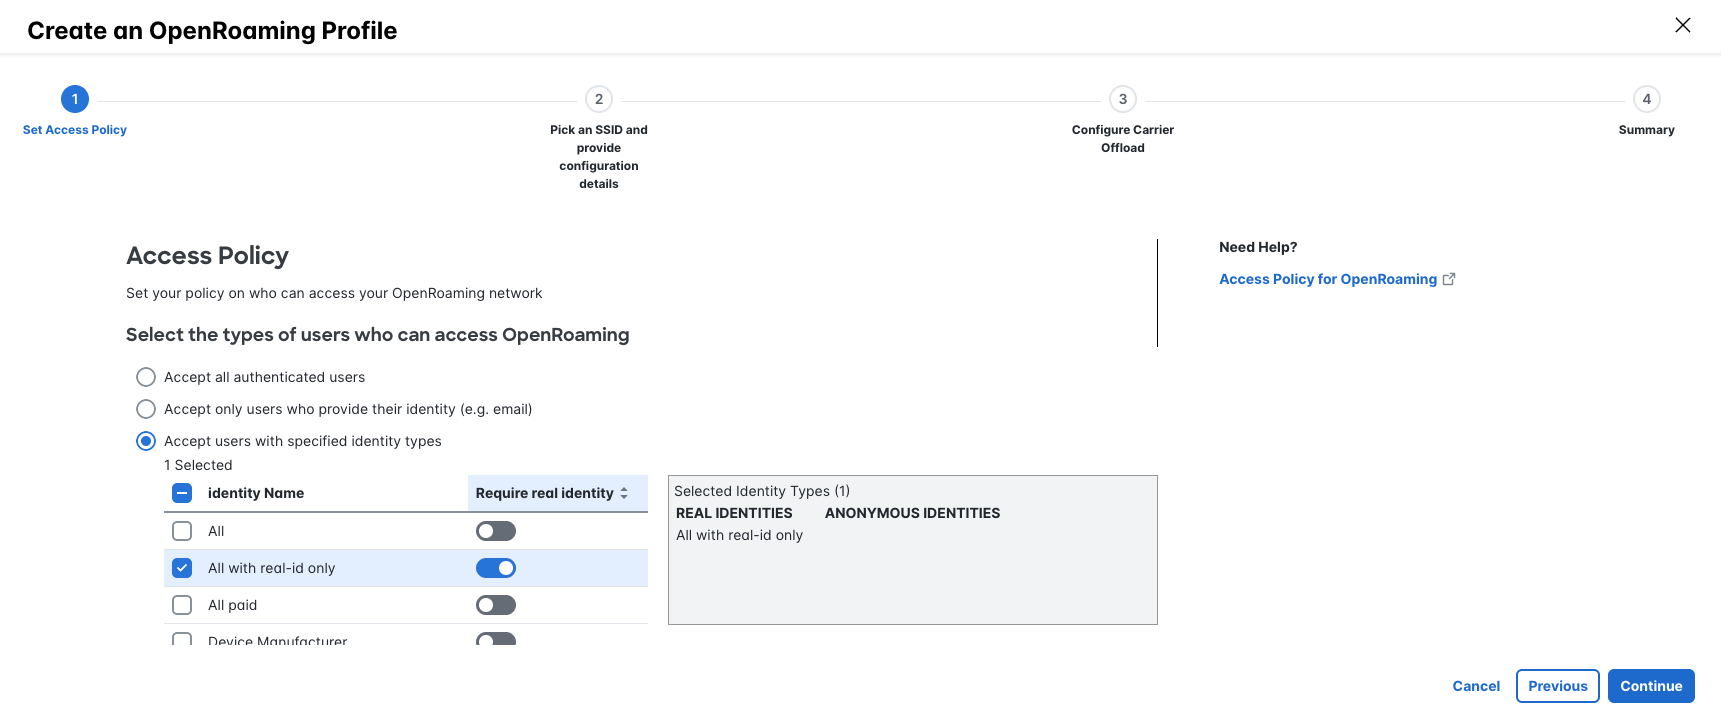
iv) Accept only your users: If you choose this option, you will need to be added as an identity provider.
-
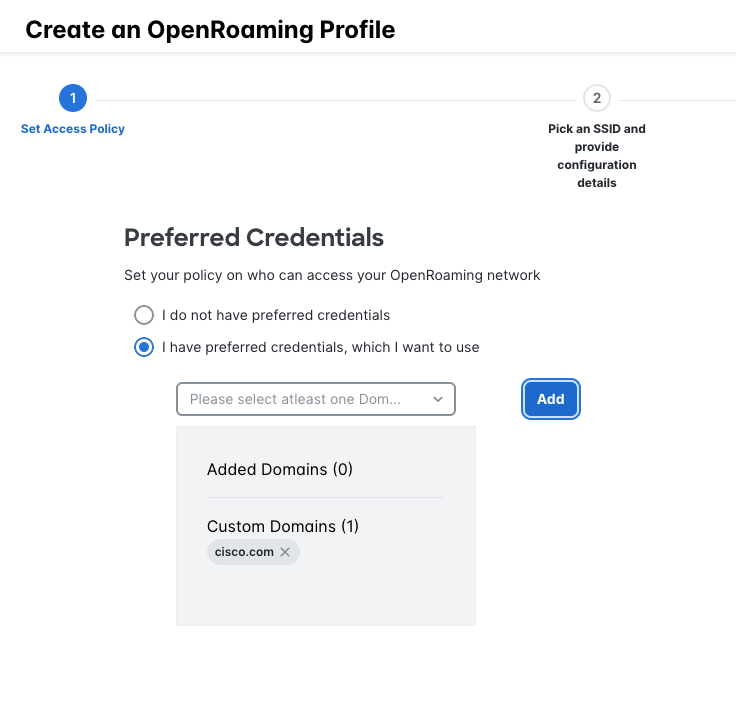
Under Preferred Credentials, choose the desired option from those listed below by clicking the corresponding radio button. This option will set your policy on who can access your OpenRoaming network:
i) I do not have preferred credentials
If you have selected Accept only your users in the Access Policy section, this option will be disabled.
ii) I have preferred credentials, which I want to use: If you choose this option, you must select a domain from the list of domains that are displayed or click Add a Custom Domain.
-
Click Continue.
The SSID Details window is displayed.
Configure an SSID
Enter the SSID details for this OpenRoaming Profile - this is a secure SSID different from your guest SSID.
If Carrier Offload will be configured as part of the Open Roaming setup, please refer to step 3 below: Configure Carrier Offload.
-
In the SSID Details section, enter the SSID name in the corresponding field. This is the SSID that will be broadcast for OpenRoaming.
For Catalyst and AireOS deployments, if the name that you enter is an existing SSID, ensure that the SSID name is an exact match of what is in the network.
For Meraki deployments, a new unique SSID name must be used. You must have a unused SSID available.
-
(Optional) In the Advanced section, you can choose among the following options by clicking the corresponding radio button:
i) Default Status: Choose between Enable or Disable by clicking the corresponding radio button. The default option is Enable.
ii) Fast Transition (802.11r): Choose between Adaptive, Enable or Disable by clicking the corresponding radio button. The default option is Adaptive.
802.11r is to significantly reduce the length of time that connectivity is interrupted between a mobile device and Wi-Fi infrastructure.
When 'Enable' is selected, the controller allows all clients to use Fast Transition, even if they don't support it.
The 'Adaptive' option enables Fast Transition only for clients that support it. The controller will dynamically determine which clients are Fast Transition capable and allow them to use Fast Transition. Clients that do not support Fast Transition will fall back to regular reauthentication processes.
The Create an OpenRoaming Profile configuration wizard is displayed.
-
Click Next.
The Carrier Offload window is displayed.
Follow the steps below to configure Carrier Offload. For more information on integrating specific Carrier Offload Providers, refer to Appendix: Carrier Offload Providers
Configure Carrier Offload (Optional)
Configure Carrier Offload (Optional)
You can leverage your Wi-Fi network to provide voice and data services to mobile carrier subscribers on your Wi-Fi network. This configuration is optional.
Ensure that the Settlement Provider is already configured previously. See below.
Before you configure carrier offload, ensure that the following prerequisites are in place:
-
You must have an existing relationship with a mobile carrier or service provider.
-
You must have configured the settlement provider with the mobile carrier or service provider.
-
You must configure a carrier or add a custom carrier. Refer to Appendix: Carrier Offload Providers.
-
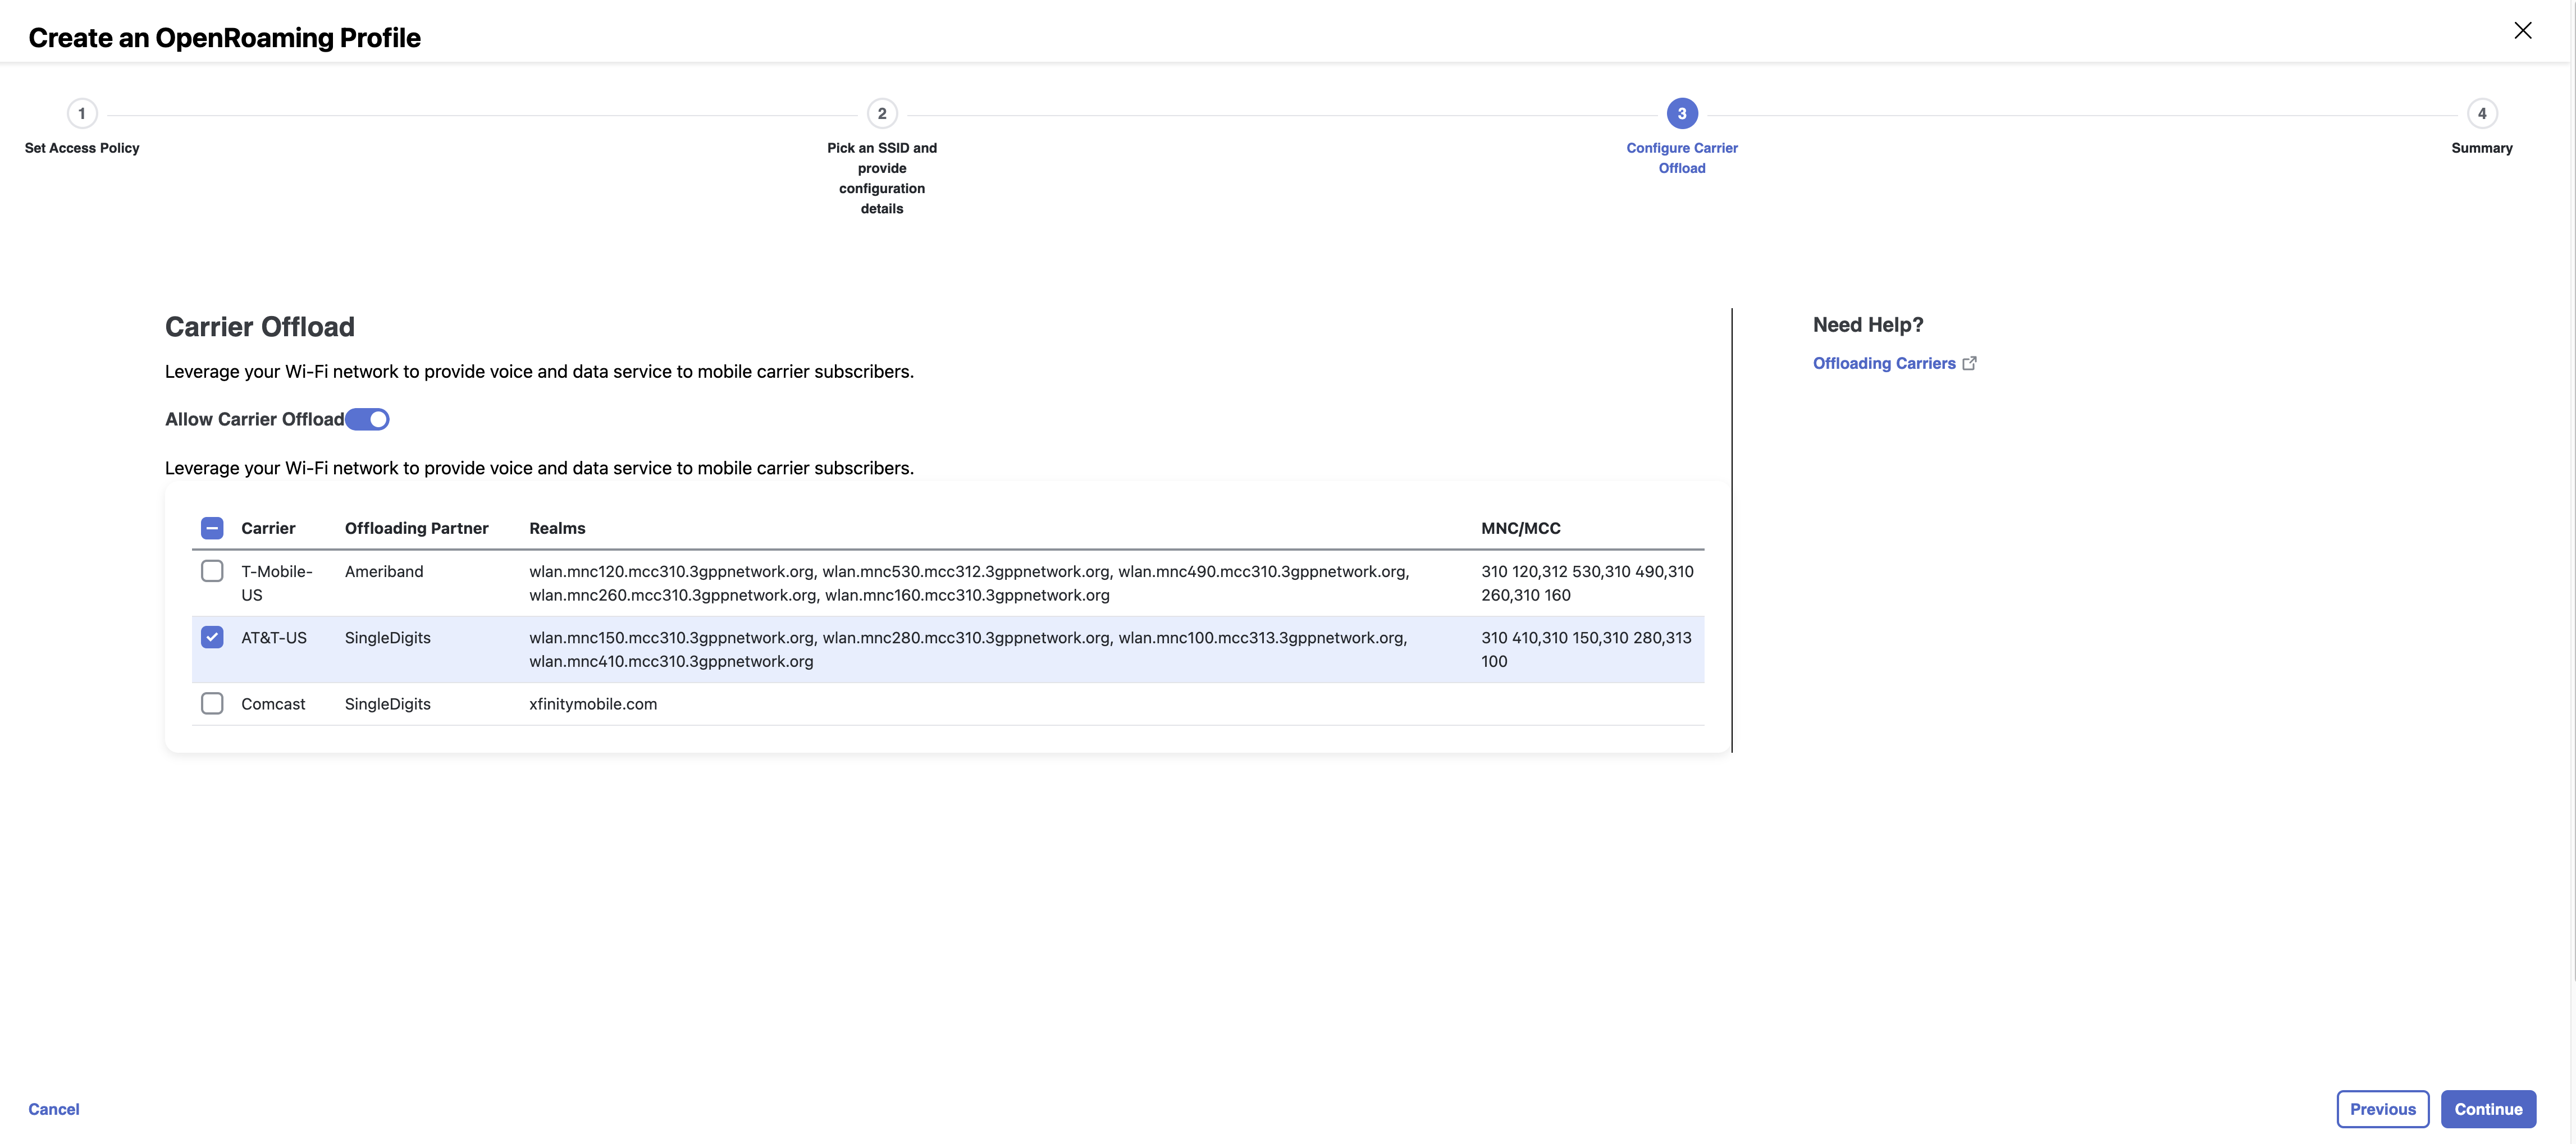
Use the Allow Carrier Offload knob to enable the Carrier Offload settings.
A table listing the various carriers, along with their corresponding details such as the Offloading Partner, Static Routing, Realms, and MNC/MCC settings, is displayed.
-
Based on your existing relationships with various carriers, you can either select from the carriers that are available in the table or click Add Custom Carrier to add carriers of your choice.
If you have not configured a carrier, or if you click Add Custom Carrier, you must visit the Cisco Spaces Partner App Center to first activate the offloading partner. Contact your carrier offloading partner for specific information that has to be entered in the custom fields. As an example, refer to the Appendix: Carrier Offload Providers.
If AT&T is selected as the carrier for Carrier Offload, the dashboard will alert that you must activate this option explicitly through the AT&T Auto-Attach Partner app. This alert has been added since AT&T has mandated that all customers must activate their partner app before they began accepting AT&T users at the venue.
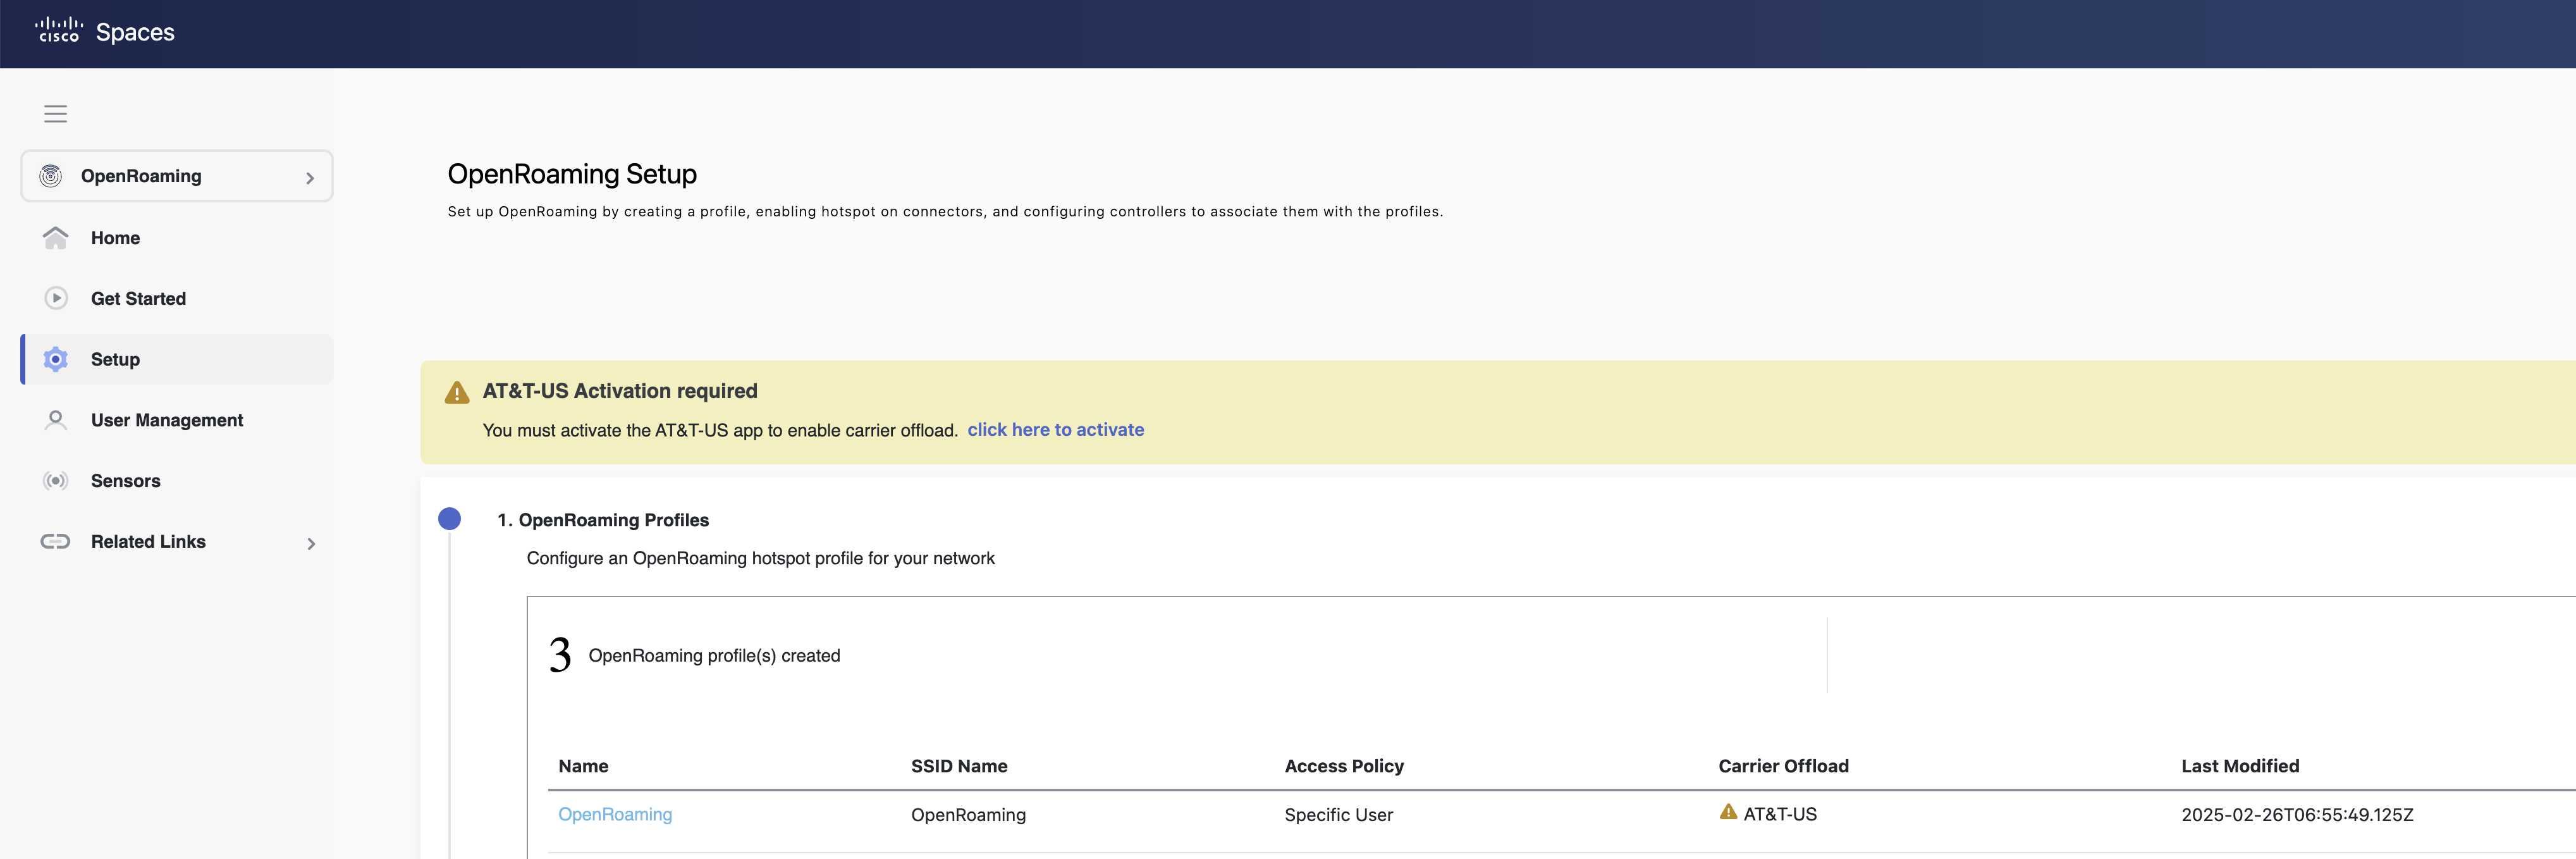
Refer to Appendix: Carrier Offload Providers for more information about activation.
-
Click Next.
The Review Your Configuration window is displayed.
Review and Confirm Settings
Review and confirm the OpenRoaming profile configuration.
After you have configured the access policy, SSID, and the optional carrier offload, you can review your OpenRoaming profile configuration and modify it if required before saving these settings.
-
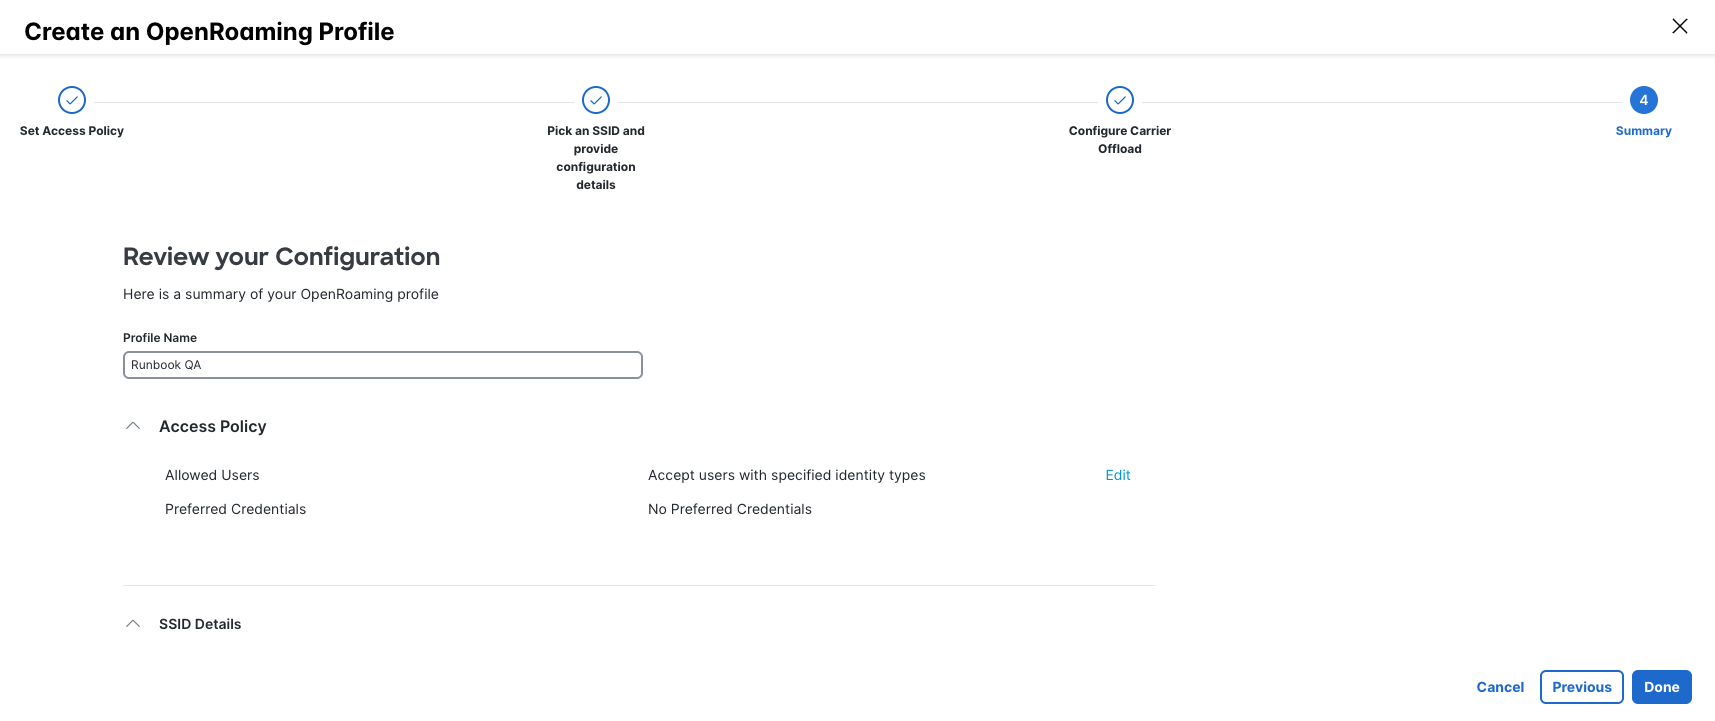
In the Review Your Configuration window, verify the settings and do one of the following:
By default, the OpenRoaming profile name is the same as the SSID name. You can choose to retain the OpenRoaming profile name as the SSID name or modify the profile name.
i) If you are satisfied with the configuration, proceed with the next step by clicking Done.
ii) If you have to make changes, click the Edit link next to the section whose configuration has to be modified and make changes. Continue to click Next until you arrive at the Review Your Configuration window. On successful modification of the OpenRoaming Profile configuration, proceed with the next step by clicking Done.
-
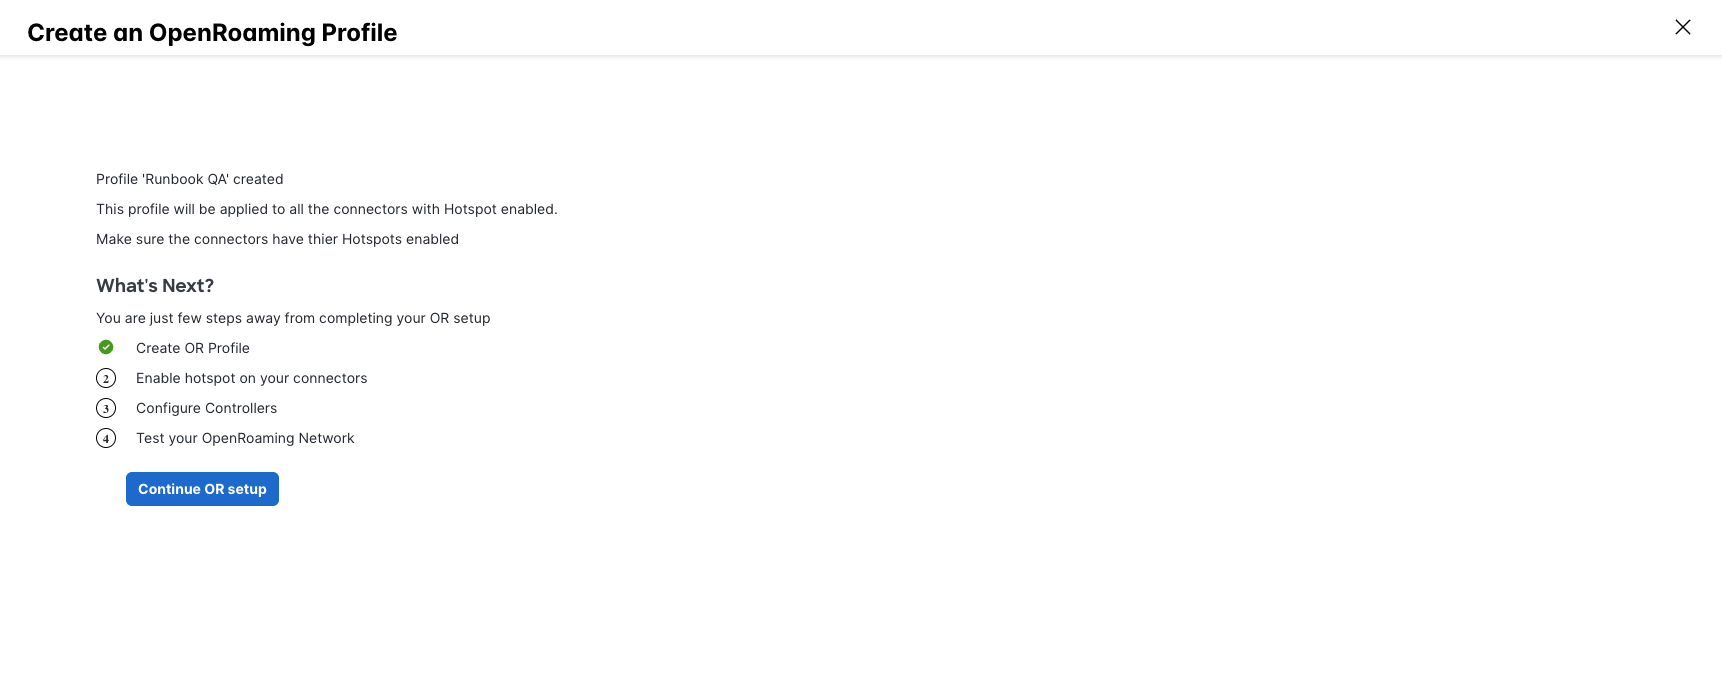
Click Done to complete the creation of the OpenRoaming profile.
A success message appears briefly, and a confirmation window is displayed.
Enable Hotspot Connector
A Hotspot Connector is not usually needed for Meraki. This functionality is handled via APIs to Meraki cloud.
Meraki implementations should validated their API integration is active only.
Enable a Hotspot on the Cisco Spaces Connector (Cisco AireOS or Cisco Catalyst Network)
Enable a Hotspot on the Cisco Spaces Connector (Cisco AireOS or Cisco Catalyst Network)
This step will allow you to enable a Hotspot on the Cisco Spaces Connector for Cisco AireOS or Cisco Catalyst Network. This is needed to add OpenRoaming functionality.
When you add a hotspot on the Cisco Spaces Connector, it leads to the installation of a new docker. You can enable a hotspot on the Cisco Spaces Connector either during the initial configuration of the connector or later using the procedure outlined here.
A Cisco Spaces Connector should already have been configured by following the prerequisite Spaces OS runbook. In which case, you can see it listed in the Hotspot-enabled Connectors section on the OpenRoaming Setup window.
Enable Hotspot on Cisco Spaces Connector 3.x
-
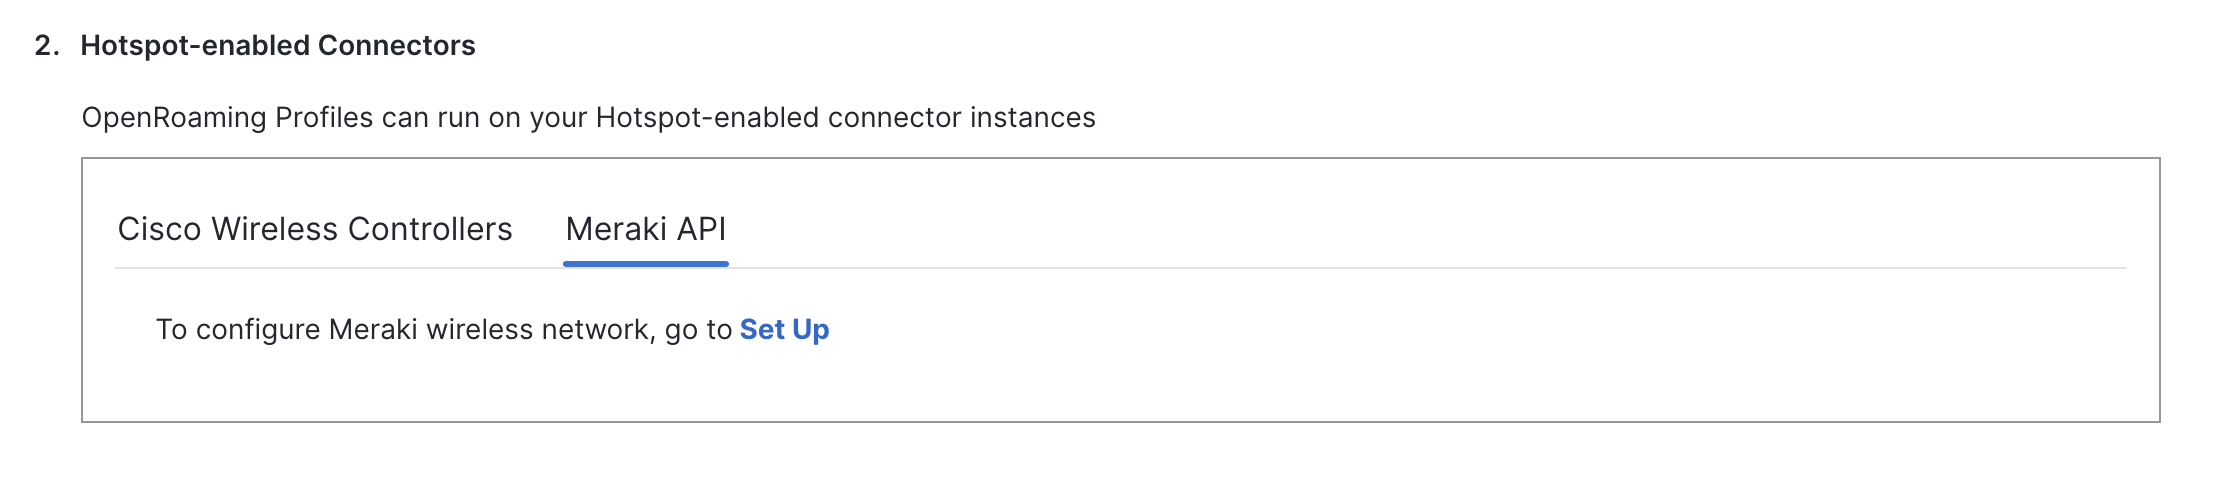
In section 2, if you do not already have a connector that is hotpot enabled, you will see the following. If you already have enabled your connector for hotspot, you can move onto Configure Network. Ensure the connector you want to use has hotspot enabled.
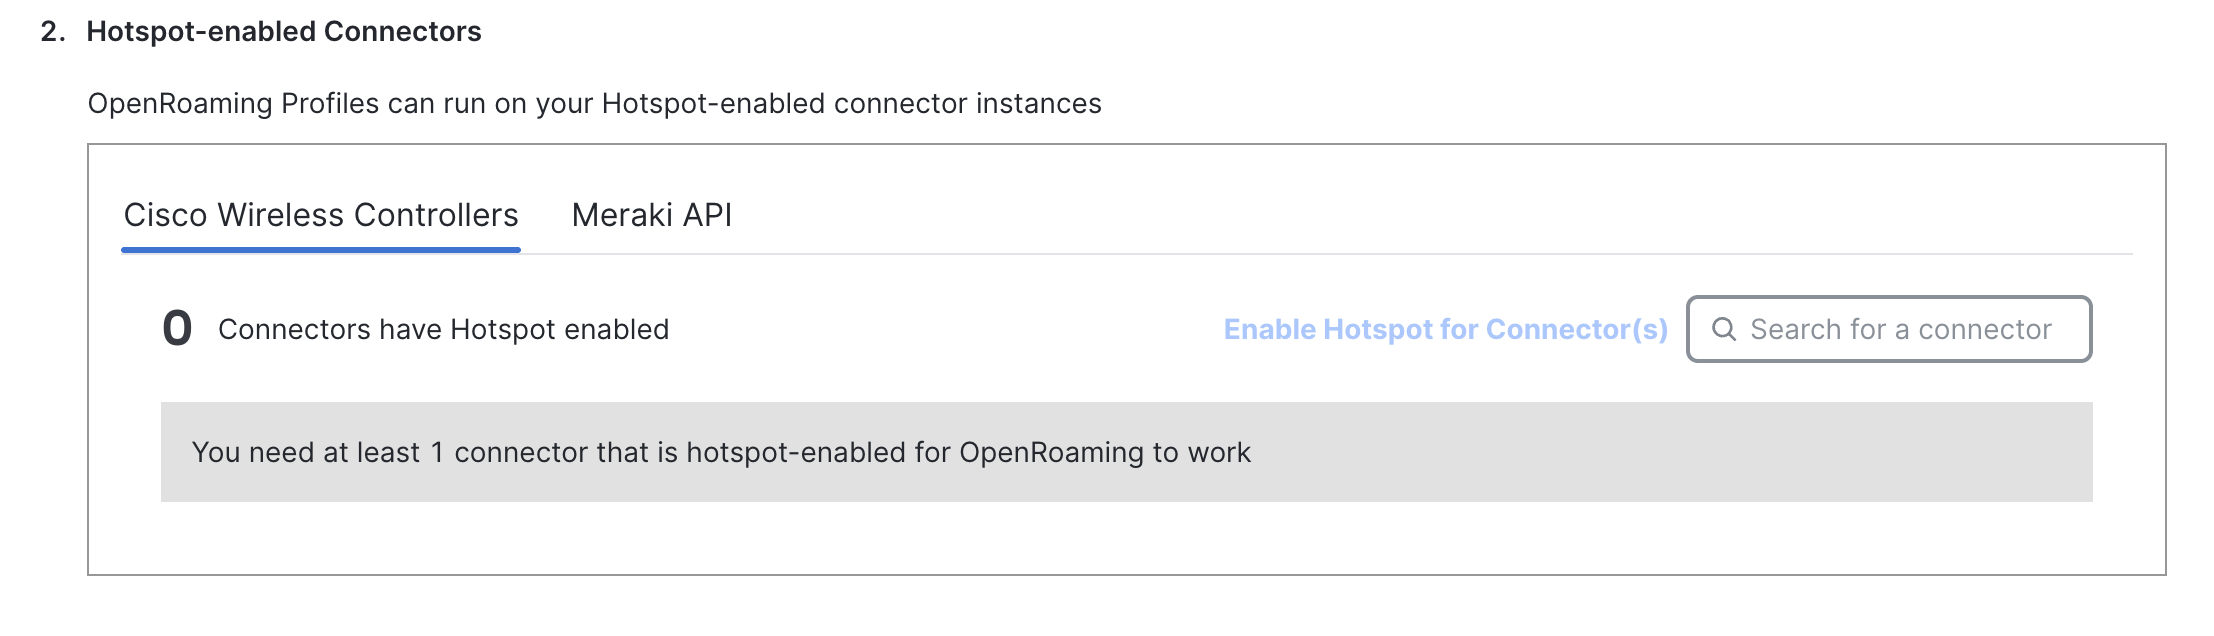
Hospot not enabled on connector -
In the Cisco Spaces dashboard left navigation pane, click Setup and choose Wireless Networks.
-
In the Connect your wireless network window that is displayed, go to the Step 2 area and click View Connectors.
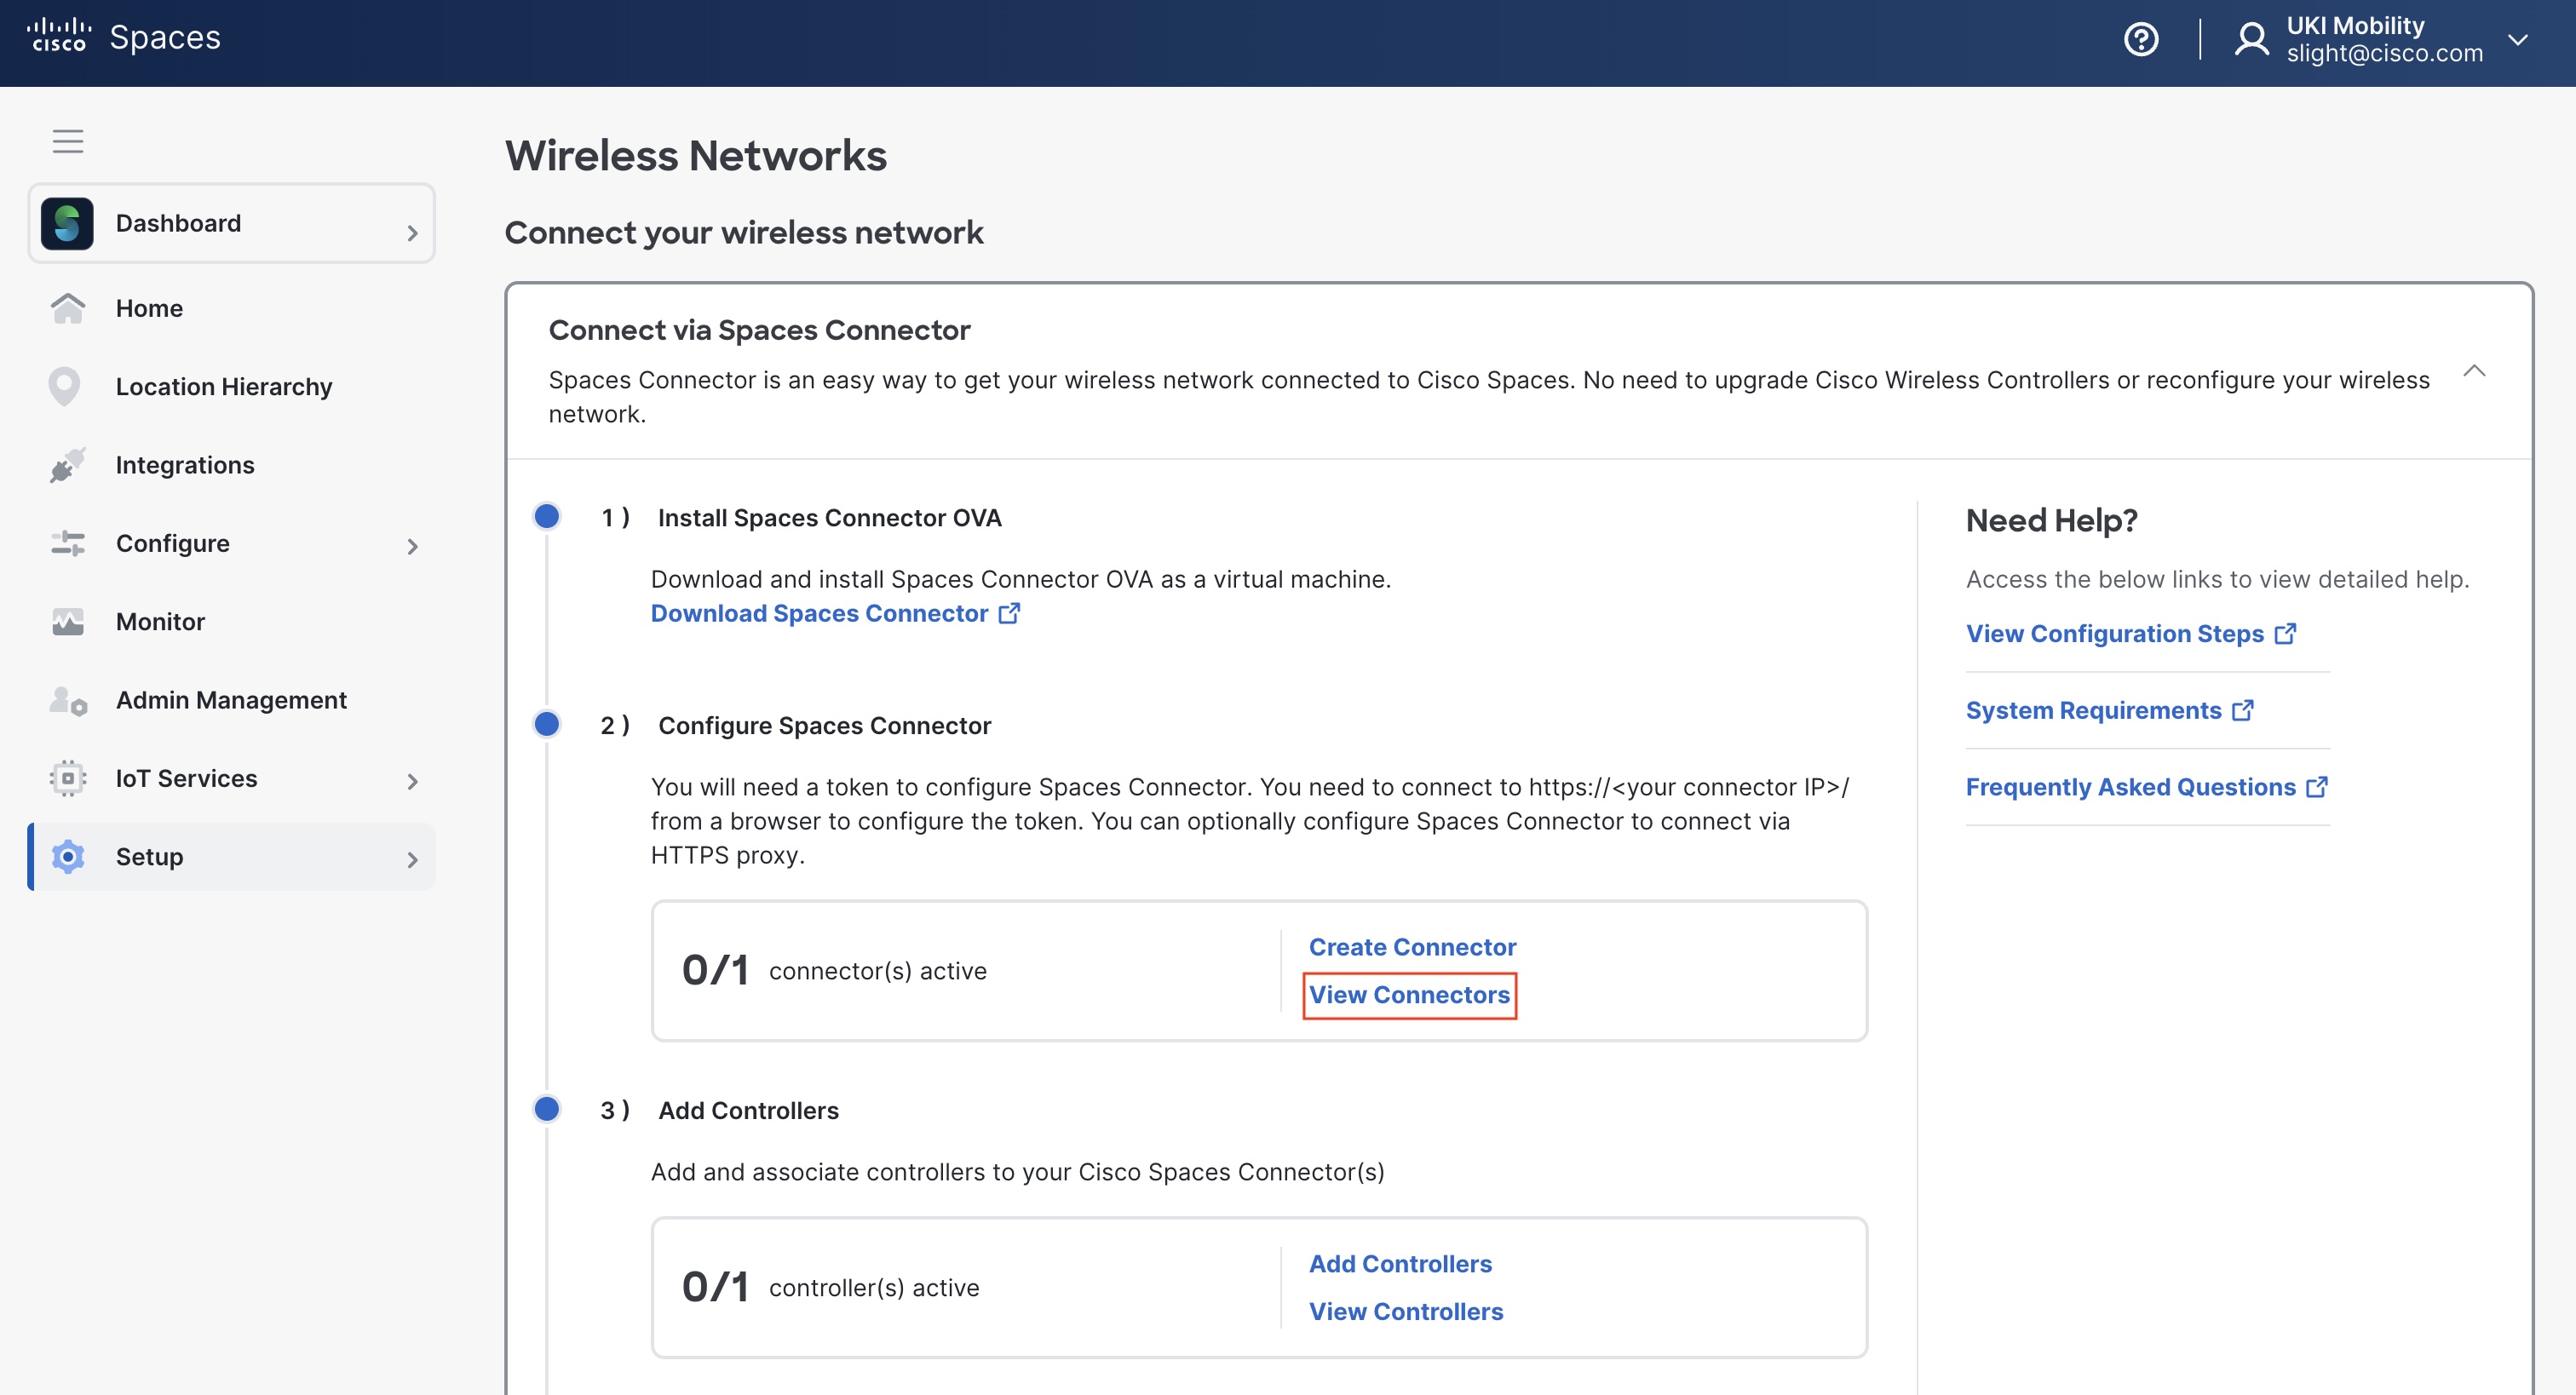
View Connectors -
Click the name of the connector you want to enable, then in the window that is displayed, click Add Services.
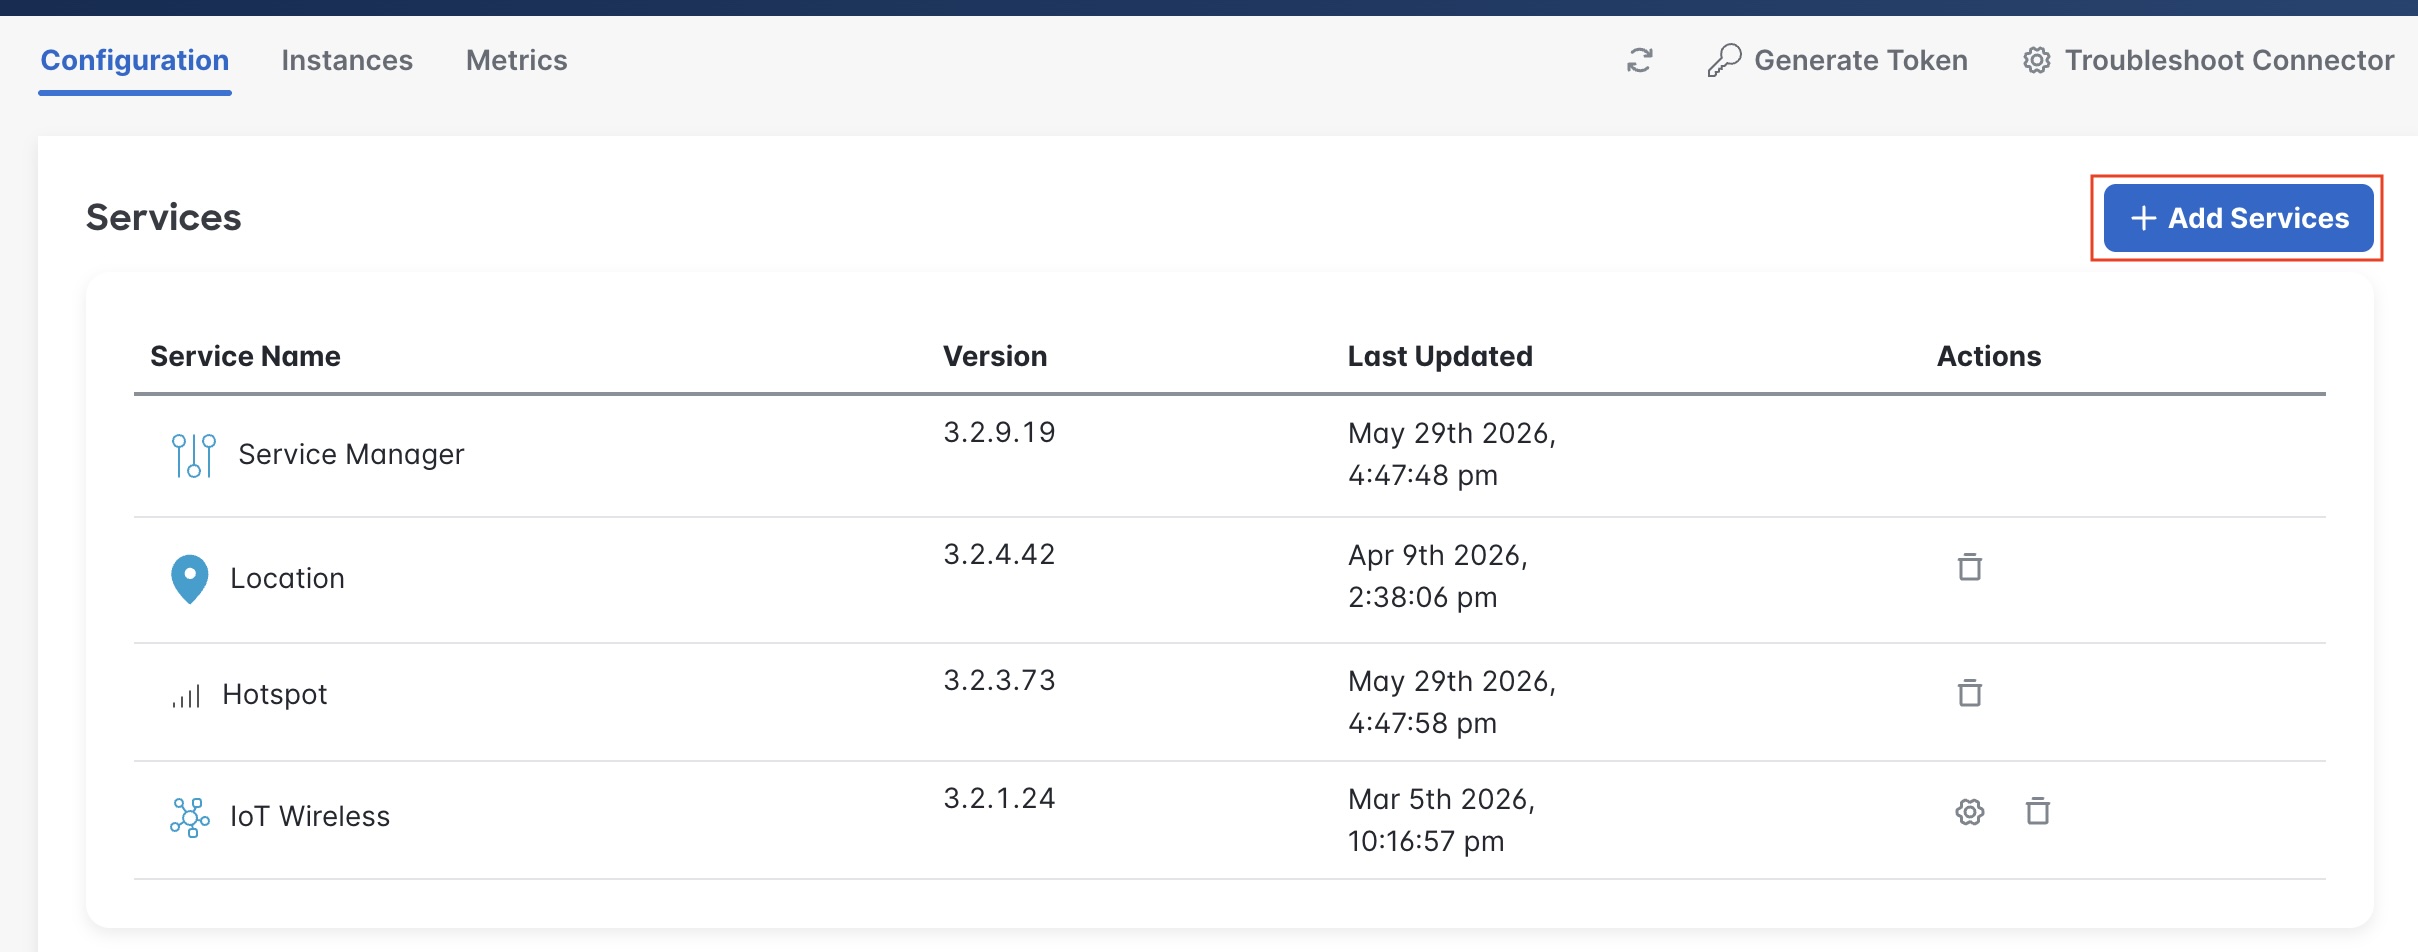
Add Service -
In the Add Service window that is displayed, choose hotspot and click Add.
In Services, Service Manager is added by default.
In the Connector Details window, you can see that the number of services enabled has increased.
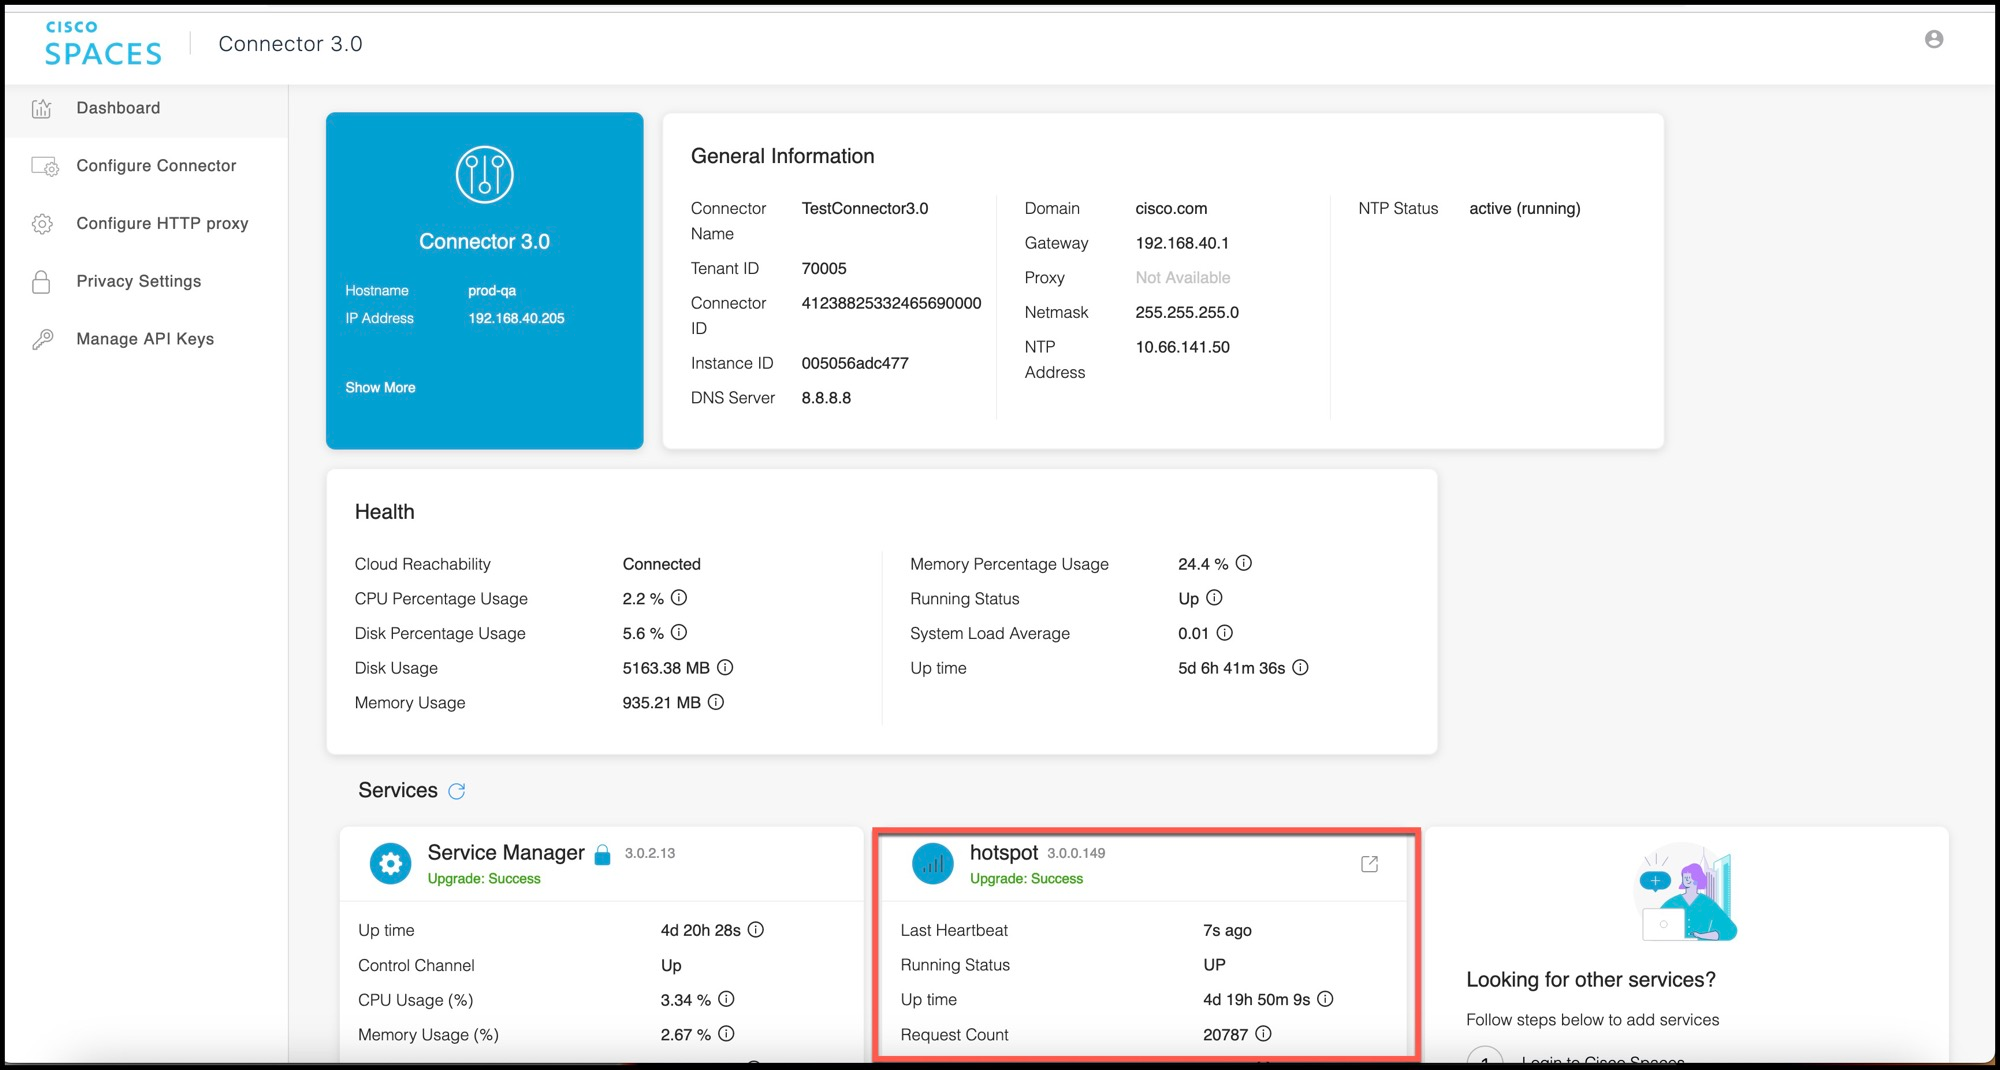
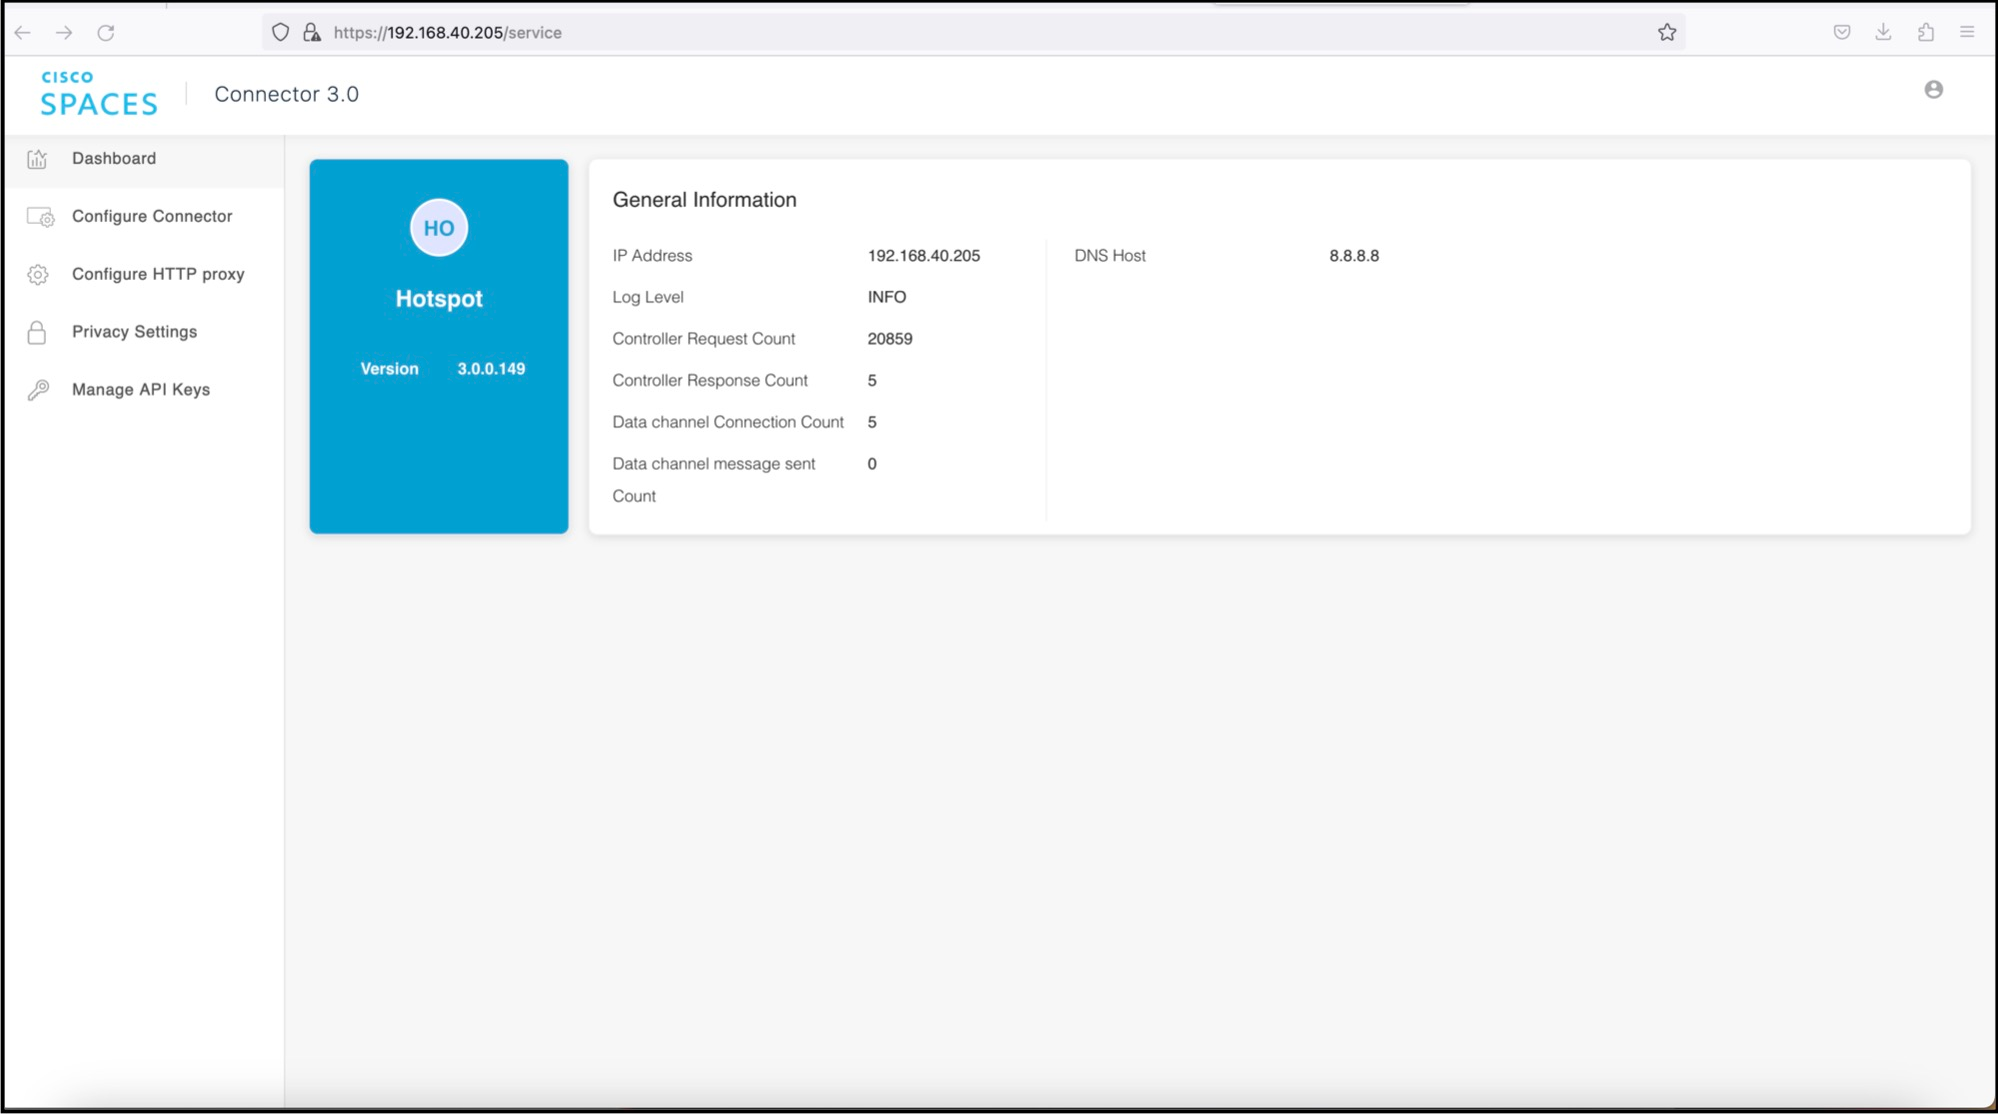
Validate Meraki API integration
Validate Meraki API Integration
In this section we should ensure the Meraki API integration is valid and active before proceeding to configure network.
-
Under 2.Hotspot-enabled Connectors, open the Meraki API tab.
-
Ensure you see a green tick as validation the API connection is active.
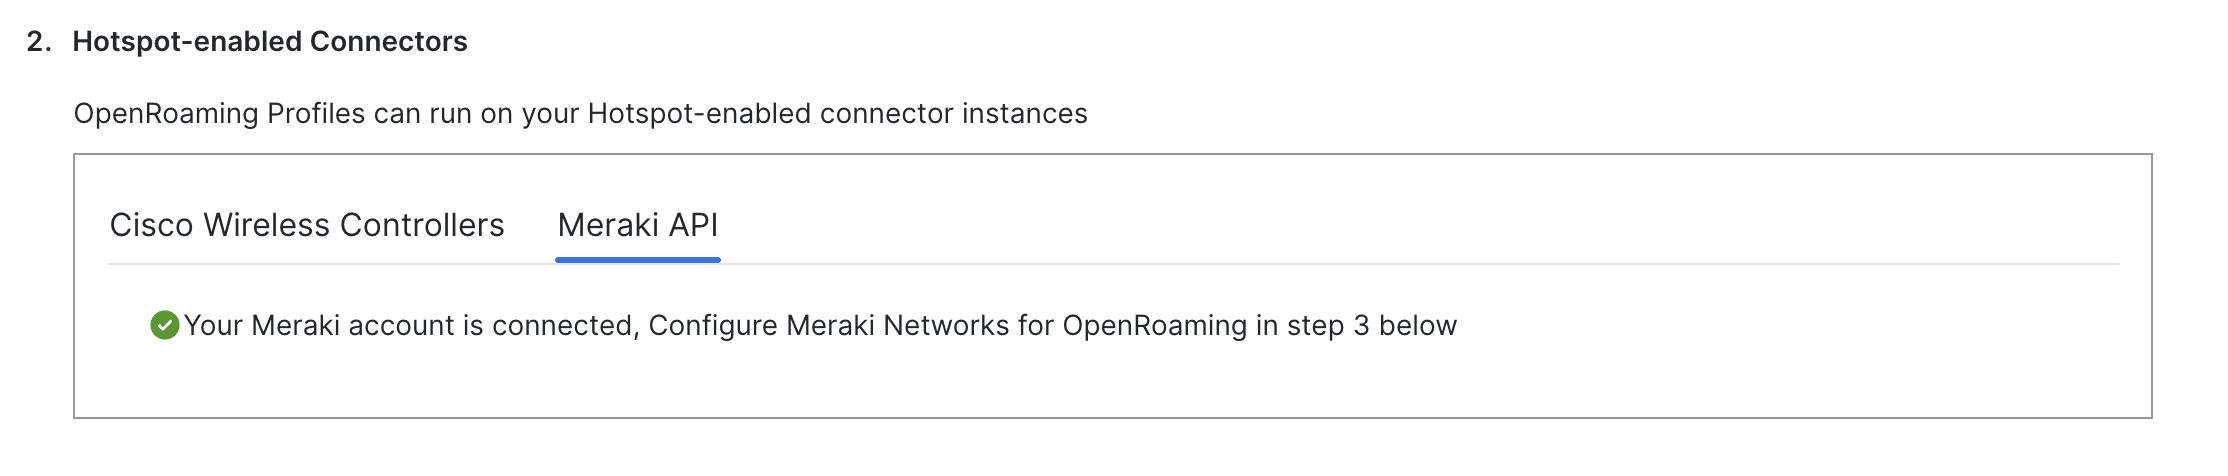
Meraki API Active -
If you see a Set Up button, that means the Meraki Integration is not active. You should follow the Set Up link, and configure your Meraki Integration before proceeding. See https://runbooks.ciscospaces.io/docs/cisco-spaces-os-runbook-cisco-validated#Meraki-Wireless for more details.
It is reccomended to use the Meraki Integration over the Meraki API method
Configure Network
Depending on your wireless network, follow the corresponding procedure to associate an OpenRoaming profile with the controller and configure the network:
Configure Cisco AireOS or Cisco Catalyst Network
Configure Cisco AireOS or Cisco Catalyst Network
Before you configure the Cisco AireOS or Cisco Catalyst wireless network, you must configure the SSID and AAA policy.
-
In the OpenRoaming app, click Set Up OpenRoaming or choose

The OpenRoaming Setup page is displayed.
If you have completed the OpenRoaming Profile configuration, click Continue OR Setup in the configuration wizard to proceed.
In the Network configuration section, under the AireOS/Catalyst controllers tab, a list of all the Cisco AireOS and Cisco Catalyst series controllers appears with details such as the Controller status and associated Connectors.
-
Under 3. Network configuration > Cisco Wireless, in the Action column, click the 3 dots, click

The Configure Controller window is displayed.
-
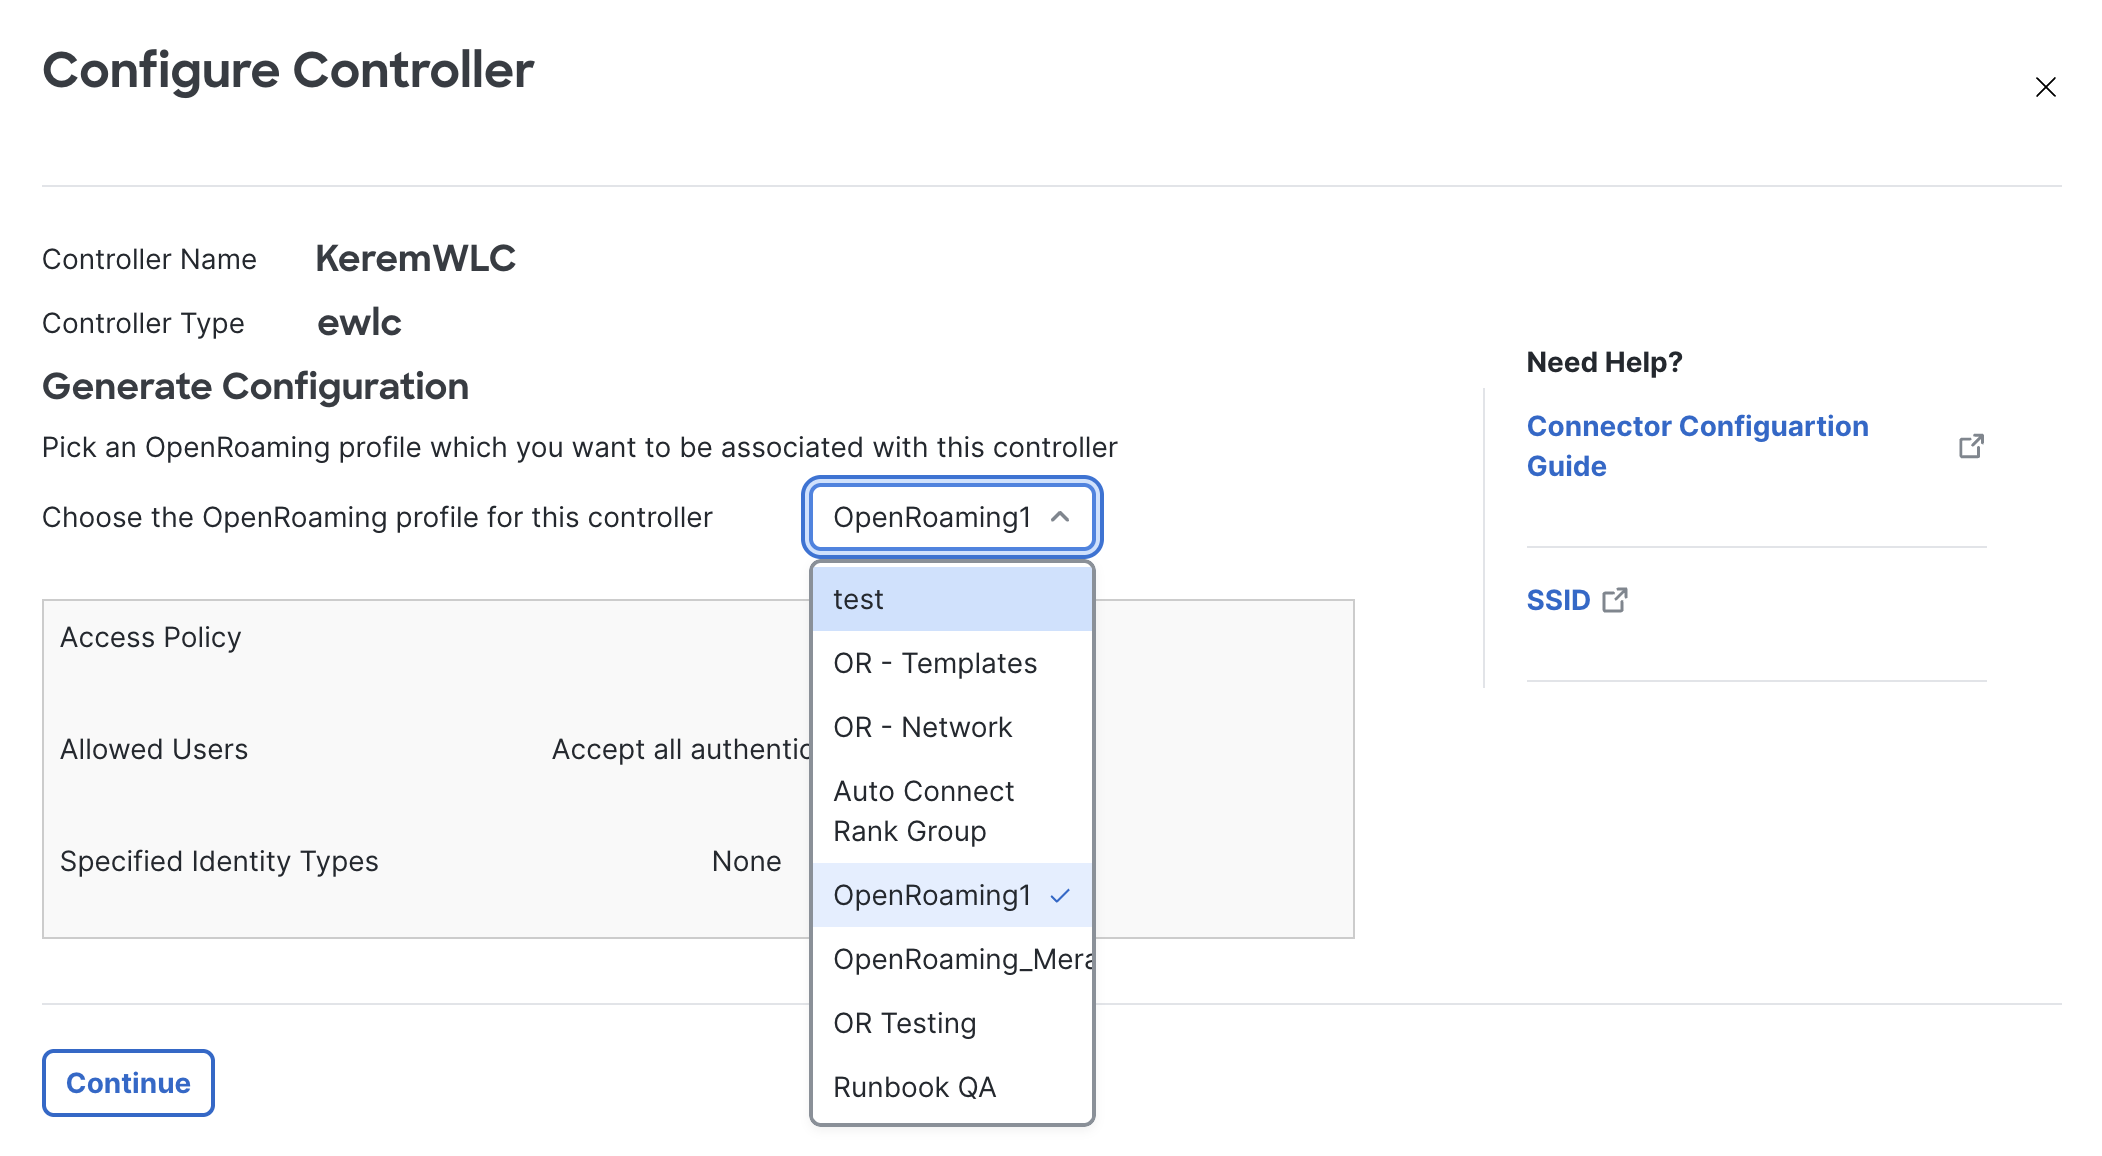
Choose the required OpenRoaming Profile for this controller, then click Continue.
Choose OpenRoaming Profile -
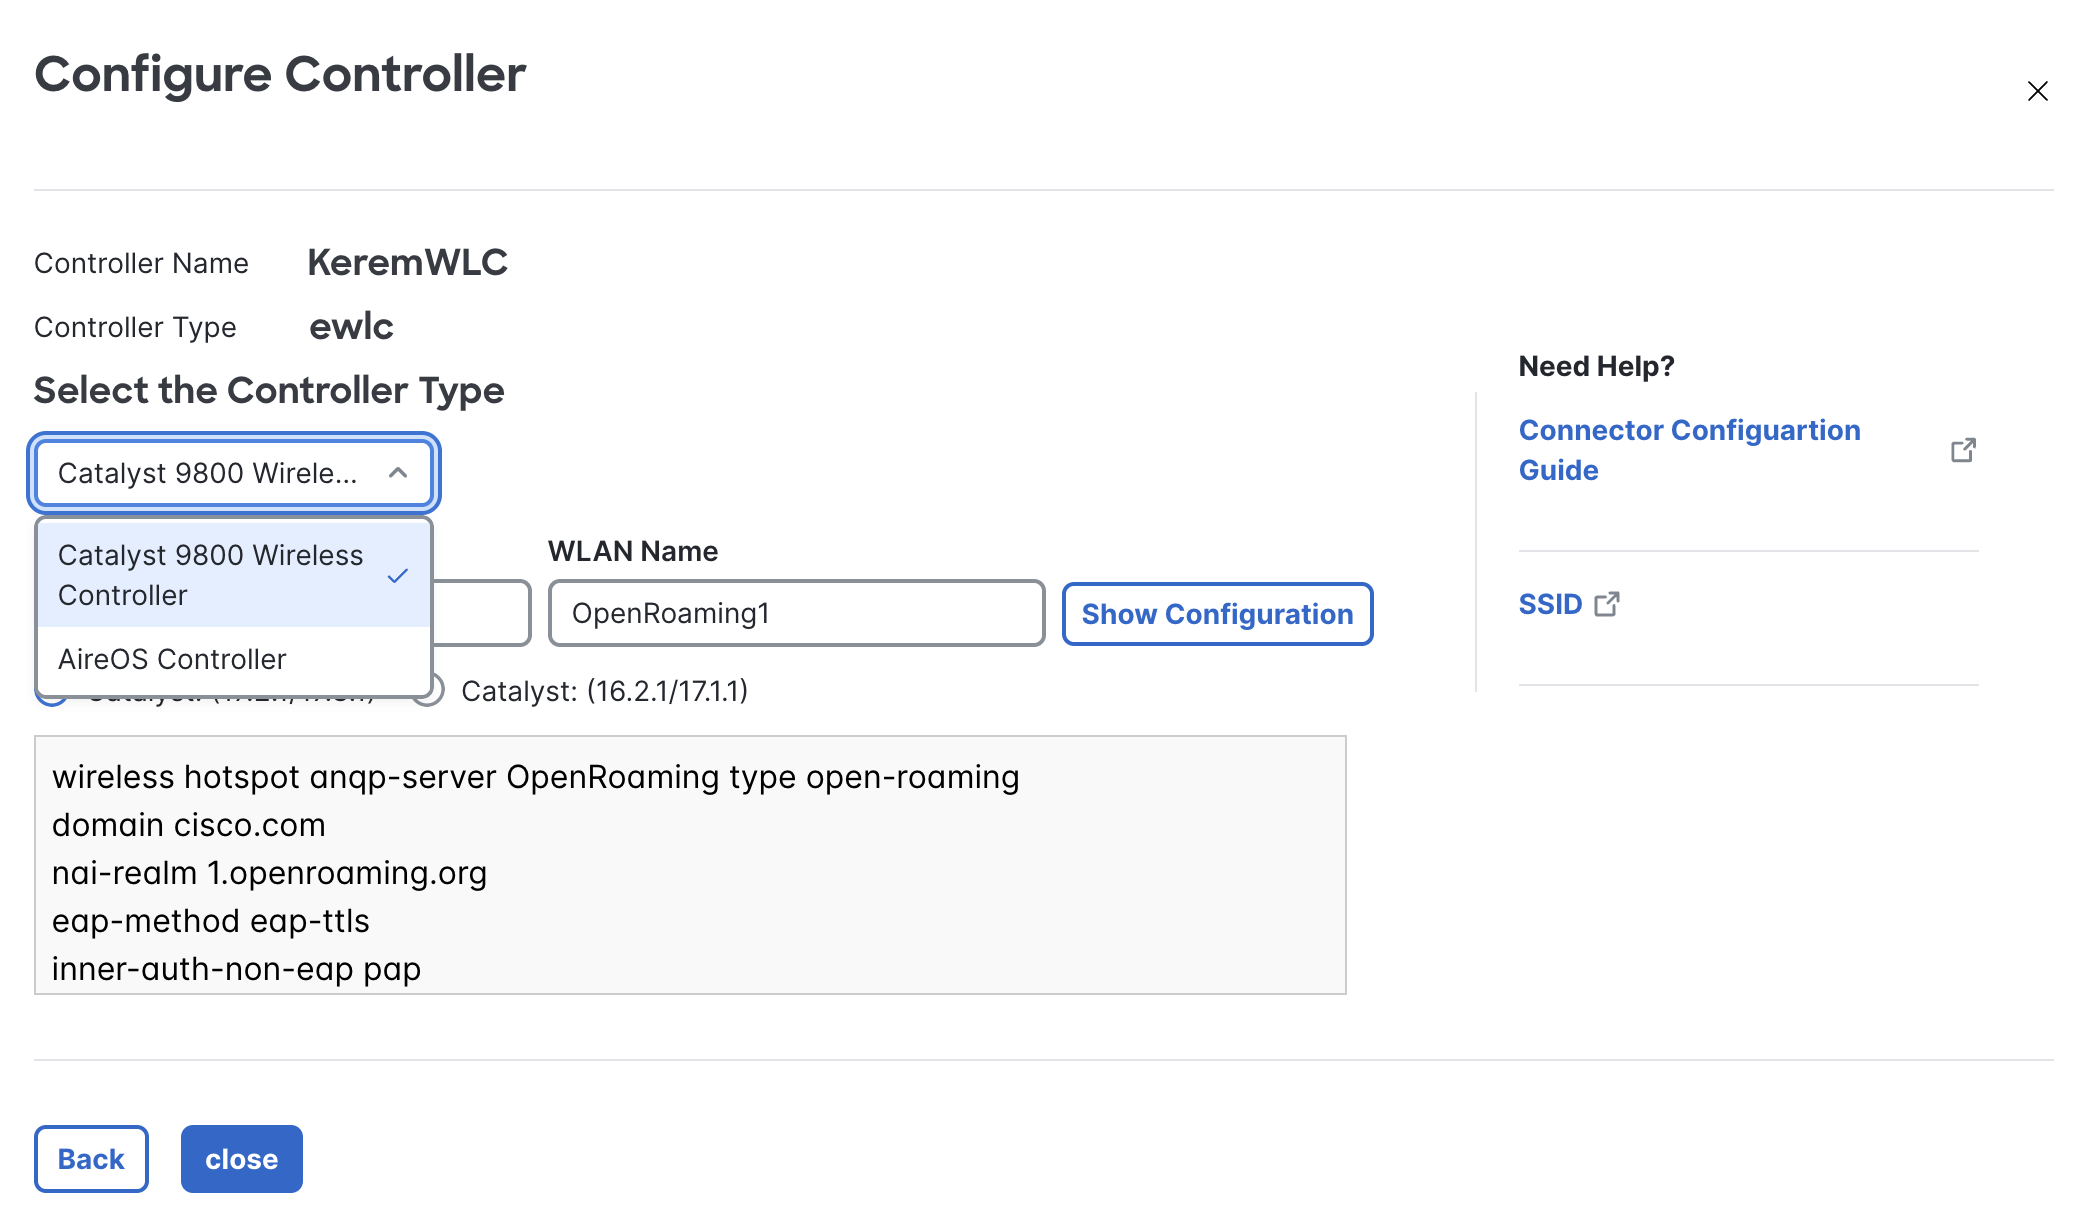
Choose the controller type between AireOS and Catalyst 9800.
Select required controller -
In the Connector IP Address field, enter the IP Address of the connector if not automatically filled.
-
The WLAN Name will be automatically filled as per the SSID Name configured in the chosen OpenRoaming Profile. To edit this, you must edit the OpenRoaming Profile.
-
Click Show Configuration.
-
Select the either Catalyst: (17.2.1/17.3.1) (for IOS XE versions 17.2.1 or later) or Catalyst: (16.12.1/17.1.1) (for IOS XE versions earlier than 17.2.1)
-
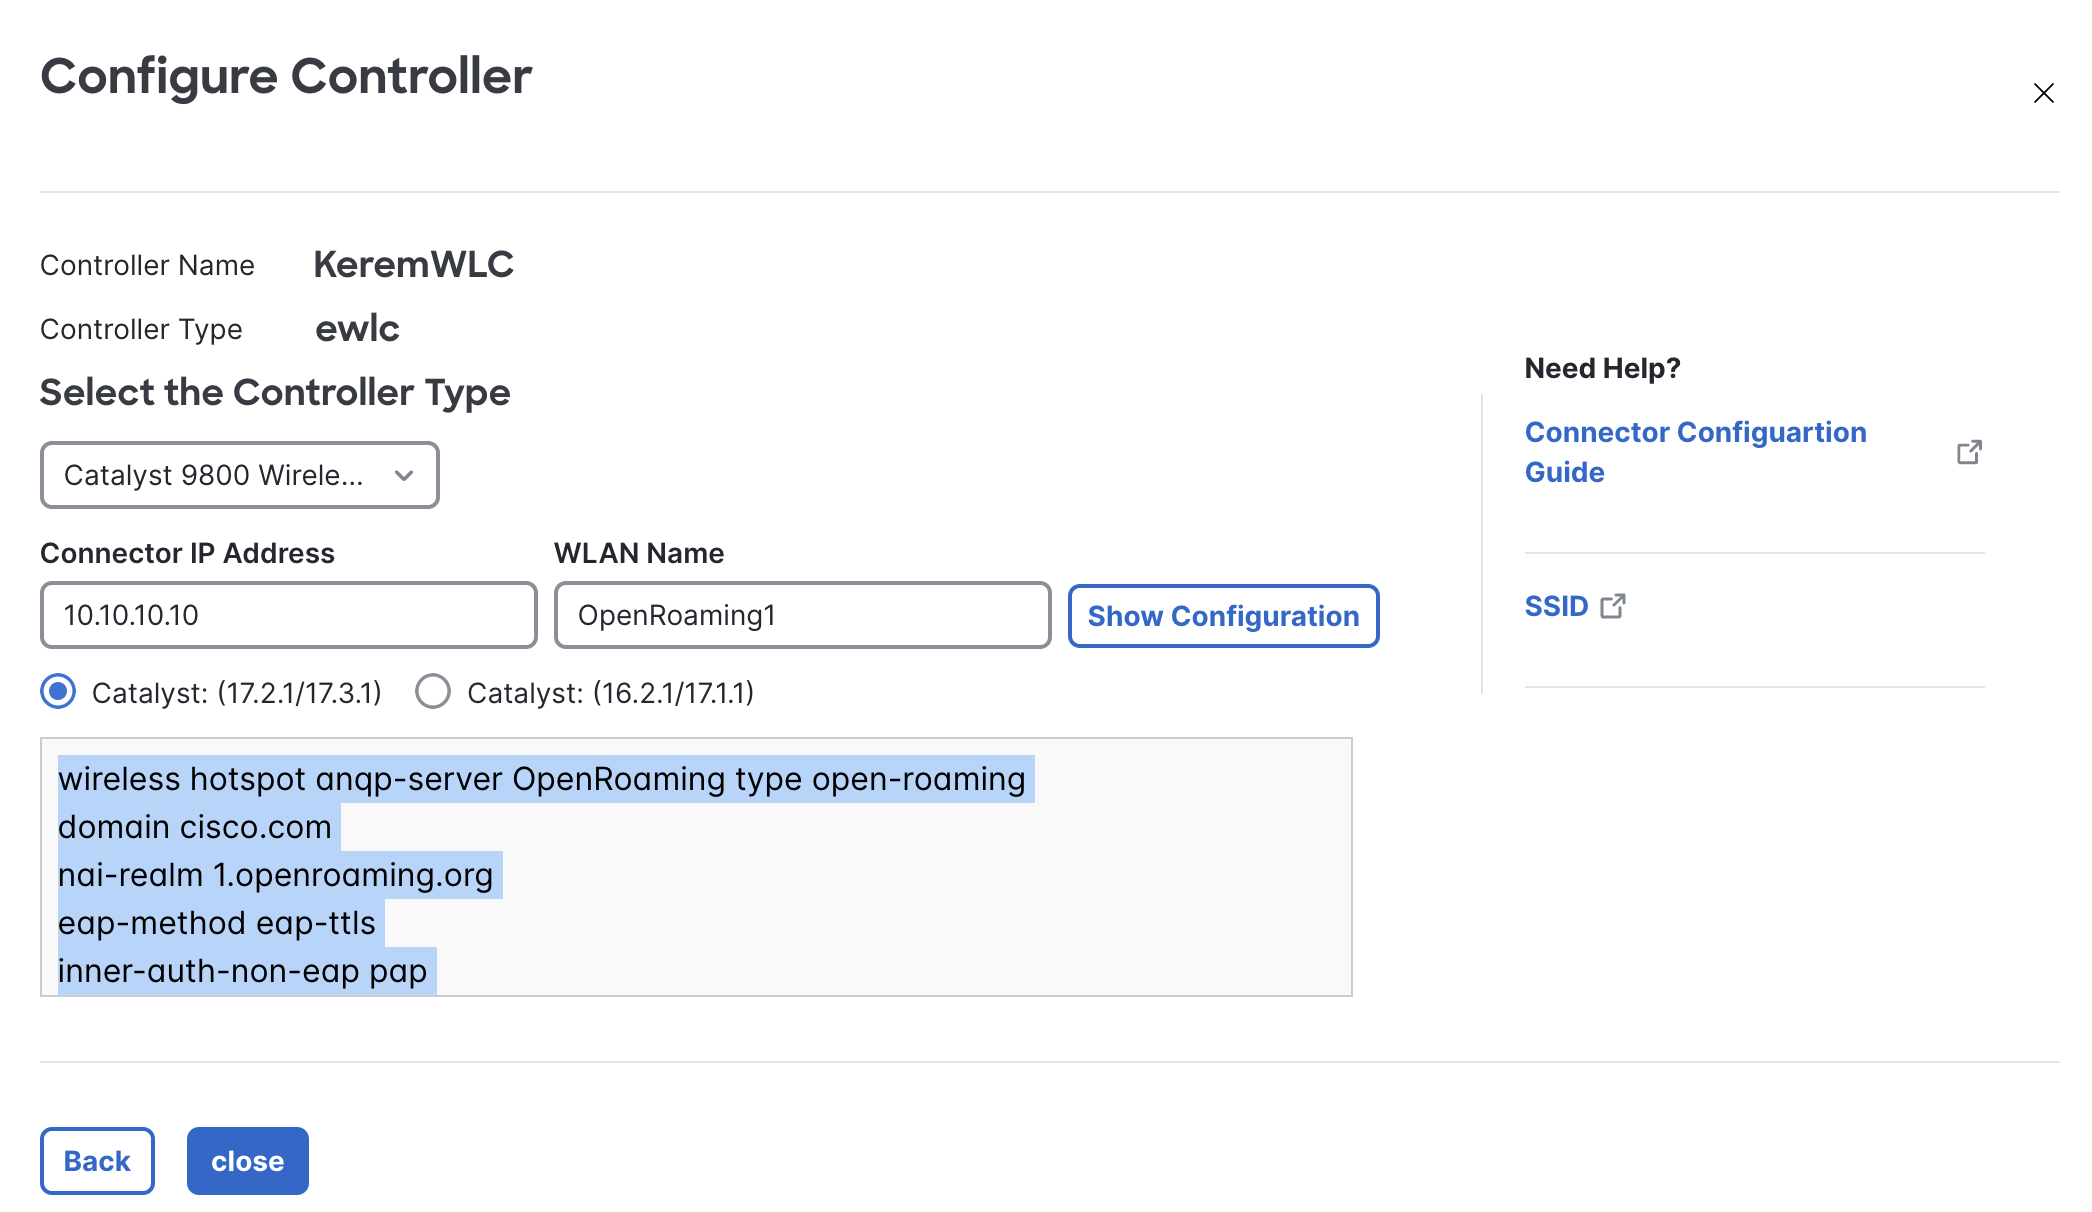
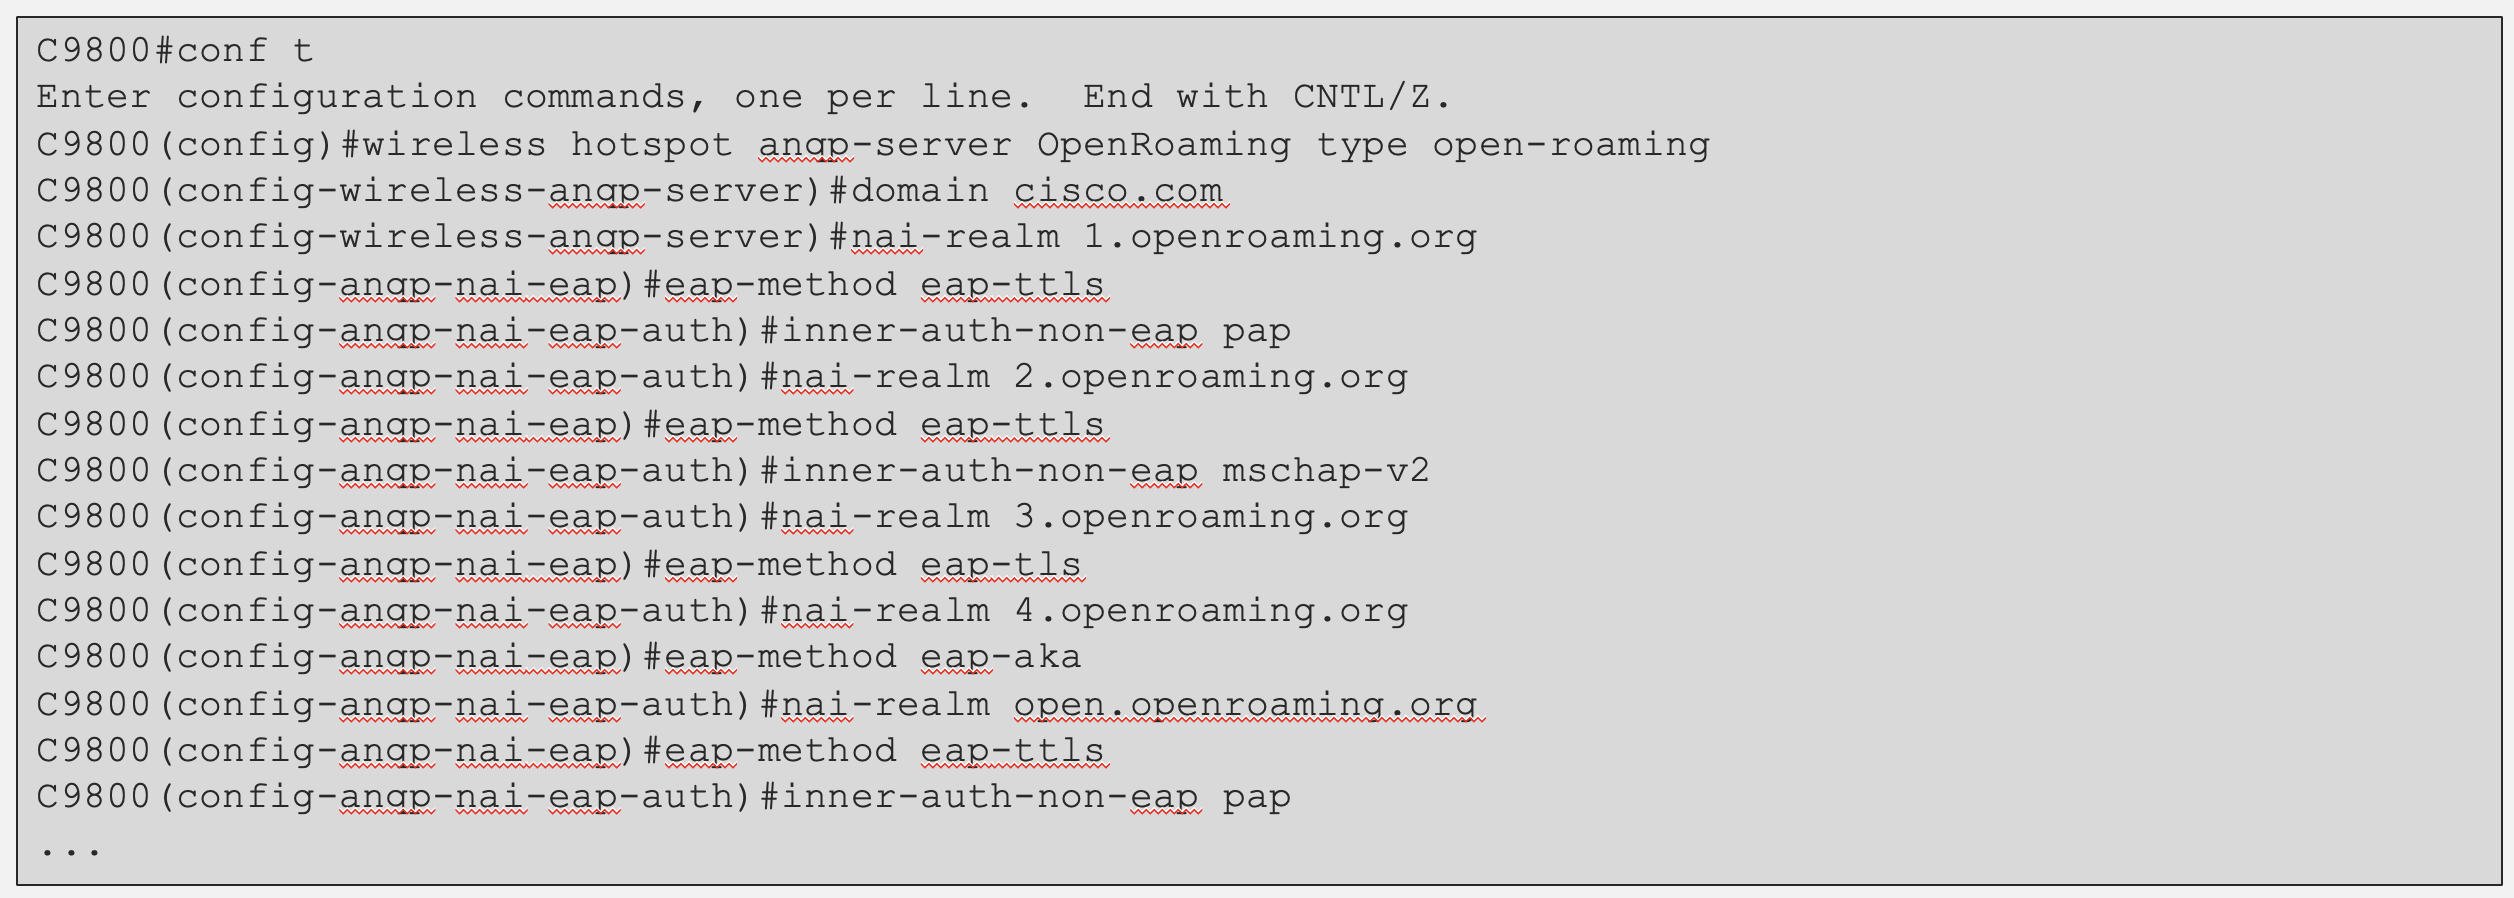
The generated CLI configuration is for the Hotspot OpenRoaming ANQP server. Copy the configuration.
It is always important to review generated configuration, and make sure you are comfortable and understand the configuration.
The generated configuration assumes the default Wireless Policy Profile and Policy Tag will be used. In deployments with the defaults being used, the entire configuration can be used.
Otherwise, if using a different Wireless Policy Profile and Policy Tag, copy only the OpenRoaming HotSpot ANQP server settings as highlighted below.
-
Paste the selected OpenRoaming profile configuration in the Cisco AireOS or Catalyst controller CLI.
-
Click Close.
The OpenRoaming Setup window is displayed.
To configure the ANQP server manually on the 9800 Controller or to use non-default Wireless Policy profile and Policy Tag, refer to this video: https://www.youtube.com/watch?v=XsD6e6F6u4k
Configure Cisco Meraki Network
Configure Cisco Meraki Network
Configuration of Cisco Meraki networks that use templates is not supported.
-
In the OpenRoaming window, click Set Up OpenRoaming or choose
The OpenRoaming Setup page is displayed.
-
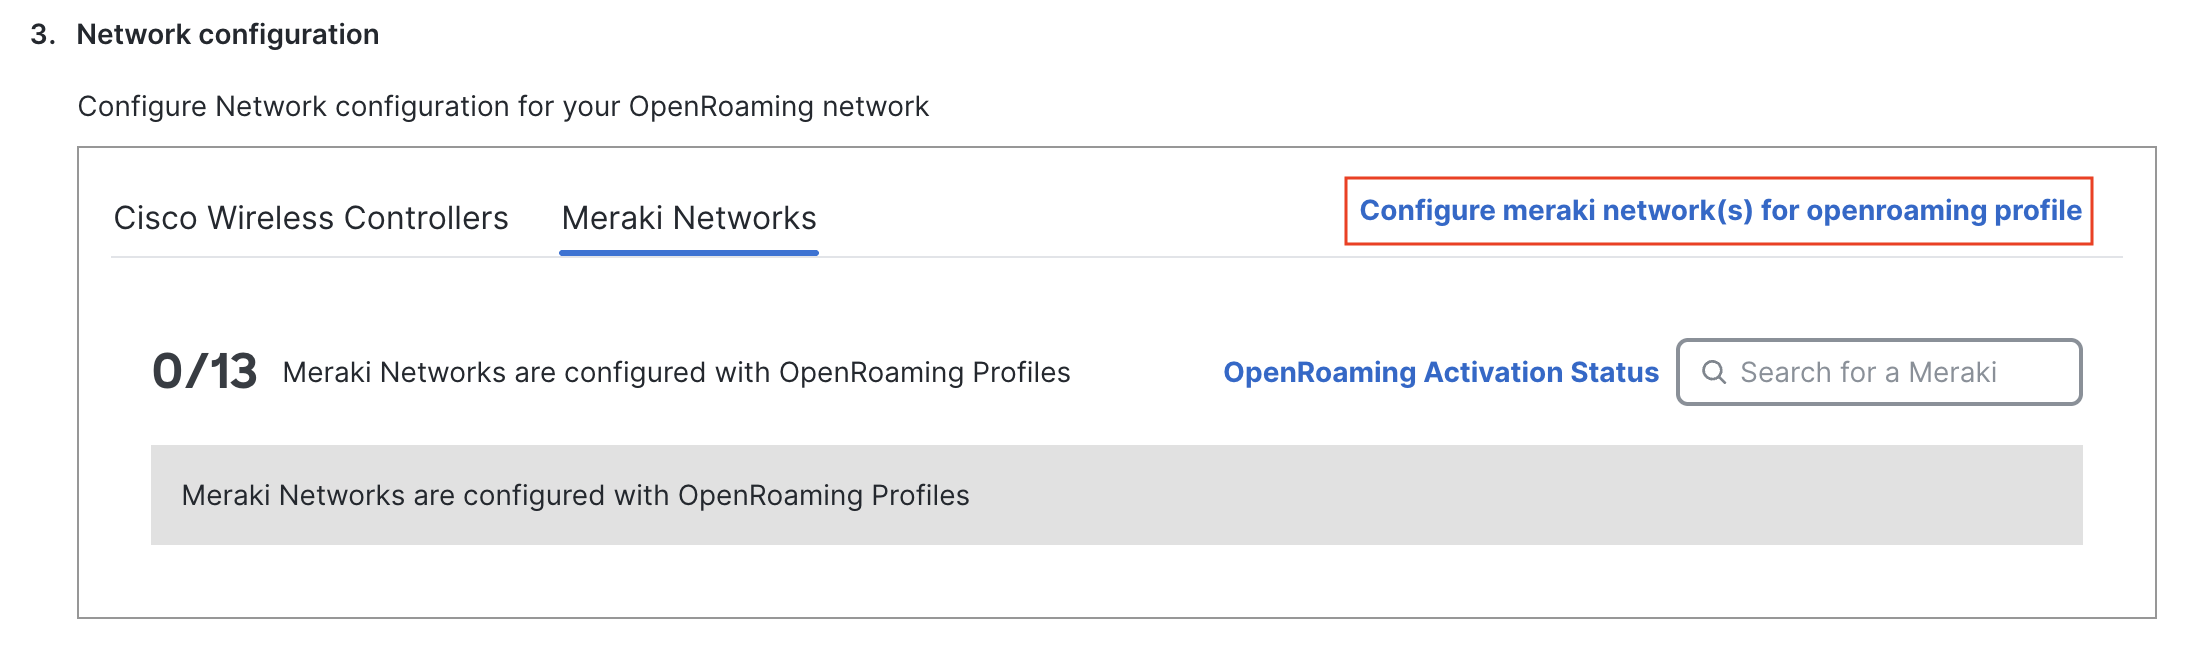
In the 3. Network configuration section, click the Meraki Networks tab.
-
Click Configure meraki network(s) for openroaming profile.
Configure meraki network(s) for openroaming profile
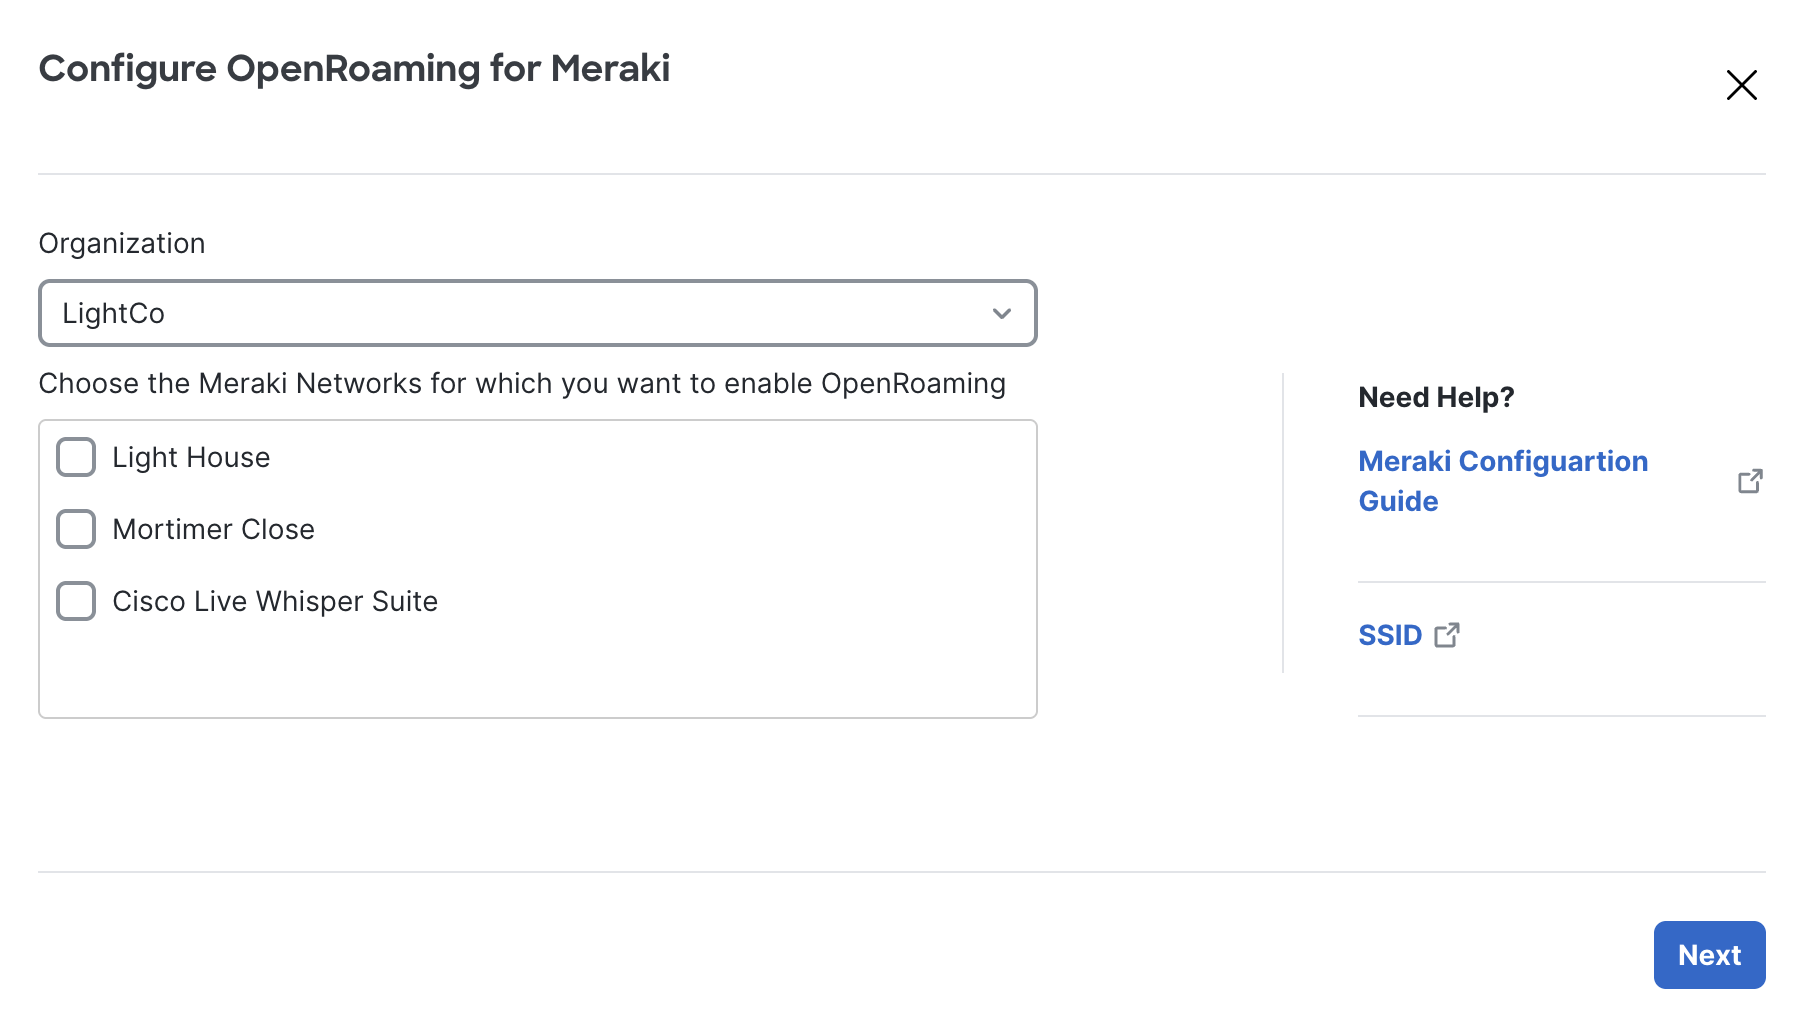
The Configure OpenRoaming for Meraki window is displayed.
For information on configuring a Cisco Meraki network, go to the Cisco Spaces Configuration Guide.
-
Choose an Organization from the drop-down list.
-
Choose the Cisco Meraki networks for which you want to enable OpenRoaming. This step is not service affecting for the existing SSID(s).
Select Meraki Networks
You can select multiple networks from the list.
-
Click Next.
-
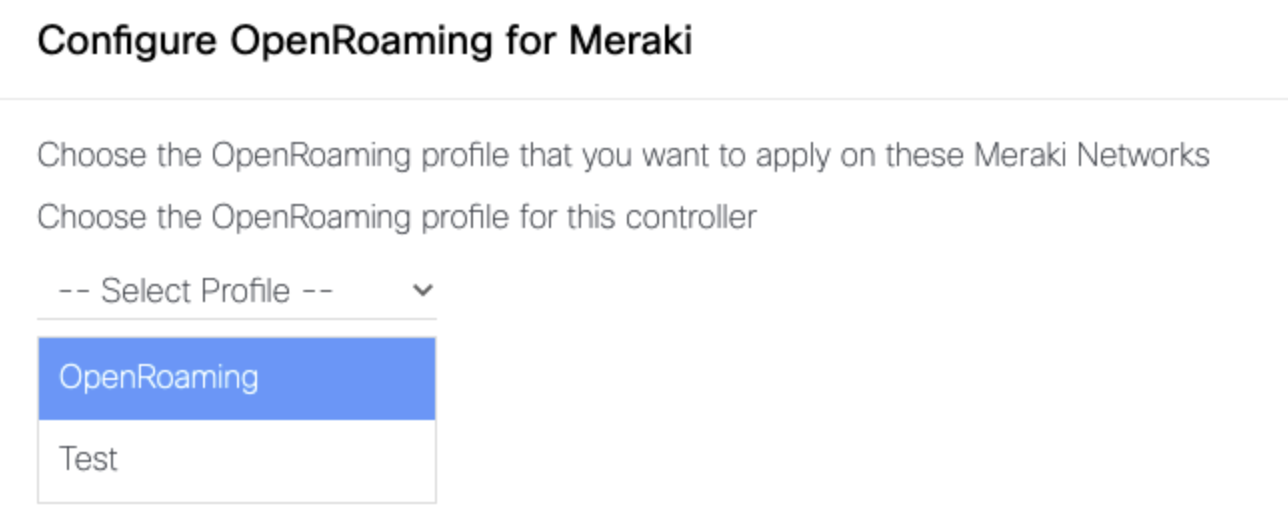
From the drop-down list, select the OpenRoaming profile that needs to be applied on the Cisco Meraki network.
-
Click Configure.
The Configure button will configure the chosen Meraki Networks, with a new SSID, as created in the OpenRoaming Profile.
-
To validate this, go to https://meraki.cisco.com
-
Log in to the application using the login credentials of your Cisco Meraki account.
-
Click the required Cisco Meraki Organization, and choose the required network.
-
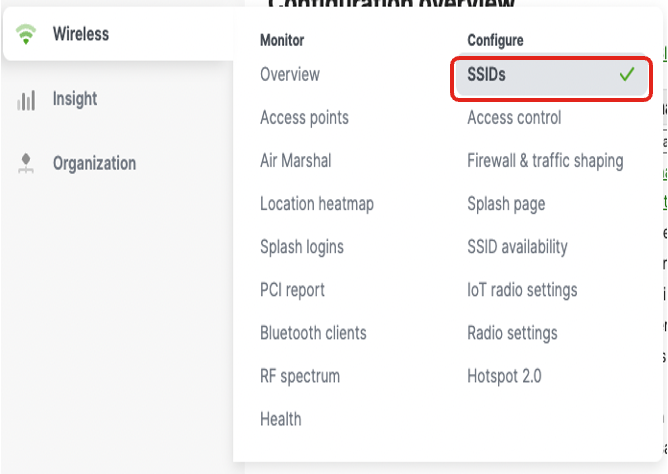
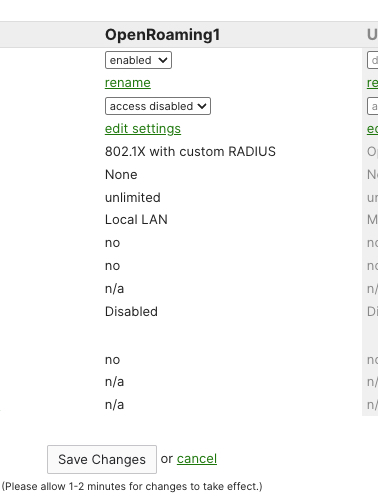
Choose Wireless > Configure > SSID and verify, the SSID you created in the OpenRoaming Profile, was created successfully and is enabled.
-
Choose edit settings and ensure the following details are configured
-
SSID: Enabled
-
Security: Enterprise with my RADIUS server
-
Encryption: WPA2 or WPA3
-
Splash Page: None (direct access)
-
Radius Servers are configured
-
Some clients might refuse to connect to SSIDs using OpenRoaming when configured with weak encryption methods (e.g., WPA1 or 'WPA1 and WPA2'). Please ensure the SSIDs are configured with strong encryption, such as 'WPA2 Only' or 'WPA3', under Wireless > Configure > Access Control, in the 'WPA encryption' section.
-
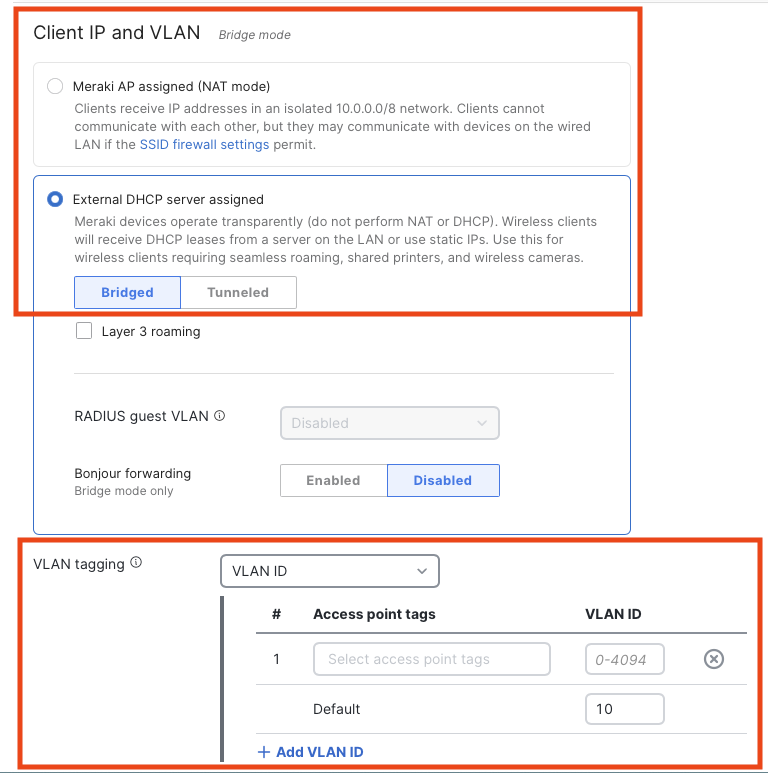
Optionally configure VLAN tagging in the Client IP and VLAN settings if required on your network
-
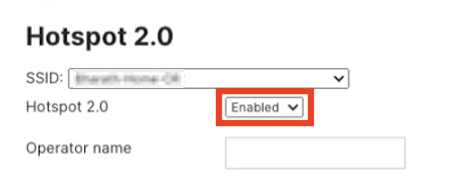
Navigate to Wireless > Hotspot 2.0 to ensure Hotspot 2.0 is enabled.
-
This completes the Meraki Dashboard OpenRoaming configuration. Continue with OpenRoaming configuration on Cisco Spaces: https://runbooks.ciscospaces.io/docs/cisco-spaces-openroaming-runbook-cisco-validated#CiscoSpacesOpenRoamingRunbook(CiscoValidated)-CreateanOpenRoamingProfile
Check Activation
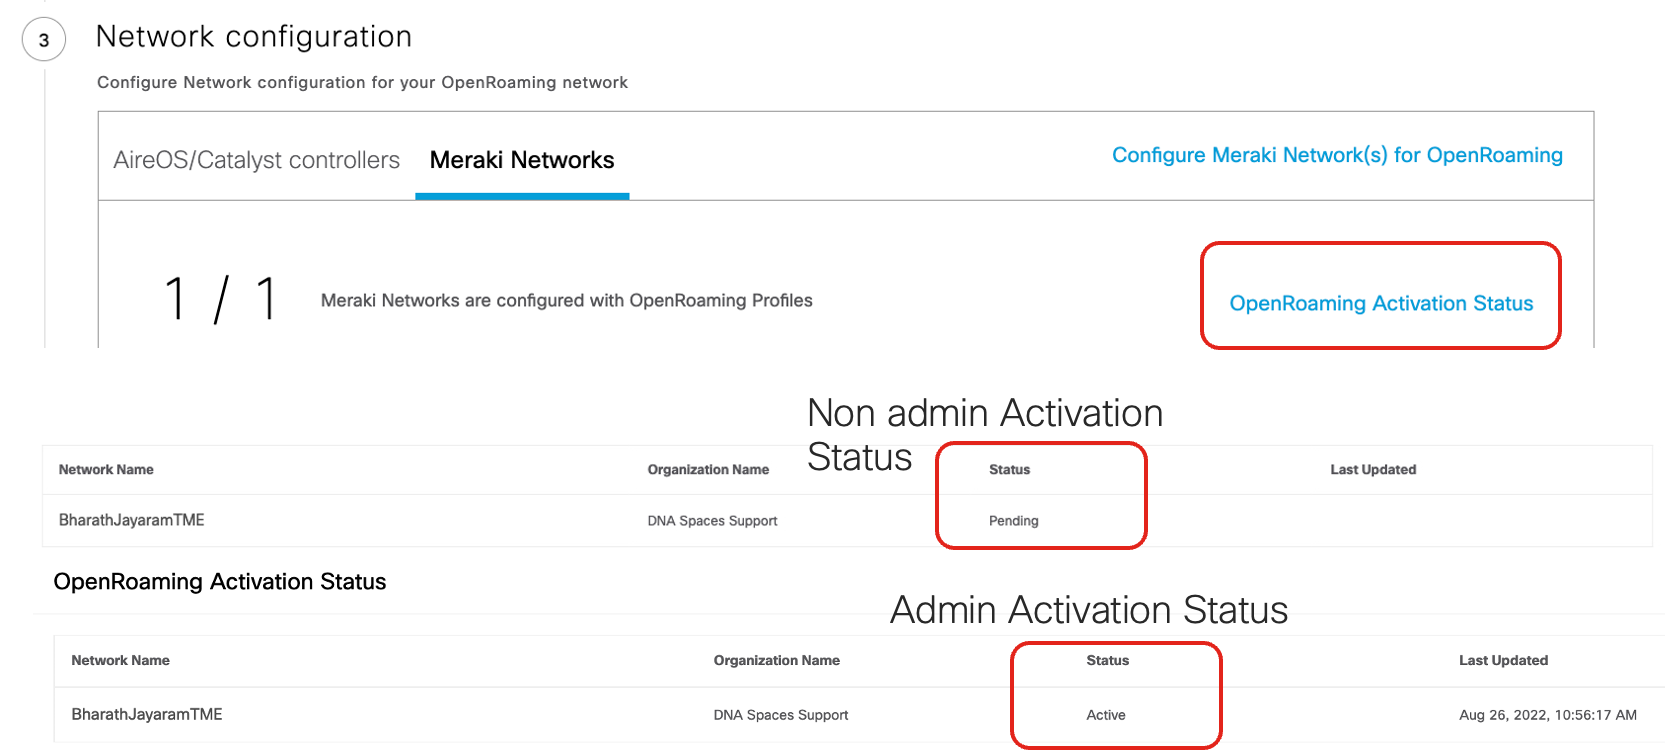
Check the OpenRoaming activation status on Cisco Spaces dashboard:
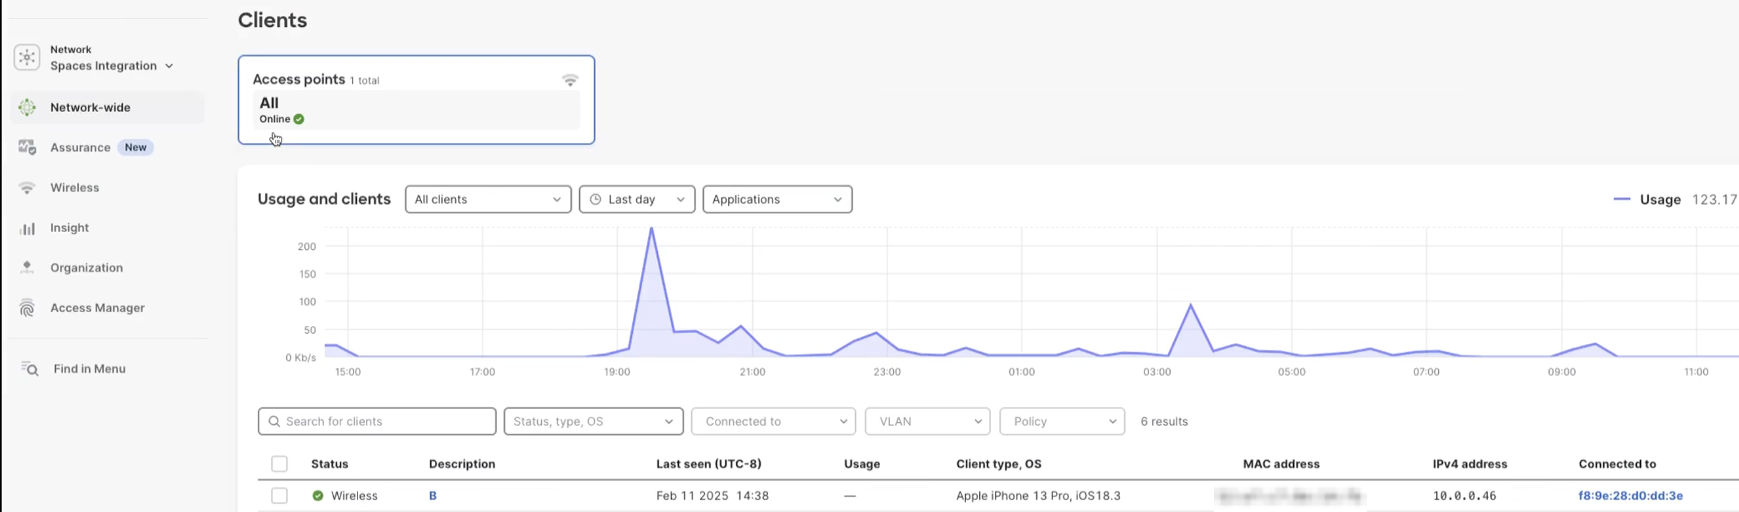
If using Meraki, you can check client connection by navigating to Network-wide > Clients. Check the device is connected.
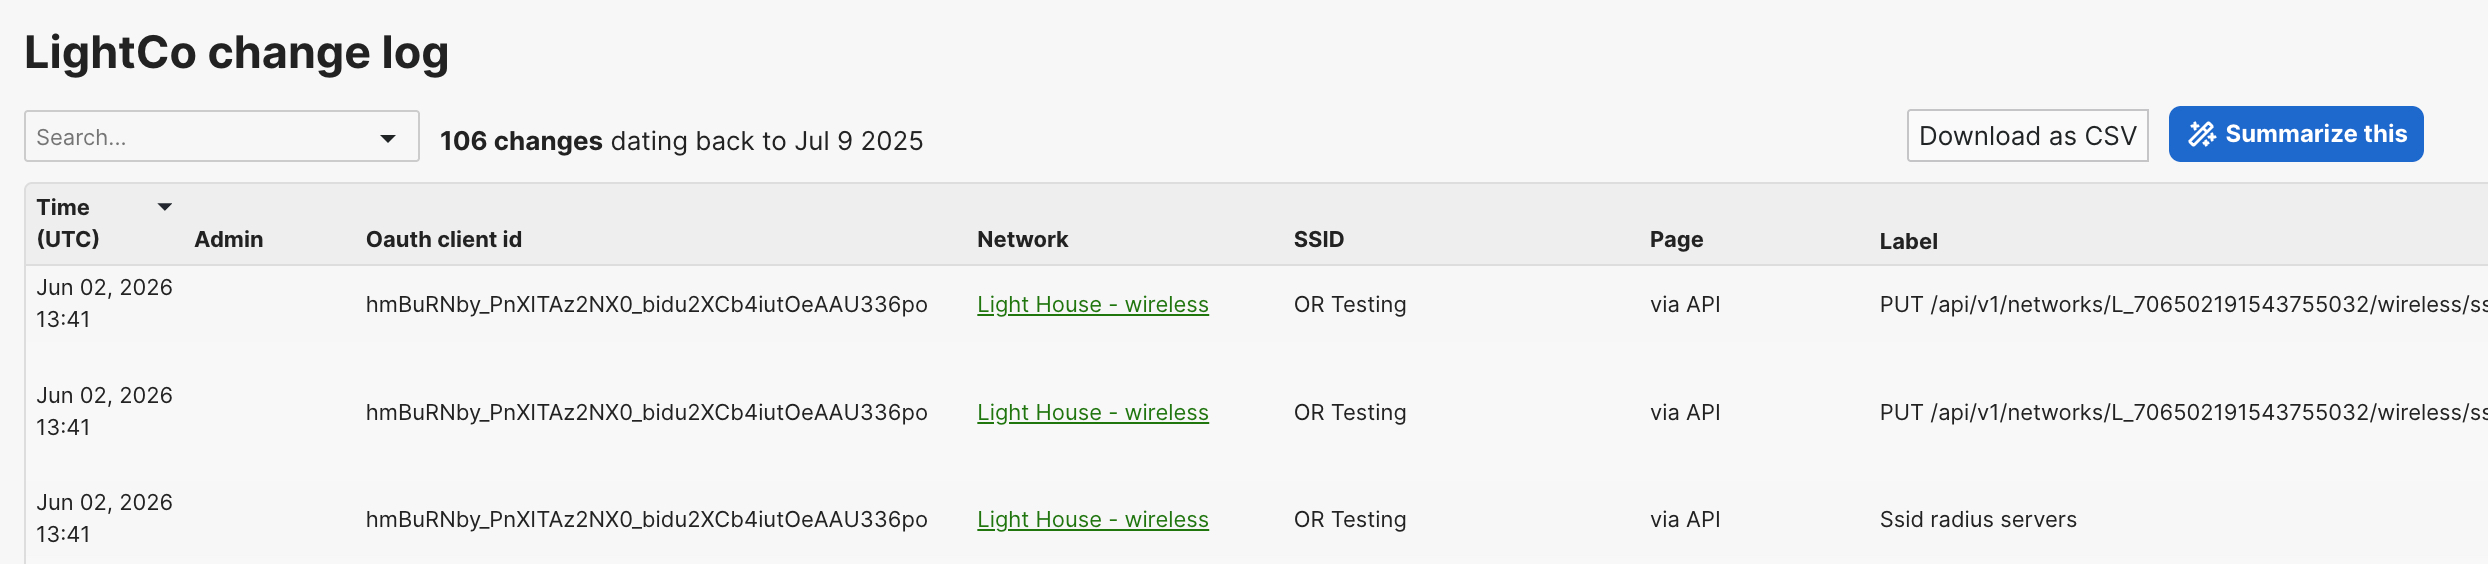
You can also validate the API calls were made from Space to Meraki to complete the activation in Organization > Monitor > Change Log
Test Your OpenRoaming Network
You can test your OpenRoaming network configuration through the following methods:
-
Cloud/Social: To use this method, download the OpenRoaming mobile app from the iOS App Store or Google Play Store to your mobile device.
-
Device Manufacturer: Use this method to test your OpenRoaming network natively on a Samsung or Google mobile device.
-
Other Methods: In addition to the above two methods, you can also test your OpenRoaming network using the following two options:
-
Carrier Offload: If you have set up a Carrier Offload solution, a mobile phone from the supported carrier will automatically get attached to your OpenRoaming network.
-
Cisco Spaces SDK: If you have integrated your brand’s mobile app with Cisco Spaces SDK, a mobile phone with your mobile app will automatically get attached to your OpenRoaming network.
For more information about Cisco Spaces SDK, see Knowledge Article: https://runbooks.ciscospaces.io/docs/openroaming-cisco-spaces-sdk-integration & Developer Docs: https://developer.cisco.com/docs/dna-spaces-sdk/ . Log in using your Cisco credentials, if prompted.
-
View OpenRoaming Reports
To view your OpenRoaming reports, click > Home.
The following reports are available in the OpenRoaming dashboard:
-
Unique Devices
-
Devices by IDP
-
Devices by Manufacturer
-
Data Usage
-
Average Visit Duration
-
Data Consumed per User
-
Connections per Day
-
Connections per Hour
APPENDIX
Carrier Offload Providers
OpenRoaming enables seamless, secure, and automatic Wi-Fi connectivity by linking access providers (such as venues and enterprises) with trusted identity providers (such as carriers and cloud services). Carrier Offload further simplifies guest Wi-Fi onboarding, increases Wi-Fi attach rates, and supports traffic offload from cellular to Wi-Fi networks, while providing actionable insights through Cisco Spaces to improve customer engagement and business outcomes.
This section offers the process to follow to integrate various Carrier Offload Providers.
AT&T
Carrier Offload with AT&T Auto-Attach
The AT&T Auto-Attach Partner App in Cisco Spaces allows businesses to offer Carrier Offload services to AT&T mobile network customers. By leveraging Cisco Spaces' existing relationship with one of the world’s largest cellular providers, businesses can seamlessly connect AT&T devices onto their wireless network – providing seamless & easy to use connectivity, replacing/supplementing DAS systems & eliminating dead zones.
The two primary functions of the AT&T Partner App are:
-
It automates the "handshake" between the access network (customer) and AT&T to setup the agreement to offload AT&T users.
-
It facilitates automation of SLA/network health related telemetry to AT&T via Spaces Meta API to provide a view of the quality of experience of their users on the access network
Once the Open Roaming app is enabled and the steps to configure are completed, follow the next steps to deploy AT&T Auto-Attach application for carrier offload.
Step 1: Setup AT&T Auto-Attach Application
-
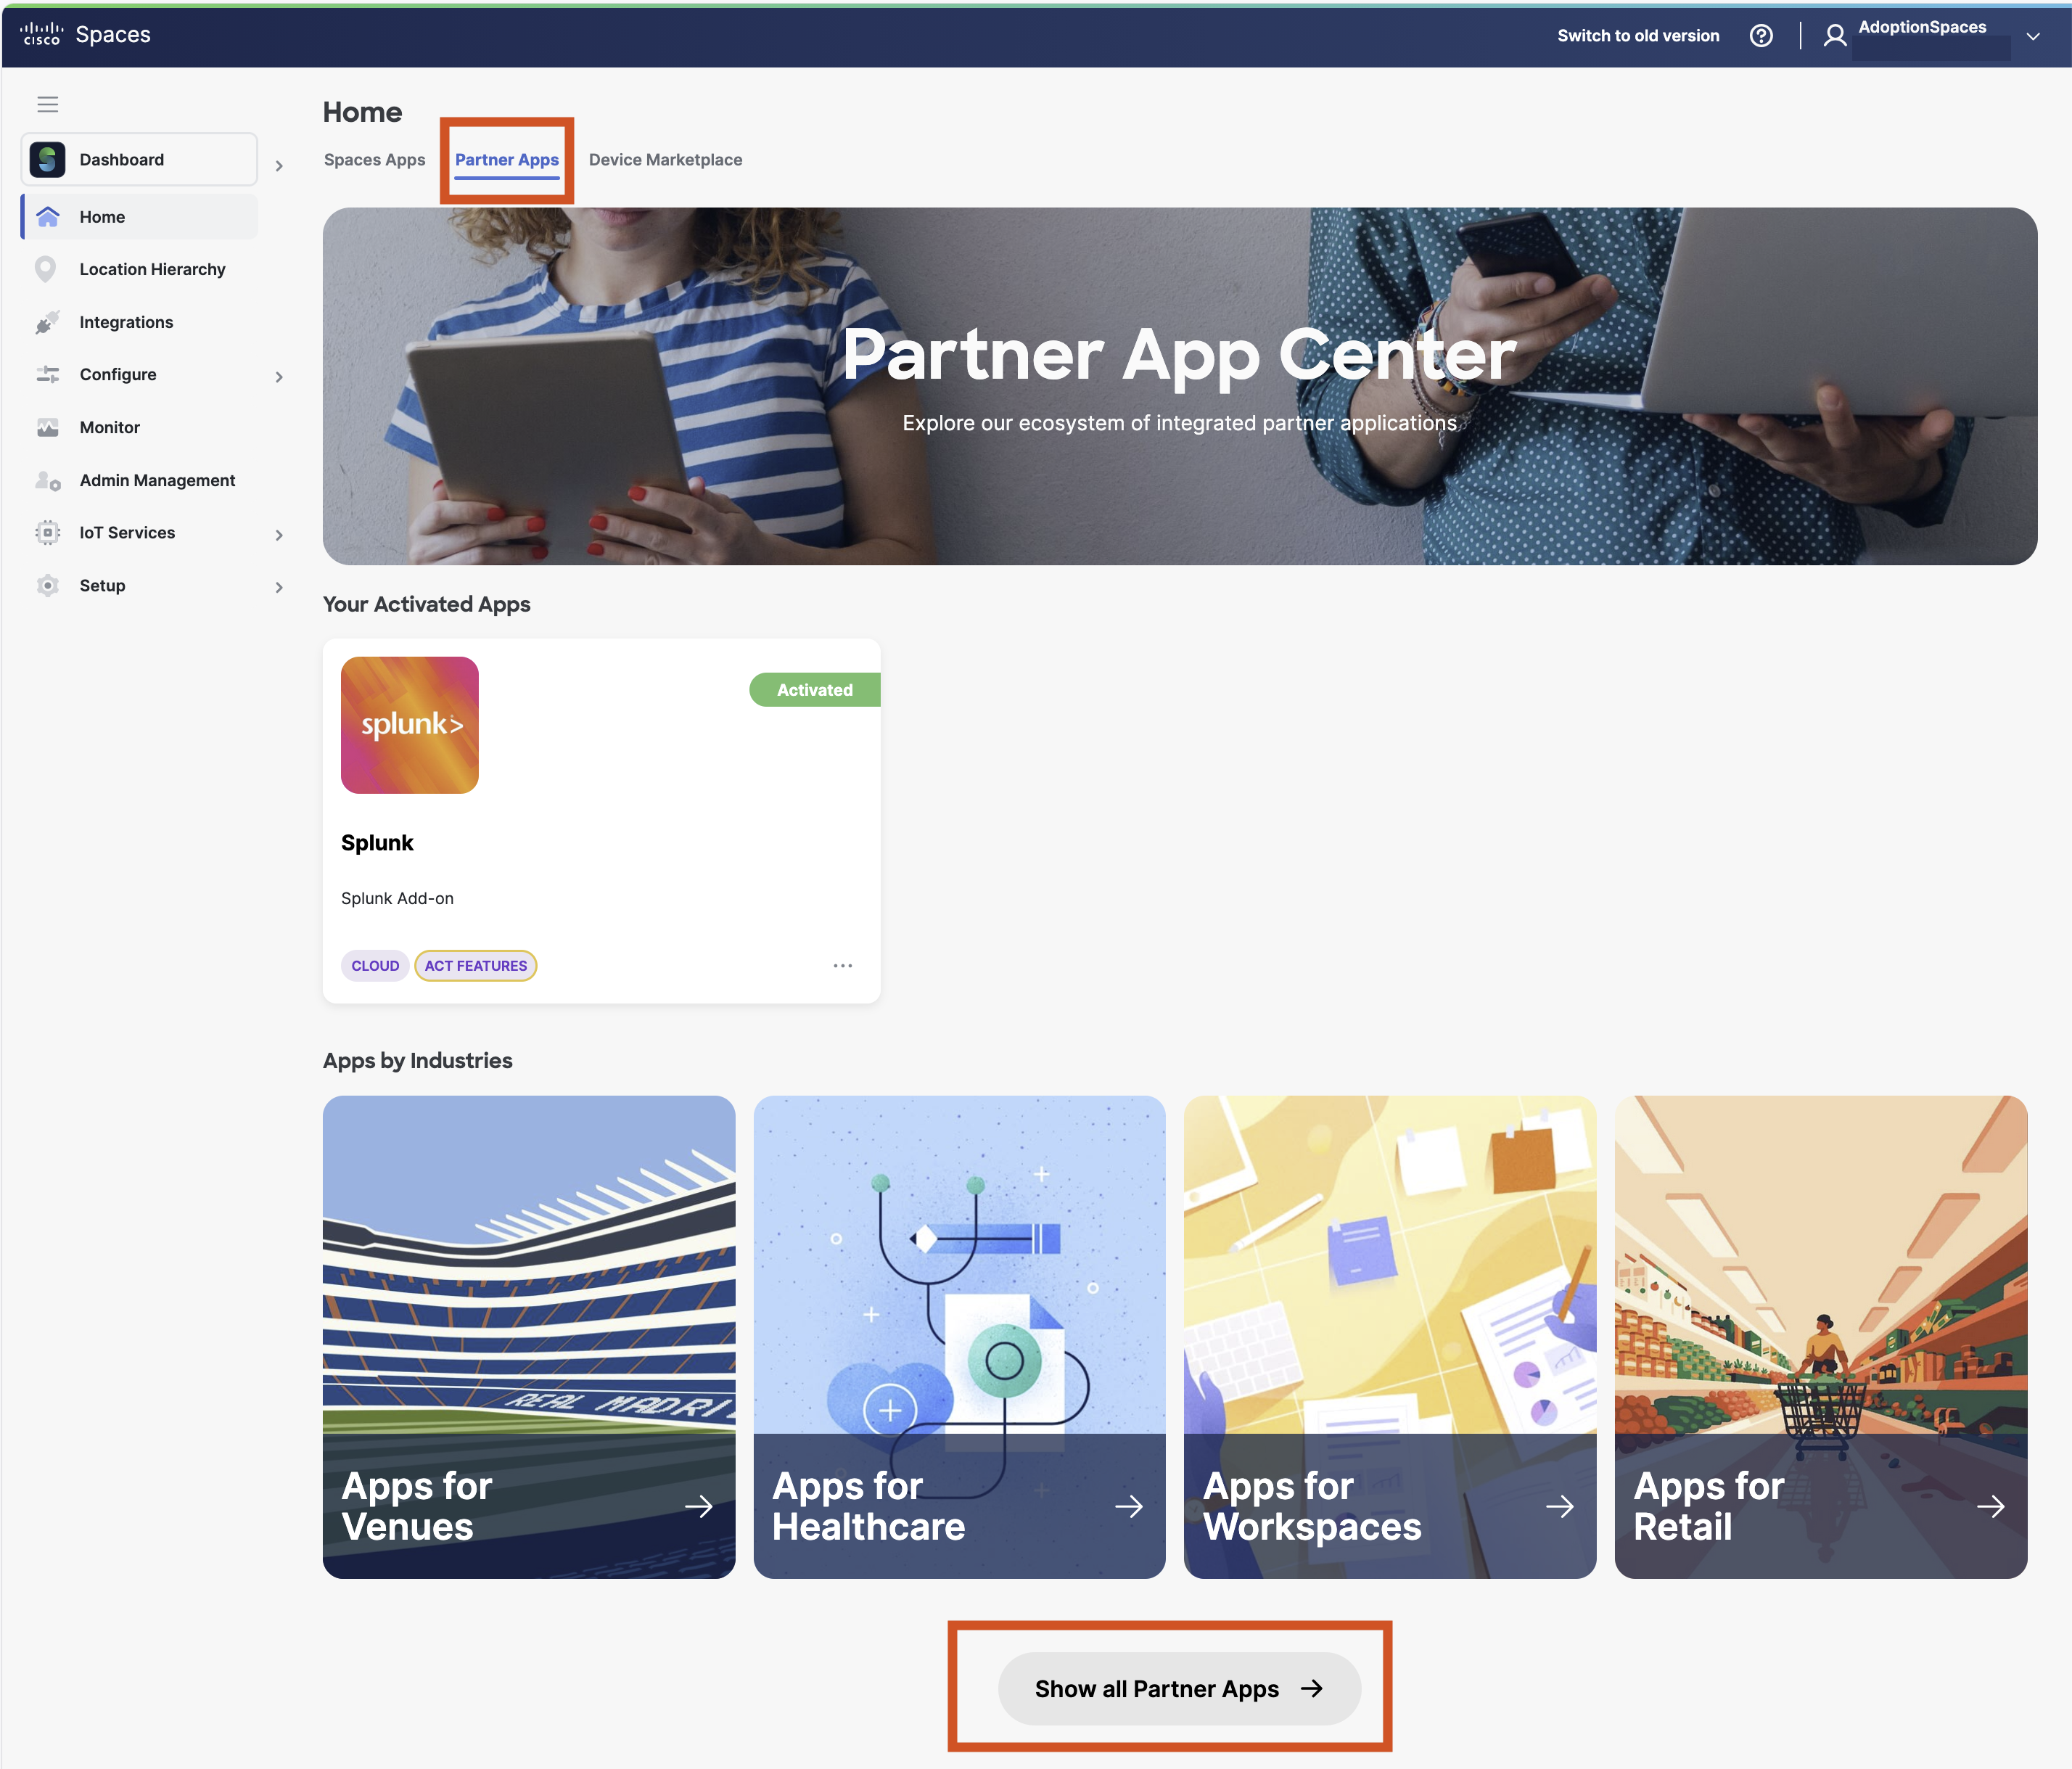
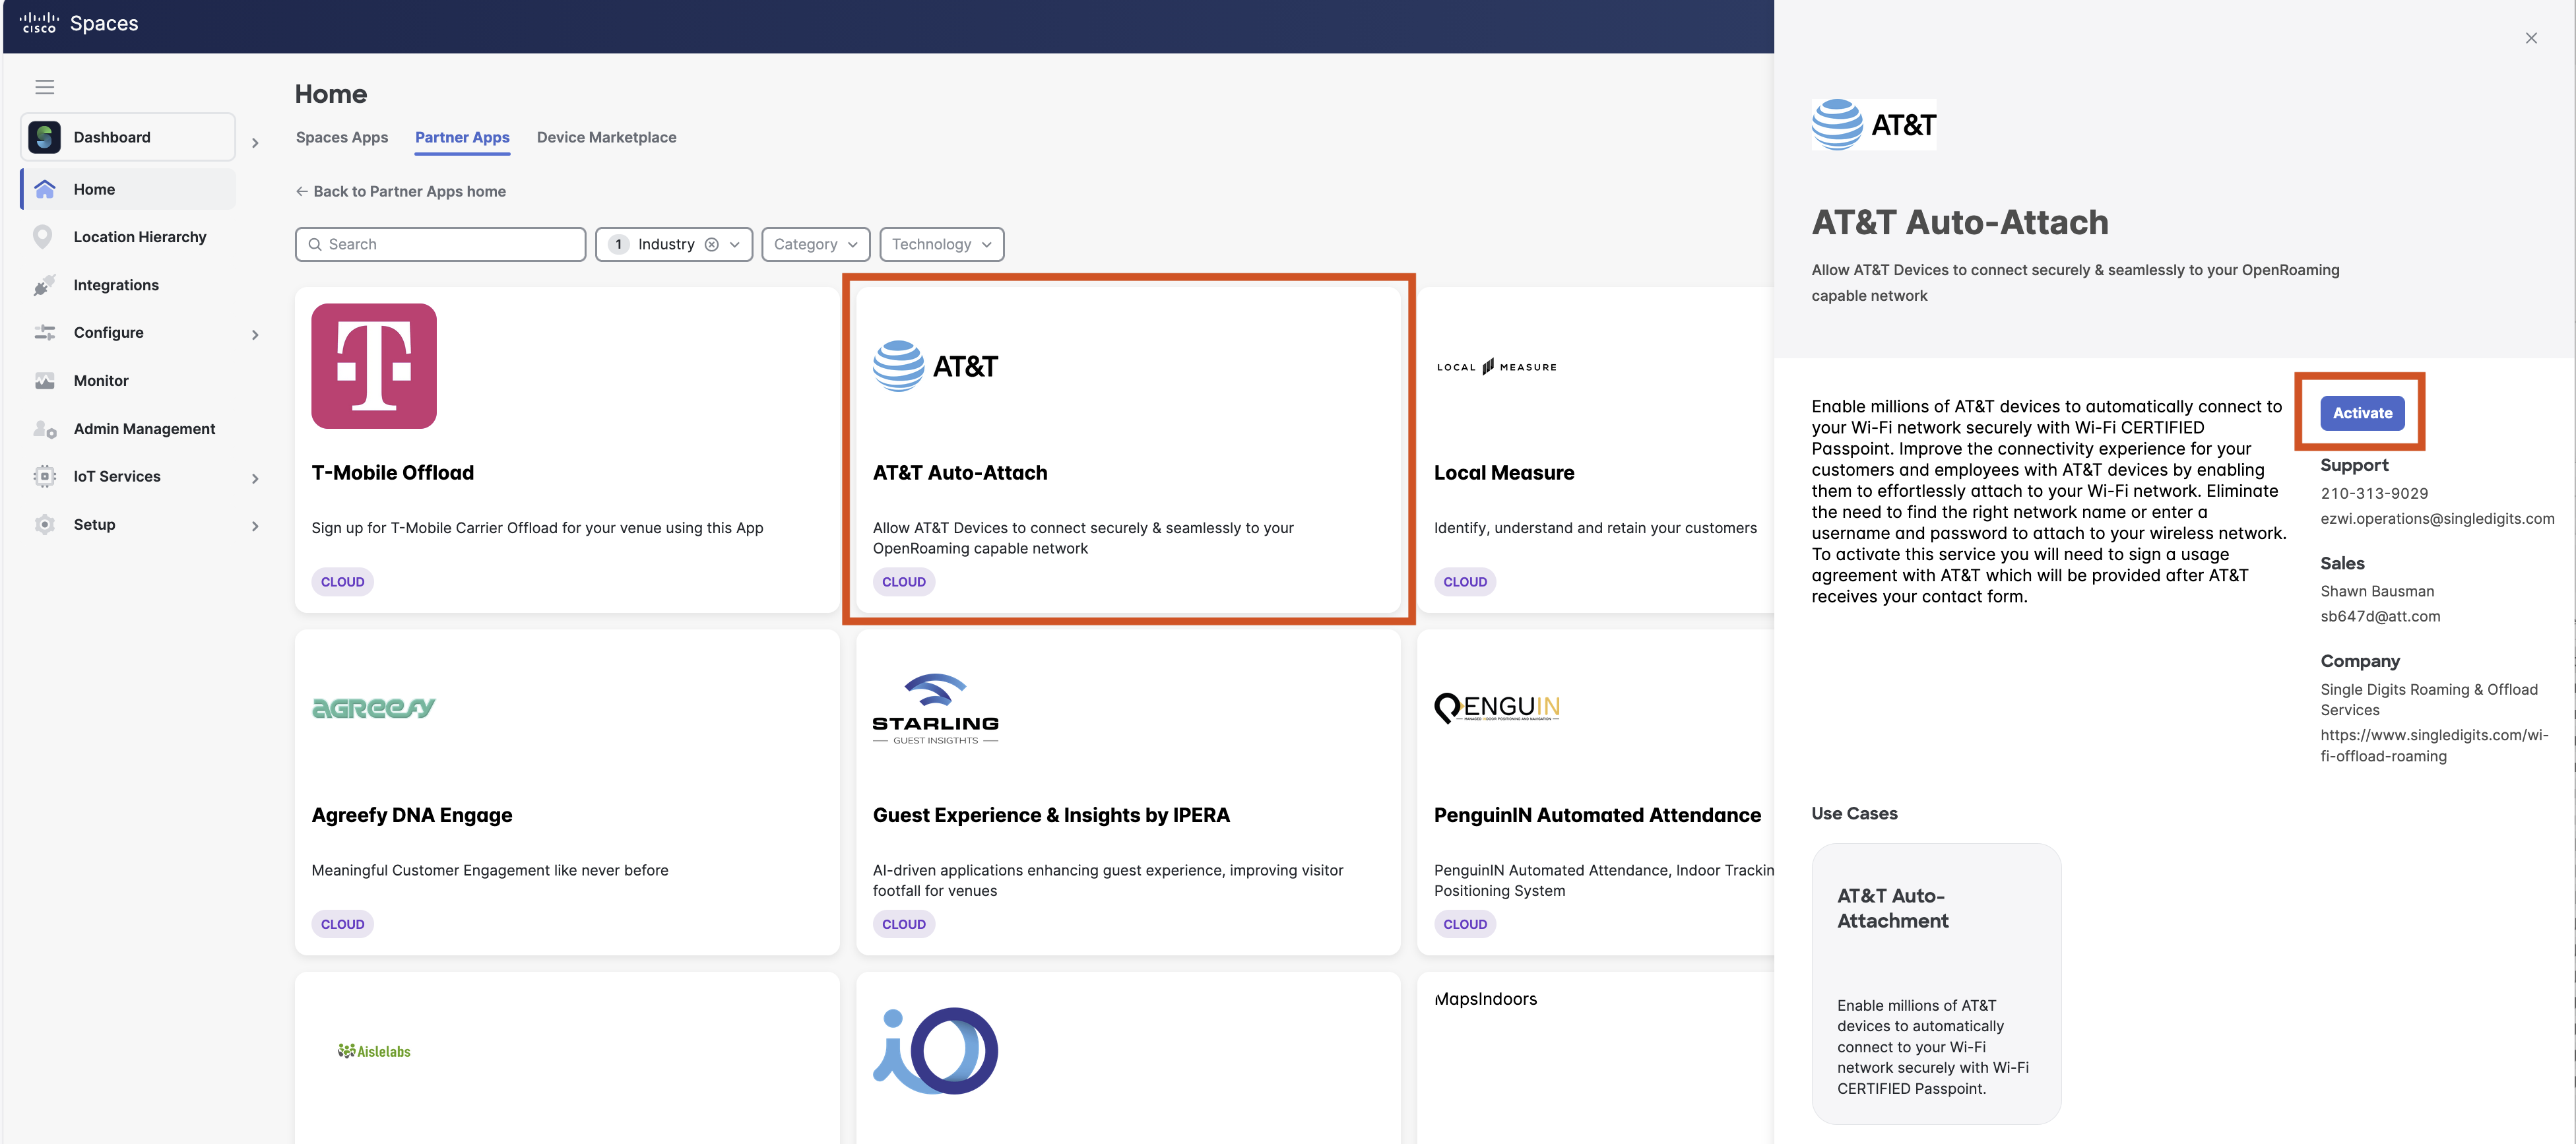
In Cisco Spaces, navigate to the Partner Apps tab on top. Then click Show all Partner Apps
-
Select AT&T Auto-Attach and then click Activate on the screen loaded.
-
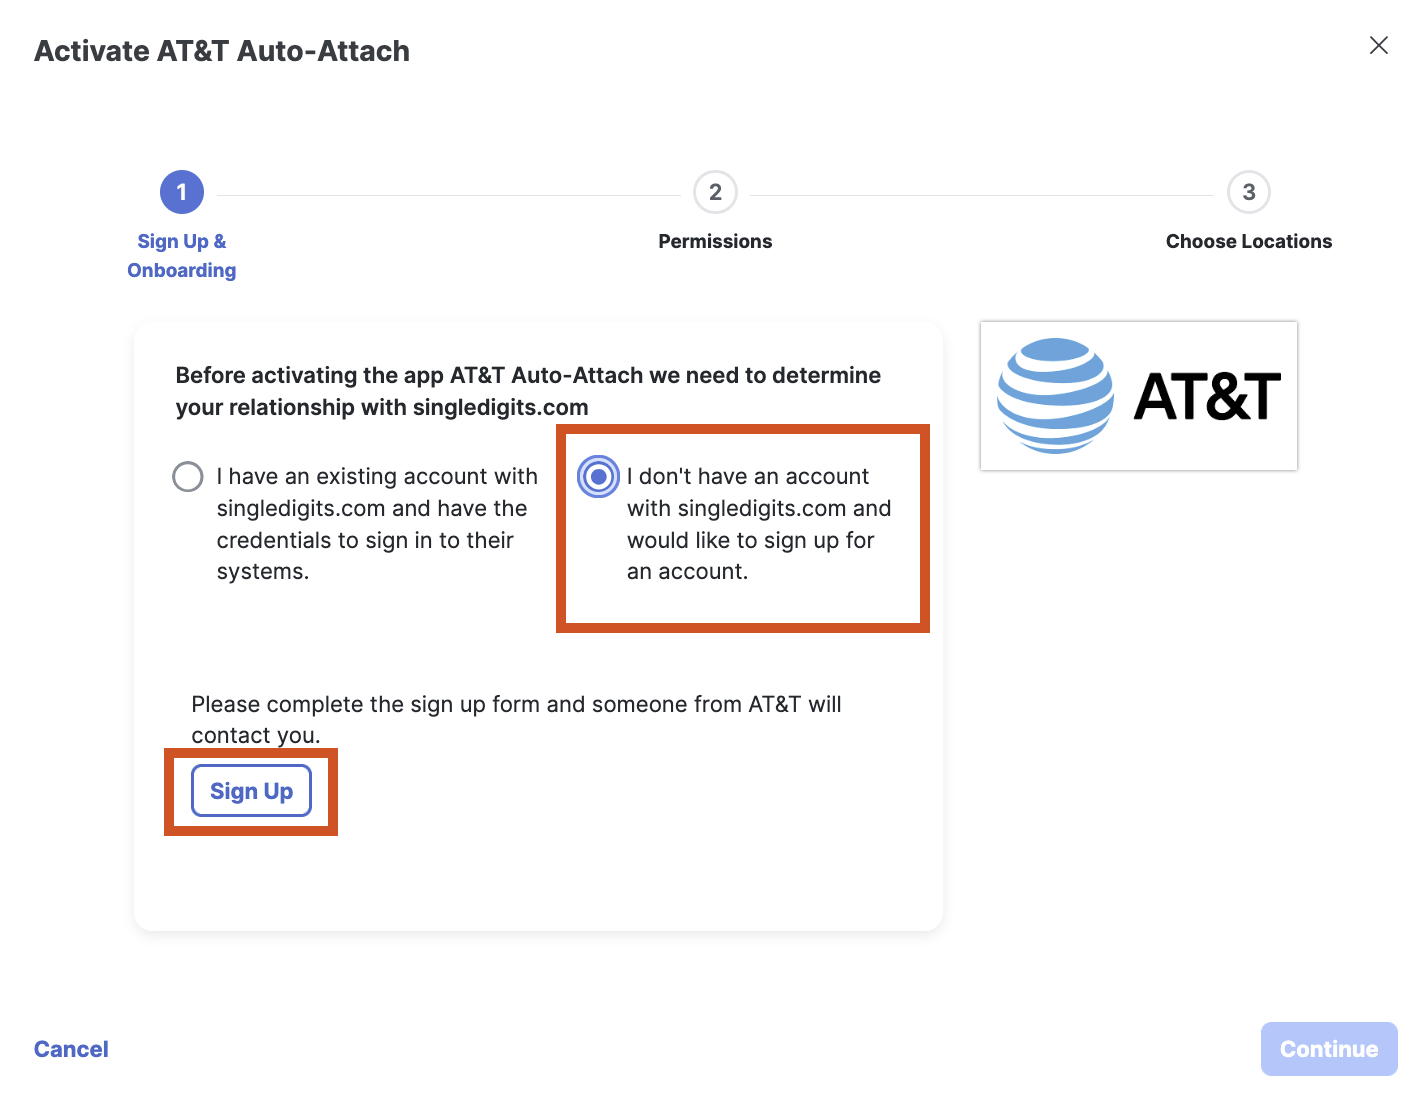
A pop-up window is displayed, asking you to accept the Terms & Conditions. This is followed by a prompt that allows you to choose an option to either use an existing account or create a new one. Select the 2nd option to create a new account and Click on Sign Up.
-
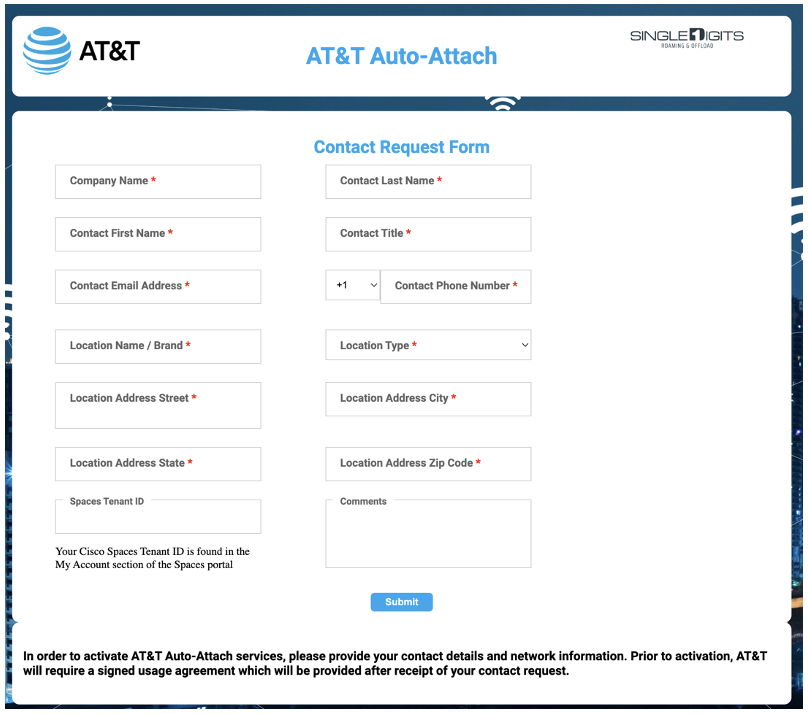
A Contact Request Form is displayed. Fill the form and Click Submit.
-
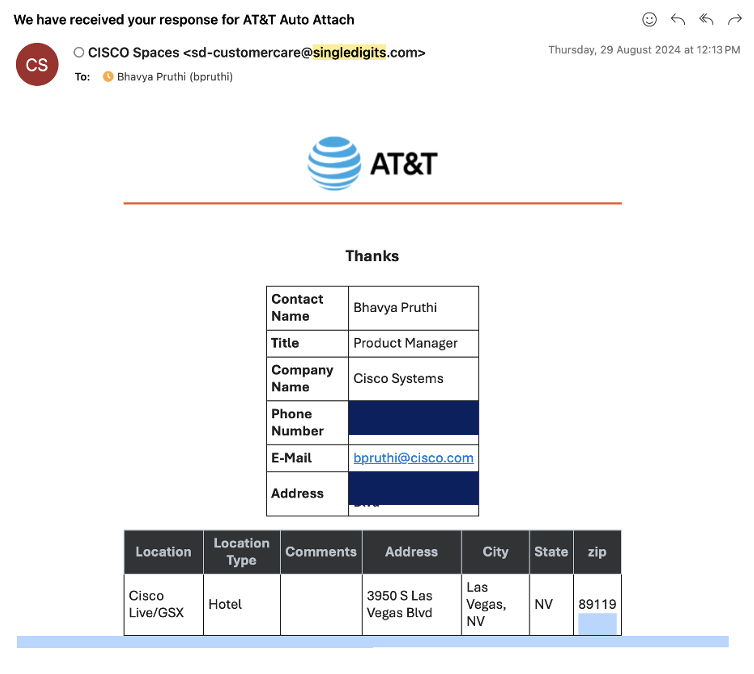
Once the form is filled, AT&T will contact you via email and setup a meeting to discuss location, location information and to sign their agreement. Essentially, AT&T wants to ensure that their customers will have a good experience when being offloaded to your wireless network.
-
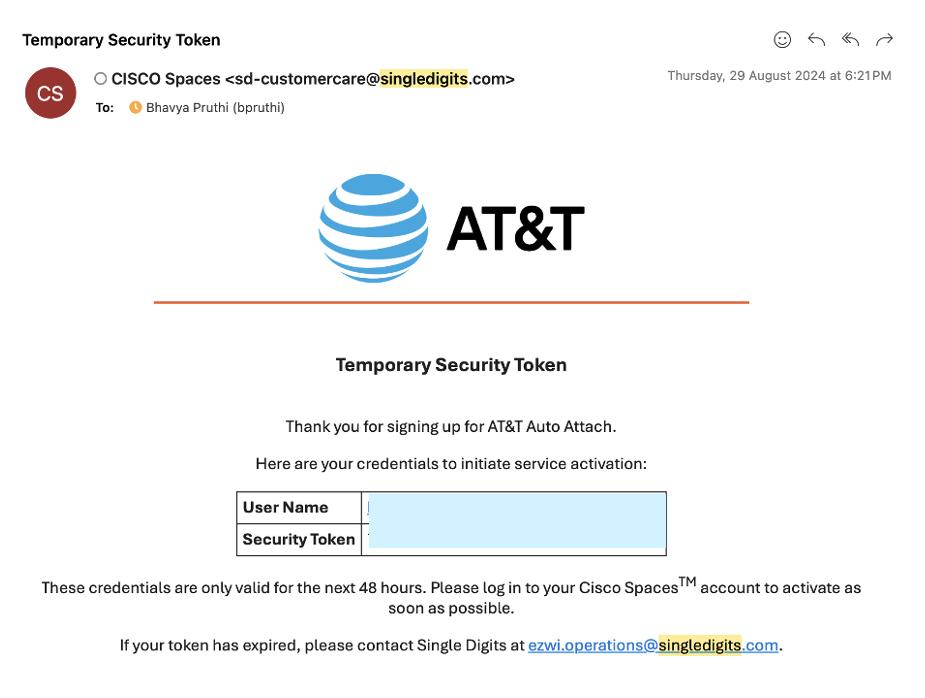
After this meeting, AT&T will provide you with a token which will be used for activating the application in the next steps.
Step 2: Activate AT&T Auto-Attach Application
-
Once the account is created, log in to your Cisco Spaces account
-
Navigate to the Partner Apps tab on top. Then click Show all Partner Apps
-
Select AT&T Auto-Attach and click Activate on the next screen.
-
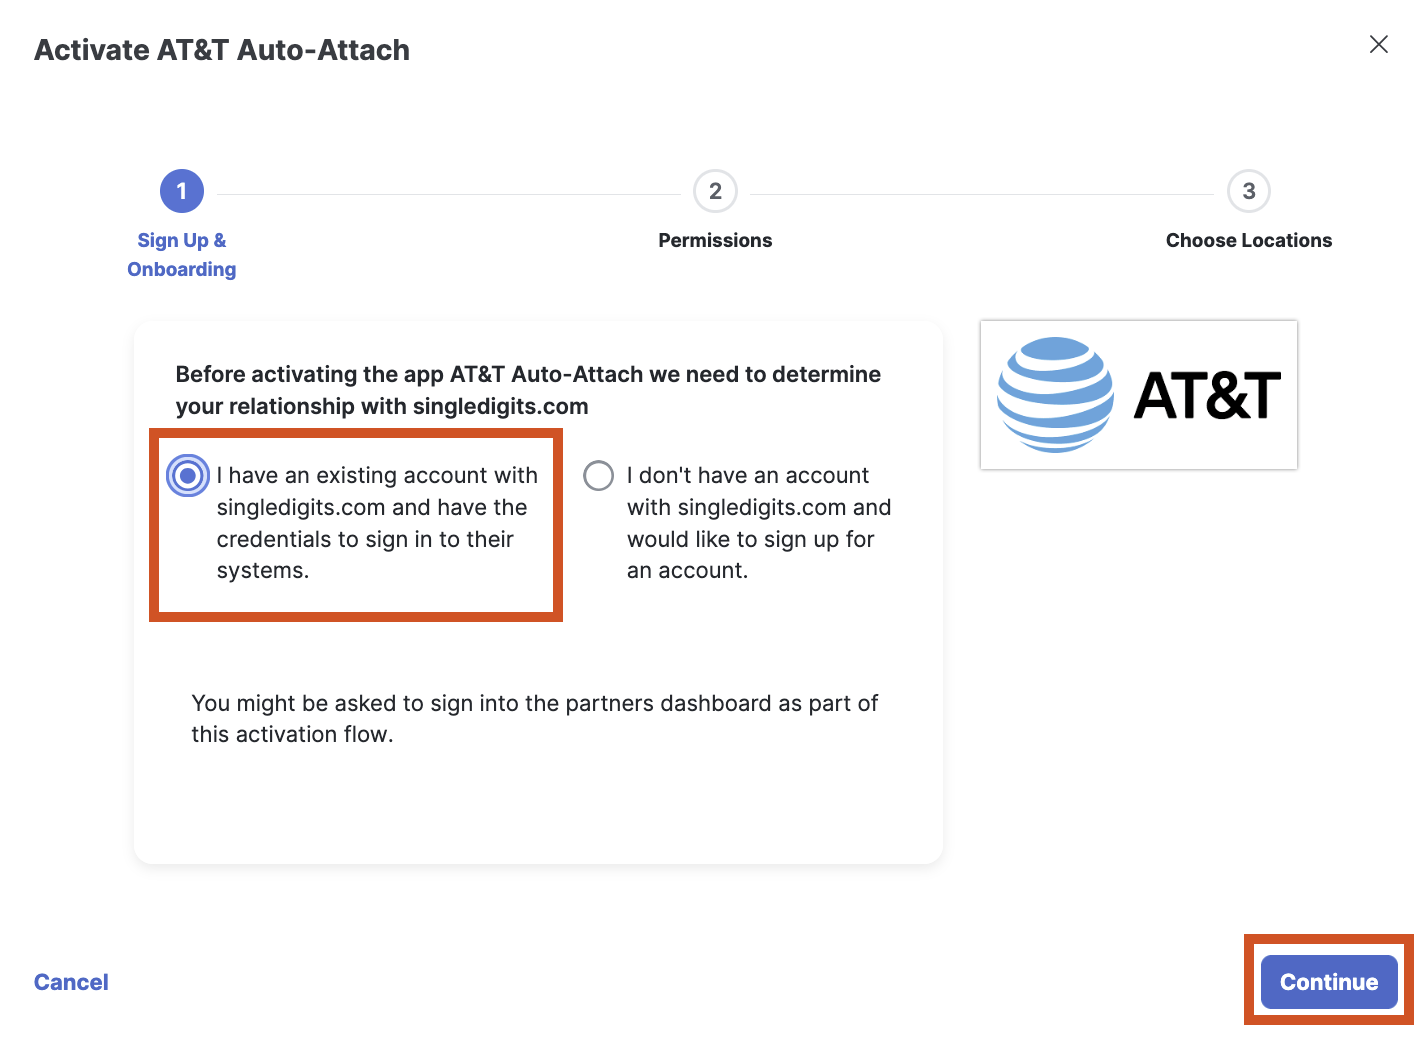
A pop-up window is displayed, choose option 1 stating you have an existing account and Click Continue
-
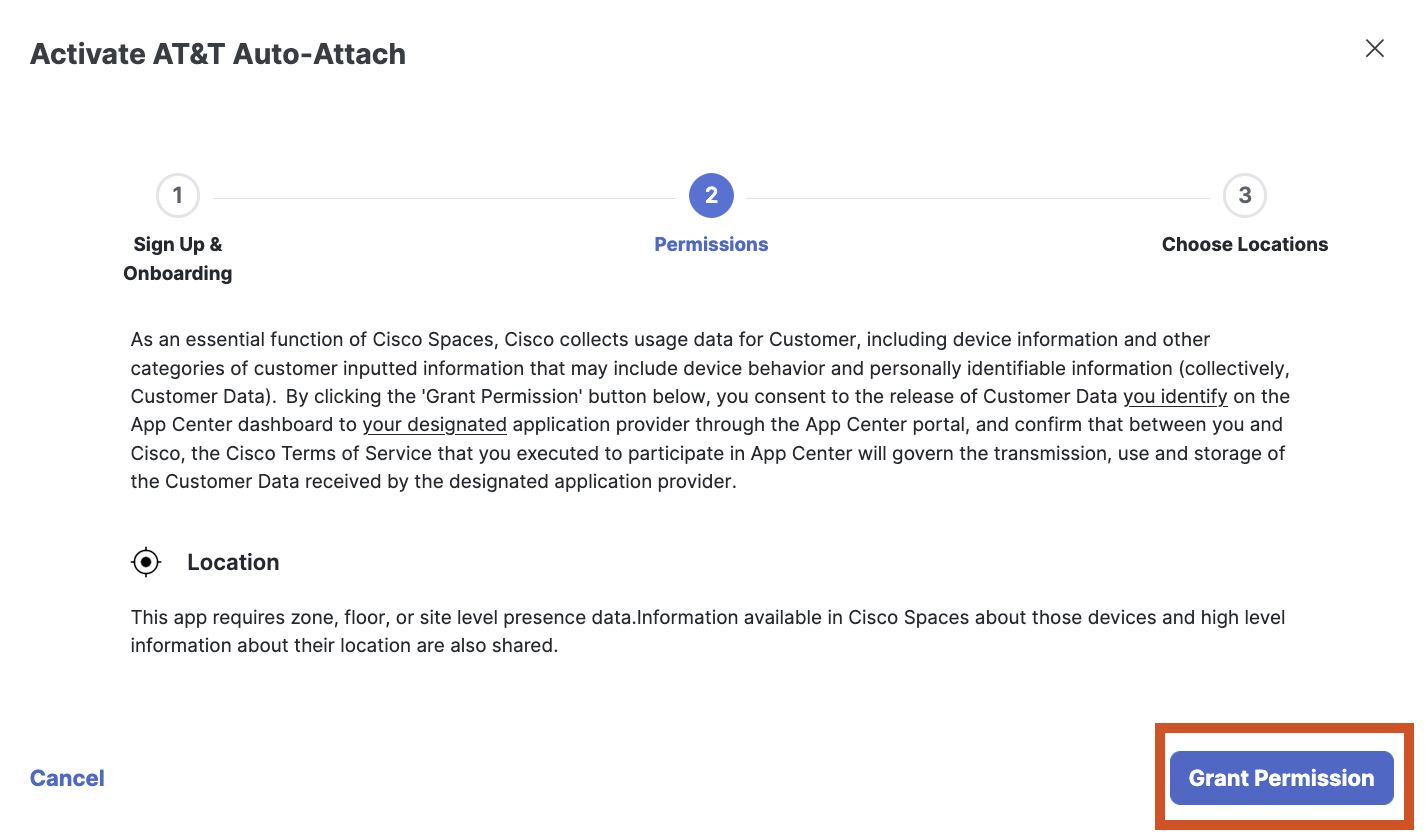
Click on Grant Permissions
-
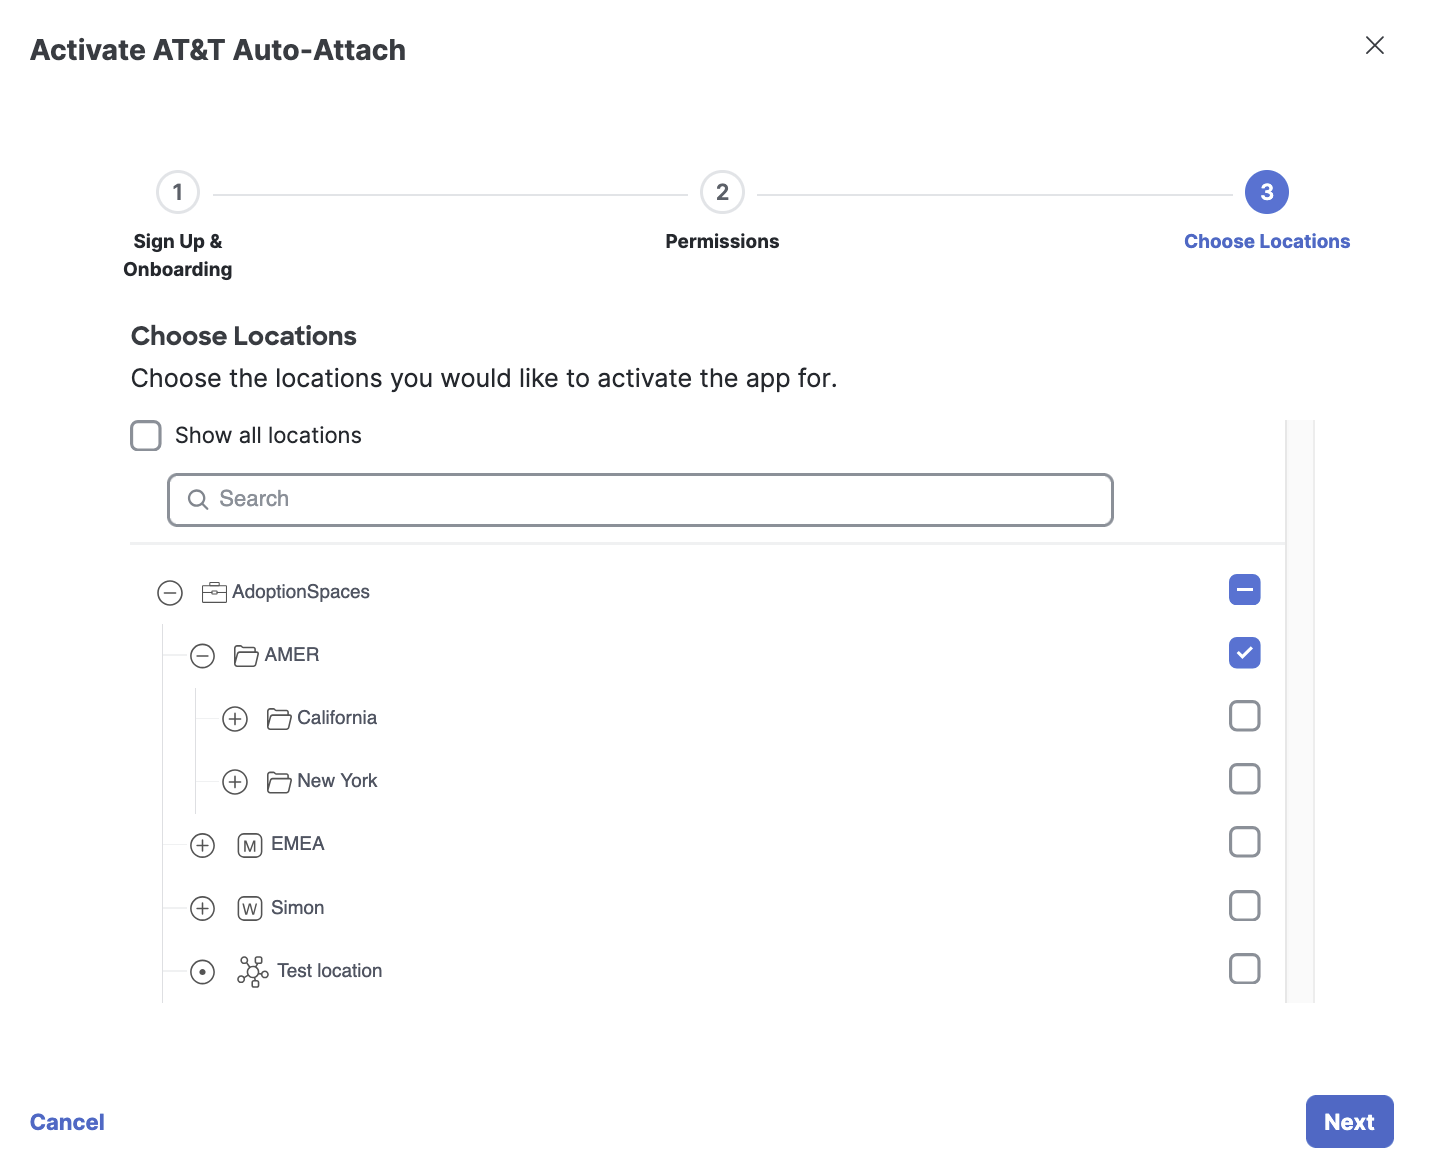
Next, we need to choose locations for which we want to enable AT&T Auto-Attach carrier offload. You can either check the box Enable for all locations or select specific locations from your location hierarchy and Click Next.
-
This opens the AT&T Auto-Attach portal. Enter the email under which the account is registered and click Continue.
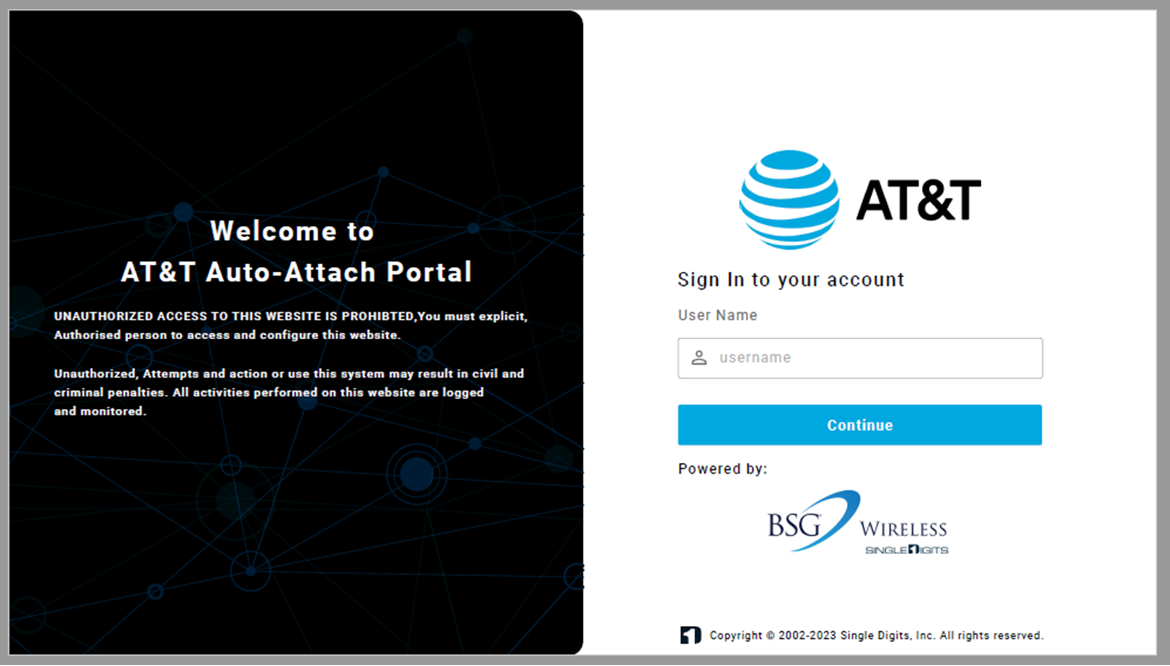
-
Enter the token sent by AT&T and Sign in
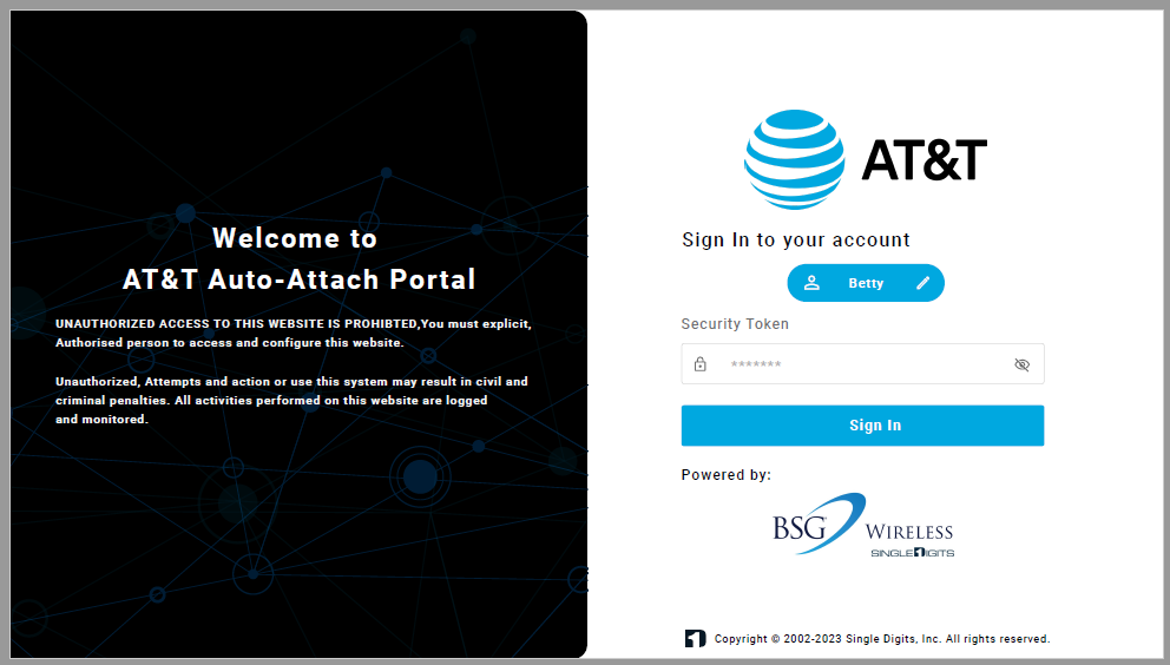
-
An email is sent from AT&T to confirm that the AT&T Auto-Attach application is live and you are offloading carrier traffic to your network.
T-Mobile
Carrier Offload with T-Mobile Auto-Attach
The T-Mobile Auto-Attach Partner App in Cisco Spaces allows businesses to offer Carrier Offload services to T-Mobile mobile network customers. By leveraging Cisco Spaces' existing relationship with one of the world’s largest cellular providers, businesses can seamlessly connect T-Mobile devices onto their wireless network – providing seamless & easy to use connectivity, replacing/supplementing DAS systems & eliminating dead zones.
The two primary functions of the T-Mobile Partner App are:
-
It automates the "handshake" between the access network (customer) and T-Mobile to setup the agreement to offload T-Mobile users.
-
It facilitates automation of SLA/network health related telemetry to T-Mobile via Spaces Meta API to provide a view of the quality of experience of their users on the access network
Once the Open Roaming app is enabled and the steps to configure are completed, follow the next steps to deploy T-Mobile Auto-Attach application for carrier offload.
Step 1: Setup T-Mobile Auto-Attach Application
-
In Cisco Spaces, navigate to the Partner Apps tab on top. Then click Show all Partner Apps
-
Select T-Mobile Offload and then click Activate on the screen loaded.
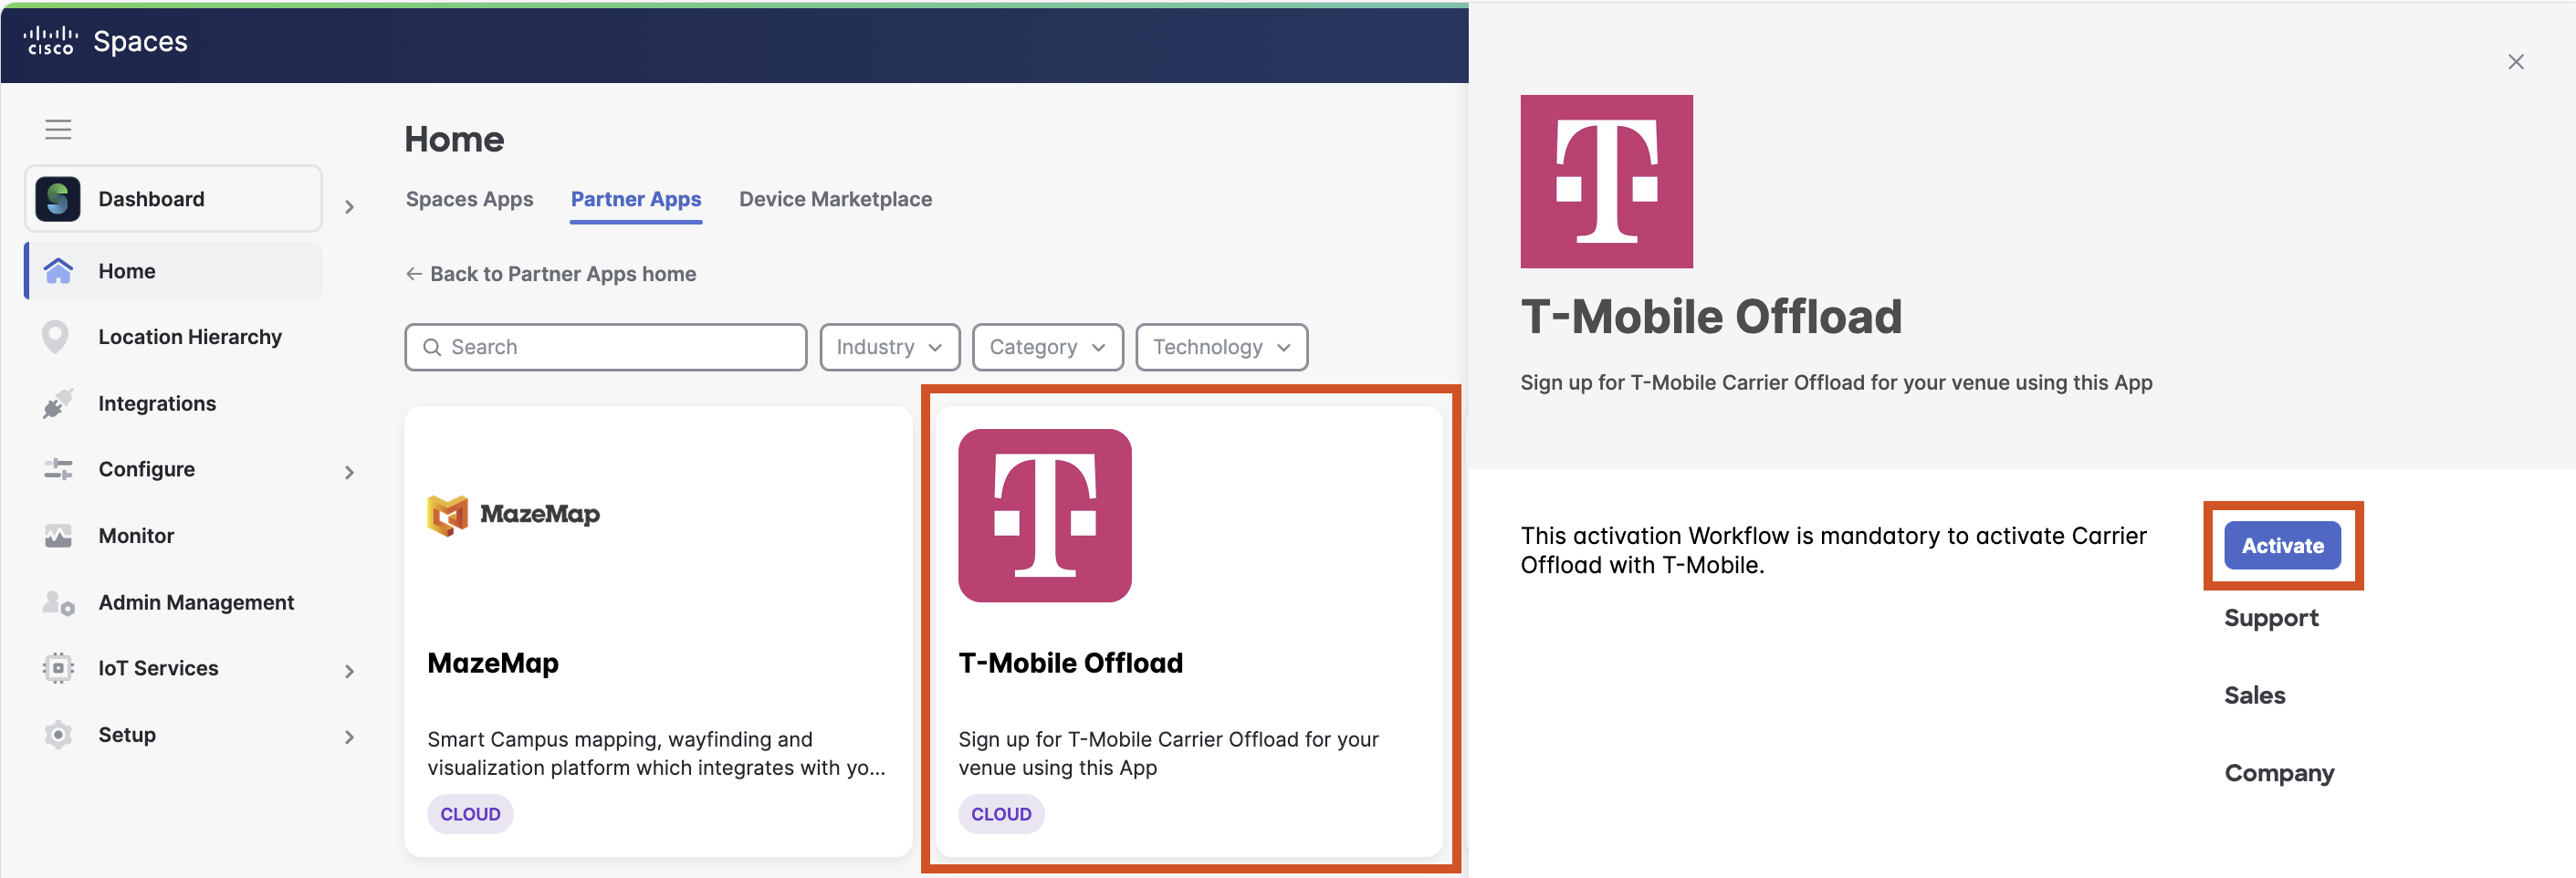
-
A pop-up window is displayed, asking you to accept the Terms & Conditions. This is followed by a prompt that allows you to choose an option to either use an existing account or create a new one. Select the 2nd option to create a new account and Click on Sign Up.
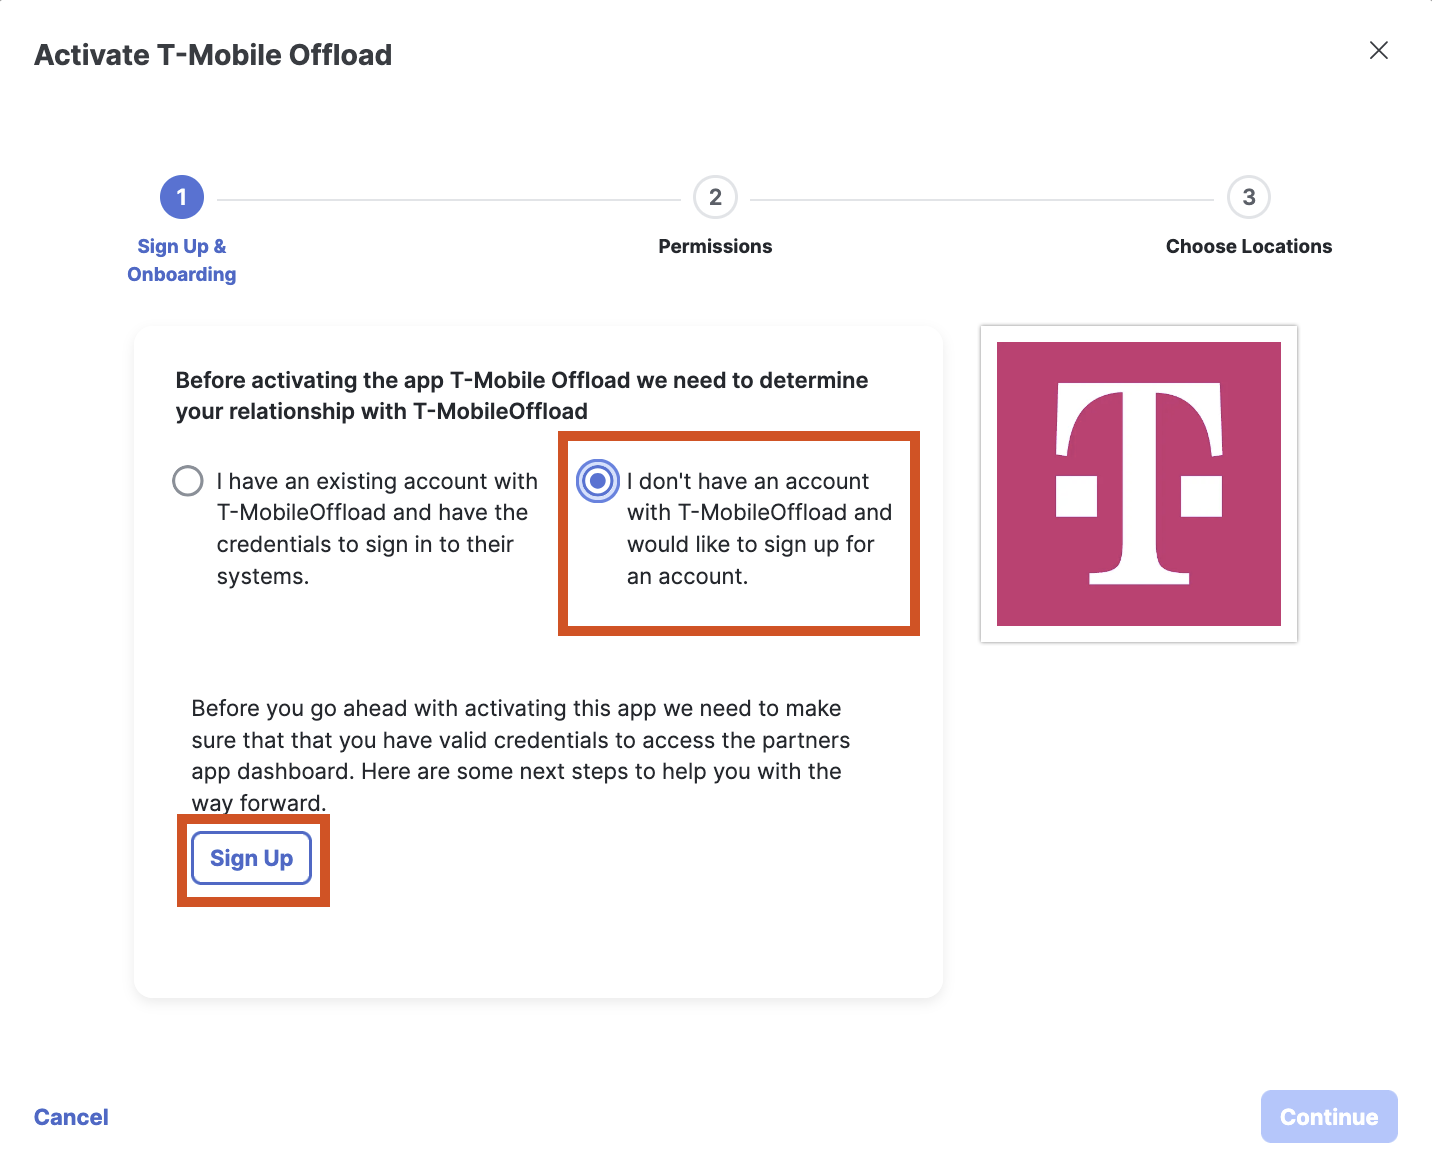
-
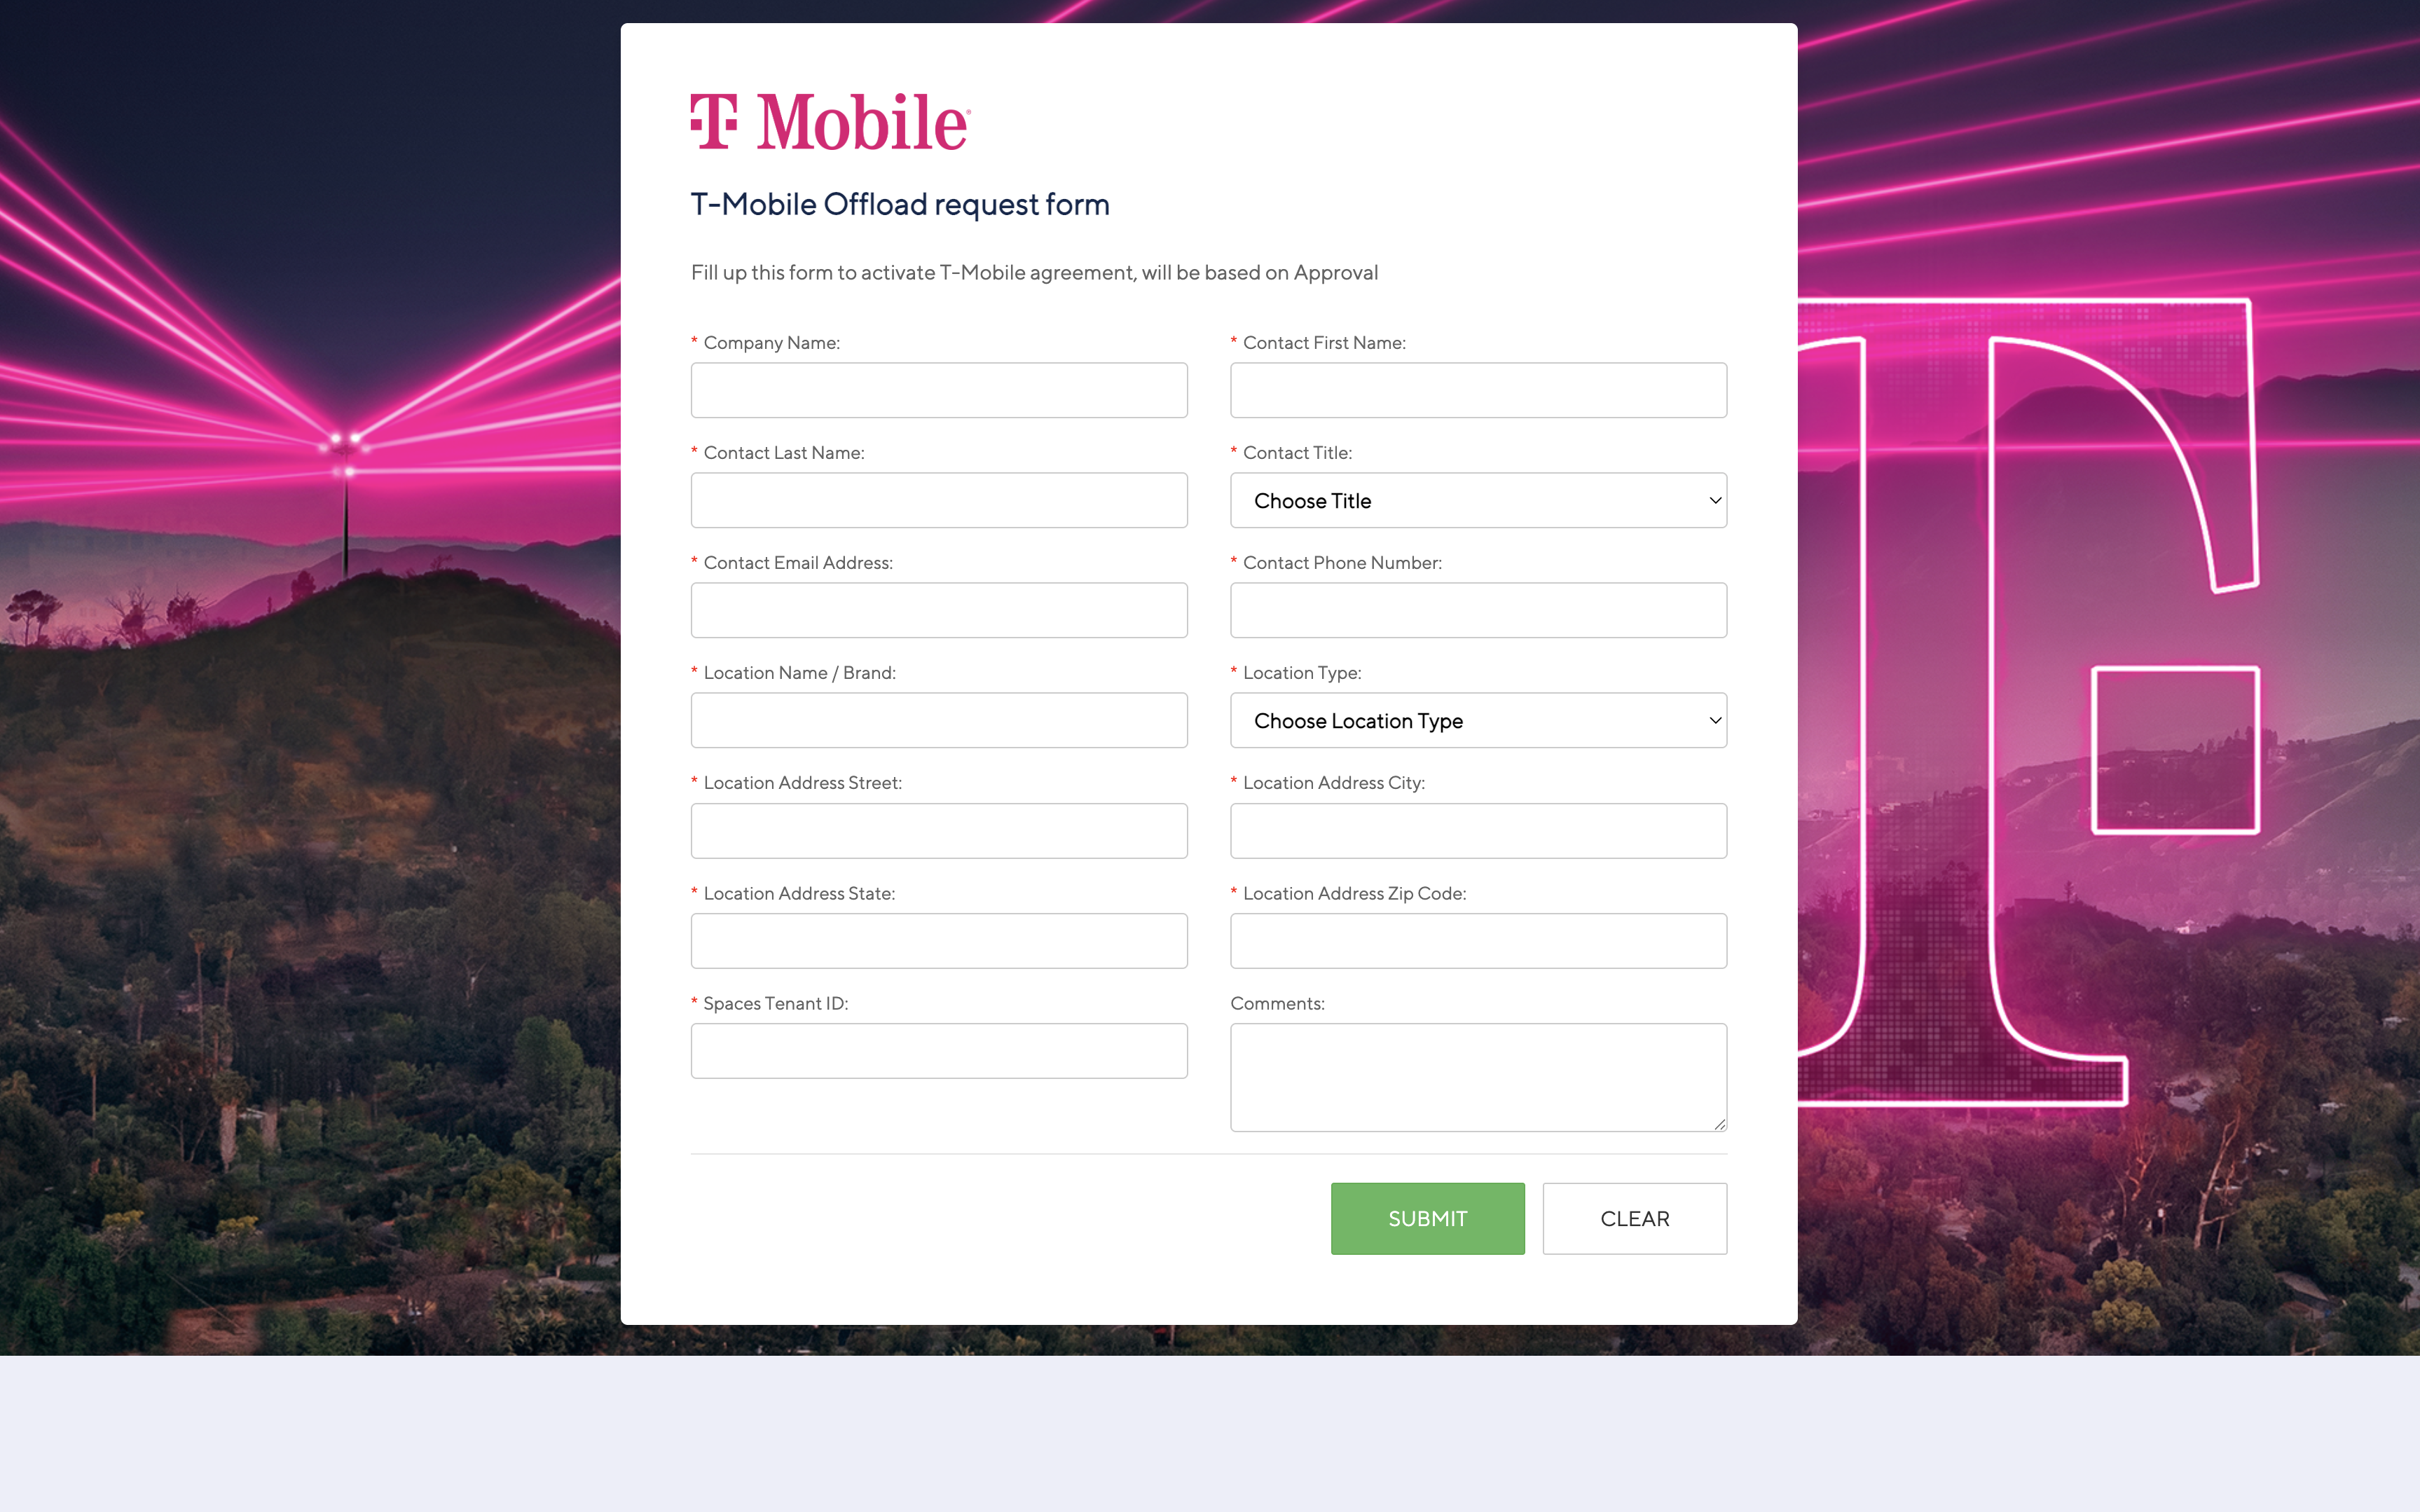
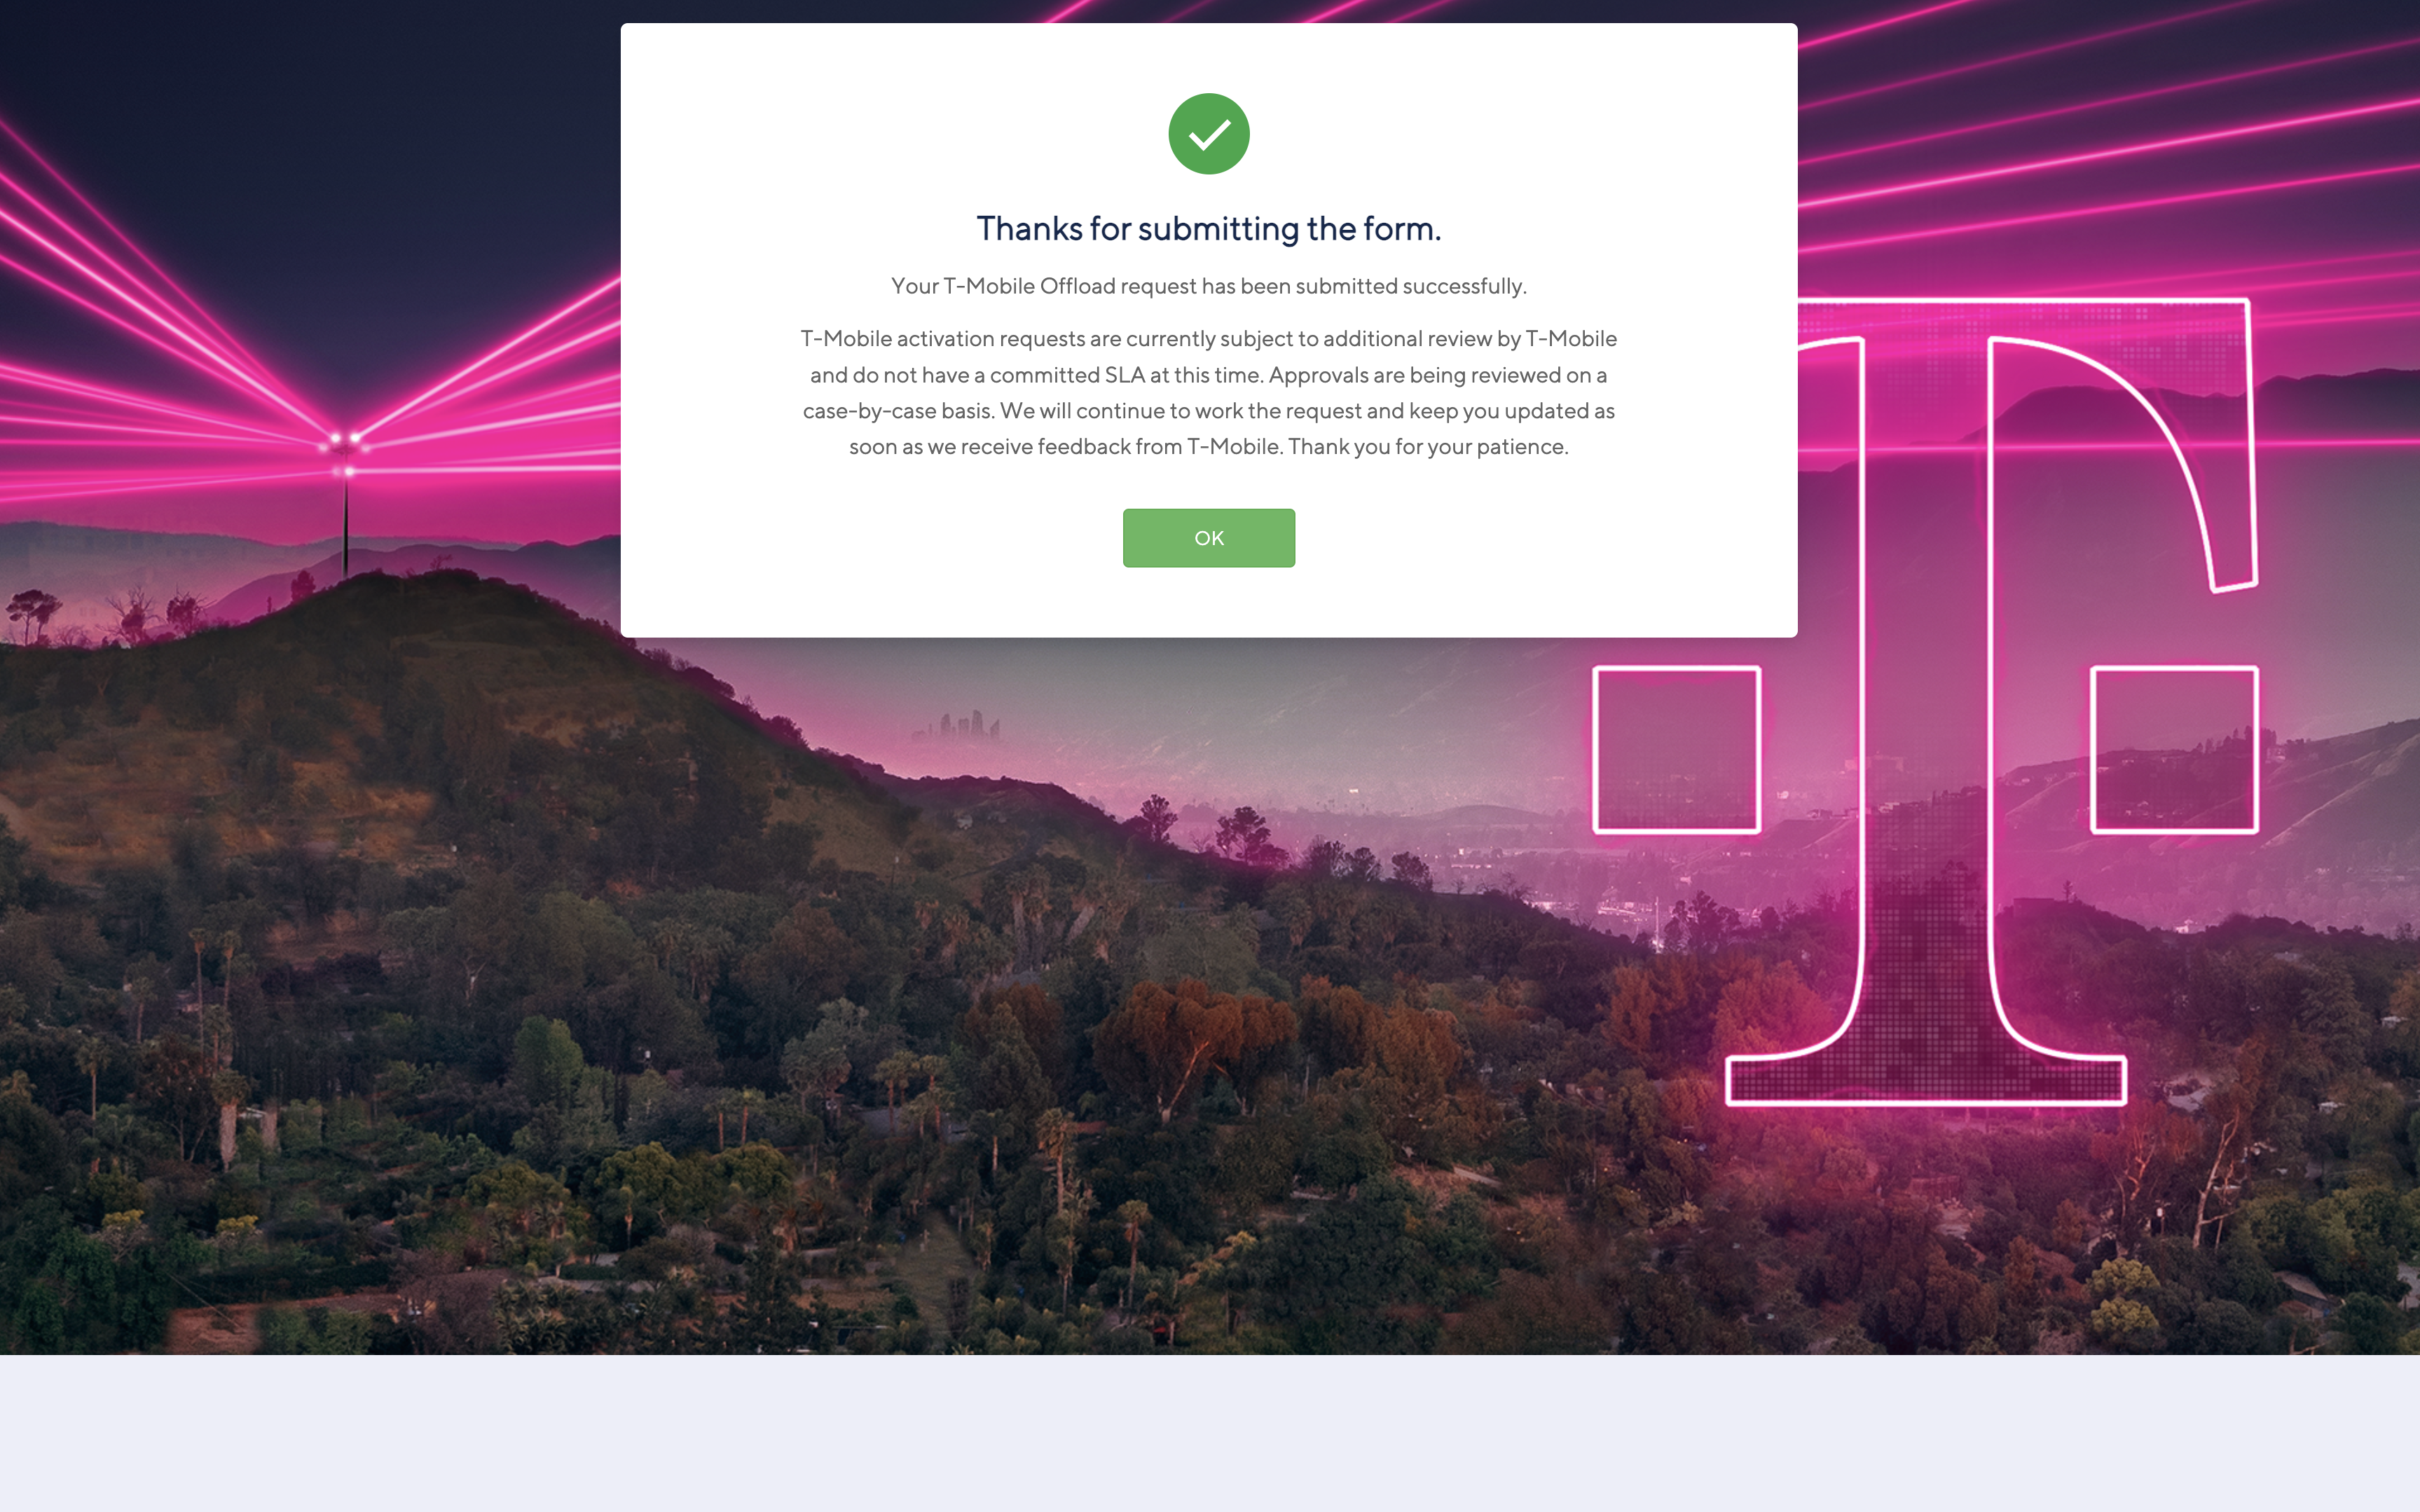
A Contact Request Form is displayed. Fill the form and Click Submit.
-
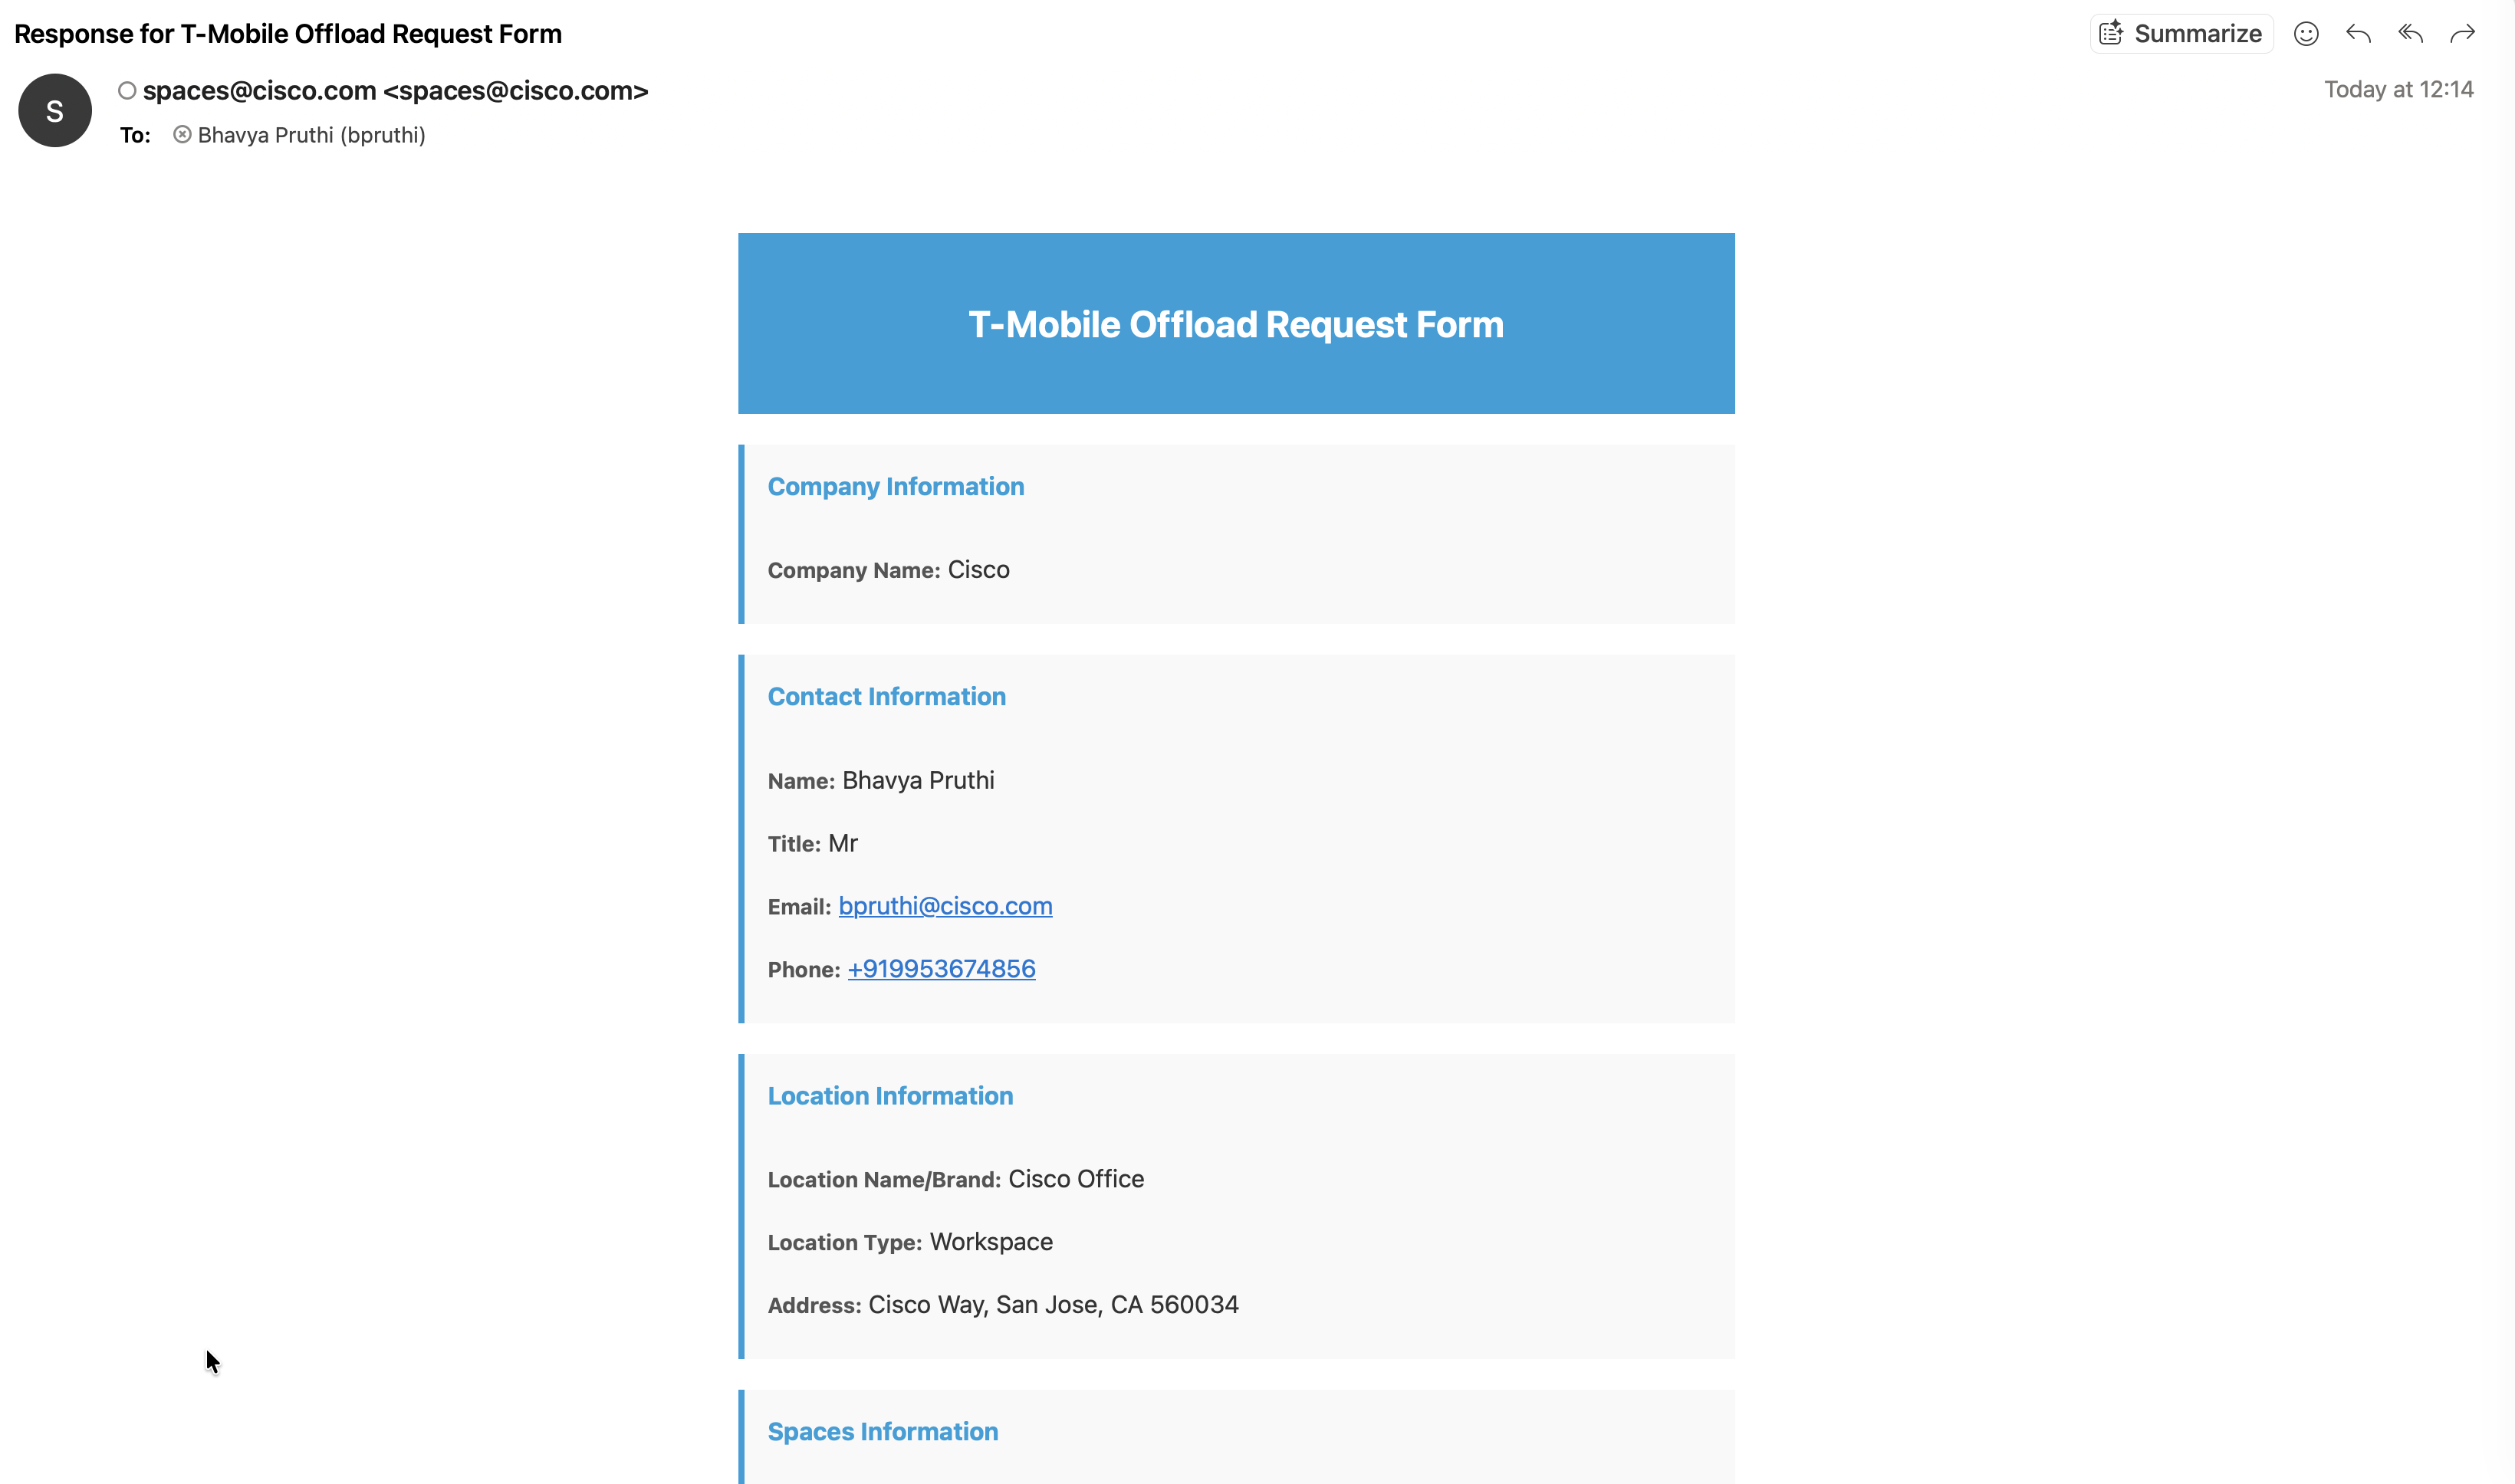
Once the form is filled, T-Mobile will contact you via email and setup a meeting to discuss location, location information and to sign their agreement. Essentially, T-Mobile wants to ensure that their customers will have a good experience when being offloaded to your wireless network.
-
After this meeting, T-Mobile will provide you with a token which will be used for activating the application in the next steps.
Step 2: Activate T-Mobile Auto-Attach Application
-
Once the account is created, log in to your Cisco Spaces account
-
Navigate to the Partner Apps tab on top. Then click Show all Partner Apps
-
Select T-Mobile Auto-Attach and click Activate on the next screen.
-
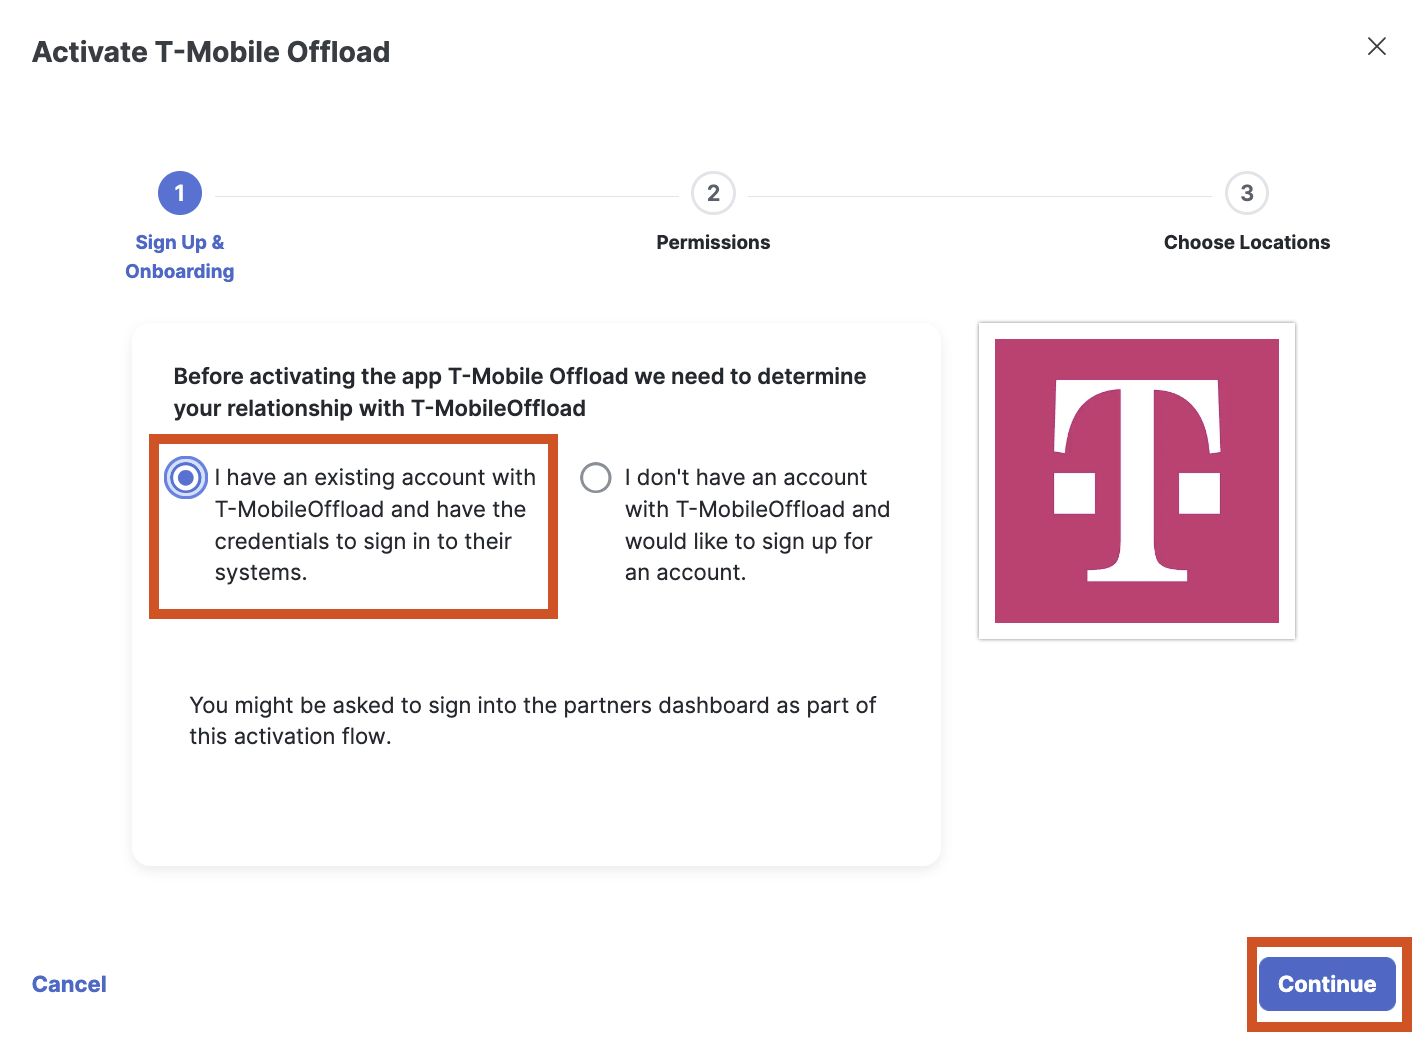
A pop-up window is displayed, choose option 1 stating you have an existing account and Click Continue
-
Click on Grant Permissions
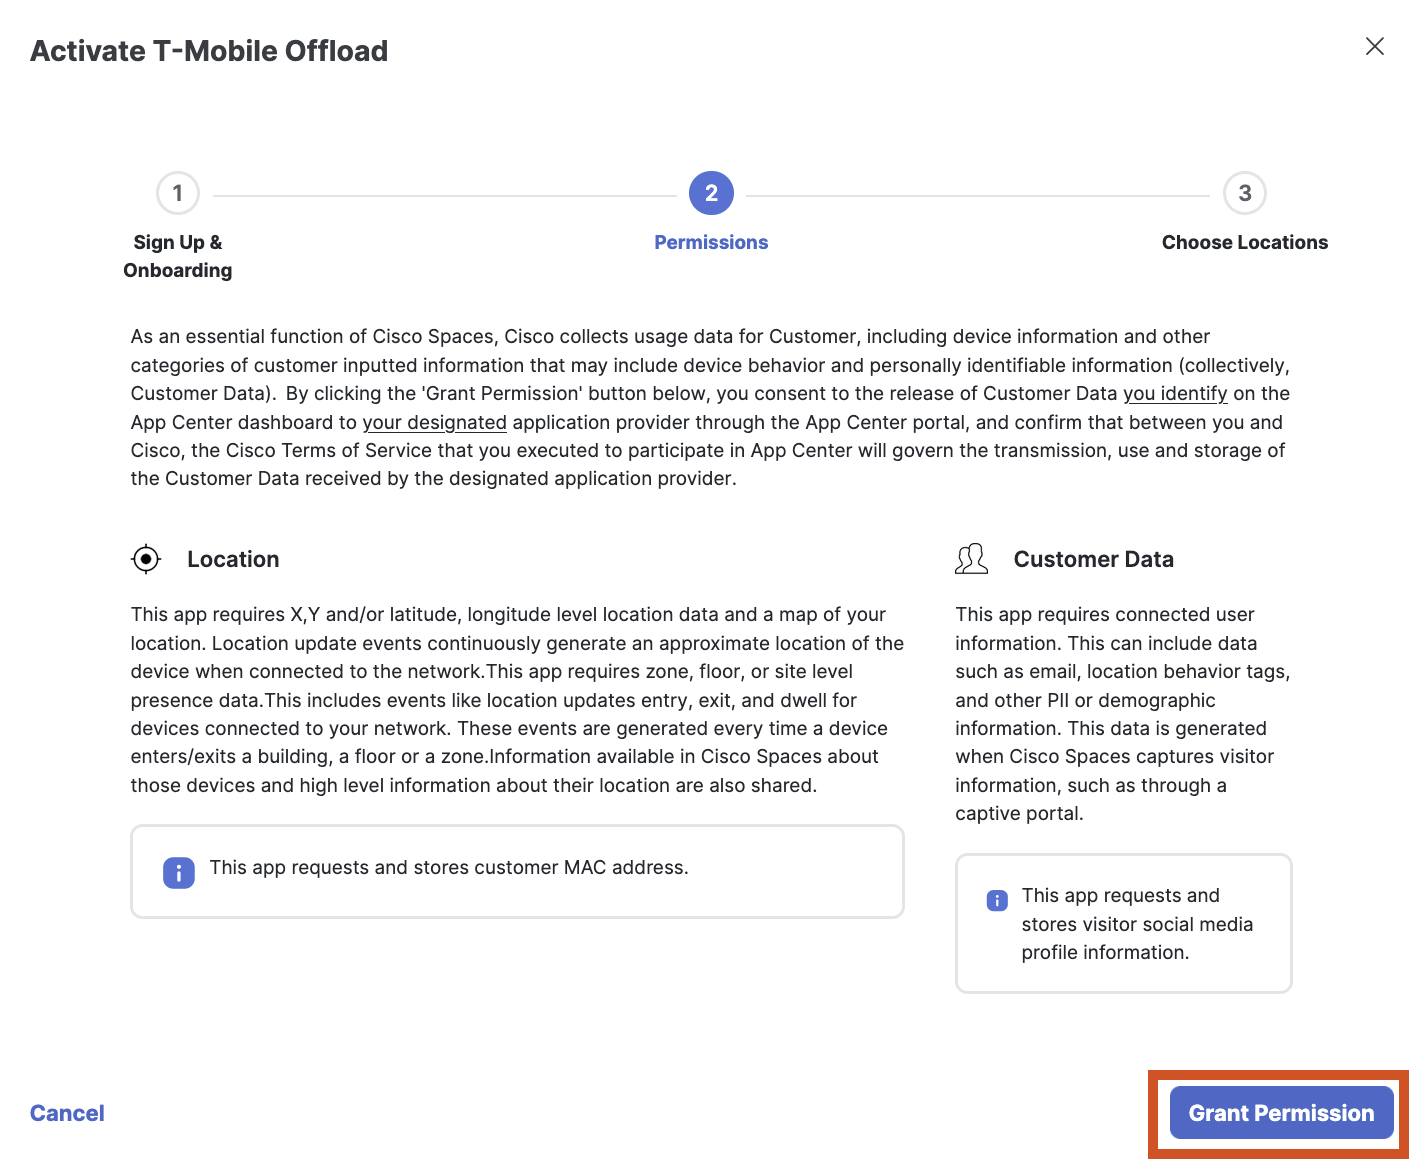
-
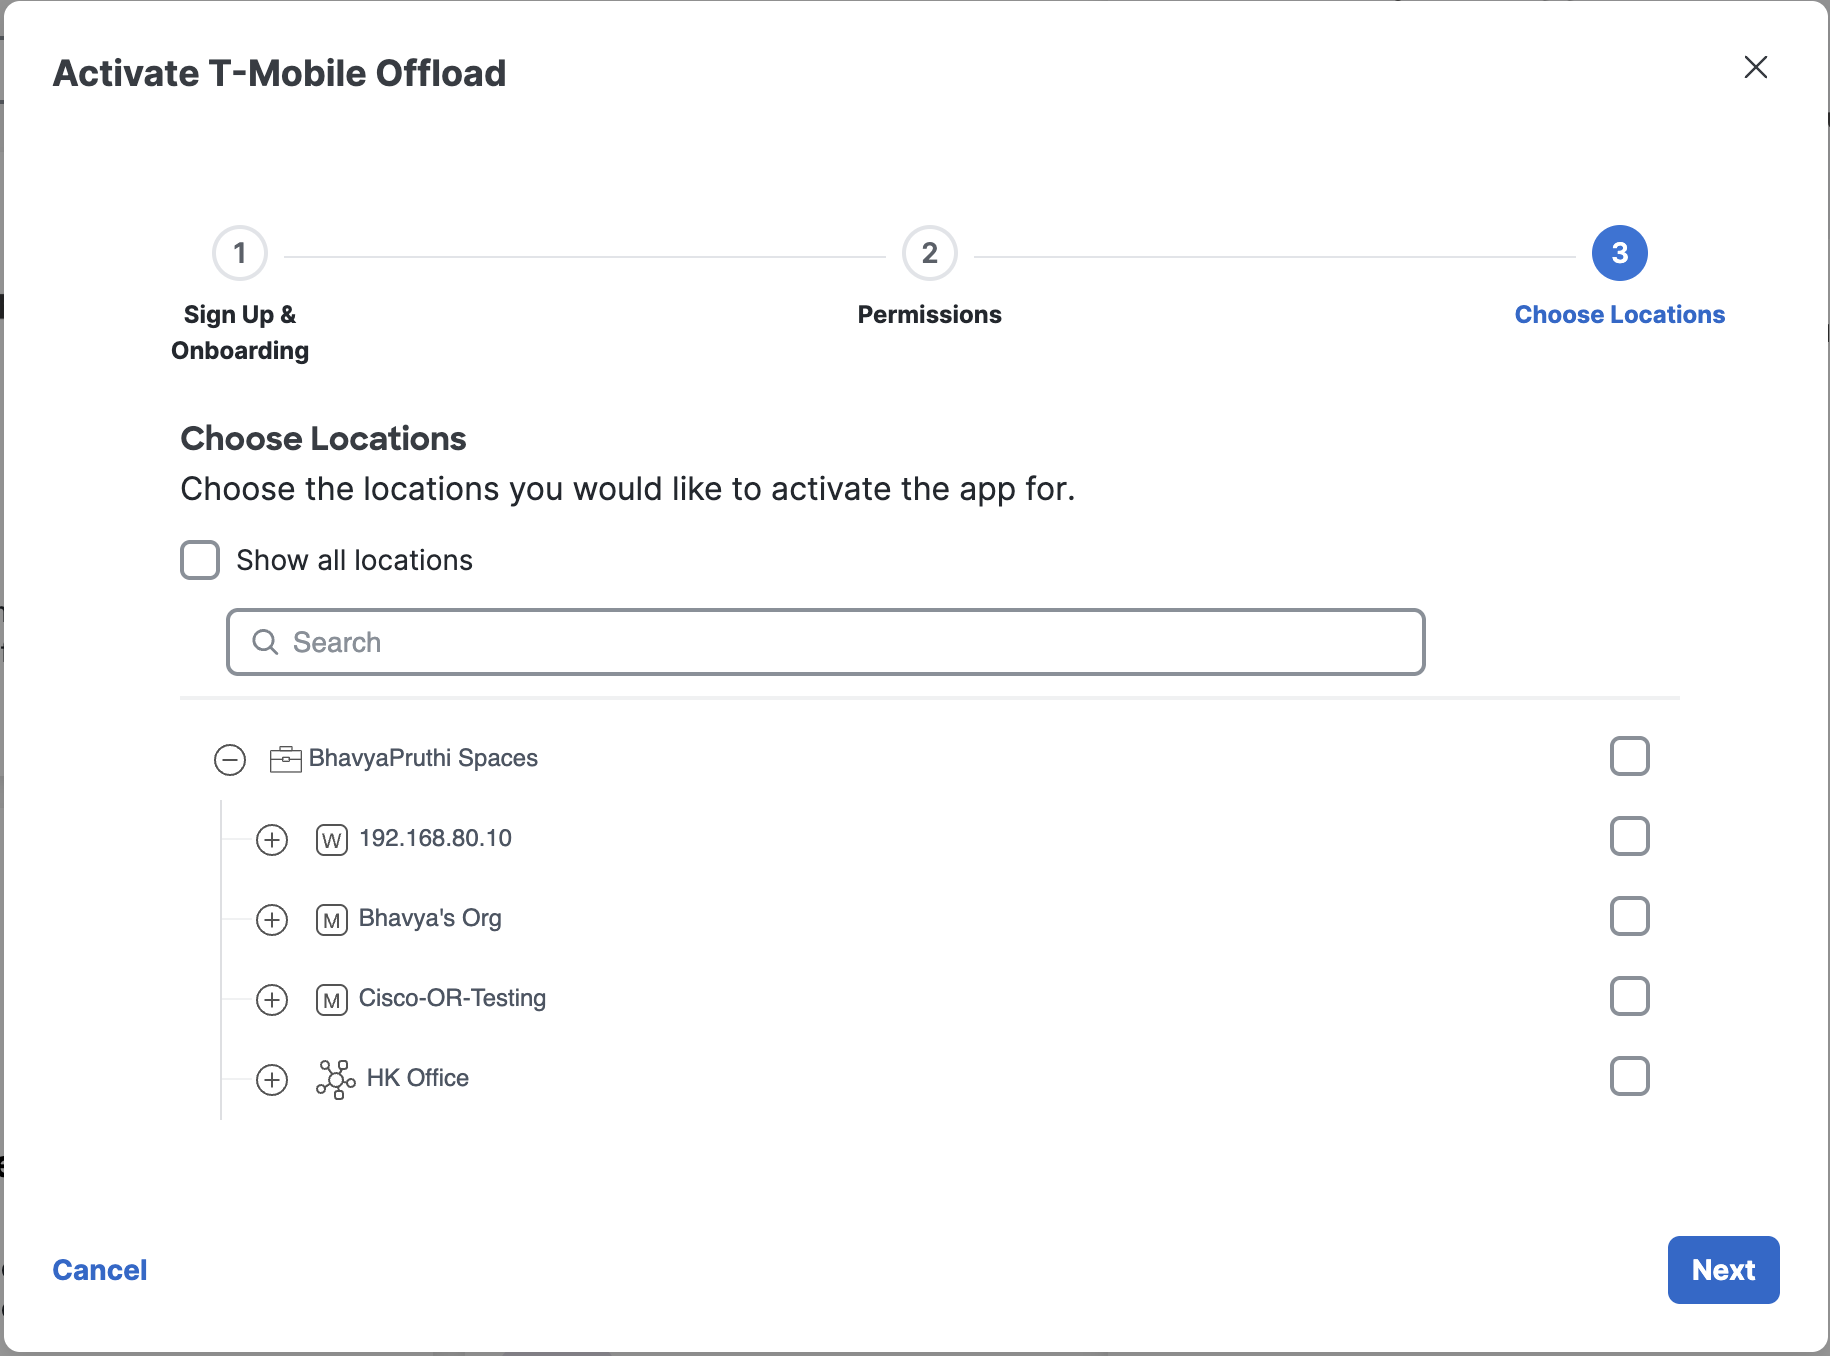
Next, we need to choose locations for which we want to enable T-Mobile Auto-Attach carrier offload. You can either check the box Enable for all locations or select specific locations from your location hierarchy and Click Next.
-
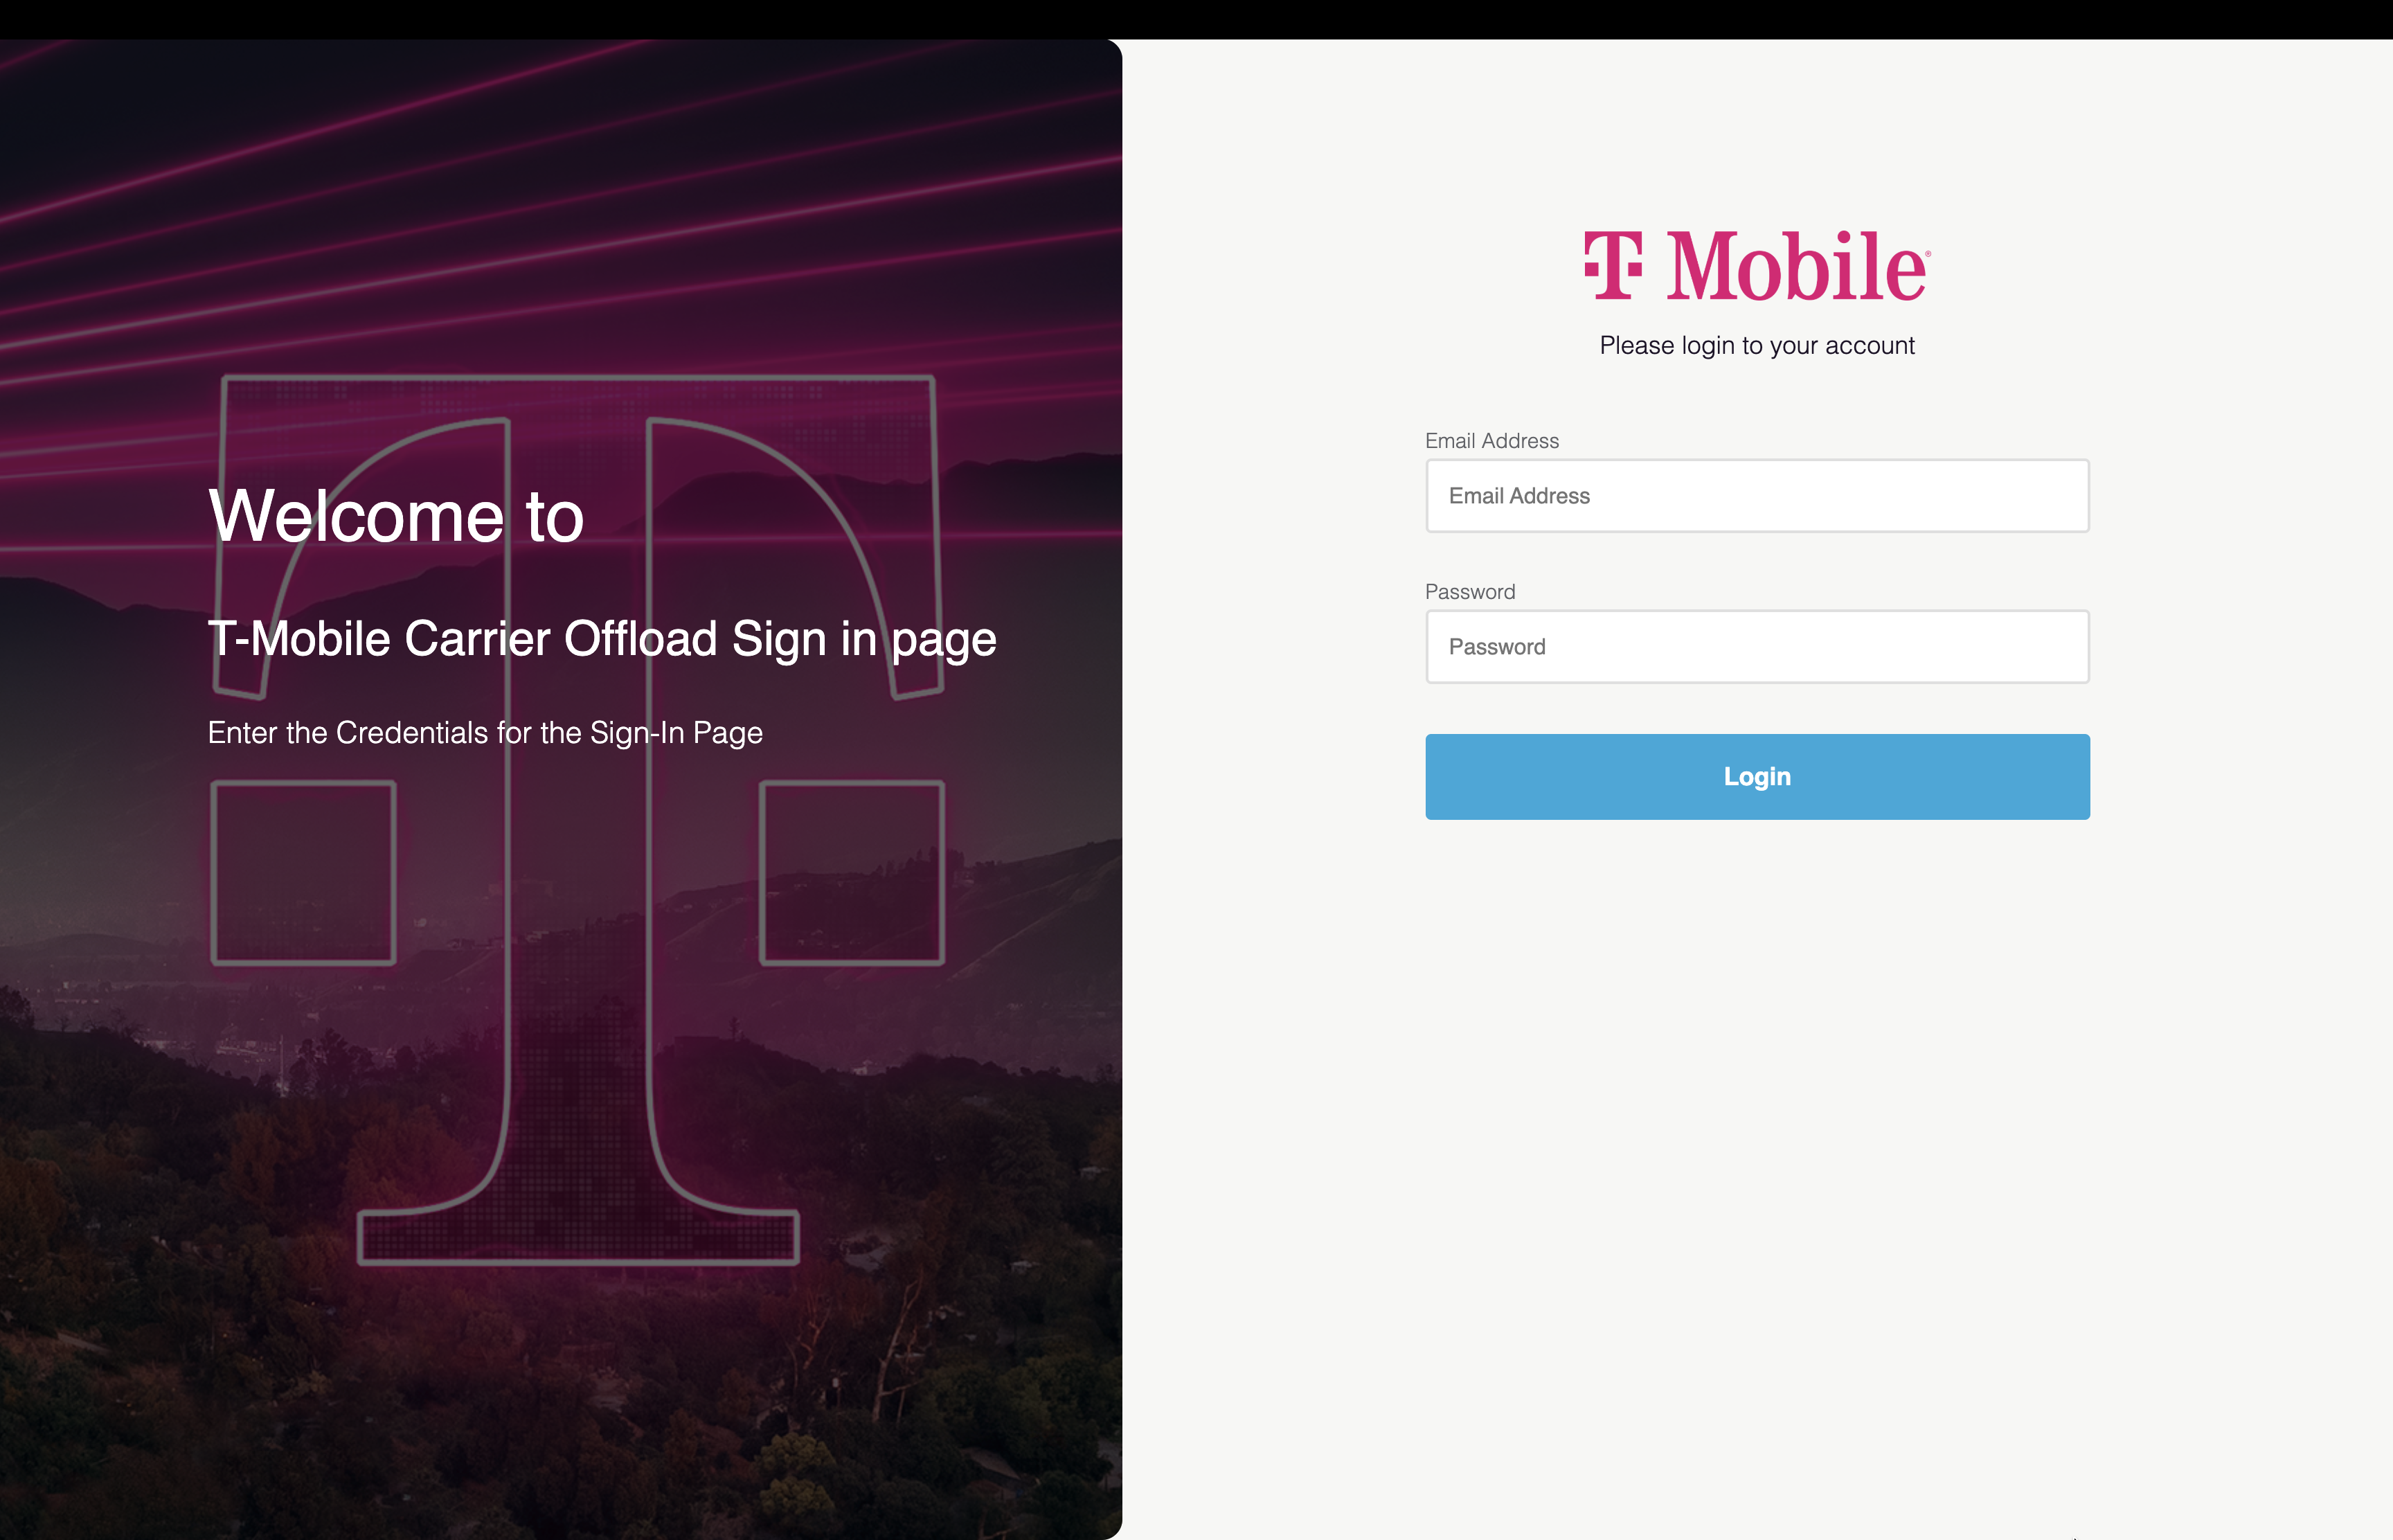
This opens the T-Mobile Auto-Attach portal. Enter the email and password shared when the approval for the location is complete and click Login.
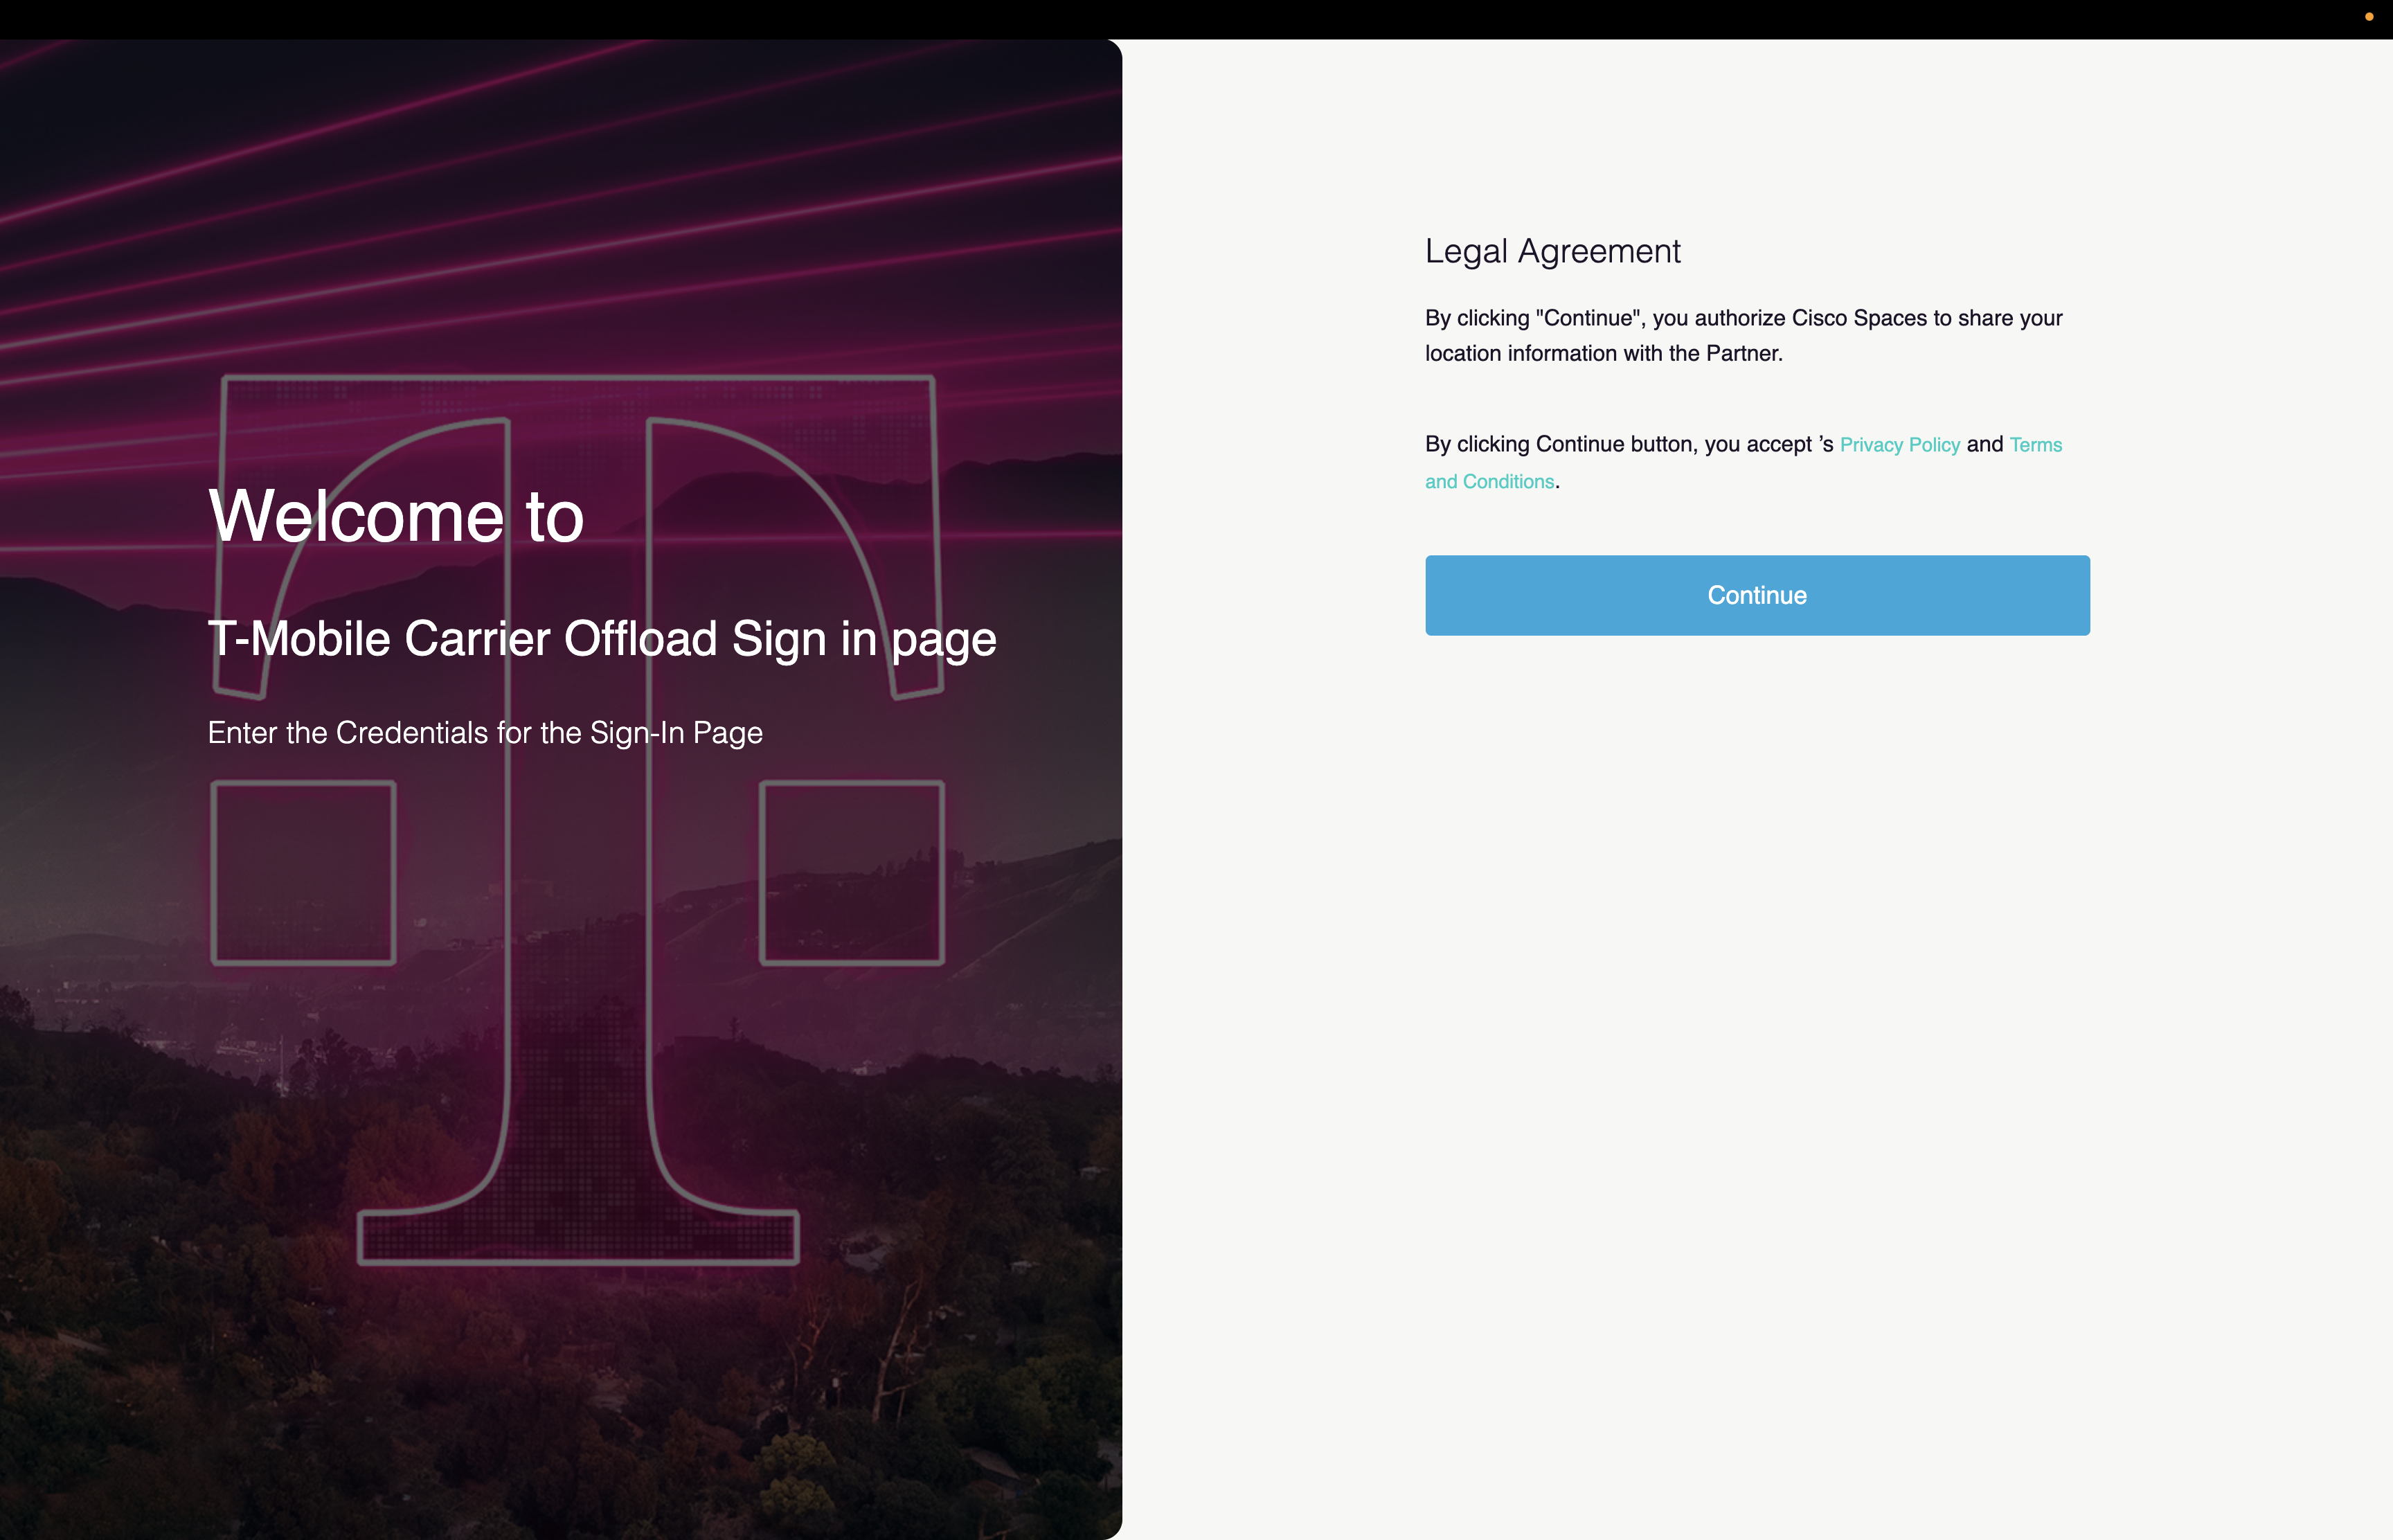
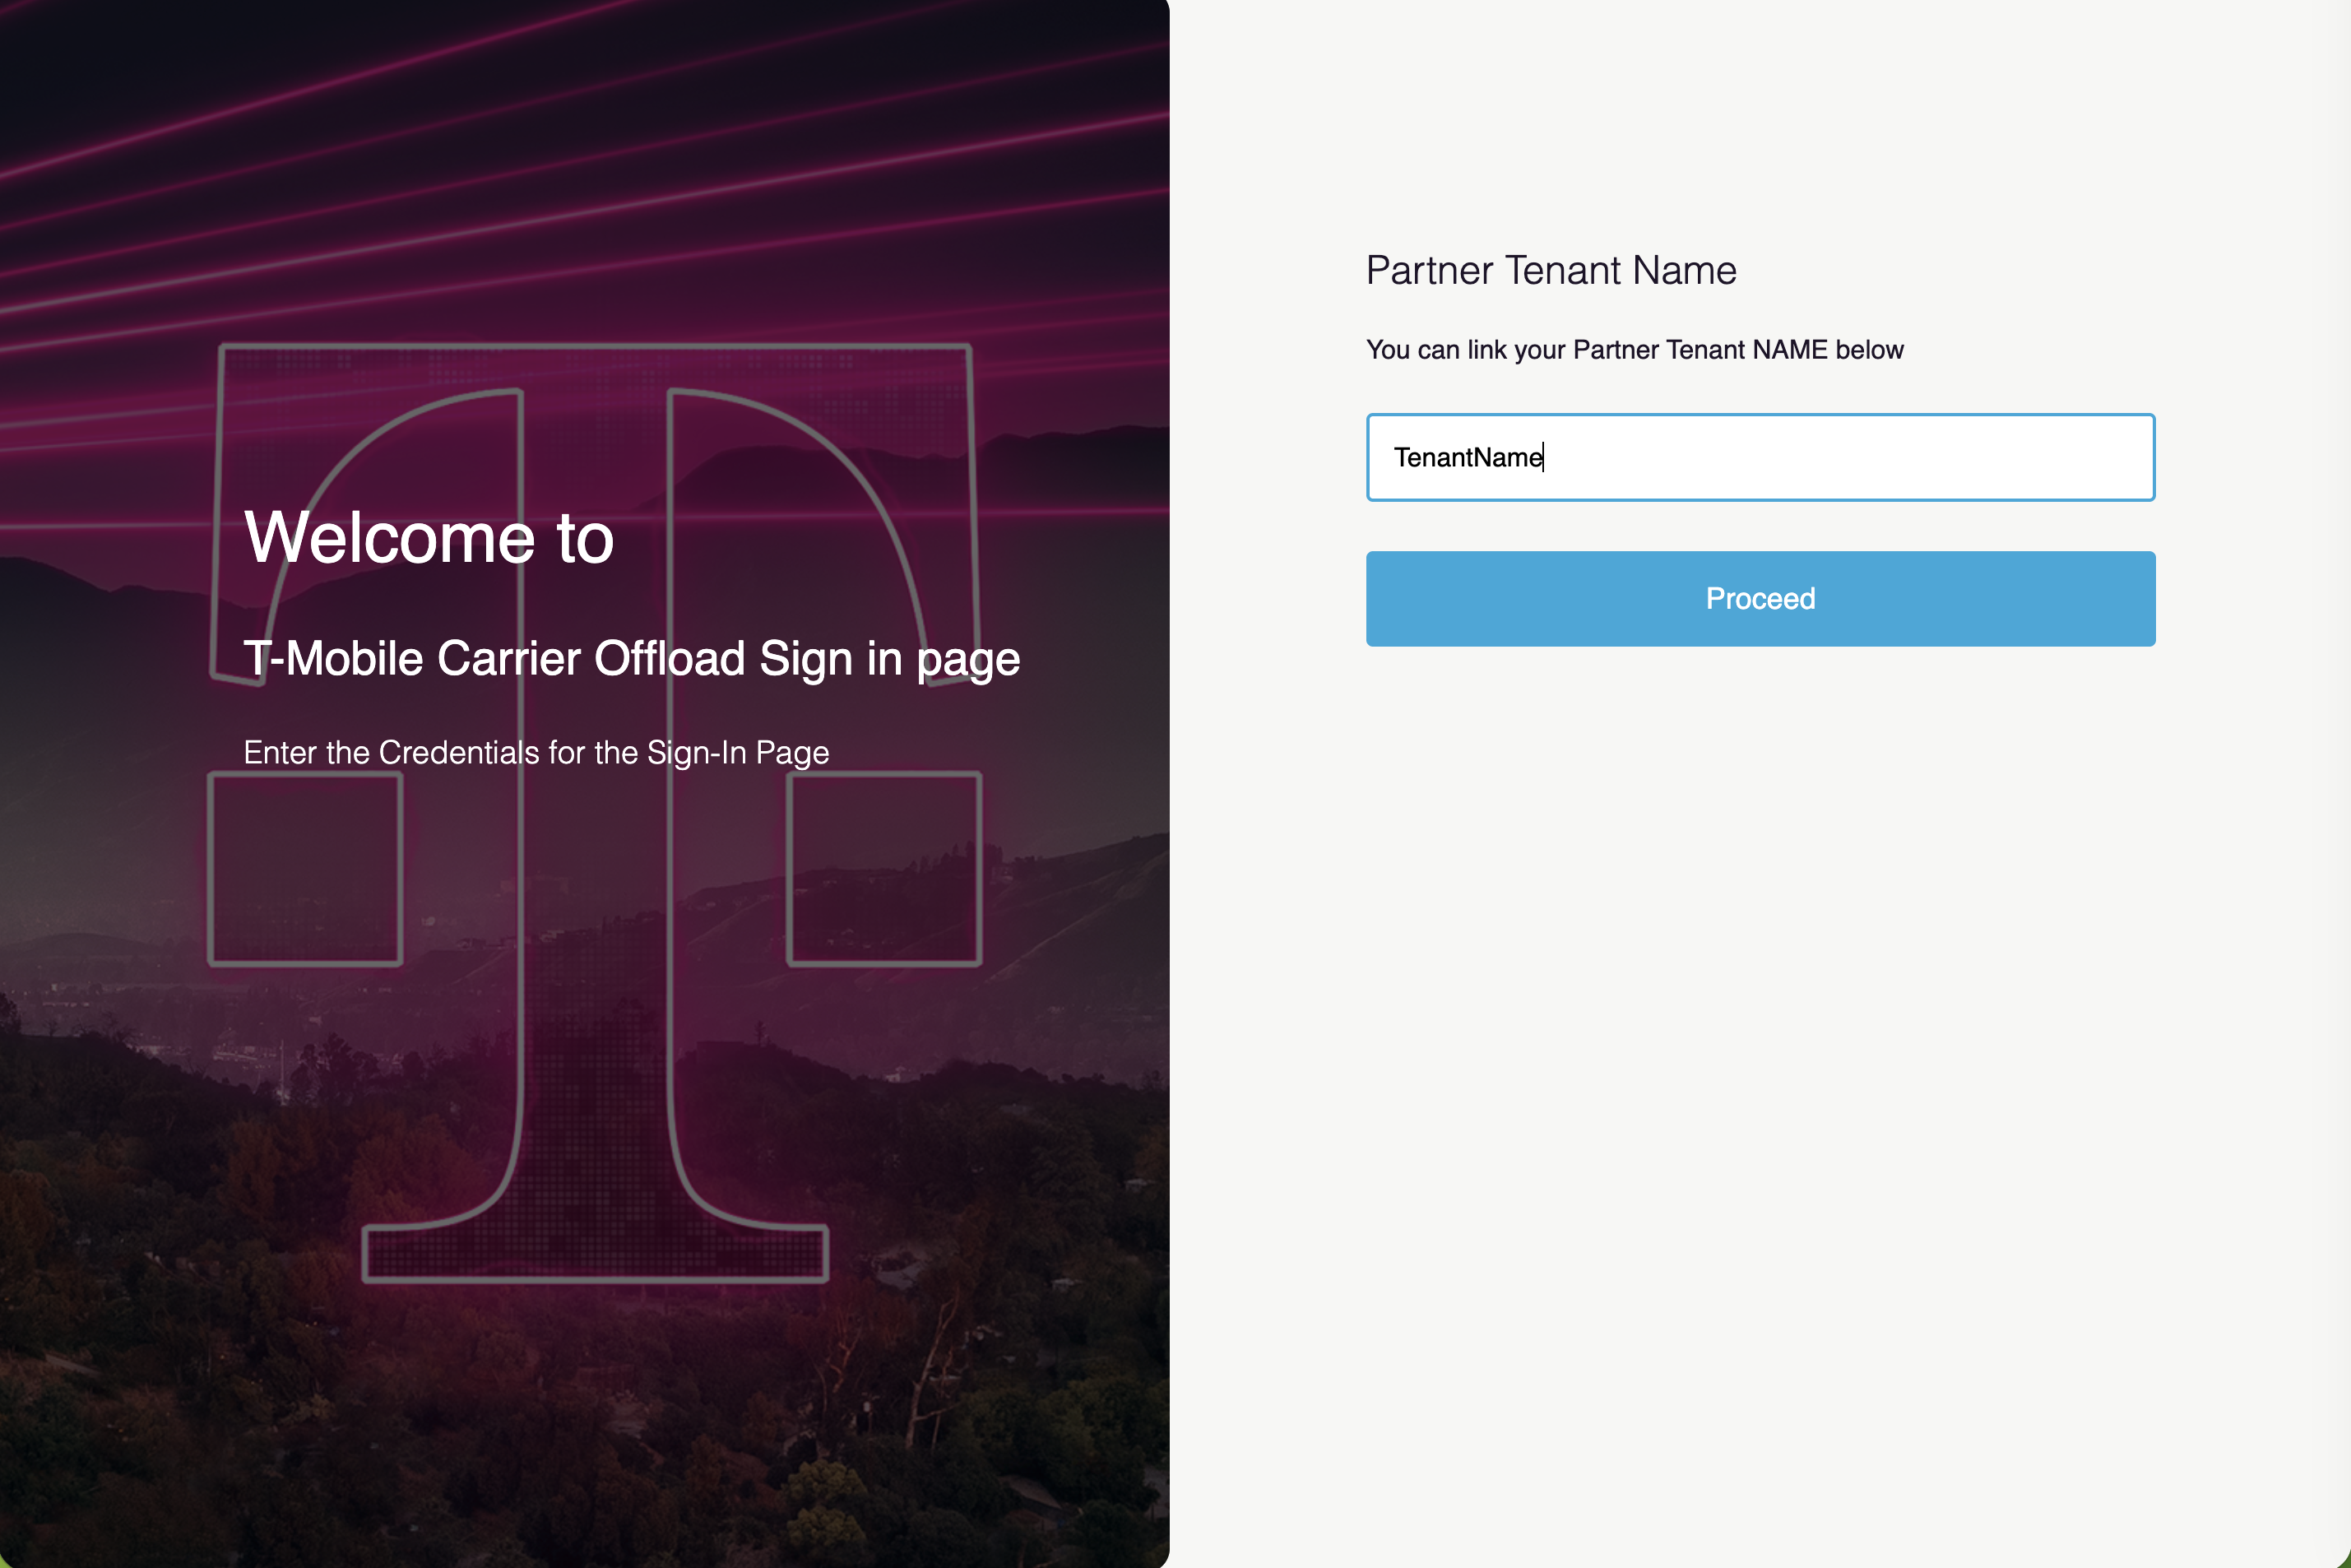
Enter your Tenant/Account Name and proceed to activation
-
T-Mobile Auto-Attach application will be live and you are offloading carrier traffic to your network.
REFERENCE
For more information about OpenRoaming in a Cisco Spaces setup, see the following documents:
For all Cisco Spaces documentation, see:
https://www.cisco.com/c/en/us/support/wireless/dna-spaces/series.html