OVERVIEW
This Cisco Validated runbook describes how to deliver an asset-tracking outcome with Cisco Spaces. It covers the shared workflow for Bluetooth Low Energy (BLE) and Ultra-Wideband (UWB), Cisco and supported third-party tags, the Asset Tracker Dashboard application, and the optional Cisco Asset Tracker mobile experience.
Cisco Spaces combines the wireless infrastructure, location hierarchy, Digital Maps, IoT Services, tags, and applications into a searchable inventory of assets with current location and status, role-based access, history, reporting, and—when Indoor Navigation is enabled—mobile directions and close-range Nearby guidance.
Complete the Cisco Spaces OS Runbook first. The Spaces OS runbook contains the infrastructure and IoT Services activation procedures. This runbook repeats only the outcome-specific checks that materially affect asset tracking.
Begin Indoor Navigation early. When users require mobile directions or Nearby, complete the Cisco Spaces Indoor Navigation Runbook. Enablement can take two to three weeks. The administrative dashboard can operate without Indoor Navigation, but directions and Nearby require navigation-ready maps.
Common outcomes include:
-
Finding equipment by asset name, category, department, manufacturer, label, location, or custom metadata.
-
Viewing an asset on a map with its last-heard time, status, battery information when available, and operational metadata.
-
Restricting access by asset category and location.
-
Reviewing location history and exporting operational reports.
-
Extending supported asset and location data into enterprise applications.
-
Onboarding Cisco Asset Tag through the mobile app
-
Real-time blue dot navigation to equipments with Cisco Spaces Indoor Navigation
SUPPORT AND ONBOARDING
Review the Cisco Spaces support and onboarding options before beginning a production deployment.
For UWB, engage the Cisco account or adoption team to confirm the current hardware, licensing, software, design-validation, site-survey, and activation requirements.
PREREQUISITES
Outcome readiness checklist
|
Area |
Required readiness |
Why it matters |
|---|---|---|
|
Cisco Spaces OS |
Wireless infrastructure, Cisco Spaces Connector or supported cloud connection, location hierarchy, Digital Maps, accurate AP placement, and IoT Services are operational. |
These services provide the maps and telemetry used to calculate and display asset locations. |
|
Maps and AP placement |
Each in-scope floor has a published Digital Map and every AP is positioned accurately. Use AP Auto Locate or the supported calibration workflow where applicable. |
Incorrect AP coordinates directly reduce BLE and UWB accuracy. |
|
Network design |
Each floor has a validated design for the intended BLE or UWB outcome. |
Wi-Fi coverage alone does not guarantee a location-ready design. |
|
Tags |
The selected tags meet the radio, form-factor, battery, environmental, mounting, and telemetry requirements. |
Tag selection determines provisioning, telemetry, battery, mobile, and precision capabilities. |
|
Identity and permissions |
Domain mapping, SSO ownership, identity-provider approvals, and administrator access are identified. |
Administrators and mobile users must be able to access only the intended categories and locations. |
|
Indoor Navigation |
Start enablement two to three weeks before mobile rollout when directions or Nearby are required. |
Directions and proximity workflows depend on navigation-ready maps. |
|
Operations |
Purchasing, receiving, inventory, mounting, battery replacement, lost-tag handling, and support ownership are defined. |
Tags require a physical and operational lifecycle after activation. |
Choose the deployment profile
Use BLE when room-, zone-, or approximate floor-level location meets the operational requirement. BLE can use Cisco Asset Tags or supported third-party tags and does not require UWB activation.
-
Confirm that the APs support the required BLE scanning mode through IoT Services.
-
Use Advanced IoT Gateway capability where supported when tag configuration, telemetry, scale, or Nearby workflows require it.
-
Set accuracy expectations from the validated design and representative testing.
Use UWB when the deployment requires higher precision and the site has supported Cisco infrastructure. Cisco BLE+UWB tags still use BLE for discovery, provisioning, and management.
-
Confirm the supported UWB-capable APs, controller, Connector services, IoT Services application, and tag firmware before scheduling changes.
-
Use a location-ready design with accurate AP placement.
-
Complete the required predictive and on-site validation before production activation.
-
Keep UWB disabled until the approved on-site survey is complete.
Do not treat a published map or successful UWB activation as proof of accuracy. Validate design coverage, AP coordinates, and representative real-world performance before handover.
Choose the gateway capability
Advanced IoT Gateway
The Advanced IoT Gateway uses the AP IoT radio and IOx container. It supports richer management and telemetry from compatible devices, including battery information where the tag exposes it. Advanced gateway functionality requires a supported AP managed by a Catalyst 9800 Wireless LAN Controller.
Use Advanced capability when the infrastructure and tags support it, particularly when tag configuration, battery visibility, enhanced scale, or optimized Nearby interaction is required.
Basic IoT Gateway
The Basic IoT Gateway collects BLE observations without an IOx container. It supports a broader set of BLE-capable APs but provides fewer management and telemetry capabilities. Battery information and Cisco-specific provisioning features may not be available.
Meraki deployments use the AP BLE radio directly and provide Basic gateway functionality for supported beacon formats. Confirm the current AP, firmware, and Sensor Connect support matrix before deployment.
Document the lifecycle-management and telemetry limitations when Basic capability is selected.
Sensor Connect on Meraki
Sensor Connect uses the integrated IoT radio in supported Meraki MR access points as the IoT access layer for Cisco Spaces. For asset tracking, it provides the Meraki-to-Spaces path for supported BLE use cases, including Cisco Asset Tags and supported third-party BLE/UWB tags. It can extend beyond passive advertisement scanning to support supported BLE device management and telemetry operations.
Sensor Connect uses the existing Meraki AP infrastructure; a separate BLE gateway overlay is not required. It is distinct from the Catalyst IOx-based Advanced IoT Gateway terminology used in this runbook. Confirm the capabilities required by the selected tag and application before choosing the deployment profile.
Review the Sensor Connect on Meraki - Deployment Guide for the current supported AP models, firmware, licensing, coexistence constraints, activation, and Cisco Spaces connection steps. The Meraki guide currently identifies Sensor Connect as beta; confirm availability and production suitability before enabling it.
Use the Meraki guide's current Sensor Connect hardware and software requirements.
Confirm compatible software releases
Software recommendations change as controller, AP, Connector, cloud, and tag releases are updated. Do not combine a controller minimum from one release train with Connector or IOx versions validated for another deployment profile.
Before approving the change plan:
-
Identify the AP models, management platform, gateway capability, tag type, and BLE or UWB outcome.
-
Use the current Catalyst AP capability matrix and applicable Cisco or Meraki release notes.
-
For Meraki Sensor Connect deployments, use MR32.2.4 or later, or the latest Cisco-recommended firmware version, and confirm the current Sensor Connect AP and license matrix in the Meraki deployment guide.
-
Select the current Cisco-recommended maintenance or Stable/GA release for the complete platform combination.
-
Record the approved controller or Meraki firmware, IOx application, Connector and service versions, Catalyst Center version when used, and tag firmware in the deployment record.
-
Validate the complete combination before production rollout.
Do not use a historical minimum release as the general recommendation for a new deployment. Retain an older release train only when Cisco confirms it for the selected legacy platform and complete combination.
Choose the asset model
Decide whether each category contains uniquely identifiable assets:
-
Individually tracked assets: Use this model when every item has a distinct enterprise identifier, serial number, history, or owner.
-
Group-tracked assets: Use this model when individual identity is not operationally important and the items are interchangeable.
IMPLEMENTATION
Verify the Cisco Spaces OS foundation
-
Complete the Cisco Spaces OS Runbook, including IoT Services activation for the selected Catalyst or Meraki deployment.
-
Confirm the in-scope campuses, buildings, and floors exist in the Location Hierarchy.
-
Confirm each floor has a published Digital Map.
-
Verify AP coordinates and correct missing, duplicated, or displaced APs.
-
Confirm the Cisco Spaces Connector or supported cloud connection, wireless infrastructure, IoT Services, and expected gateways are operational.
-
Start Indoor Navigation in parallel when mobile directions or Nearby are in scope. Allow two to three weeks.
Validate design and AP placement
-
Compare the installed APs with the approved design.
-
Confirm perimeter coverage, AP spacing, mounting height, and visibility from representative asset locations.
-
Confirm that representative tags can be heard by enough APs for the intended location method.
-
Review AP coordinates on the wireless-management map and Cisco Spaces Digital Map.
-
Run AP Auto Locate or the supported calibration workflow where required.
-
Correct missing APs, coordinate errors, map-scale problems, and design gaps.
-
Use Detect & Locate to confirm that the operational map agrees with the physical deployment.
-
Retain the accepted design and AP-placement record.
Complete the required UWB survey and activate UWB
Skip this section for BLE-only deployments.
Complete the UWB site survey
-
Confirm that UWB is disabled for the in-scope locations.
-
Schedule the approved on-site UWB survey with the authorized Cisco or partner team.
-
Survey representative operational areas and document coverage, obstructions, AP-placement concerns, and remediation actions.
-
Resolve blocking findings before activation.
-
Retain the approved survey report with the deployment record.
Survey first, then activate UWB. The current survey workflow requires UWB to be disabled.
Activate UWB
-
On the Catalyst 9800 controller, confirm AP geolocation ranging is enabled for the in-scope AP profiles.
-
In Cisco Spaces, open Configure > Location Compute > UWB.
-
Review UWB capable APs and resolve unsupported or missing APs.
-
Select Activate UWB location.
-
Select only the approved buildings and floors included in the change plan.
-
Review the AP count and begin activation.
-
Monitor ranging, clustering, and cluster-push progress.
-
Confirm Activation Success and reconcile the activated AP count for every selected floor.
Purchase, receive, prepare, and mount tags
-
Confirm the tag model and quantity, including commissioning and replacement spares.
-
If ordering Cisco Asset Tag; search for SPACES-CT-UB SKU in CCW (https://apps.cisco.com/ccw/cpc/catalog/home)
-
Order the required mounting plates, adhesives, screws, zip ties, labels, batteries, and installation tools.
-
Record the supplier, order identifier, ship-to contact, delivery location, and expected arrival date.
-
Inspect the shipment and reconcile the delivered quantity and models.
-
Maintain inventory states for received, staged, mounted, associated, active, spare, lost, and retired tags.
-
Confirm Cisco tag is activated and claimed in Cisco Spaces tenant before assignment.
-
Record the tag MAC address or unique identifier with the physical asset or category.
-
Attach the mounting plate and adhesive, or use approved screws or zip ties where required.
-
Protect the tag from impact, avoid radio-shielding materials, and keep the battery cover and reset control serviceable.
-
Remove the battery isolator only when the site is ready for provisioning.
-
Record the asset, mounting position, installer, and installation date.
Claim and configure tags
Cisco Asset Tags
Method 1 (Recommended): Activate and Claim Cisco Tags using Asset Tracker mobile app
Refer to Onboard and Claim Cisco Asset Tag section
Method 2: Claim tags in IoT Services
-
Open IoT Services > Inventory > Claimed Devices.
-
Select Claim devices, then select Cisco Asset Tags.
-
Enter one or more MAC addresses or upload the supported bulk file.
-
Select Claim and confirm that the tags appear in Claimed Devices.
Enable Nearby Interaction and validate provisioning
-
Open IoT Services > Settings.
-
Enable Automated onboarding for Cisco asset tags for the commissioning window.
-
Enable Optimized nearby interaction only when Nearby is required and the battery-life tradeoff is accepted.
-
Move or tap each tag to wake it and allow a nearby AP to discover and provision it.
-
Open the tag request history and confirm successful provisioning.
Supported third-party tags
-
Select a validated device from the Cisco Spaces IoT Device Marketplace when advanced management or telemetry is required.
-
Follow the validated Cisco Spaces and vendor onboarding procedure for the selected tag.
-
Apply the required identifier, radio, transmit-power, telemetry, battery, and mounting settings.
-
Confirm that the tag is visible in IoT Services before associating it with an asset.
-
Verify telemetry and location data after configuration.
Do not assume Cisco-specific provisioning, battery, UWB, or Nearby capabilities apply to third-party tags.
Create categories and assets in Asset Tracking
-
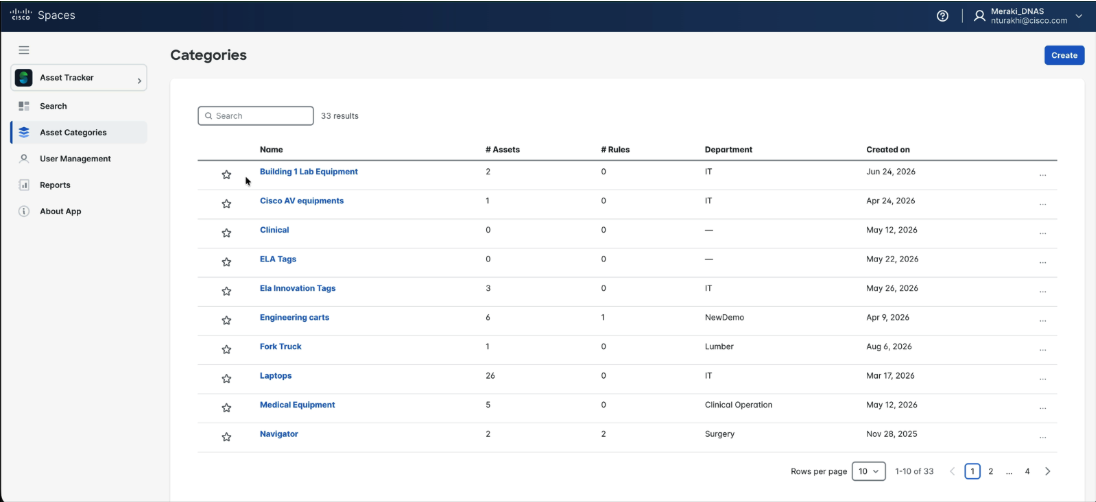
Open Asset Tracking > Asset Categories.
-
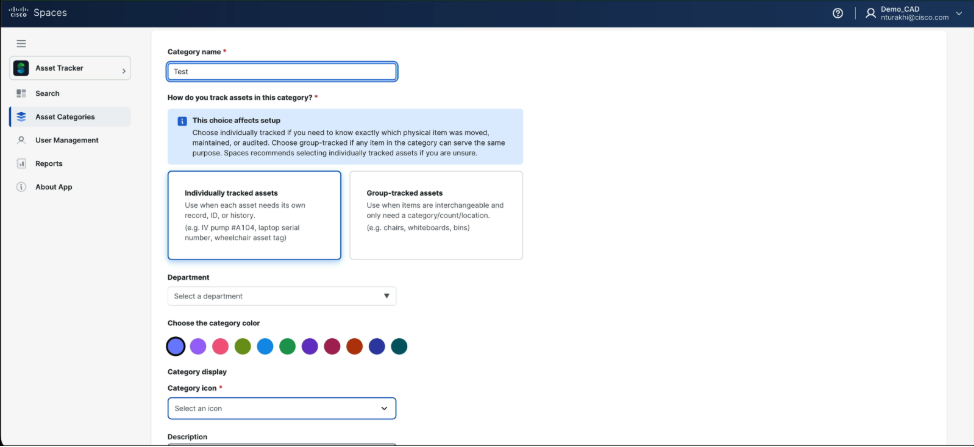
Select Create and enter the category name.
-
Choose Individually tracked assets or Group-tracked assets according to the selected asset model.
-
Select or add the department, category color, and icon, then enter a description.
-
Select Create Category.
-
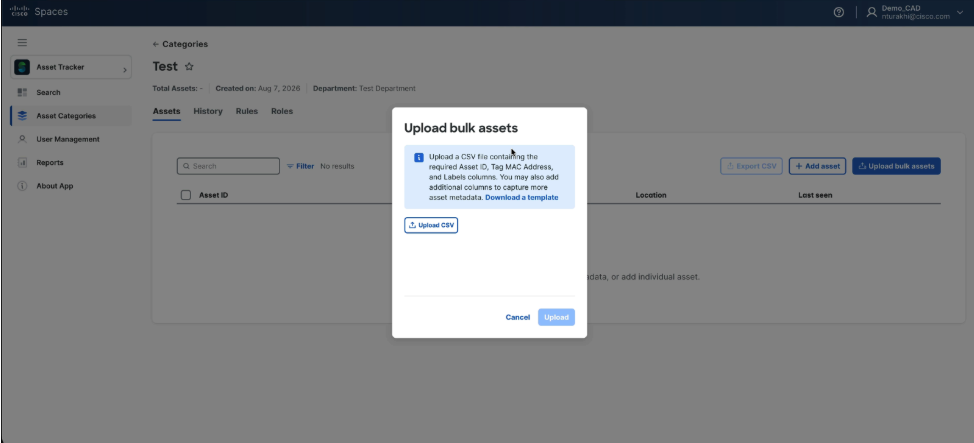
Open the category and select Add asset for one item or Upload bulk assets for multiple items.
-
For bulk import, download the current CSV template and populate its required fields.
-
Upload the CSV, resolve import errors, and confirm all expected assets appear.
-
Associate each asset with the correct tag.
-
Verify the physical asset label and tag identifier together.
Do not reuse one tag identifier across multiple assets.
Configure identity, roles, and users
-
Complete the supported tenant-to-domain mapping process before mobile users are invited.
-
Configure or validate the supported enterprise SSO method and obtain required identity-provider approval.
-
Open Asset Tracking > User Management > Roles.
-
Select Create role and choose Read only or Read & write.
-
Scope the role by asset category and location.
-
Enable Mobile app only user for users who do not require dashboard access.
-
Create the role.
-
Open Users, select Add user, and assign the role.
-
Sign in as a test user and confirm only the intended categories and locations are visible.
Verify the administrative experience
Search and map views
-
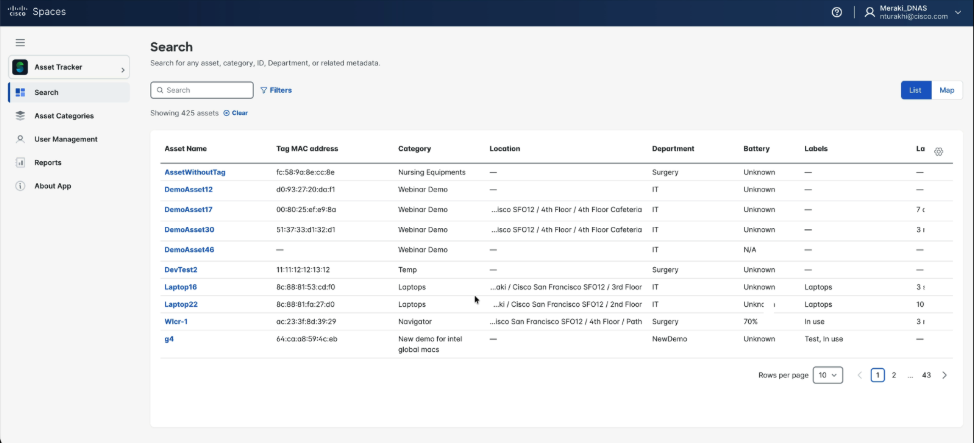
Open Asset Tracking > Search.
-
Search by asset ID, asset name, category, serial number, label, manufacturer, department, location, or available metadata.
-
Use filters, favorites, saved filters, List view, and Map view.
-
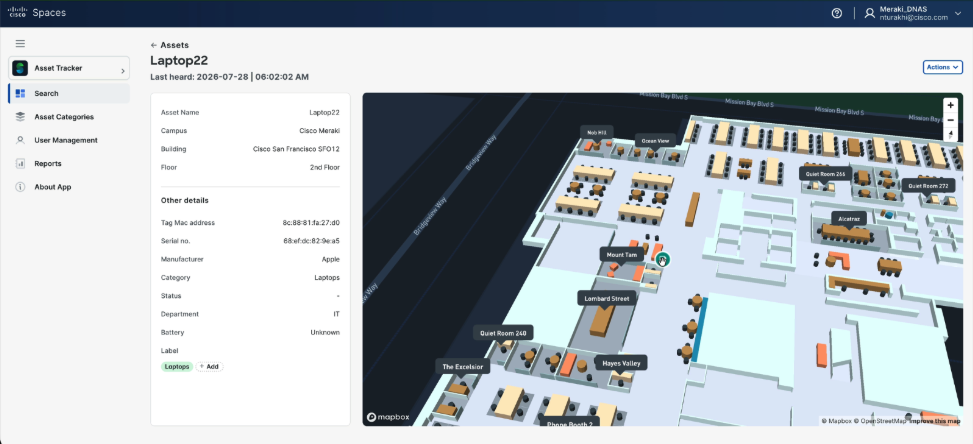
Open an asset and verify its identifier, tag, category, department, location, available battery information, labels, metadata, and last-heard time.
-
Move a test tag within the validated area and confirm location and last-heard information update.
History
-
Open Asset Categories, select a category, and select History.
-
Choose the time window and floor.
-
Review the heatmap, asset count, and data-point count.
-
Confirm the history agrees with representative test movement.
Reports
-
Open Reports > Tag Report.
-
Select the required campus, building, or hierarchy branch.
-
Review tags by category, model, and location.
-
Verify the asset, tag, location, model, category, battery when available, and last-heard fields.
-
Select Export CSV and verify the exported data.
Validate the mobile experience
Complete this section after Cisco Spaces OS, maps, IoT Services, domain mapping, categories, assets, tag onboarding, roles, SSO, and Indoor Navigation are ready.
-
Confirm the current supported Cisco Asset Tracker app version, device and OS matrix. Cisco Asset Tracker currently requires iOS 18 or later.
-
Currently Cisco Asset Tracker mobile app is only supported on iOS
-
For Nearby, confirm that the iPhone supports Ultra-Wideband and Apple Nearby Interaction.
-
Install Cisco Asset Tracker (https://apps.apple.com/ie/app/cisco-asset-tracker/id6759779536 ) and sign in with the approved enterprise identity provider.
-
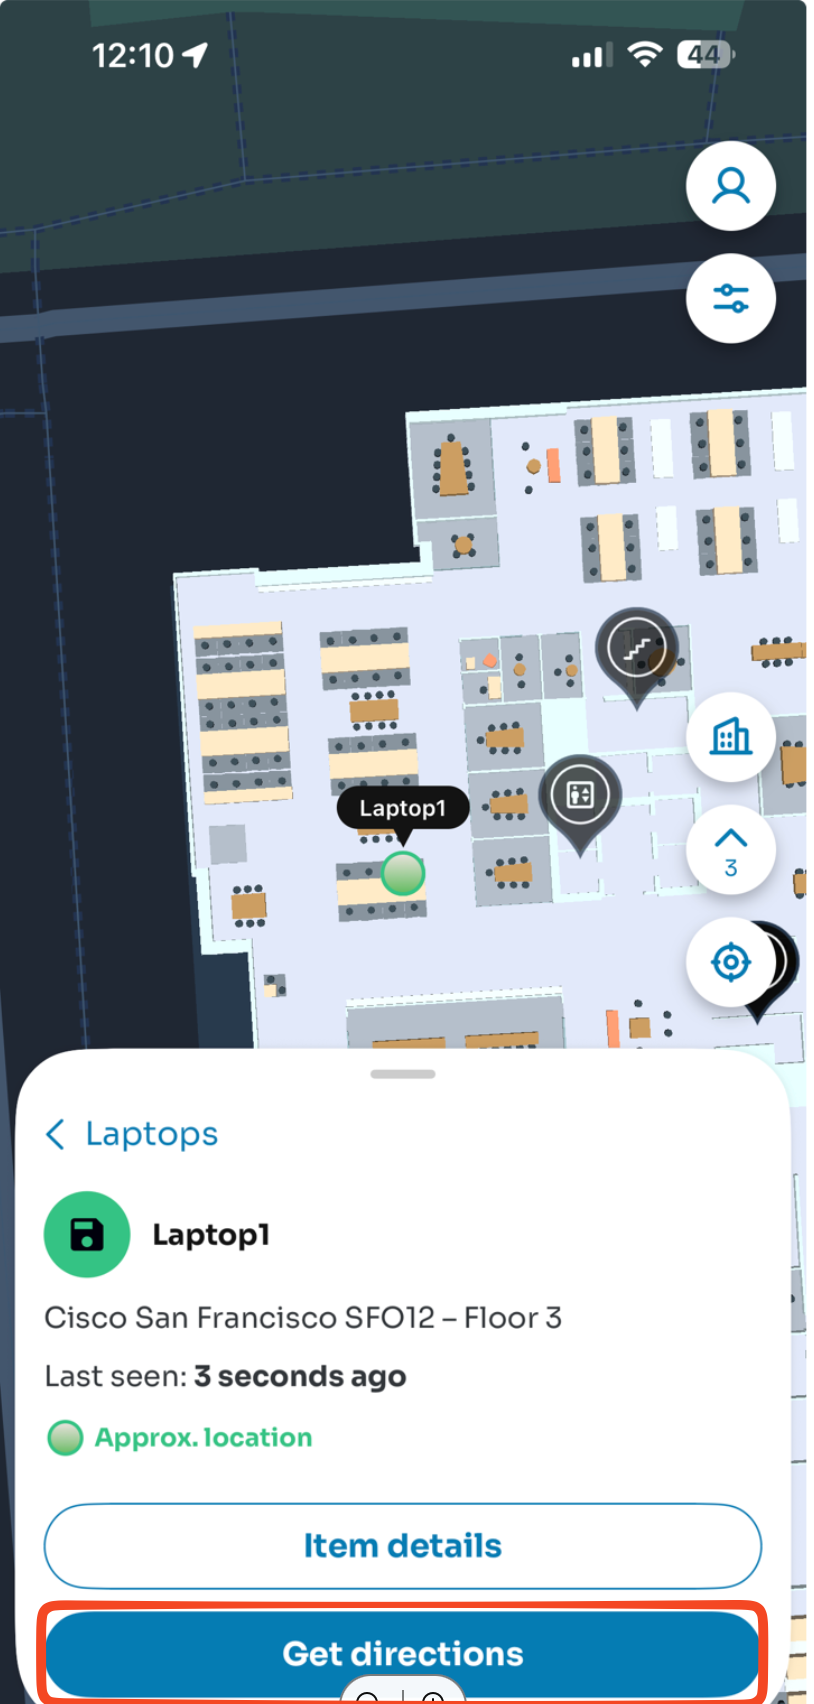
Search by asset name, department, category, or building.
-
Open the asset and verify its details and location.
-
Select Get directions and confirm Indoor Navigation routes the user to the asset's mapped area.
-
When Nearby (Beta) is enabled, move within close range and verify distance and direction to the supported Cisco Asset tag.
-
Confirm category- and location-based permissions are enforced.
Nearby is the final close-range step after search and navigation. It depends on a supported phone and tag, completed Indoor Navigation, correct maps, and validated infrastructure.
Validate UWB location accuracy
Use this controlled test only after infrastructure activation and tag provisioning have completed.
-
Open IoT Services > Inventory > Claimed Devices.
-
Select the Cisco Asset Tag and expand Beacon Configuration.
-
Enable ranging and select Rapid Blink for the approved test interval.
-
Open Request History and confirm UL TDOA CONFIG reports SUCCESS.
-
On a nearby AP, run
show ranging uwb ultdoa statsand confirm tag bursts are received. -
Run the approved location-accuracy test at representative points.
-
Return the tag to its normal blink configuration after testing.
Rapid or constant UWB blinking increases power consumption. Do not leave test settings enabled after validation.
Complete operational handover
-
Record the in-scope buildings, floors, categories, tag counts, administrators, and support contacts.
-
Reconcile ordered, received, mounted, active, spare, lost, and retired tags.
-
Provide the mounting, battery-replacement, tag-reset, and lost-tag procedures.
-
Export a baseline Tag Report.
-
Confirm monitoring ownership for last-heard, battery, provisioning, and location-quality exceptions.
-
Confirm dashboard search, history, reporting, SSO, mobile directions, and Nearby where applicable.
-
Repeat location validation after material AP, map, wall, furniture, or tag-mounting changes.
Firehose API
Updates to the Cisco Spaces Firehose API have been done for asset location.
Asset Location Update (ASSET_LOCATION_UPDATE)
Sent when an asset's location is updated by an asset locator device. Includes the asset metadata (assetInfo), the locator device that detected it (assetLocatorDeviceInfo — BLE, RFID, UWB, or Wi-Fi client), the detected position on the floor, the hierarchy location, and allComputedPositions.
Sample
{
  "recordUid": "event-5a166f6a",
  "recordTimestamp": 1787160465853,
  "spacesTenantId": "spaces-tenant-2015f20c",
  "spacesTenantName": "Meraki_DNAS",
  "partnerTenantId": "merakidnas",
  "eventType": "ASSET_LOCATION_UPDATE",
  "assetLocationUpdate": {
    "assetInfo": {
      "idType": "AIT_UNKNOWN",
      "id": "Laptop24",
      "labels": [
        "Laptops"
      ],
      "category": "Laptops",
      "department": "IT",
      "status": "AS_AVAILABLE"
    },
    "assetLocatorDeviceInfo": {
      "type": "ALDT_BLE",
      "macAddress": "8c:88:81:53:af:80",
      "vendorId": "Apple",
      "model": ""
    },
    "position": {
      "xPos": 97.1,
      "yPos": 223.6,
      "latitude": 37.770191467093966,
      "longitude": -122.38736846753208,
      "confidenceFactor": 64,
      "mapId": "e5e3a316785a5c41d6397132e4d55eae",
      "locationId": "location-8f2c2",
      "lastLocatedTime": 1787160465000,
      "computeType": "CT_RSSI"
    },
    "location": {
      "locationId": "location-8f2c2",
      "name": "3rd Floor",
      "inferredLocationTypes": [
        "FLOOR"
      ],
      "parent": {
        "locationId": "location-d6ec4429",
        "name": "Cisco San Francisco SFO12",
        "inferredLocationTypes": [
          "NETWORK"
        ],
        "parent": {
          "locationId": "location-3f0bd87",
          "name": "Cisco Meraki",
          "inferredLocationTypes": [
            "MERAKI"
          ],
          "parent": {
            "locationId": "location-1b57d120",
            "name": "Meraki_DNAS",
            "inferredLocationTypes": [
              "ROOT"
            ],
            "sourceLocationId": "",
            "apCount": 281
          },
          "sourceLocationId": "",
          "apCount": 281
        },
        "sourceLocationId": "",
        "apCount": 171
      },
      "sourceLocationId": "g_566890603095261536",
      "apCount": 37
    },
    "allComputedPositions": [
      {
        "xPos": 97.1,
        "yPos": 223.6,
        "latitude": 37.770191467093966,
        "longitude": -122.38736846753208,
        "confidenceFactor": 64,
        "mapId": "e5e3a316785a5c41d6397132e4d55eae",
        "locationId": "location-8f2c2",
        "lastLocatedTime": 1787160465000,
        "computeType": "CT_RSSI"
      }
    ]
  }
}
MOBILE APP
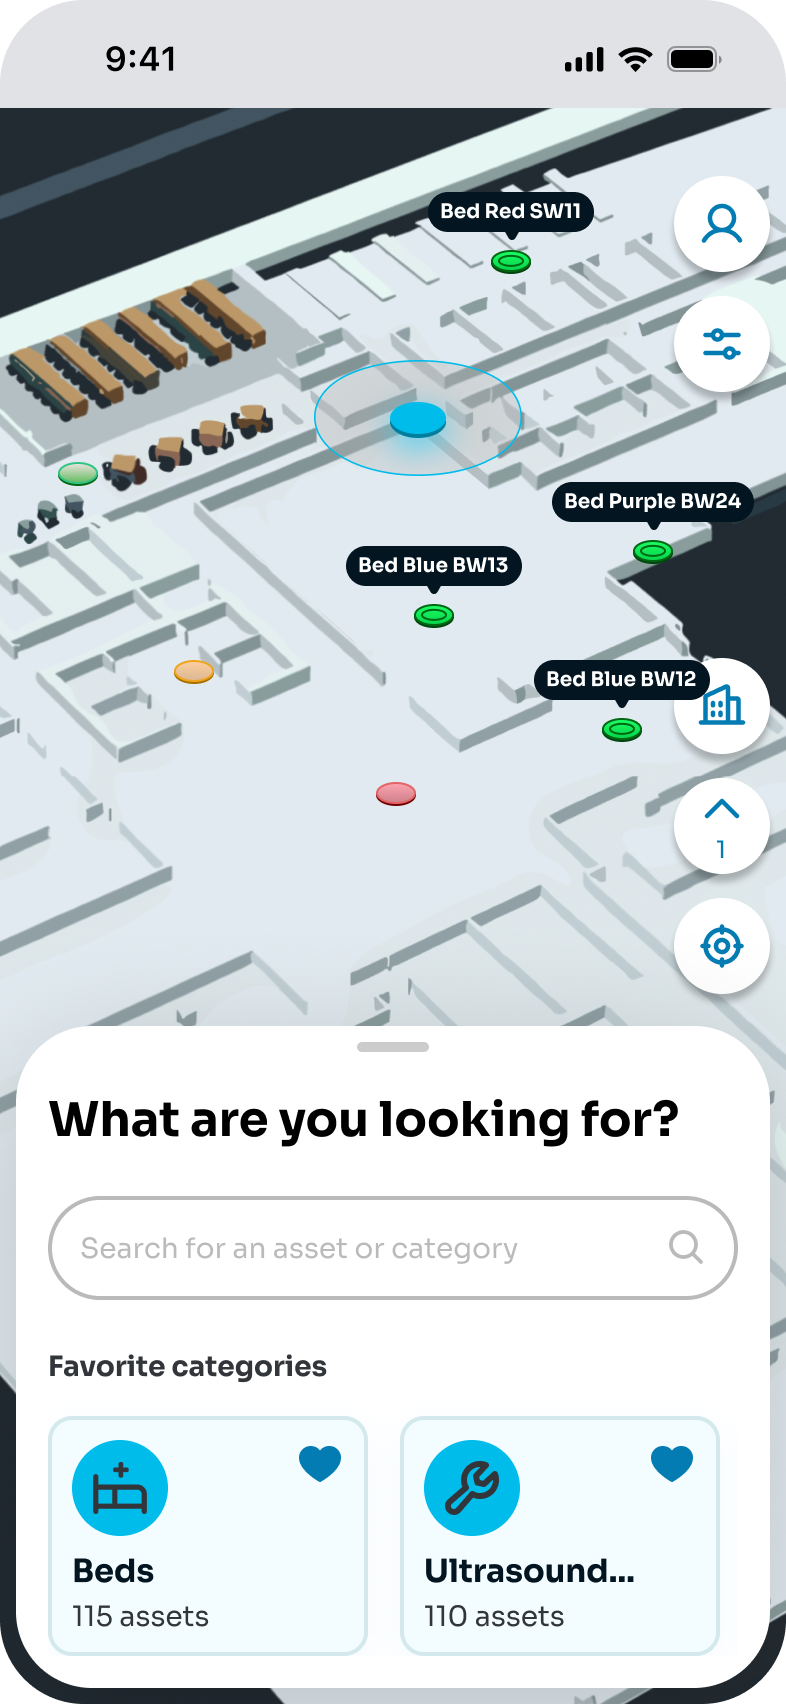
Use the Cisco Asset Tracker mobile app to search for assets, view their location and details, get directions within a building, and confirm the physical asset at close range.
Complete the following before mobile rollout:
-
Complete the Cisco Spaces OS, hierarchy, Digital Maps, IoT Services, tag, category, asset, and identity configuration described earlier in this runbook.
-
Complete tenant-to-domain mapping and register each mobile user through the Asset Tracking Dashboard. Users cannot create accounts from the mobile app.
-
Complete the Cisco Spaces Indoor Navigation Runbook for every building and floor where directions or Nearby are required. Allow two to three weeks for enablement.
-
Use a supported iPhone running the current required iOS release. Nearby additionally requires a UWB-capable iPhone and a Cisco tag that supports UWB. Validate the device, OS, tag, and feature combination before rollout.
Sign in and select a location
-
Install Cisco Asset Tracker on a supported iPhone.
-
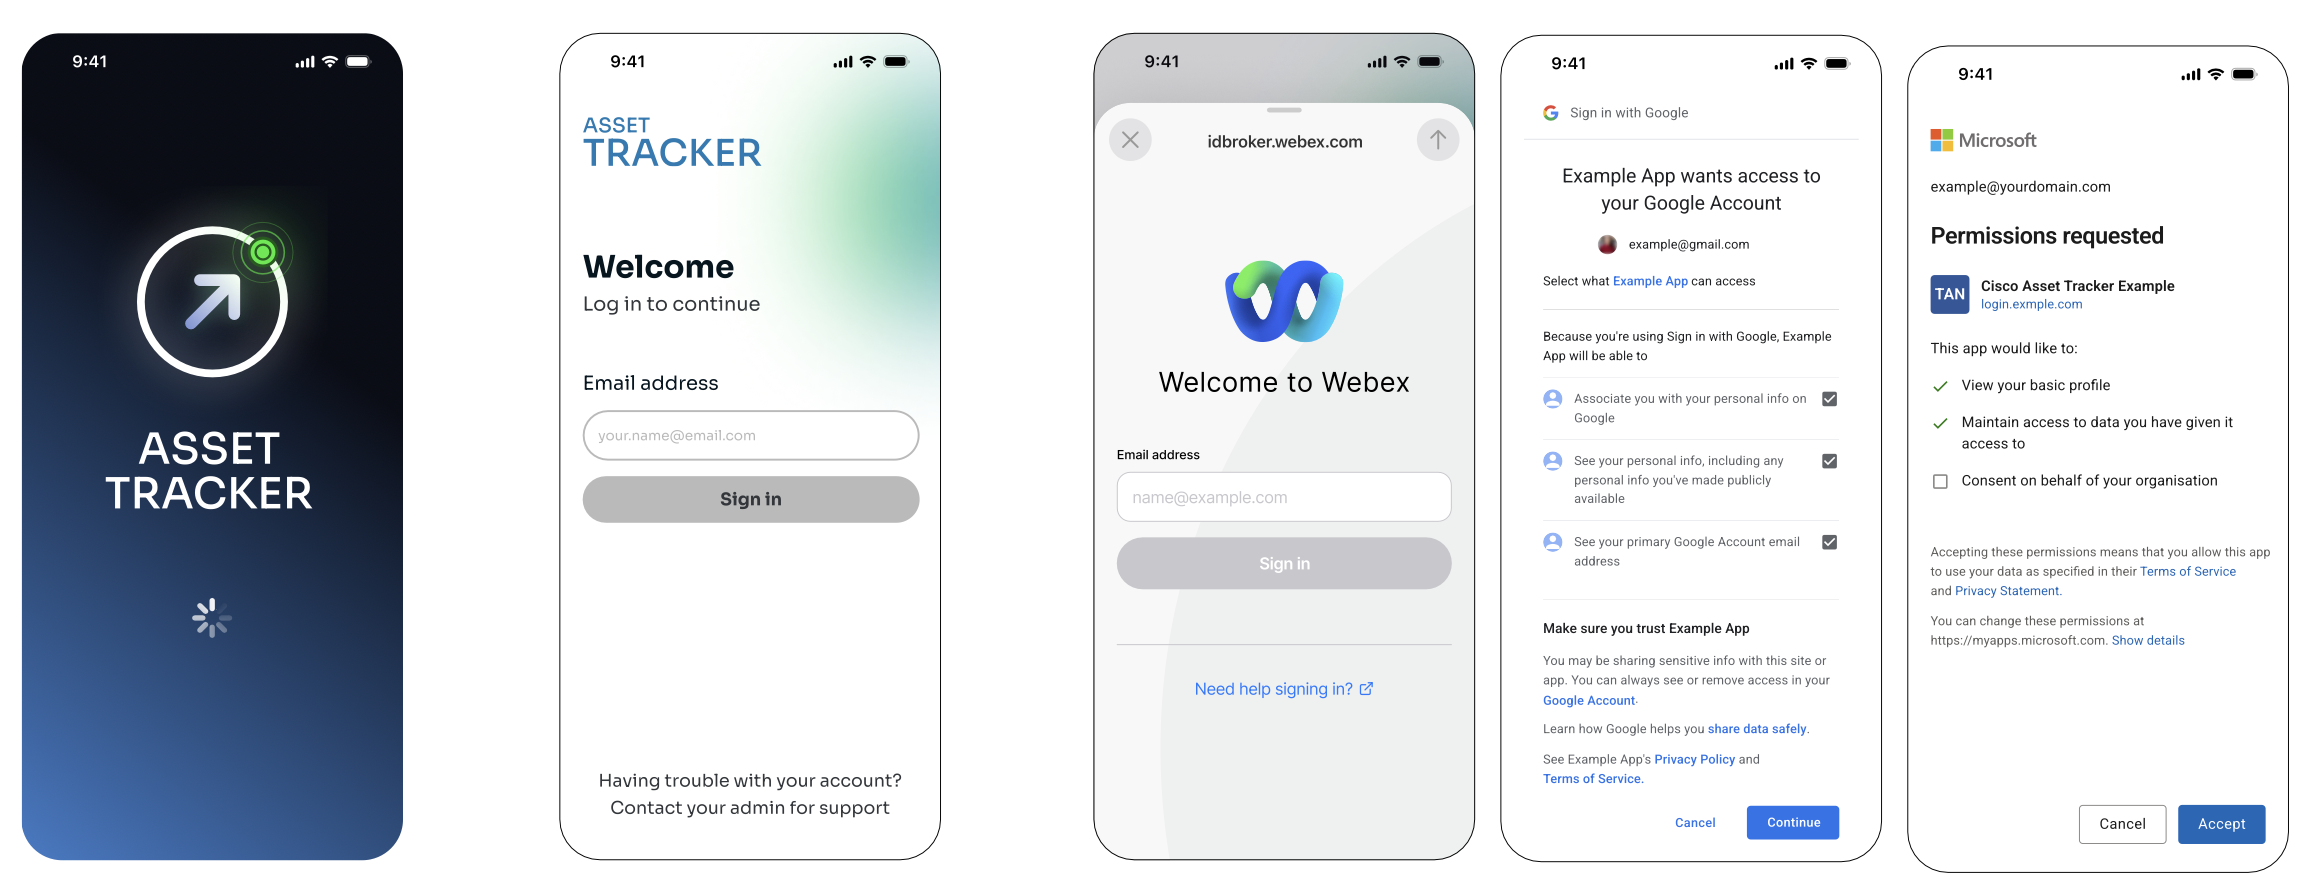
Enter the corporate email address registered by the administrator.
-
Complete authentication with the configured identity provider and any required SSO or MFA steps. If the app presents multiple providers, select the provider used by your organization.
-
On first access, allow the requested Location, Bluetooth, and Motion & Fitness permissions. The app uses these signals to determine the user's building and floor and to support indoor positioning and navigation.
-
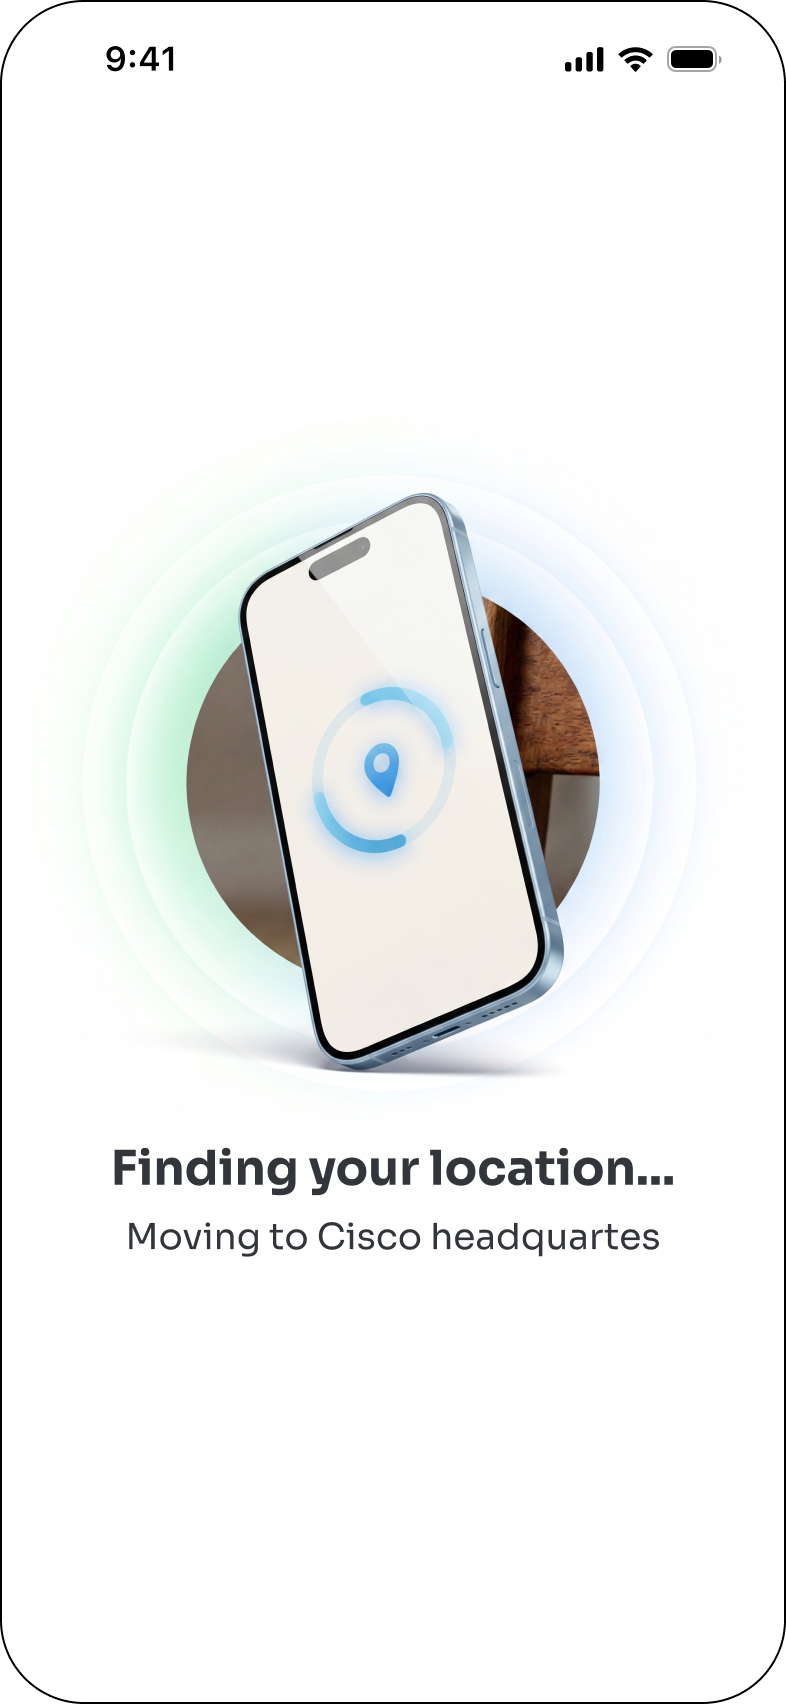
Wait for the app to load the map for the current building. If the app cannot identify an accessible building, it opens the most recently accessed building when available.
-
To switch buildings, select the building control on the map, search for a building, and select one from the list. The list contains only buildings granted to the user by an administrator. The selected building's map loads so the user can browse and search for assets even when not physically there.
If sign-in fails, verify that the exact corporate email is registered in the Asset Tracking Dashboard and that the assigned identity provider is correct. For No Internet Connection or a temporary loading error, restore connectivity and select Try Again. If the error persists, close and reopen the app, then contact the administrator or support team.
Onboard and associate a Cisco Asset Tag from the field
Use this workflow only when the user has permission to at least one asset category and the tag is ready to be activated.
NOTE: Onboarding a tag using Asset Tracker Mobile App only works with a Cisco Asset Tag
-
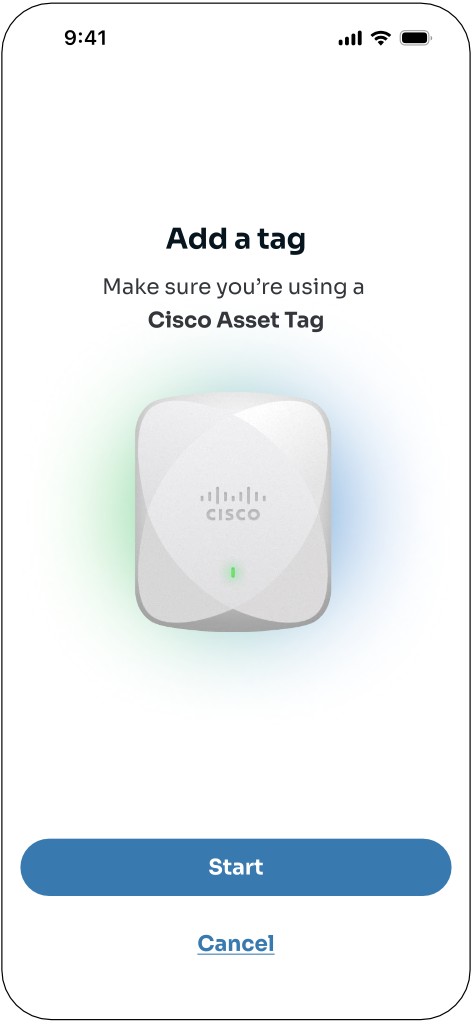
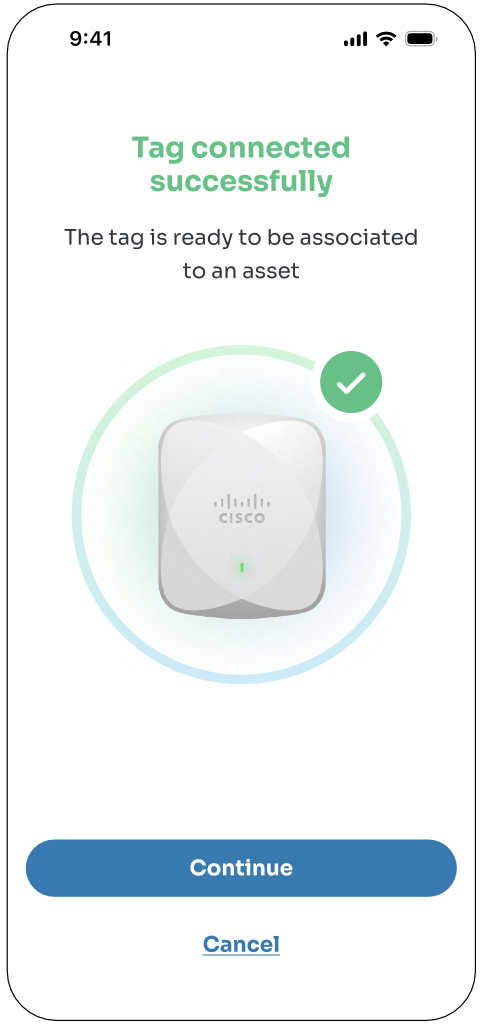
From the map, open the profile menu and select Add a tag.
-
Select the supported Cisco tag type shown by the app.
-
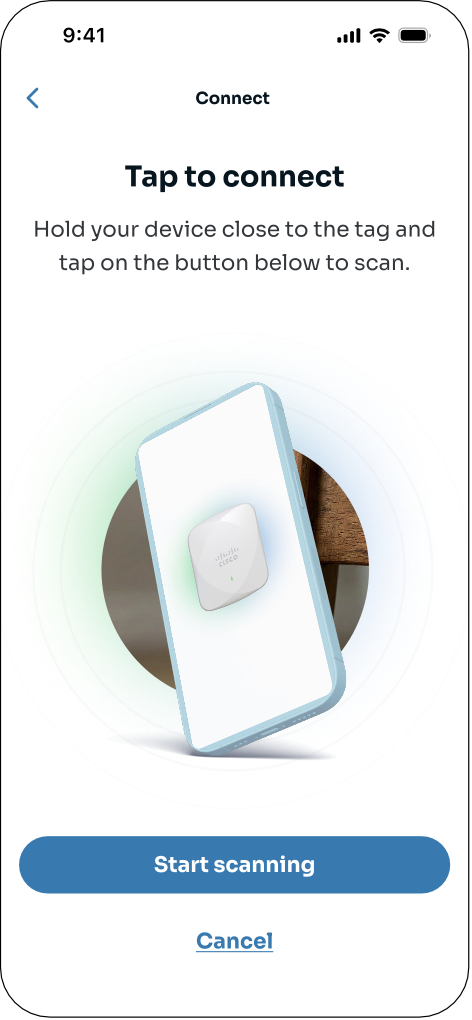
Follow the prompt to activate the tag, then hold the phone close to the tag and select Start scanning. Keep the phone close and steady while the NFC connection is established.
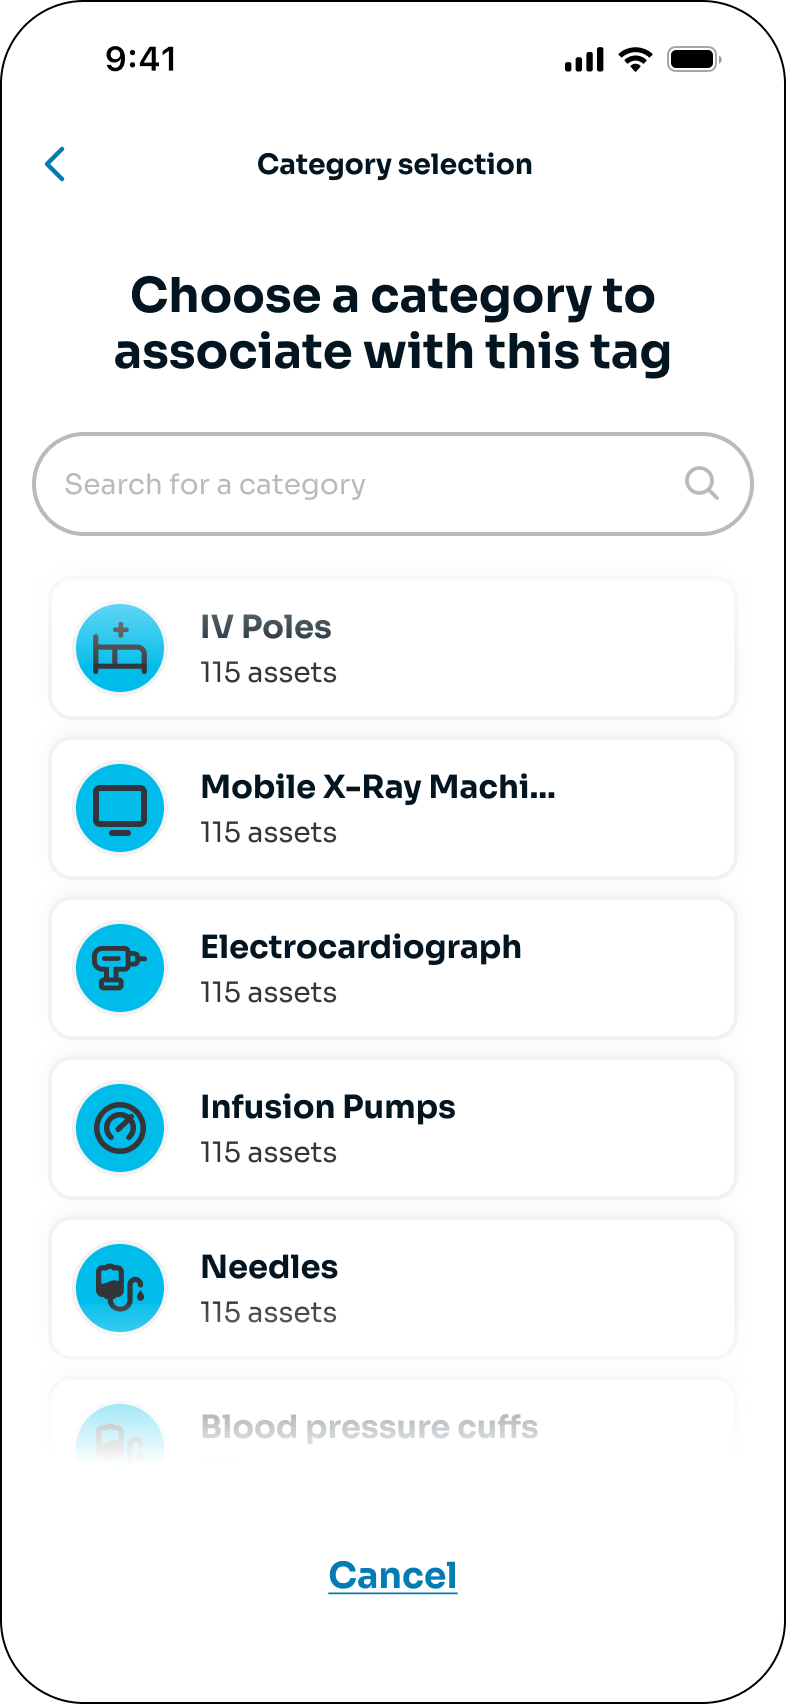
-
Select an existing category, then select an existing asset in that category. Categories and new assets must be created by an administrator in the Asset Tracking Dashboard.
-
Follow the prompt to attach the tag to a flat surface on the asset.
-
Add an asset picture when useful, review it, and select Save. The picture is optional.
-
Confirm the success message. The tag is now associated with the asset and can be found by users with the required permissions.
|
|
|
|
A tag that is already associated cannot be reused for another asset without administrative action. The mobile NFC flow supports Cisco tags; it does not onboard arbitrary third-party tags.
Search for an asset
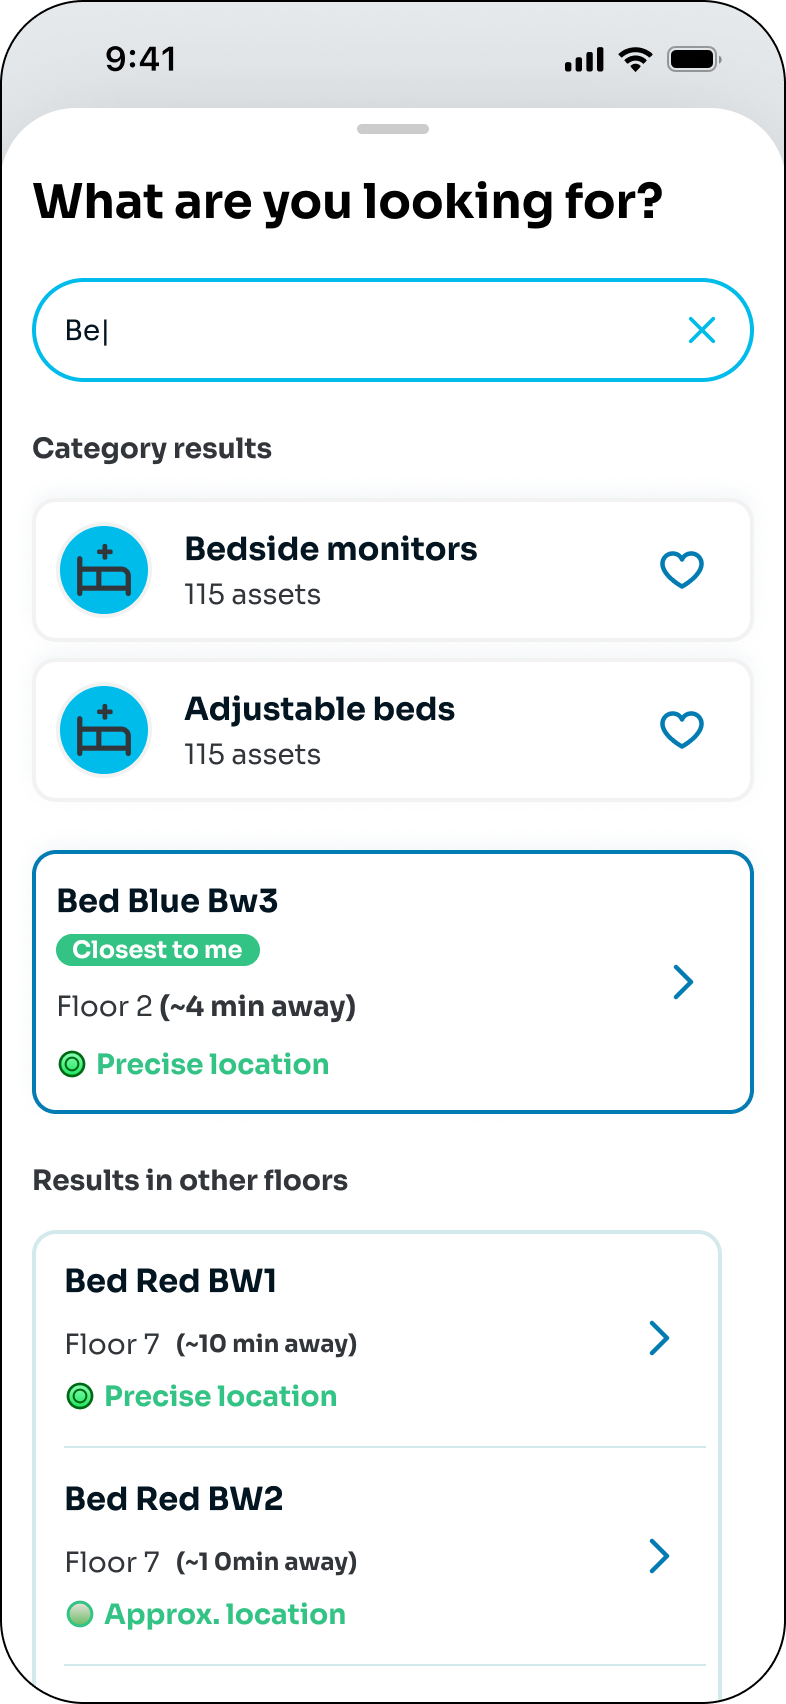
-
From the home screen, select the search field in the bottom sheet.
-
Enter an asset or category name, or select a favorite, recent search, or category from the list.
-
Select a category to browse its assets, or select an asset from the results. The selected asset is highlighted on the map.
-
Use the building control to change buildings or floors when needed.
-
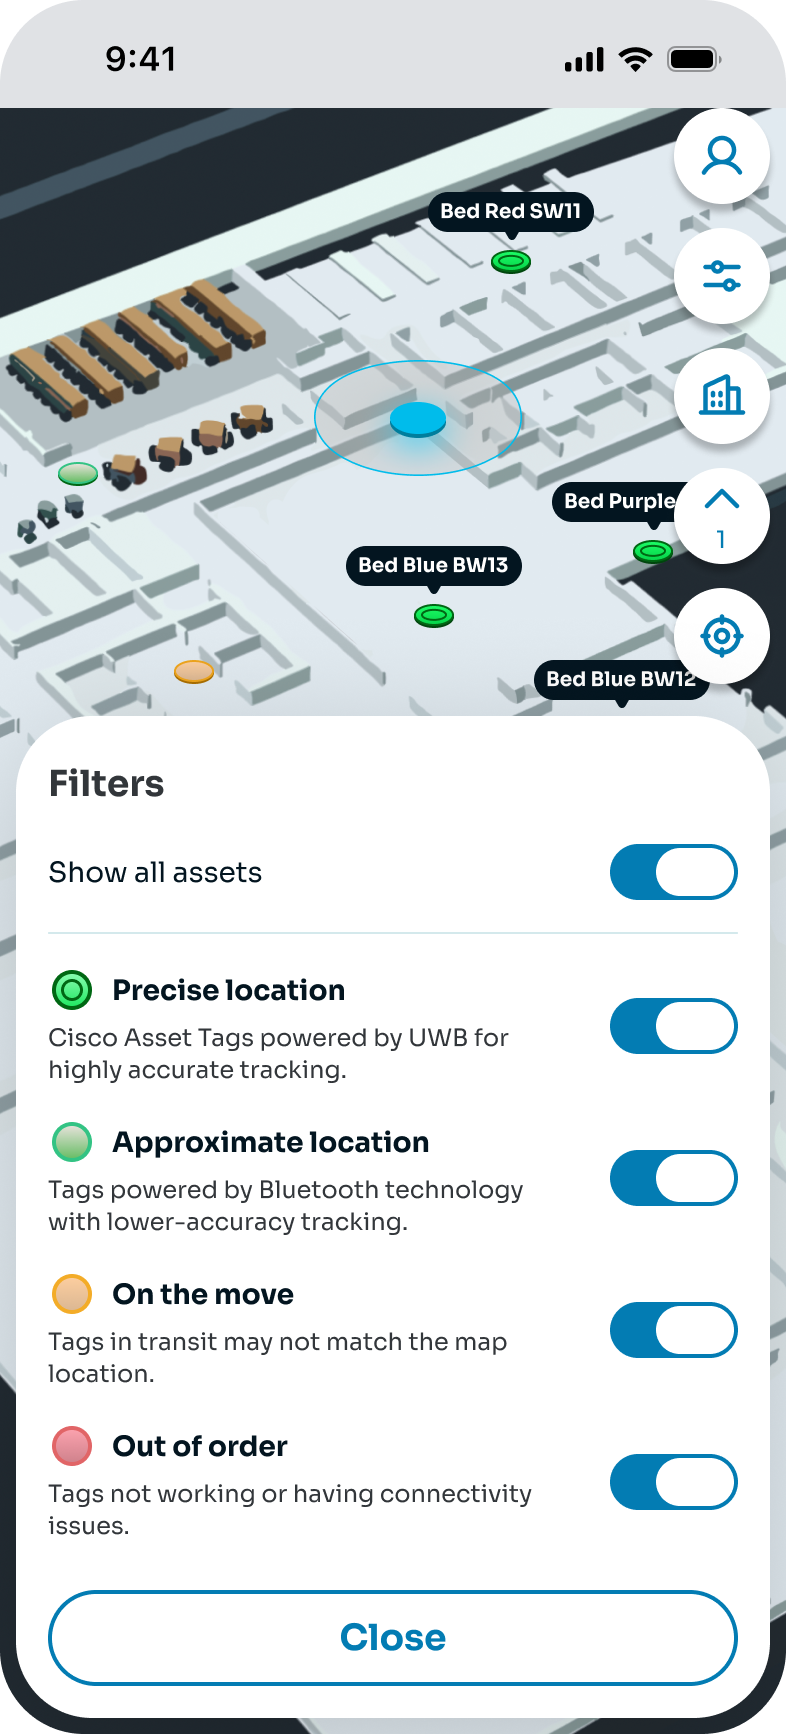
Use the filter control to show or hide available result types, including Precise location, Approximate location, On the move, and Out of order, when those states are available in the deployment.
-
Open the asset details to review the available location, last activity, last-seen information, serial number, department, labels, and other asset metadata.
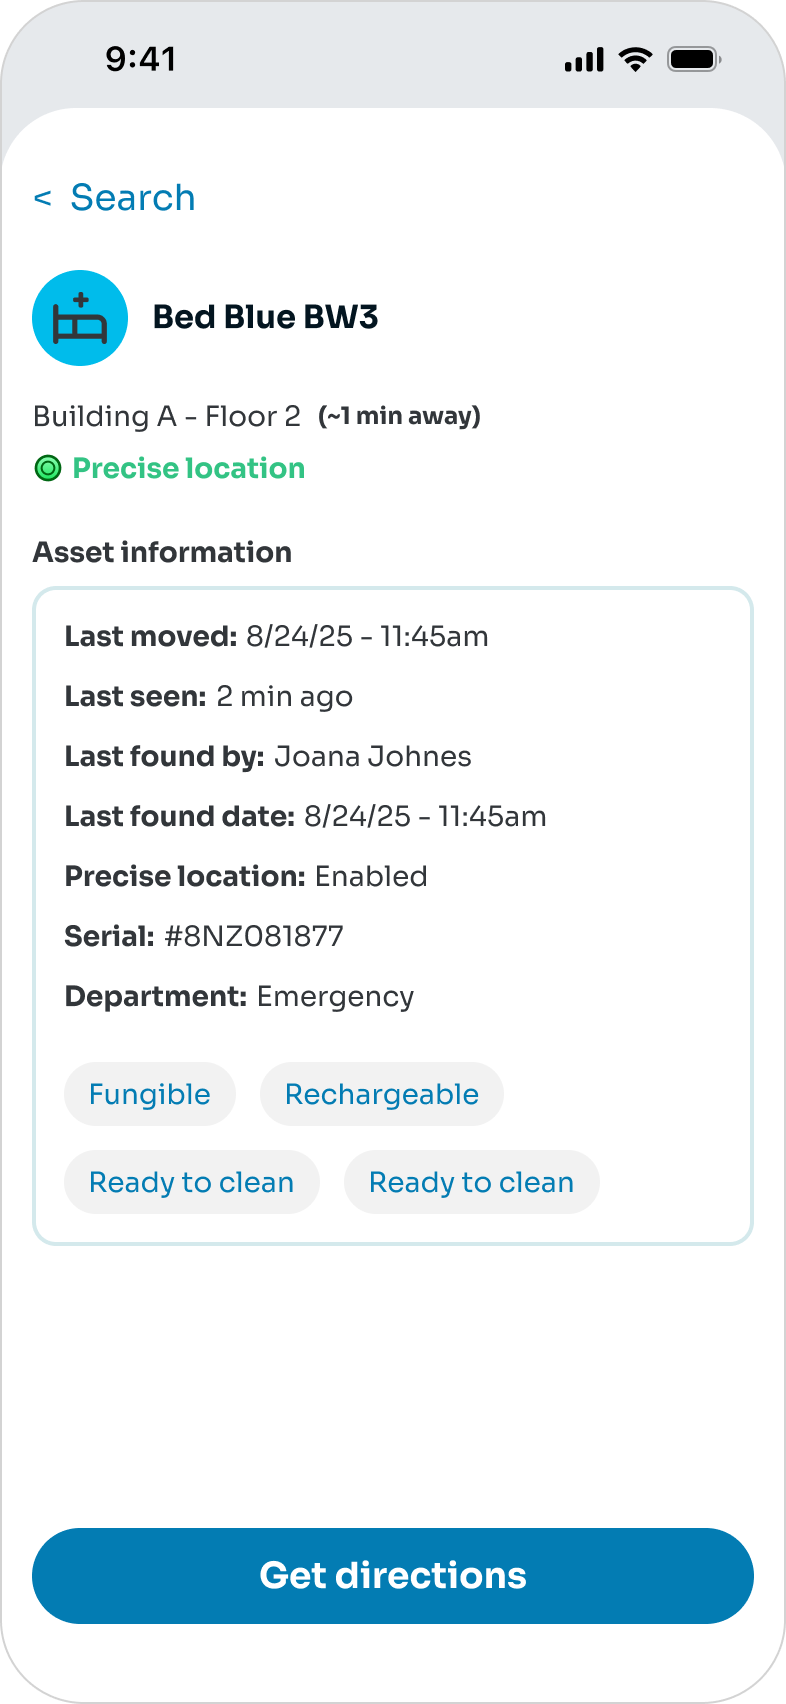
If no categories appear, ask an administrator to create categories or update the user's category permissions. If no assets appear on the current map, change floors or buildings and confirm that the asset has a current location.
Navigate to an asset
-
Select an asset from the search results or map.
-
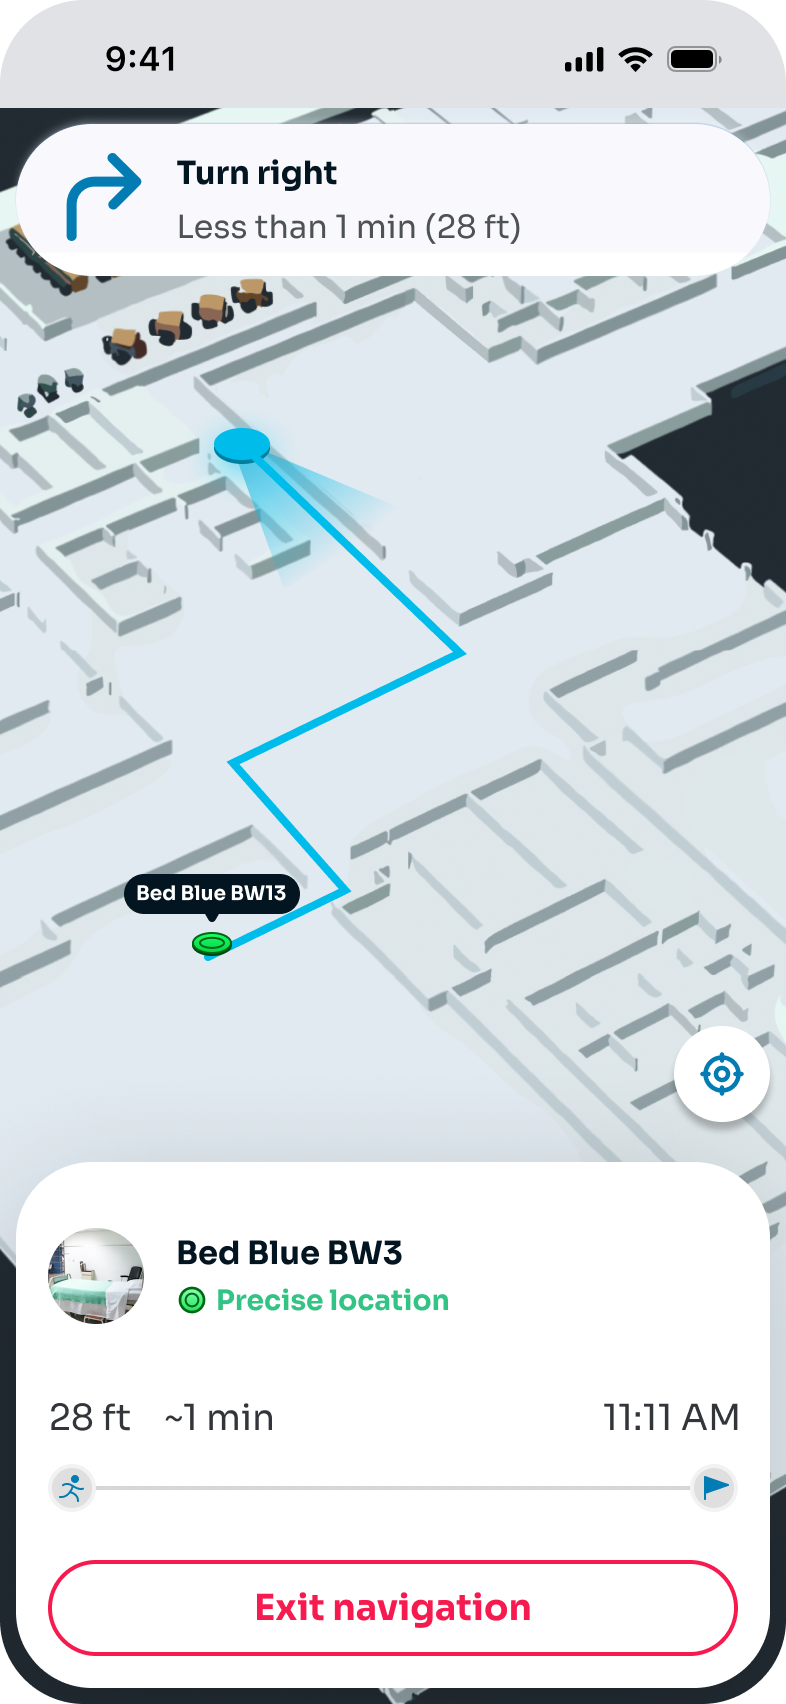
Open the asset details and select Get directions.
-
Follow the turn-by-turn route from the current position to the asset. The route can include floor transitions such as stairs or elevators.
-
Keep Location, Bluetooth, and motion/orientation access enabled while walking. The app updates the map, remaining distance, and next direction as the user moves.
-
If the user takes a wrong turn or leaves the suggested path, continue walking. The route recalculates from the new position.
Mobile directions require a published, navigation-ready map and completed Indoor Navigation for the building and floor. Asset search and the administrative dashboard can still work when Indoor Navigation is not enabled.
Use Nearby and confirm the physical asset
Nearby is the close-range portion of navigation for a supported UWB asset tag.
-
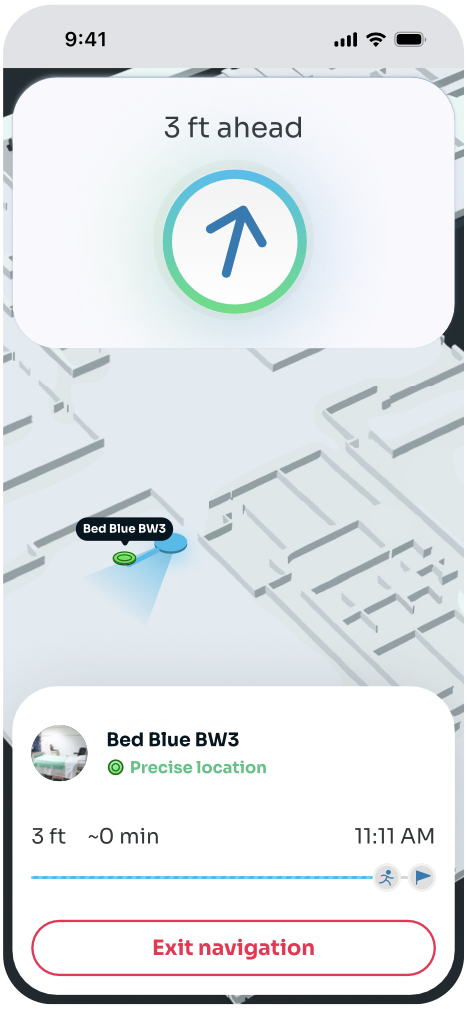
During navigation, move toward the selected asset until the app detects the tag's UWB signal. Nearby typically activates when the user is within approximately 20 feet of the tag.
-
When prompted, allow Camera and Nearby Interaction access. These permissions are required for the close-range experience.
-
Hold the phone so the camera and top edge are unobstructed. Move the phone slowly from side to side if the directional arrow does not appear.
-
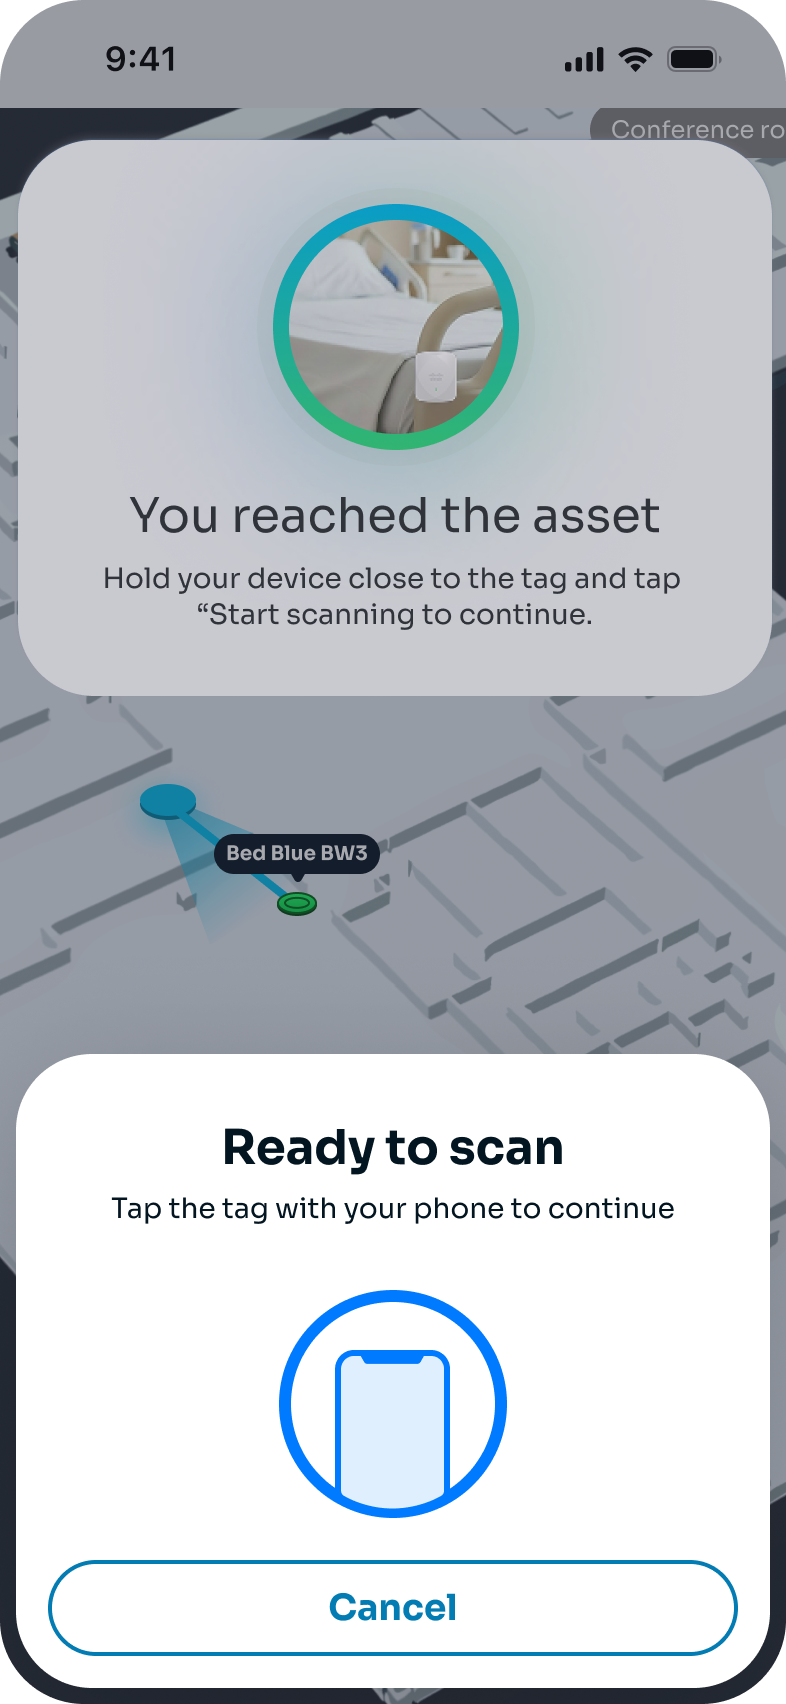
Follow the arrow and distance shown by Nearby until the app displays You reached the asset. The app displays this confirmation when the user is within approximately 3 feet.
-
Hold the phone close to the Cisco tag and select Start scanning when prompted. NFC is activated automatically for the confirmation step.
-
After the tag is recognized, review the asset information and select Finish or search for another asset.
If Nearby cannot establish a signal, the app falls back to map navigation when possible. If Nearby is not available, confirm the phone supports UWB, the selected tag supports UWB, Indoor Navigation is complete, and the required permissions are enabled.
Mobile troubleshooting
-
No categories or no Add a tag completion: Ask an administrator to confirm that the user has access to at least one category and that the required existing asset is registered.
-
Connection failed while scanning: Select Try Again and slowly bring the phone close to the tag. If the error continues, contact the administrator or support team.
-
Tag already in use: The tag is associated with another asset. Contact an administrator.
-
Unsupported tag: The NFC confirmation flow supports Cisco tags. Use a supported Cisco tag or complete the appropriate administrative workflow for a third-party tag.
-
Nearby arrow is missing: Confirm Camera and Nearby Interaction permissions, keep the camera and top edge of the phone clear, and move the phone slowly from side to side.
-
Nearby signal drops: Continue with map navigation. Confirm the phone, tag, maps, infrastructure, and Indoor Navigation configuration before retrying.
CAVEATS AND TIPS
Accuracy is a system outcome
AP density and position, map alignment, RF conditions, tag mounting and movement, firmware, and location-engine configuration all affect accuracy. Neither BLE nor UWB provides the same precision in every environment.
Navigation must start early
The dashboard can manage and locate assets without Indoor Navigation. Mobile directions and Nearby cannot be treated as a final-day addition. Allow two to three weeks and complete the navigation workstream before end-user rollout.
BLE is the UWB control channel
Cisco Asset Tags use BLE for discovery, provisioning, and management even when UWB supplies the higher-precision location signal.
Cisco Asset Tag LED behavior
The Cisco Asset Tag has one green LED. Wake a stationary tag by shaking or tapping it before interpreting the LED.
|
Pattern |
Meaning |
Expected behavior |
|---|---|---|
|
Three rapid blinks |
The tag is not provisioned and is waiting for Cisco Spaces configuration. |
Repeats more often in motion and less often at rest. |
|
One blink |
The tag is provisioned and operating normally. |
Usually visible when the tag is moving. The LED can remain off at rest to conserve battery. |
|
Two rapid blinks |
The tag is provisioned and operating in constant UWB blinking mode. |
The LED follows the configured UWB transmission interval. |
|
No LED after motion |
The battery may be depleted, disconnected, or still isolated. |
Inspect the battery and isolator, then wake the tag again. |
Reset a Cisco Asset Tag
-
Open the battery cover.
-
Locate the reset control.
-
Press and hold the reset control for approximately 10 seconds.
-
Wake the tag and confirm the unprovisioned three-blink pattern returns.
-
Allow automated onboarding to provision the tag again and verify the successful request history.
Troubleshoot missing directions or Nearby
For missing directions, confirm Indoor Navigation is complete, the map is published, the asset has a valid location, and the user can access the location.
For missing Nearby, also confirm the feature is enabled, the phone supports UWB and Nearby Interaction, the app and OS are supported, the tag supports Nearby, and the user is within close range.
FAQ
Does UWB replace BLE?
No. Cisco Asset Tags use BLE for discovery, provisioning, and control. UWB adds a higher-precision location signal when the infrastructure and tag support it.
Why is an asset visible but directions are unavailable?
Asset inventory and location can operate without Indoor Navigation. Directions require a completed Indoor Navigation deployment for the building and floor.
Does UWB guarantee sub-metre accuracy everywhere?
No. Precision depends on the validated design, AP positions, map alignment, tag placement, physical environment, and live system state.
Can third-party tags be used?
Yes, where the tag type and protocol are supported. Management, telemetry, battery reporting, mobile, and precision features vary.
Can users be restricted to selected assets and locations?
Yes. Roles can be read-only or read-and-write, scoped by category and location, and designated as mobile-app-only.
What is next after the deployment is completed?
After completing the deployment, work with asset managers and operations teams to prepare asset tags, onboard end users, and establish training and ongoing management processes. The Asset Tracking Adoption Playbook provides recommended launch activities, training resources, and best practices to help teams effectively track, monitor, and manage enterprise assets.