Overview
Portal Beam is a multi sensor BLE device from Kontakt.io that provides information about room occupancy (people count) and environmental data like temperature and humidity that is leveraged into Cisco Spaces outcome applications. Portal Beams leverage the existing Cisco wireless access point infrastructure and Cisco Spaces plugin framework to provide additional visibility into occupancy within workspaces without needing any additional gateways or significant additional investments.
Prerequisites
For Catalyst based customers
|
Component |
Supported configuration |
Notes |
|---|---|---|
|
Cisco Catalyst 9800 WLC |
IOS-XE 17.15.6 or higher |
BLE may work on older or other releases, but this runbook supports only these versions because they include key BLE bug fixes. |
|
Access points |
C9120 or later, with the latest Spaces BLE Gateway installed (also called the BLE IOx app) |
BLE may work on some other AP models or without the IOx app, but this combination is required for the performance expected in a supported deployment. |
|
Spaces Connector |
Version 3.3 or later, using the latest released Docker images |
Version 2.3 is no longer supported. Refer to the Spaces OS runbook for connector sizing guidance. |
For Meraki based customers
This combination has not undergone validation. We recommend engaging with the Spaces product management teams to explore this use case further.
Cisco Spaces requirements
-
Maps: A Cisco Spaces Digital Map (CAD-based Rich Map) is required. Follow the Rich Map best practices to ensure the map meets basic requirements, including correct names and layers.
-
Access point placement: Place access points on the network map using Catalyst Center, Prime Infrastructure, or Cisco Spaces AnyLocate. Ensure each access point is positioned correctly on the floor plan.
-
Licensing: Cisco Spaces Advantage or Unlimited license is required.
-
Optional Webex devices for Kiosk: Cisco Webex Pro Boards are required if you plan to use Portal Beam data in the Kiosk experience. Refer to the applicable Kiosk runbook for deployment details.
Kontakt.io requirements
-
Access to physical Portal Beam devices.
-
The appropriate Kontakt licensing or support SKUs for the devices. If the devices were purchased through Cisco Solutions Plus, the required SKUs may already be included. Confirm licensing with the sales team.
Supported and Unsupported Functionality
Supported Functionality:
For Environmental Sensor Data (Temperature and Relative Humidity)
|
App or Feature |
Frequency of Data |
Data |
|---|---|---|
|
Space Manager App Room occupancy view |
Real time |
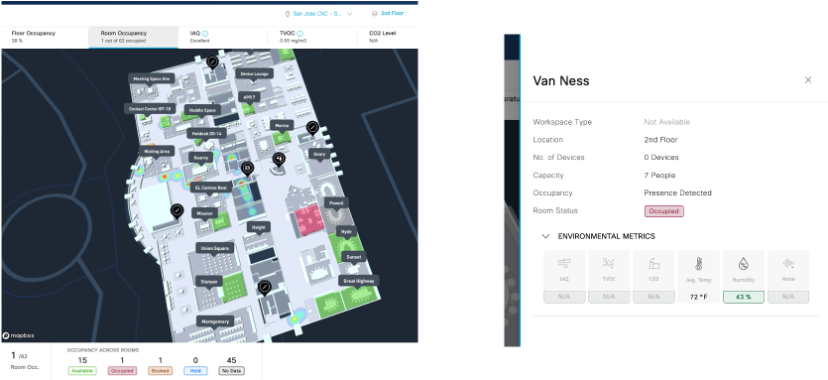
Temperature and Relative Humidity |
|
IOT Services |
Real time |
Temperature and Relative Humidity |
|
Environmental Analytics |
Real time historical |
Temperature and Relative Humidity |
|
Spaces API (Firehose API) |
Real time |
Temperature and Relative Humidity |
For People Count (Room Occupancy) Data
-
Single Portal Beam in a room: one Portal Beam counts up to 10 people. Use one beam in
rooms with an occupancy of 10 people or fewer.
-
More than one Portal Beam in a room: for rooms where occupancy can be more than 10
people, install more than one Portal Beam and calibrate the room from Kio Setup Manager
for iPhone or iPad. Room calibration lets the beams count each person in the room once,
including people standing where two beams' coverage areas overlap.
|
App or Feature |
Frequency of Data |
Outcome |
|---|---|---|
|
Kiosk |
Real time |
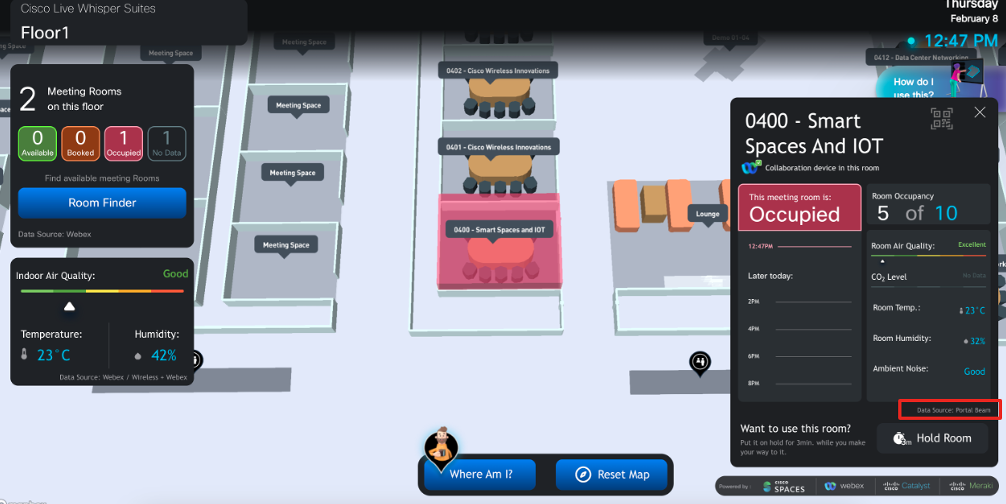
People count on rich map |
|
Space Manager App Room occupancy view |
Real time |
Binary room occupancy (i.e., occupied or unoccupied) |
|
Space Manager App Room occupancy report |
Historical |
People count and binary room occupancy as an exportable report |
|
Space Utilization App Room Occupancy Charts |
Historical |
People Count, Utilization report exports for specific locations and time periods |
|
Spaces API (Firehose API) |
Real time |
People Count |
Supported Space Types
Meeting Rooms, Conference Rooms, Small Audio Privacy Rooms.
Unsupported Functionality:
The current joint solution is limited and does not support:
-
IR based location in Spaces
-
Integration with Portal Lights as a 3rd party gateway (Not a supported architecture)
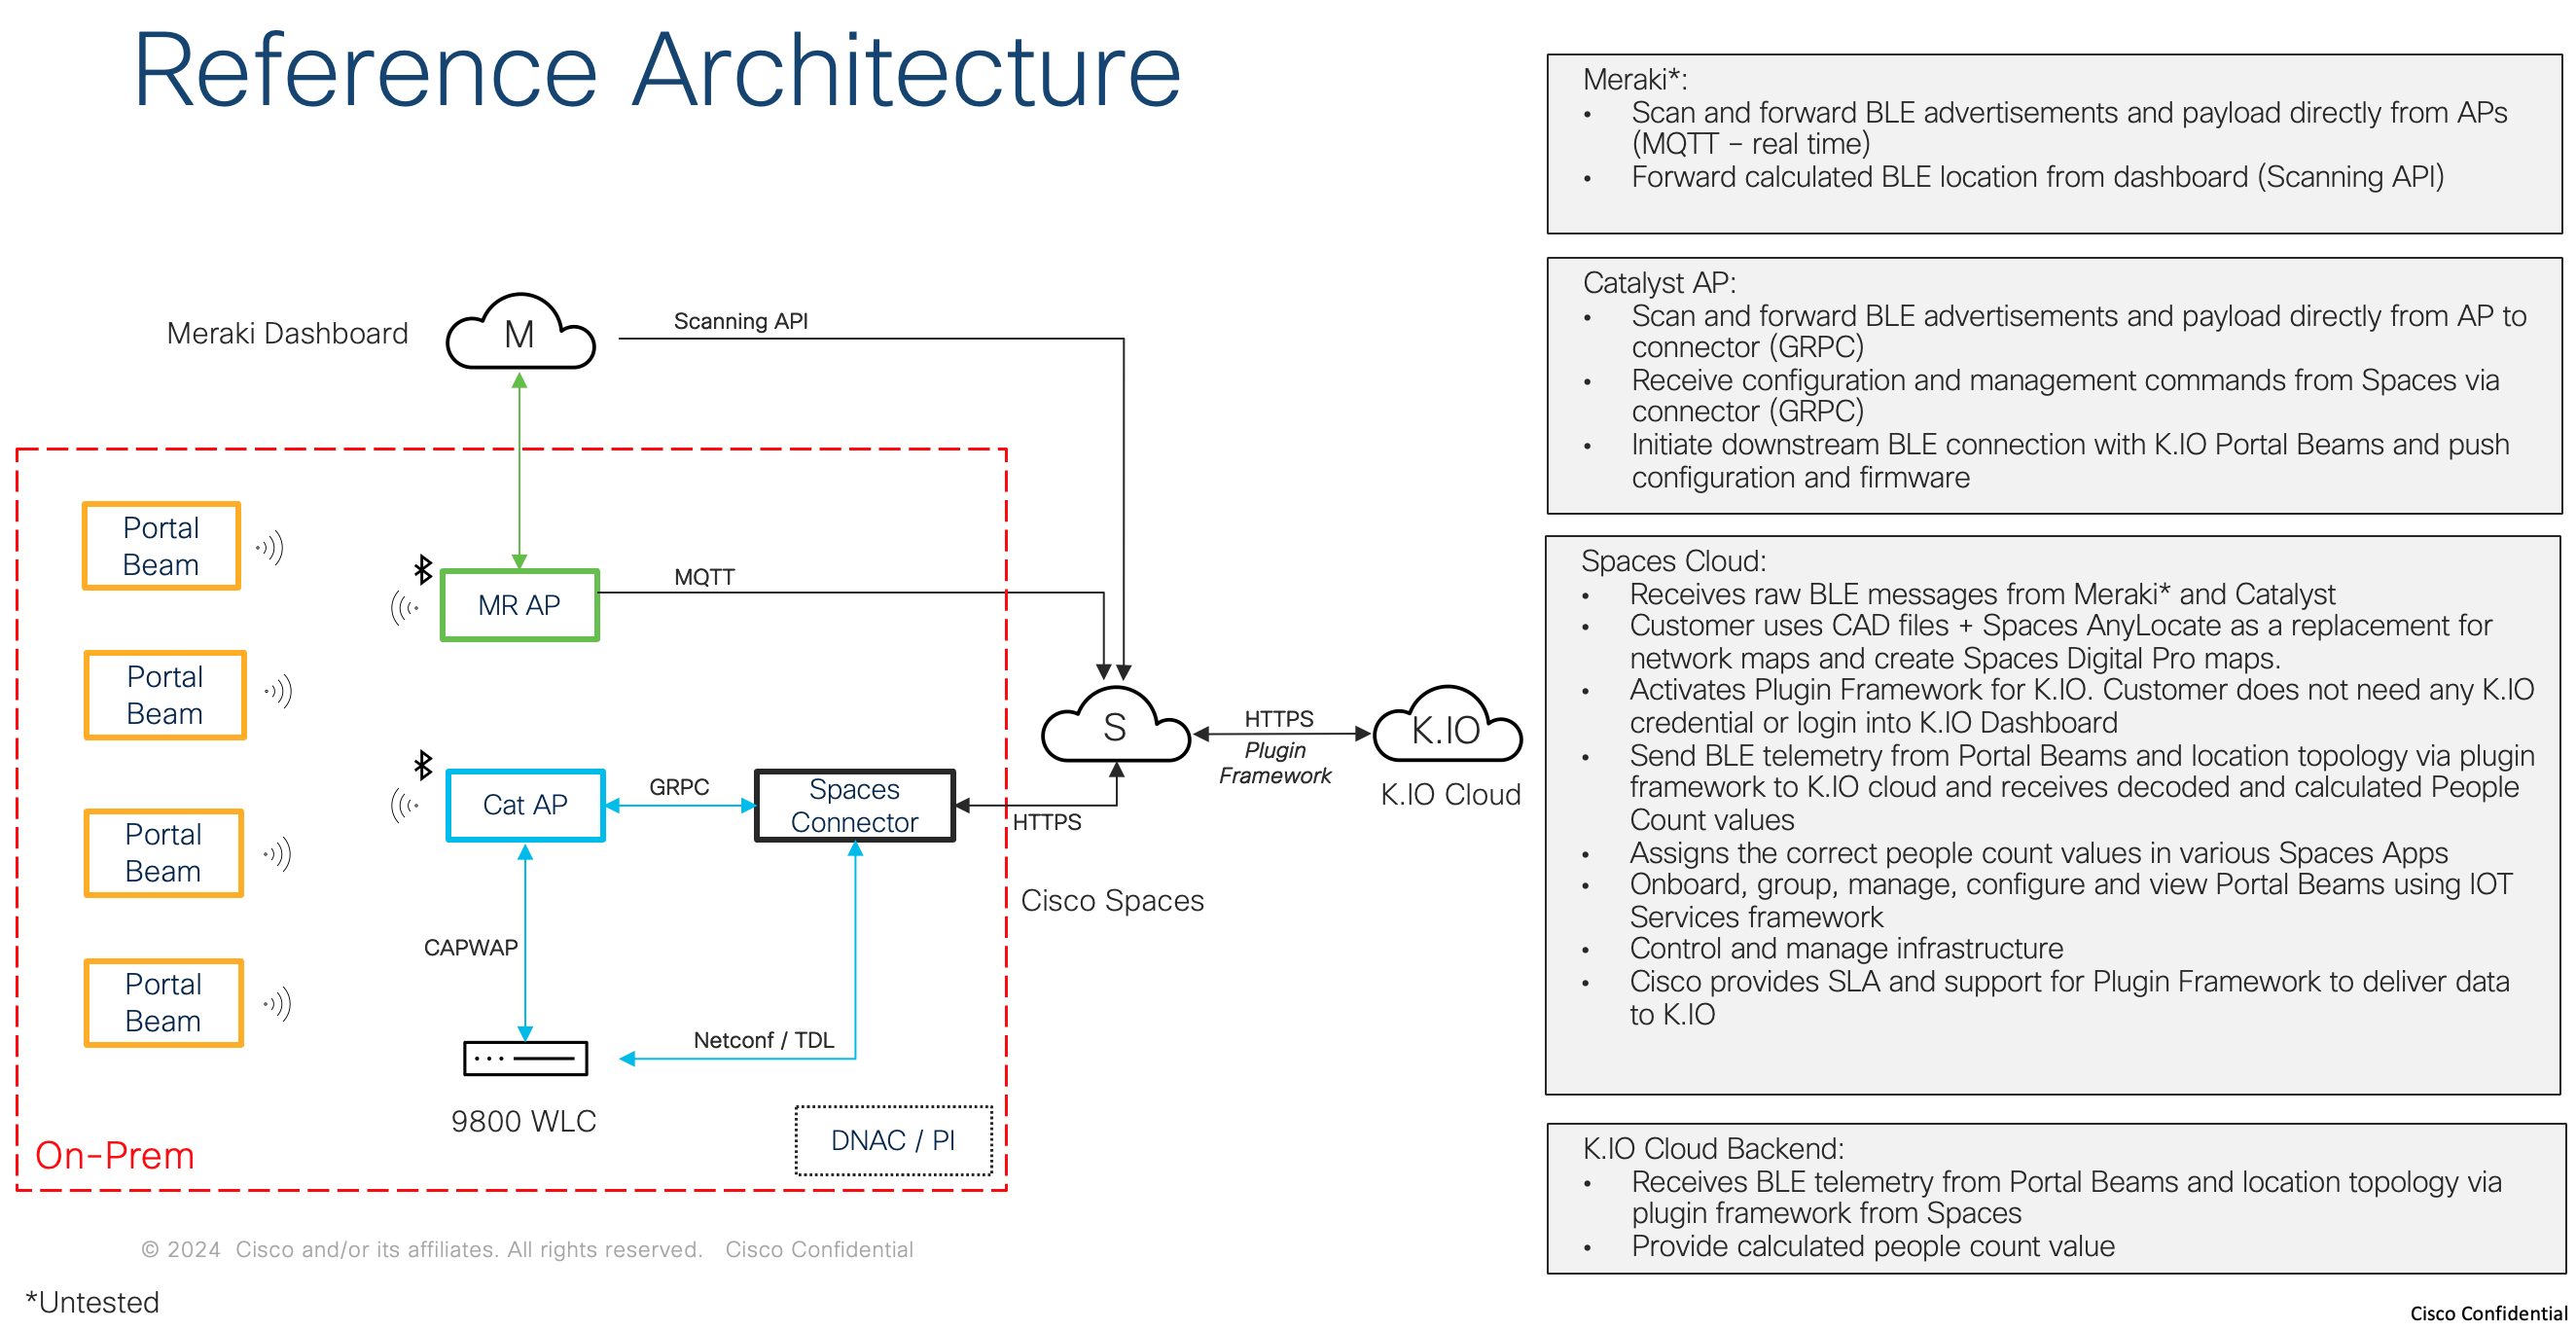
Reference Architecture
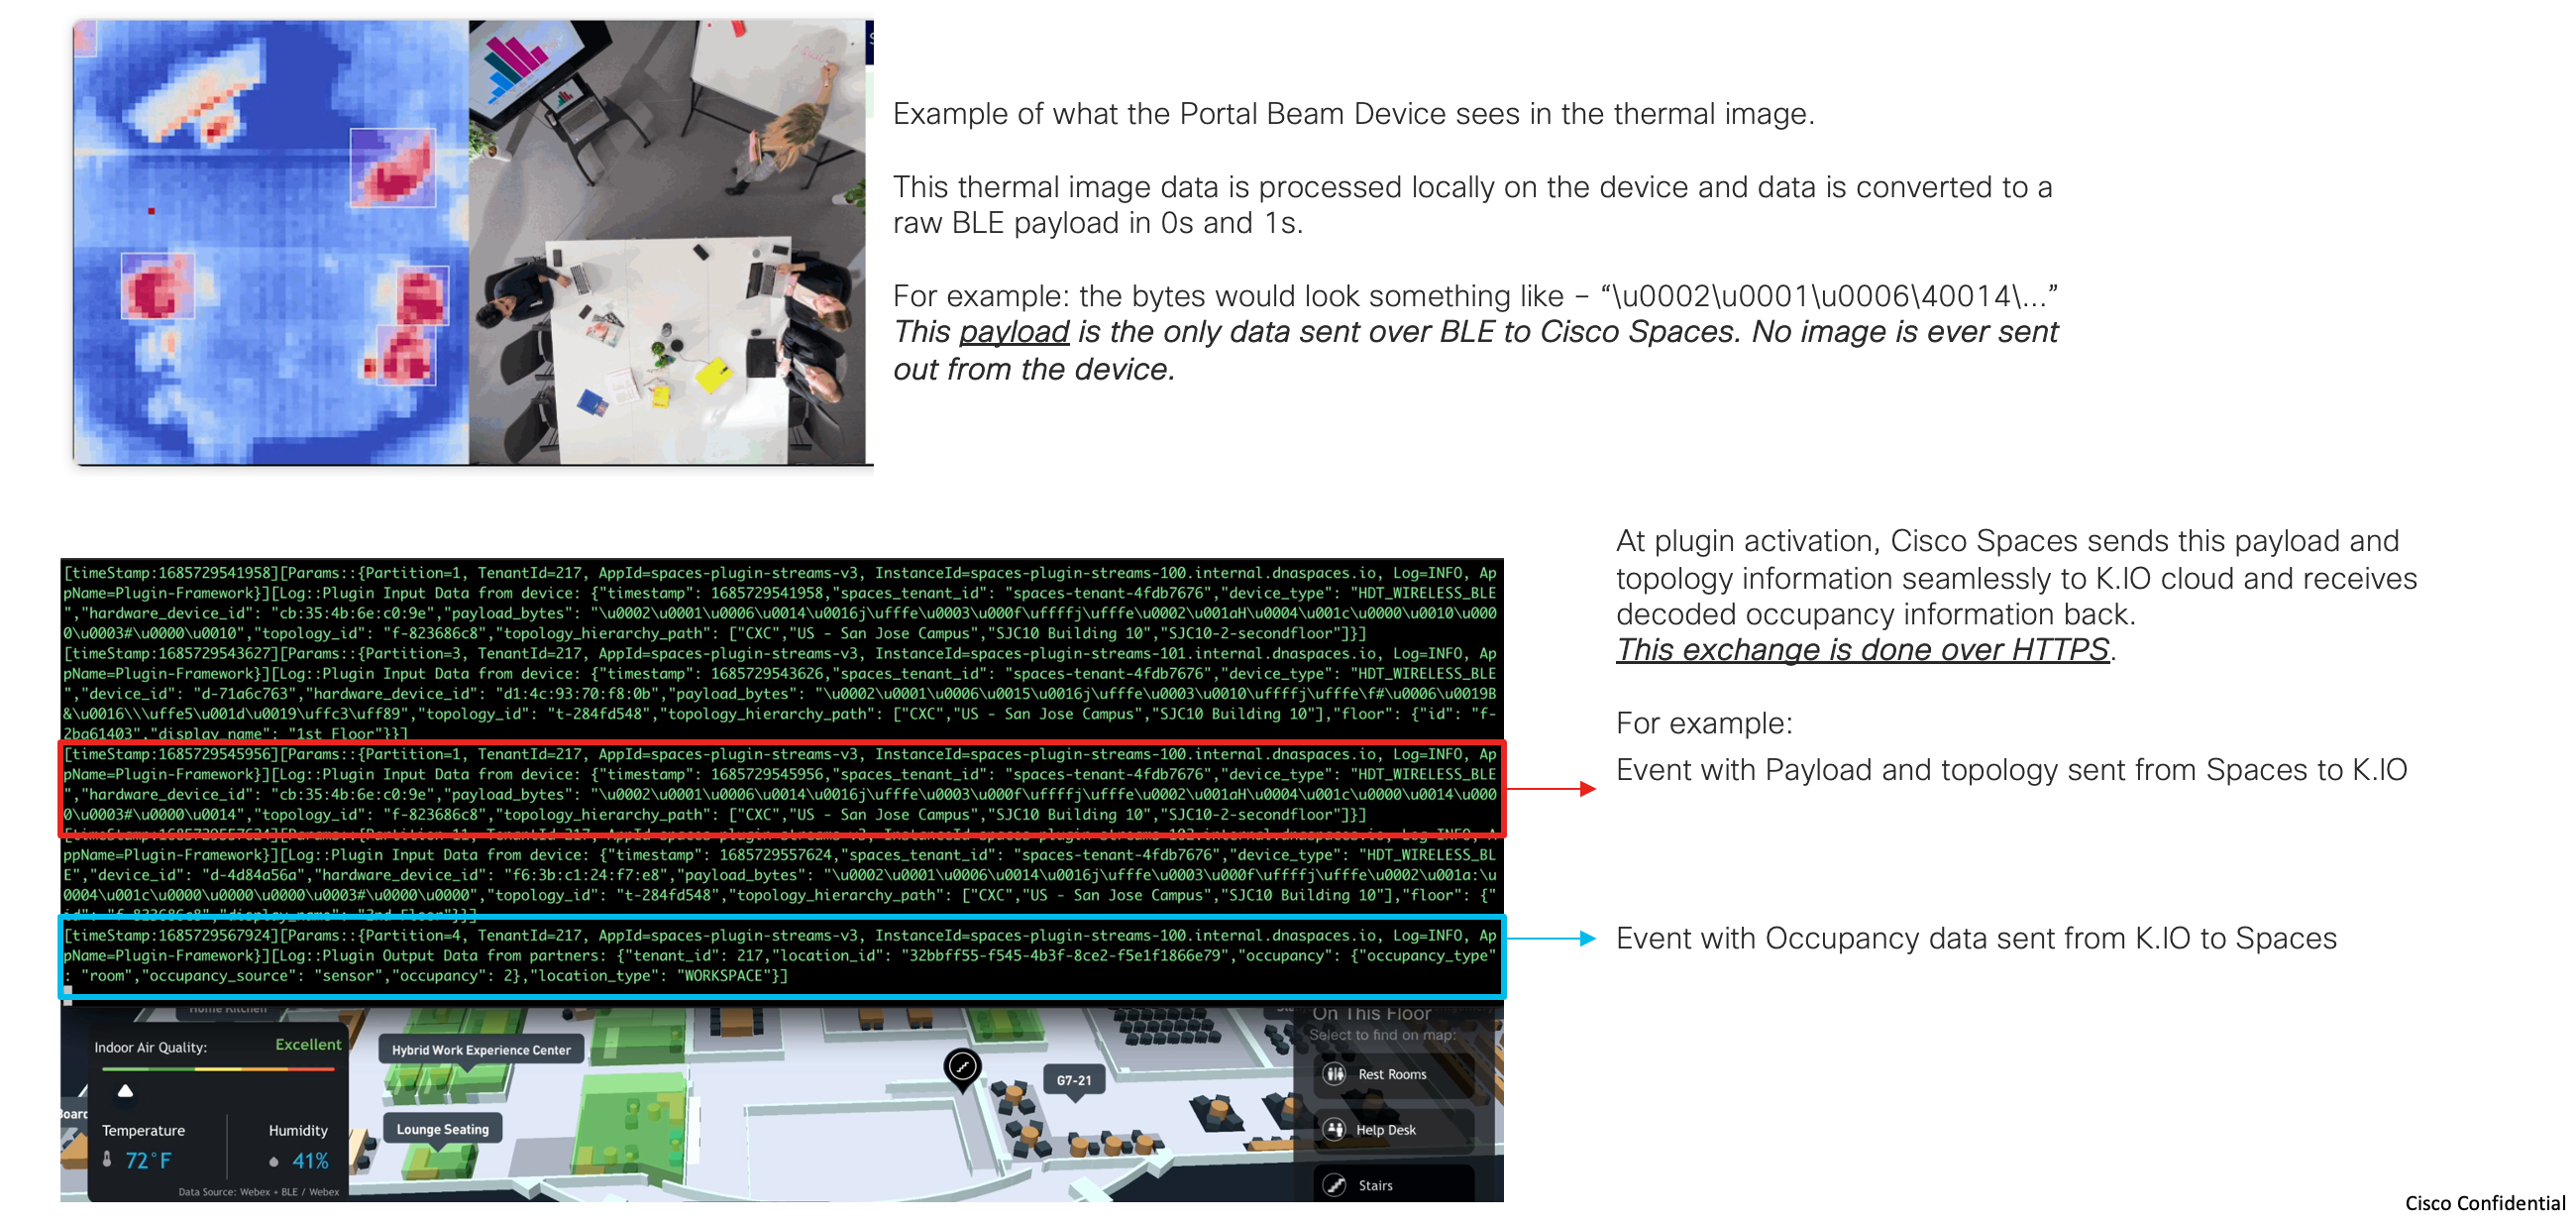
Data Flow and Data Security
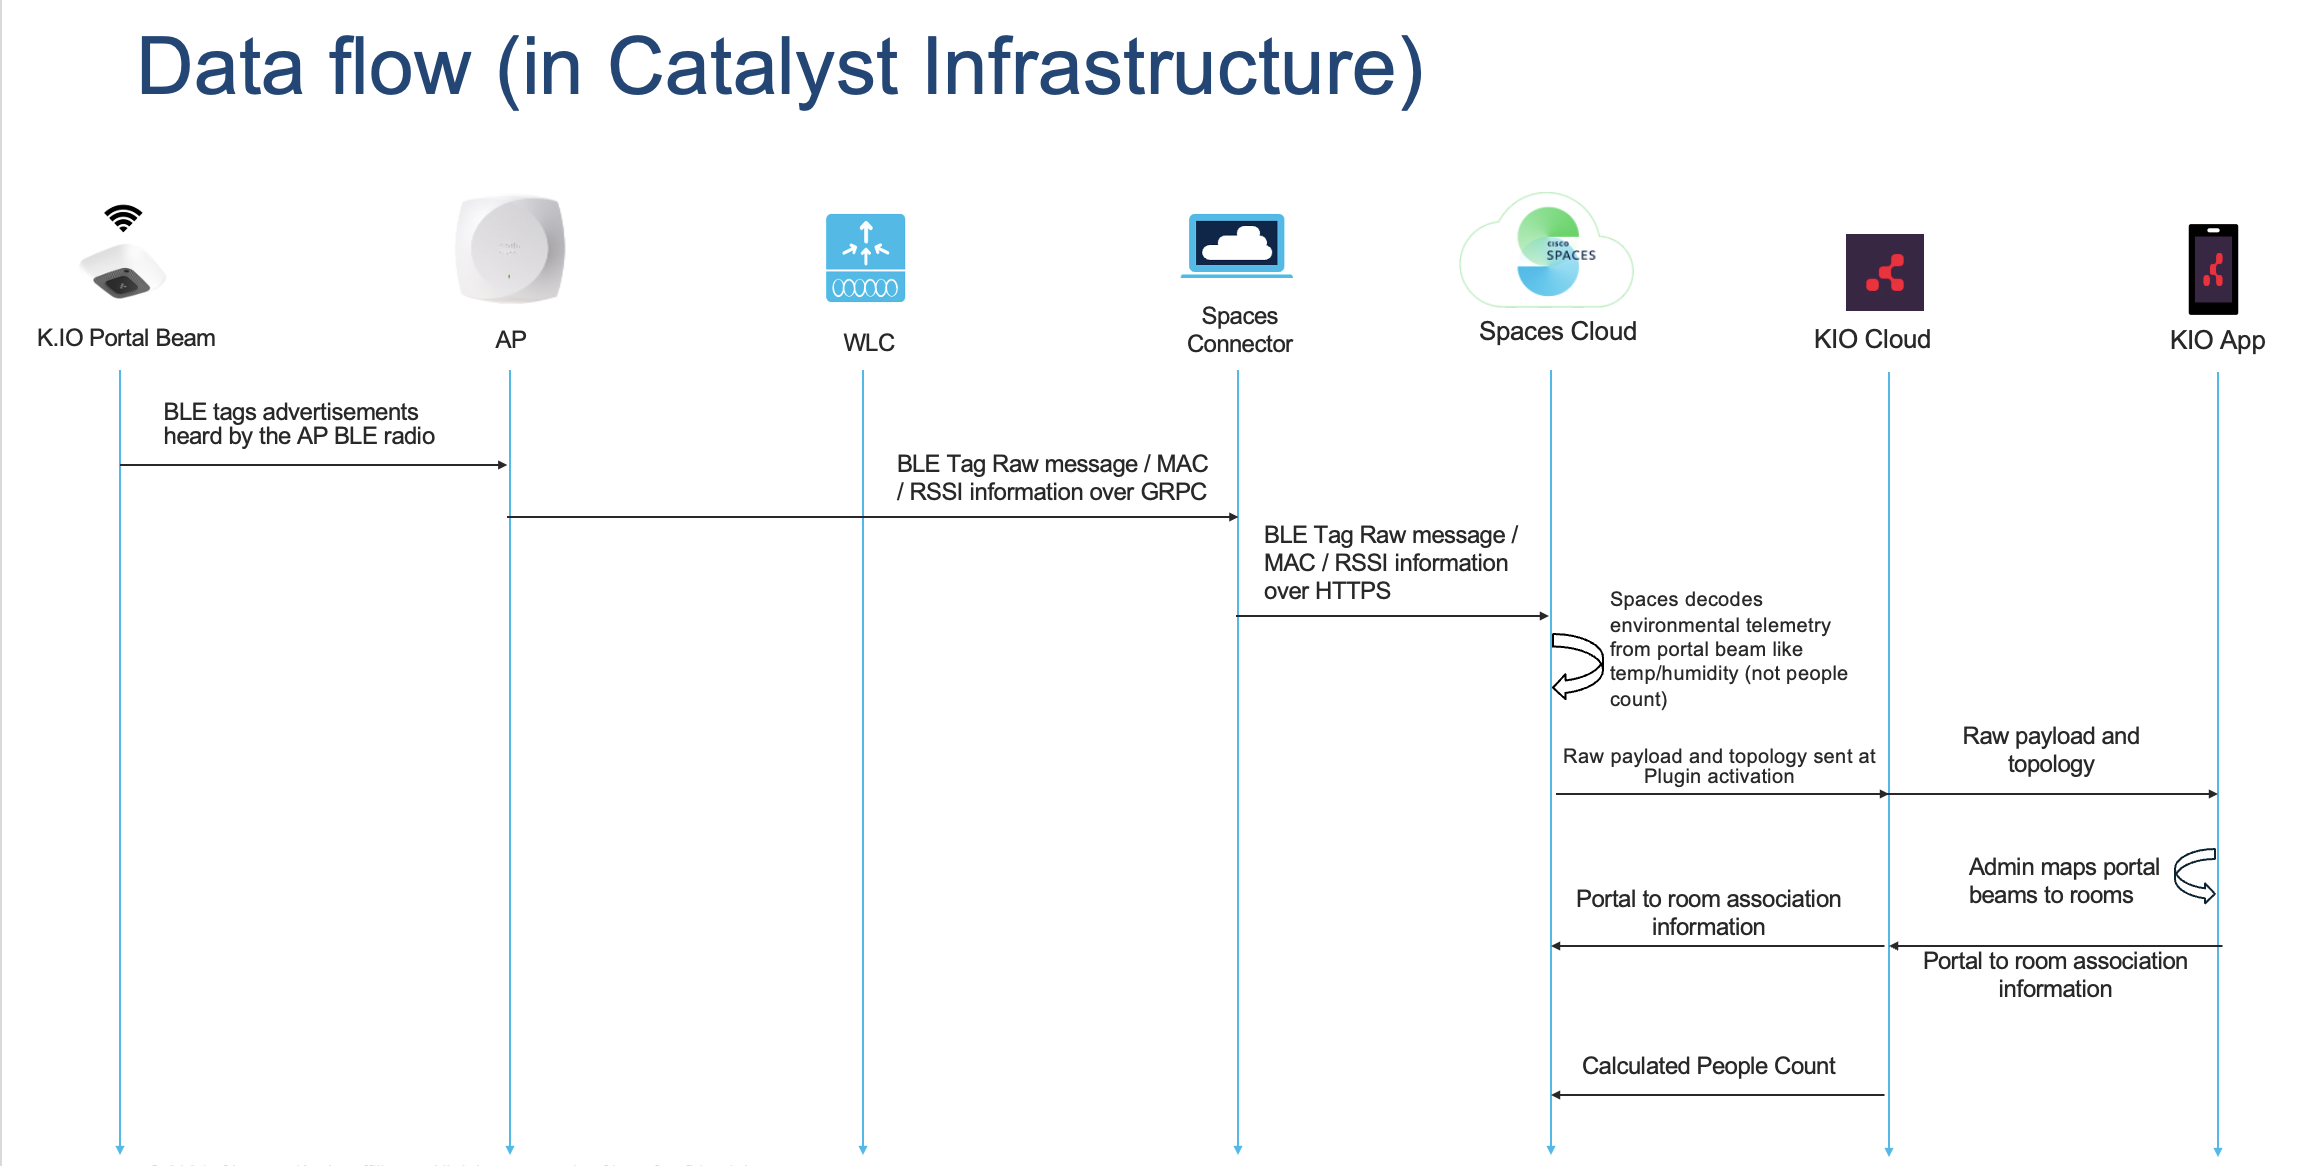
Data Flow Diagram
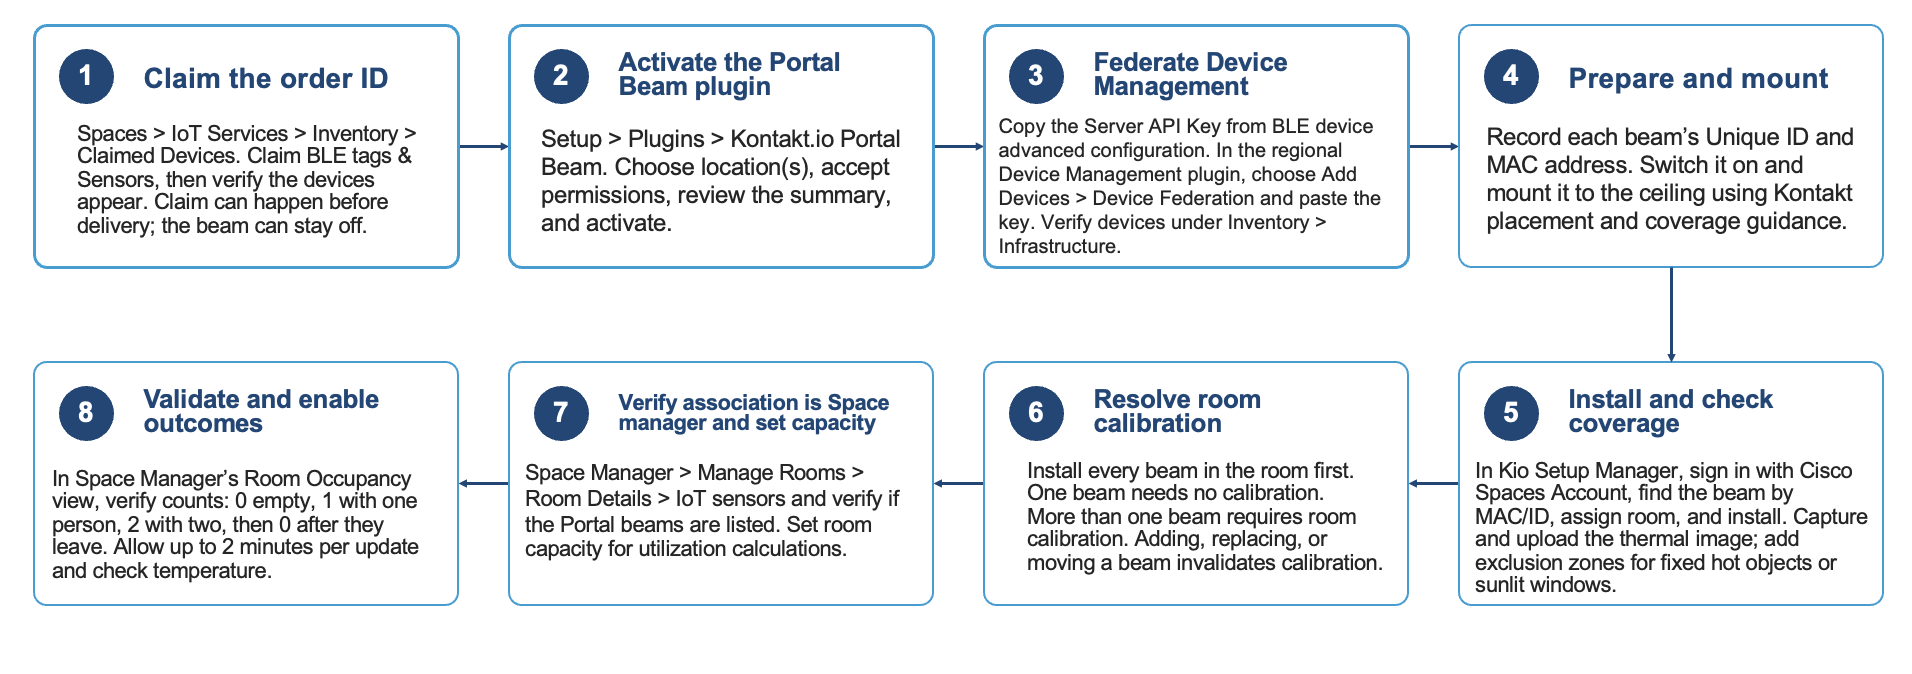
Deployment Workflow
Step 1 - Claim Order Id in Spaces IOT Services
The order ID can be claimed before or after device delivery. It is typically provided with the devices, and the devices do not need to be powered on to complete the claim.
-
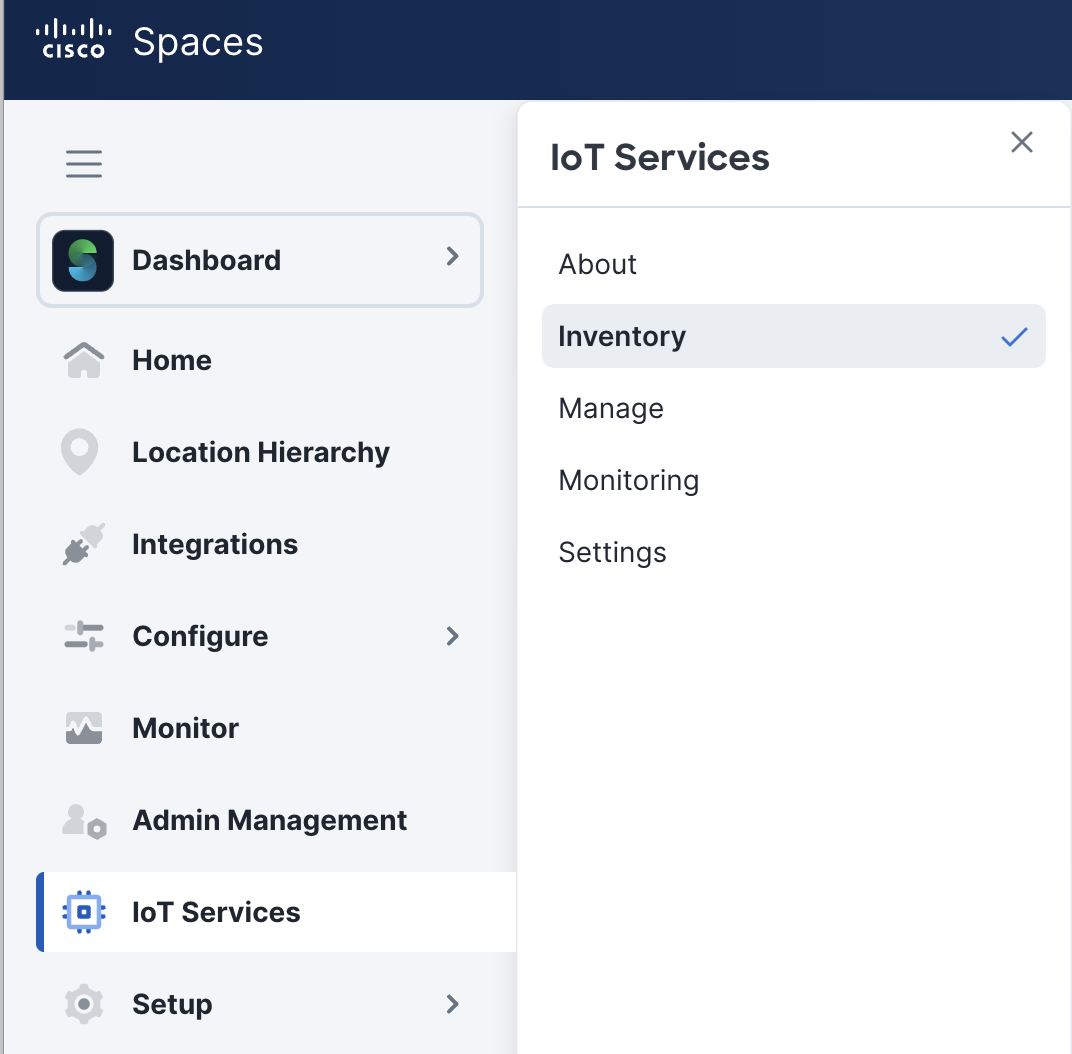
Log into the Cisco Spaces dashboard
-
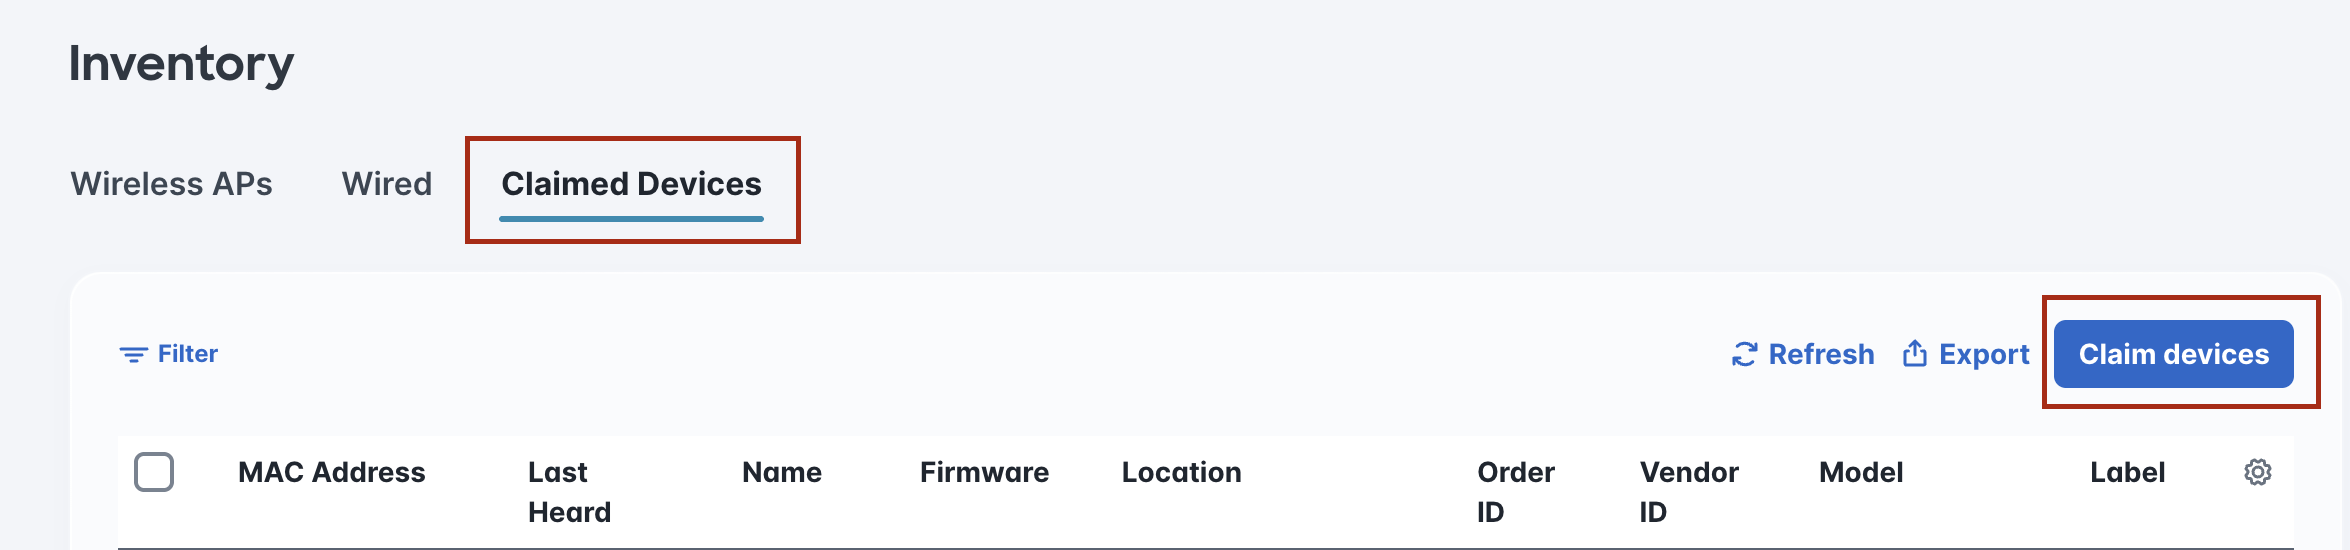
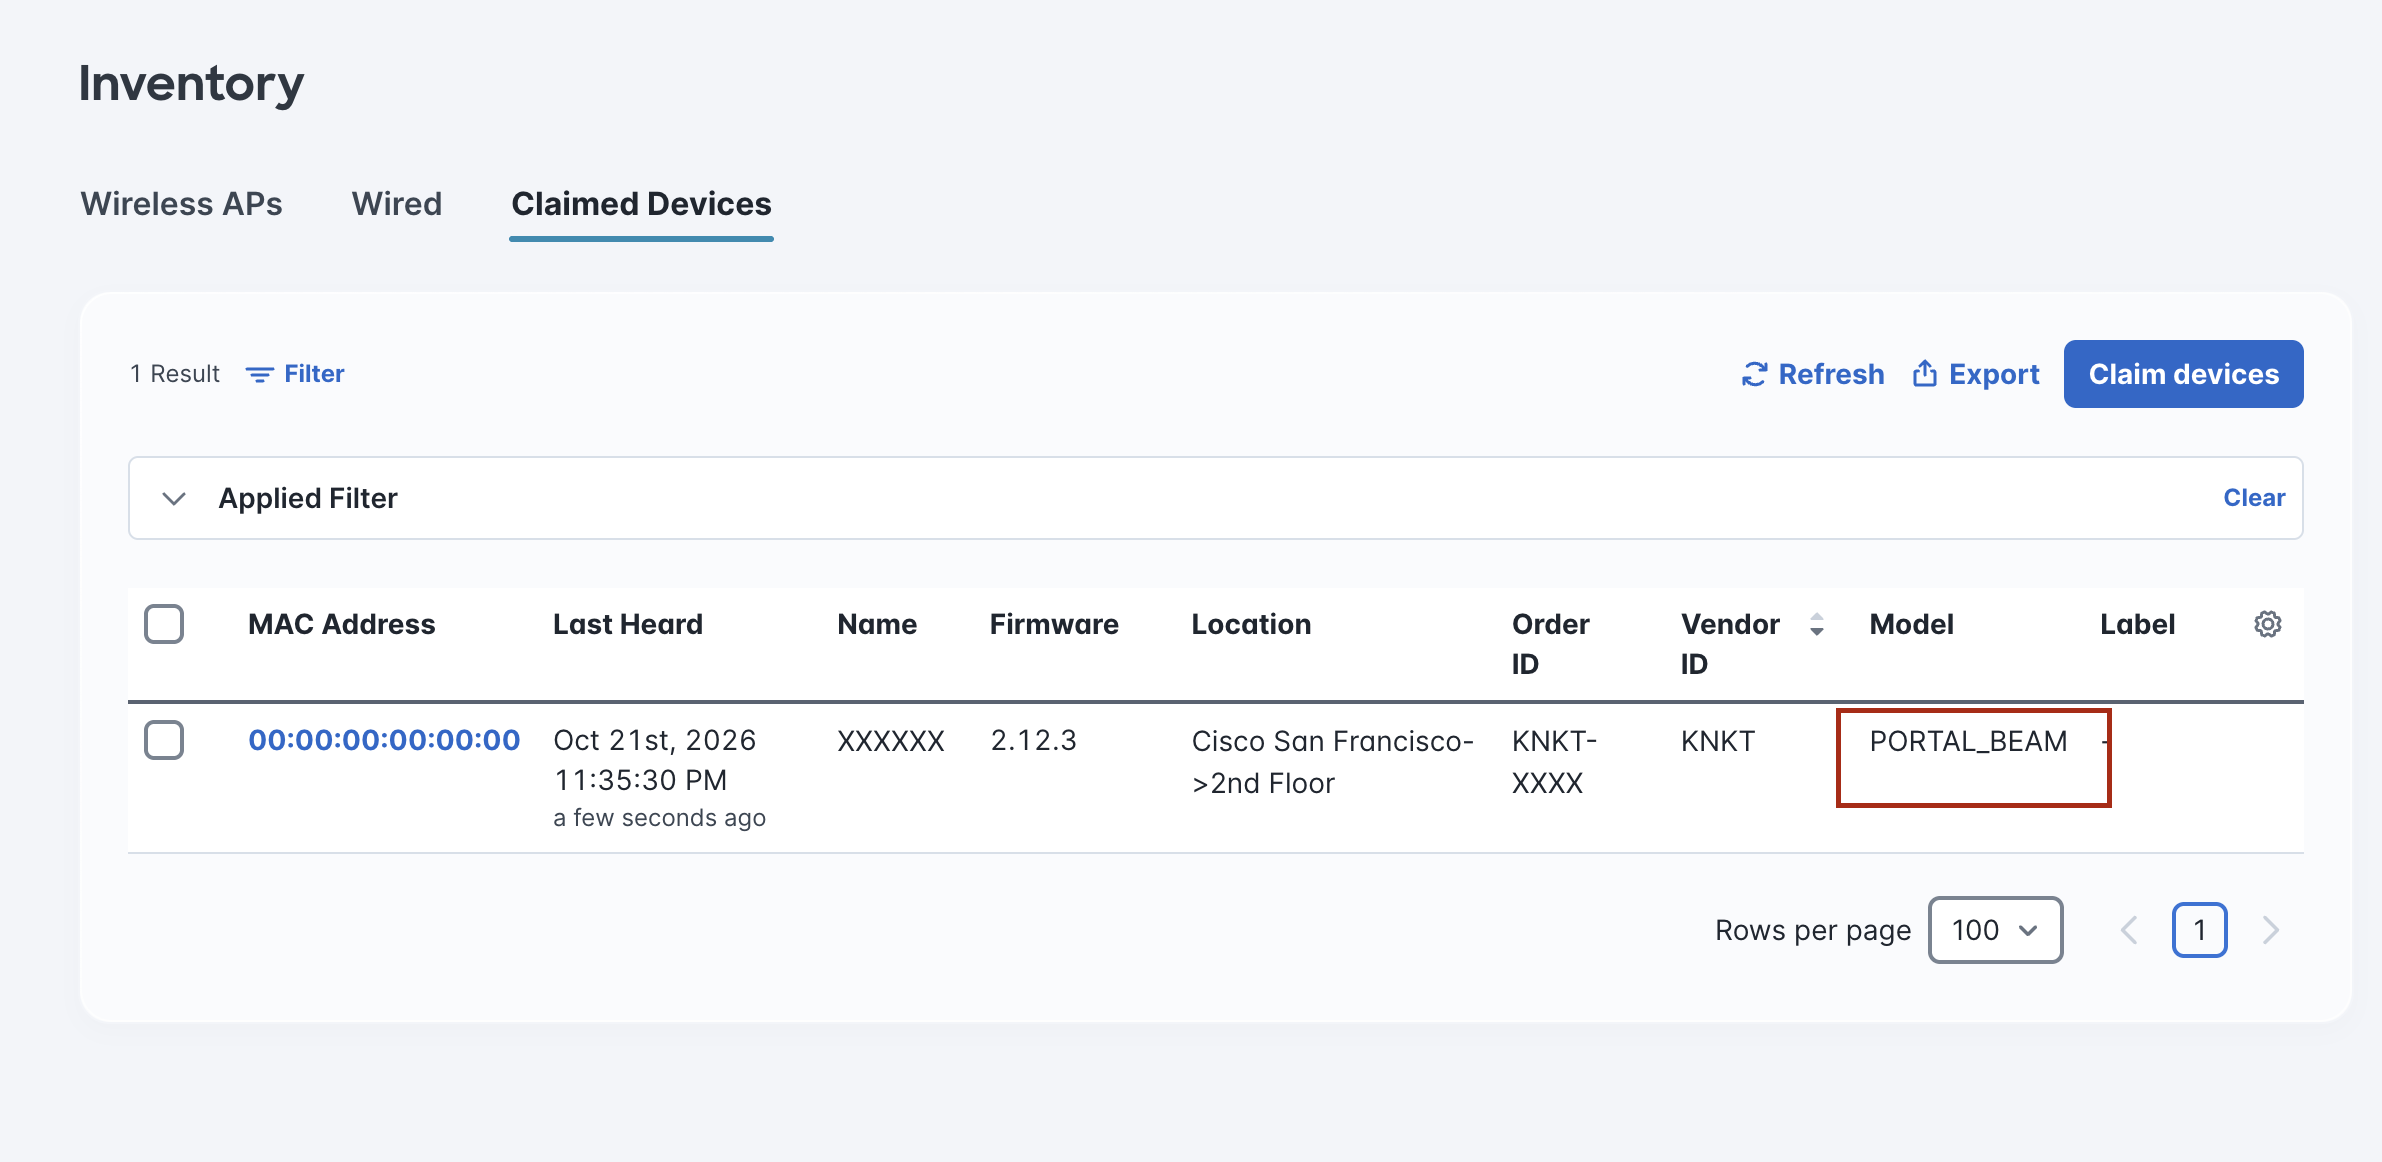
From the left menu, go to IoT Services > Inventory > Claimed Devices and click on Claim devices.
-
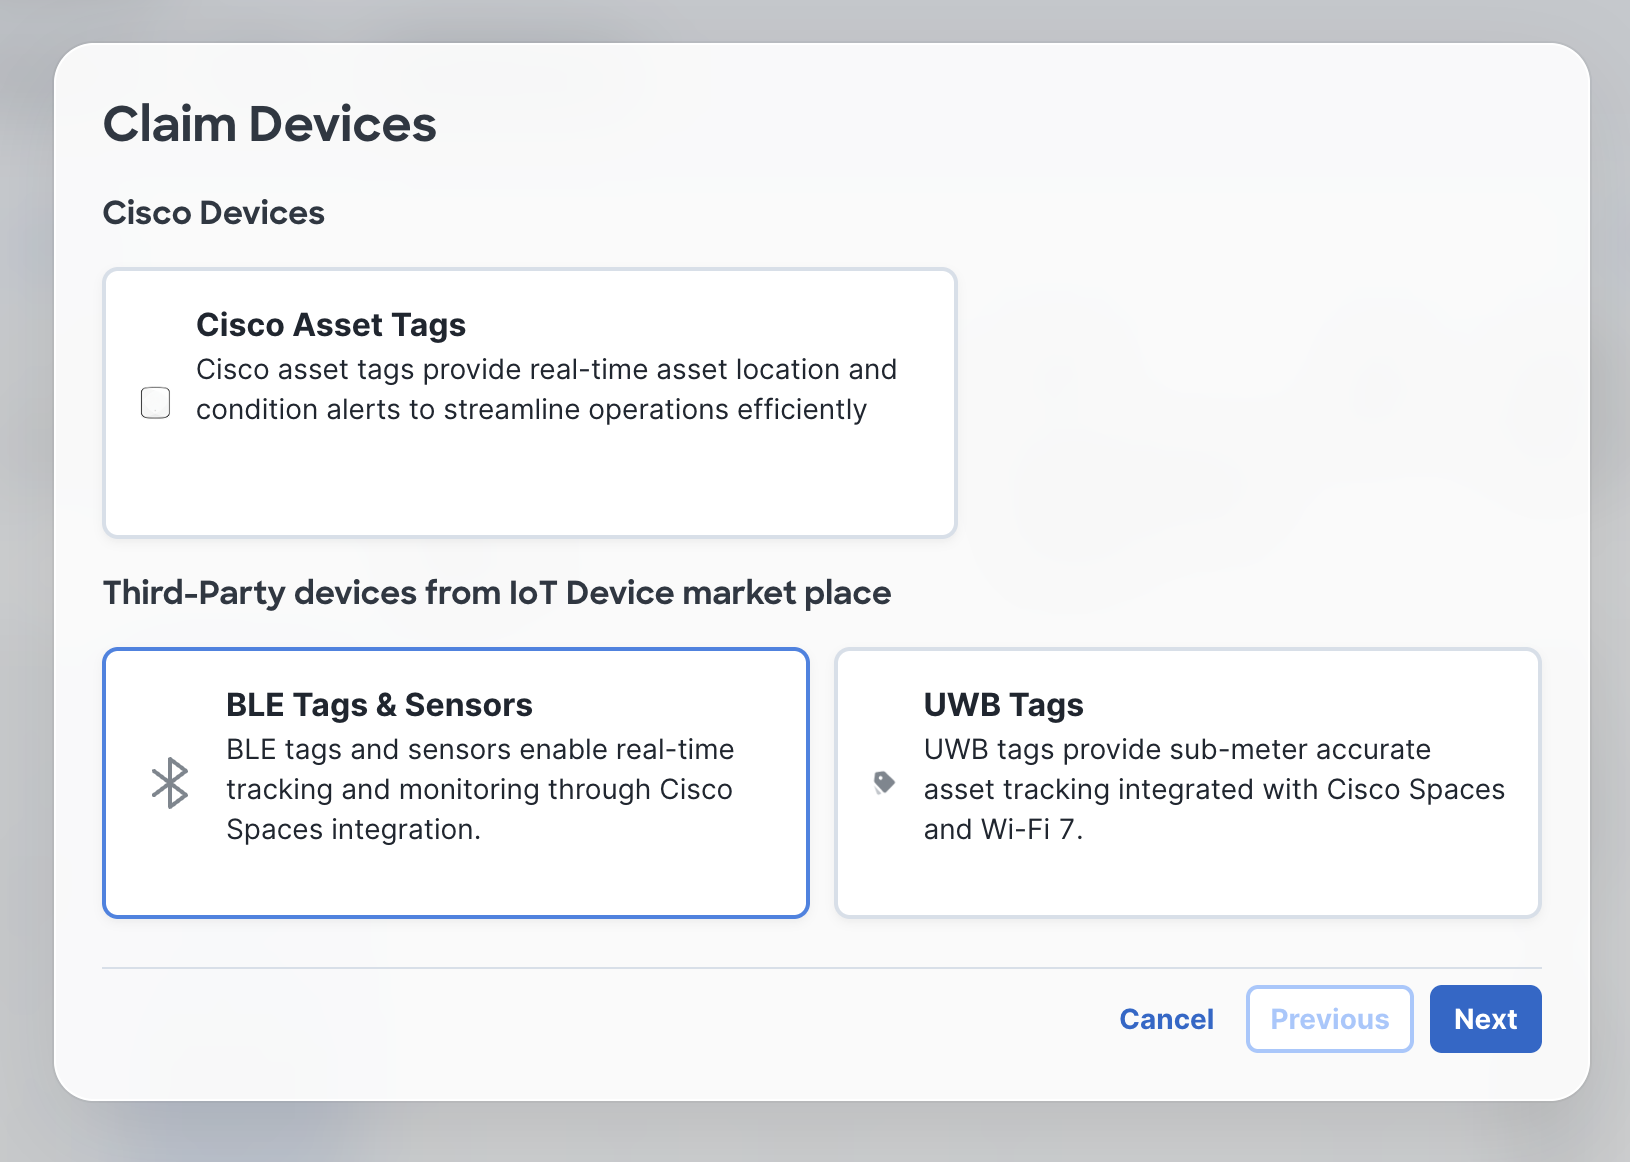
Select BLE tags & Sensors
-
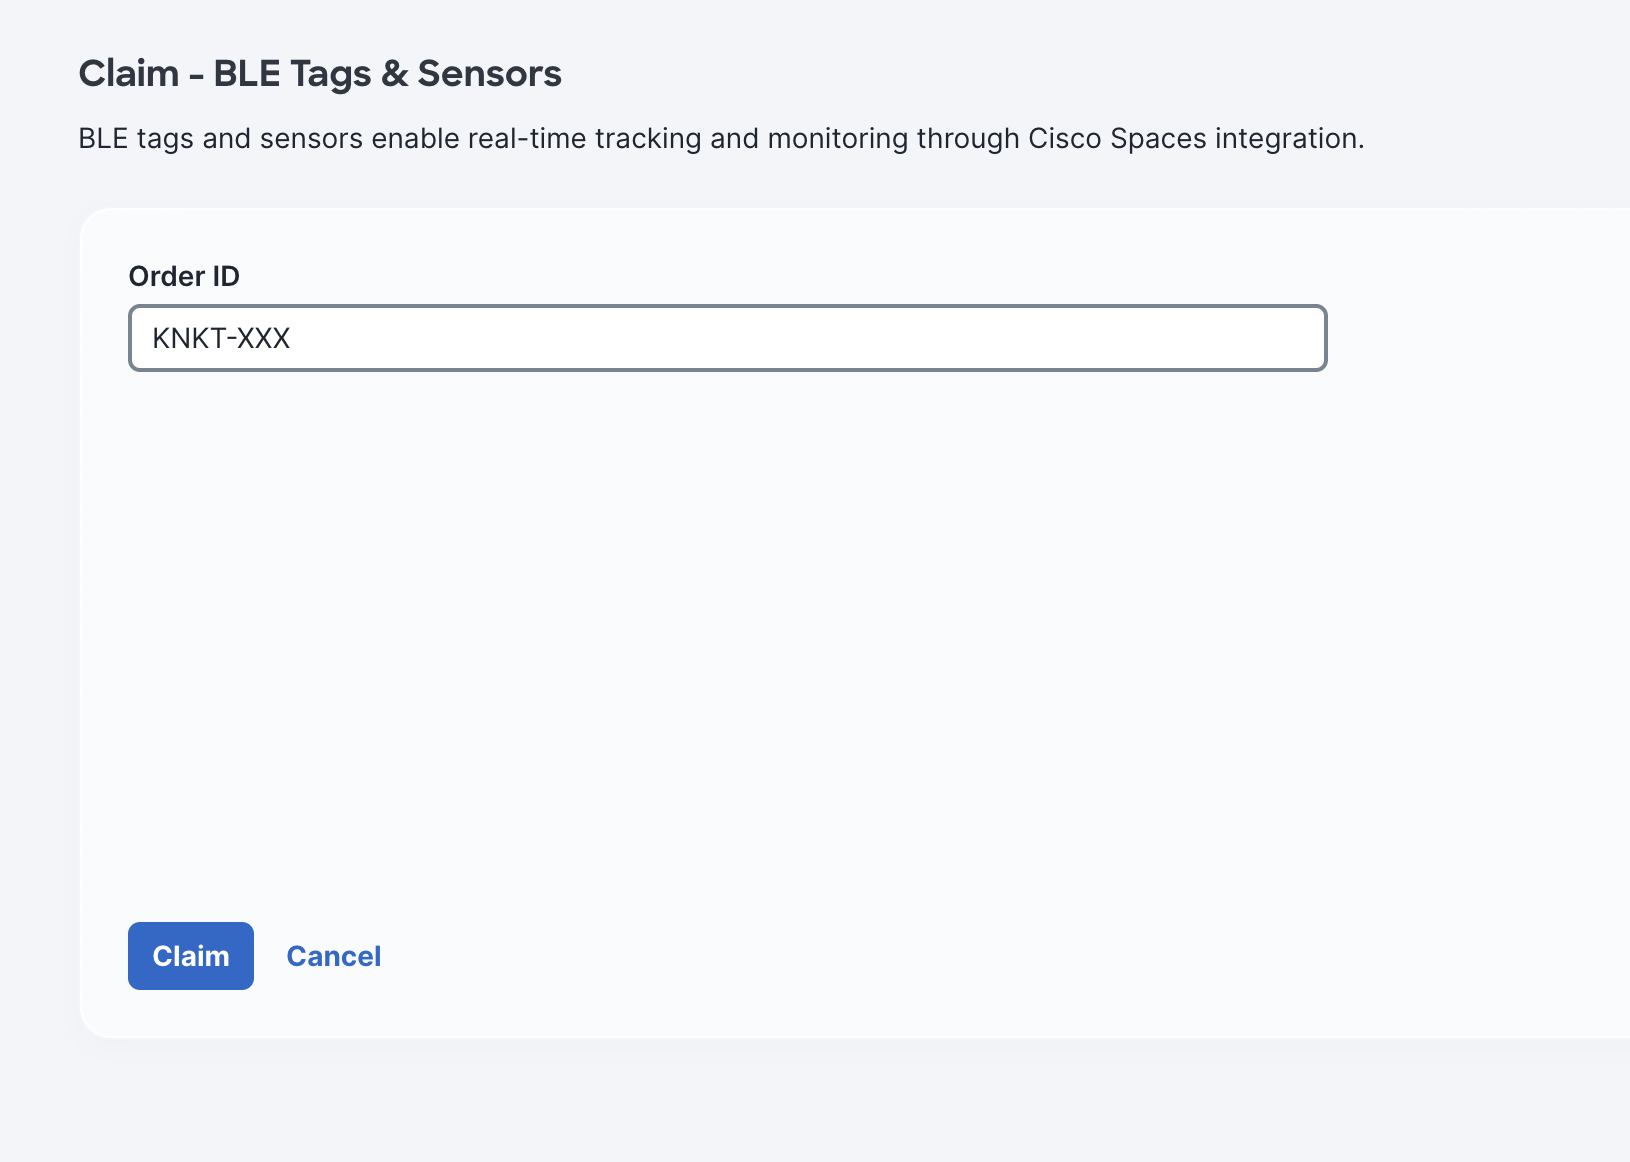
Enter the Order ID (it's case sensitive) and click Claim.
-
To verify the devices were successfully claimed, from go Claimed Devices (step 2) and verify the claimed devices are listed.
Step 2 - Activate Kontakt Portal Beam Plugin
This step enables the plugin within the Spaces dashboard, allowing data from Kontakt.io to be received back into Spaces.
-
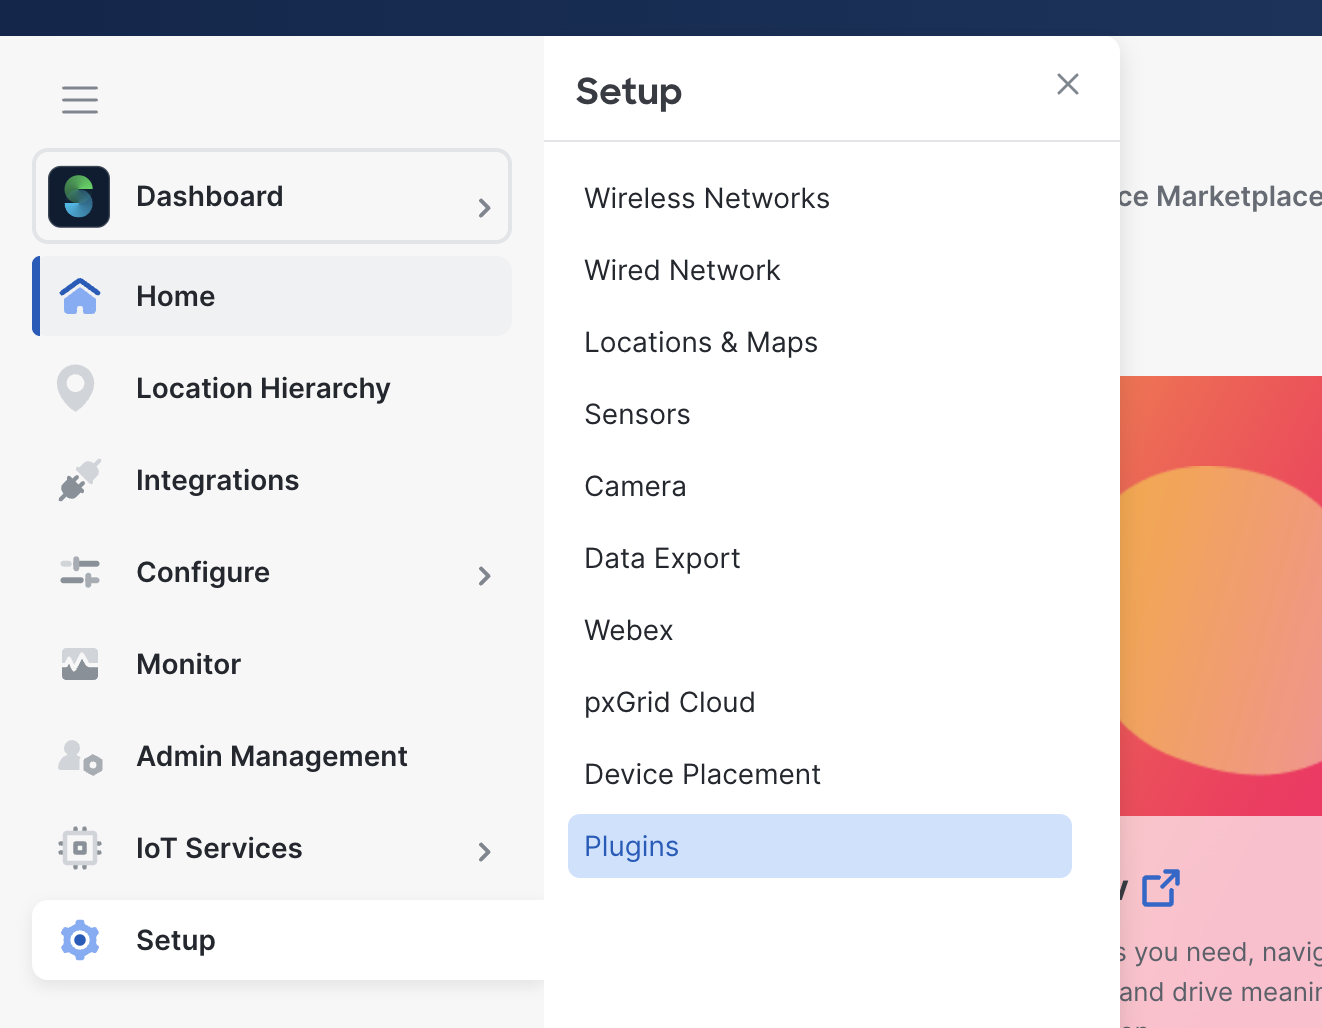
Go to Setup > Plugins
-
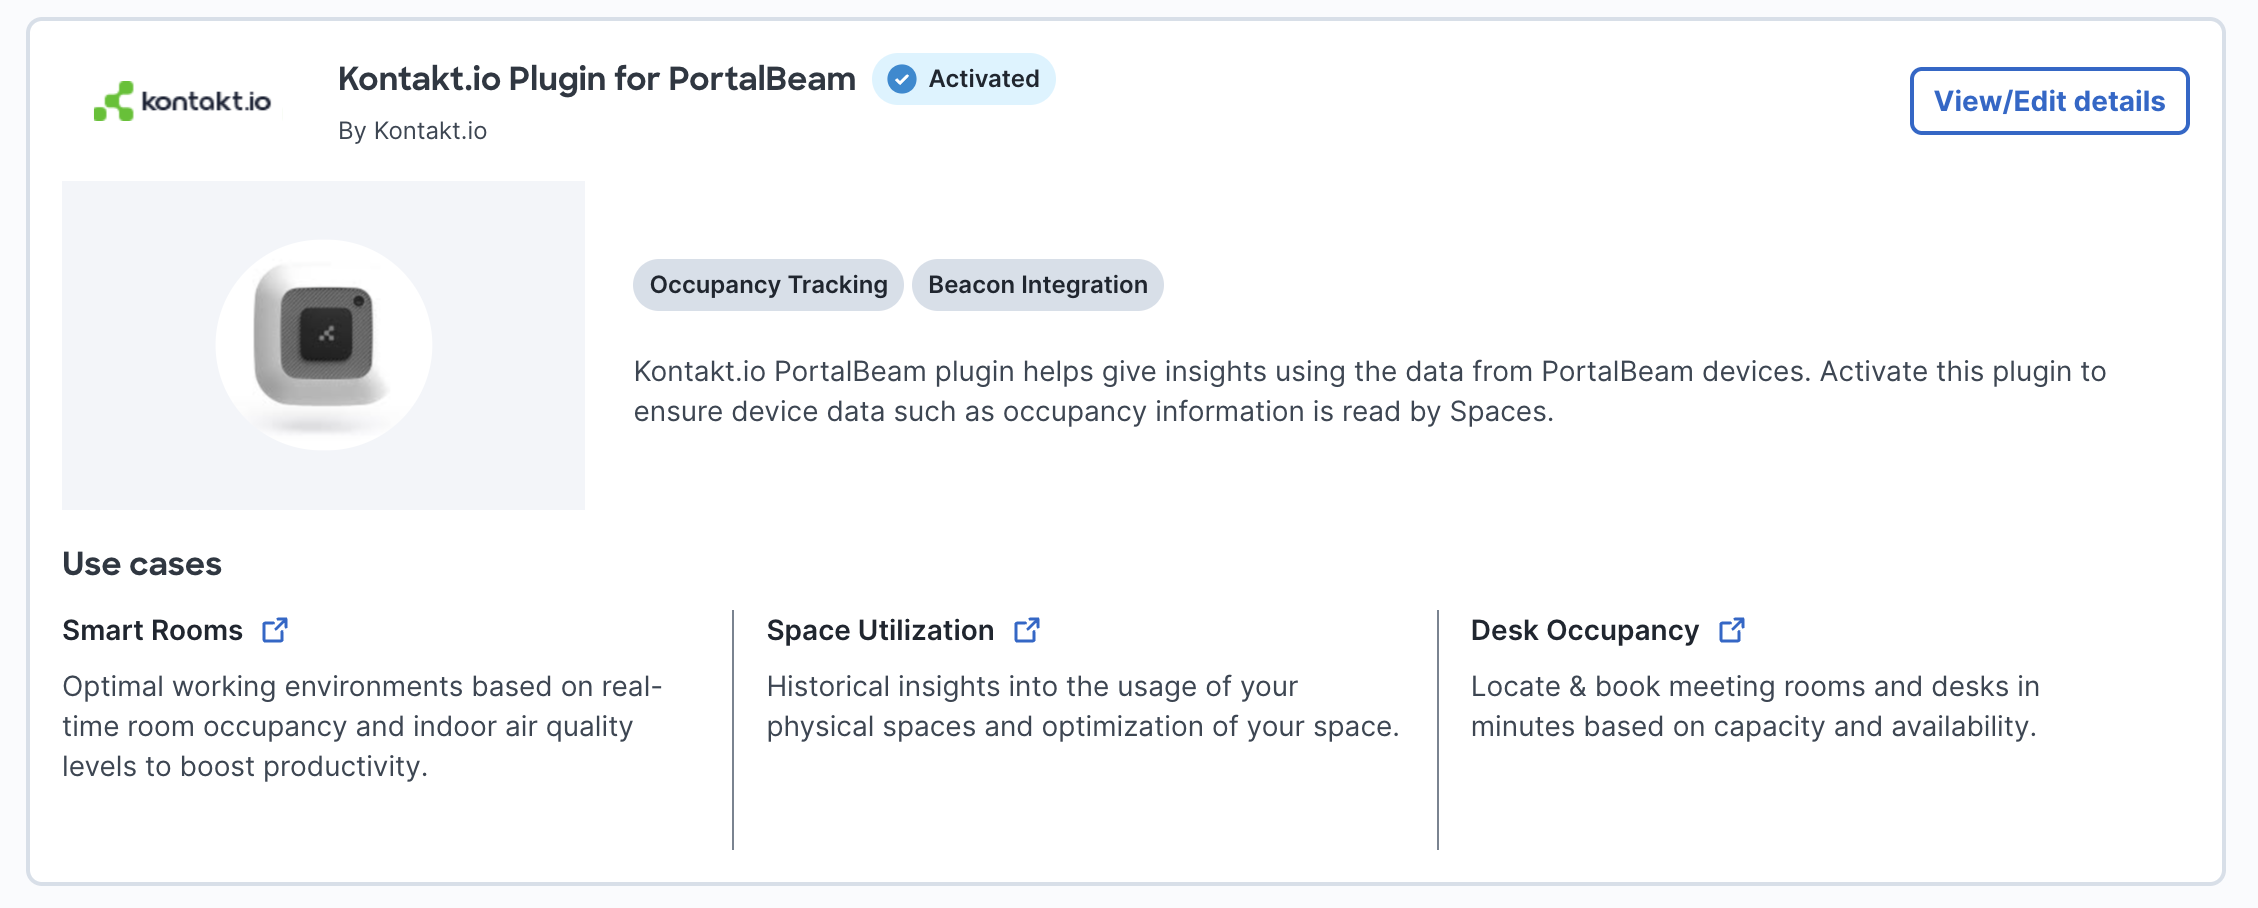
Find the Kontakt.io Plugin for PortalBeam and select Activate.
-
Select the location(s) to activate the plugin, then click Next.
-
Click Accept Permissions.
-
Review the summary page and click Activate.
Step 3 - Activate the Kontakt.io Device Management Plugin
This step allows the use of Kontakt.io’s Kio Setup Manager mobile app to complete the setup of the Portal Beams. The plugin only applies to Portal Beams claimed within Cisco Spaces.
Get Cisco Spaces Device Management Server API Key
-
Log in to the Spaces account where the Portal Beams have been claimed.
-
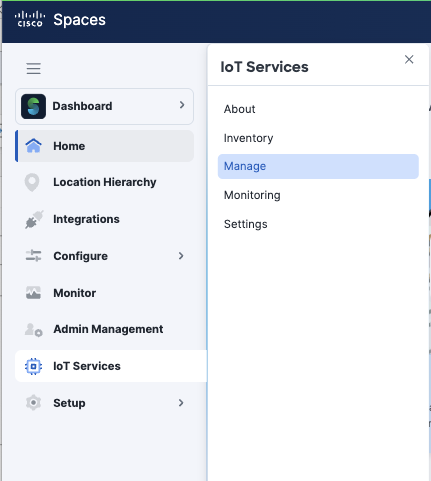
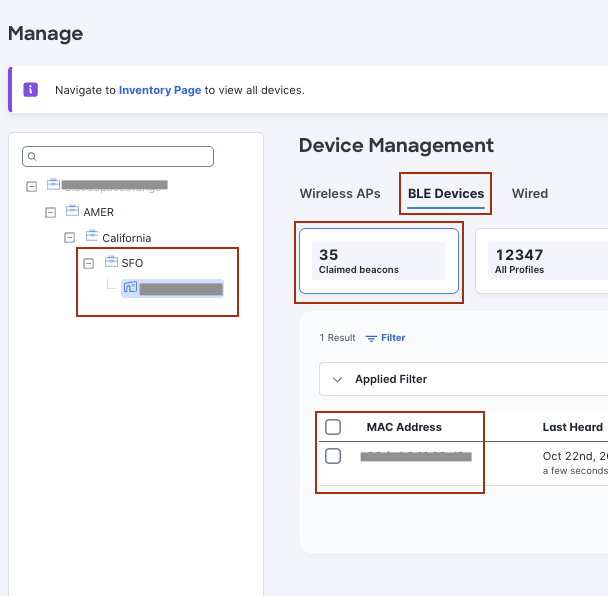
Go to IoT Services > Manage, Select the Location where the Portal Beams are installed.
-
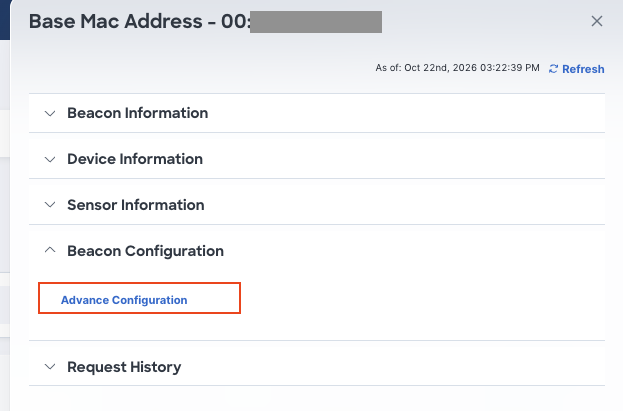
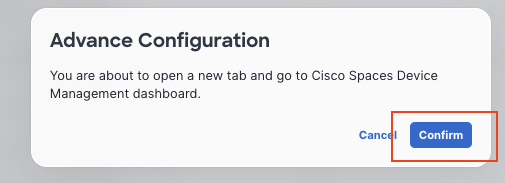
From the top menu, select BLE Devices select the Mac Address of a device from the Beacon Configuration section, select Advance Configuration select Confirm.
-
From the Server API Key section, select Copy to clipboard. This API Key is required in the next step.
Activate Kontakt Device Management plugin
-
From a web browser, go to the below URL specific to the Cisco Spaces account region. If not already signed in to Cisco Spaces, there will be a prompt to sign in.
United States region: https://plugin-app.cloud.us.kontakt.io/device-management/
Europe region: https://plugin-app.cloud.uk.kontakt.io/device-management/
-
From the Add Devices menu, select Device Federation.
-
Paste the Cisco Spaces Device Manager Server API Key into the below field.
-
To confirm the plugin activation, from the Inventory menu, select Infrastructure verify the Portal Beams are listed.
-
Be sure to bookmark the region's Device Management Plugin URL.
Once the Portal Beams are mounted and setup, they can be viewed and managed in the settings from this plugin and can view the last thermal image captured and shared from the Kio Setup Manager mobile app.
For Steps 4 and 5 - Cisco highly recommends using Kontakts official installer service to make sure devices are correctly installed and configured. Cisco will not be responsible for any incorrect data that may be generated due to that. Please work with a Kontakt representative to get additional details. Nonetheless, if customers still want to move forward on their own, these are the steps.
Step 4 - Mount Portal Beam
Before beginning, review the Portal Beam placement and coverage area guidelines and ceiling mount instructions.
-
Write down the Portal Beam's Unique ID and MAC address printed on its underside. This is needed during the next step.
-
Turn on the Portal Beam from its underside, move its battery switch to the ON position.
-
Mount the Portal Beam to the ceiling.
Step 5 - Setup and Verify Portal Beam Settings and Coverage
Using Kontakt.io's Kio Setup Manager mobile app, capture the Portal Beam's real-time thermal image. This image is a heatmap of the objects detected within its field of view allowing verification of the people detected and set Exclusion Zones.
Exclusion Zones are user-defined areas within the Portal Beam's field of view that are ignored by the KIO Occupancy Engine. These zones can include non-human, stationary objects with high background temperatures, such as TVs, light fixtures, windows, or other electrical equipment. Additionally, a zone can be a specific area within a large room where occupancy detection is not required.
-
Download the Kio Setup Manager mobile app. If the app is already obtained, be sure to check for updates.
To download the app, go to the App Store or Google Play. Search for Kio Setup Manager .
-
Device compatibility: iPhone or iPad: iOS version 17 or later | Android phone or tablet: version 8 or later
-
Device connectivity: Bluetooth enabled and an internet connection over Wi-Fi or cellular data
-
-
Turn on the Portal Beam. On the underside of the Portal Beam, move the battery switch to the ON position.
-
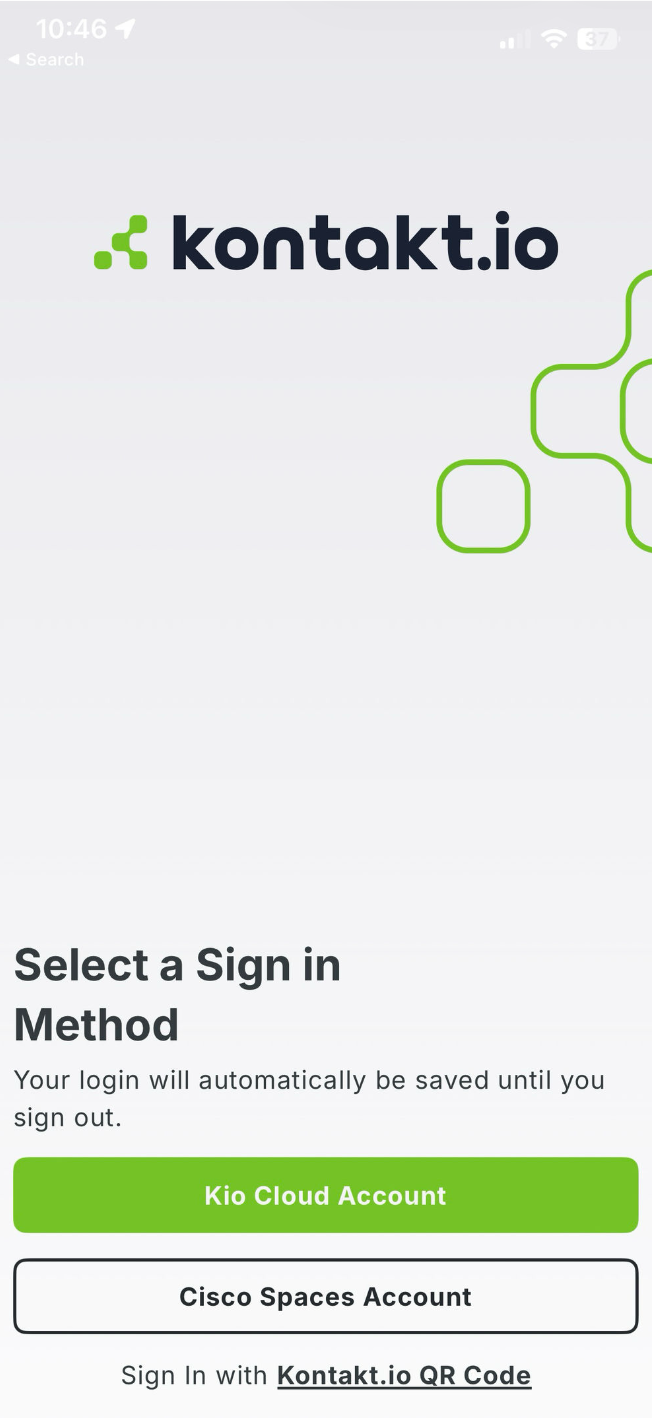
From your mobile device, open Kio Setup Manager > from the Sign in Method, tap Cisco Spaces Account.
-
You're directed to Cisco Spaces sign in. Enter your Cisco Spaces credentials > select the account.
-
From the bottom menu, tap Devices.
-
From the list of Nearby Devices, locate the Portal Beam by its MAC address or Unique ID.
-
Tap the Portal Beam to view its management menu options.
(Optional) To verify the Portal Beam selected, tap Show Details > tap Flash LED. From its front-side, a colored LED flashes briefly.
-
From the menu, tap Install Device. From Choose location > tap the campus, building, floor, and room where the Portal Beam will be installed.
-
Tap Next and prepare to mount the Portal Beam.
-
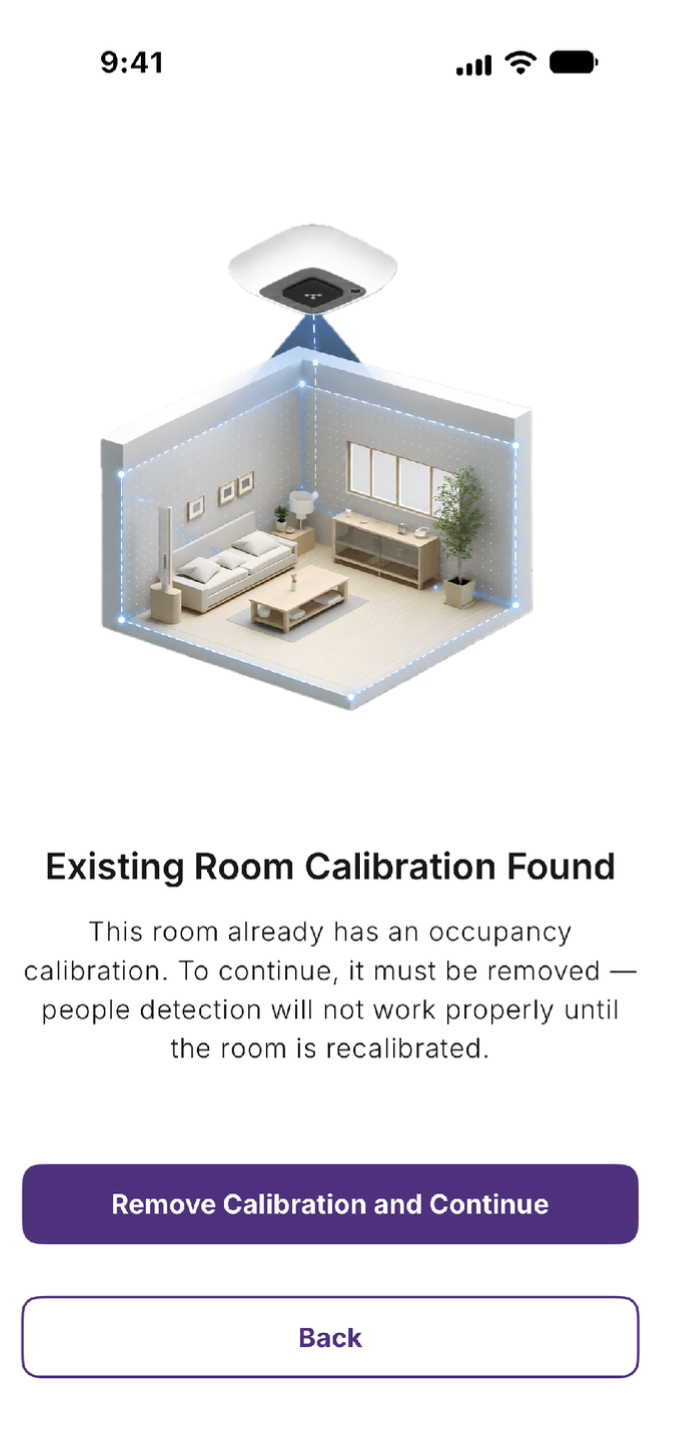
If the room already has a room calibration, the app displays Existing Room Calibration
Found. Tap Remove Calibration and Continue > tap Remove. Installing a beam in a
calibrated room removes the room's calibration, so recalibrate the room after all its
beams are installed. Mount the Portal Beam, then continue to the next step.
-
-
From Verify Thermal Camera, tap Capture Image.
-
From the top section of the captured image, tap the cloud icon. The thermal image is uploaded to the Portal Beam's Occupancy settings within the Device Management Plugin.
-
From the captured image, verify if any hot objects were detected.
If there are any non-human, stationary hot objects detected or areas you want to exclude from occupancy detection, you can configure these as Exclusion Zones (tap Add Exclusion Zone). After configuring the Exclusion Zones, tap Next.
It's recommended to set windows within the room as exclusion zones, especially when there is direct sunlight into the room.
Exclusion Zone examples:The following Portal Beam thermal images show how Exclusion Zones can be set to exclude objects or areas from occupancy detection. Each exclusion zone is outlined in red.
Hot objects: wall-mounted TV and window excluded from occupancy detection.
|
Captured thermal image |
TV and window set to exclusion zones |
Large room: two specific areas excluded from occupancy detection.
|
Captured thermal image |
Two areas set to exclusion zones |
-
View the device note that is saved in the Portal Beam's profile in the KIO Device Management Plugin. You can add additional information > tap Next.
-
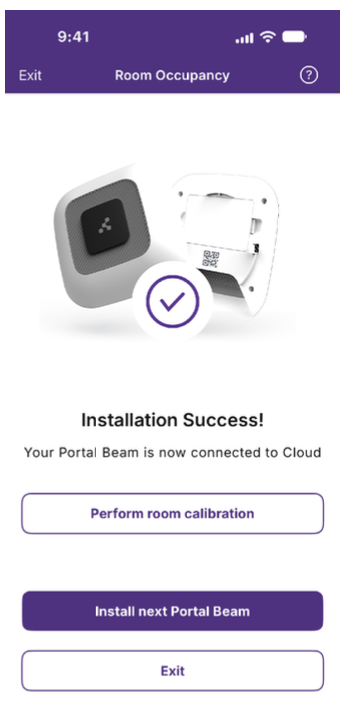
The app displays Installation Success! — this is your confirmation the install is complete.
To install another Portal Beam in the same room or a different room, tap Install nextPortal Beam and repeat the steps. After you install the last beam in a room with more
than one Portal Beam, tap Perform room calibration and continue to Step 5.1. A room
with one Portal Beam doesn't need calibration; continue to Step 6.
Step 5.1 - Calibrate a room with more than one Portal Beam
Room calibration is required for every room with more than one Portal Beam. A room with a
single Portal Beam doesn't need calibration. During calibration, you use your mobile device's
camera (augmented reality) to mark each installed Portal Beam and the walls of the room, so the
beams count each person once.
Before you begin, make sure each Portal Beam in the room is installed with Kio Setup Manager
and mounted to the ceiling, and the room is well lit. You must be signed in to Kio Setup Manager
for iPhone or iPad with Cisco Spaces Account.
Note: Recalibrate a room whenever you add, replace, or move a Portal Beam in it. Installing a
beam in a calibrated room removes the room's calibration, and people detection isn't accurate
until the room is recalibrated.
-
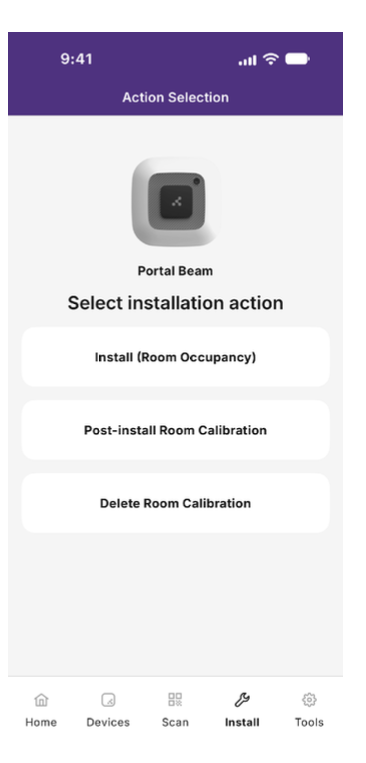
From Kio Setup Manager mobile app, tap Install > Post-install Room Calibration. After you install the last beam in the room, you can instead tap Perform room calibration from the Installation Success! screen.
-
Tap the campus, building, floor, and room to calibrate. The app checks the beams installed in the room:
-
-
No Beams Detected: no Portal Beams are installed in the room yet. Install at least two Portal Beams, then calibrate the room.
-
Calibration Not Needed: the room has a single Portal Beam. No further setup is needed.
-
-
From Room Calibration, tap Start. The camera view opens.
-
Point the phone at the floor and walk a few steps until the app finds the floor > tap Use the floor it found. Mounting heights are measured from this floor.
-
Capture each Portal Beam in the room:
-
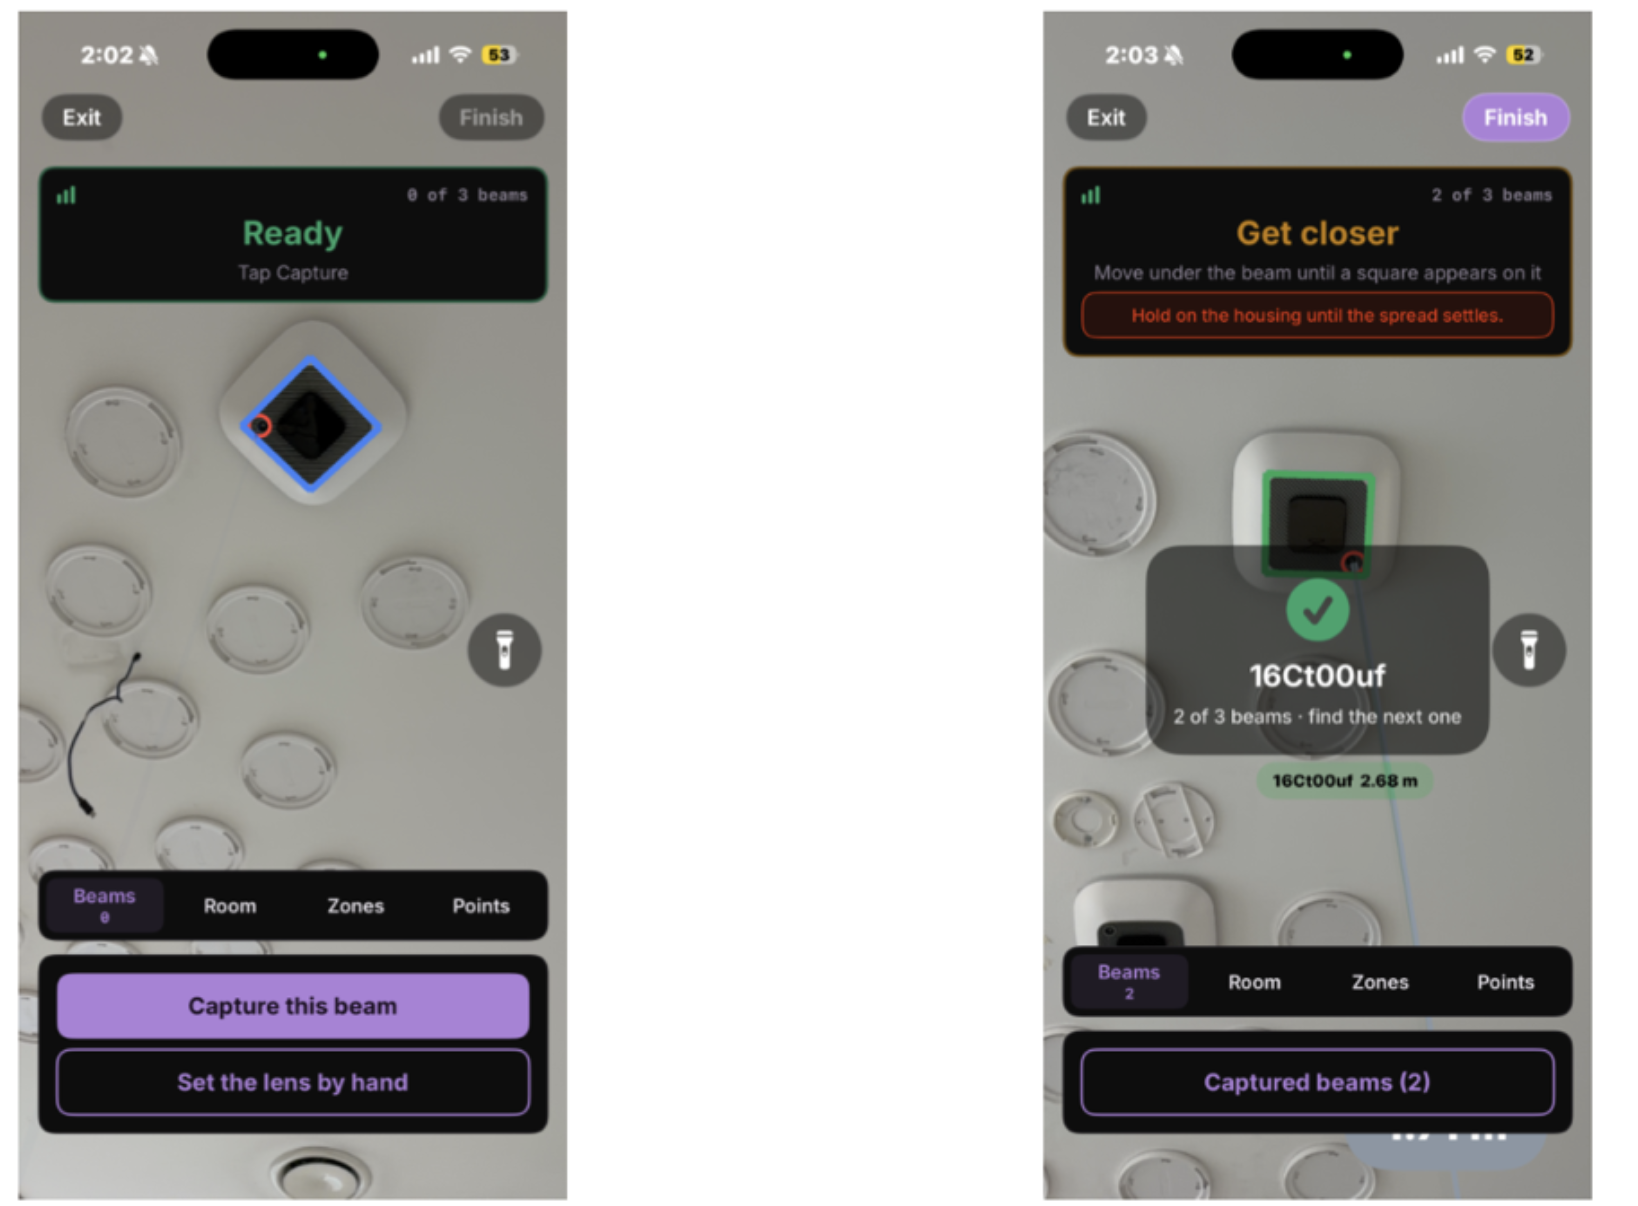
Stand under a Portal Beam and point the phone up at it. Hold still until the app displays Ready. If the app displays Get closer, stand under the beam. If it displays Back off a little, step back until the whole beam fits in the frame. If it displays Find the lens, move around the beam until the app finds the lens, or tap Set the lens by hand.
-
Tap Capture this beam > from Which beam?, tap the beam you're standing under. To confirm the beam selected, tap the antenna icon next to a beam to make its LED blink.
-
The app confirms the capture and shows how many beams are left. Move to the next Portal Beam and repeat until the app displays that all beams are captured.
-
To change or remove a captured beam, tap Captured beams. If you point the phone at a beam you already captured, the app displays Ready to adjust and an Adjust button for that beam.
-
Mark the walls of the room: walk along the walls and tap Add corner at each corner of the room from close range. To close the room outline, tap near the first corner or tap Close loop. To remove the last corner, tap Undo.
-
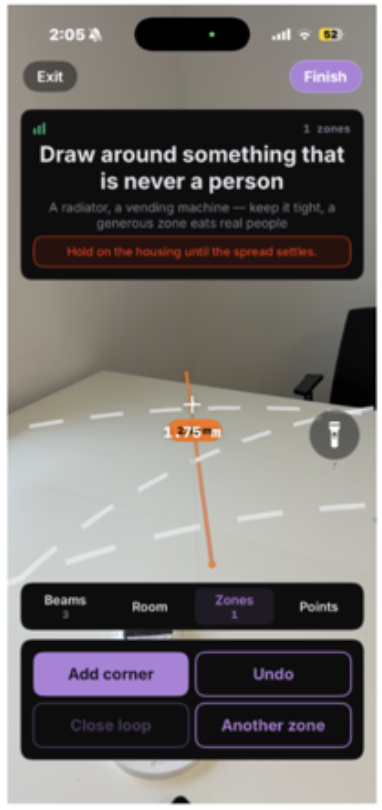
(Optional) Mark warm objects that are never a person, such as a radiator or vending machine: tap Add a zone > enter a name > tap Draw > tap Add corner at each corner around the object > tap Close loop. Keep each zone tight around the object. People inside a zone aren't counted
-
(Optional) Mark a known point: tap Mark point 1 at a spot on the floor where you can stand later to check the count.
-
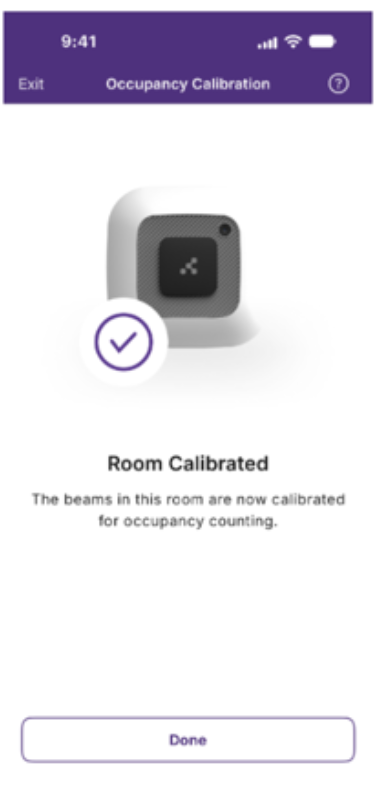
Tap Finish. The app uploads the calibration and displays Room Calibrated > tap Done.
Step 6 - Verify Portal Beam association to the workspace (Room) in Space Manager Application
This step if to verify that the association completed in KIO app reflects in Space Manager app correctly.
-
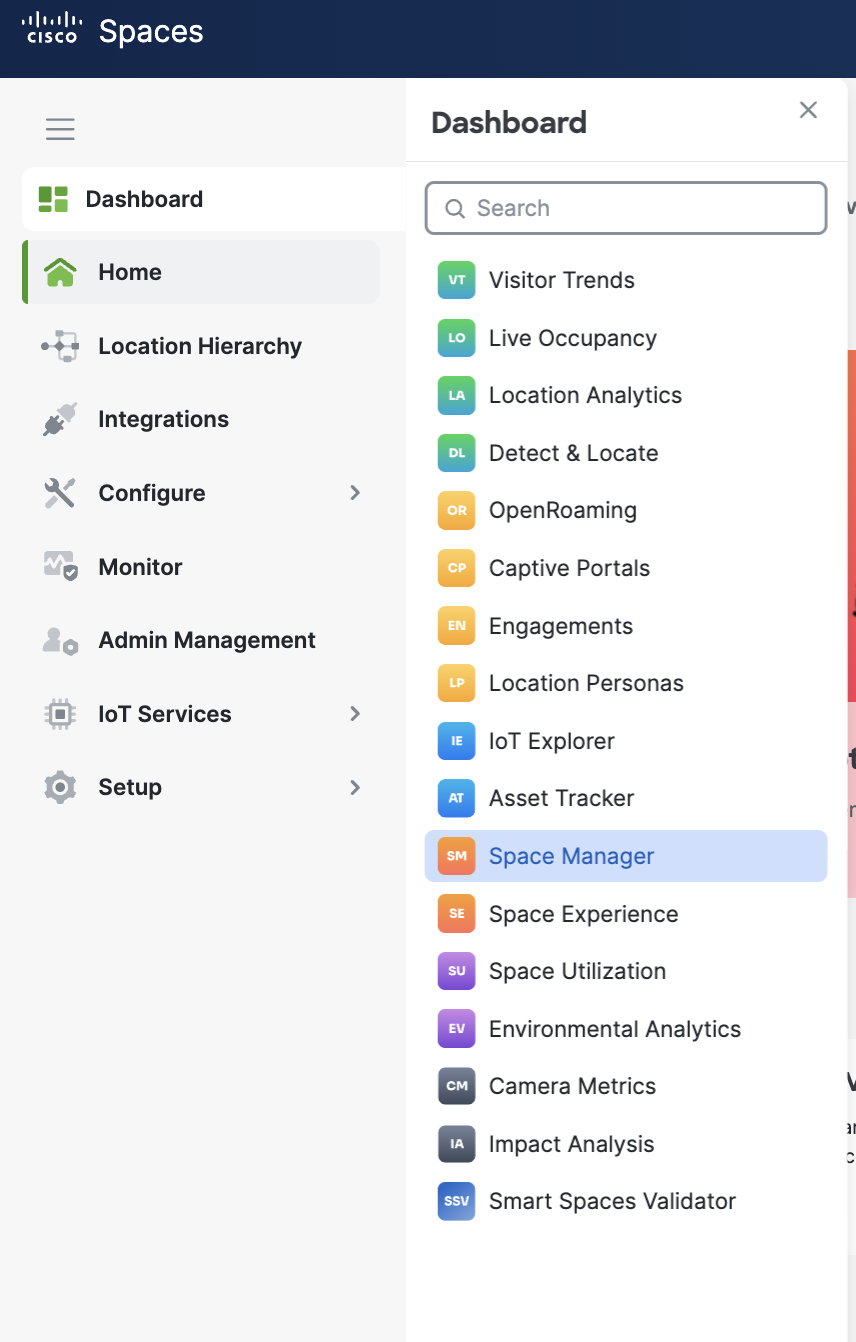
From the Cisco Spaces Home page, navigate to the Space Manager app.
-
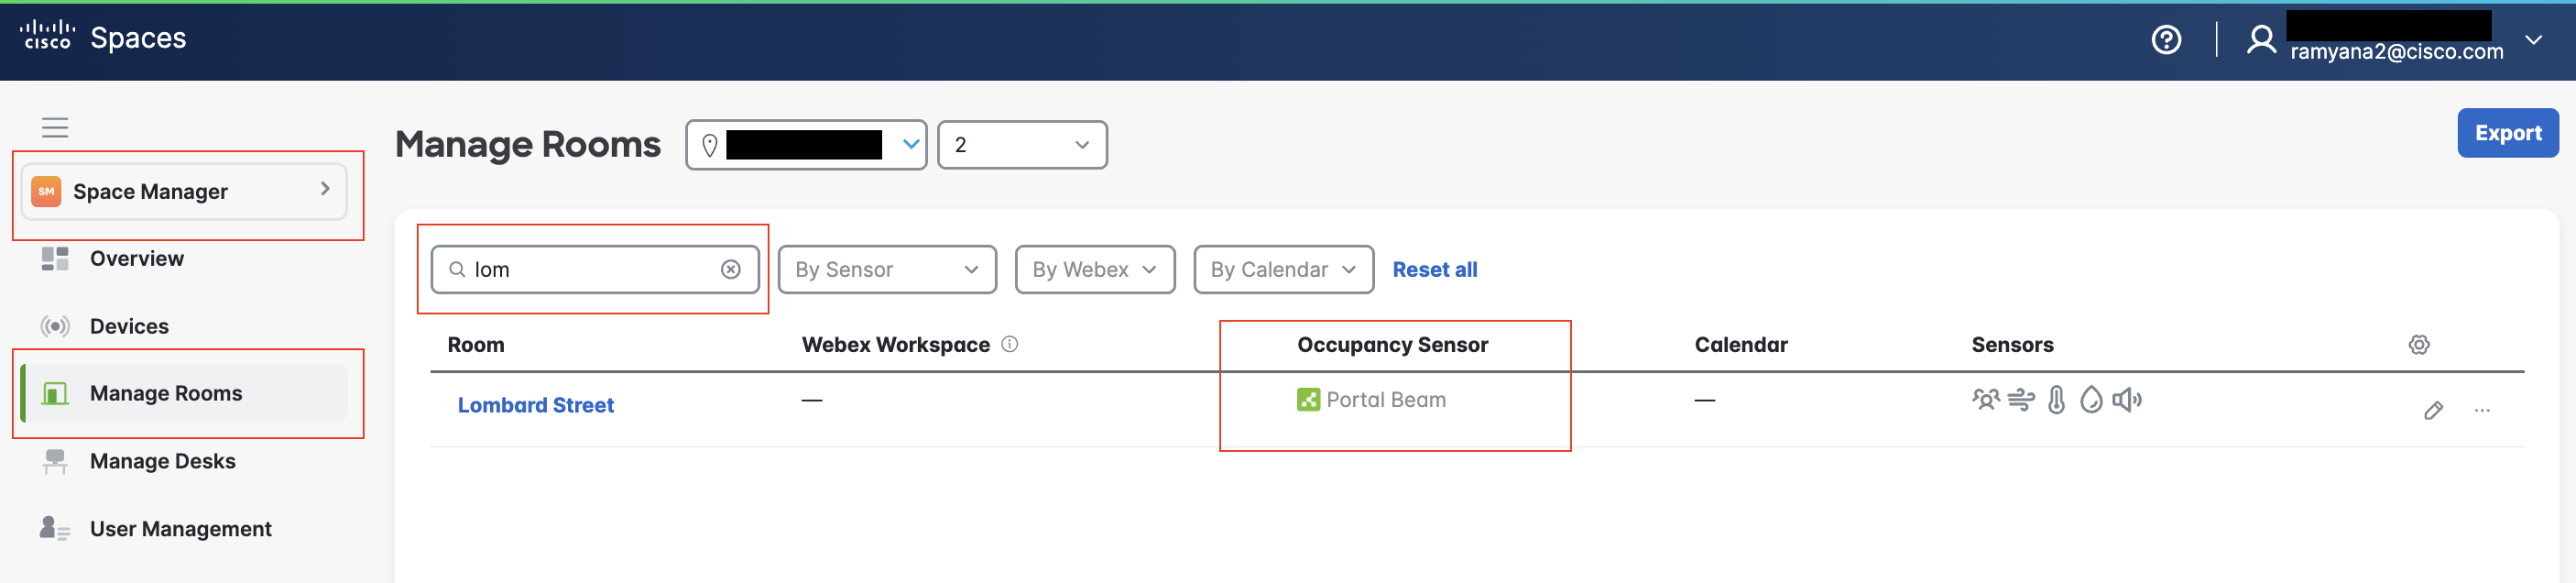
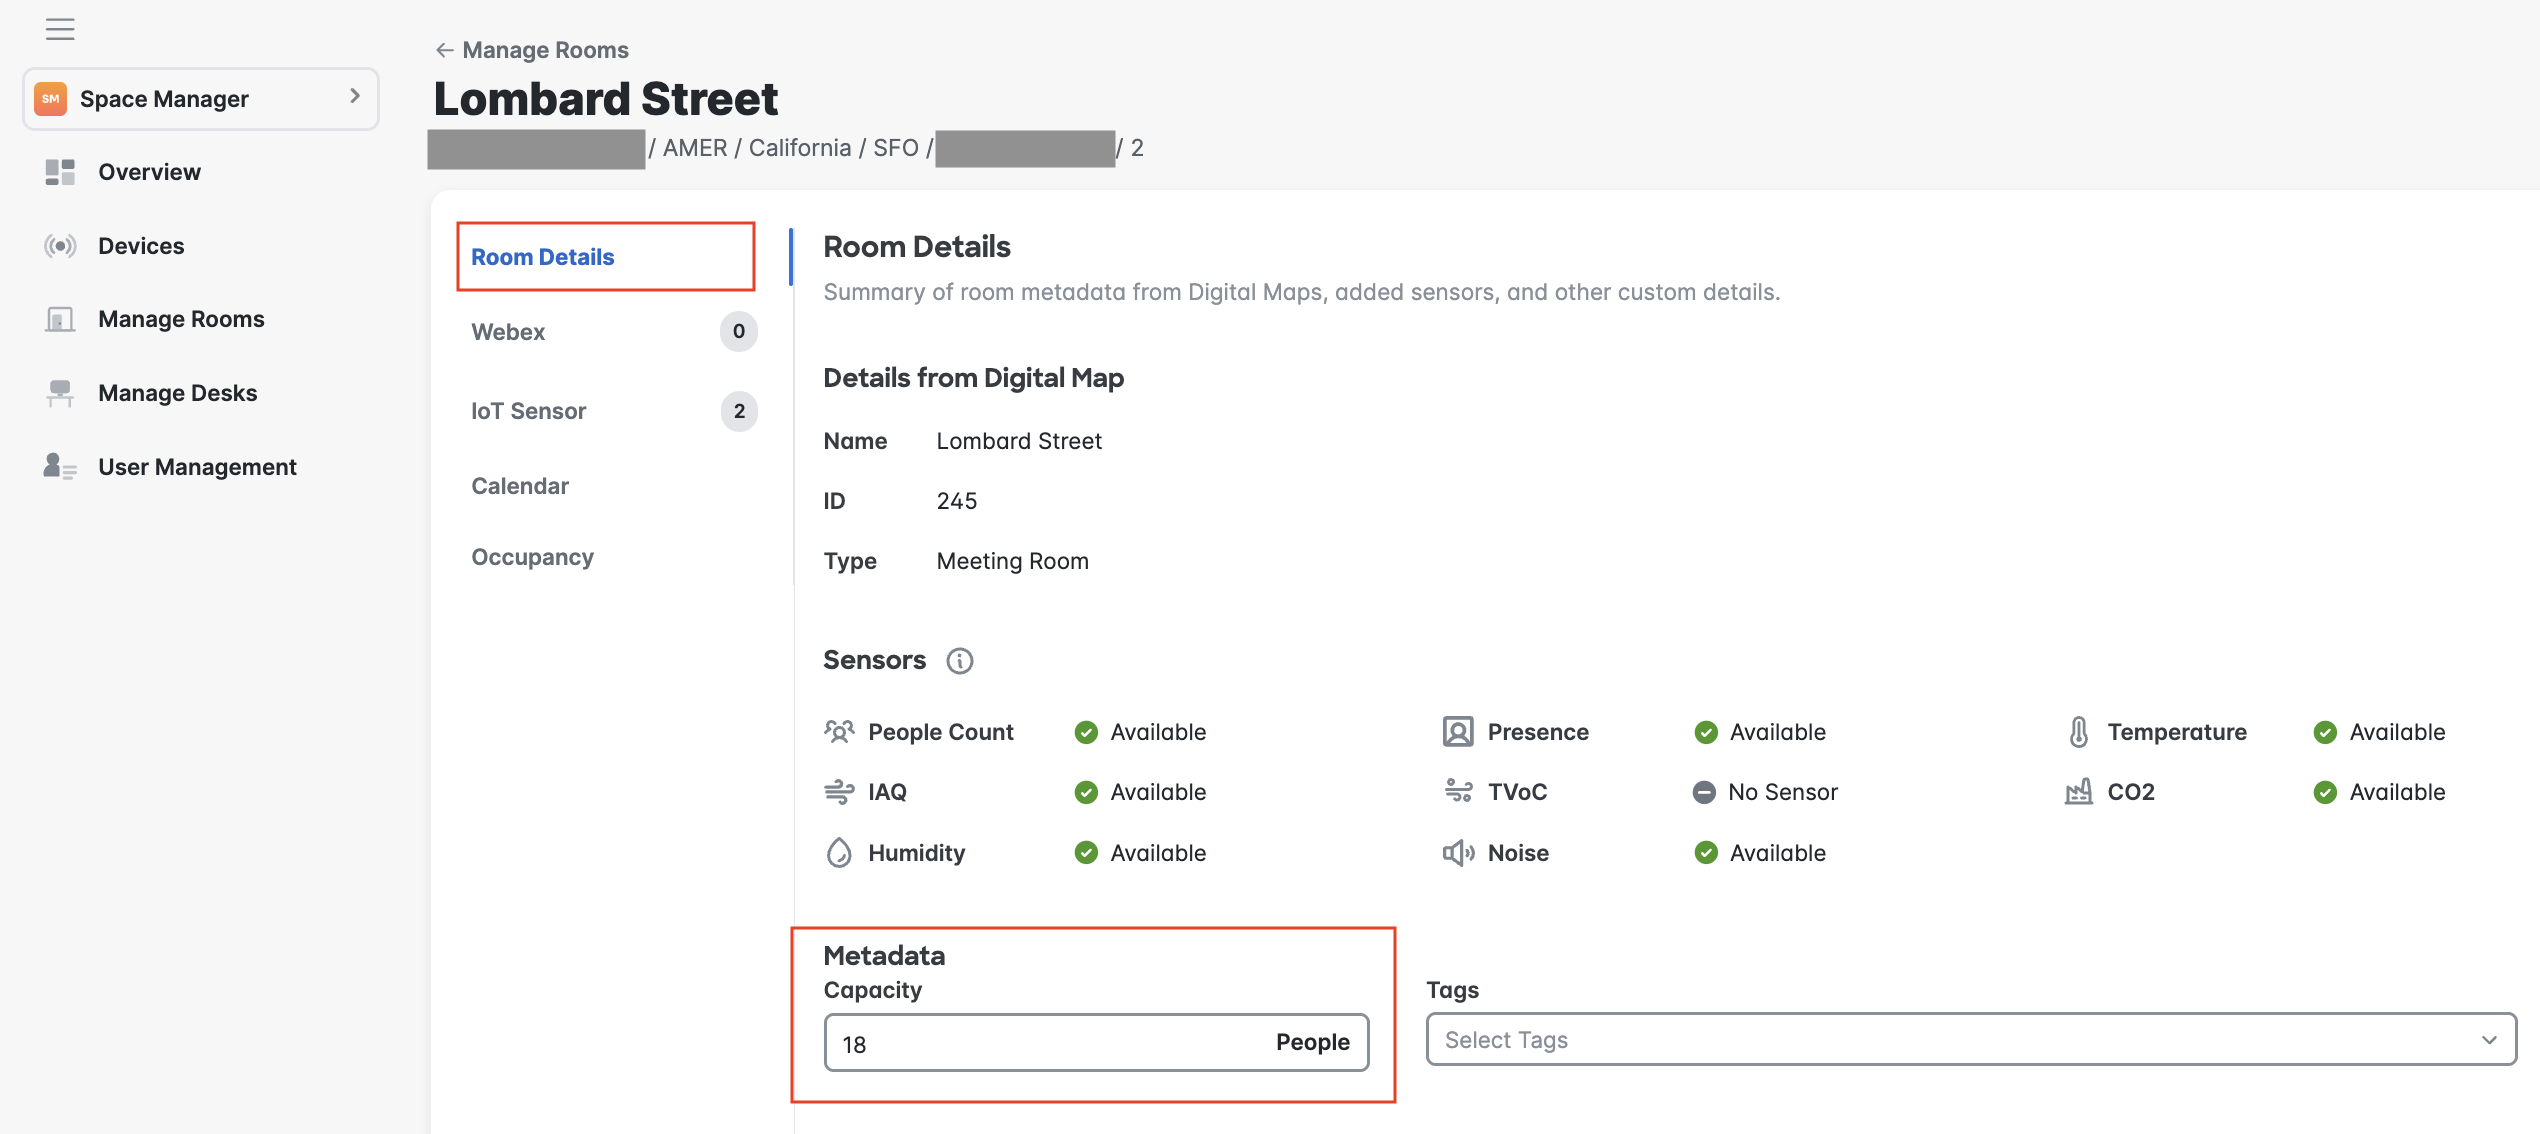
Go to Manage Rooms, search and select the room name (left most table column) where the Portal Beam is installed.
-
On the Room Details page, locate and edit the Capacity field.
-
Select the room, and click on IoT Sensor
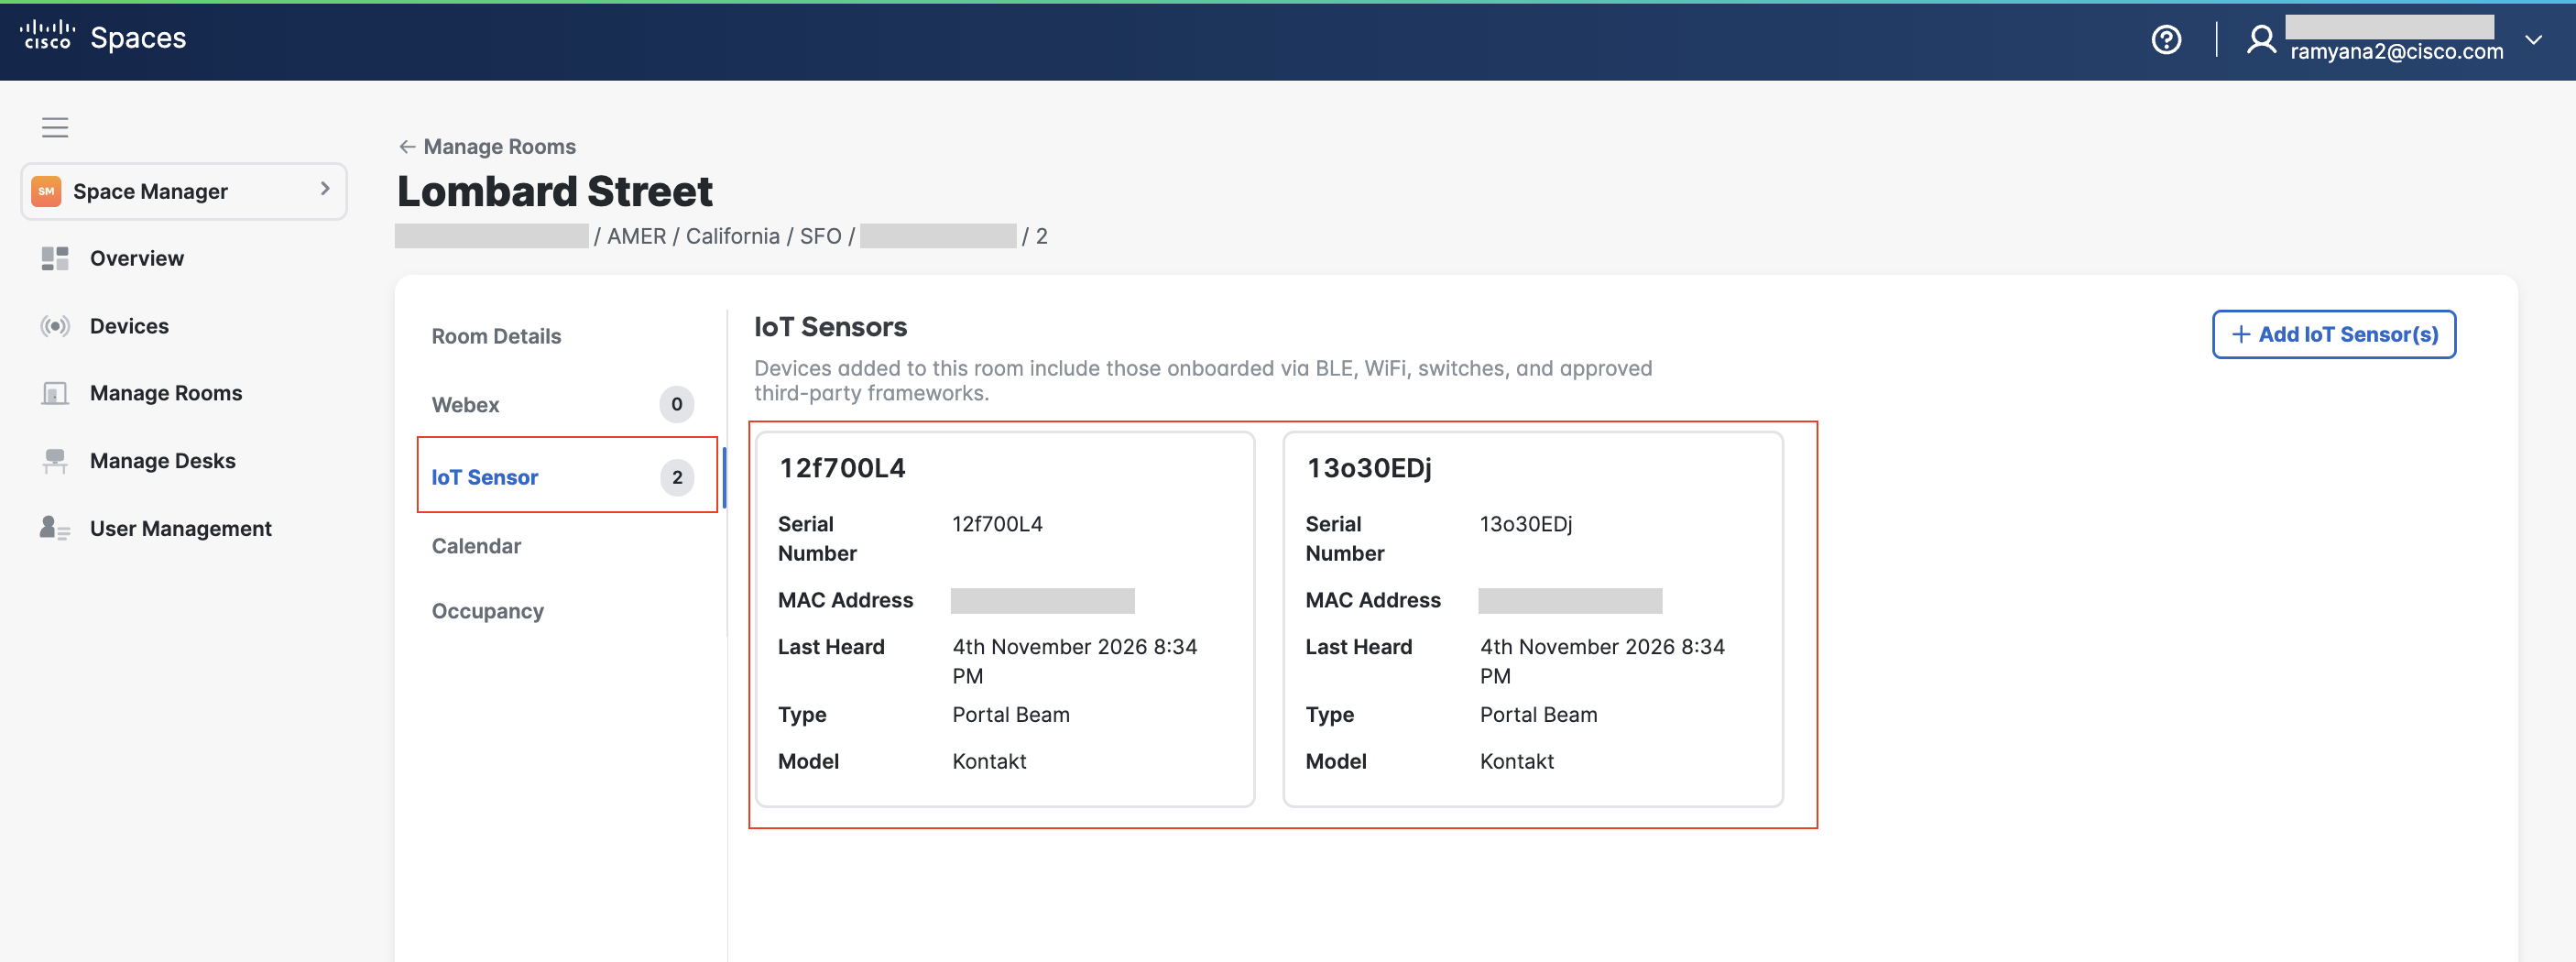
The portal beams associated to the room should be listed. Any changes to the association of the sensors should be done through the KIO Setup manager app.
Step 8 - Validate Portal Beam outcomes on Digital Maps
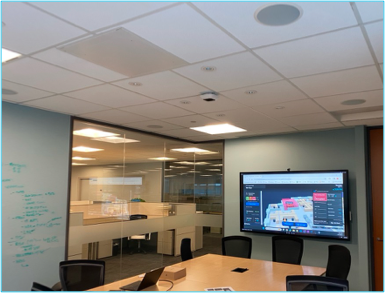
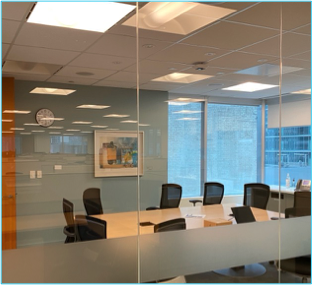
As the final deployment step, we recommend validating the Portal Beam outcomes from the Digital Maps. Complete this at the room location where the Portal Beam is mounted and will require two people.
From the Cisco Spaces home page, navigate to the Space Manager app. Navigate to the correct floor and select the Room Occupancy option. All the rooms can be seen with the associated sensors and their real time
|
Validation steps (complete at the Portal Beam's room-level location) |
Expected outcome |
|---|---|
|
Room occupancy counts are accurate.
Sensor/temperature readings are accurate. |
Step 8 - Enable Digital Kiosk Outcome
Once the devices are correctly added and validated, customers can use the device data to feed into the Kiosk application. Refer to the Kiosk section within the relevant guides to understand the steps needed.
Best Practices
For Cisco Spaces + Portal Beam solution, Cisco recommends the following best practices.
-
Make sure all infrastructure release versions and AP deployment modes are used. For example, if older IOS-XE code or a connector with a lower than recommended resources are used, customers may run into known and unpredictable BLE behavior. It will directly impact any BLE based outcomes
-
Follow all Cisco recommended best practices for location grade deployment, including but not limited to APs installed at the periphery of the floors, no more than 50 feet of inter AP distance, devices heard at least -75dbm or better by at least 3 APs.
-
Make sure IoT Services and location (Detect and Locate) is working for the account and location properly as it is a inherently used by the plugin framework.
-
Make sure devices are either installed by Kontakt official installers, or in conjuction with Kontakt support and guidance and follows all Kontkat best practices published.
-
Understand and explain to customers the unsupported and supported functionality to set right expectations.
For Cisco Spaces + Portal Beam solution, Cisco recommends the following best practices.
-
Make sure all infrastructure release versions and AP deployment modes are used. For example, if older IOS-XE code or a connector with a lower than recommended resources are used, customers may run into known and unpredictable BLE behavior. It will directly impact any BLE based outcomes
-
Follow all Cisco recommended best practices for location grade deployment, including but not limited to APs installed at the periphery of the floors, no more than 50 feet of inter AP distance, devices heard at least -75dbm or better by at least 3 APs.
-
Make sure IoT Services and location (Detect and Locate) is working for the account and location properly as it is a inherently used by the plugin framework.
-
Make sure devices are either installed by Kontakt official installers, or in conjuction with Kontakt support and guidance and follows all Kontkat best practices published.
-
Understand and explain to customers the unsupported and supported functionality to set right expectations.
Support and Monitoring
Joint Support Model
The Cisco Spaces Partner Ecosystem operates under a shared responsibility support model, ensuring issues are routed quickly to the team best positioned to resolve them.
Enlarges the table by opening it in a full screen dialogOpen
|
Responsibility Area |
Primary Owner |
|
Cisco Spaces Platform, APIs, Network Integration |
Cisco Spaces |
|
Portal Beam, KIO Cloud, Kio Setup Manager |
Support Workflow
Cisco Support
For detailed support channels, case creation, ownership, joint investigation, and escalation procedures, refer to the Cisco Spaces Support and Escalation Process for Partner Ecosystem.
Kontakt.io Support
If you have questions about Kio apps or Kontakt.io devices, contact the Technical Support team.
Support options
-
Support portal: https://support.kontakt.io
-
From the support portal, submit a request to get in touch with Kontkat.io’s Technical Support team
-
Phone: +1 (336) 283-7646
Before contacting support with Kontakt.io, to help resolve issues as quickly as possible, please:
-
Verify that your system meets the requirements listed in the product documentation.
-
Have the following information available:
-
Customer ID/Tenant ID or account name
-
Kio app name and a description of the issue or question
-
Device hardware details (model, MAC address)
-
Troubleshooting steps already taken
-
Troubleshooting Guide
Recalibrate a room with more than one Portal Beam (iPhone or iPad only)
If occupancy counts are inaccurate in a room with more than one Portal Beam, recalibrate the room. Recalibrate whenever you add, replace, or move a Portal Beam in the room.
-
From Kio Setup Manager, tap Install > Post-install Room Calibration.
-
Tap the campus, building, floor, and room to calibrate.
-
From Room Calibration, tap Start, and complete the room survey (Step 5.1).
Delete a room calibration (iPhone or iPad only)
Delete a room's calibration when it no longer matches the beams installed in the room and you aren't recalibrating right away. People detection isn't accurate in the room until it's recalibrated.
-
From Kio Setup Manager, tap Install > Delete Room Calibration.
-
Tap the campus, building, floor, and room.
-
Tap Continue > Delete. The app displays Calibration Deleted.
Validate IOT Services
Refer to Cisco Spaces documentation or leverage Cisco TAC support to make sure IOT Services is working correctly.
-
https://runbooks.ciscospaces.io/docs/cisco-spaces-os-runbook-cisco-validated
-
https://runbooks.ciscospaces.io/docs/iot-services-deployment-monitoring-and-troubleshooting-guide
Portal Beam Checklist Form
The form here is to ensure proper readiness for the occupancy outcome using portal beams prior to deployment.
Frequently asked Questions
How can i move or relocate a Portal Beams?
When you move a Portal Beam within its room or relocate it to a different room, install it again from Kio Setup Manager. Installing it again updates the beam's room in Cisco Spaces and lets you recalibrate the room.
-
Take down the Portal Beam. Moving within its room: take it to the new position in the same room and mount it to the ceiling. Relocating to a different room: bring it to the new room and mount it to the ceiling.
-
From Kio Setup Manager, tap Devices > from Nearby Devices, tap the Portal Beam by its MAC address or Unique ID.
-
Tap Install Your Device > from Choose location, tap the campus, building, floor, and room.
-
When moving within a room, choose the Portal Beam's current room. When relocating, choose the room it's moving to.
-
Complete the installation (Step 5). The app keeps the Portal Beam's existing Exclusion Zones, so review them from its new position.
-
If the room has more than one Portal Beam, tap Perform room calibration and complete the room survey (Step 5.1).
-
If you relocated the Portal Beam, update the room it moved from: if more than one Portal Beam is left, recalibrate the room. If one Portal Beam is left, delete the room calibration. If no Portal Beams are left, no update is needed.
-
From Space Manager, verify the Portal Beam is listed in its room (Step 6). If you relocated the beam, set the new room's Capacity if it isn't set (Step 7), then validate the room's occupancy (Step 8).
How can i view the last shared thermal image?
-
From a web browser, open the Kio Device Management Plugin URL for your Cisco Spaces account region (United States region: https://plugin-app.cloud.us.kontakt.io/device-management/ | Europe region: https://plugin-app.cloud.uk.kontakt.io/device-management/ ).
-
From the Inventory menu, select Infrastructure > select the Portal Beam.
-
From its profile, select the Occupancy tab. The last image shared from Kio Setup Manager is displayed.
How do I update firmware for Portal Beams?
-
From the bottom menu, tap Devices.
-
From the list of Nearby Devices, locate the Portal Beam by its MAC address or Unique ID. A blue up arrow icon next to a Portal Beam indicates a firmware update is available.
-
Tap the Portal Beam > tap the firmware update indicator to apply the update. Stay within range of the beam until the firmware update is complete.