
Overview
Room presence in Cisco Spaces shows whether a configured room is Occupied or Available, helping employees find spaces that are currently in use or available for an impromptu call, focused work, or a small meeting. It is suited to small meeting rooms, focus rooms, phone rooms, and huddle spaces.
Presence data also helps facilities and workplace teams understand how these rooms are used over time. Historical utilization can reveal frequently used rooms, underused spaces, and usage patterns that inform decisions about room availability, layout, and future space planning. Presence reflects detected room activity independently of whether a room has been booked.
Haltian Thingsee PRESENCE provides this room-level status through the Cisco Spaces BLE integration. After the sensor is claimed and associated with a room, its status is available in supported Cisco Spaces applications. The integration provides a binary presence state; it does not count people or identify occupants.
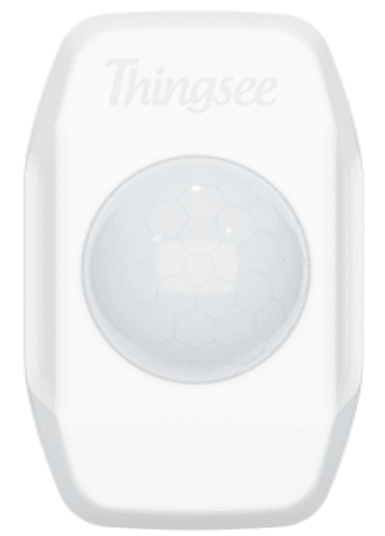
Thingsee PRESENCE Sensor
Thingsee PRESENCE is a compact, battery-powered wireless sensor from Haltian. It uses passive infrared (PIR) technology to detect movement within its coverage area. The device runs on two replaceable AAA batteries and can be mounted using adhesive tape, allowing installation without power cabling.
PIR detection relies on the heat differential between a person and the surrounding environment. As a person moves across the sensor’s detection zones, the infrared energy reaching the sensor changes, triggering a detection. The sensor passively receives infrared energy and operates without a camera, capturing no images or video.
Detection depends on movement and thermal contrast. A person remaining still may not continuously trigger detections. Sensitivity can also decrease when the surrounding temperature approaches body temperature. Direct sunlight, nearby heat sources, and rapid temperature changes can affect performance, making sensor placement and orientation important.
For Cisco Spaces deployments, the sensor uses the existing Cisco BLE infrastructure to deliver room presence data without an additional Haltian gateway.
Prerequisites
|
Area |
Pre-requisites |
|
Spaces Licenses |
Cisco Spaces Advantage or above
|
|
Wireless infra |
|
|
|
|
Spaces infra |
Cisco Spaces Connector 3.3 Virtual Machine (VM) with internet access to Spaces Cloud endpoints (firewall allow list and proxy requirements) |
|
Enable IoT Services - Advanced BLE Gateway enabled BLE Scan Mode (iBeacon) enabled (minimum requirement) Dual mode is fine but only Transmit Mode is not supported |
|
|
Setup Digital Maps for floors where sensors need to be installed |
Supported Functionality
In the currently available Cisco Spaces + PIR architecture, the following functionality and outcomes are supported:
|
App / Feature |
Frequency of Data |
Data |
|---|---|---|
|
Digital Signage / Kiosk |
Real time |
Binary room occupancy, such as occupied or unoccupied |
|
Space Utilization App |
Real time |
Binary room occupancy displayed as a historical graph |
|
Space Utilization App - Room Occupancy Report |
Historical |
Binary room occupancy available as an exportable report |
|
Space Manager App - Room Occupancy View |
Real time |
Binary room occupancy, such as occupied or unoccupied |
|
IoT Explorer — Sensor View |
Real time |
Binary room occupancy, such as occupied or unoccupied |
|
IoT Explorer — Occupancy History |
Historical |
Binary room occupancy displayed as a historical graph with 1-day, 7-day, and 30-day views |
|
Spaces API (Firehose) |
Real time |
Binary occupancy value |
Reference Architecture
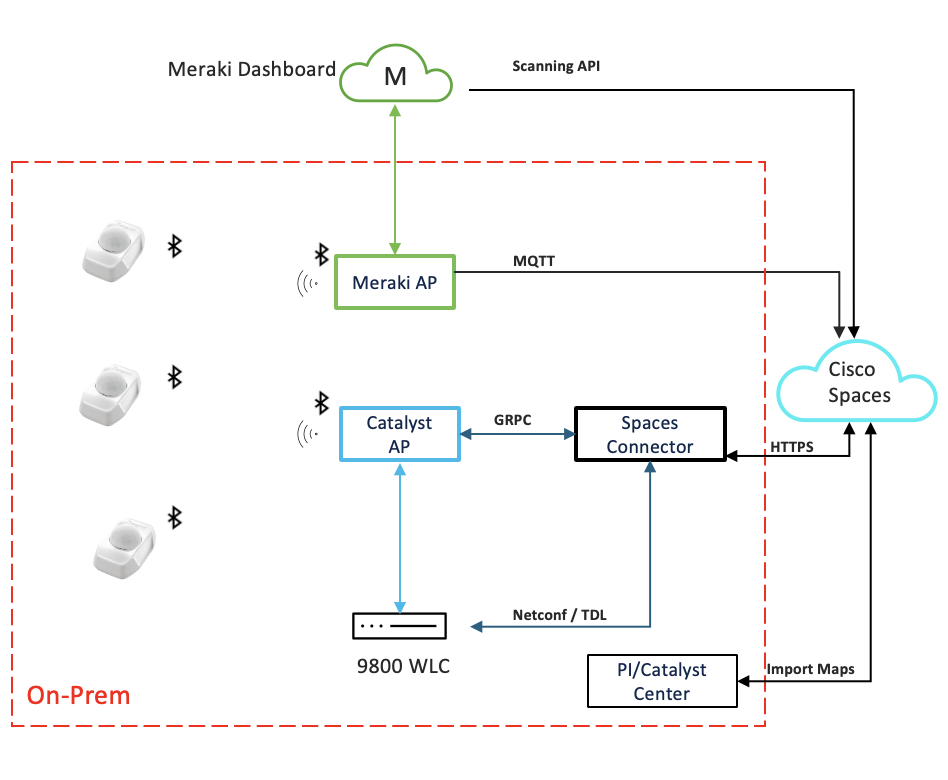
Data Flow
Thingsee PRESENCE broadcasts sensor telemetry using Bluetooth Low Energy (BLE). The path to Cisco Spaces depends on whether the wireless infrastructure is Catalyst-managed or Meraki-managed.
Catalyst Data Flow
-
Sensor detection and transmission: The wireless PIR sensor detects movement through changes in infrared energy and broadcasts the resulting telemetry over BLE.
-
Access point collection: A supported Cisco Catalyst access point configured as a BLE gateway receives the advertisements.
-
Telemetry forwarding: The access point forwards the telemetry directly to the Cisco Spaces Connector over gRPC. The Connector forwards it to Cisco Spaces cloud over HTTPS.
-
Room presence processing: Cisco Spaces associates the sensor data with the room configured in Space Manager and uses it to determine the room’s Occupied or Available state.
-
Applications and integrations: Room presence data becomes available in supported Cisco Spaces applications and through the Spaces Firehose API.
The Catalyst 9800 Wireless Controller supports access point configuration and management. The Connector communicates with the controller through NETCONF, and the controller applies access point configuration through CAPWAP. Sensor telemetry follows the direct access point-to-Connector gRPC path.
Meraki Data Flow
The Meraki path shown in the reference architecture operates as follows:
-
Sensor detection and transmission: The sensor detects movement and broadcasts telemetry over BLE.
-
Access point collection: A supported Meraki access point receives the BLE advertisements.
-
Telemetry forwarding: The access point forwards the advertisements and raw payload directly to the Cisco Spaces cloud ingestion endpoint over MQTT. This path does not require an on-premises Spaces Connector or Catalyst wireless controller. Meraki supports MQTT forwarding of BLE telemetry from compatible access points.
-
Room presence processing: Cisco Spaces associates the received sensor data with the configured room and processes its presence status.
-
Applications and integrations: The resulting room presence data is made available through the supported Cisco Spaces experiences.
A separate Meraki Dashboard Scanning API feed supplies calculated location information. This feed can have processing delays and serves a different purpose from the MQTT sensor telemetry stream.
How to Order PIR Sensor
-
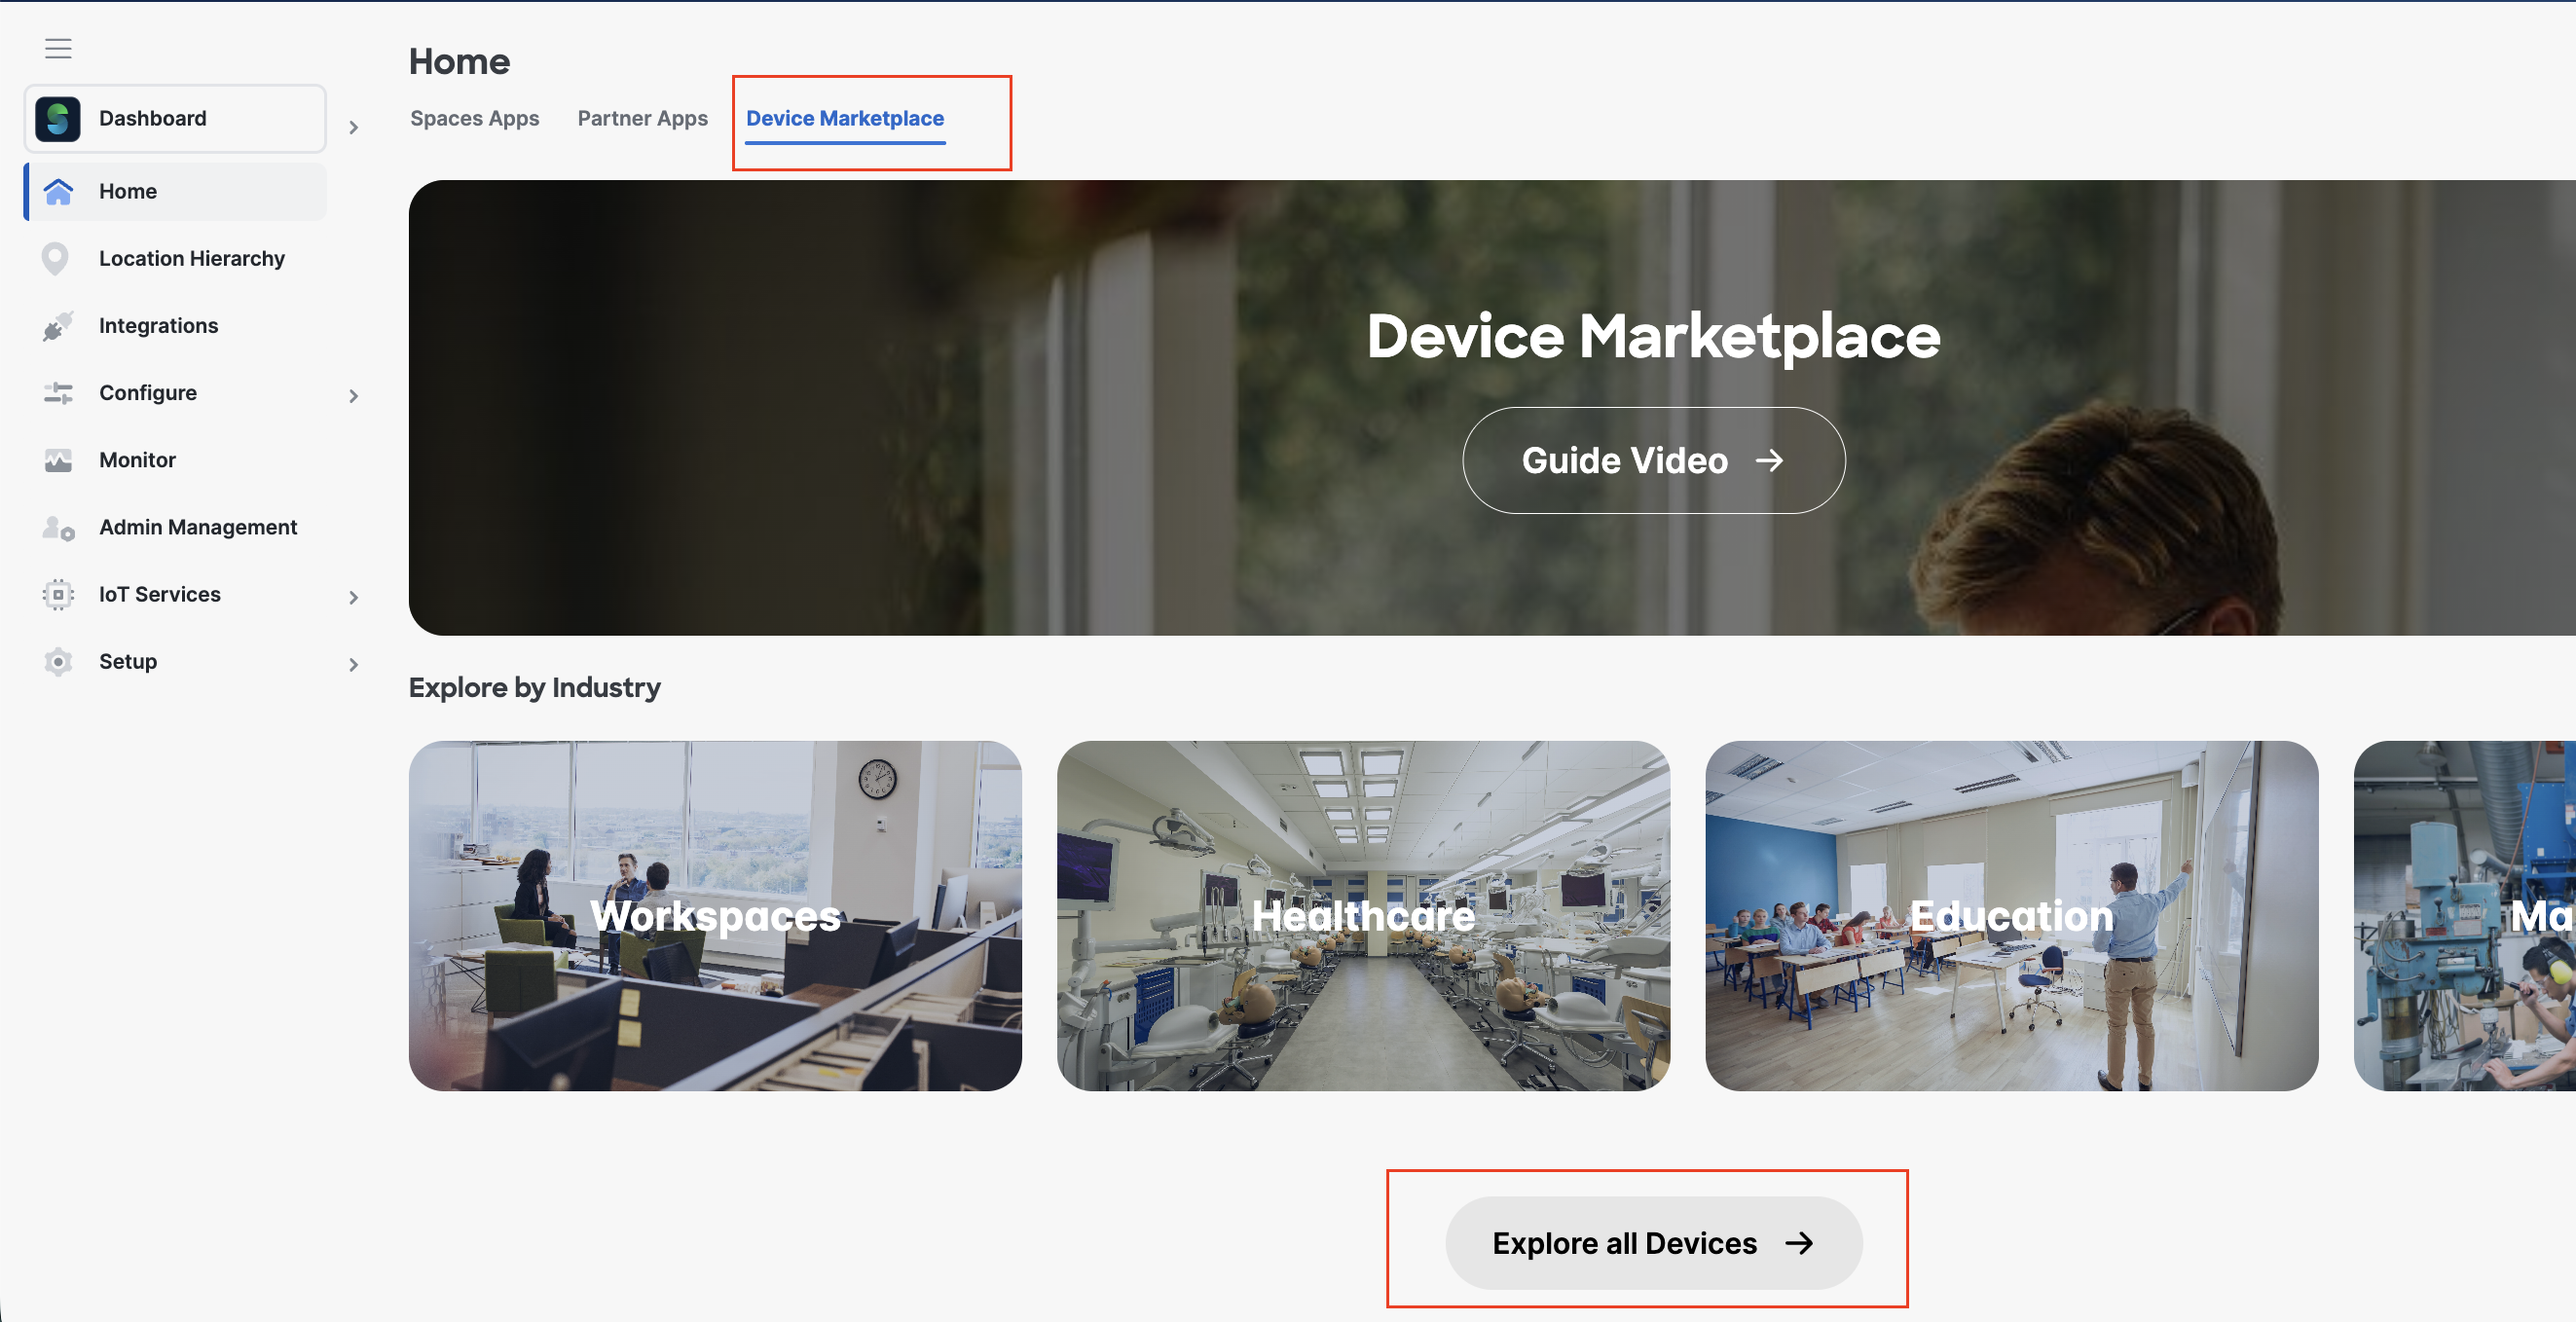
Log into Cisco Spaces , Select to Device Marketplace and click on Explore All Devices.
-
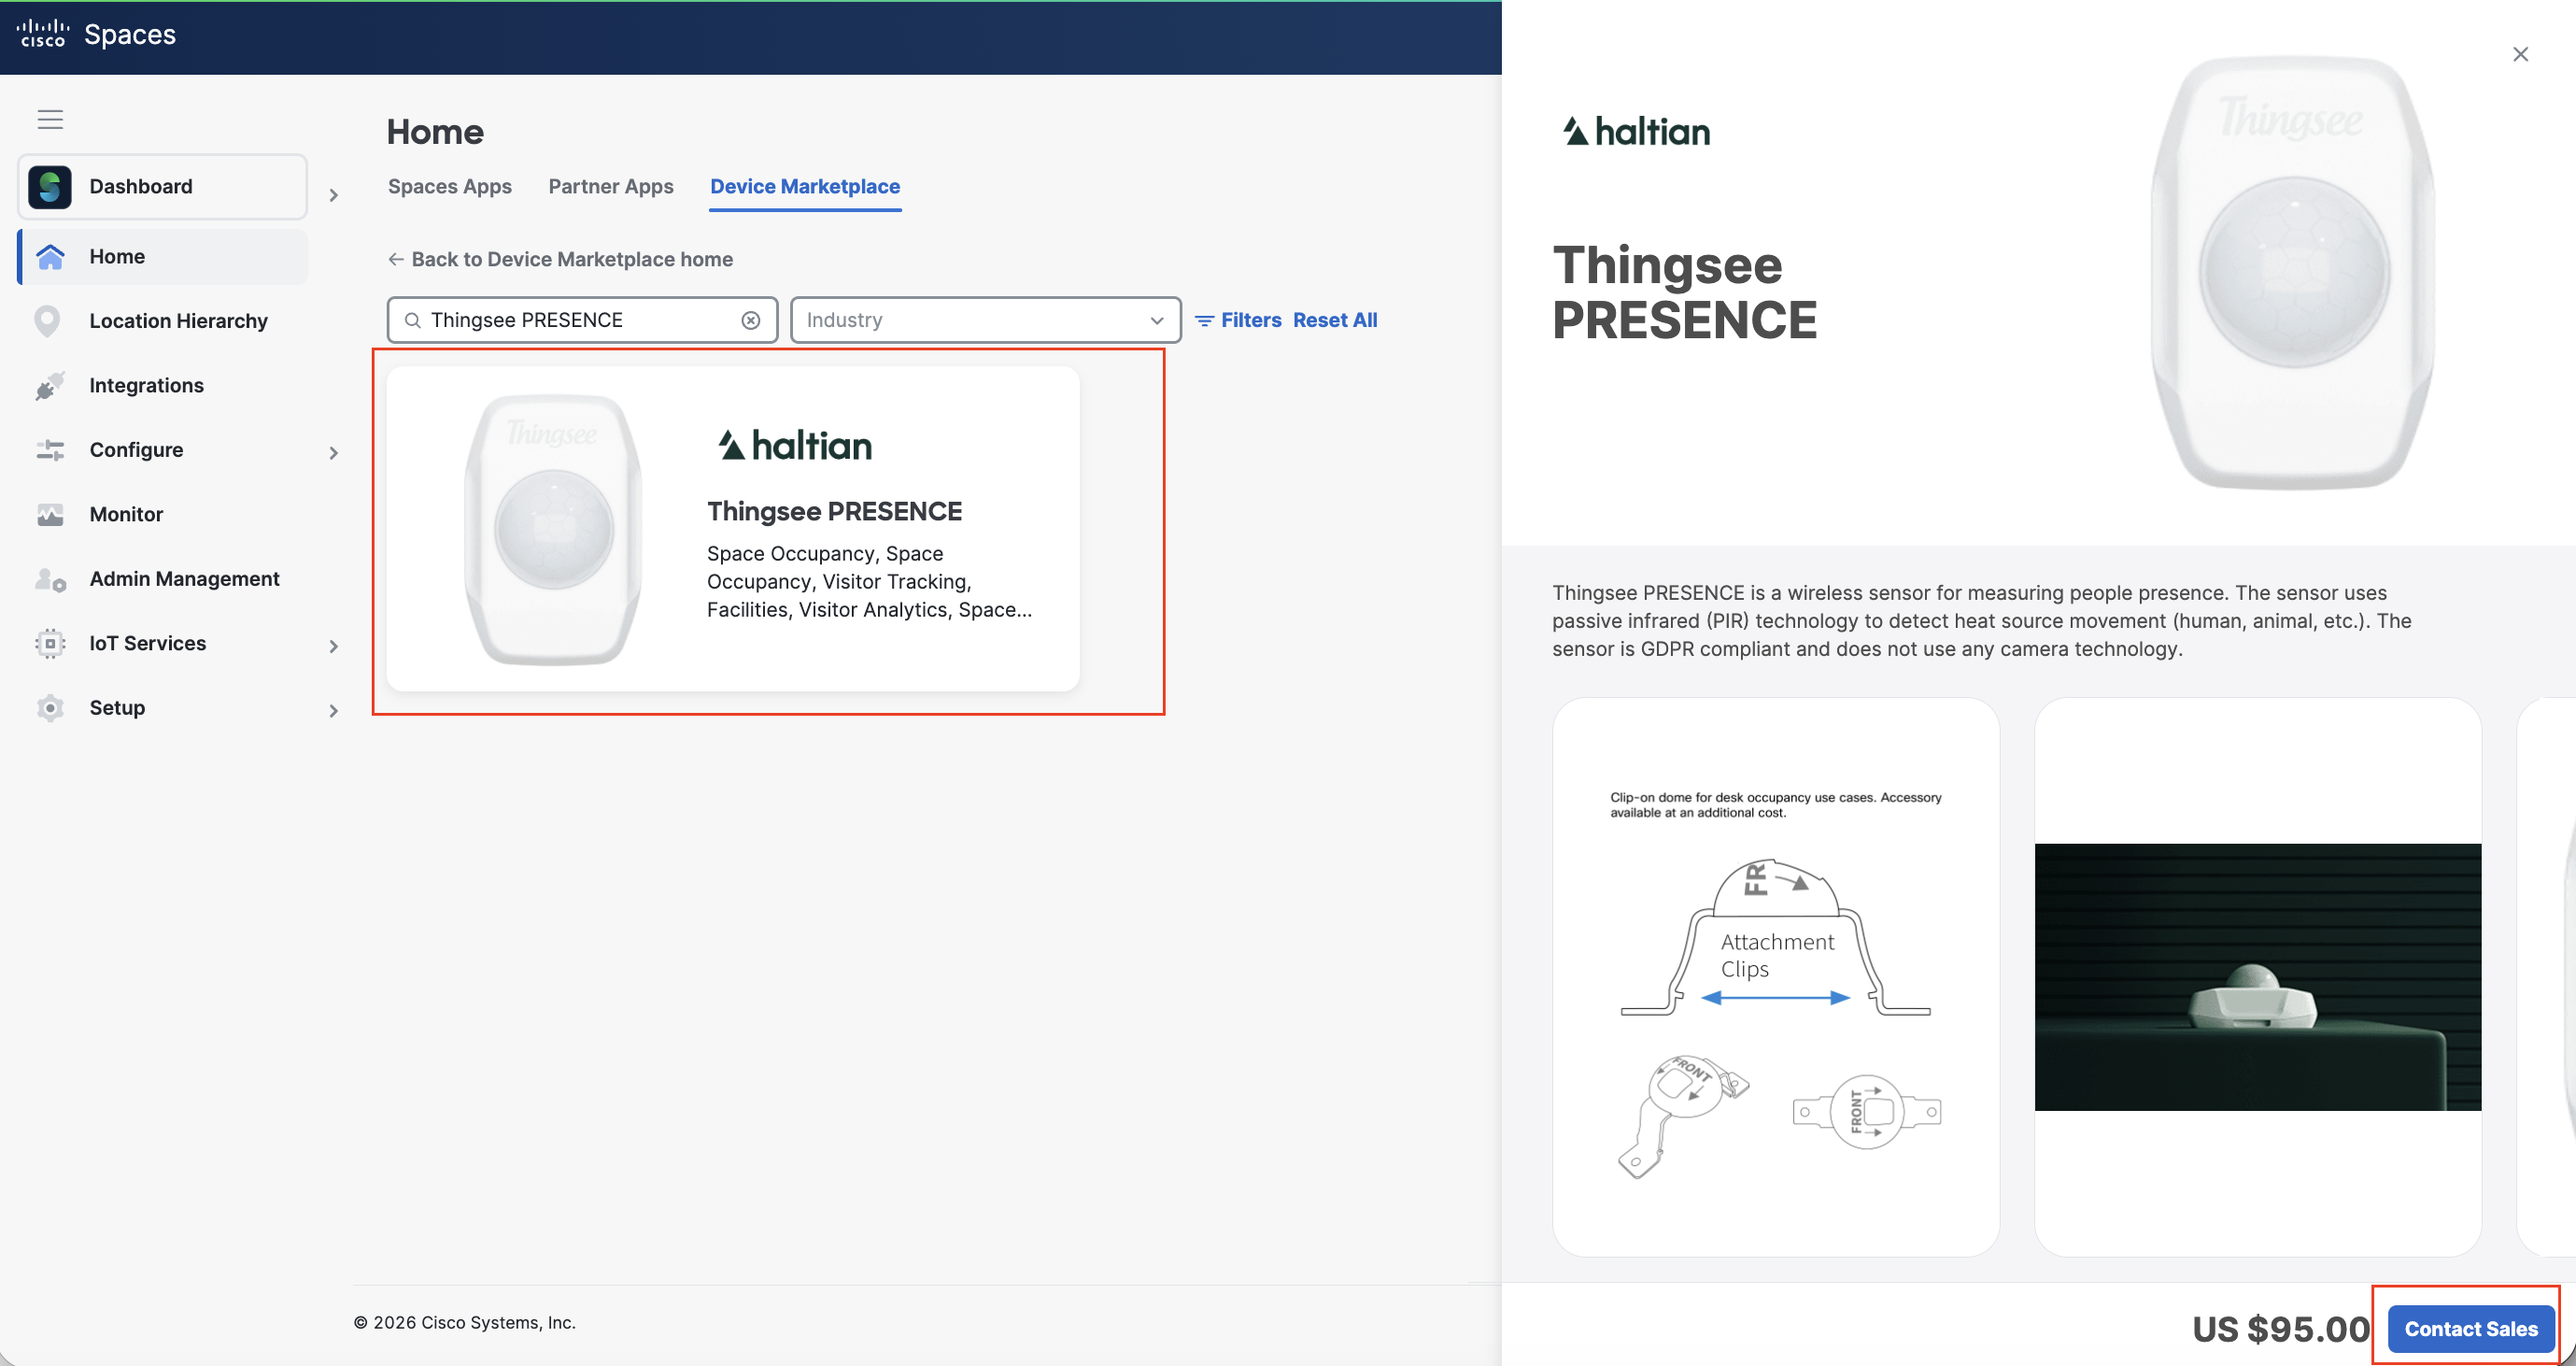
Search for Thingsee Presence and select the listing. On the right panel, click on Contact Sales button.
-
Fill the Contact Vendor form and submit it.
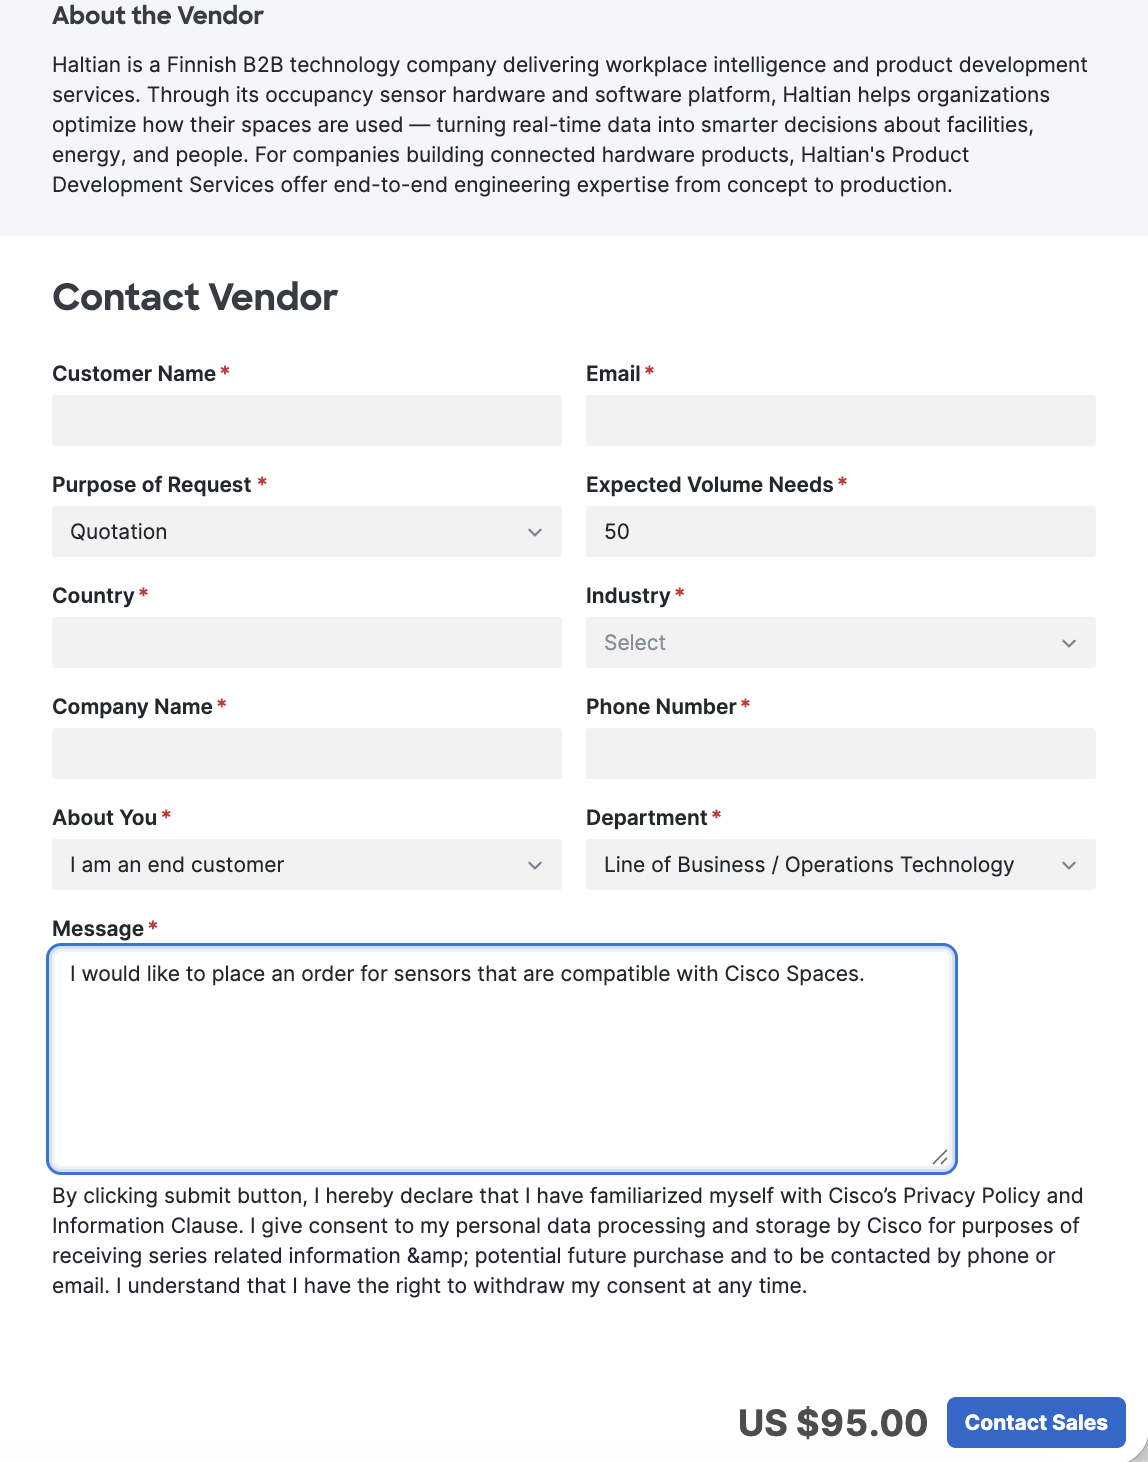
confirm with the vendor that the sensors include Cisco-specific firmware. A minimum order quantity of 50 sensors is required when ordering through Device Marketplace.
-
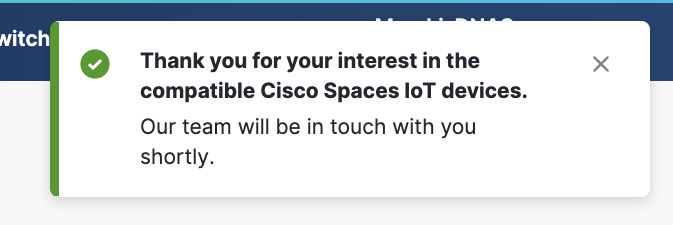
A confirmation window will appear at the top.
-
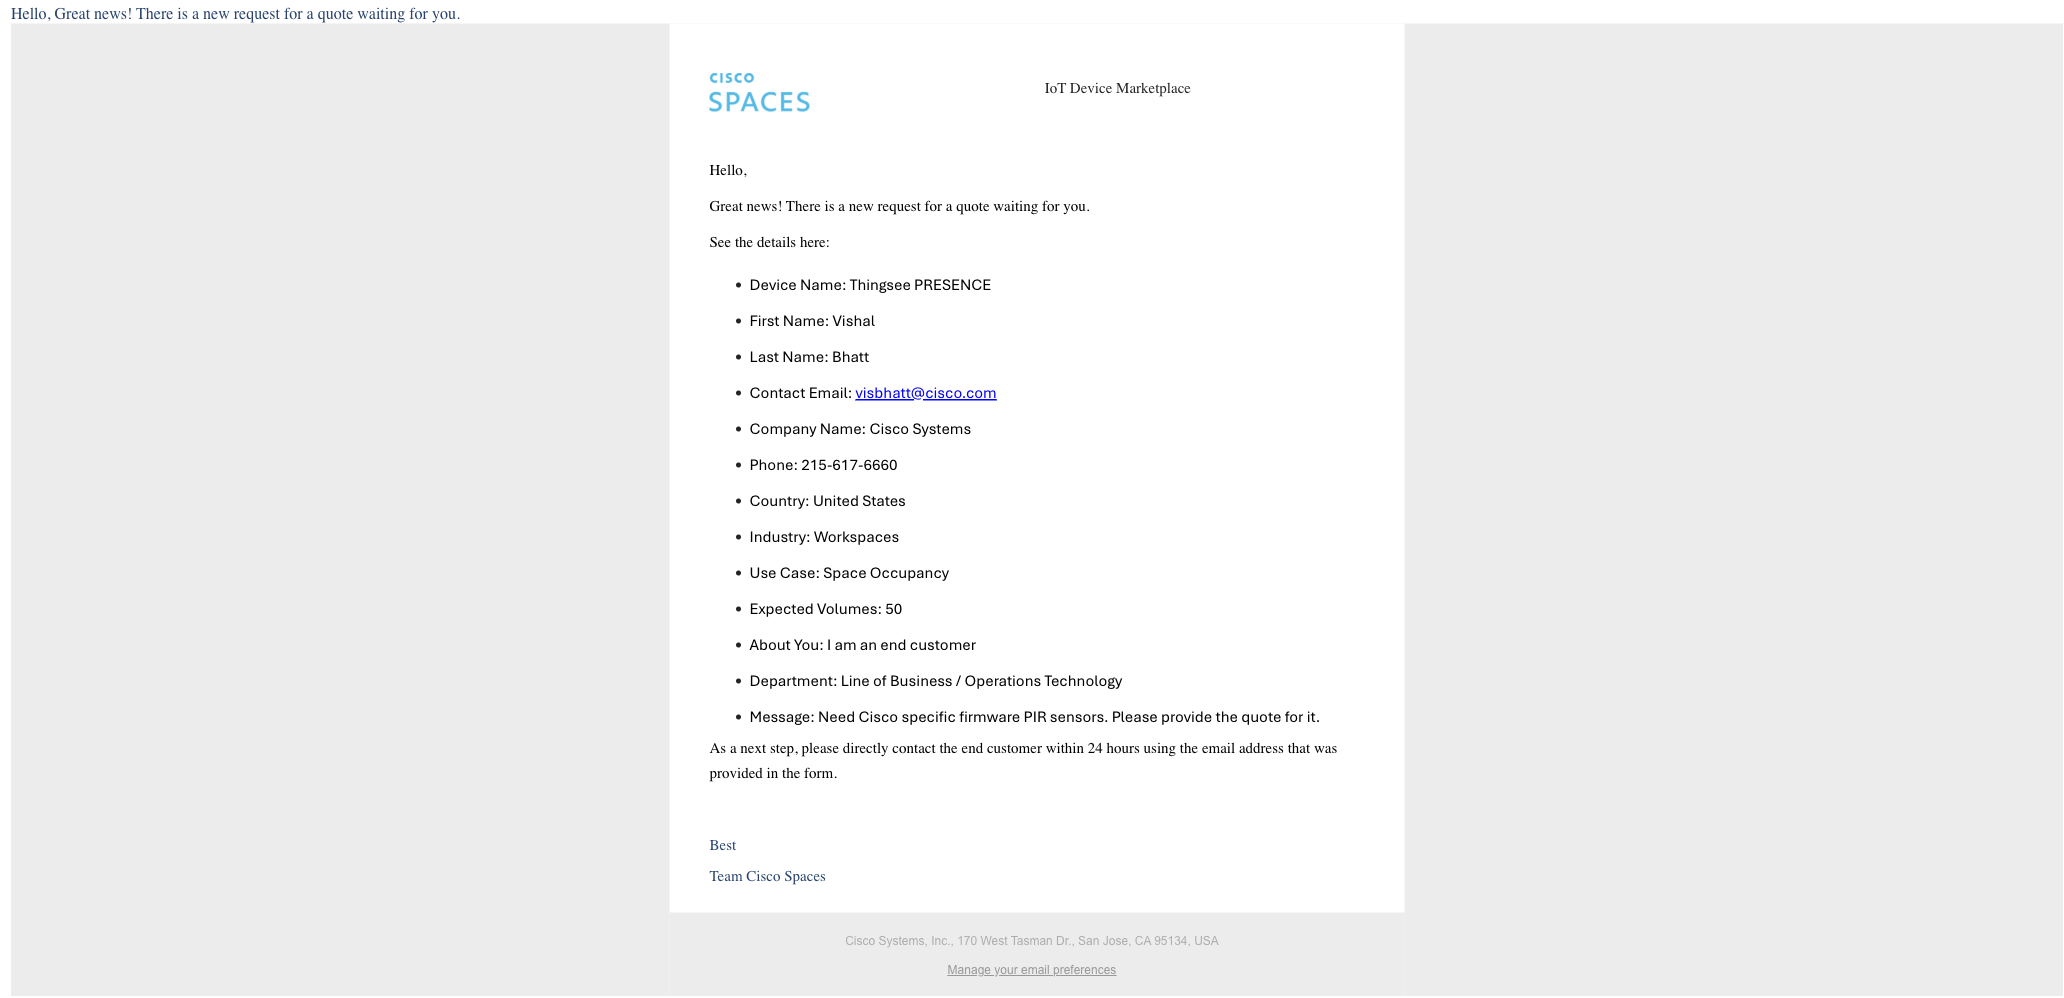
The Haltian team will follow up with you to create the purchase order and coordinate shipment of the devices. Please keep an eye out for emails from Haltian.
-
The customer will receive an invoice from the Haltian team.
-
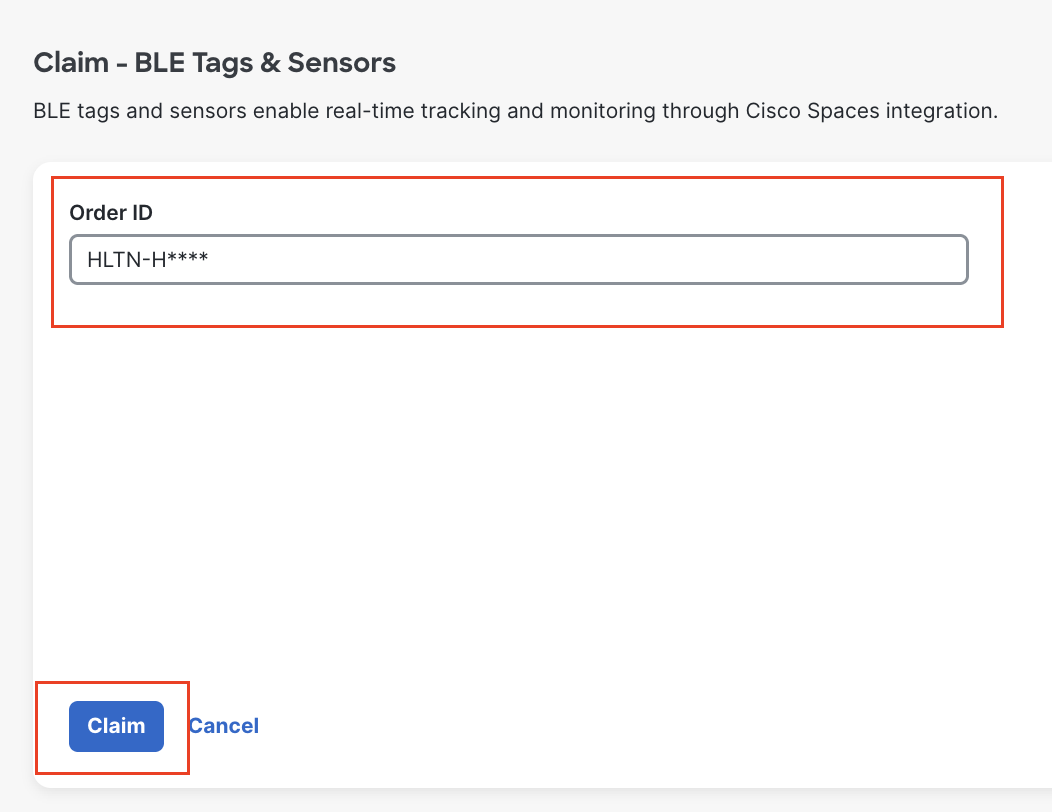
Haltian will provide an order ID for the purchased devices. Use the order ID to claim the devices under IoT Services in Cisco Spaces.
Example order ID format:
HLTN-H****
Deployment Workflow
Onboard and Activate
Claiming PIR sensor using Order ID
-
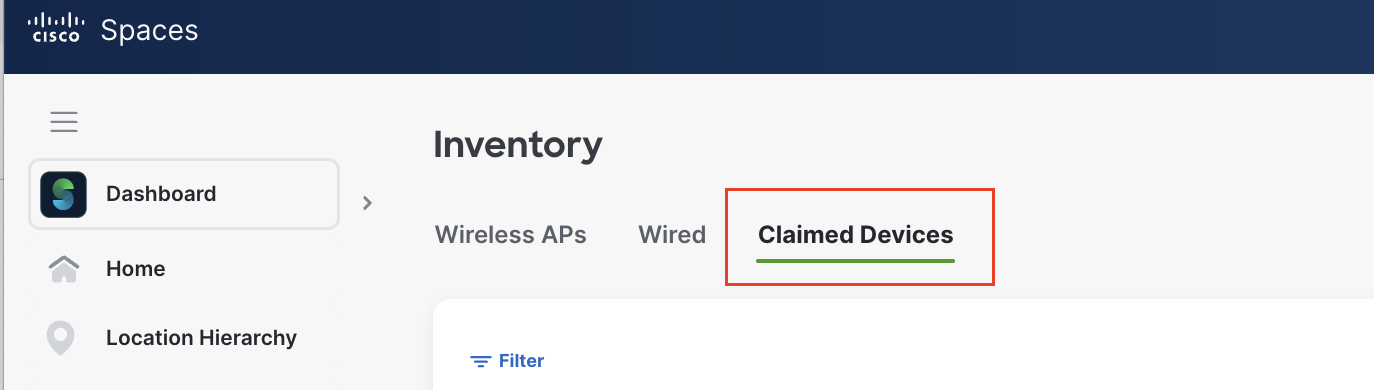
Login into Cisco Spaces Dashboard
-
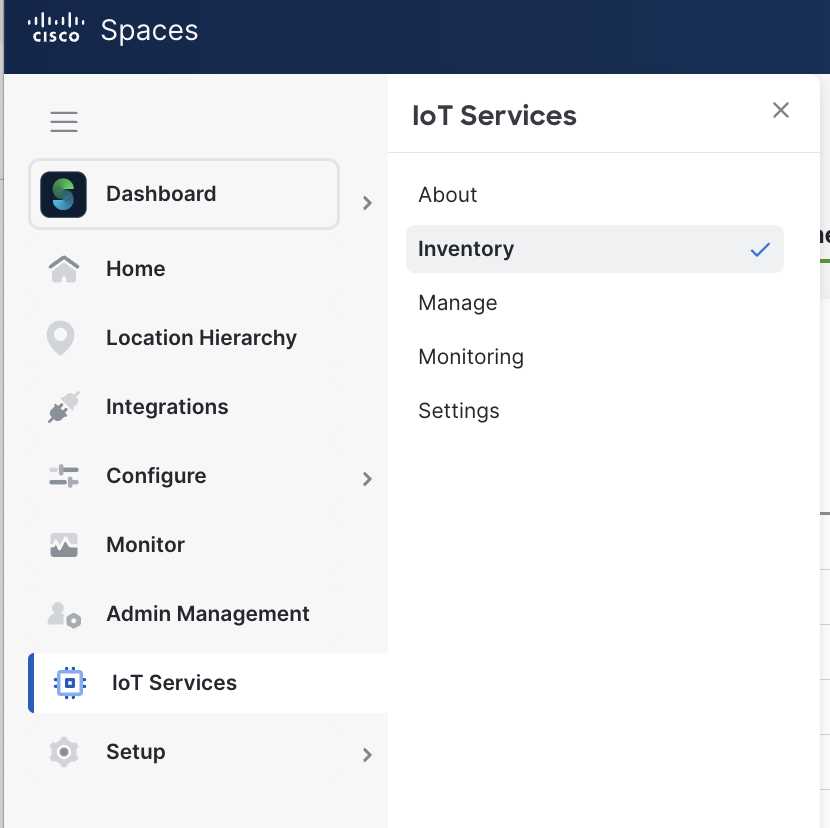
Navigate to IOT Services and Inventory.
-
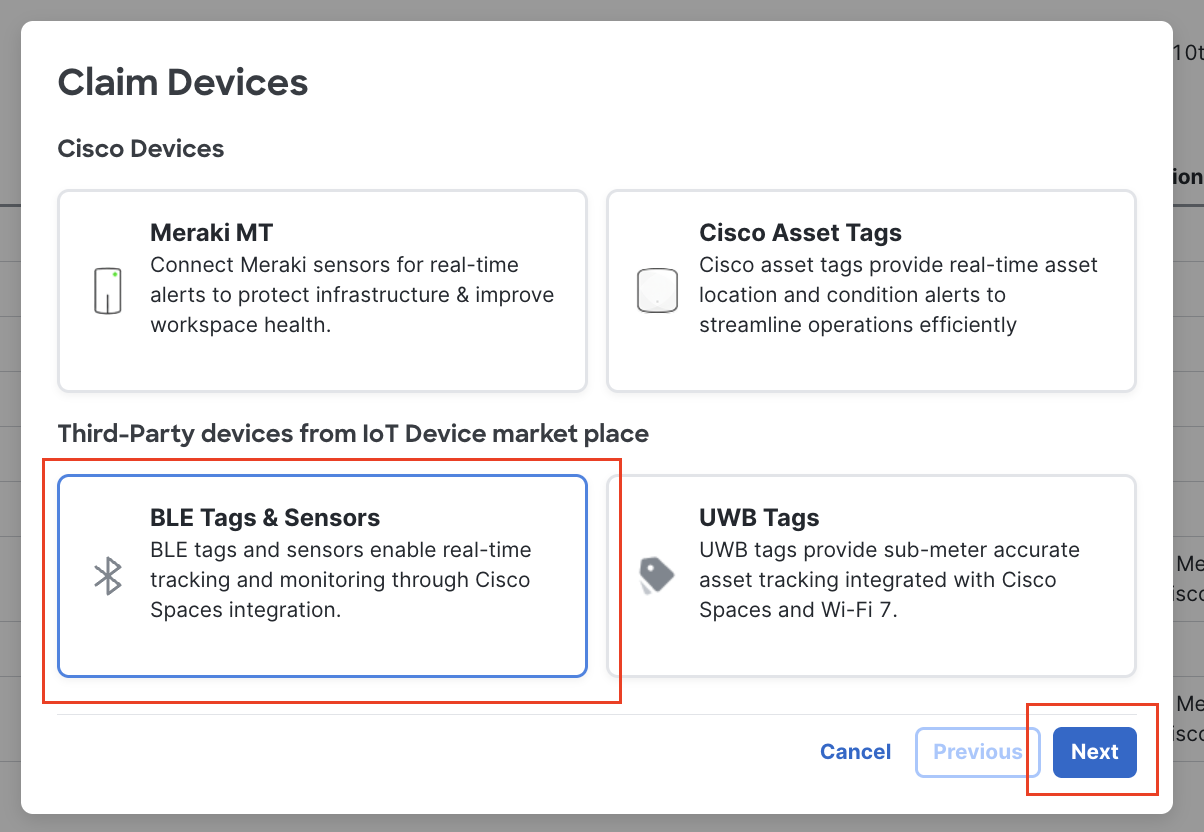
Select Claim Devices and select BLE Tags and Sensors and click Next.
-
Use the Order ID provided by vendor and click Claim
-
A confirmation message will indicate that the devices have been successfully claimed. The devices will get added under Claimed Devices. Make sure the all the sensors are showing under the Claimed Devices and verify the Last Heard time (usually shows few seconds ago for active beacons)
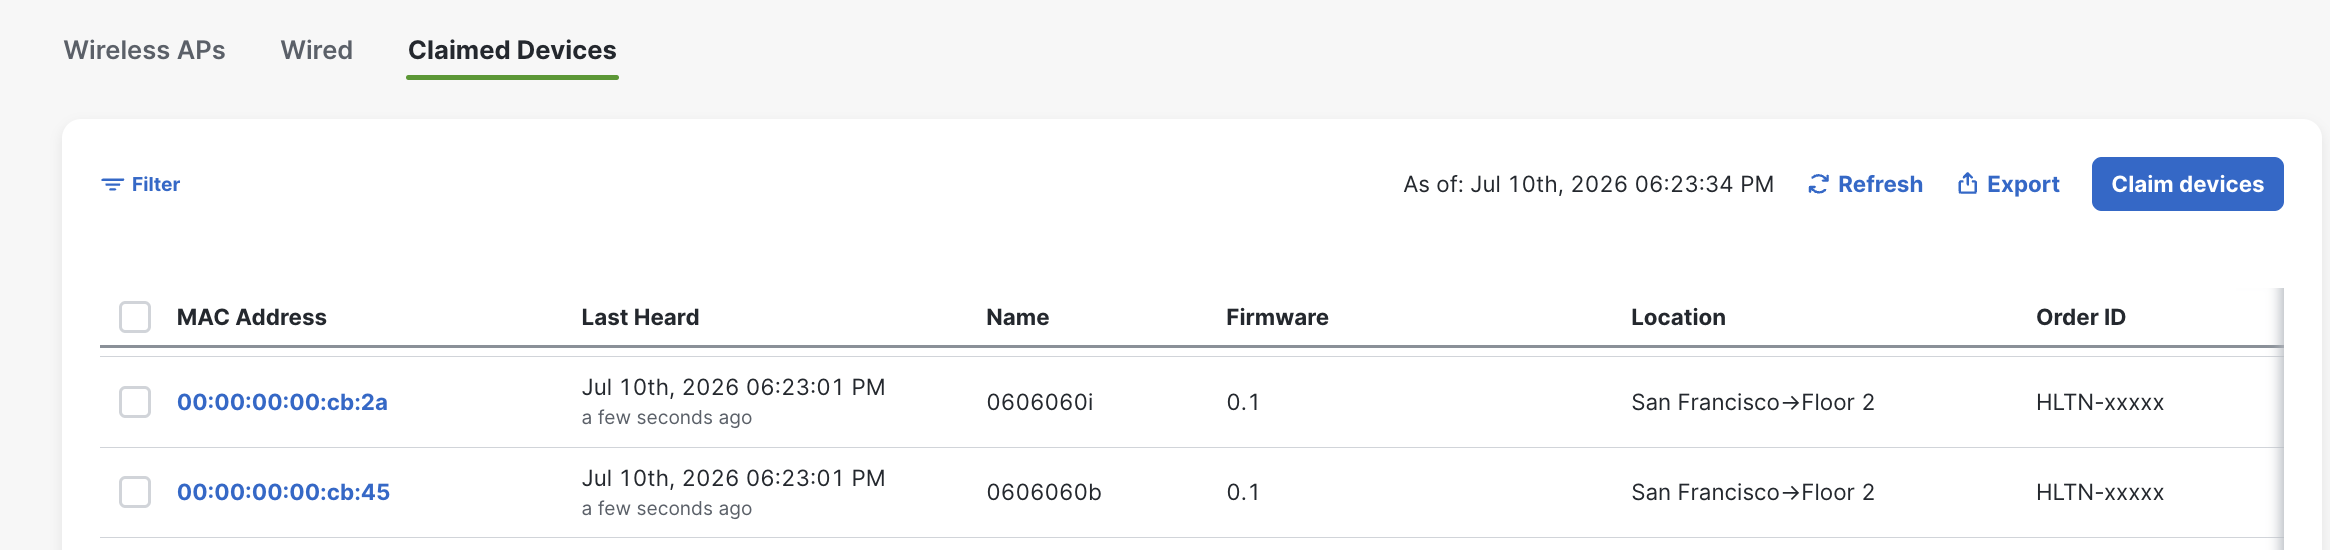
Best Practices : Label the PIR sensors in order to manage or track them easily as shown below as soon as you claim the devices.
Adding Sensor to Room
-
Once the Sensor is been claimed, can be associated under Space manager for a Room occupancy use case.
-
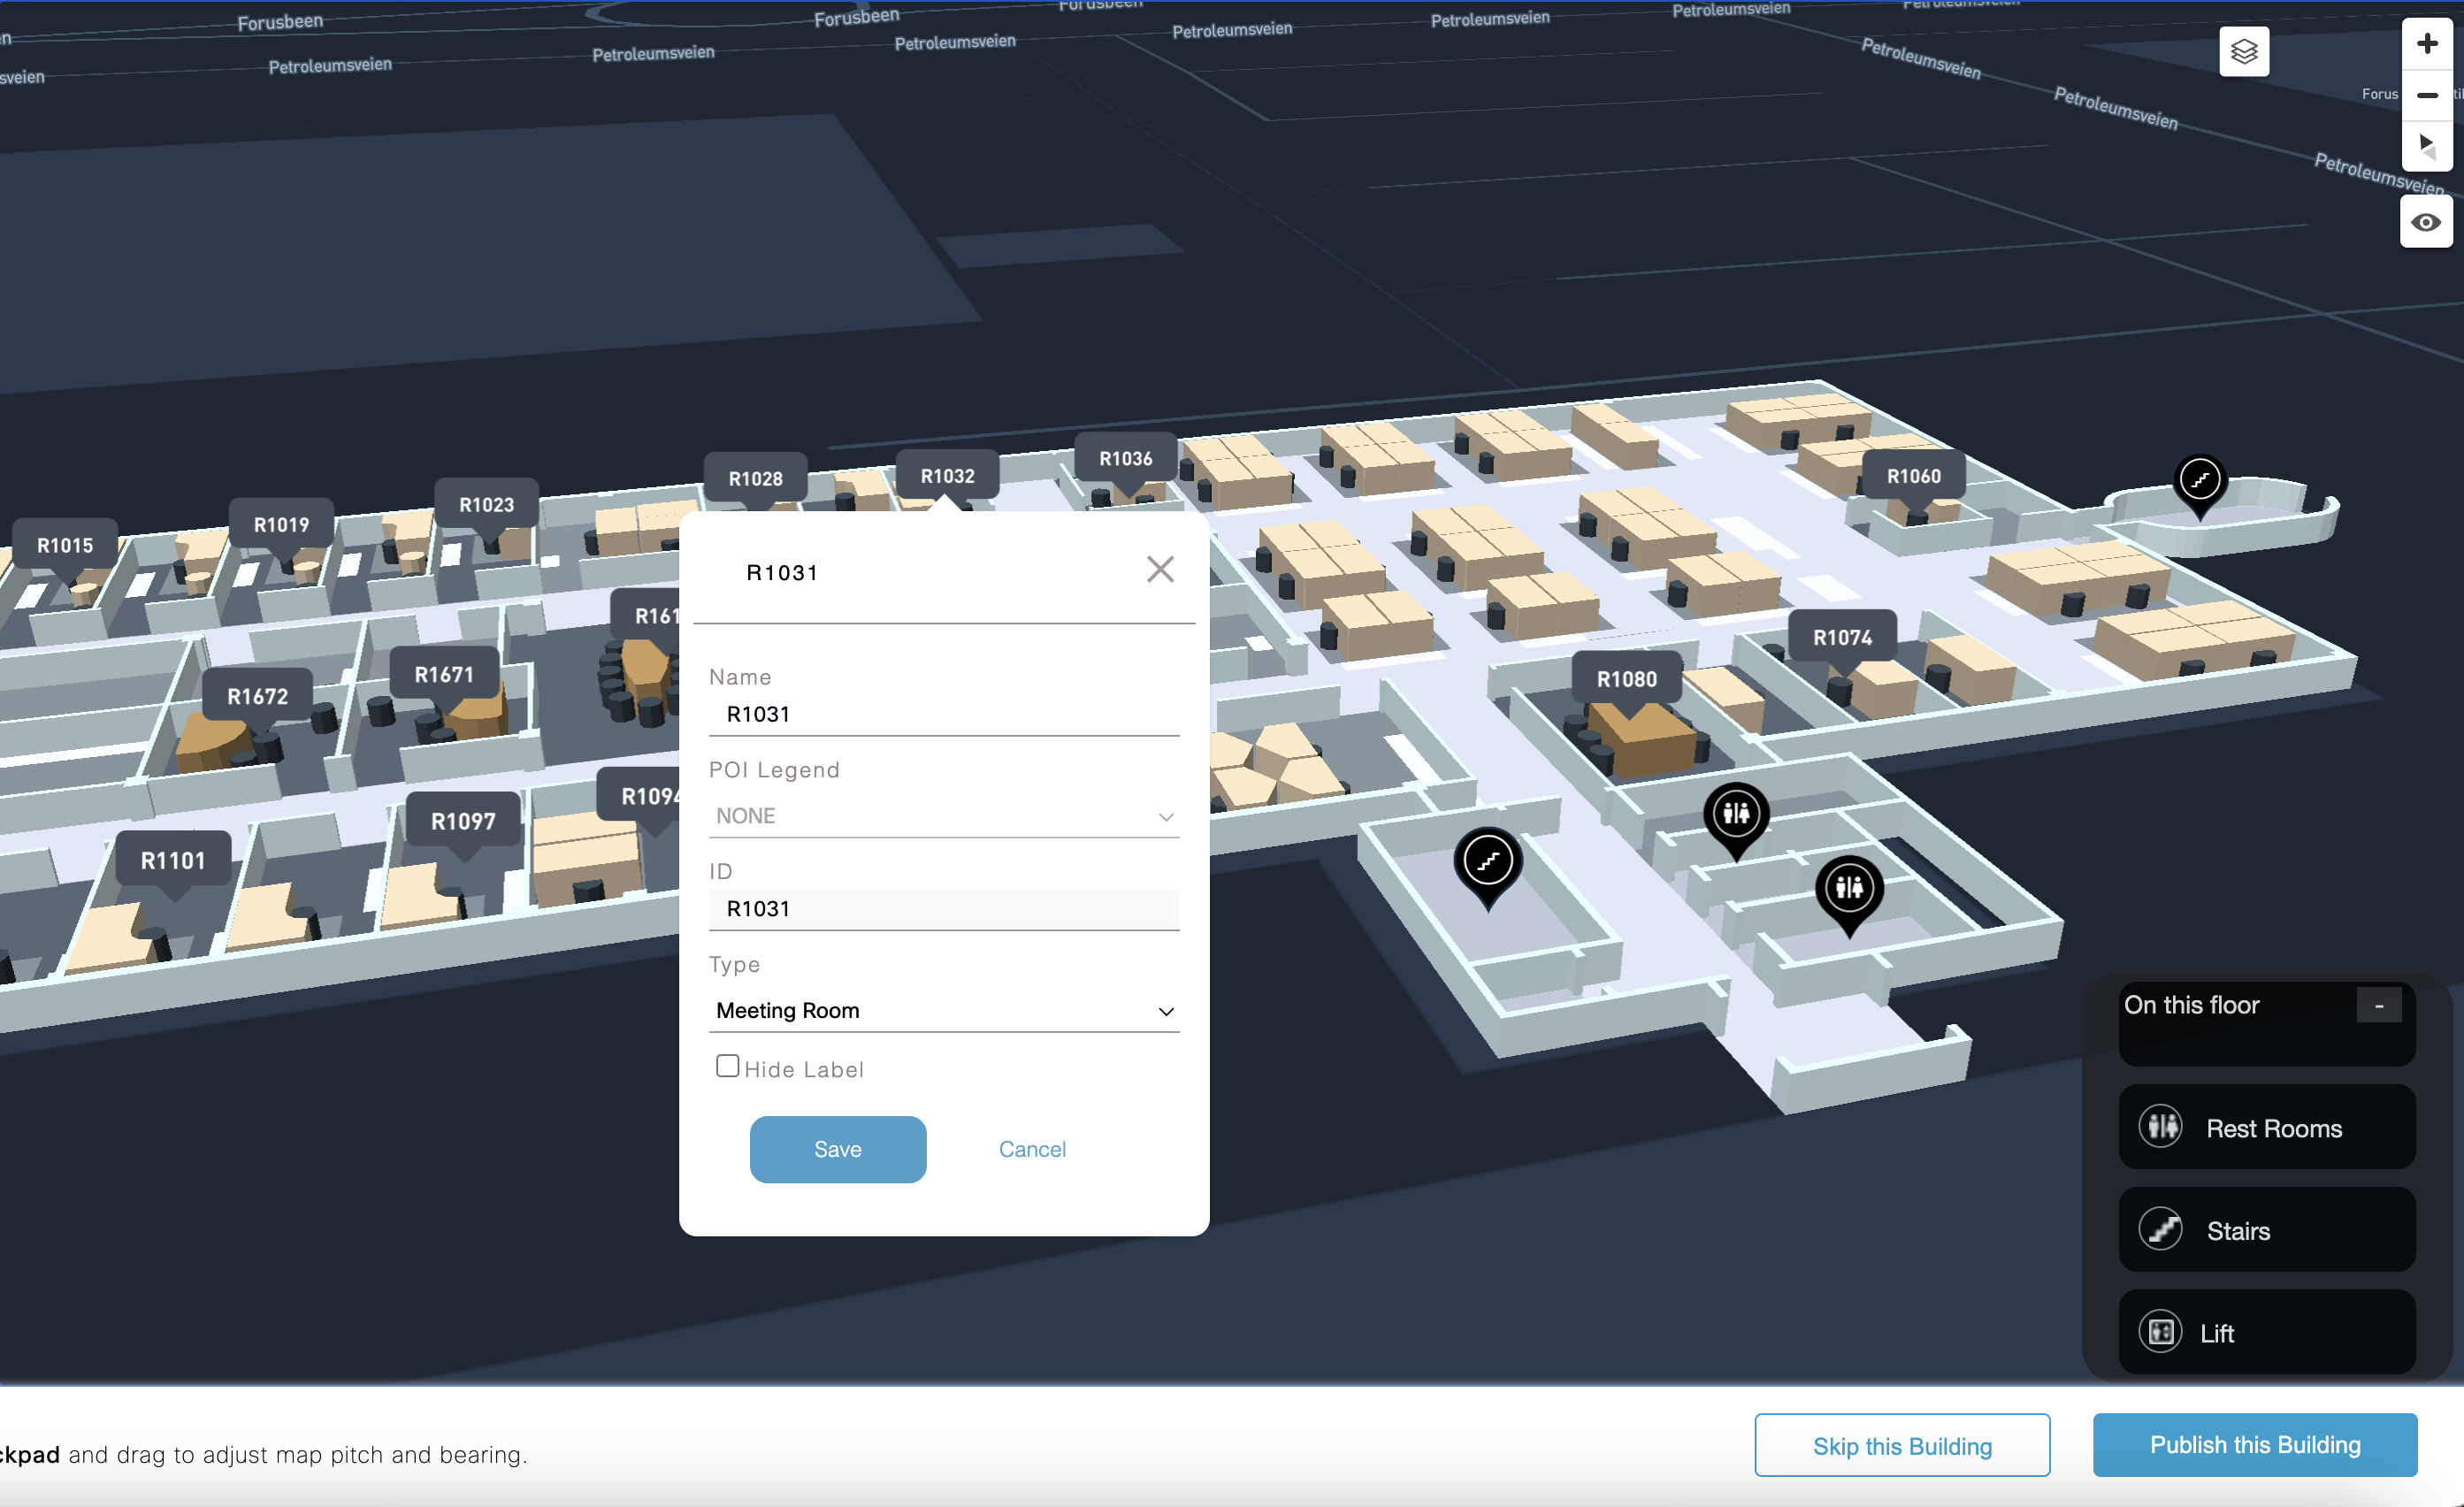
Make sure the Digital space where you are associating the PIR Sensor is a Meeting room as shown below under the Digital Map and publish the map again.
-
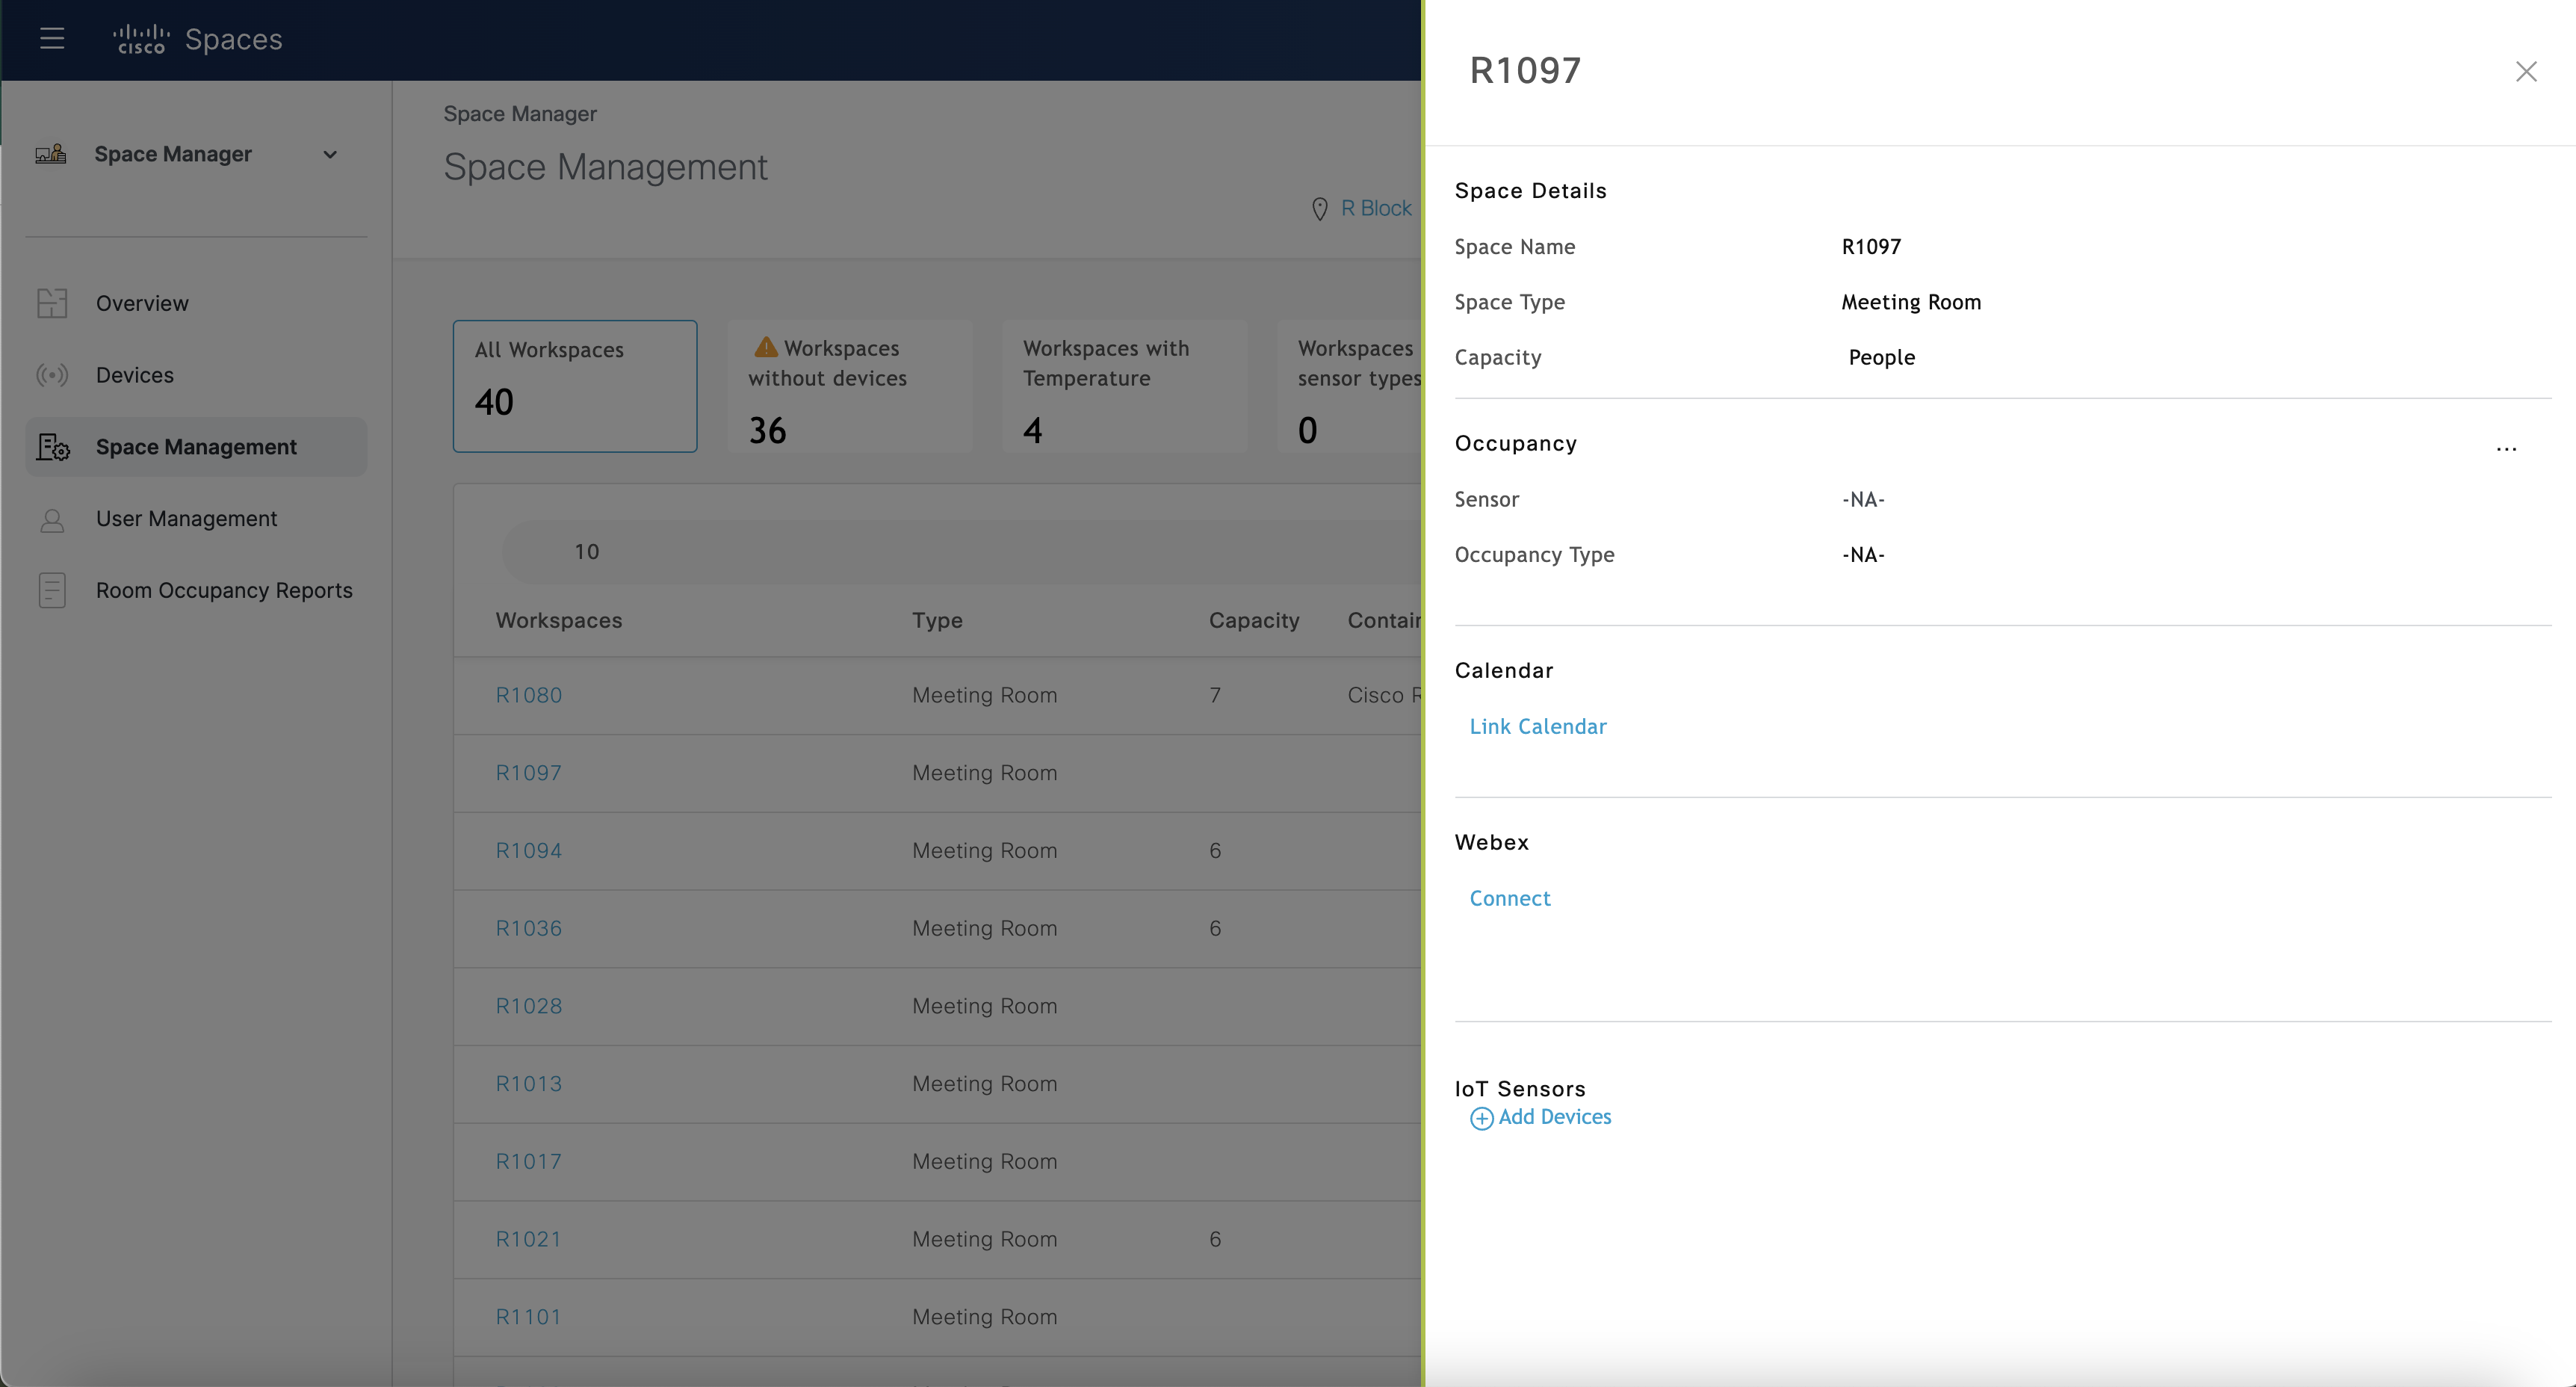
Navigate to Space Manager Space Management and select the Location and floor/zone where the Meeting room located and you want to associate the PIR to.
-
Click on the Meeting room space and should open a pop window on the right side after that as below.
-
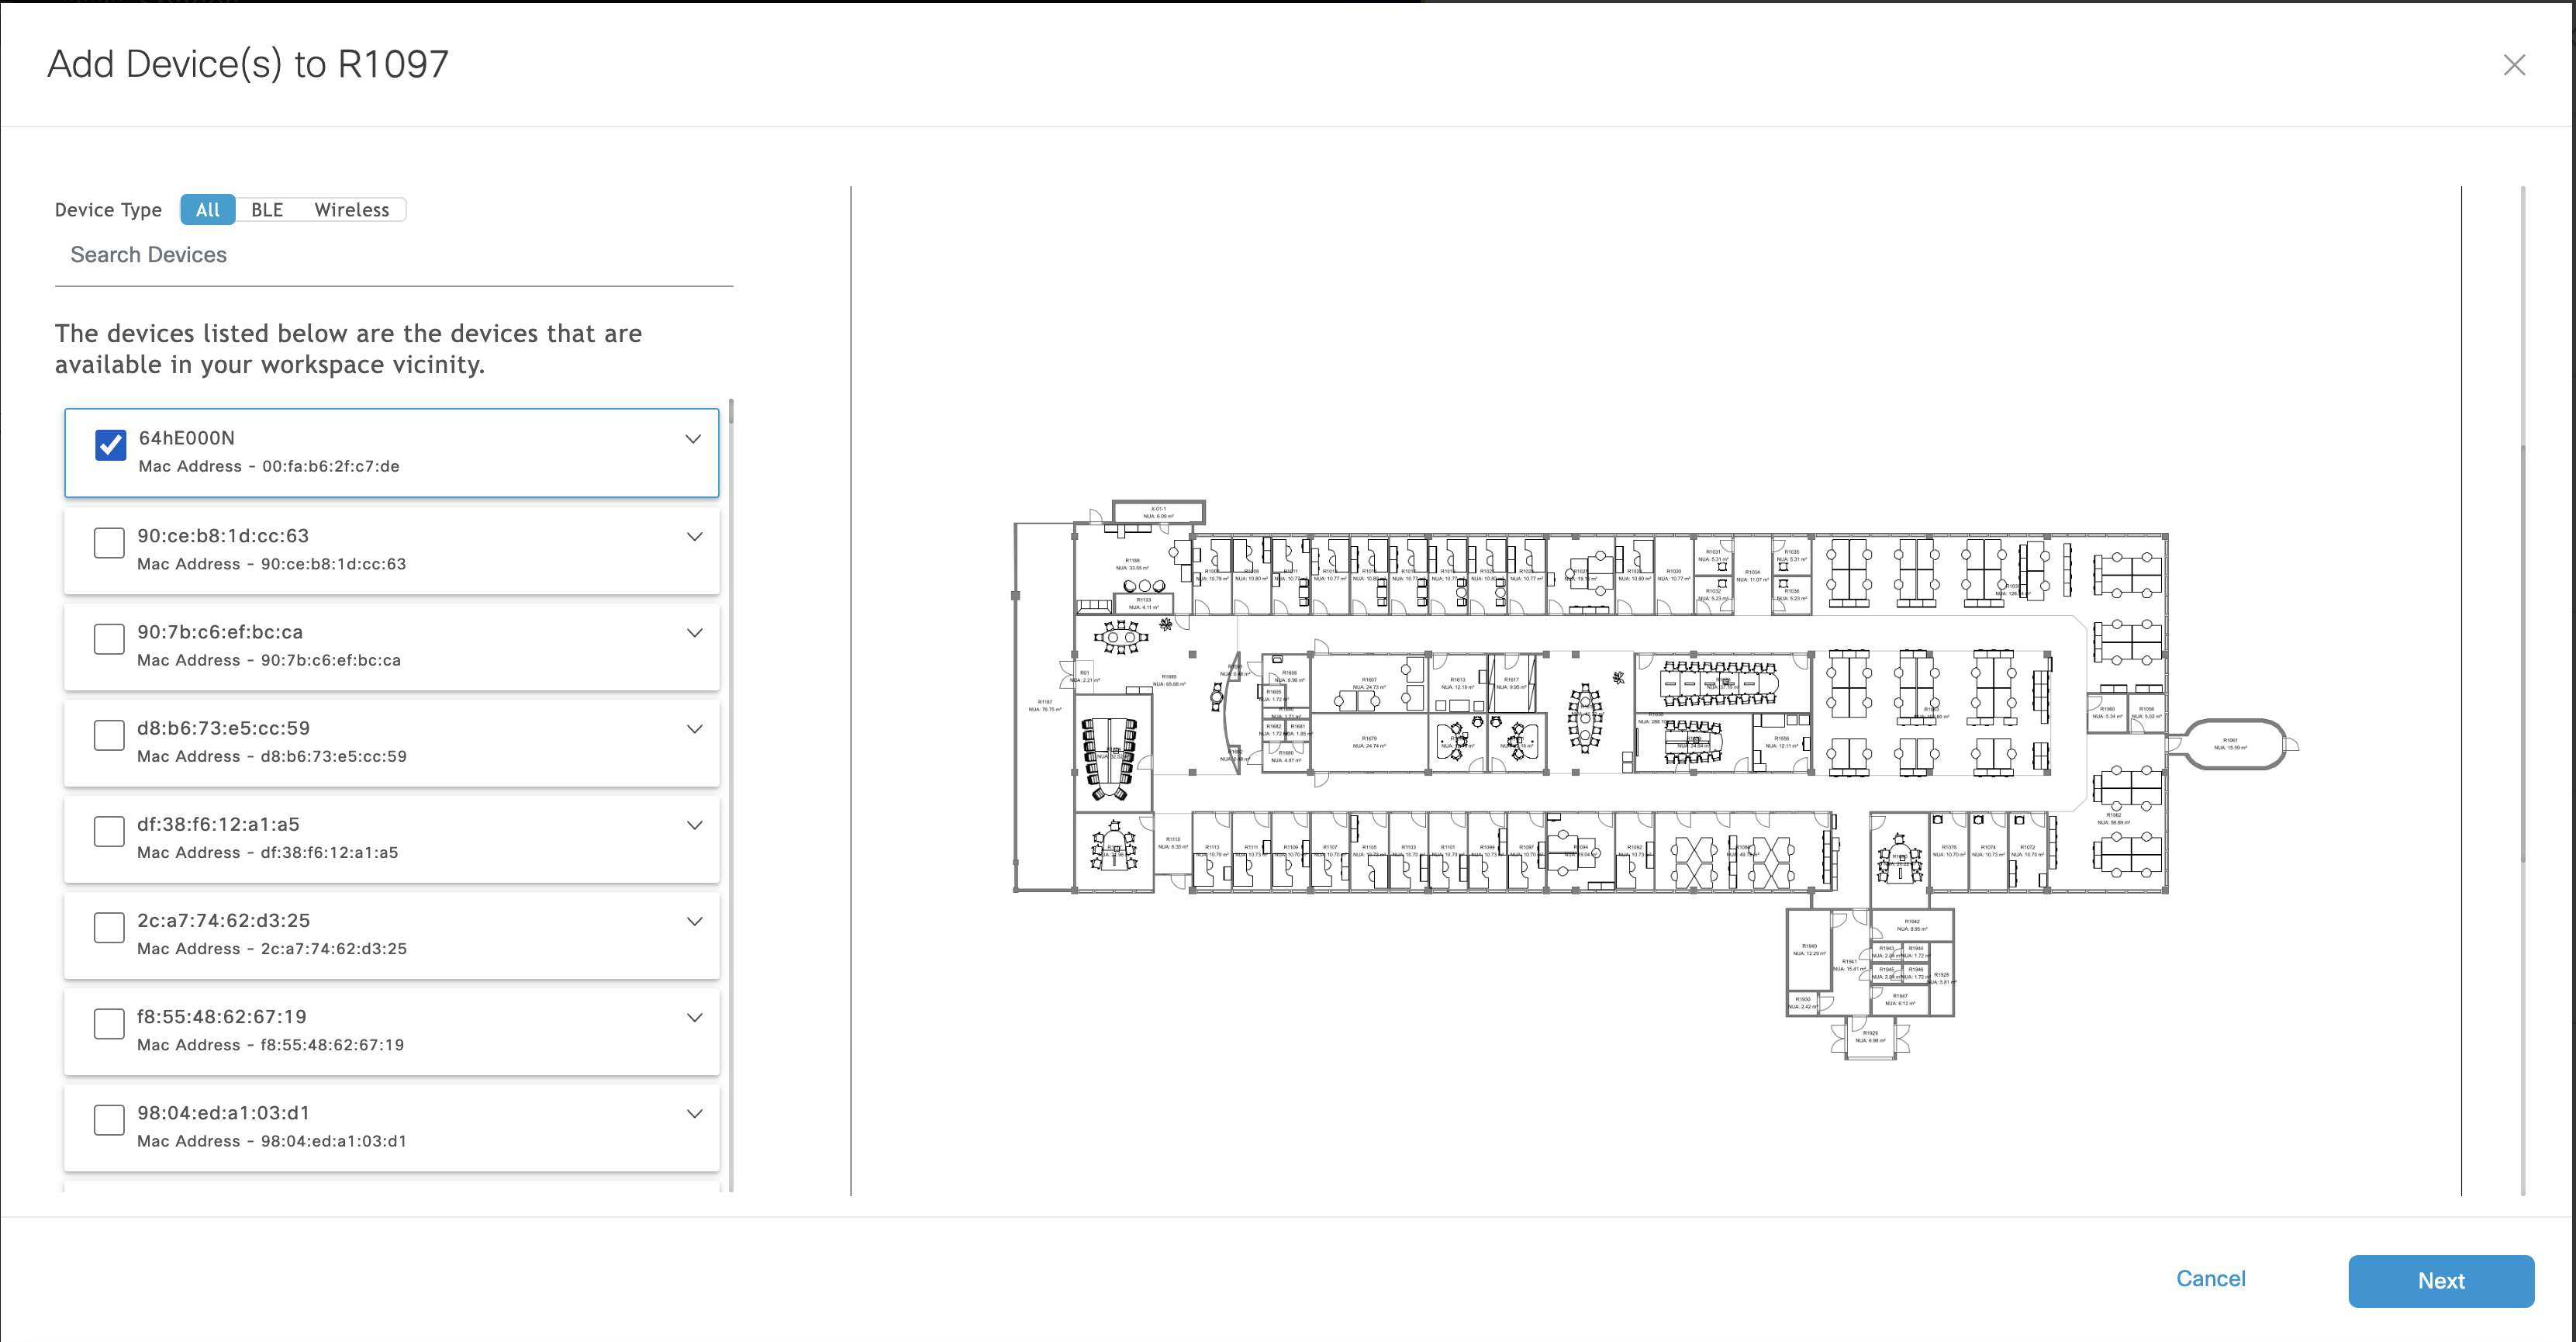
Click on Add Devices under the IOT Sensors associate the Sensors mac/BLE mac or uniq ID(device ID) to a Meeting room
-
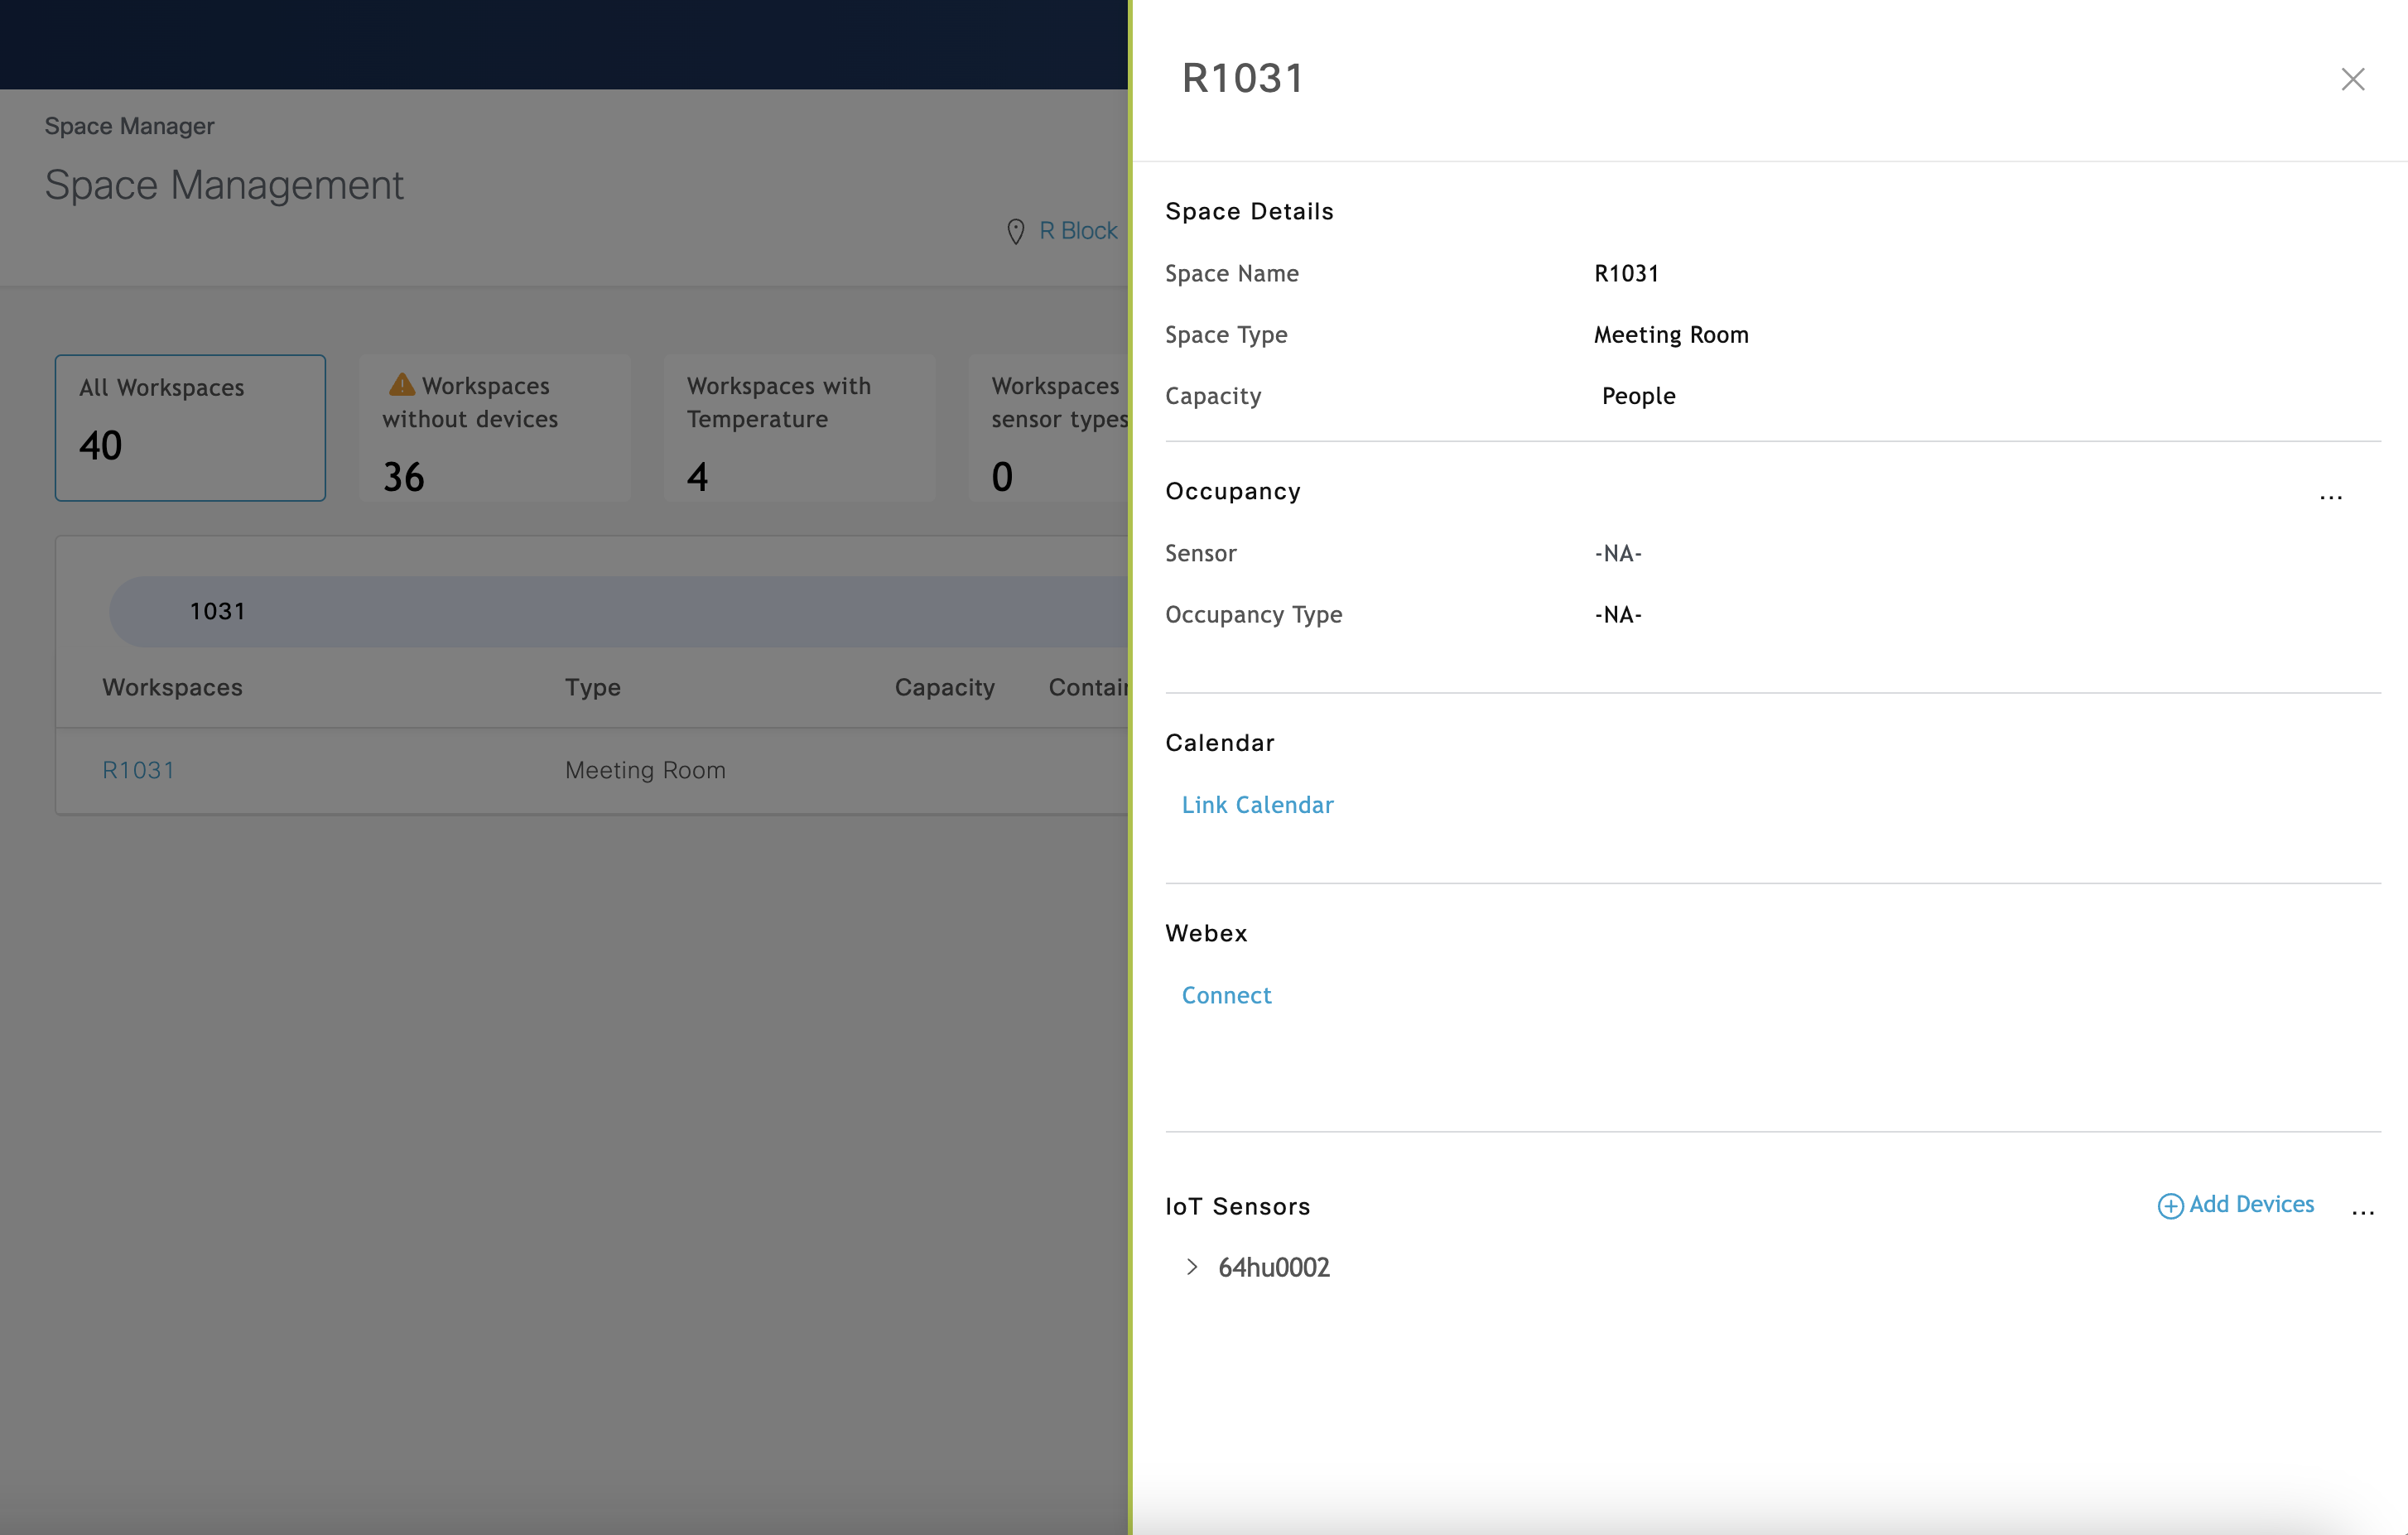
Once added it should reflect under the IOT Sensors.
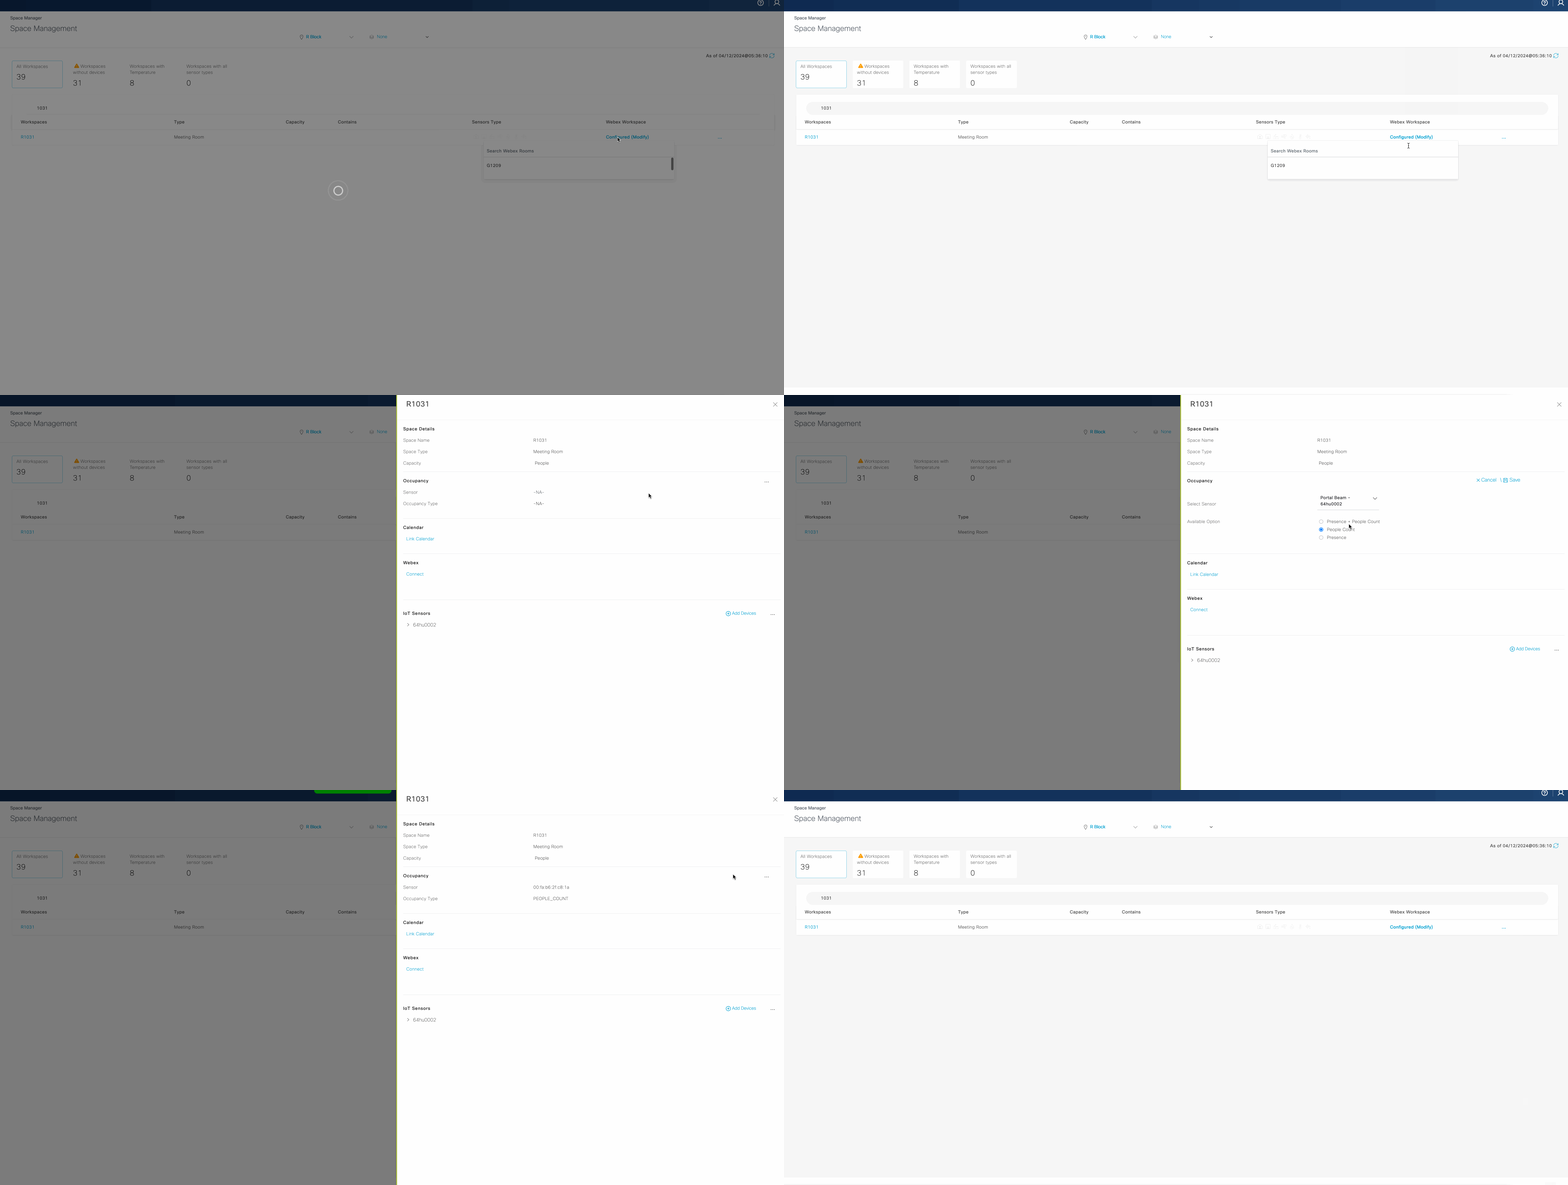
Necessary Step (Short term) :
For room occupancy report to reflect these PIR room info - we need to set occupancy setting for each of this room.
Select edit option for occupancy and save the setting (it will be default People count).
-
Navigate to Space Manager Overview and PIR reflect immediately there under the Room Occupancy view for the specific Meeting Room
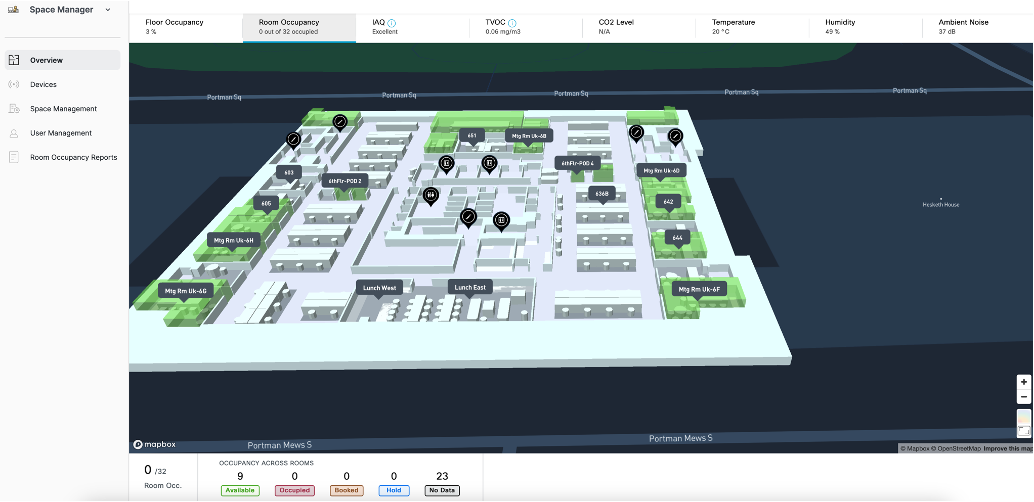
-
Meeting Room should immediately reflect Available status under the Room Occupancy View.
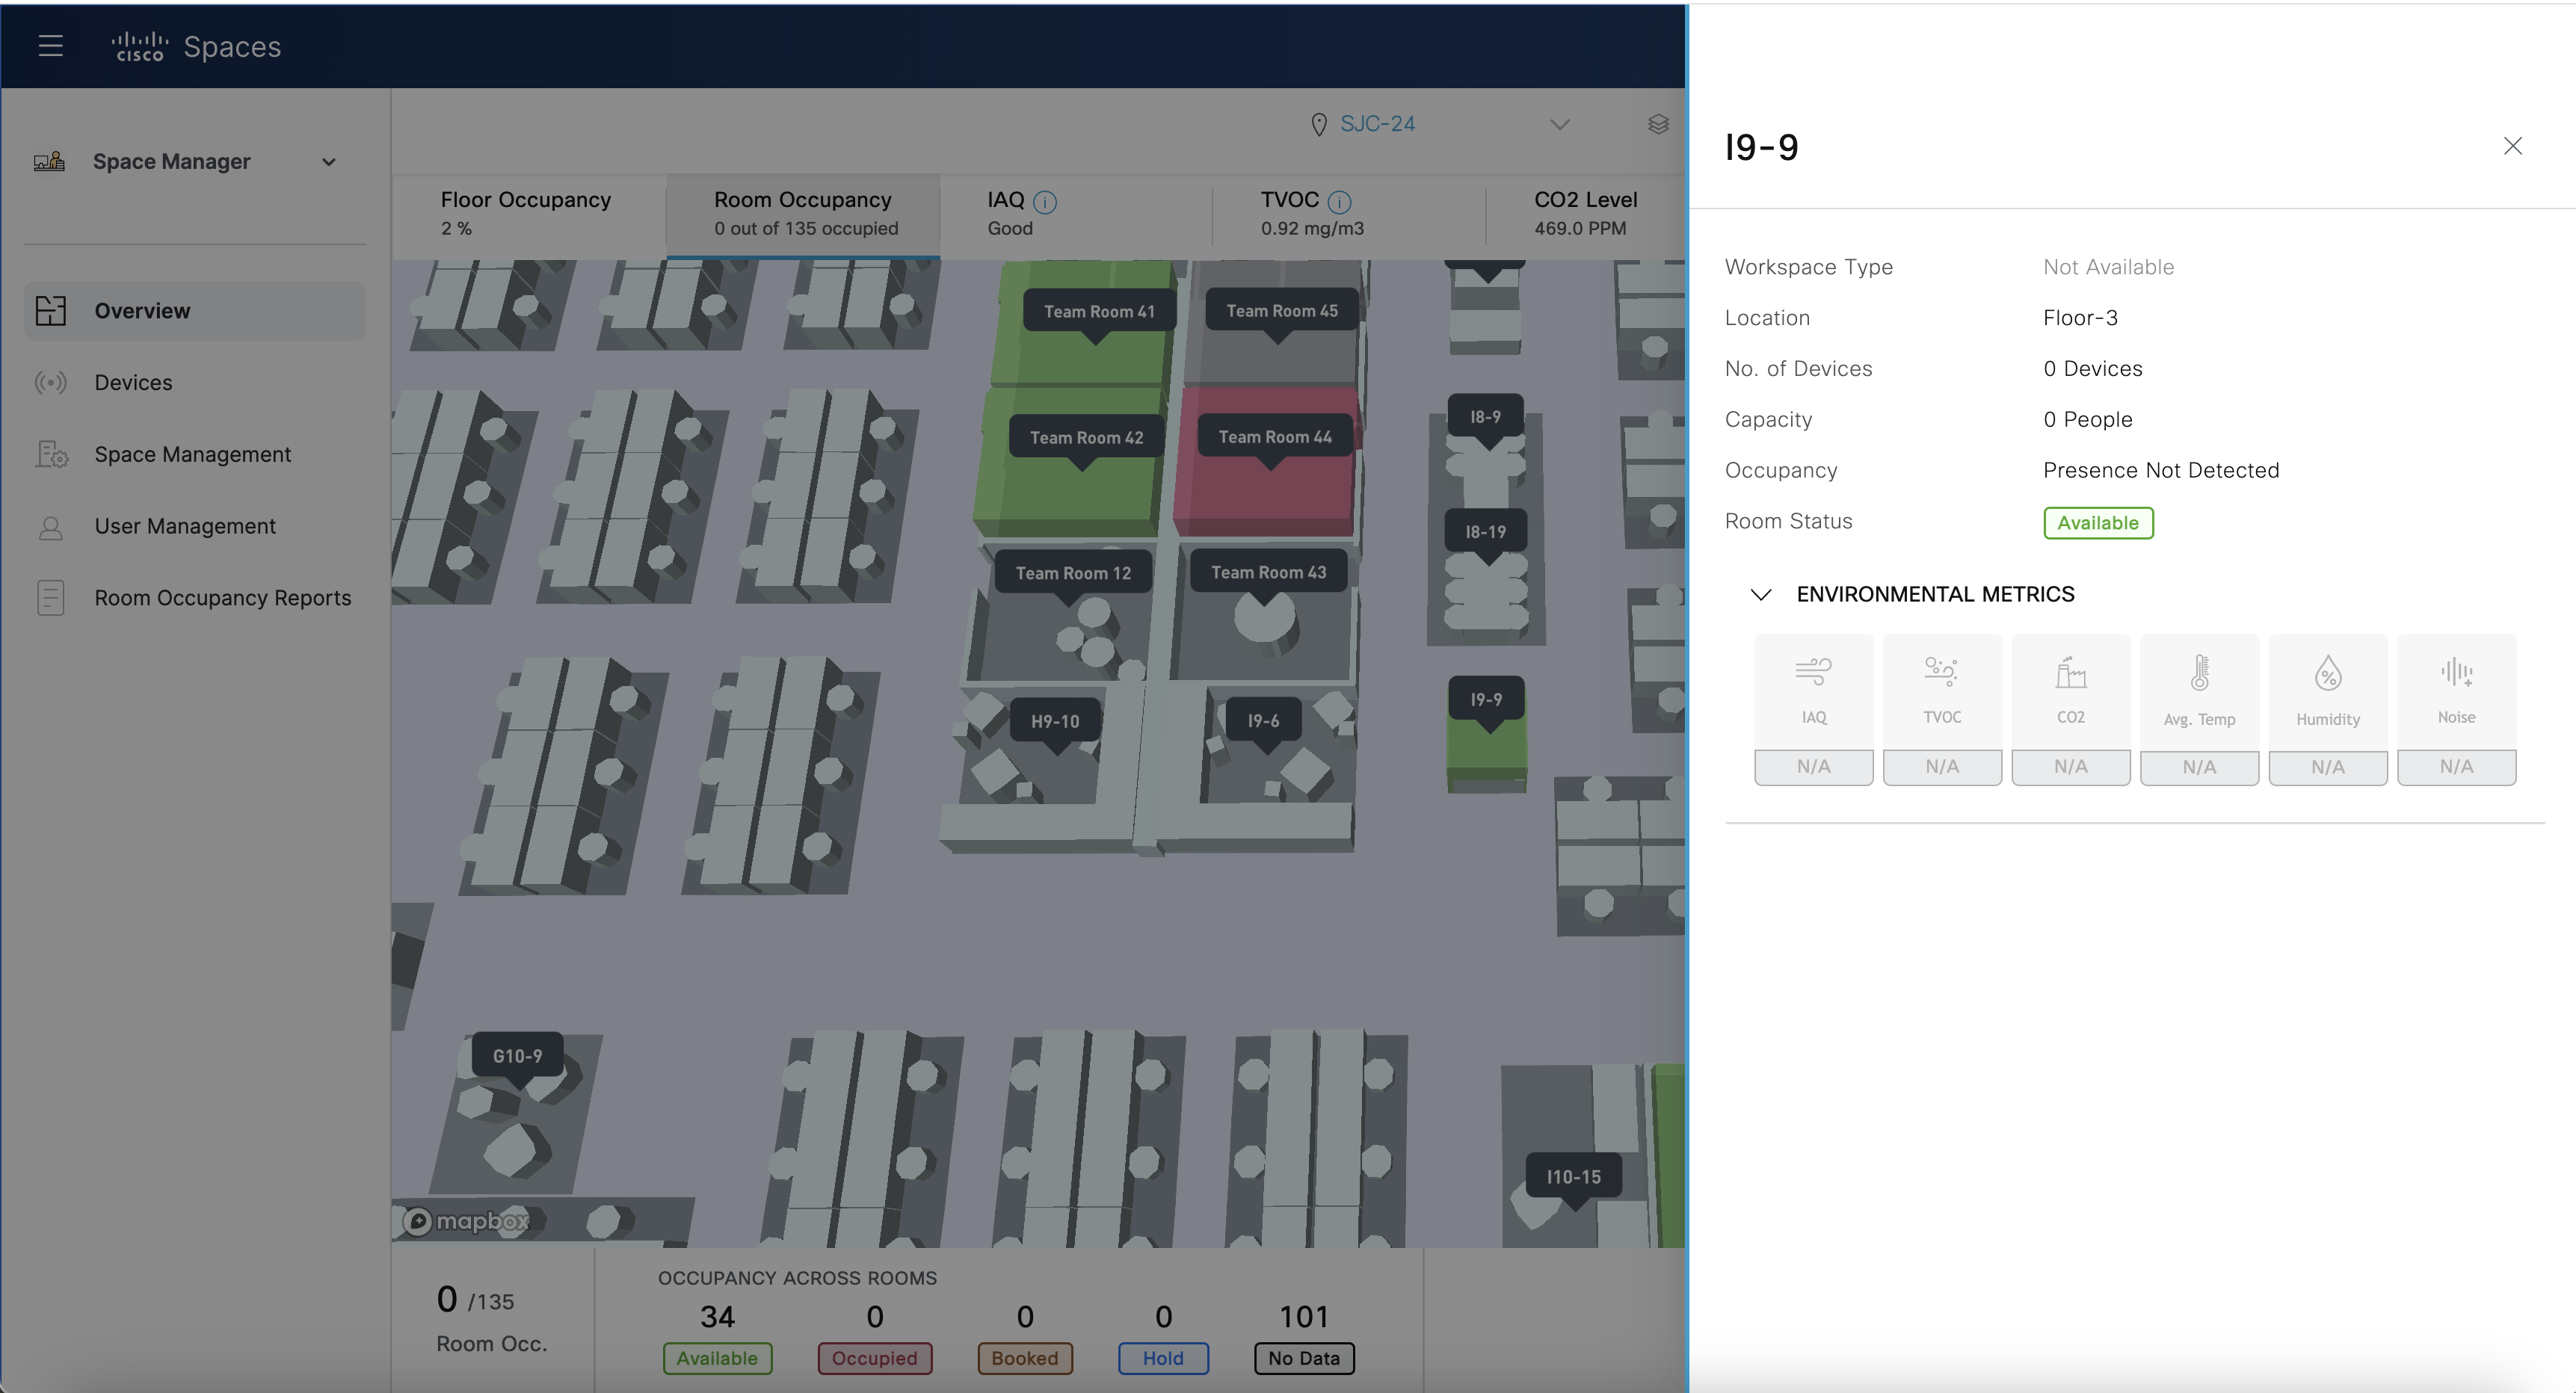
The room status updates to Occupied within 30 seconds of detected movement. A 5-minute (300-second) guard timer keeps the status Occupied until no further movement has been detected for five consecutive minutes, after which it changes to Available. This helps prevent brief periods of inactivity from incorrectly marking the room as available.
Removing a Sensor from a Room
There are two ways to remove sensors once placed in a room within Space Manager.
-
In the Space Details screen (as seen in step 6 above) you can click on Disassociate to remove one single sensor from a room.
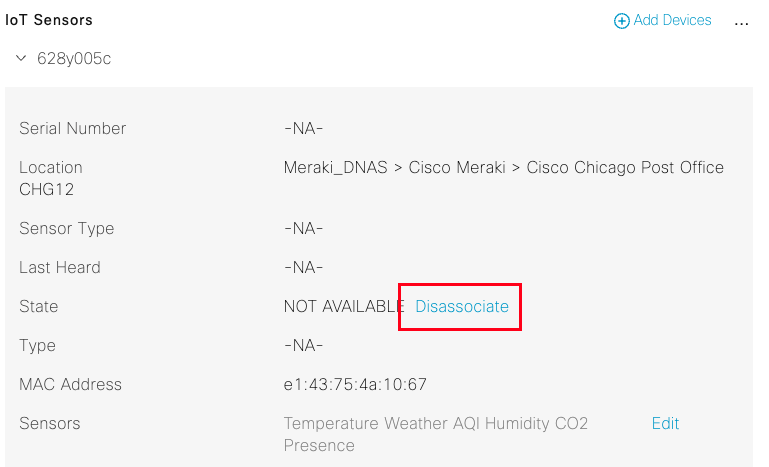
-
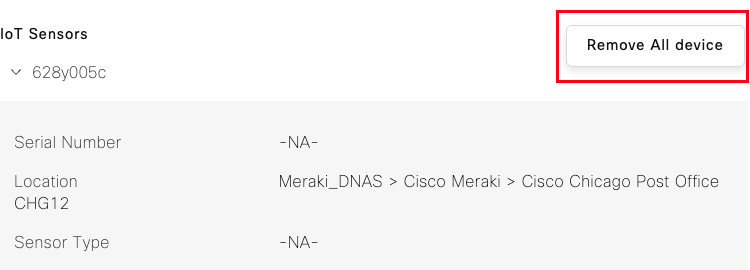
To remove all sensors at one time the ellipsis can be selected next to Add Devices and then select Remove All Device.
Placement Best Practices
PIR Sensors are only recommended for Small meeting pods or small meeting rooms with capacity of 2-3 people.
For all installations:
-
Install the sensor inside the room, with a clear view of the intended occupied area.
-
Use the sensor without the occupancy dome to maintain its room coverage.
-
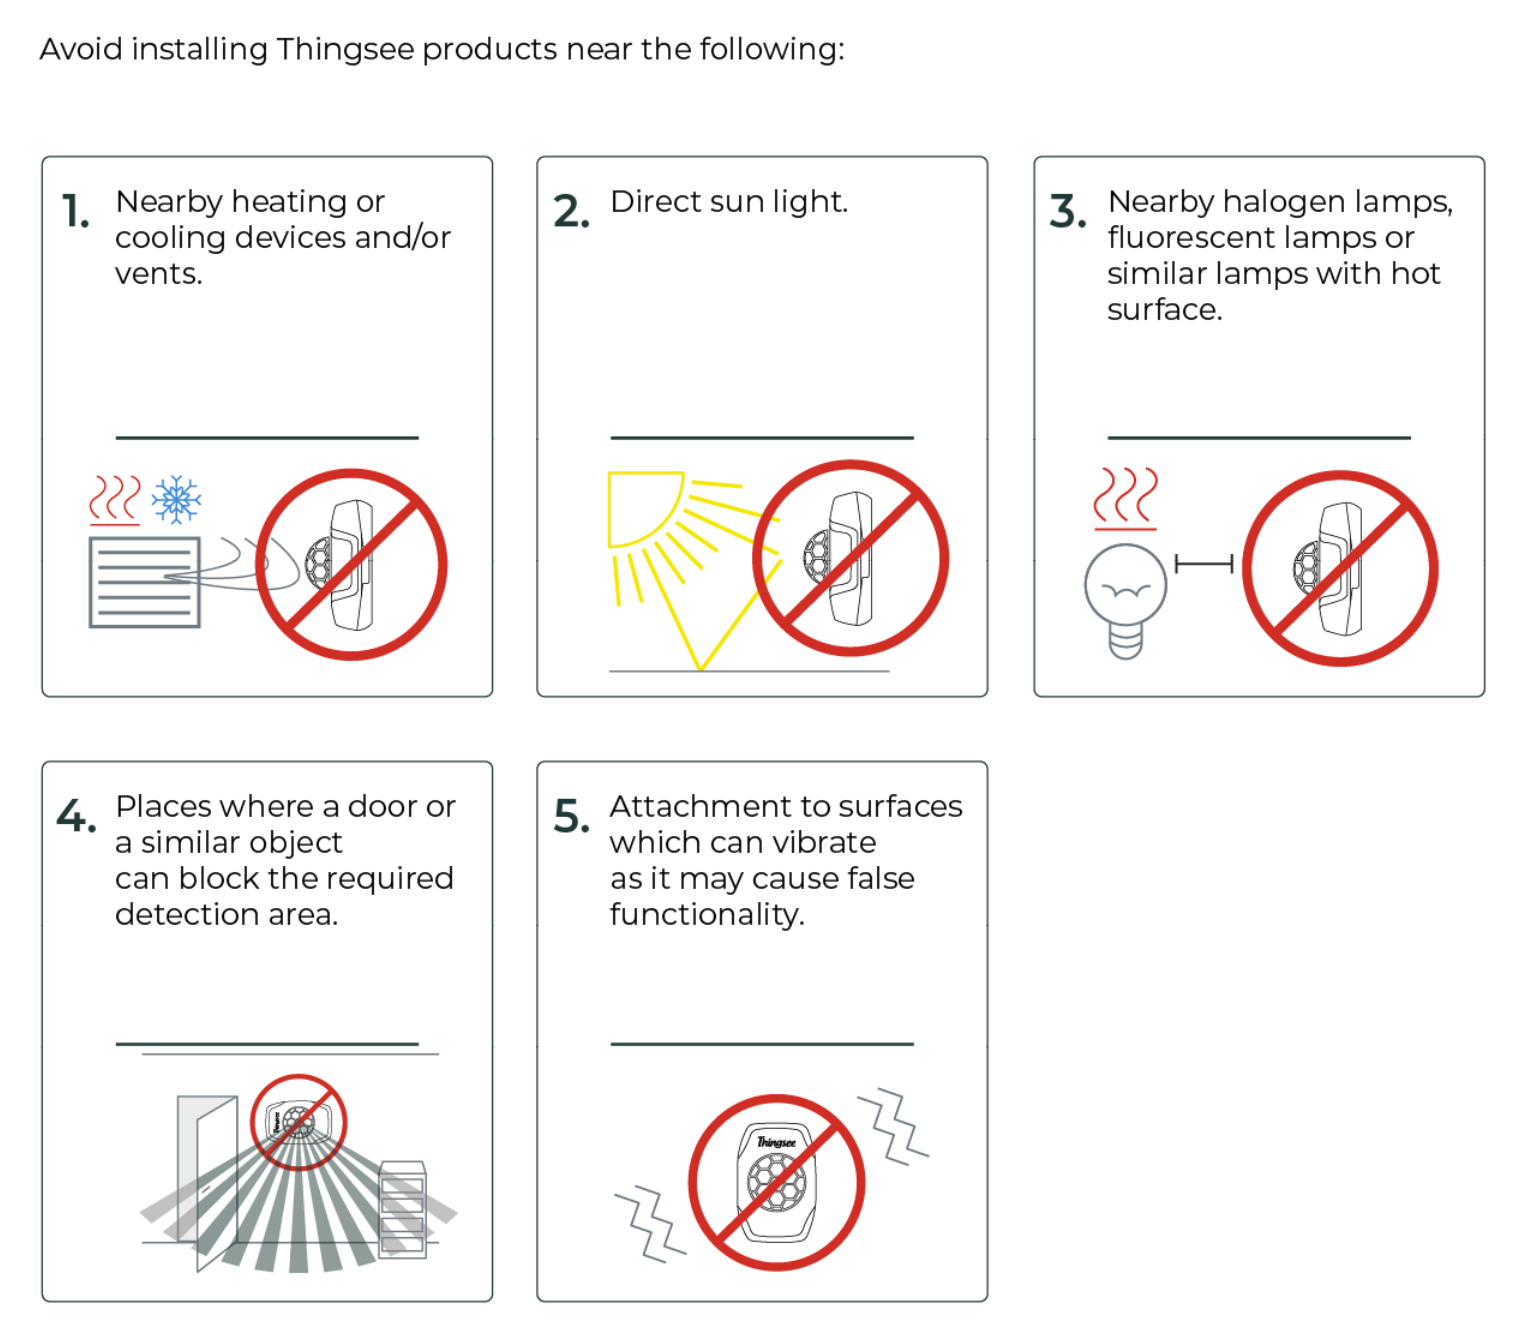
Avoid direct sunlight, heating and cooling outlets, and nearby halogen lamps.
-
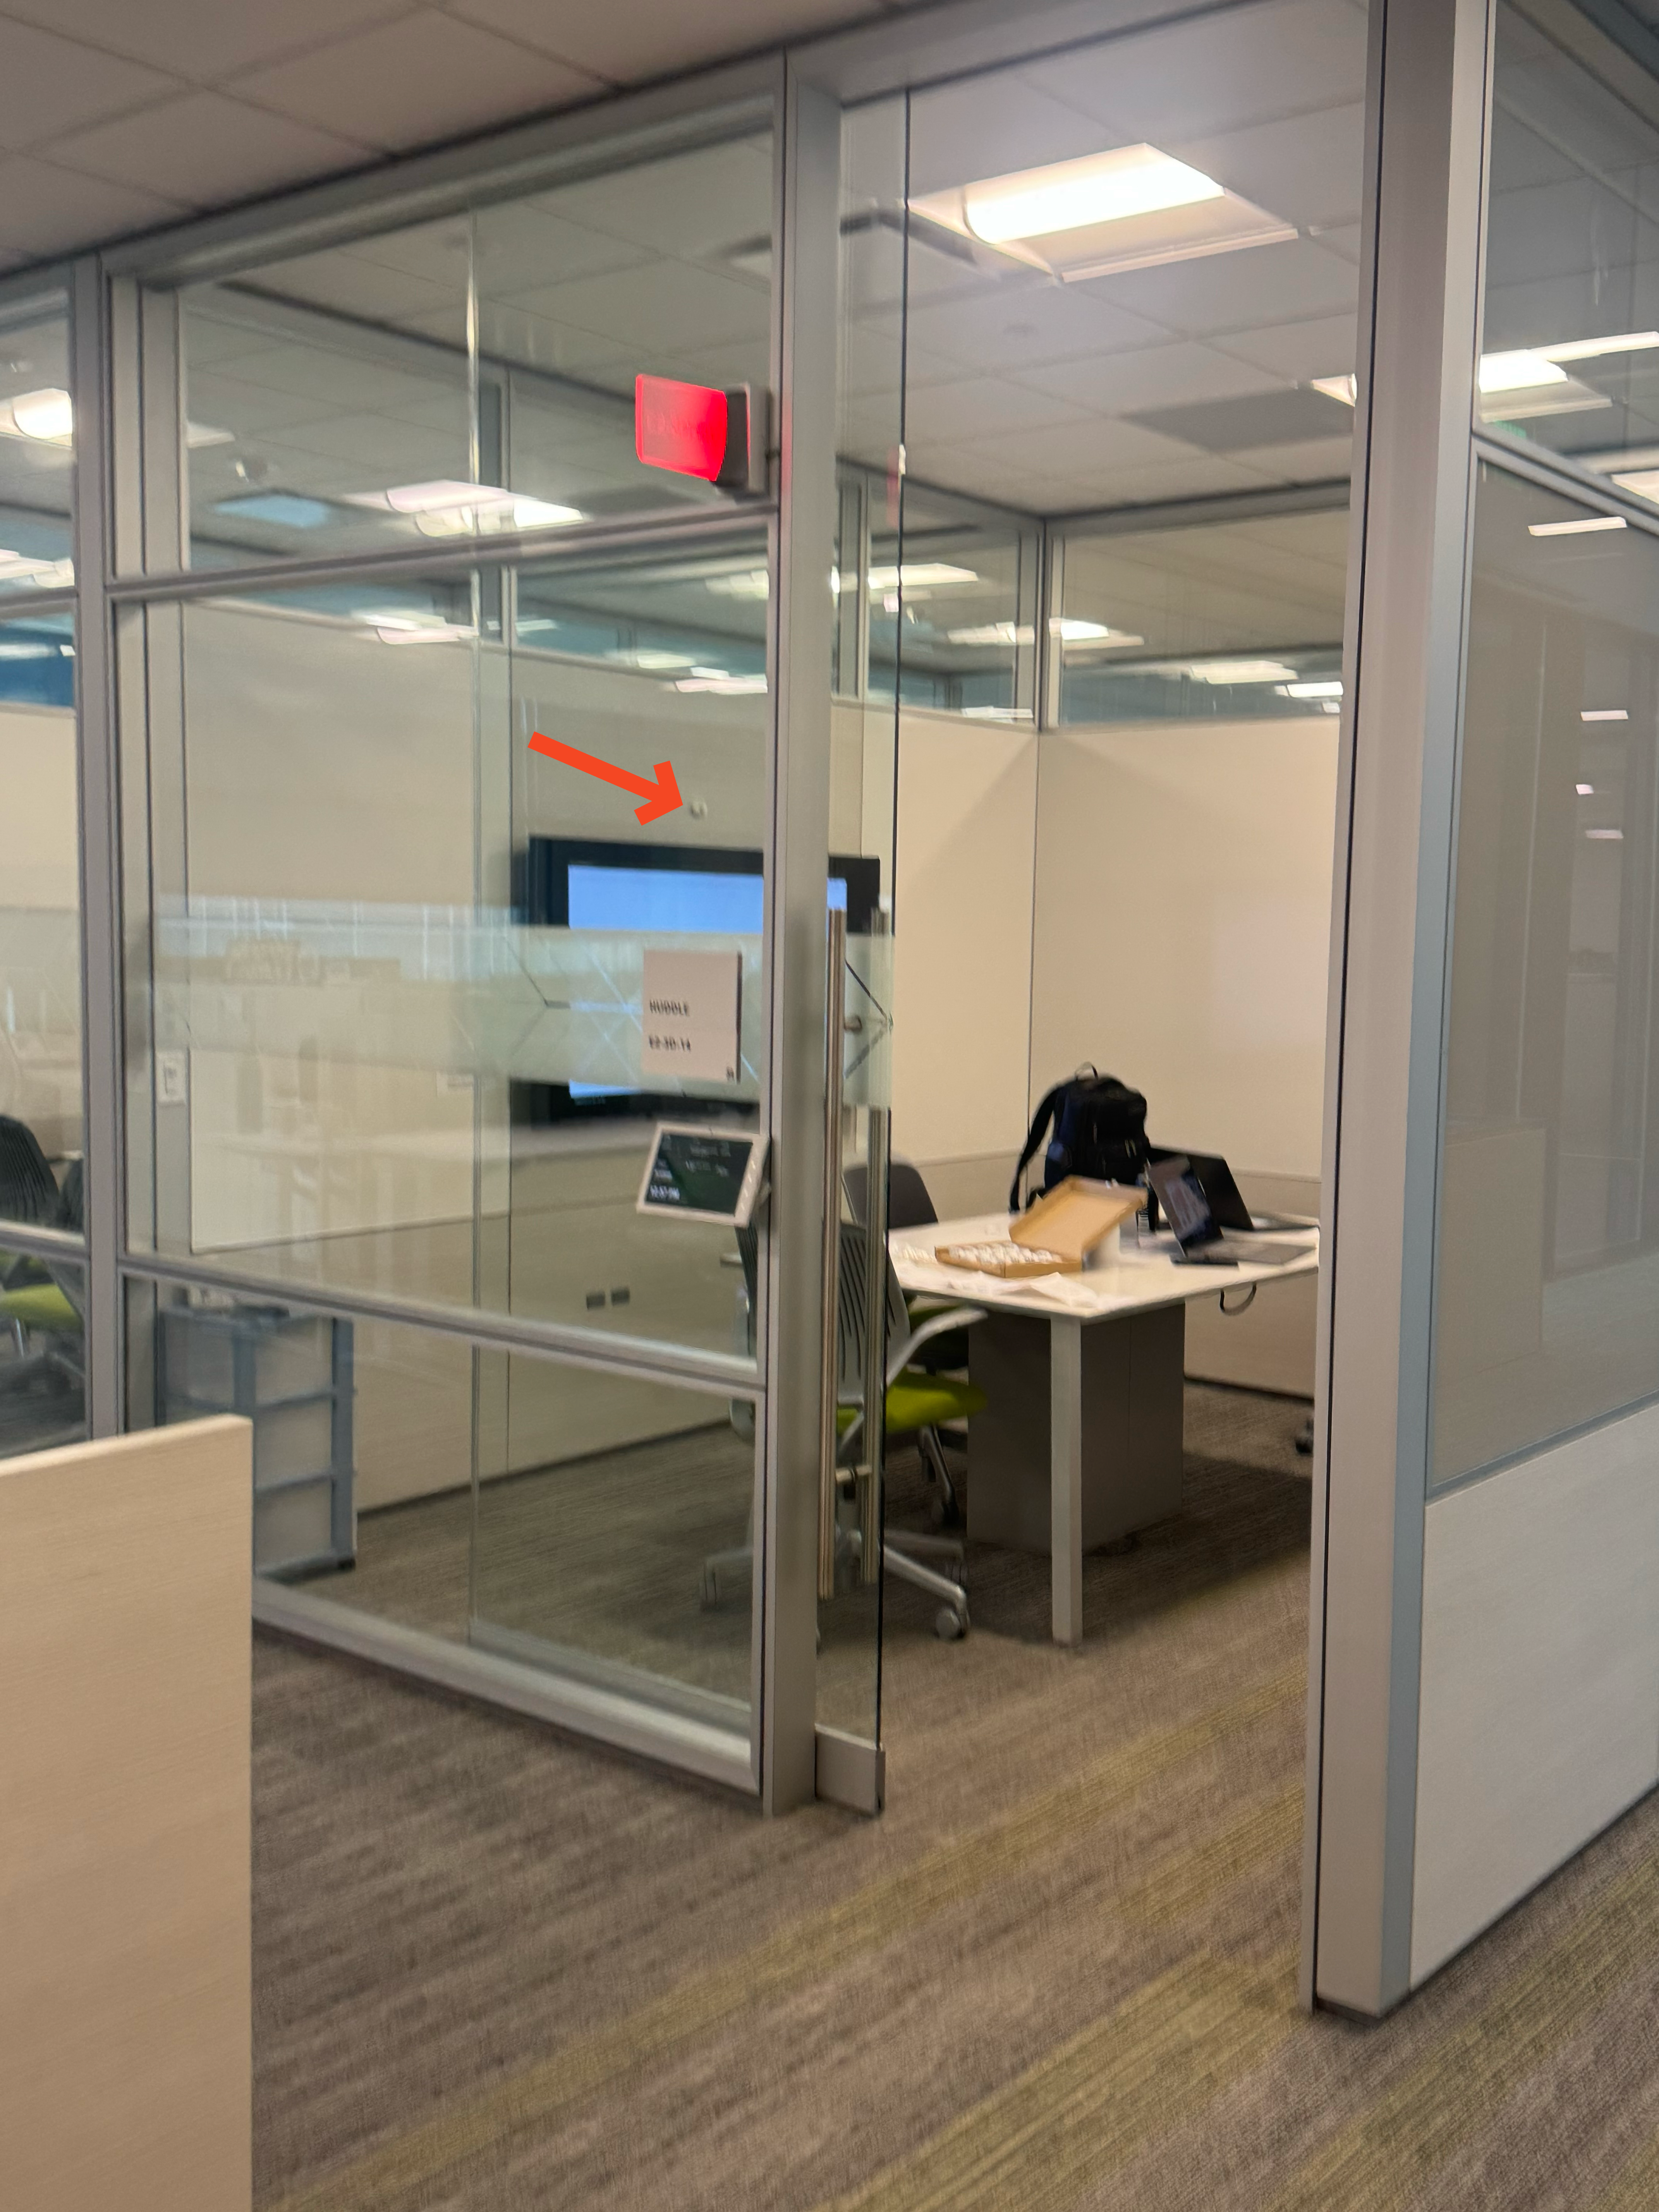
Position the sensor so movement outside an open door does not trigger room occupancy.
-
Clean the mounting surface with isopropyl alcohol and allow it to dry. For adhesive mounting, press the sensor firmly against the surface for at least five seconds.
-
Confirm that the mounting surface can securely hold the sensor. Adhesive may not hold reliably on porous or textured surfaces, including acoustic panels.
Installing the sensor in a small meeting rooms
PIR sensors are recommended for small meeting pods and small meeting rooms with a capacity of 2–3 people. The typical practical footprint for a single sensor is approximately 15 ft × 15 ft (4.5 m × 4.5 m). Larger rooms, unusual layouts, or obstructed spaces require a placement review with Cisco and Haltian before deployment.
-
Select a clear mounting location Avoid hanging fixtures and other objects that obstruct the detection field. Do not attach the sensor to another ceiling device.
-
Choose the ceiling orientation In a square room, either orientation can be used. In a rectangular room, align the sensor’s long axis with the room’s shorter dimension to extend coverage across the longer dimension.
-
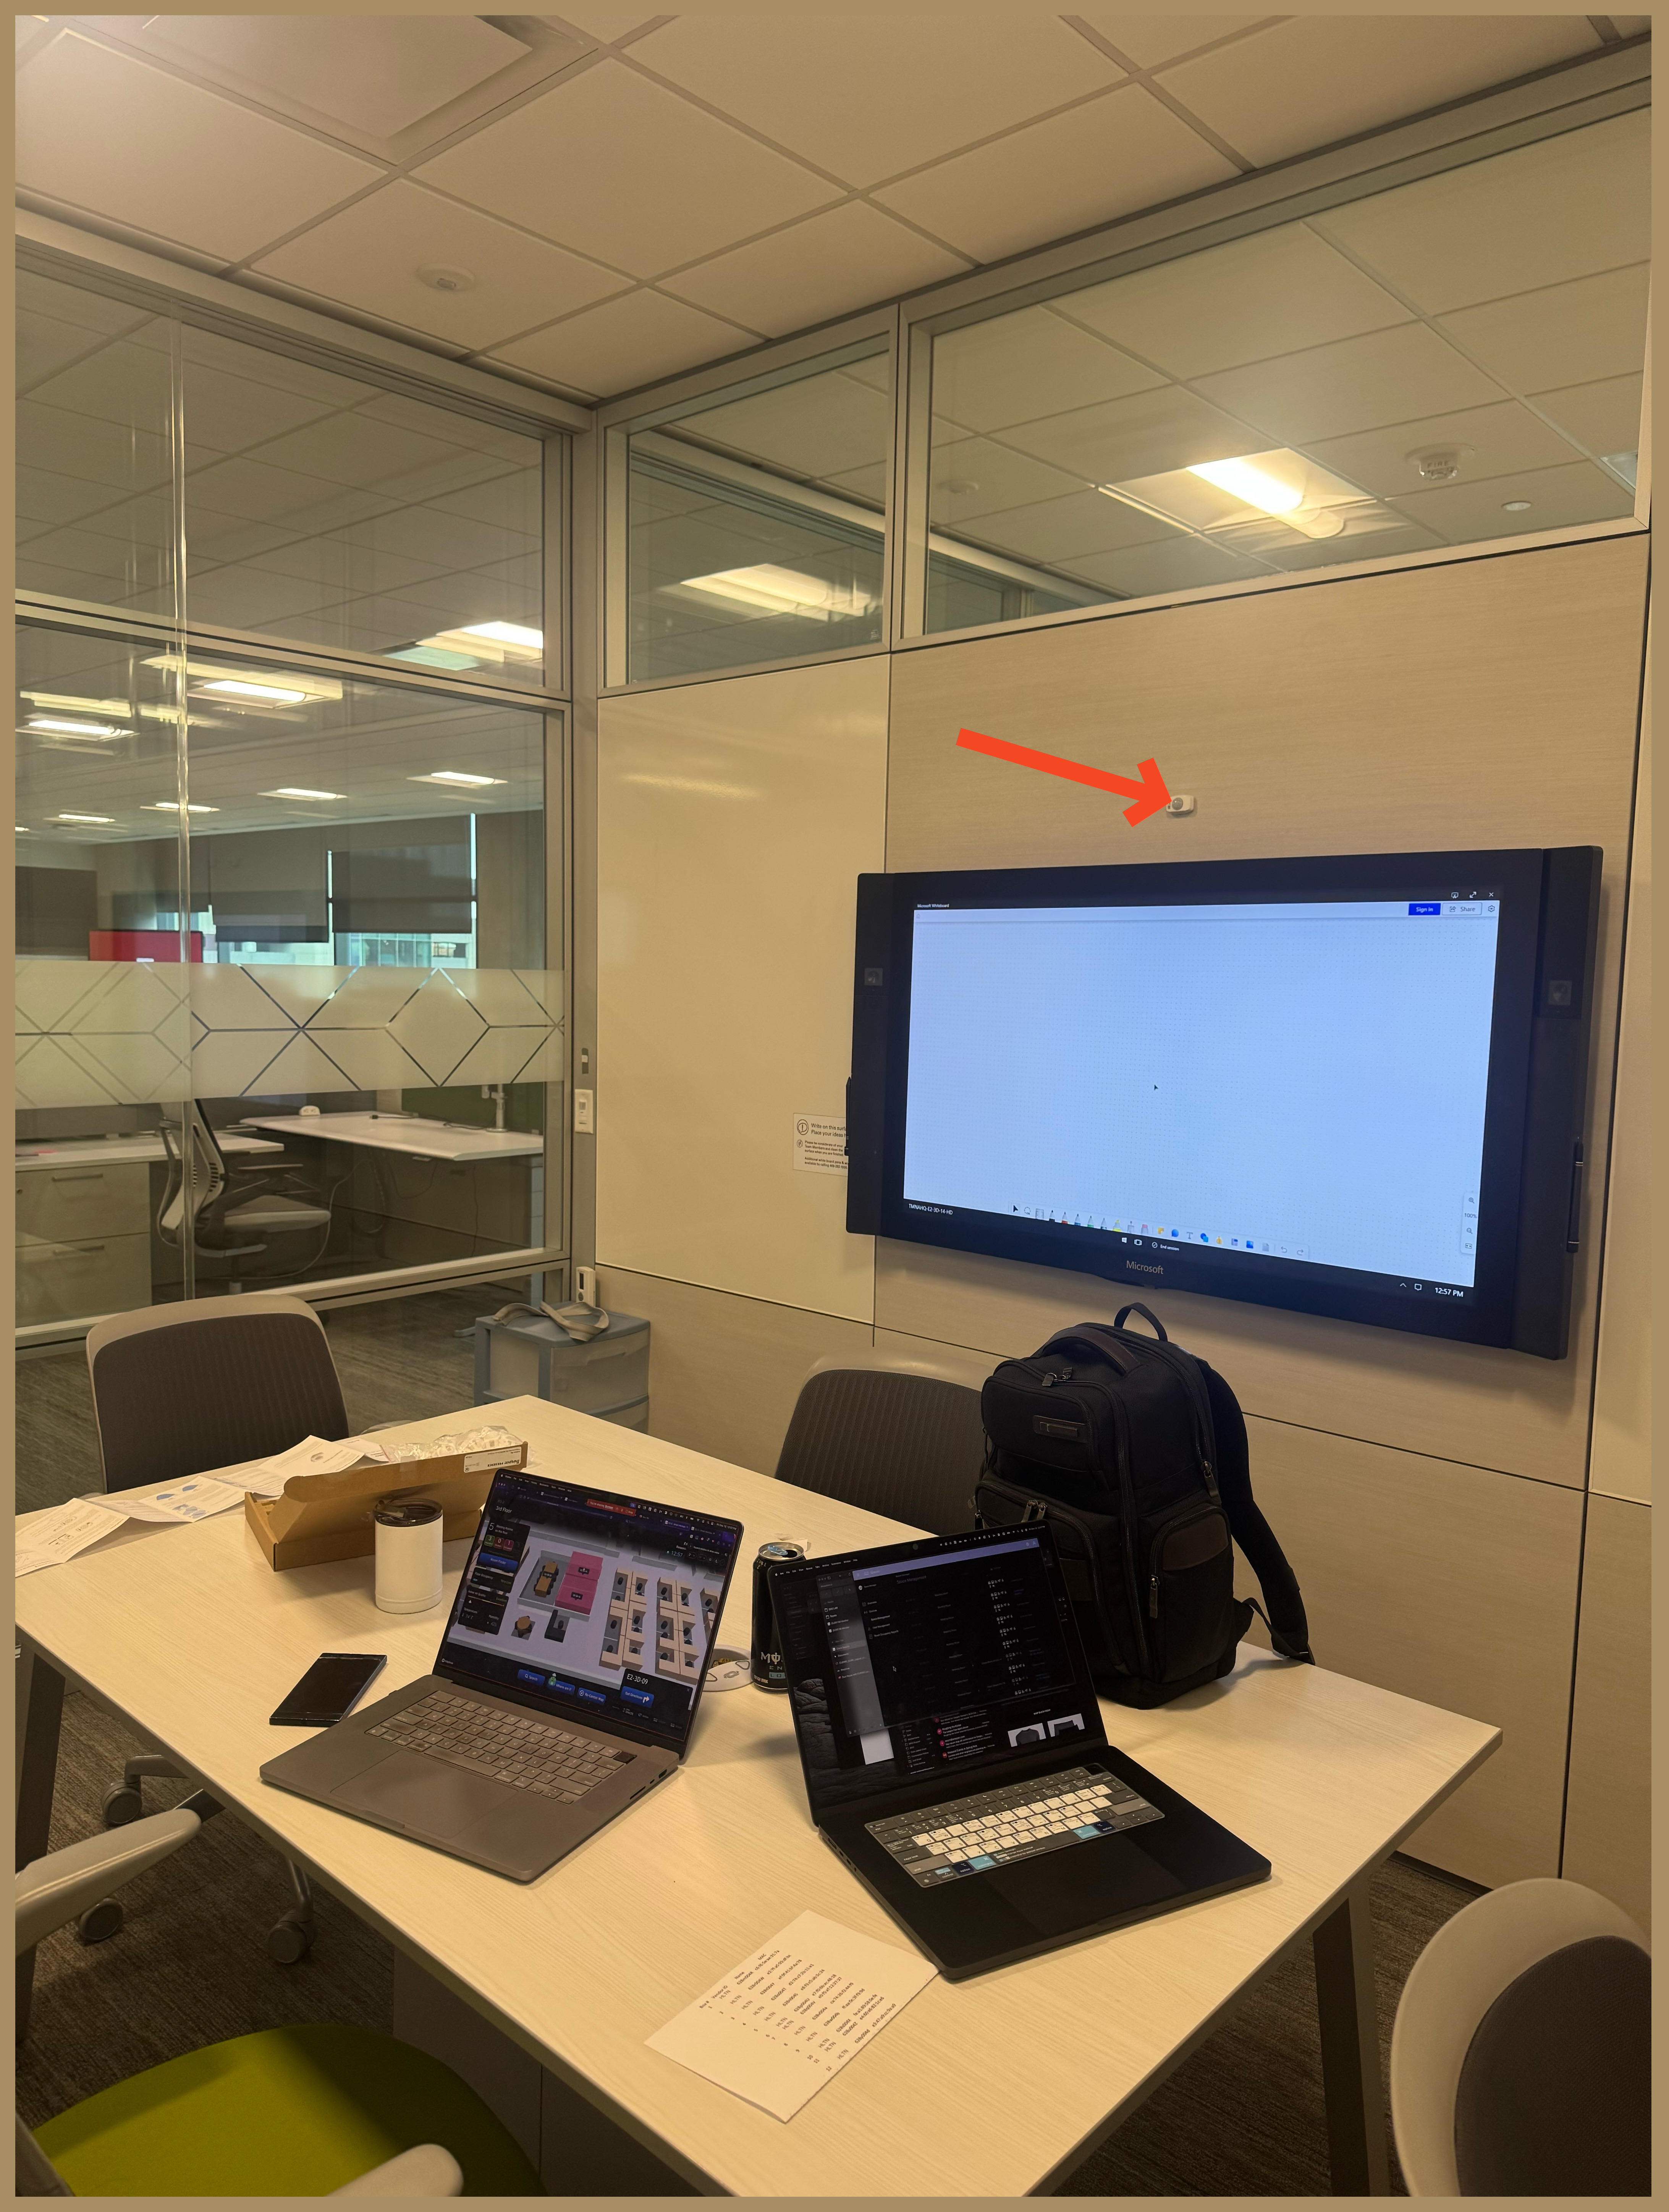
Use wall mounting when ceiling mounting is unsuitable Mount approximately 6 ft (1.8 m) above the floor, or roughly two-thirds of the wall height in a typical room. Keep the sensor above shoulder level and away from accidental contact.
-
Select the wall orientation based on room shape:
|
Orientation |
Coverage effect |
|---|---|
|
Vertical
|
Wider lateral coverage, with less coverage forward and vertically 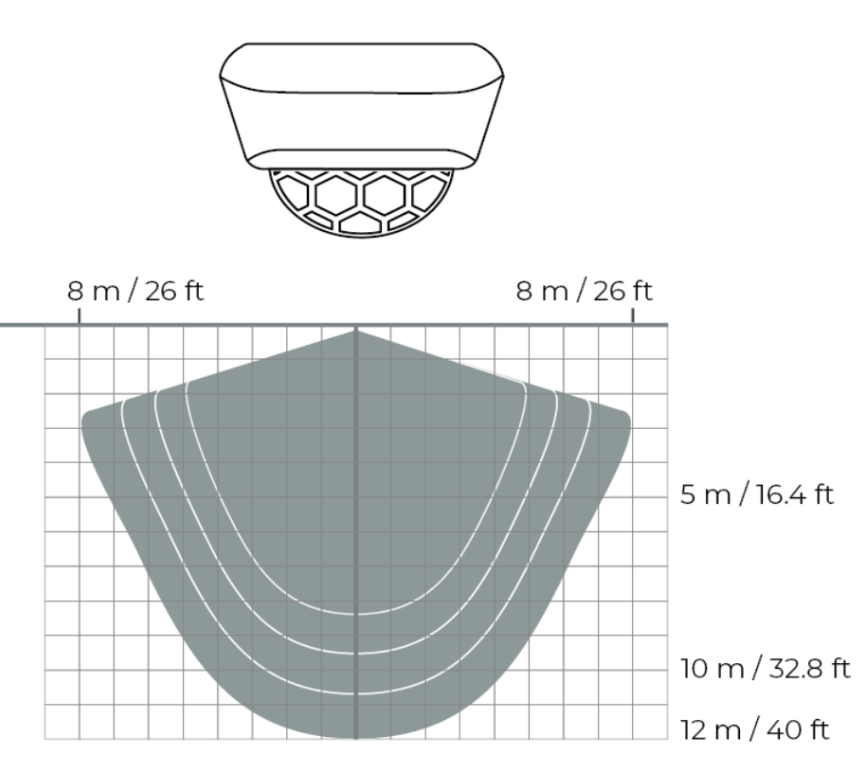
|
|
Horizontal 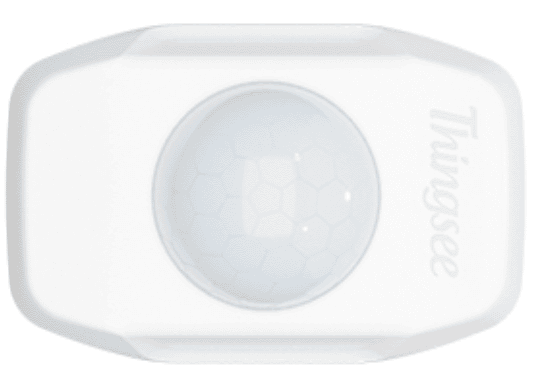
|
Greater forward and vertical coverage, with narrower lateral coverage 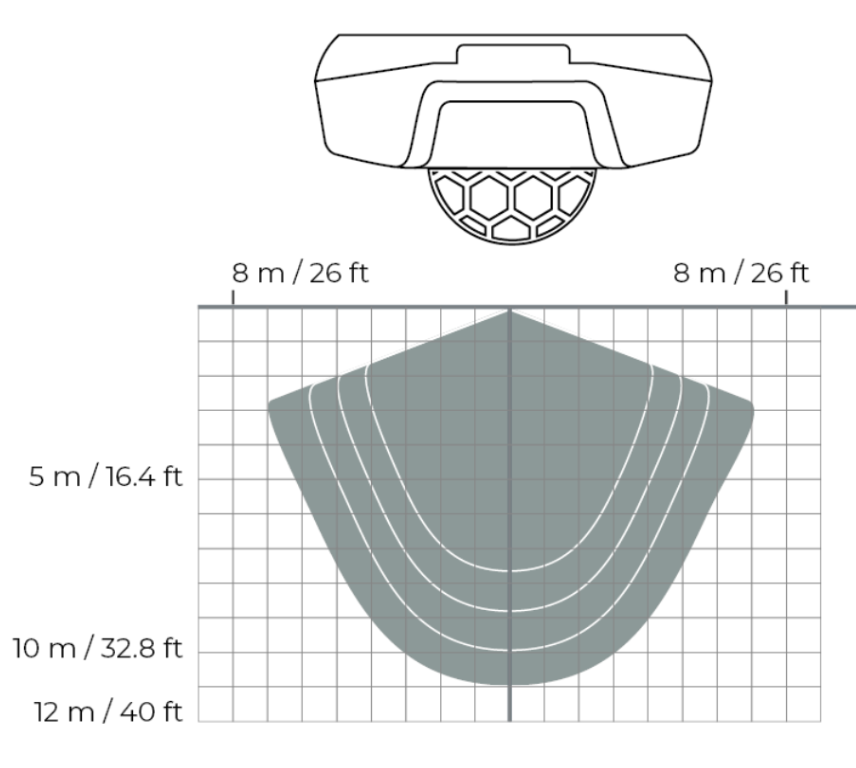
|
-
Check display-related obstructions When mounting above a display, leave sufficient clearance so the display’s upper edge does not block the sensor’s view. Avoid positioning directly above ventilation openings.
-
Avoid mounting directly opposite the room door Position the sensor so that it does not detect people passing outside when the door is open, which could falsely mark the room as occupied.
Installing the sensor in Focus rooms and Phone Booths
-
Keep the sensor clear of legs, supports, stored items, and other obstructions.
-
Position it where it has a clear view of the occupant and is protected from accidental contact.
-
Wall: Mount approximately 6 ft (1.8 m) above the floor, with a clear view of the occupied area and facing the chair.
-
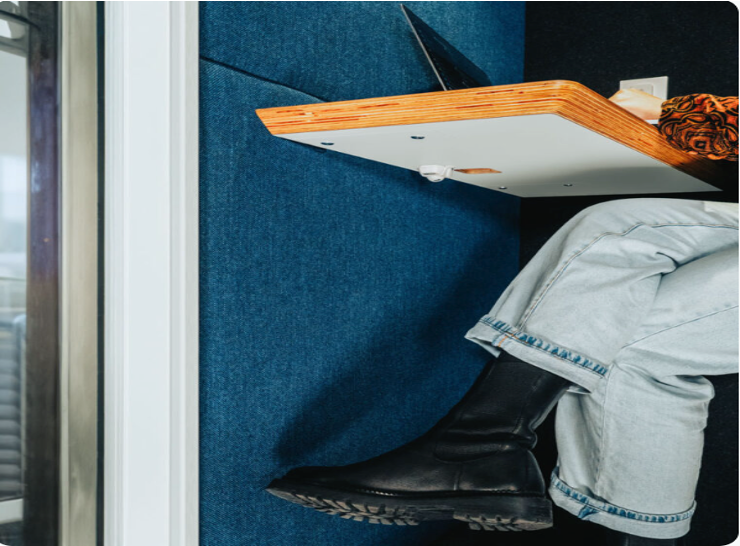
Under the desk: Position away from supports, stored items, and leg movement. Maintain at least 50 mm of clearance from the rear edge of the desk for maintenance access.
Moving Sensors After Install
Treat relocation as a new placement that requires mapping and validation.
-
Record the sensor’s unique ID, BLE MAC address, and existing room association before moving it.
-
Assess the new location using the mounting height, orientation, obstruction, and environmental guidance above.
-
Inspect the mounting adhesive and replace it if it no longer provides a secure attachment.
-
If moving to another room, update the sensor-to-room association in Space Manager and remove its association with the previous room. Update the deployment worksheet and floor-map placement as applicable.
-
Confirm that Cisco Spaces receives current telemetry, then repeat the occupied/available and open-door tests.
Moving the device physically must be accompanied by a review of its configured room association.
Changing the batteries
If you change the batteries, Haltian recommends using Varta Industrial Pro 1.5 V AAA LR06 alkaline batteries.
-
Follow the opening direction illustrated in the Thingsee PRESENCE user guide to release the cover.
-
Replace both batteries with fresh batteries of the same type, following the polarity markings in the compartment.
-
Close the housing securely and restore the original mounting position and orientation.
-
Confirm that the sensor’s Last Heard value updates in Cisco Spaces and repeat a room presence test. Verify that the sensor remains associated with the correct room.
Cisco Spaces Applications
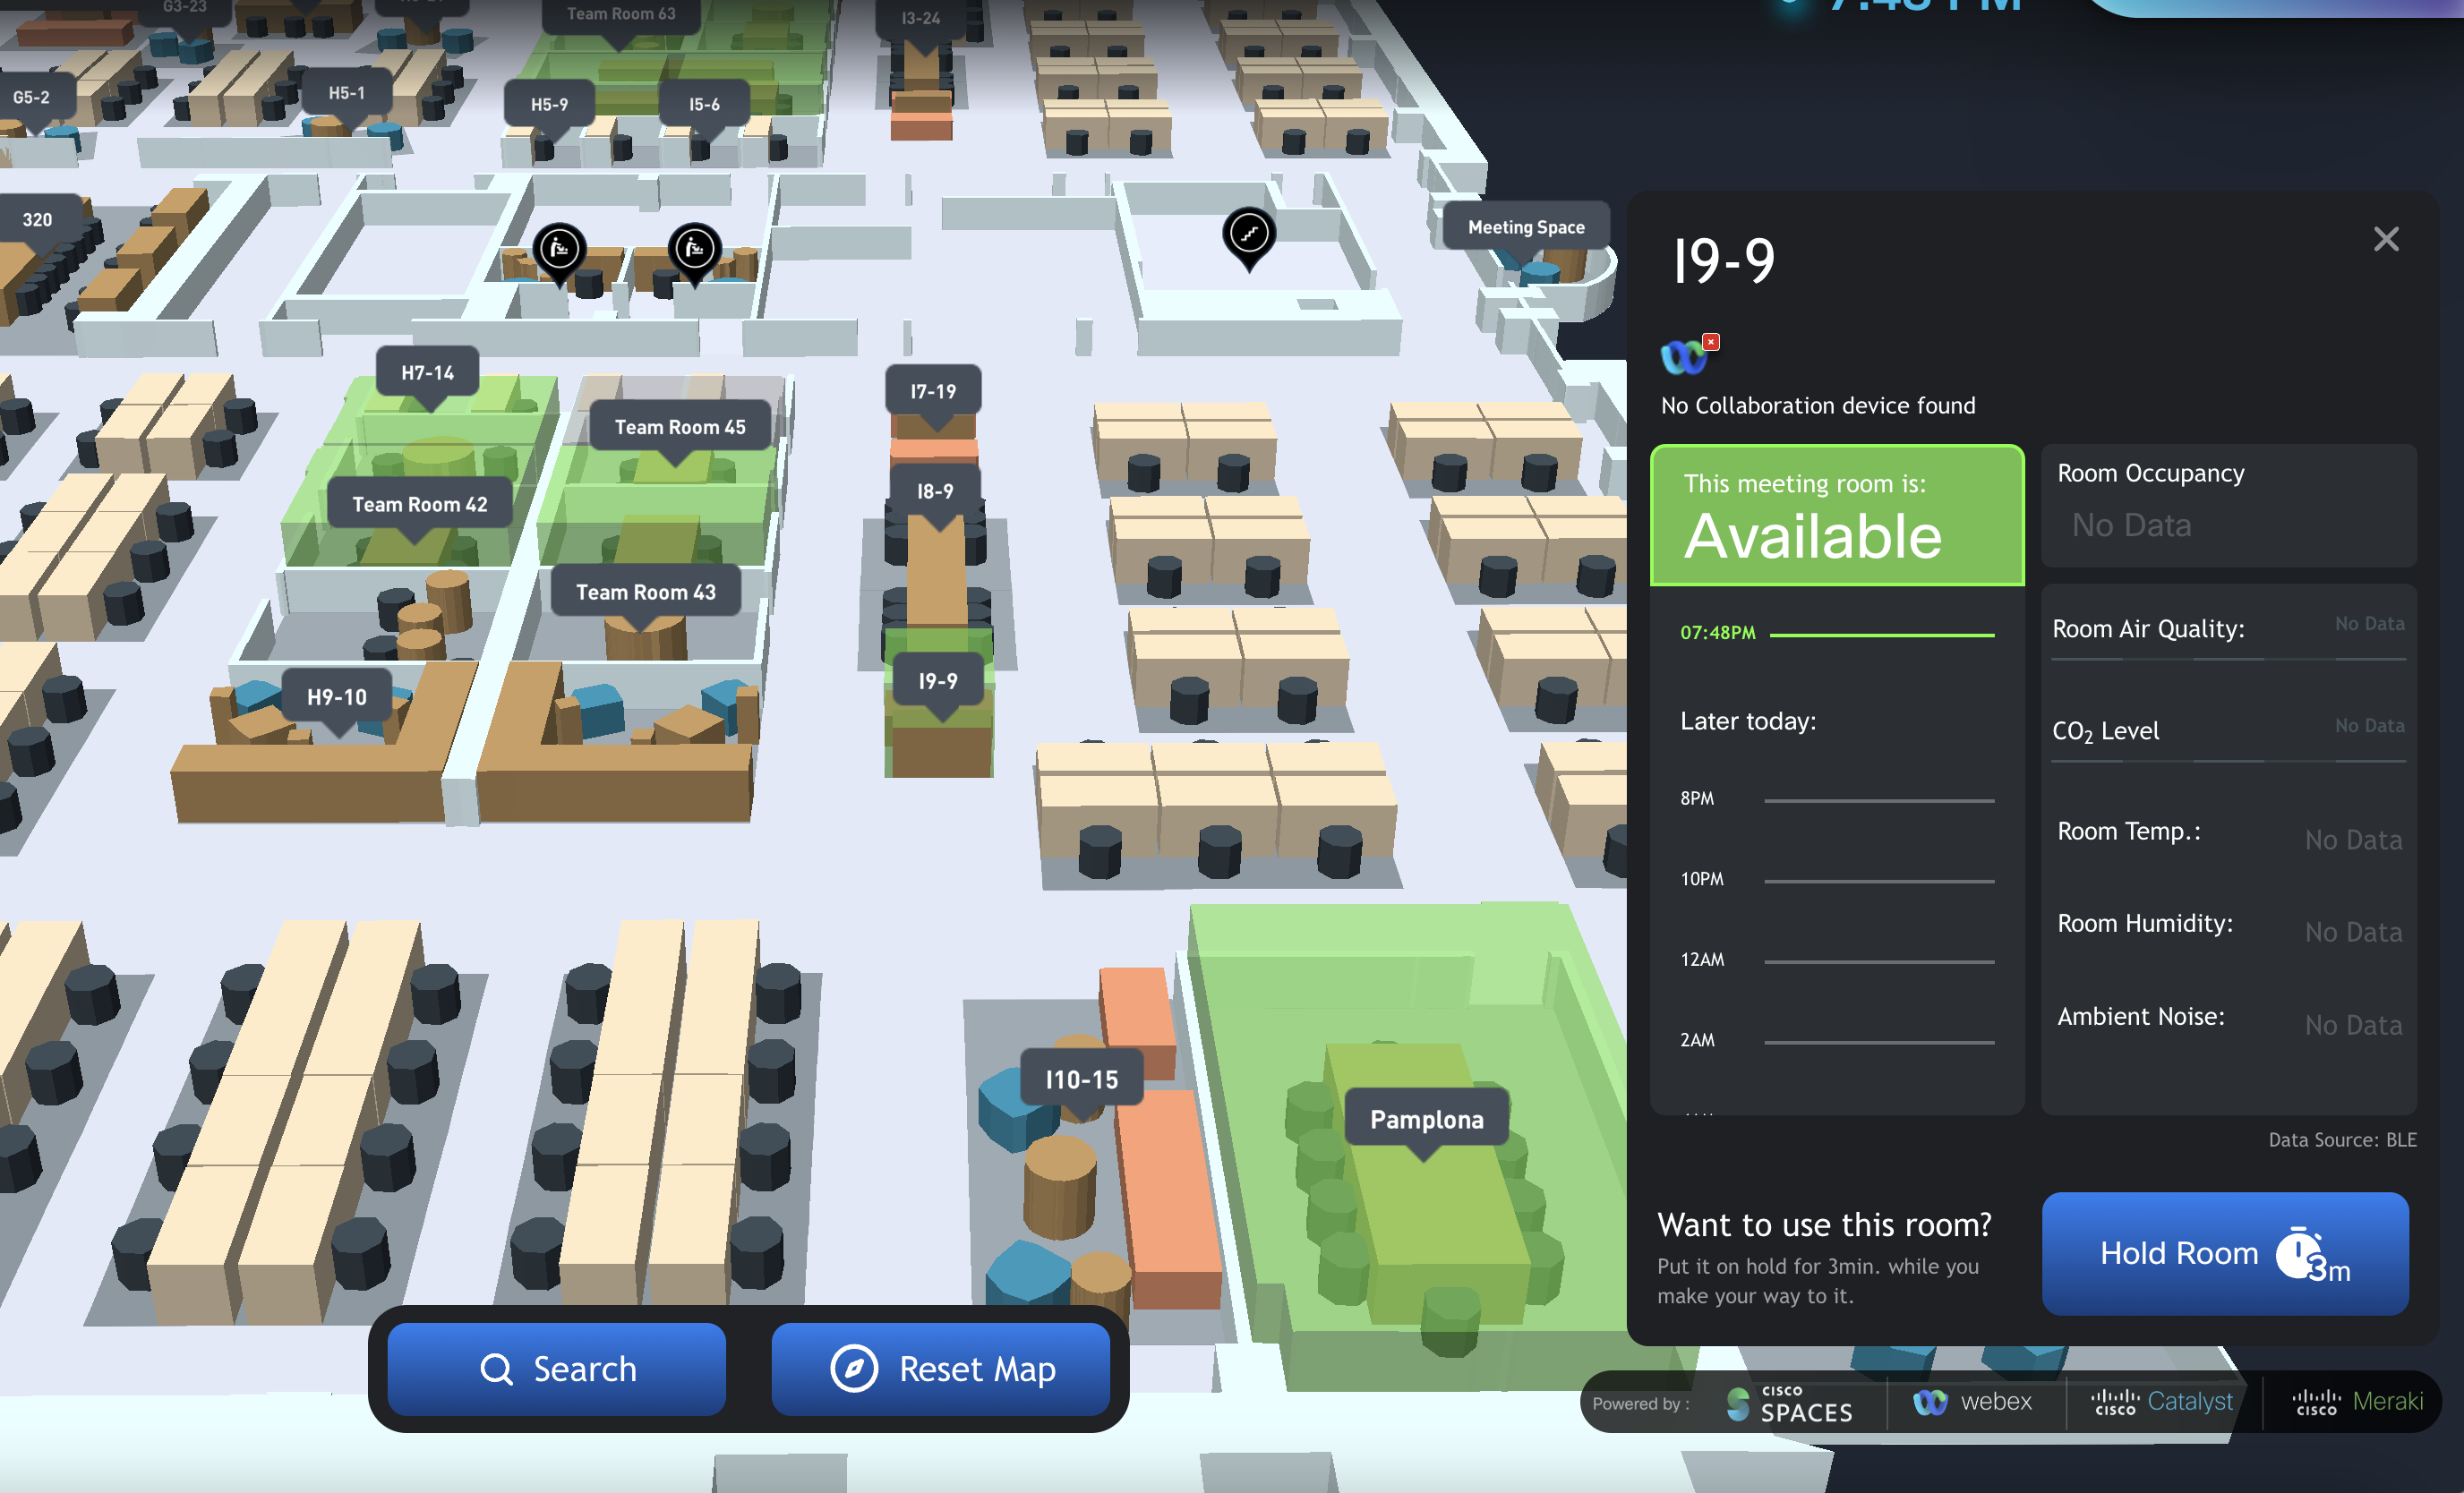
Digital Kiosk Experience
Digital Signage should also reflect the Occupancy Room occupancy status immediately.
Space Utilization - Room Occupancy Reports
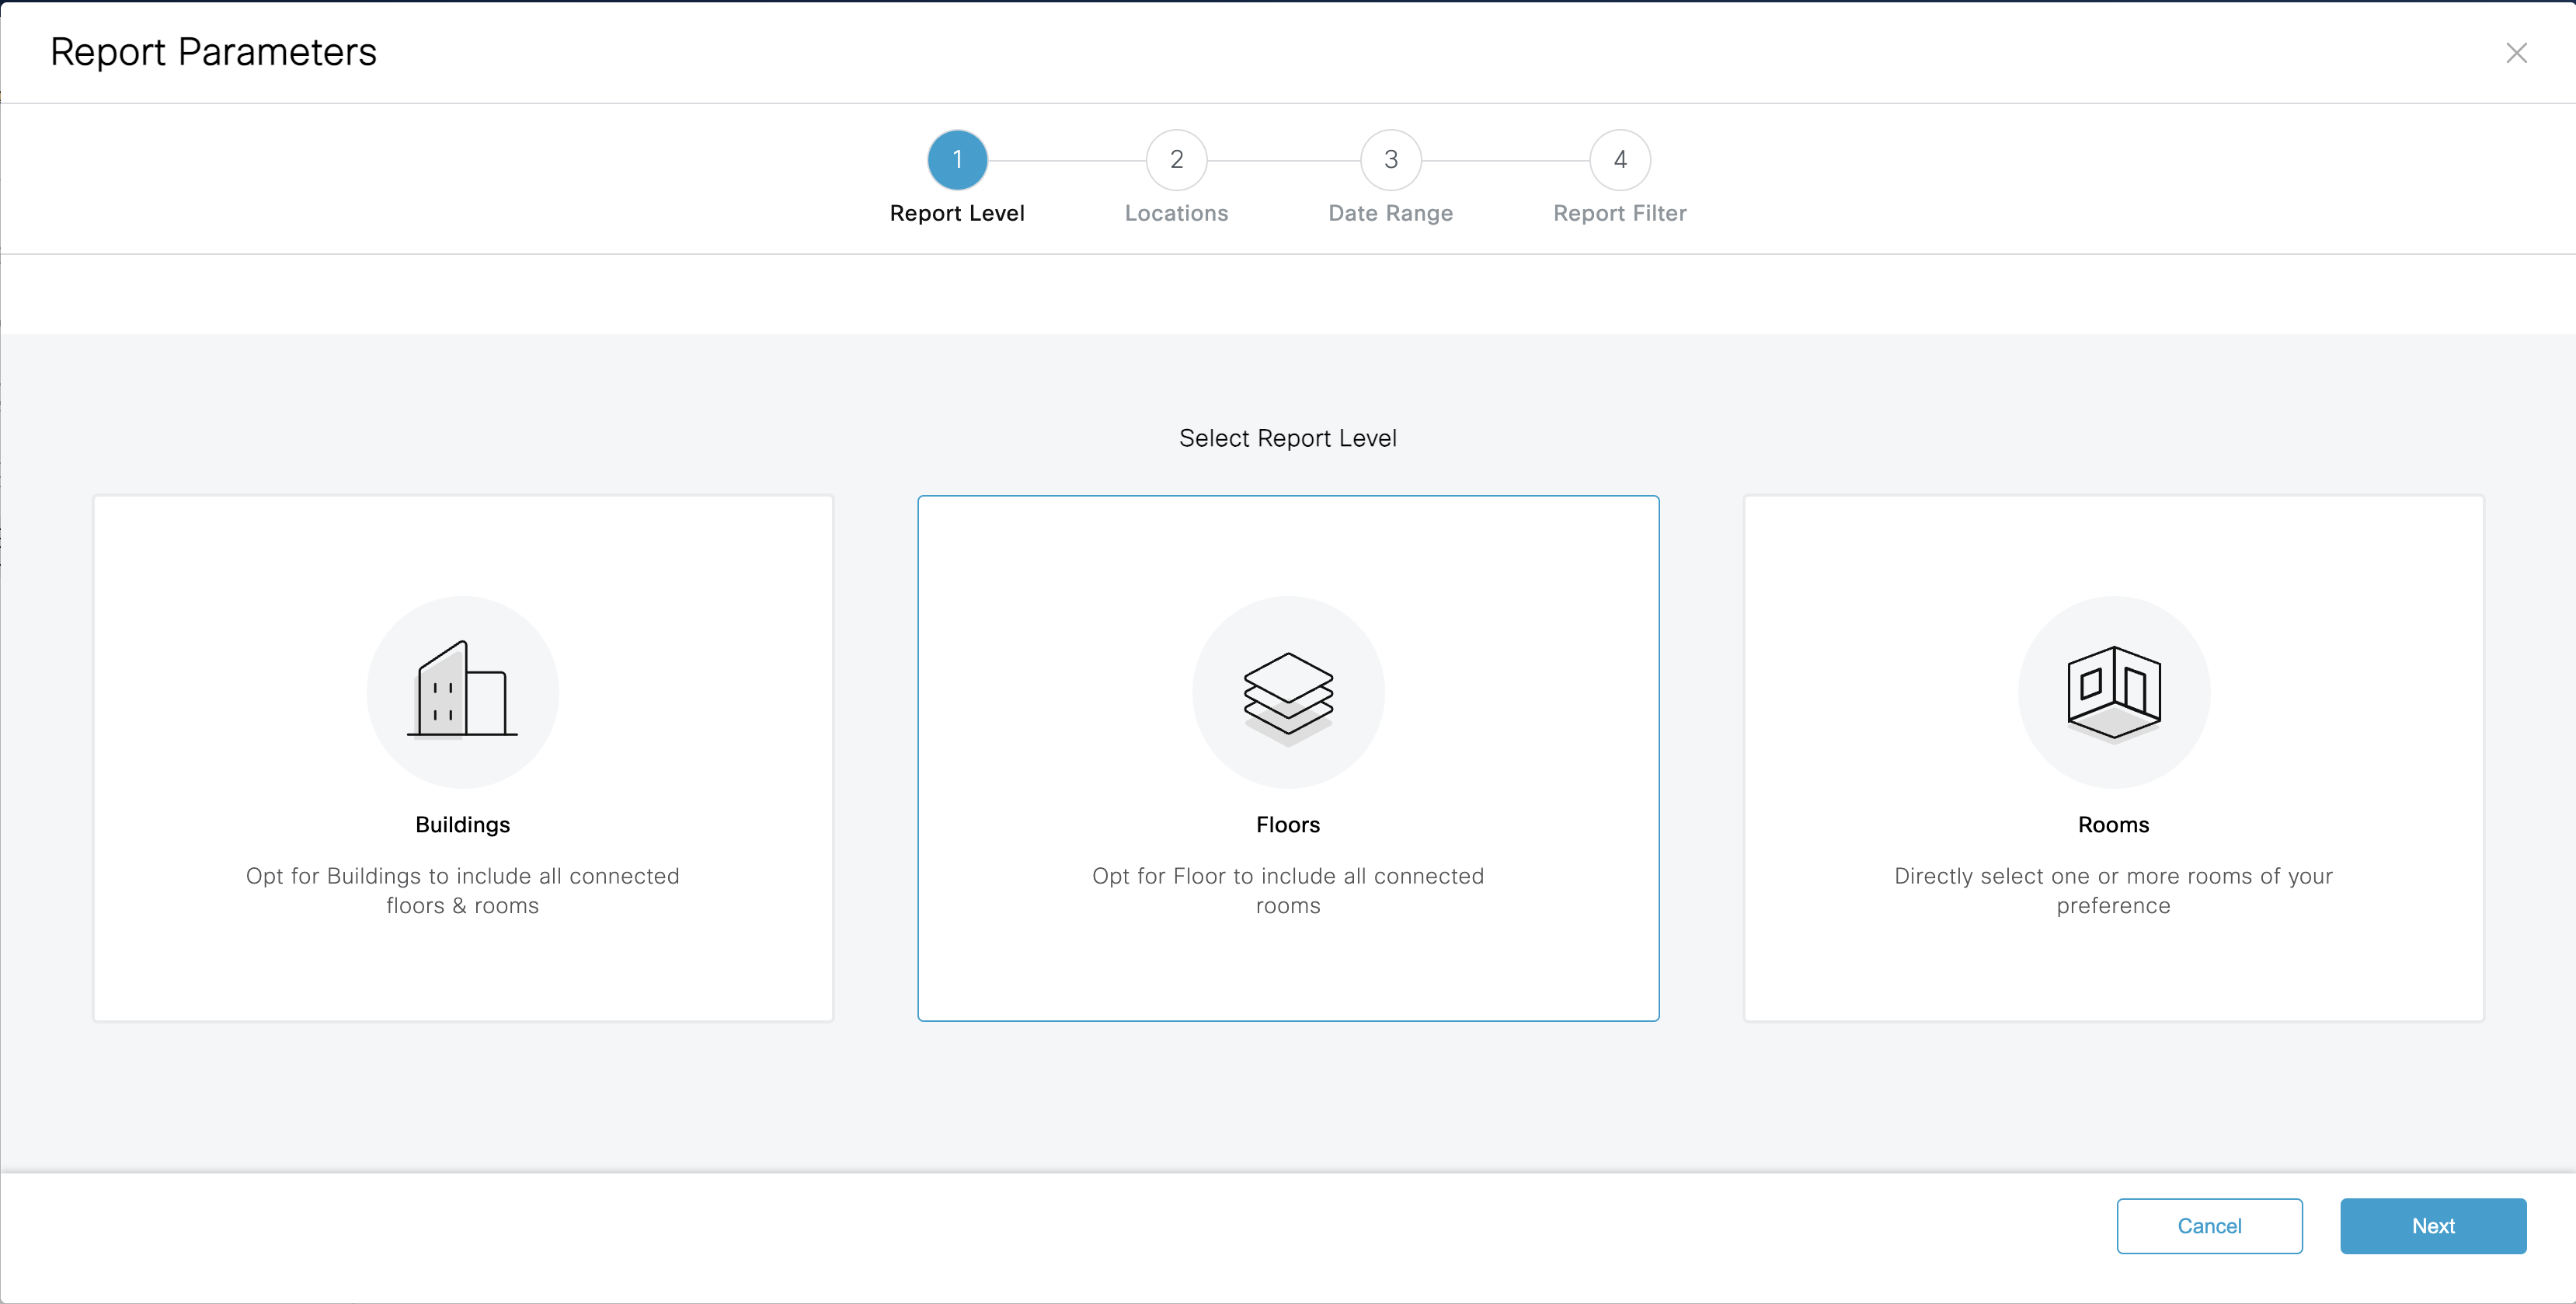
You can Generate Occupancy reports Under Space Manager Room Occupancy report for Buildings, Floors and rooms.
-
Click on Create a Report and select Buildings, Floors or Rooms.
-
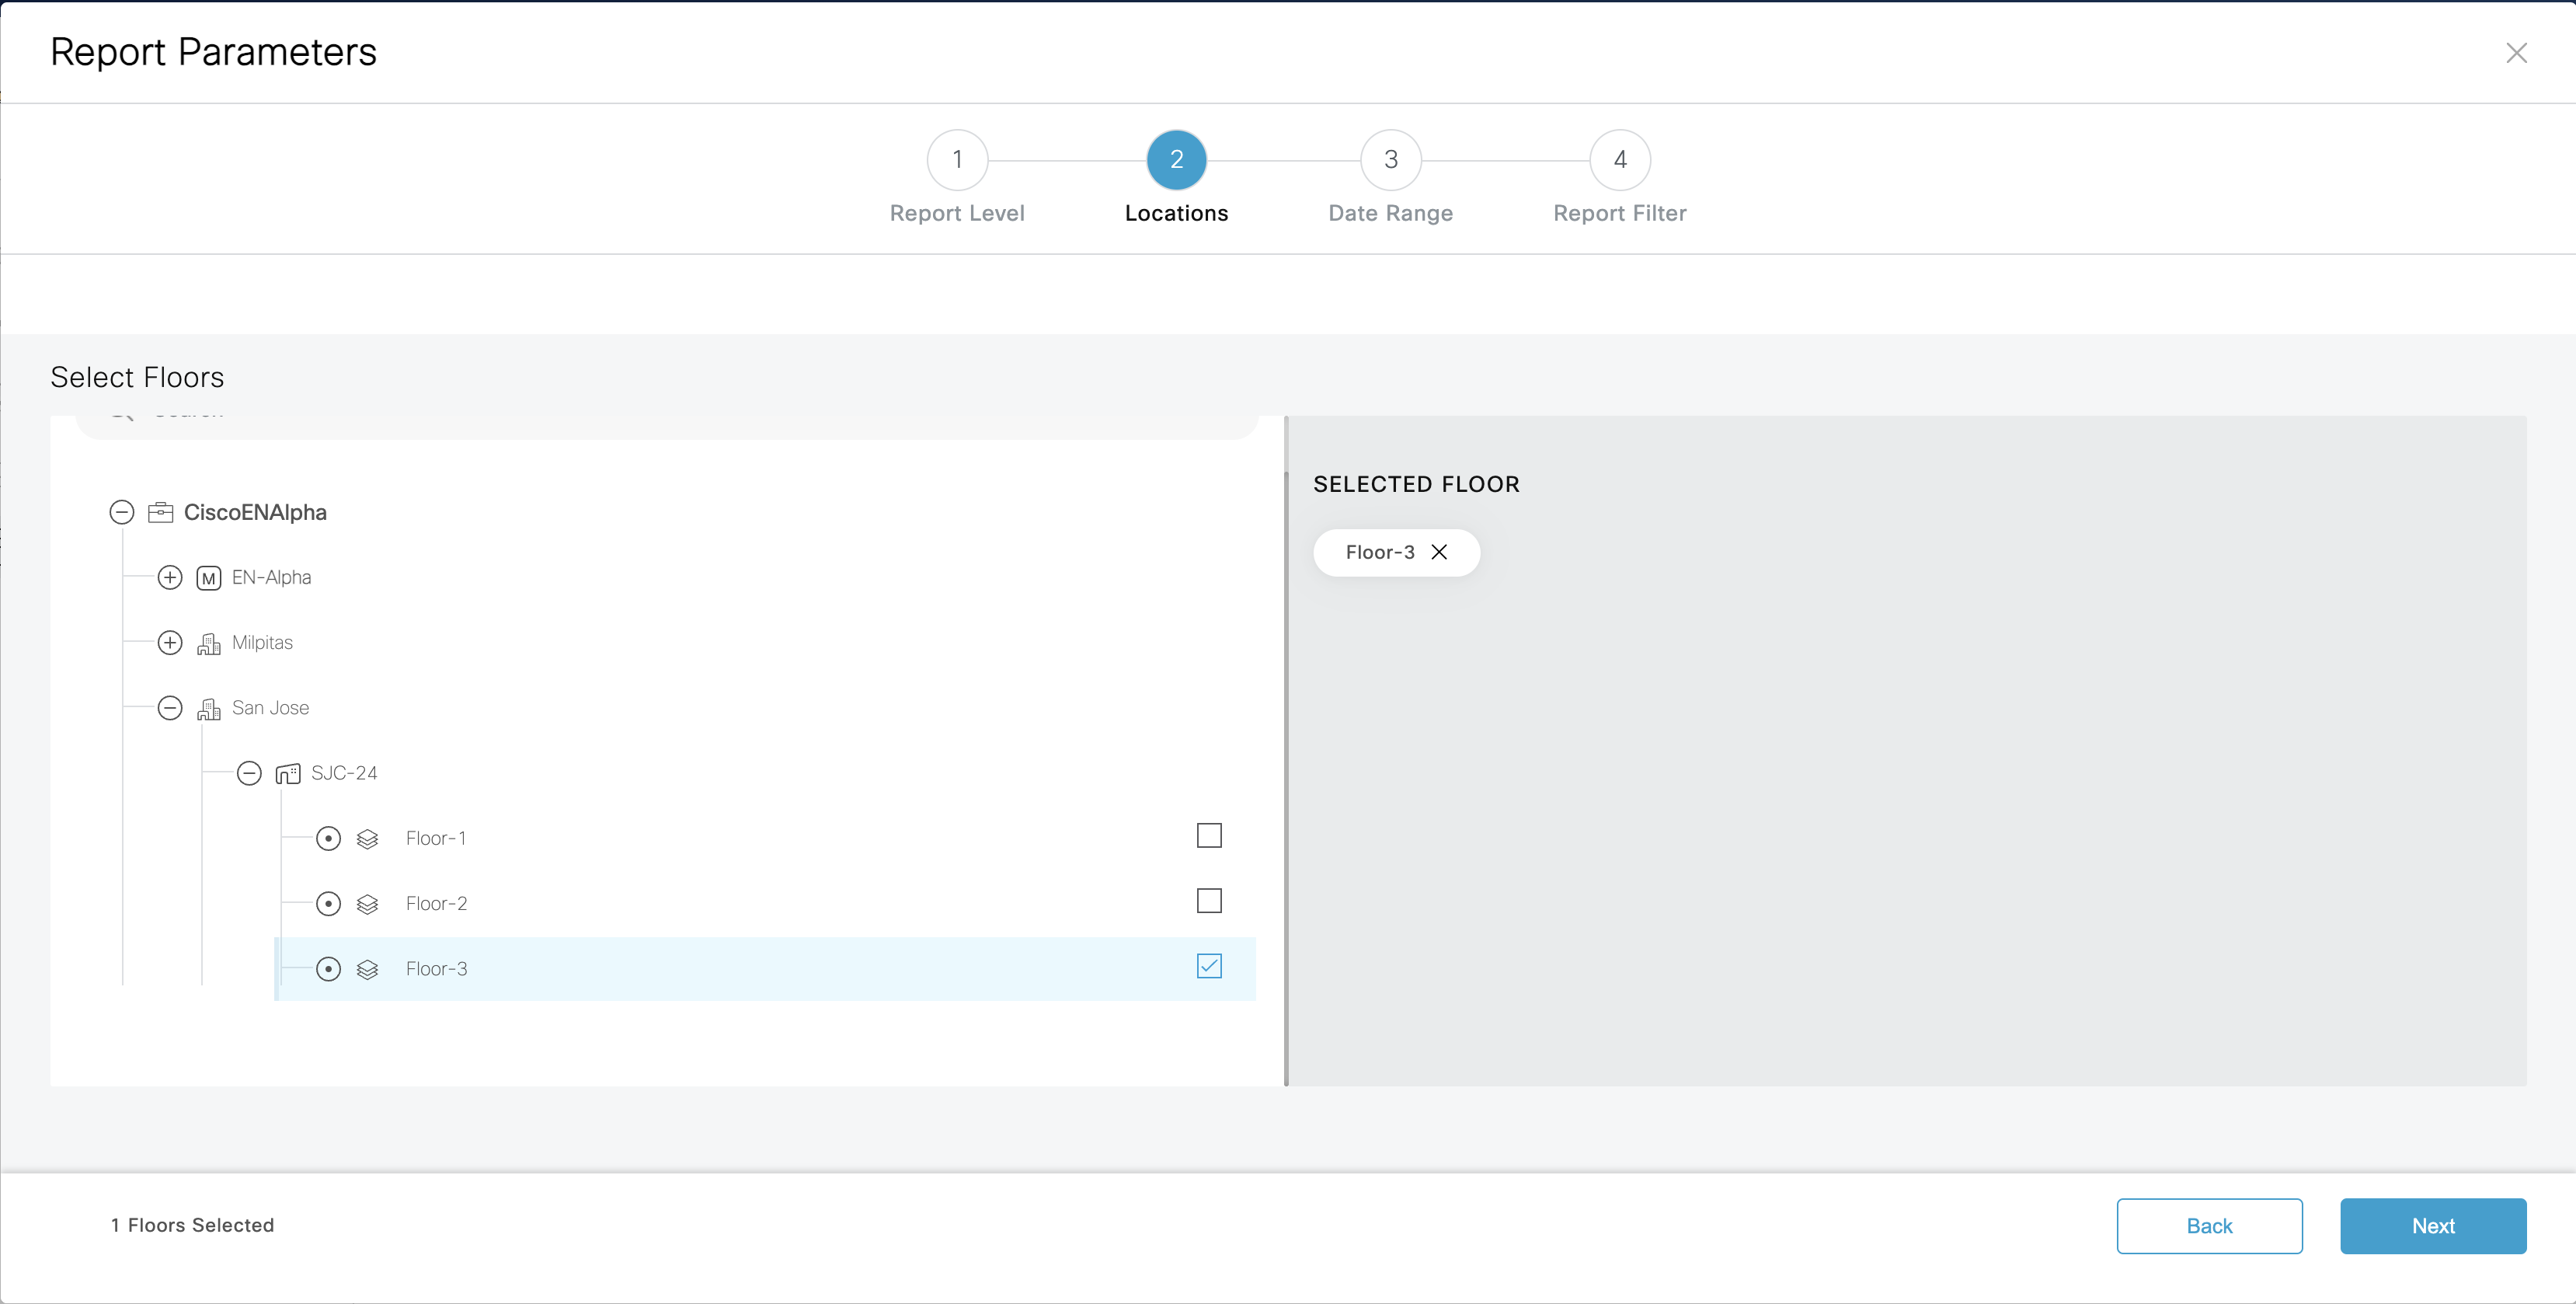
Select a specific Location which will be shown from the Location Hierarchy and Click Next.
-
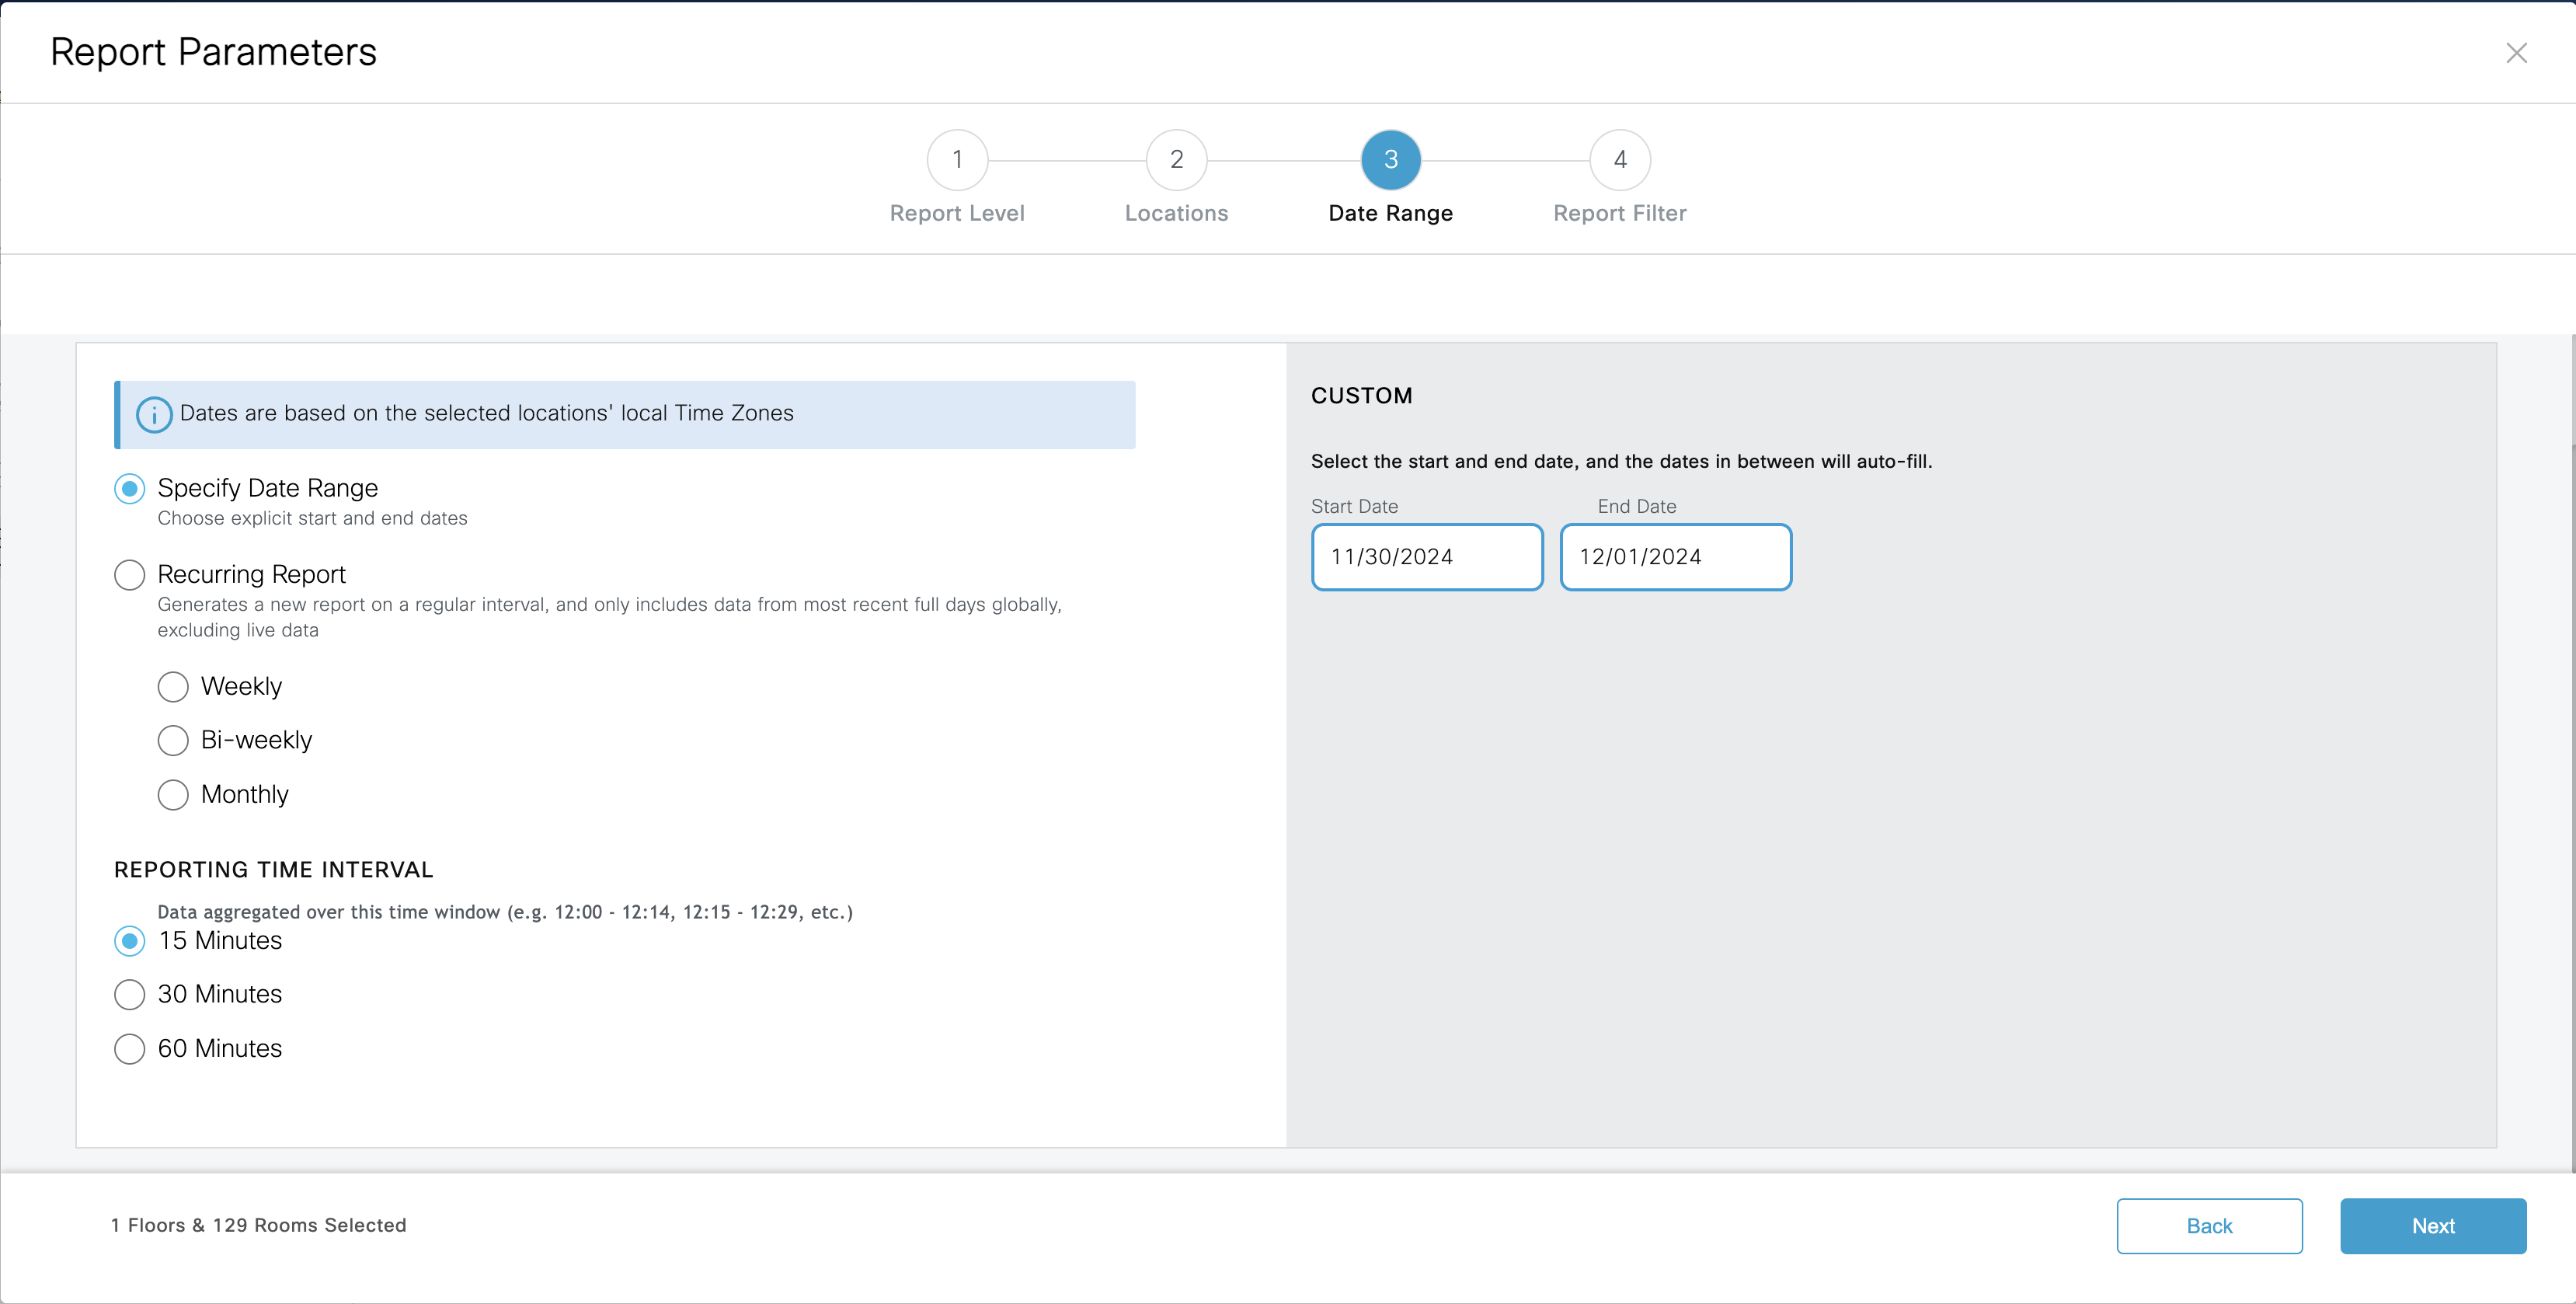
Select the Date range or can also Customize it as shown below.
-
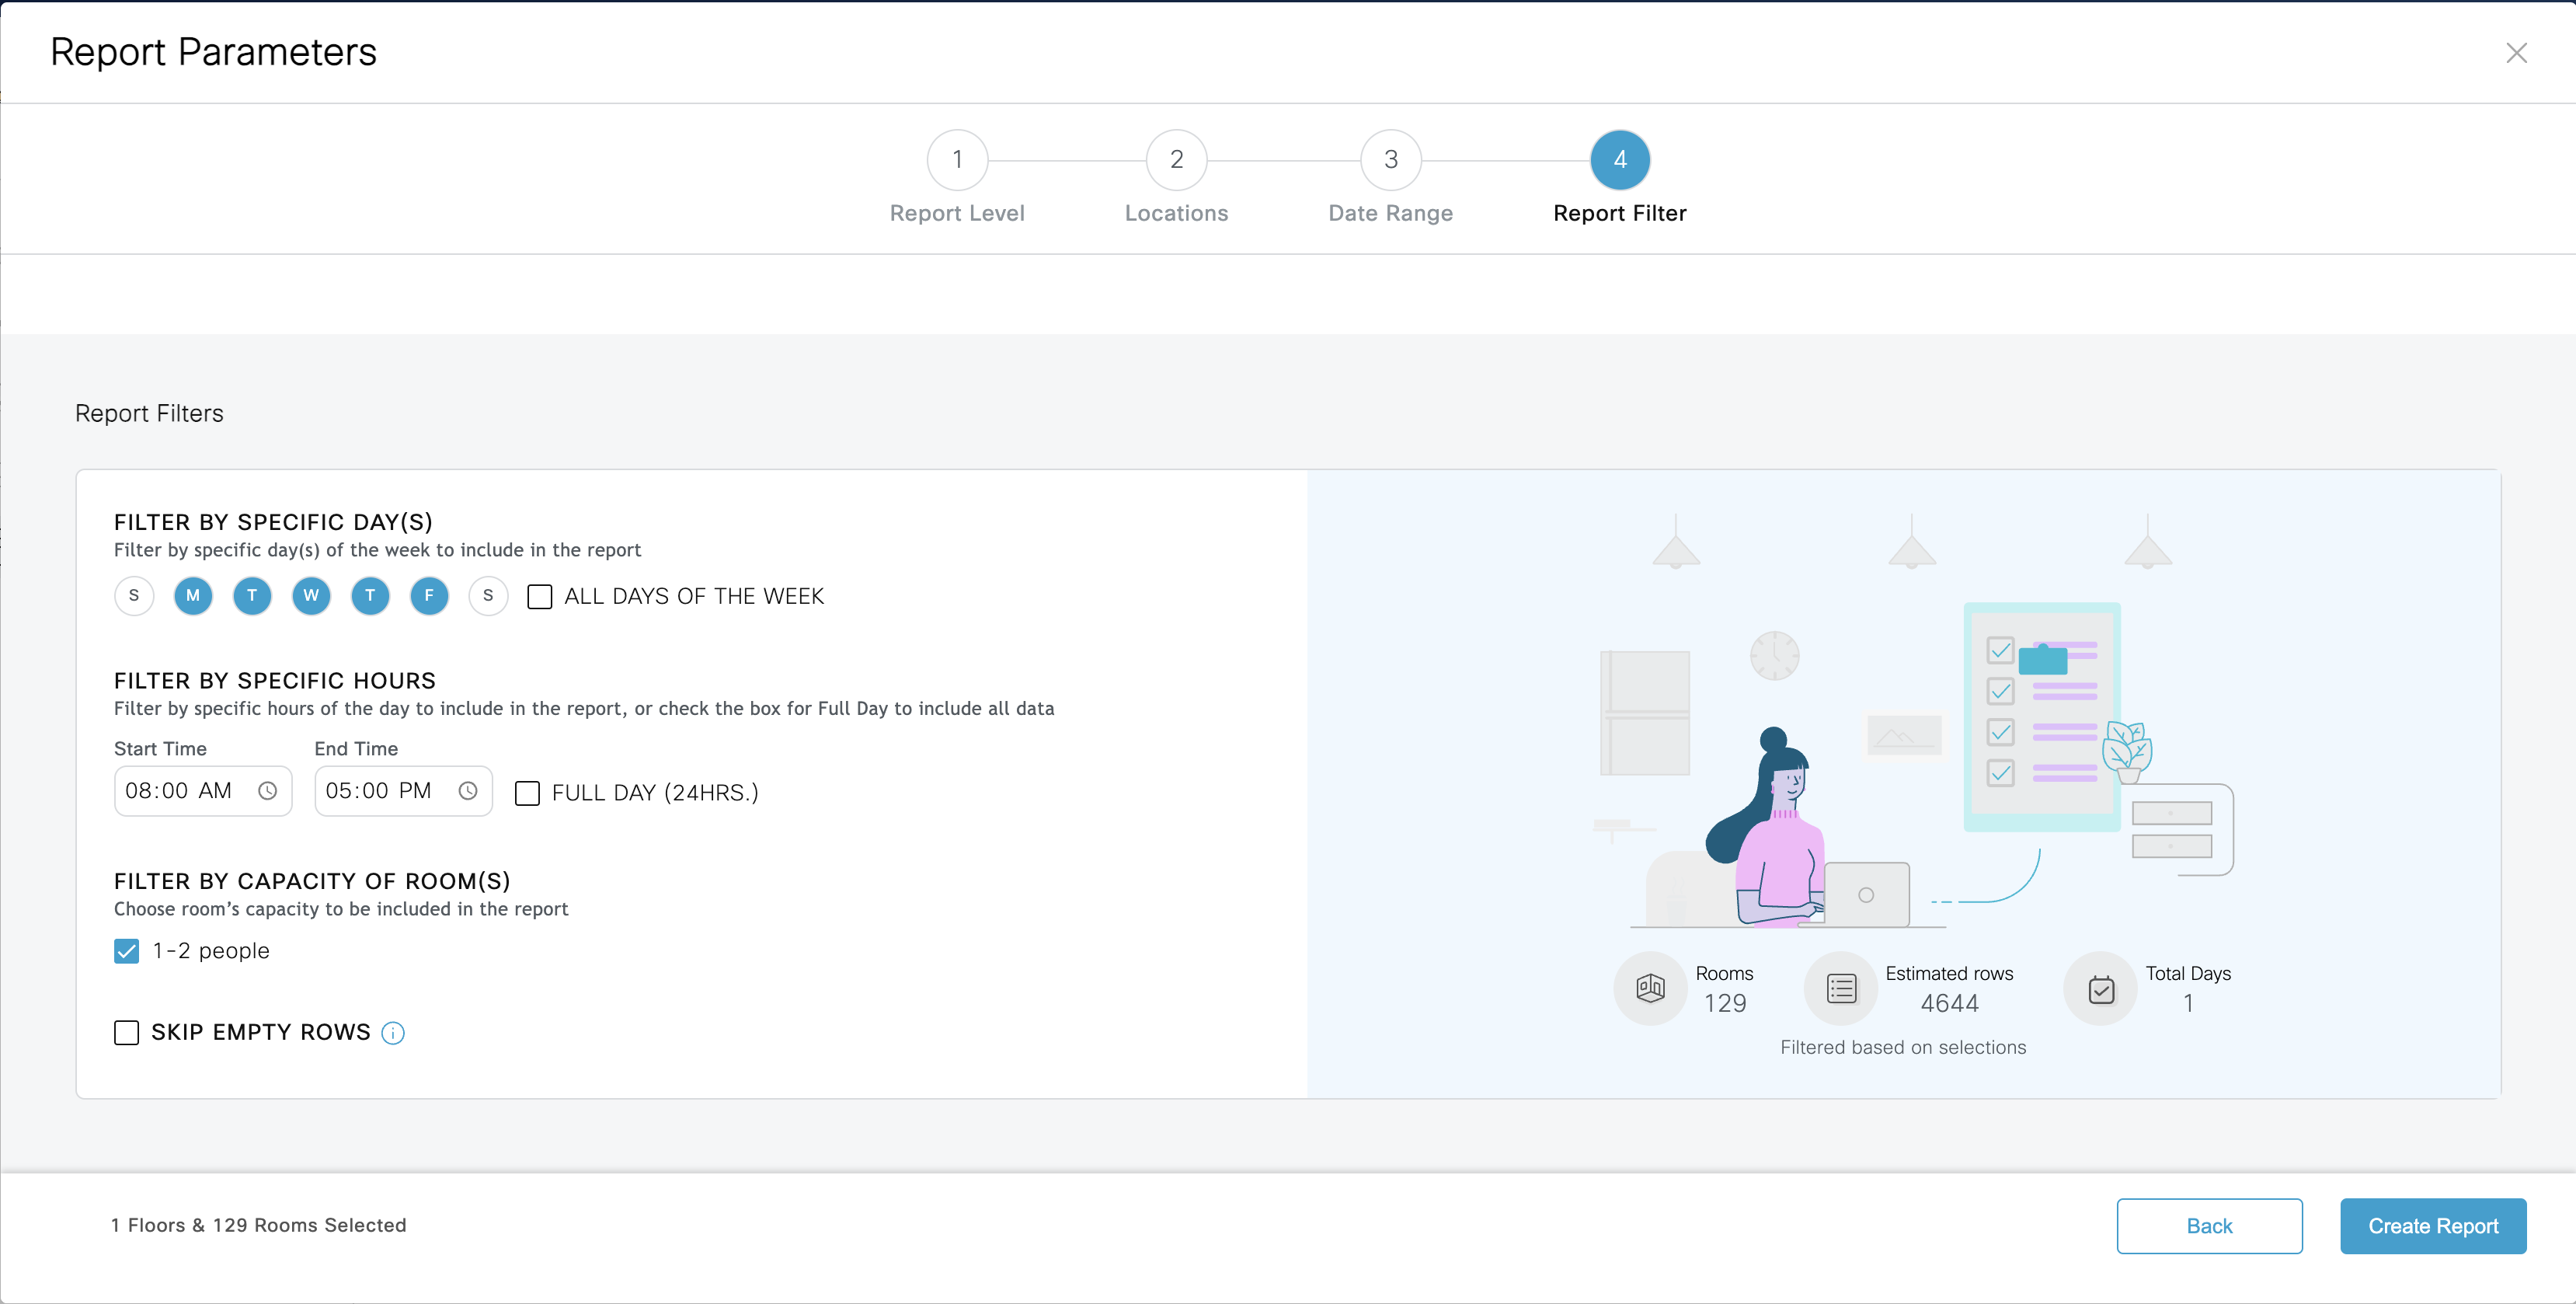
You can be as specific as for Days, hours and capacity of rooms and click on create report.
-
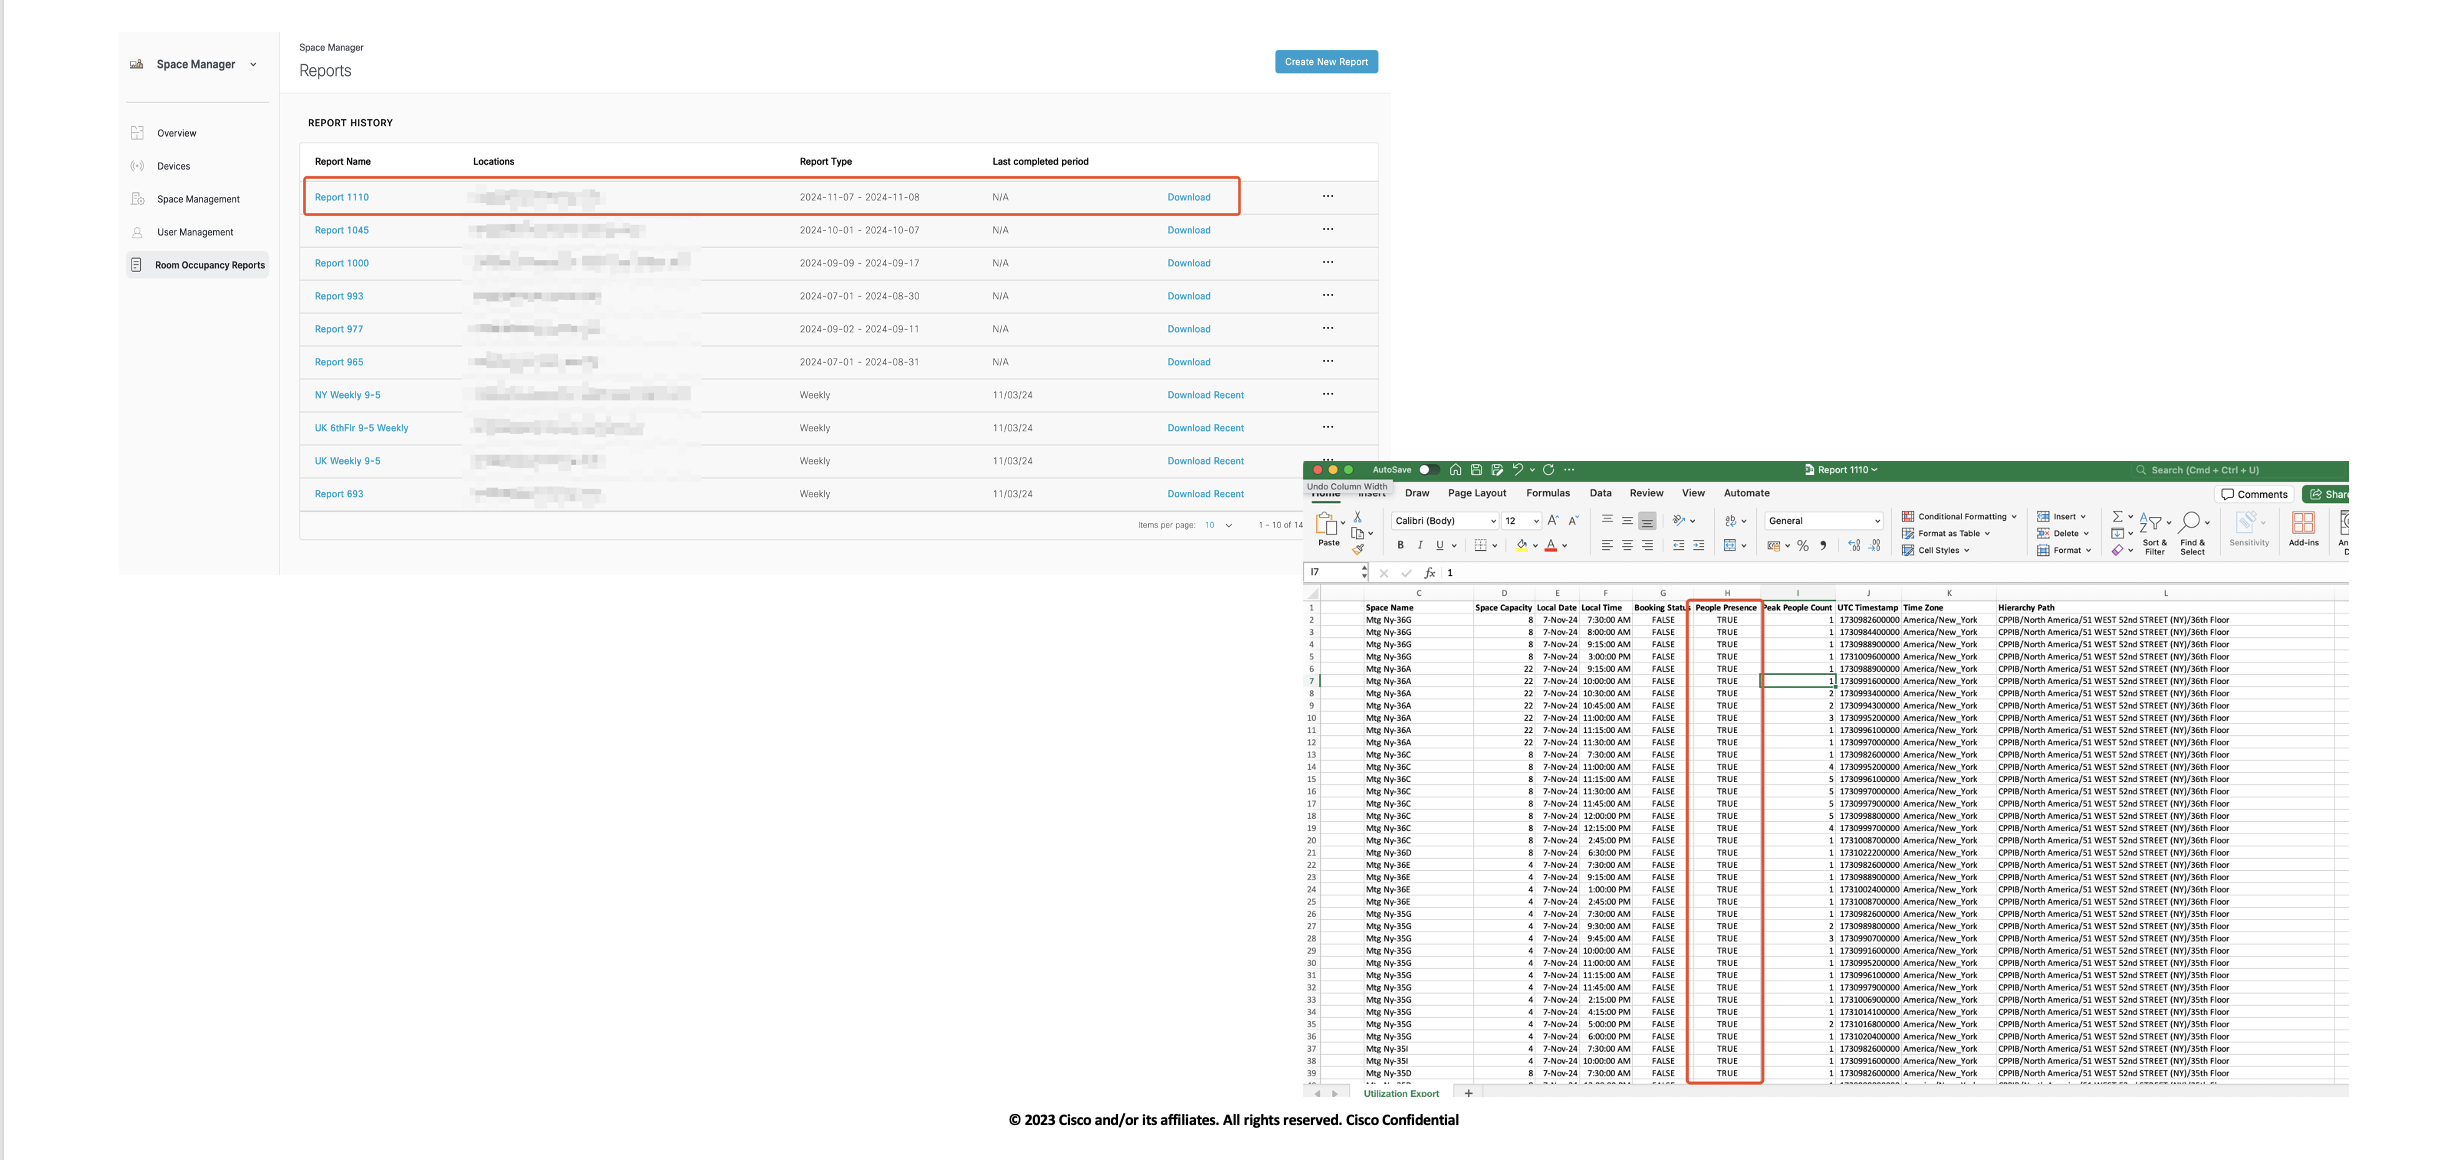
Report layout would like this and can also be exported in .CSV formate to further review and share.
Observations and troubleshooting
-
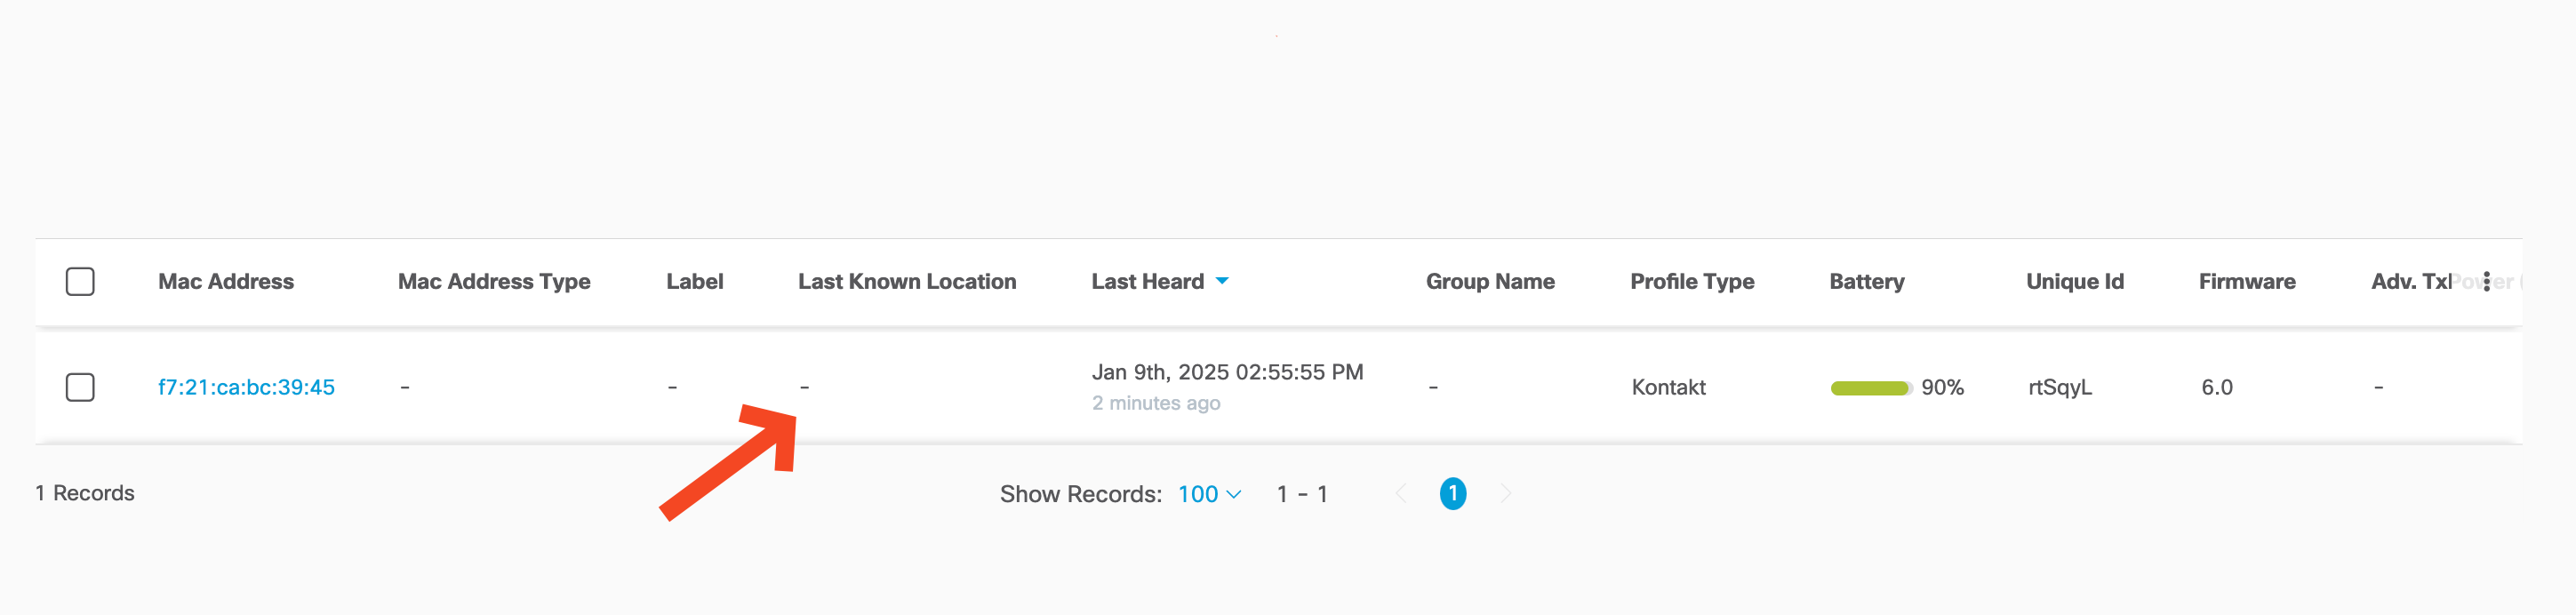
Missing location for claimed sensors in IOT services. This blocked sensor to be seen and associated in space manager to any room and not usable for occupancy use case through space manager.
Workaround : Delete the the sensor from IOT services multiple times if needed (until it updates the location under the IOT services)
You need to select the Mac Addresses which are not updating last known location. Under the actions use Delete Beacons to delete that.

Seeing dual Profile types IBeacon and Kontakt under the IOT Services

-
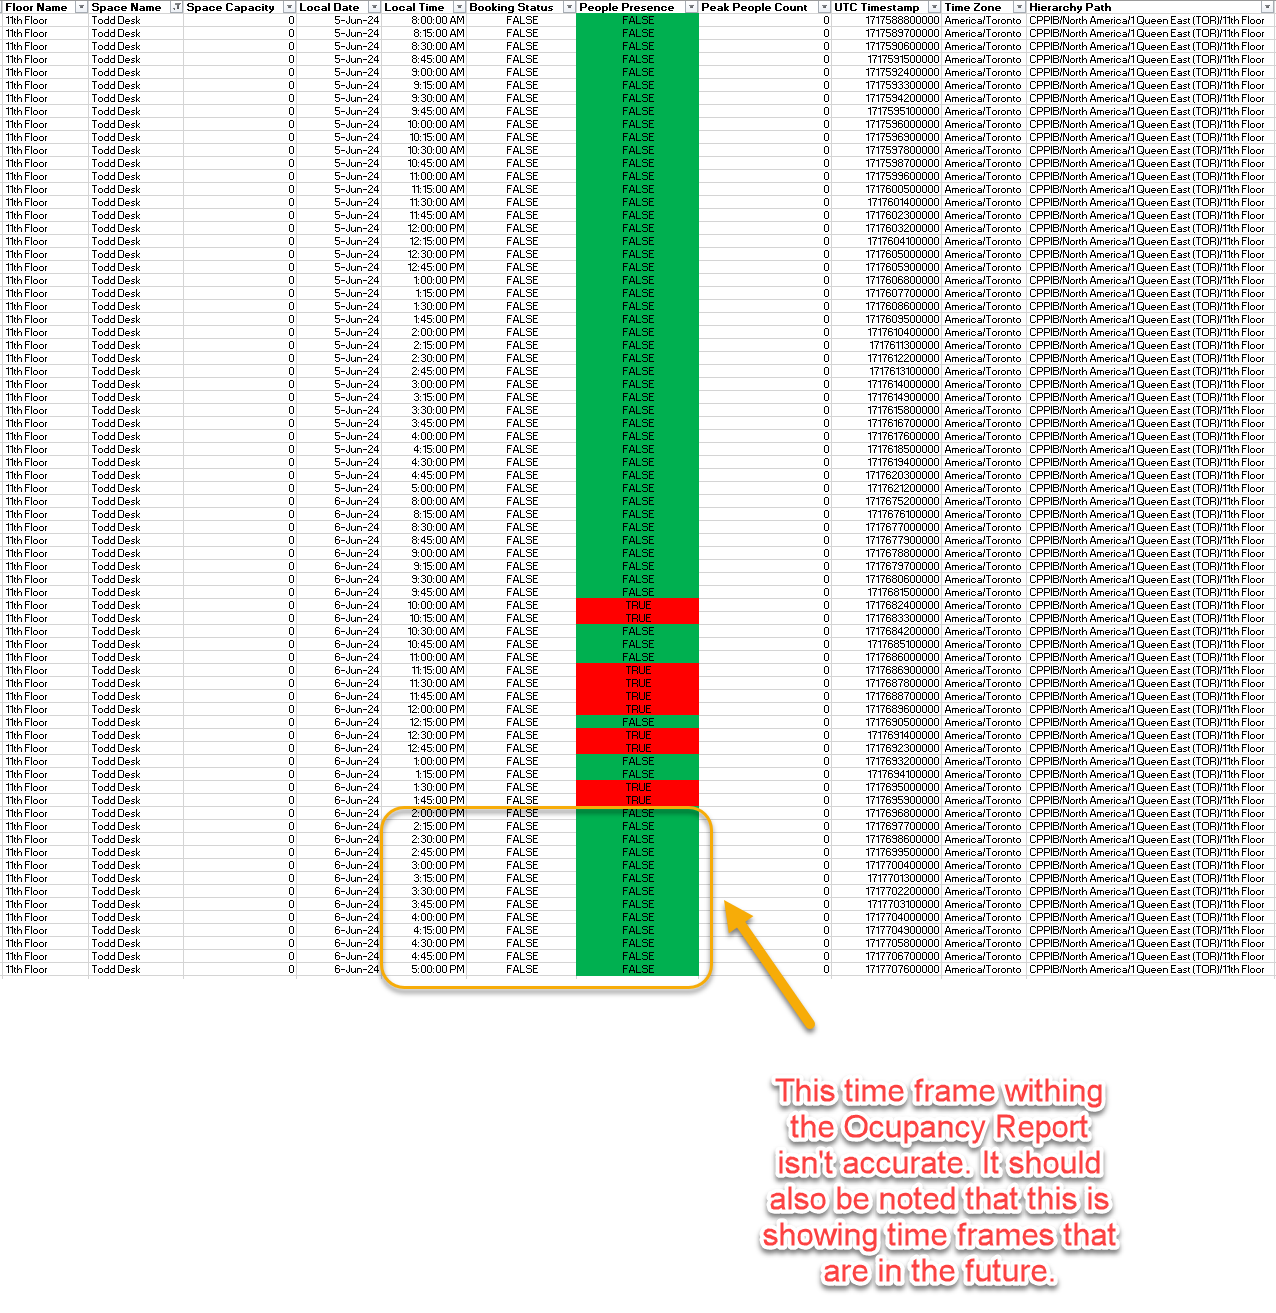
Room occupancy report runs in 4 hour intervals. (Recent update : Resolved but please reach out to Spaces support if the issue reappears )
Workaround : if customer runs report which included current day - then report includes last 4 hours but it shows incorrect data for those last 4 hours (as FALSE) as data is still not processed. We should either avoid prodding last 4 hours or have different status/value for those hours to avoid confusion or have this 4 hour consideration shown as info to customer.
-
Room Occupancy Report Interval : Room occupancy report calculation for 15 min slot does not sync with WebEx calculation. Currently presence in 8 to 8:15 window reflect into 8:00 slot rather than 8:15 like Webex report. ( Expected )
-
The Space will be identified as Occupied within 30 seconds (Once the person enters the area if the PIR sensor coverage in both Desk and Room scenarios) and once the person leaves the coverage of the PIR sensor it will still reflect as Available after 5 minutes interval (5 minutes/300 seconds guard timer).The Guard timer should also reflect on Occupancy report as Presence True.
-
Peak People Count Column : Room Occupancy report should have N/A entry to Peak People Count , currently it reflect 0 (tentatively expected)
-
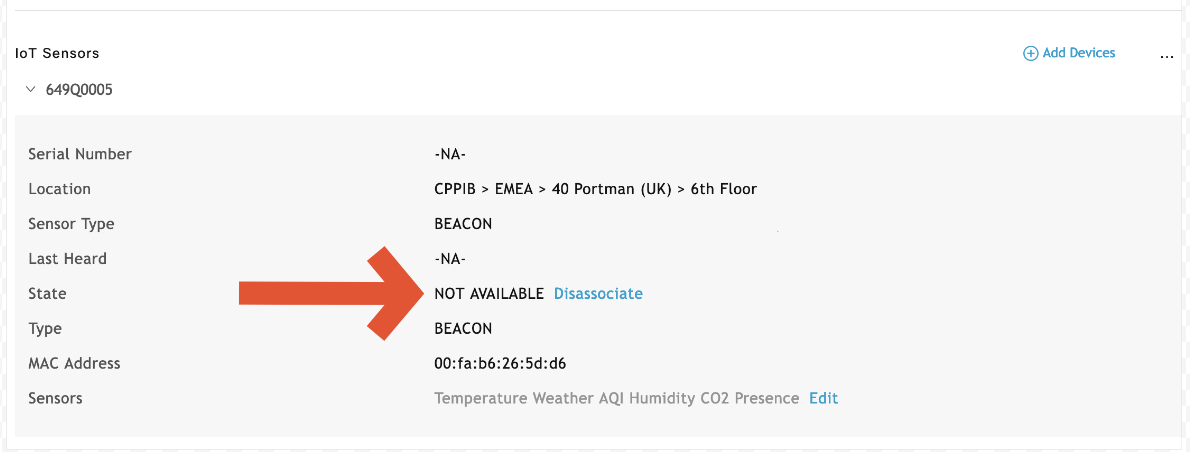
Space Manager: after adding the IOT device with a meeting room the state is seen as NOT AVAILABLE even Sensor has been associated successfully and showing status on overview and room occupancy
Asset Tracker App
The Asset Tracker app can be used to track and manage PIR sensors.
-
Create a sensor category, such as Thingsee PIR Sensors.
-
Add sensors individually or use bulk upload to import them into the category.
-
Configure optional rules to monitor sensor health and generate notifications:
-
Battery Sense: Sends a notification when the reported battery level falls below the configured threshold.
-
Sensor Not Heard: Sends a notification when a sensor has not reported for the configured interval.
-
IOT Explorer App
IoT Explorer’s Presence Detection use case provides live occupancy monitoring, historical data logs, and configurable alerts.
To configure the use case:
-
Open Cisco Spaces > IoT Explorer > Presence Detection.
-
Select Get Started, enter a use-case name and description, and select Create Use Case.
-
Add the claimed Thingsee PRESENCE sensors.
-
Open Occupancy View to view occupied and unoccupied spaces on the floor map.
-
Use the Sensors tab to find sensors by name or location.
Optional rules can generate notifications for:
-
Presence Detected: Presence is detected in the monitored space.
-
Presence Not Detected: Presence is no longer detected.
-
Sensor Not Heard: The sensor has not reported for the configured interval.
Rule-triggered events are available in the Events tab. Historical occupancy data can be collected through data-log rules.
Spaces API (Firehose)
The Spaces Firehose API makes room occupancy data available to external applications, dashboards, and operational workflows.
The relevant event types are:
|
Event |
Purpose |
|---|---|
|
|
Reports changes in room presence or people count, depending on the configured occupancy source. |
|
|
Provides periodic occupancy snapshots with room, location, and presence information. |
For Thingsee PRESENCE deployments, applications should use the peoplePresence value to interpret binary occupancy: true indicates presence detected and false indicates presence not detected. Room and floor identifiers provide the context needed to associate each event with the correct space. People-count values must not be treated as measurements from the PIR sensor.
Support and Monitoring
Joint Support Model
The Cisco Spaces Partner Ecosystem operates under a shared responsibility support model, ensuring issues are routed quickly to the team best positioned to resolve them.
|
Responsibility Area |
Primary Owner |
|
Cisco Spaces Platform & Apps, APIs, Network Integration, |
Cisco Spaces |
|
Thingsee PIR Sensor - Order, Shipment, Installation and Product details |
Haltian |
Support Workflow
Cisco Support
For detailed support channels, case creation, ownership, joint investigation, and escalation procedures, refer to the Cisco Spaces Support and Escalation Process for Partner Ecosystem.
Haltian Support
For assistance with Thingsee PRESENCE hardware, installation, battery replacement, or suspected device faults, contact support@haltian.com.
Include the following information to help with troubleshooting:
-
Sensor model, unique ID, and BLE MAC address.
-
Order ID, if available.
-
Installation location, mounting height, and orientation.
-
Description of the issue, when it started, and troubleshooting already completed.
-
Battery level, Last Heard time, and relevant screenshots or installation photos.
For installation and device documentation, refer to Haltian’s Thingsee PRESENCE support page.
Troubleshooting Guide
Frequently asked Questions
Q. Can the sensor sense movement behind glass walls?
No. Ordinary glass blocks the infrared wavelengths used by PIR sensors. A sensor installed inside a glass-walled room detects movement within that room rather than people passing outside the glass.
Movement through an open doorway can still trigger detection. Avoid positioning the sensor directly opposite the door.
Q. How can i check the battery left for the sensor?
The reported battery level can be checked in several places:
-
IoT Services > Inventory > Claimed Devices: Open the sensor’s details and review its battery telemetry.
-
Asset Tracker: Find the sensor in its assigned category and review the battery level.
-
IoT Explorer: Open the relevant use case, select Sensors, and review the sensor’s battery percentage.
-
Spaces Firehose API: Battery measurement is also available in the IoT telemetry events.
Check the telemetry timestamp or Last Heard value to confirm how recently the battery level was reported.
Q. Can notifications be sent when the sensor’s battery is running low?
Yes. In the Asset Tracker app, configure a Battery Sense rule for the PIR sensor category. Set the battery threshold and notification recipients so an alert is sent when the reported battery level falls below that threshold.
A Sensor Not Heard rule can also notify the maintenance team when a sensor has not reported for the configured interval.