OVERVIEW
Workplace violence and staff duress incidents in healthcare environments present significant risks to both healthcare workers and patients. These incidents can range from verbal abuse and threats to physical violence, impacting staff well-being, operational continuity, and quality of care. Recent industry surveys indicate that over 80% of nurses report experiencing workplace violence, with many reporting an increase in incidents year over year. These trends highlight the growing need for proactive, real-time staff safety solutions within healthcare facilities.
Staff duress events have broad implications:
-
Safety of Healthcare Workers: Staff may be exposed to physical harm or emotional trauma during duress incidents.
-
Patient Safety: Disruptions caused by such events can impact care delivery and patient outcomes.
-
Operational and Economic Impact: Repeated exposure to duress events can lead to stress, burnout, reduced productivity, and increased staff turnover.
This runbook provides Cisco partners and customers with implementation guidance for deploying a Staff Duress solution using Kontakt.io Smart Badges integrated with Cisco Spaces. The solution enables staff members to trigger alerts using wearable devices, allowing security and response teams to receive real-time notifications with location visibility.
The solution leverages:
-
Cisco Catalyst Access Points with BLE capabilities for device detection
-
Cisco Spaces IoT Services for BLE telemetry ingestion and location intelligence
-
Kio Cloud (Staff Safe application) for alert orchestration, escalation workflows, and incident management
Cisco Spaces acts as the middleware layer, ingesting BLE telemetry, calculating real-time location, and delivering event data to the application layer. The Kontakt.io Staff Safe application consumes this data to generate alerts, notify responders, and manage the incident lifecycle.
This runbook aligns with the Cisco Spaces validated design for Staff Duress deployments using Kontakt.io. It outlines the technical architecture, deployment workflow, validation procedures, operational considerations, and support model required to implement a scalable and reliable staff safety solution.
TARGET AUDIENCE
This runbook is intended for stakeholders involved in the design, deployment, and operation of Staff Duress solutions within healthcare environments, including:
-
Hospital IT Administrators responsible for network infrastructure, Cisco Spaces deployment, and system integration
-
Clinical Engineering Teams managing device integration, validation, and ongoing operational support
-
Security Operations Personnel responsible for monitoring alerts, coordinating incident response, and managing escalation workflows
-
Cisco Partners and System Integrators deploying and configuring healthcare solutions for customer environments
-
Facility and Operations Managers overseeing campus-wide safety initiatives and ensuring alignment with organizational policies
HOW IT WORKS
The Staff Duress solution leverages BLE-based Real-Time Location Services (RTLS) technology to provide comprehensive staff safety monitoring. It combines Cisco Spaces wireless infrastructure with the Kio Cloud platform to enable real-time staff location visibility and emergency alert management.
Smart Badges communicate over Bluetooth Low Energy (BLE) and are detected by Cisco Catalyst access points with BLE scanning enabled. Cisco Spaces ingests and processes telemetry from these devices, calculates their location, and securely shares this information with the Staff Safe application, where alert workflows are executed.
The solution continuously supervises badge presence and enables immediate incident escalation when a duress event is triggered.
Smart Badge and Enrollment
The Smart Badge is a wearable BLE-enabled device equipped with a programmable emergency button. When assigned to a staff member and activated, the badge begins broadcasting BLE telemetry at defined intervals. Smart Badges may support multiple buttons (e.g., emergency and non-emergency), allowing different alert types to be configured based on organizational policy.
Once the badge is claimed in Cisco Spaces and federated into the Kio Cloud platform, it is logically associated with an individual staff profile. From this point forward, the badge is continuously monitored within the system.
If a badge stops transmitting for a defined period, the system can detect the absence of telemetry and flag the condition for investigation. This ensures operational awareness of both device health and staff presence.
Duress Activation
When a staff member presses the emergency button on the Smart Badge, the badge immediately transmits a duress event via BLE advertisement. This broadcast is captured by nearby Cisco Catalyst access points and forwarded to Cisco Spaces IoT Services.
Cisco Spaces processes the telemetry, determines the badge’s location based on signal strength and map hierarchy, and exposes the event data to the Kio Cloud platform through secure API integration.
The Staff Safe application processes button press telemetry and correlates it with location and user identity to generate duress alerts. Configured responder groups are immediately notified, and the alert enters an active state until acknowledged and resolved.
Because the solution leverages existing wireless infrastructure, duress alerts function anywhere within Cisco wireless coverage.
Location Awareness and Zone Monitoring
Location is determined using BLE signal strength measurements captured by multiple access points. Cisco Spaces correlates this telemetry with uploaded floor maps and building hierarchies to identify the staff member’s approximate location.
Where enhanced room-level precision is required, optional Beam Minis may be deployed. These devices improve certainty in high-risk areas such as behavioral health units, emergency departments, or secure access zones.
The system maintains visibility of the badge location as long as BLE telemetry is detected, allowing responders to track movement during an active incident.
Device Monitoring
The Smart Badge includes mechanisms to detect button presses and abnormal device states. In addition, battery levels and device health metrics are transmitted as part of normal telemetry.
If a badge experiences abnormal conditions — such as extended signal loss or critically low battery — administrators can be notified to take corrective action. This ensures badges remain operational and available when needed.
Continual Supervision
Each Smart Badge transmits BLE telemetry at regular intervals, even when no duress event is active. Cisco Spaces continuously ingests these transmissions and updates the device’s last-seen location.
If a badge is not detected within a configurable supervision window, the system can generate alerts indicating loss of communication. This supervision model ensures operational continuity and allows administrators to proactively address coverage or device issues.
Continuous wireless coverage ensures staff remain protected while moving between departments, floors, or buildings within the coverage area. The solution is designed to provide near real-time location updates and rapid alert delivery across the deployment.
Escalation and Incident Lifecycle
Once a duress alert is generated in the Staff Safe application, it enters an active state. Responders receive notification through configured channels and can acknowledge the alert directly within the platform.
If an alert is not acknowledged within a defined timeframe, escalation rules may automatically notify secondary responder groups or supervisory personnel.
After the situation is addressed, the incident is marked as resolved within the application. All state transitions - activation, acknowledgment, and resolution, are logged and retained for reporting, compliance, and operational review.
SOLUTION COMPONENTS
Cisco Hardware Components
|
Device |
Function |
Recommended Versions |
Quantity Guidance |
|---|---|---|---|
|
Cisco Catalyst Access Points |
Scans for BLE signals from Smart Badges |
Wi-Fi 6/6E/7 |
1 AP per 1000 sq ft for high-density coverage |
|
Cisco Catalyst WLC |
Manages Catalyst AP’s, aggregates telemetry |
IOS-XE 17.15 or above
Minimum compatible version - 17.9.6 |
Per campus architecture |
Cisco Software Components
|
Application |
Function |
Version |
Notes |
|---|---|---|---|
|
Cisco Spaces Connector |
Gathers data from controller and AP and sends data to Spaces Cloud |
Cisco Spaces Connector 3.x |
Deploy the latest supported Connector 3 release. Connector 3 is recommended for production deployments and supports monitoring, troubleshooting, and HA options. |
|
Cisco Spaces Dashboard |
Cloud-based portal for Cisco Spaces services and applications |
Cloud Service |
|
|
Kio Cloud Partner App |
Consumes Cisco Spaces location and event data to enable staff safety and RTLS workflows within Kio Cloud |
Latest version available in Cisco Spaces Partner App Center |
Activate via Cisco Spaces Dashboard → Partner Apps. Requires valid Kio Cloud credentials and location/device selection during activation. |
Kontakt.io Components
Kontakt.io components provide the application and workflow layer of the solution, consuming BLE telemetry and location data from Cisco Spaces to enable staff safety use cases.
|
Device |
Image |
Function |
Procure / Enable |
Notes |
|---|---|---|---|---|
|
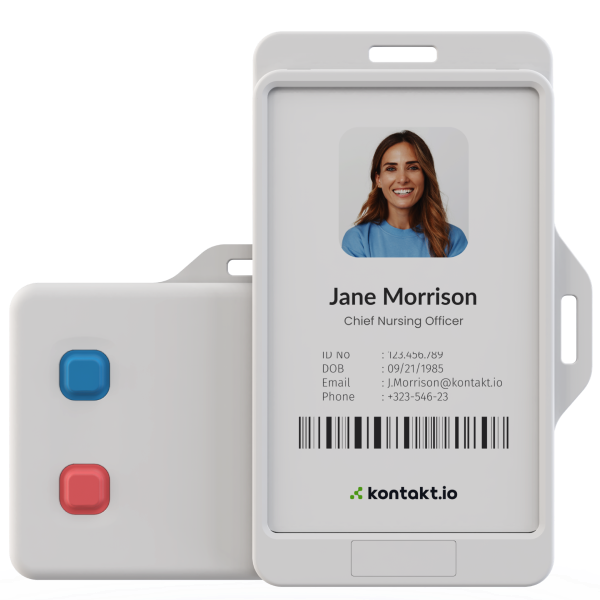
Smart Badge 3 |
|
Wearable BLE device used by staff to trigger duress alerts via button press. Continuously broadcasts BLE telemetry for location tracking |
Contact the Kio team through the Device Marketplace listing on Cisco Spaces Dashboard |
Supports multi-button configuration (e.g., emergency vs non-emergency). Button press transmits event including identity, location (via Cisco Spaces), timestamp, and severity. |
|
Smart Badge 3 Mini |
|
Compact BLE panic button device used for staff duress activation. Provides simplified single-button interaction with BLE telemetry broadcast |
Contact the Kio team through the Device Marketplace listing on Cisco Spaces Dashboard |
Suitable for smaller form-factor deployments. |
|
KIO Cloud |
|
Cloud Application for Staff Duress Workflows |
Kio team will provision the account and onboarding |
Integrated with Cisco Spaces via Partner App on Dashboard |
|
KIO Staff Safe App |
|
Responding to staff duress incidents |
Kio team will provision the account and onboarding |
Provides dashboards, alert acknowledgment, escalation, and reporting. Access controlled via user roles. |
INFRASTRUCTURE SETUP
Proper infrastructure design is critical to achieving accurate location tracking and reliable Staff Duress workflows. Cisco Spaces leverages existing wireless infrastructure to deliver BLE-based location services without requiring additional gateway hardware, making network readiness and design validation essential for successful deployment.
Infrastructure should be designed for location outcomes first, not just connectivity. Insufficient AP density or improper placement can significantly impact location accuracy, alert effectiveness, and overall solution reliability.
Cisco validated design guidance for IoT Services and RTLS deployments can be found here: https://runbooks.ciscospaces.io/docs/iot-services-deployment-monitoring-and-troubleshoo
AP Density and BLE Design Considerations
AP density plays a critical role in determining BLE location accuracy and overall solution performance. For Staff Duress and RTLS use cases:
-
AP placement must enable consistent detection of BLE devices by multiple access points
-
Designs should prioritize location outcomes, not just Wi-Fi connectivity
-
Higher-density deployments may be required in healthcare environments to support accurate X/Y positioning
-
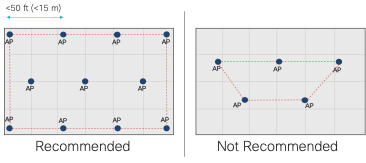
Ensure APs are placed across the floor, including edges, to provide full coverage (convex hull)
-
Each BLE device should be heard by ≥ 3 APs with RSSI ≥ -75 dBm for accurate X/Y location
-
Maintain AP proximity within ~50 ft (15–20 m) of BLE devices where possible
-
Accurately place APs on maps, including correct location and antenna orientation (if available)
-
Configure maps with proper scale, inclusion, and exclusion zones in Cisco Spaces
-
Use iBeacon profile for BLE devices whenever possible
-
Adjust BLE device transmit power or interval if detection is inconsistent (trade-off: battery life)
To determine the required access point (AP) models and density for the Staff Duress use case, use the Smart Spaces Studio: https://spaces.cisco.com/smart-space-builder/
The tool provides guided recommendations on AP deployment density, depending on the level of location accuracy needed.
AP Compatibility Validation
Validate that the existing wireless infrastructure supports BLE gateway functionality required for the use case.
Refer to the Cisco Spaces Catalyst AP capability matrix: https://runbooks.ciscospaces.io/docs/catalyst-ap-capability-matrix
Ensure that:
-
AP models are supported for IoT Services (wireless)
-
APs support BLE scanning (gateway mode) and enable BLE radios in scan mode or dual mode
-
Perform location accuracy testing in Cisco Spaces before deploying the Staff Duress solution
-
Software versions meet minimum requirements
Cisco Catalyst access points function as BLE gateways, scanning nearby BLE devices and forwarding telemetry to Cisco Spaces via the Connector.
Network Design Validation
Network design must be validated prior to deployment to ensure the infrastructure can support the intended use case. Cisco Spaces provides tools and services to assist with this process:
-
Validate AP density, placement, and coverage
-
Ensure maps and floor plans are accurate and aligned
-
Confirm that infrastructure supports BLE telemetry ingestion and location services
PREREQUISITES
Cisco Spaces Prerequisites
-
Cisco Spaces License
-
Minimum required license for this solution is Spaces Advantage
-
To identify existing licenses - https://spaces.cisco.com/find-my-license/
-
Explore Packages - https://spaces.cisco.com/packages/#compare
-
-
Spaces OS configured and validated per https://runbooks.ciscospaces.io/docs/cisco-spaces-os-runbook-cisco-validated
-
Cisco Catalyst Center or Prime Infrastructure configured with accurate floor maps.
-
IoT Services must be enabled with required firewall ports open.
Kontakt.io Prerequisites
-
KIO Cloud Account
a. A valid KIO Cloud account is required, with KIO Staff Safe app activated in your account.
If a new account is required, submit a Kontakt.io support request with the topic “Request new account” and include company name, region (US or UK), and contact information.
If the account does not have Staff Safe enabled, submit a support request. -
Kontakt.io Devices
a. Smart Badge 3 or Smart Badge 3 Mini devices must be ordered and ready for deployment.
b. A valid Order ID must be available to claim the devices in Cisco Spaces. -
Cisco Spaces Integration
a. The KIO Cloud Partner App must be activated in the Cisco Spaces Dashboard.
b. Valid Kio Cloud user credentials are required during partner app activation and configuration.
REFERENCE ARCHITECTURES
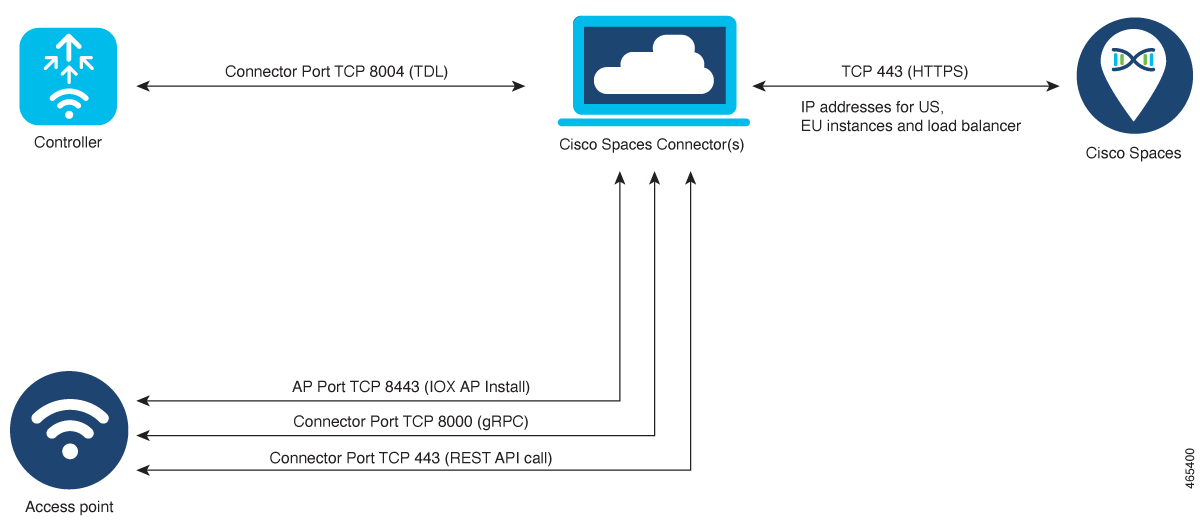
The diagram below illustrates the reference architecture for Cisco Spaces IoT Services (wireless) and highlights the required network ports and communication flows for proper operation. It can be used to validate firewall configurations and ensure connectivity between Cisco Catalyst infrastructure, the Cisco Spaces Connector, and Cisco Spaces Cloud.
For detailed firewall configuration procedures, refer to:
Connector Configuration – IoT Services Firewall
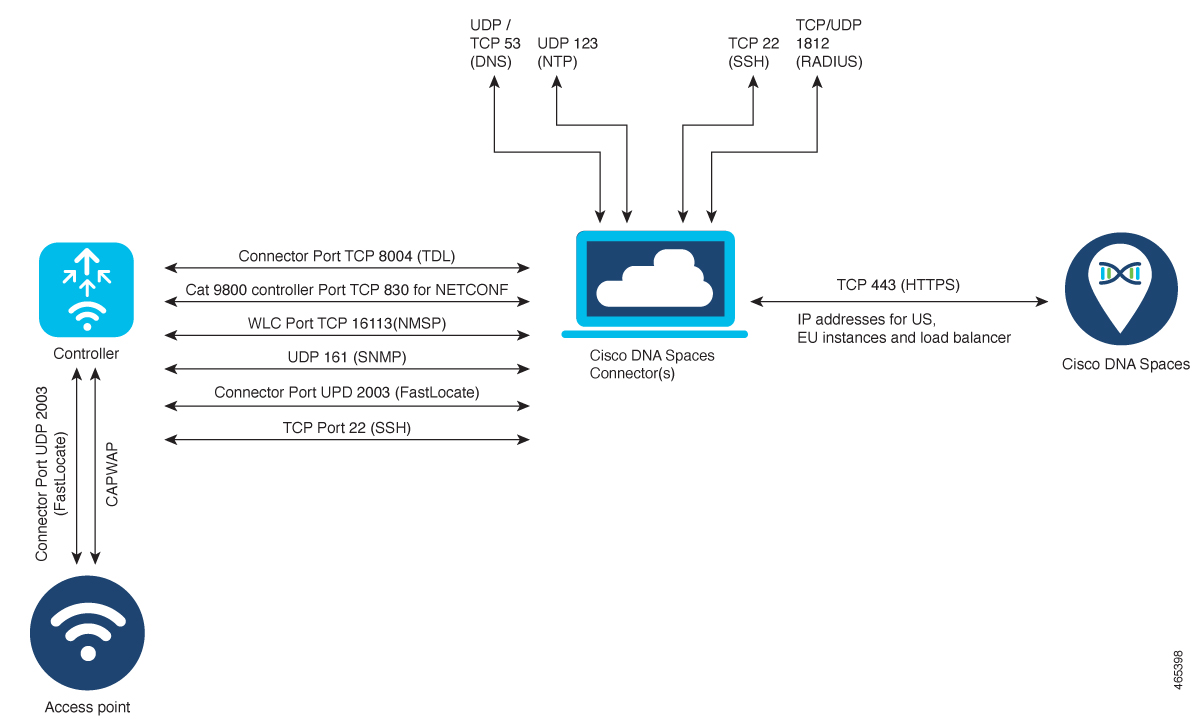
Connector Configuration – Access Points with BLE Gateway
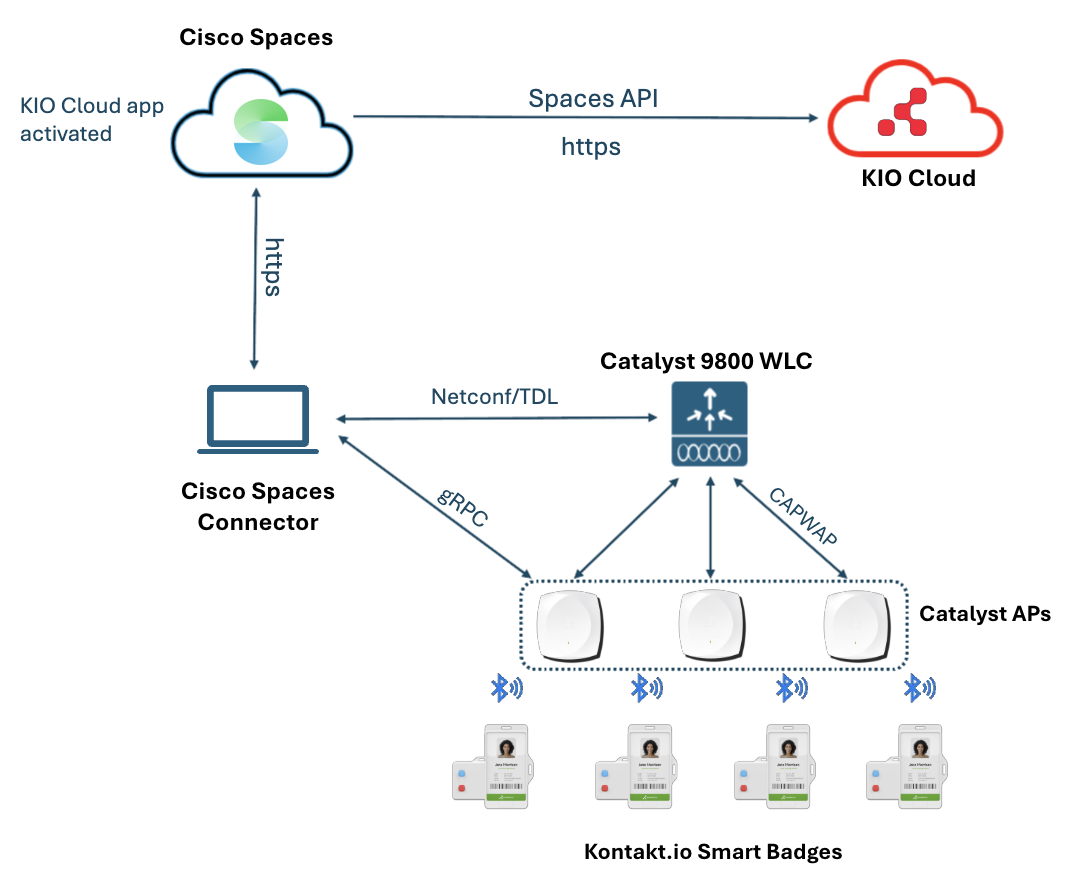
The architecture below illustrates the end-to-end flow of BLE telemetry from Kontakt.io Smart Badges through Cisco Catalyst infrastructure into Cisco Spaces, where location is calculated and event data is processed. Cisco Spaces then delivers real-time location and duress events to the Kio Cloud platform, which executes alerting, escalation, and incident management workflows.
HOW COMPONENTS INTERACT
The integration between Cisco Spaces and Kontakt.io for BLE-based Staff Duress is orchestrated through structured data flow between on-premises Cisco Catalyst infrastructure, Cisco Spaces Cloud, and the Kio Cloud platform. Cisco Spaces acts as the middleware layer, providing BLE telemetry ingestion, location computation, and event delivery to partner applications. This end-to-end flow enables real-time BLE telemetry ingestion, cloud-based X/Y location calculation, and delivery of duress alerts to the Staff Safe application. High Availability mechanisms within the Connector and cloud layers ensure continuous and resilient operation.
Once Smart Badges are activated and assigned to staff members, they begin transmitting periodic Bluetooth Low Energy (BLE) advertisement packets. These advertisements contain the badge MAC address, telemetry payload, and event indicators such as button press (duress activation).
Data Collection and Processing
Smart Badges function as Bluetooth Low Energy (BLE) transmitters. When assigned to staff members, each badge continuously broadcasts BLE advertisement frames containing a unique device identifier and telemetry data. If a staff member presses the duress button, the badge immediately includes a button press indicator within the transmitted BLE payload.
Cisco Catalyst Access Points equipped with BLE radios detect these advertisements. The Cisco Catalyst Access Points capture the badge MAC address, Received Signal Strength (RSSI), Timestamps and Telemetry payload. They function as BLE gateways, scanning and forwarding BLE advertisements and enabling communication between BLE devices and Cisco Spaces middleware.
BLE telemetry is forwarded from the access points to the Catalyst 9800 Wireless LAN Controller (WLC) over CAPWAP. The WLC aggregates telemetry from multiple APs and forwards BLE tag information to the Cisco Spaces Connector using gRPC.
For resilience, the Cisco Spaces Connector should be deployed as a VIP pair to provide redundancy. The Connector serves as the secure on-premises gateway that forwards telemetry to Cisco Spaces Cloud over encrypted HTTPS.
Cisco Spaces Cloud performs centralized processing of BLE telemetry. Upon receiving MAC and RSSI data from multiple access points, Cisco Spaces:
-
Decodes BLE telemetry payloads.
-
Associates badge identifiers with claimed devices.
-
Applies building and floor context using Digital Pro maps (CAD-based via AnyLocate) or network-derived maps.
-
Executes multi-AP RSSI triangulation using the Cloud Location Engine.
-
Calculates real-time X/Y coordinates for each Smart Badge. For accurate X/Y location, each badge should be detected by at least three access points with consistent RSSI levels.
Application Workflow
When the KIO Cloud Partner Application is activated in Cisco Spaces, the following information is transmitted to KIO Cloud via the Cisco Spaces API.
-
BLE X/Y coordinates
-
Device MAC address
-
Telemetry payload
-
Location hierarchy & contextual data
Kio Cloud platform hosts the Staff Safe application and performs the following functions:
-
Associates badge MAC addresses with staff identities.
-
Receives button press / duress events and generates active duress alerts.
-
Correlates real-time location with staff identity.
-
Routes alerts to configured responder groups and executes escalation policies.
-
Provides dashboards and reporting.
Alert acknowledgement, escalation, and resolution are managed within Kio Cloud.
For environments requiring deterministic threshold detection (e.g., secure units or controlled entry points), Portal Beams may be deployed. Portal Beams detect Smart Badge proximity at short range and generate entry or exit events. These events are transmitted directly to Kio Cloud over secure outbound connections and enhance workflow logic within the Staff Safe application.
Delivery of Duress Alerts and Notifications
The Kontakt.io Staff Safe application processes duress events based on key contextual parameters, including:
-
The unique identifier of the Smart Badge (associated staff member)
-
The location of the event
-
The type of button press (e.g., emergency vs non-emergency)
Once these conditions are evaluated, Kio Cloud generates alerts and distributes them through configurable notification channels. These may include dashboard alerts, mobile notifications, email, or integration with external systems via webhook APIs.
Each alert includes critical context required for rapid response:
-
Identity of the staff member initiating the alert
-
Real-time location as determined by Cisco Spaces
-
Timestamp of the event
-
Severity level based on button configuration
In healthcare environments, duress alerts are typically routed to internal response teams such as hospital security, unit supervisors, or rapid response teams. Alert workflows are aligned with organizational policies and may vary by department, location, or severity level.
Where required, Kio Cloud can integrate with enterprise communication and notification platforms to extend alert delivery. These integrations enable organizations to notify additional stakeholders or escalate incidents through existing communication systems. Some examples of these systems are: CriticalArc, Singlewire, 911Cellular, RapidSOS, Everbridge
This flexible notification model allows healthcare organizations to tailor response workflows to clinical operations while ensuring timely and coordinated incident response.
Operational Responsibility Model
The solution architecture maintains clear ownership boundaries
-
Cisco Infrastructure and Cisco Spaces are responsible for BLE telemetry ingestion, location calculation, and API-based data delivery.
-
KIO Cloud is responsible for staff safety workflows, alert processing, escalation logic, and application-level functionality.
This separation ensures scalability, clear support alignment, and predictable operational behavior across infrastructure and application domains.
INSTALLATION AND CONFIGURATION STEPS
The following steps outline the end-to-end deployment and configuration process across Cisco Spaces and Kontakt.io platforms.
Cisco Spaces Configuration Steps
-
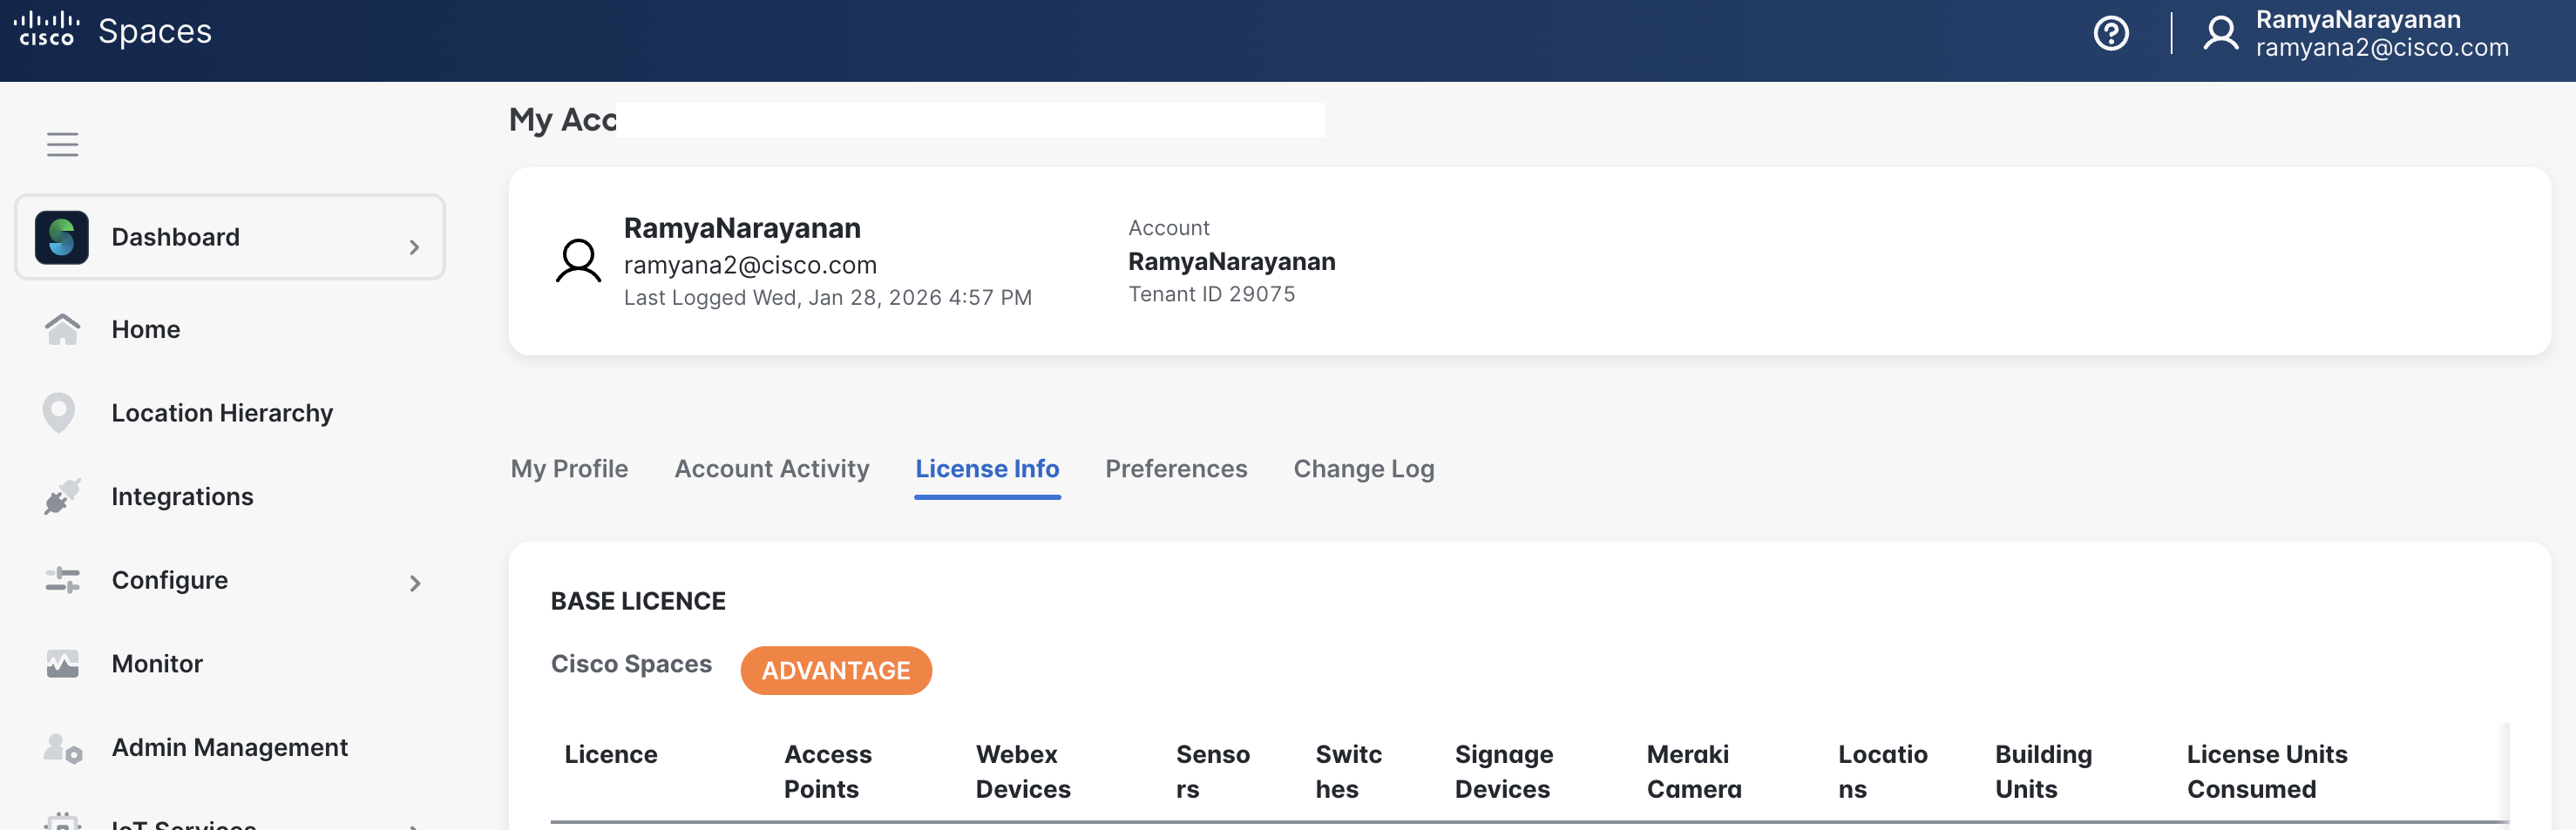
Confirm that the Cisco Spaces license is active
-
Login to your Spaces account and navigate to My Account section.
-
Navigate to License Information section to verify status.
-
-
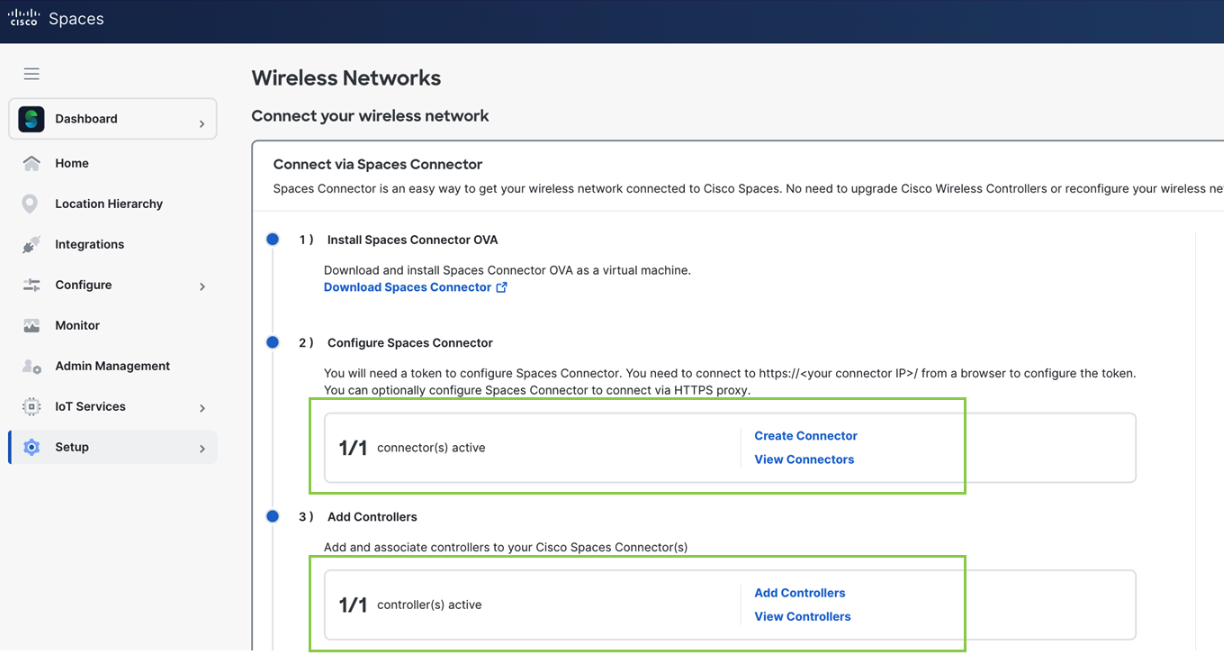
Follow the OS Runbook to install Spaces Connector on VM and add Catalyst WLC
-
Confirm that the Cisco Spaces Connector and Catalyst Controller are active.
-
-
Cisco Catalyst Center or Prime Infrastructure Floor Maps Configuration
-
Log in to Cisco Catalyst Center or Prime Infrastructure web interface.
-
Navigate to Design > Network Hierarchy (Catalyst Center) or Maps > Site Maps (Prime Infrastructure) and select your building.
-
Add or edit floors with accurate details including floor name, floor number, floor type, and floor height (typically 10-12 feet).
-
Upload floor map files using CAD (.dwg, .dxf preferred) or image formats (.png, .jpg, .pdf)
-
Set map scale and dimensions by entering actual building length and width, or use the span-and-measure tool to click two known points and enter the actual distance - this is critical for location accuracy.
-
Define RF attenuation by marking walls, obstacles, and materials (thick walls, regular walls, glass, doors) to improve location accuracy.
-
Place Access Points on the map at their exact physical mounting locations and assign to correct floors.
-
Add GPS markers (minimum 3-4 markers, at least 20 meters apart) for proper geo-alignment.
-
Verify synchronization by logging into Cisco Spaces and navigating to Setup > Locations & Maps to confirm all floors, maps, and APs appear correctly.
Reference Documentation
-
-
Claim the Smart Badge in Cisco Spaces
a. Verify that IoT services is enabled for your tenant. If not, reach out to the Cisco Spaces team to help enable IoT services.
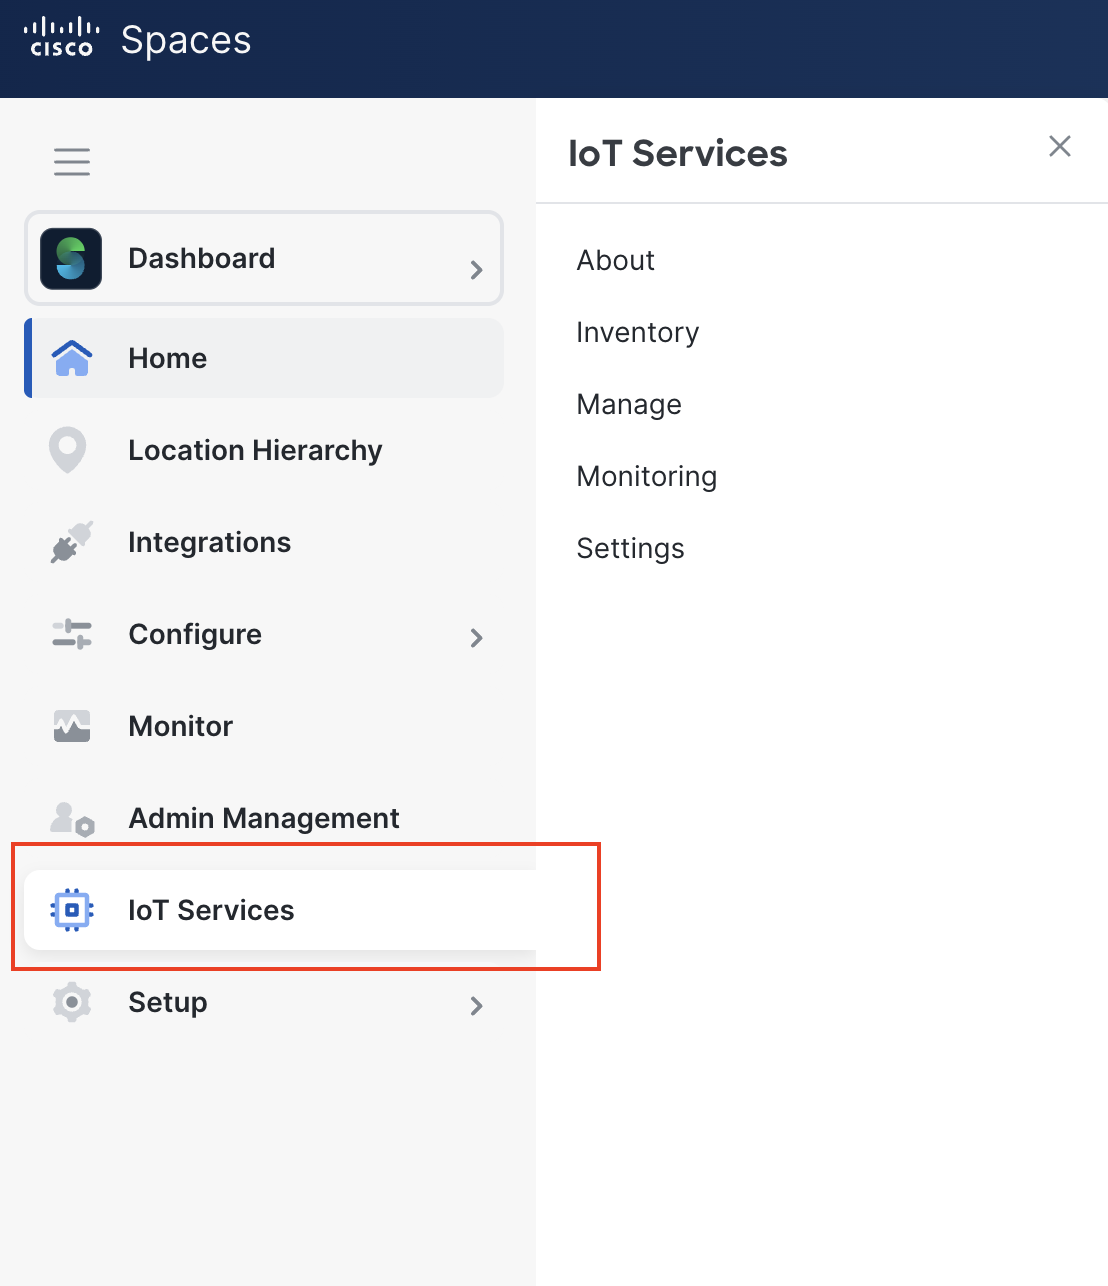
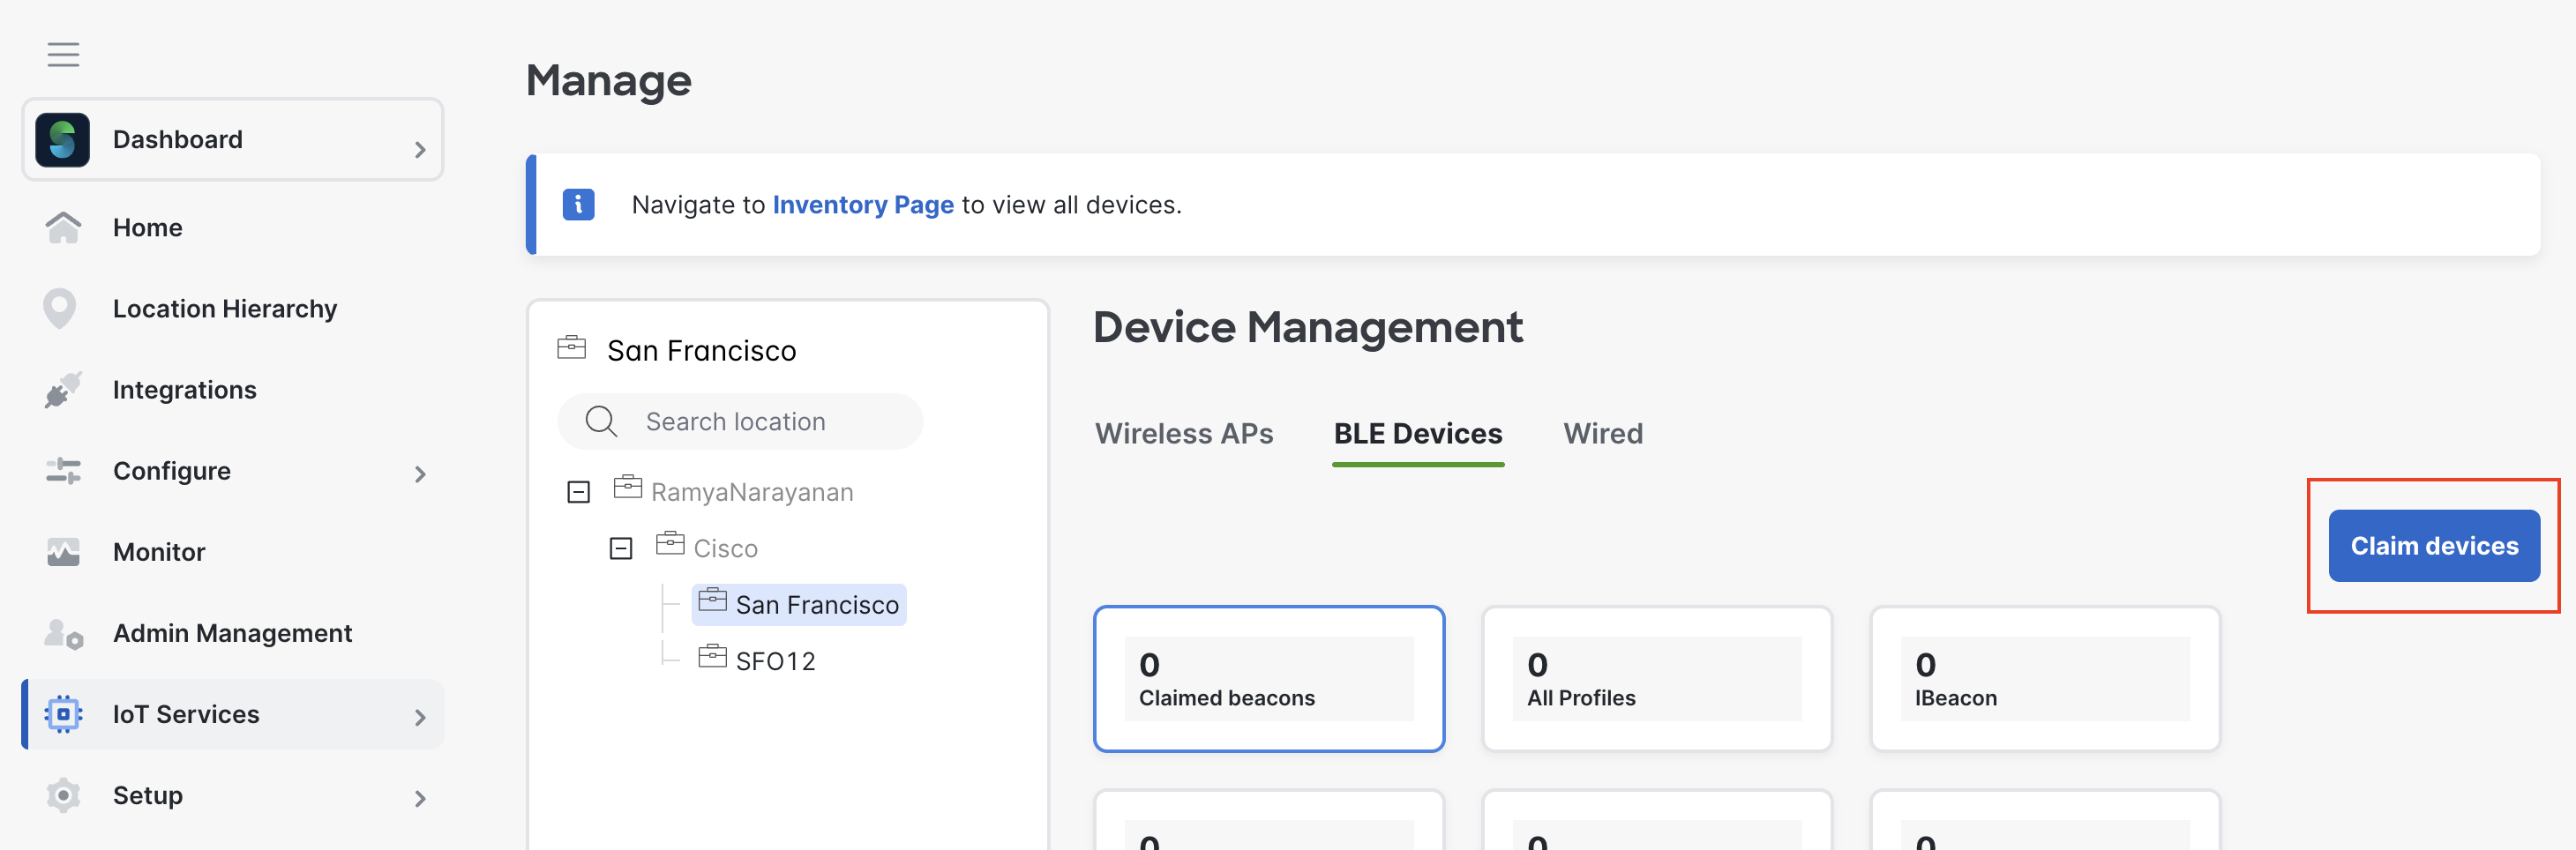
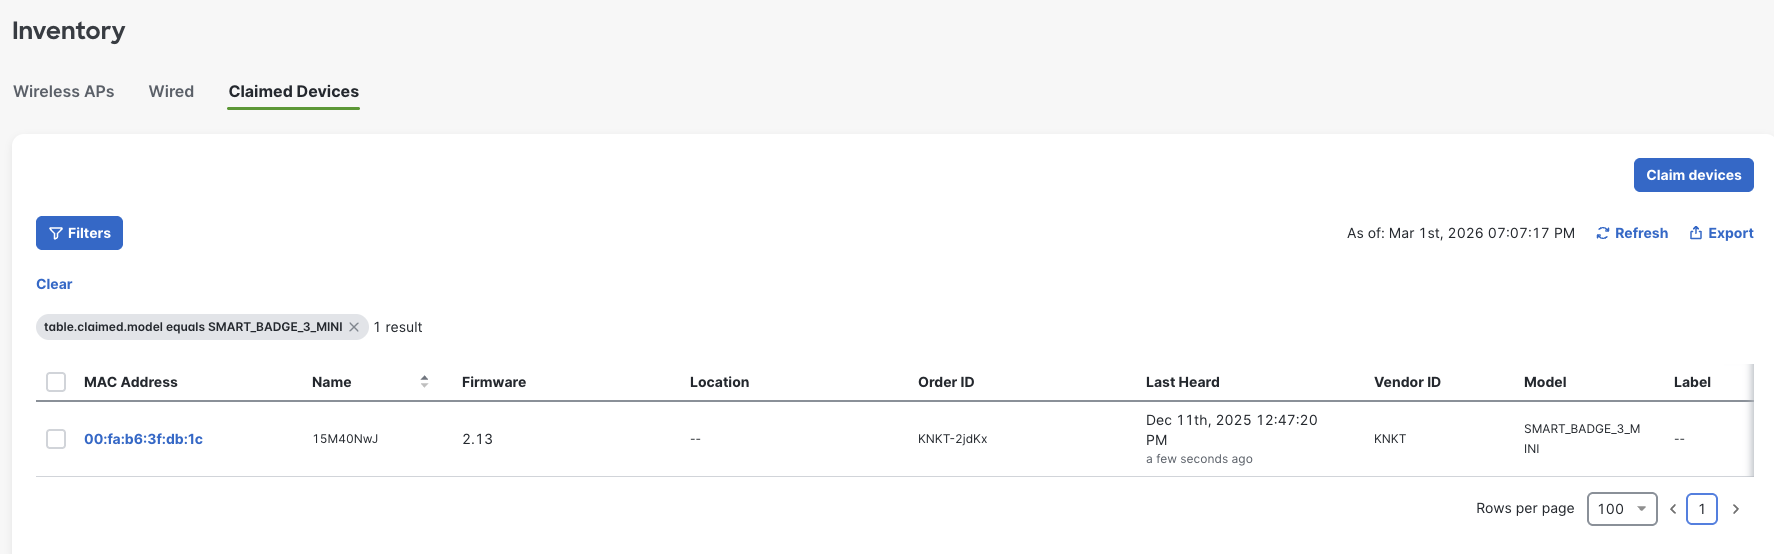
b. Navigate to IoT Services, Manage and select a location. Select the BLE devices tab and click on Claim devices.
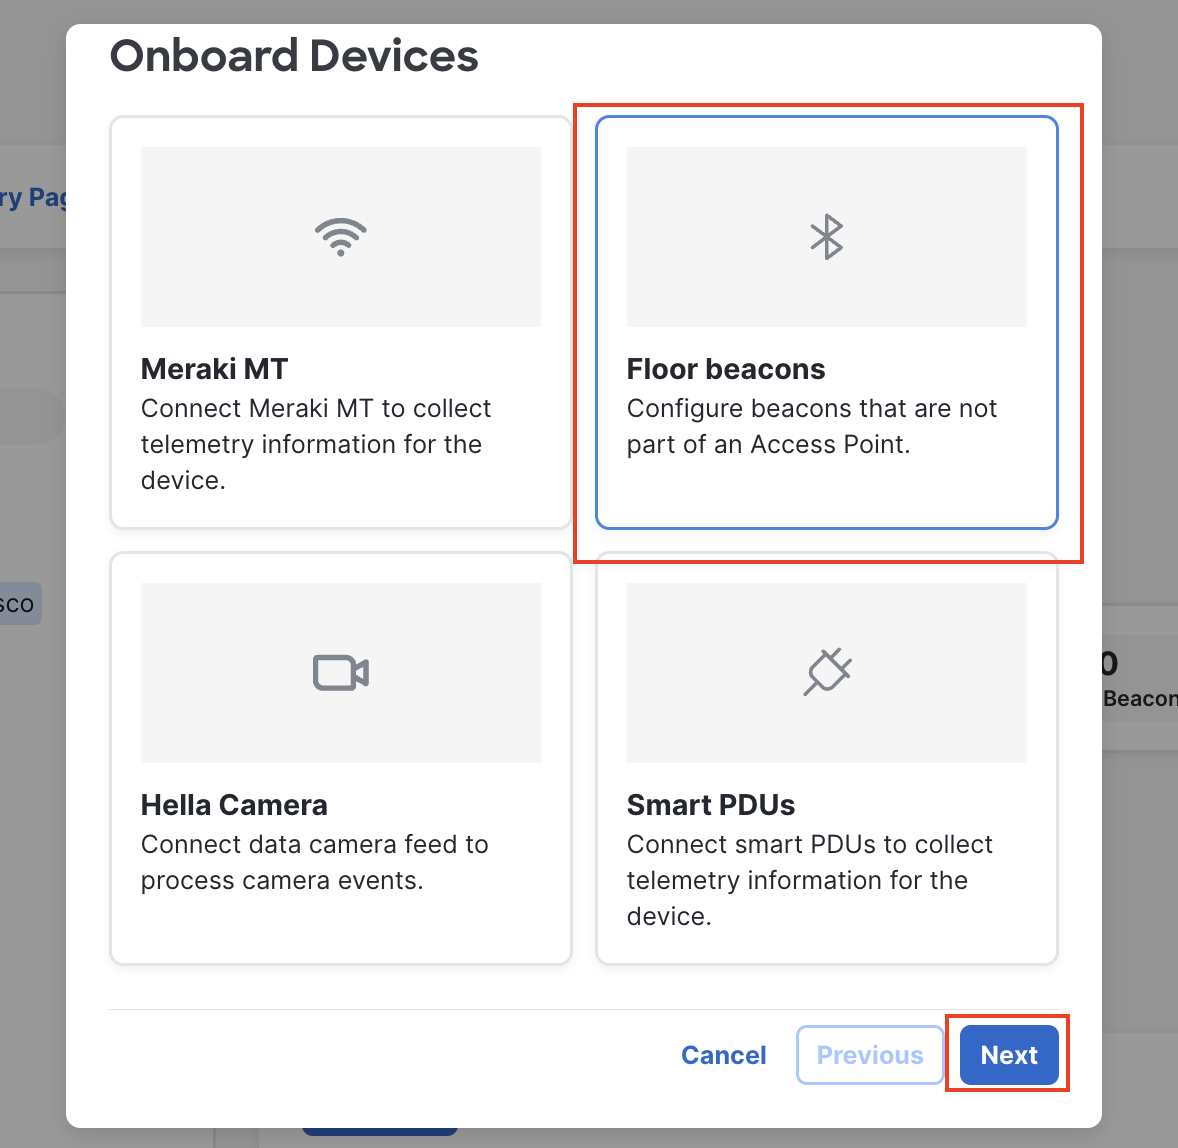
c. Select Floor Beacons and click Next.
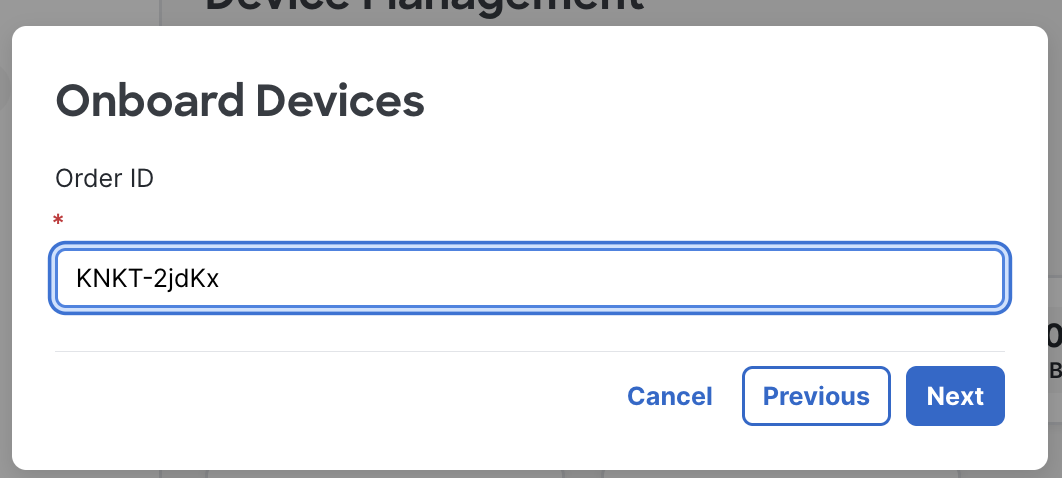
d. Enter the Kontakt.io Order Id in the next screen and click Next. The devices part of this order should be onboarded.
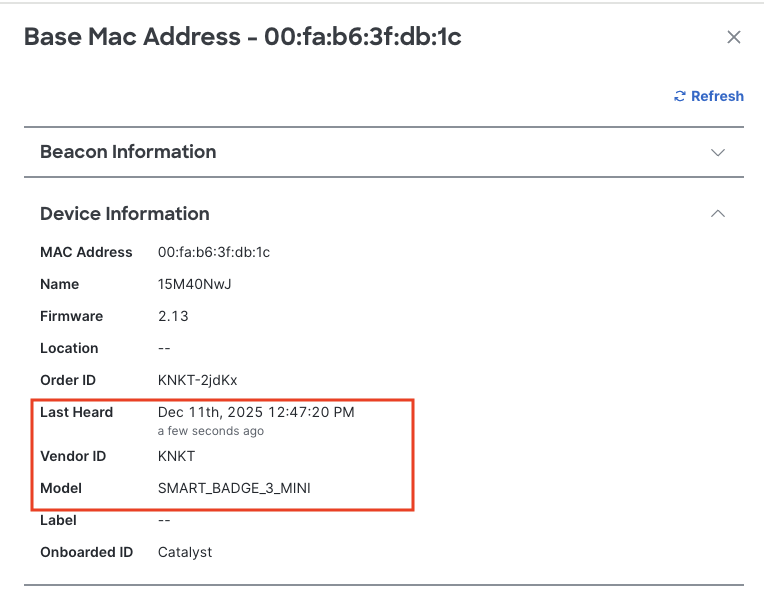
e. Once the devices have been onboarded, click on the mac address to view the Device Information. Make sure that the devices are turned on and the Last Heard timestamp is “a few seconds ago“. If not, reach out to the Cisco Spaces partner team or Kontakt.io support team.
By default, devices are shipped with its power turned OFF.
Refer to the below articles to power on a badge:
Smart Badge 3: https://support.kontakt.io/hc/en-gb/articles/19676429111580-Power-on-or-verify-a-Smart-Badge-3-is-powered-on
Smart Badge 3 Mini: https://support.kontakt.io/hc/en-gb/articles/21101784167324-Power-on-or-verify-a-Smart-Badge-3-Mini-is-powered-on
-
Dynamic Device Grouping for Smart Badges
-
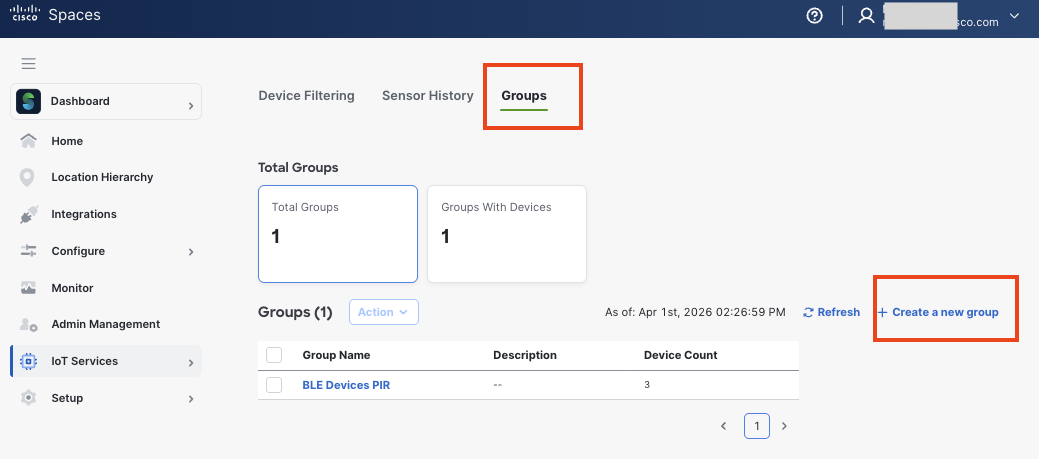
Navigate to IoT Services → Settings and click on the Group Tab.
-
Click on “Create a new group”
-
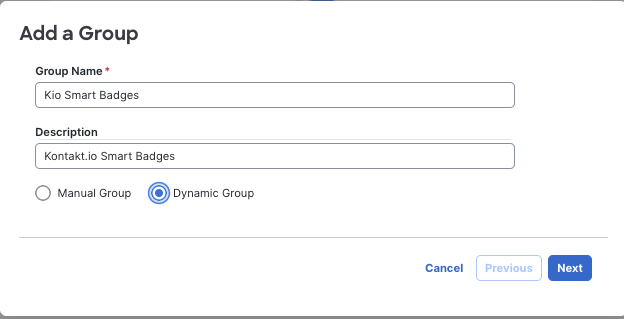
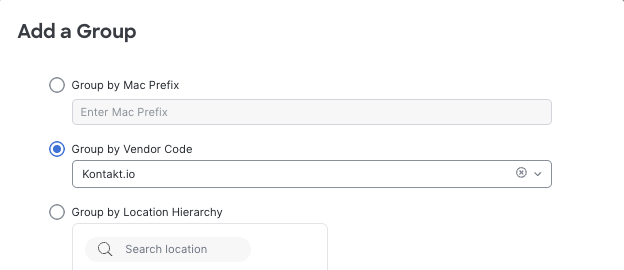
Select “Dynamic” is you would like to group all devices from Kontakt.io into one group. If you have other badges from Kontakt.io they would also be added to this group. Devices can also be manually by selecting MAC address from the list of wireless devices.
-
Select Group by Vendor Code and enter Kontakt.io and click on Next
-
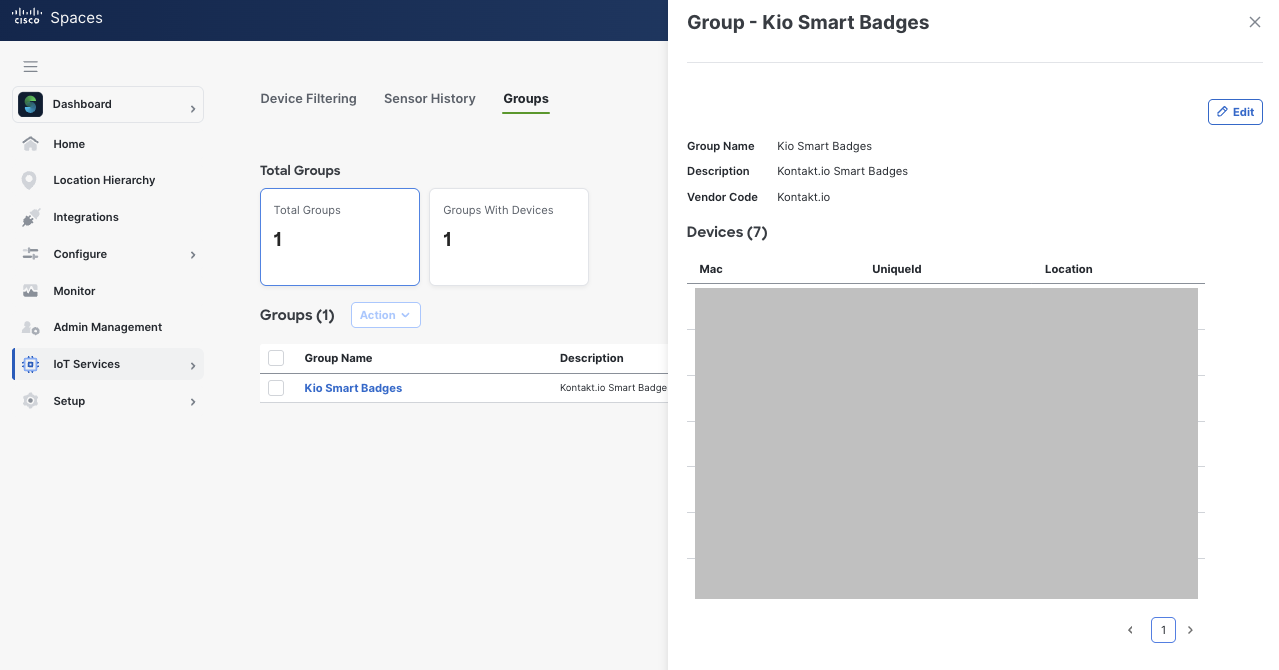
e. The group will have all the Kio Tags making it easier to filter them.
-
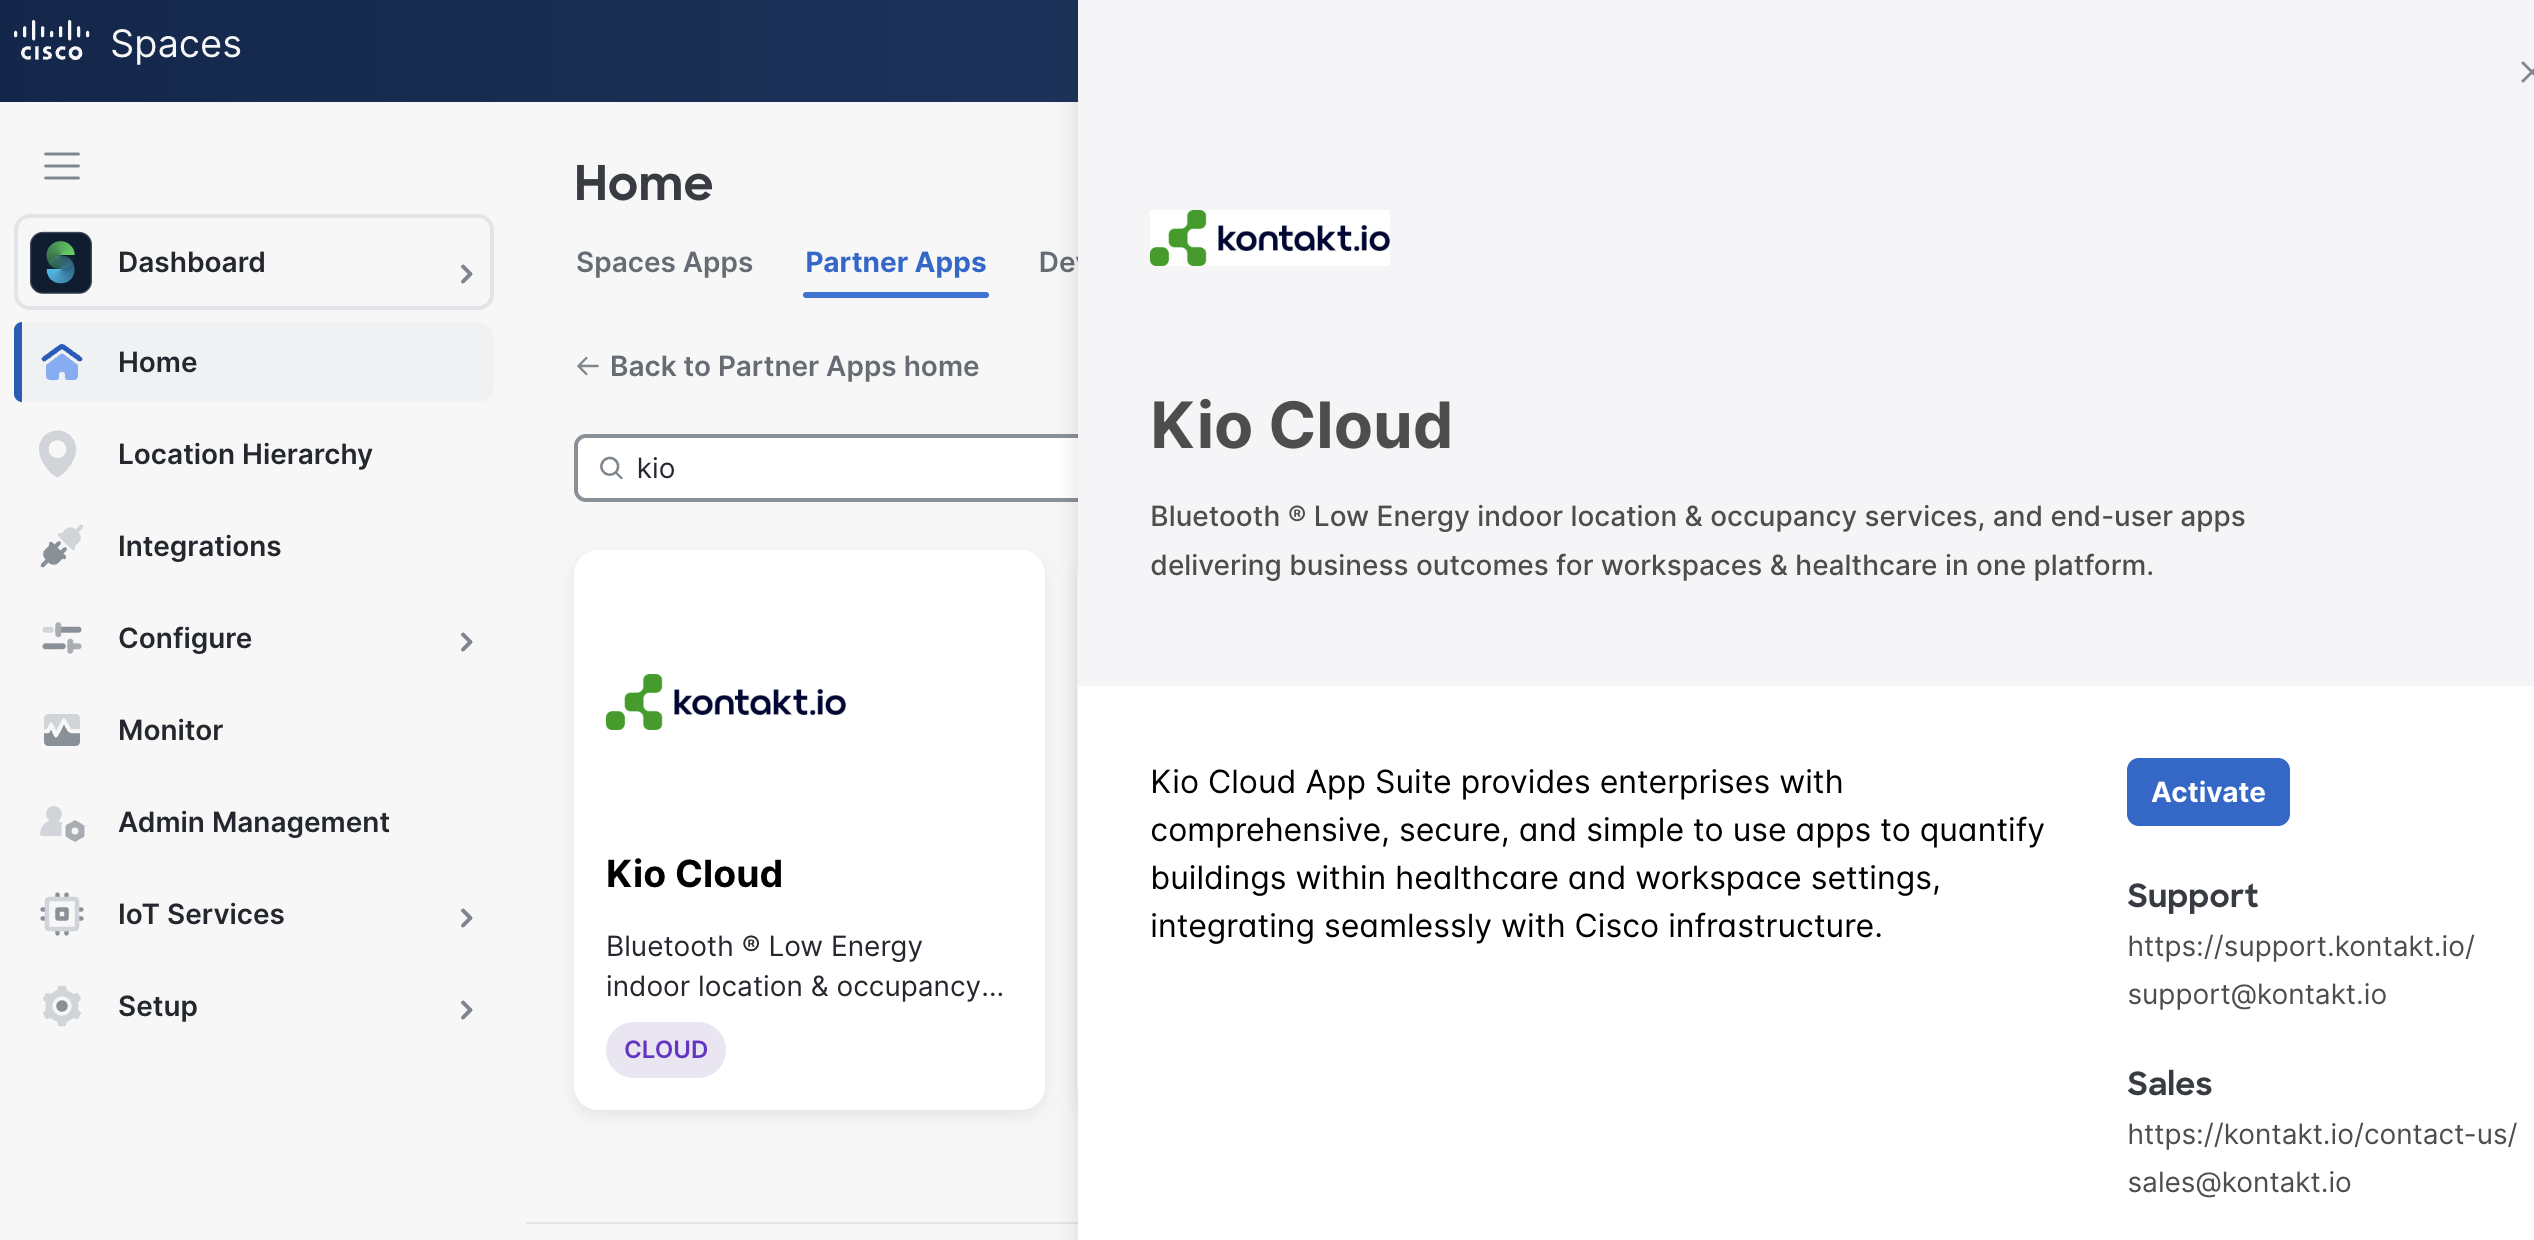
Activate KIO Cloud Partner App
-
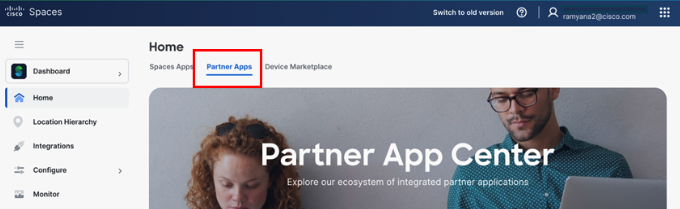
Navigate to the Partner Apps tab within the Spaces Dashboard
-
Click on Partner Apps and Search for “kio” and click on the Kio Cloud app tile. The app details should show up in a pane to the right.
-
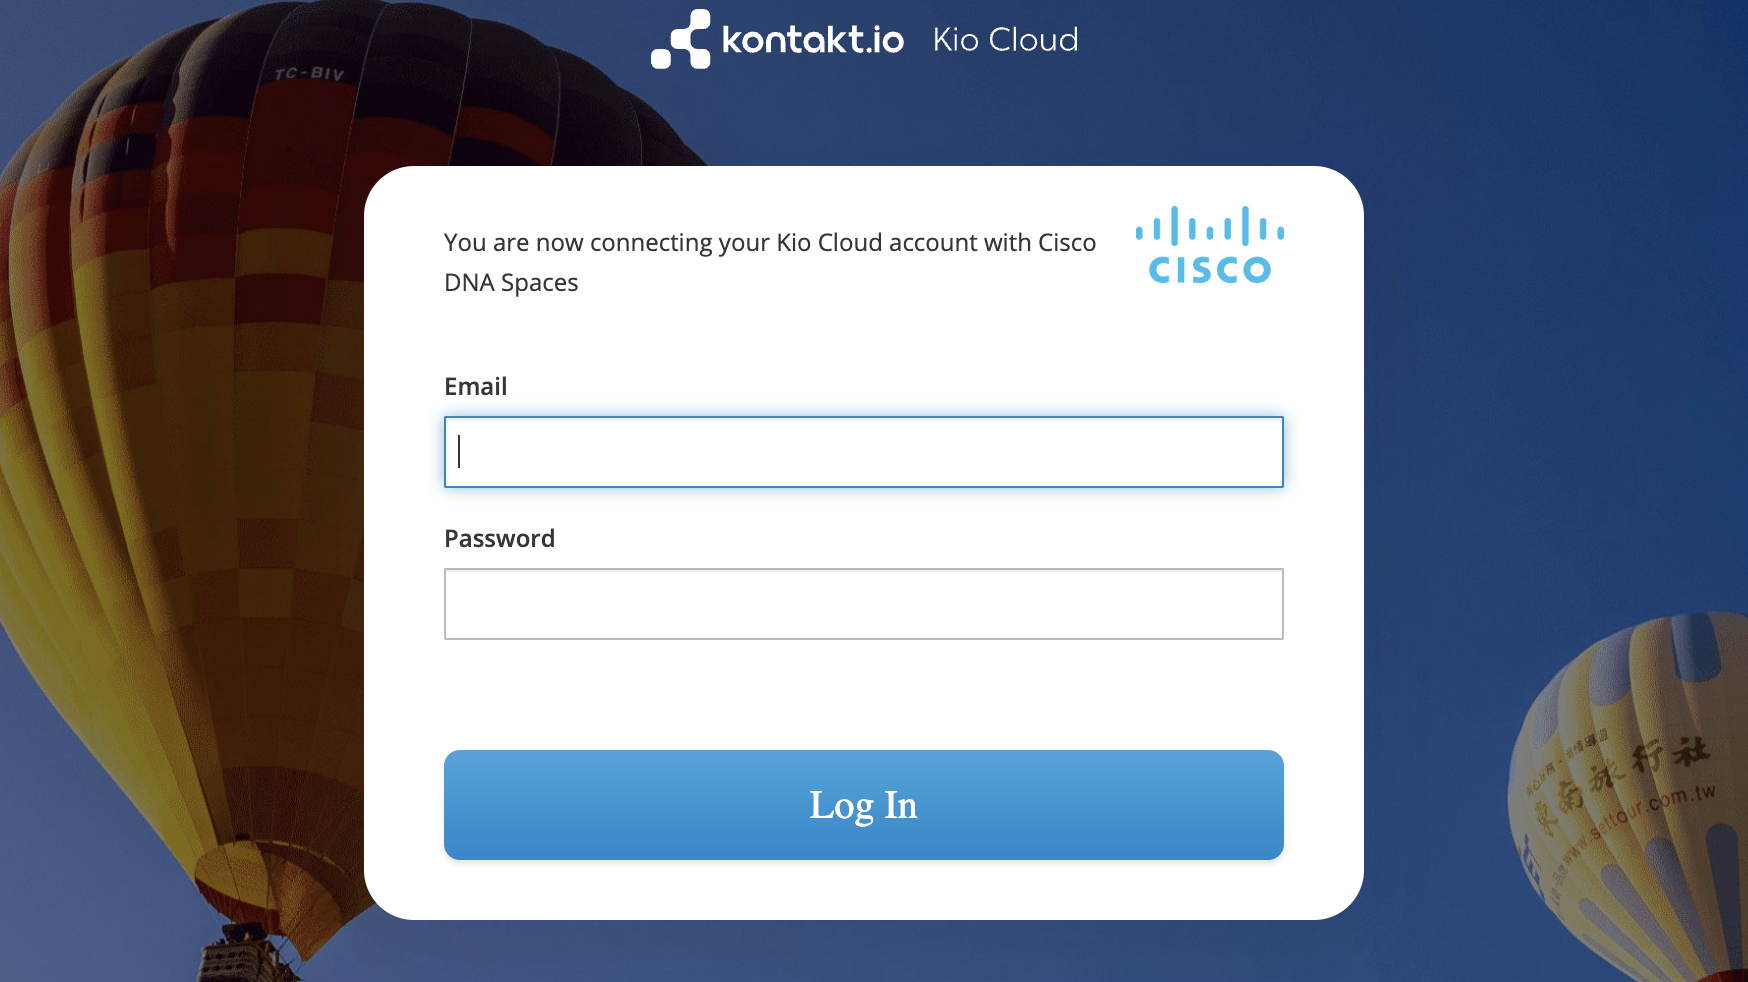
Click on Activate to start the activation process. Select “I have an existing account with Kontakt.io and have the credentials to sign in to their systems.“

-
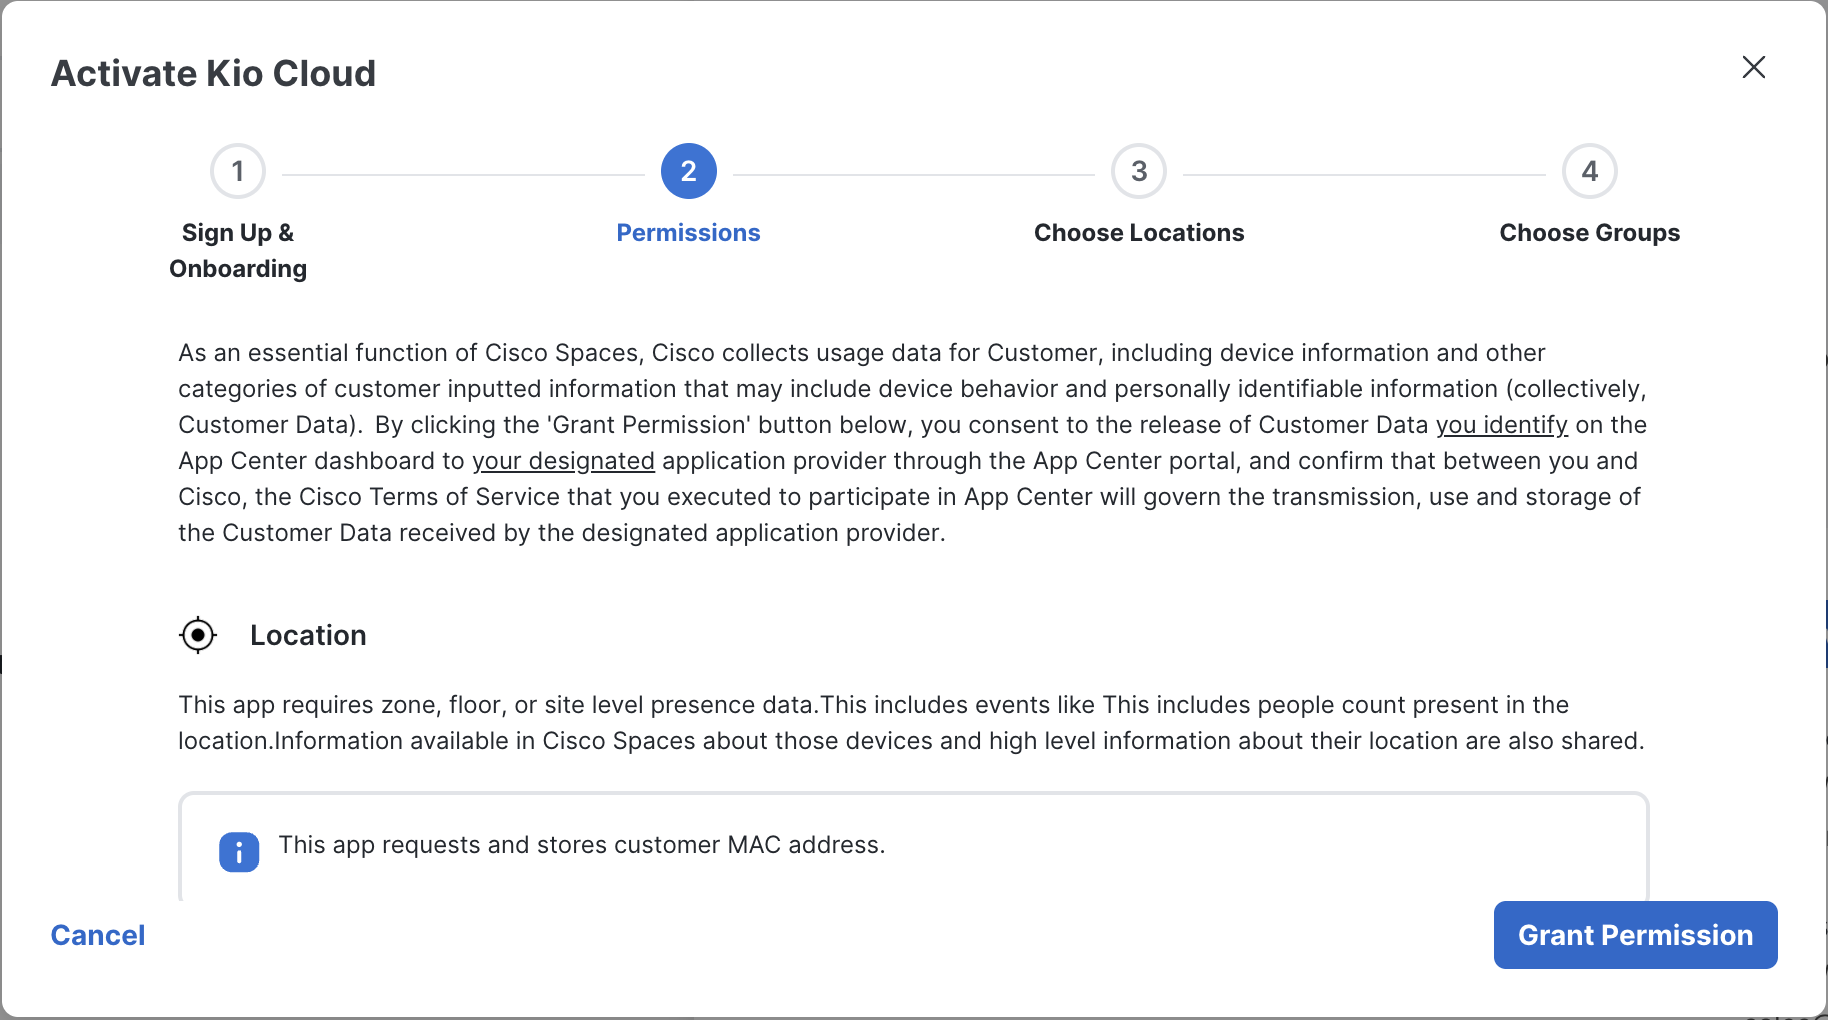
Review the permissions needed to activate the app and click on “Grant Permission”.
-
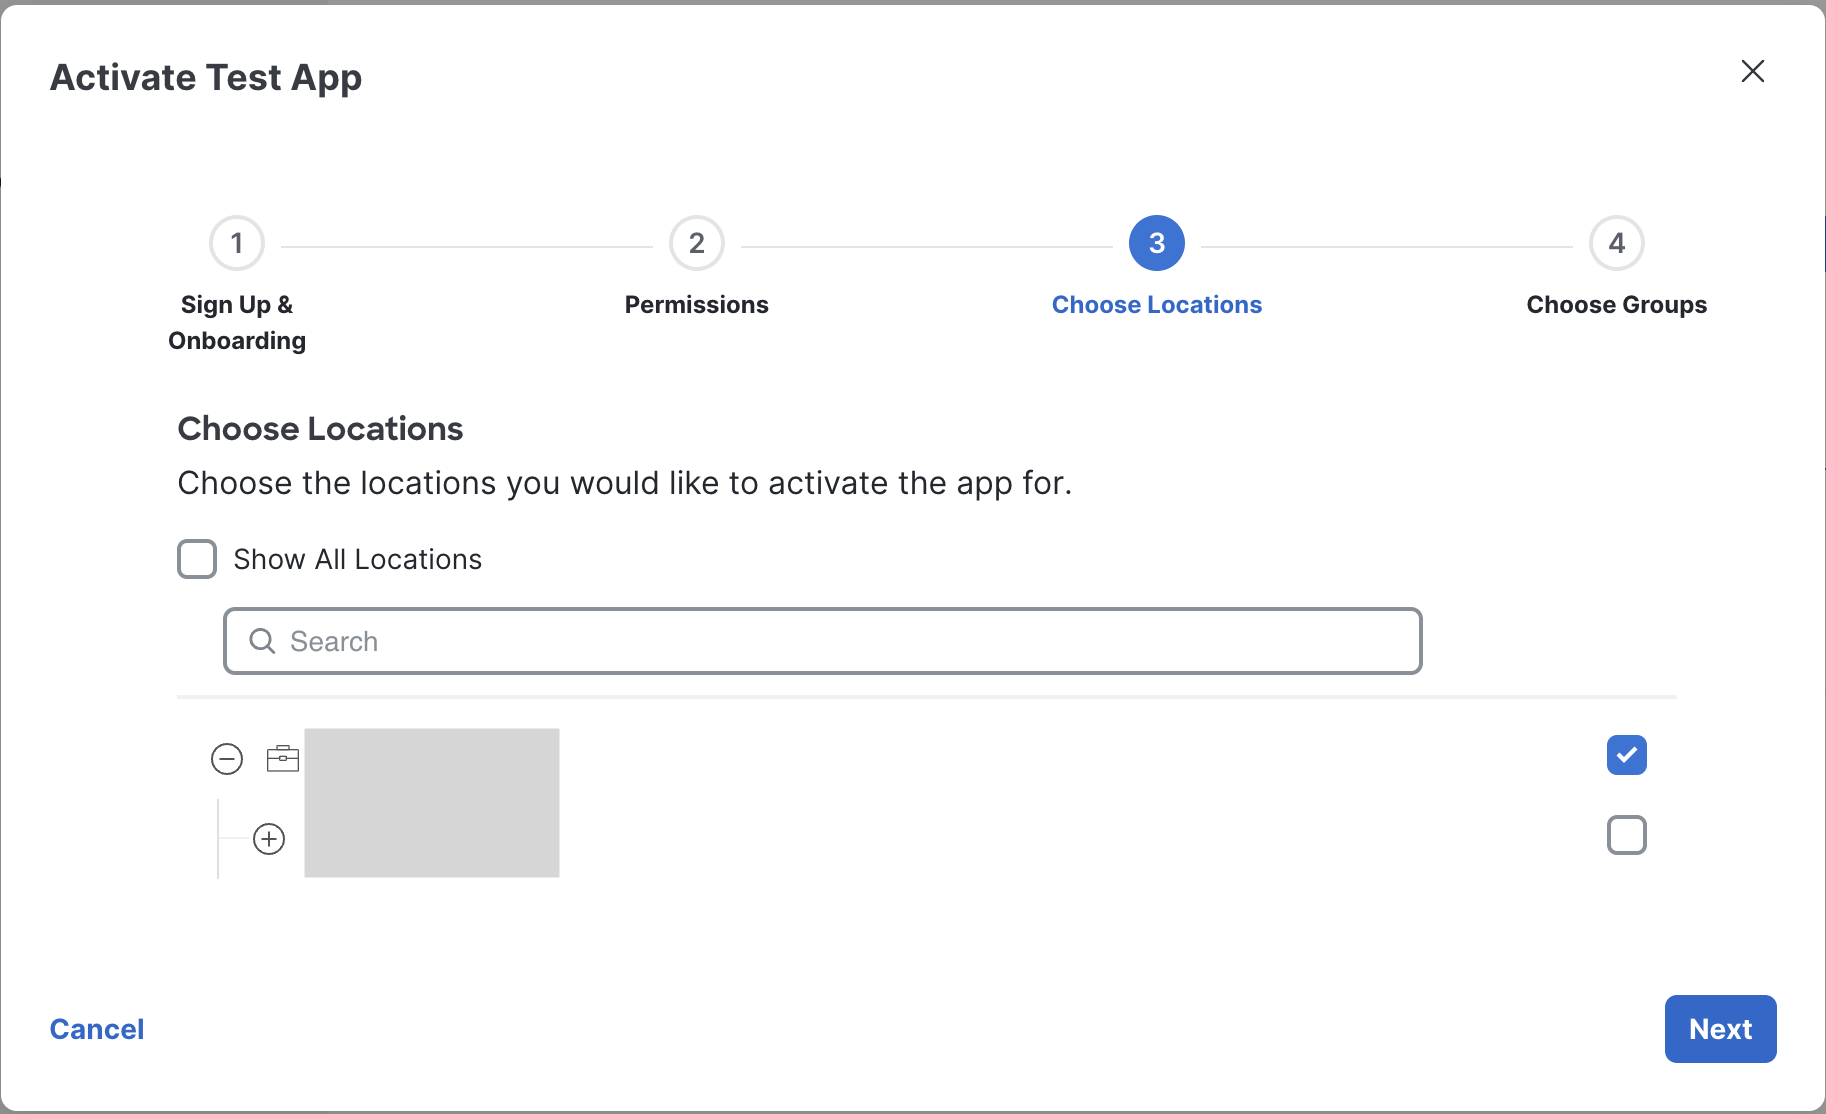
Select the locations and click on “Next”.
-
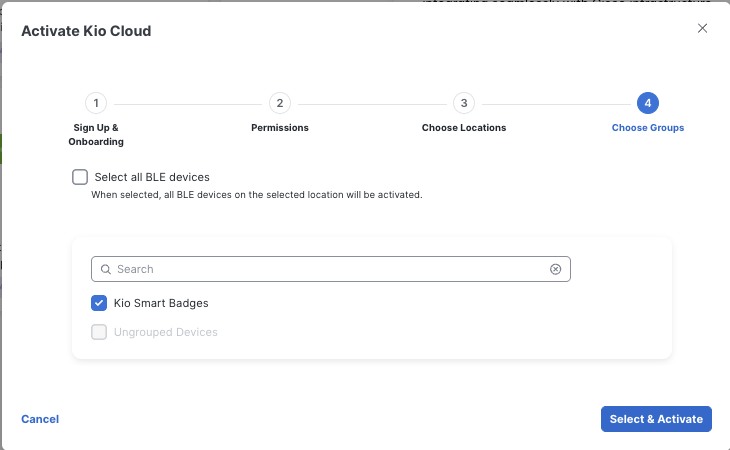
Select all BLE devices or select a group of KIO devices (recommended) and click on Select & Activate.
-
Enter the credentials to login to KIO Cloud. This step will connect Spaces Cloud and KIO Cloud.
-
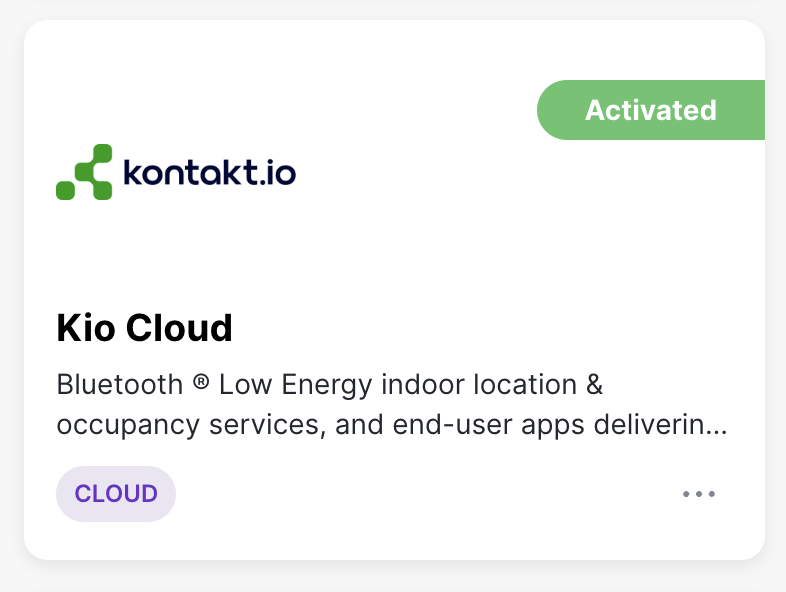
Navigate to Partner Apps tab on the dashboard and under Your Activated Apps section, verify if Kio cloud app is visible.
-
Kontakt.io Configuration Steps
-
Sign in to KIO Cloud account.
US region: https://app.cloud.us.kontakt.io
UK region: https://app.cloud.uk.kontakt.io
-
From the Kontakt.io Launchpad, select Device Management.
-
From the left menu, go to Add Devices > select Device Federation, enter in your Cisco Spaces Device Management API Key > select Create
-
Submit a map import request to Kontakt.io so that the Cisco Spaces maps are available in the KIO Cloud.
https://support.kontakt.io/hc/en-gb/requests/new -
KIO Staff Safe Application
For detailed Staff Safe setup and use, refer to https://support.kontakt.io/hc/en-gb/sections/17278582876444-Staff-Safe -
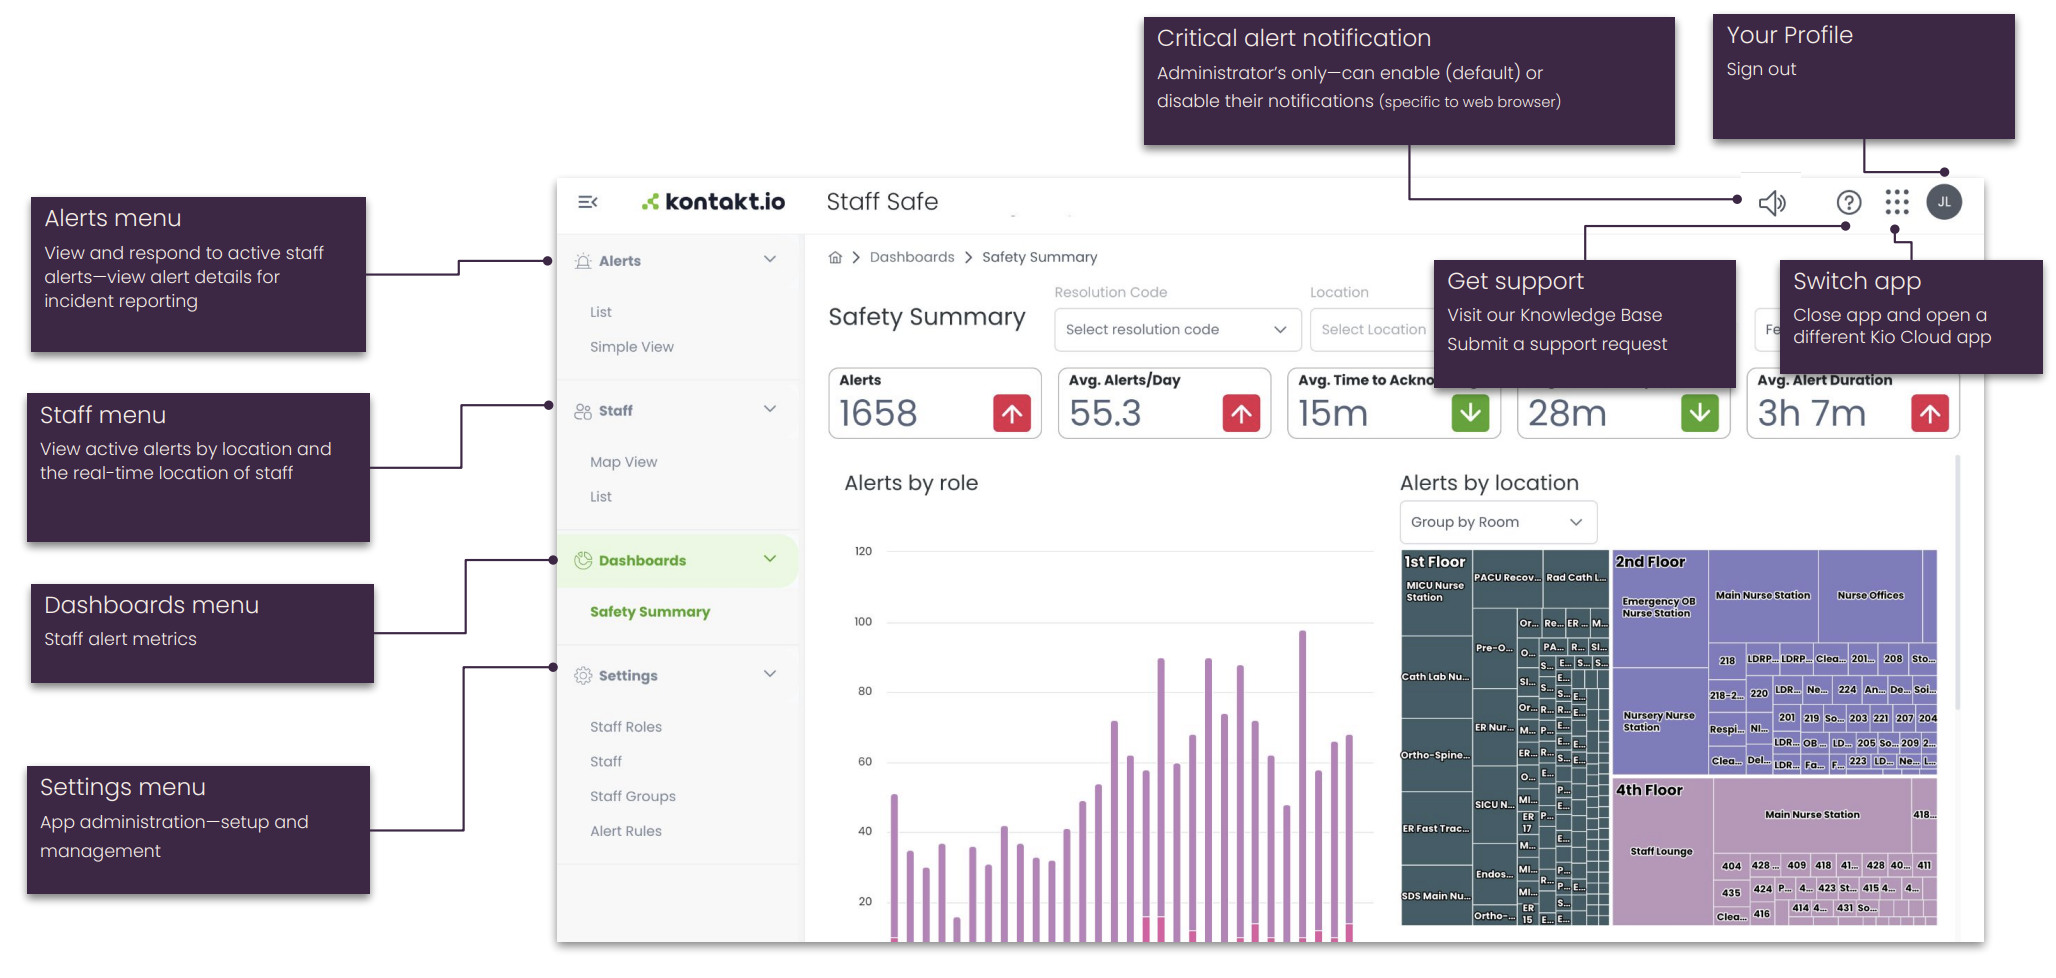
From your Kontakt.io Launchpad, select Staff Safe.
The menus displayed are determined by the Staff Safe roles assigned to your Kio Cloud user profile.
Refer to the Staff Safe roles article: https://support.kontakt.io/hc/en-gb/articles/17278599227292-Manage-user-access-to-Staff-Safe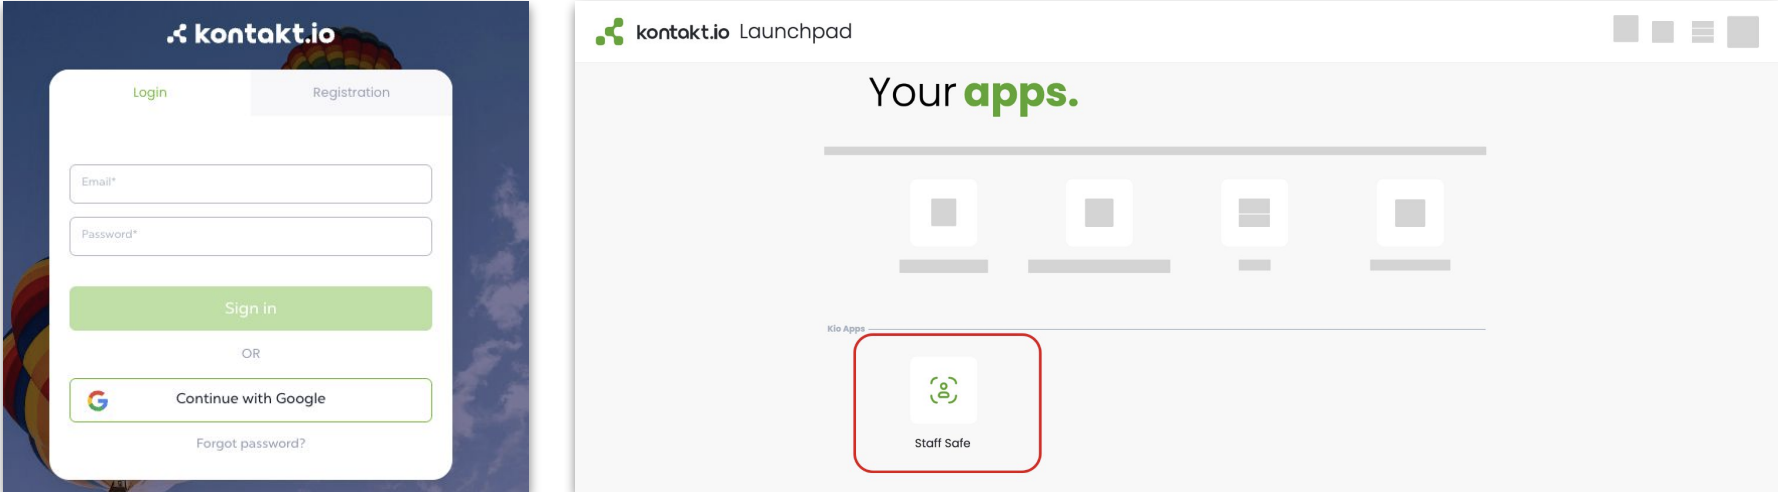
-
Create Staff Roles — staff are required to be assigned to a Staff Role. Roles also apply to metrics and can be assigned to Alert Rules.
-
Create Staff —those that will wear a badge
-
Create Staff Groups (optional) — when your deployment requires first-time response metrics and alert responders will also wear badges.
Related article: Manage staff
-
-
Create Alert Rules
Set up the alerting rules that define when alerts is triggered by a Smart Badge button press event including the blue, red, or any button, who the alert applies to (the staff wearing badges), the location including one to multiple Campuses and Buildings, and the who receives alert notifications (the responders).Based on the scope of your deployment, you may have one to multiple Alert Rules. If your deployment includes alerts sent to a third-party system, complete the Webhooks advanced setup.
How to create an Alert Rule:
From the Staff Safe Settings menu, select Alert Rules > Create Alert Rule > Button Click > the wizard guides you through each configuration step.
Related article: Manage Alert Rules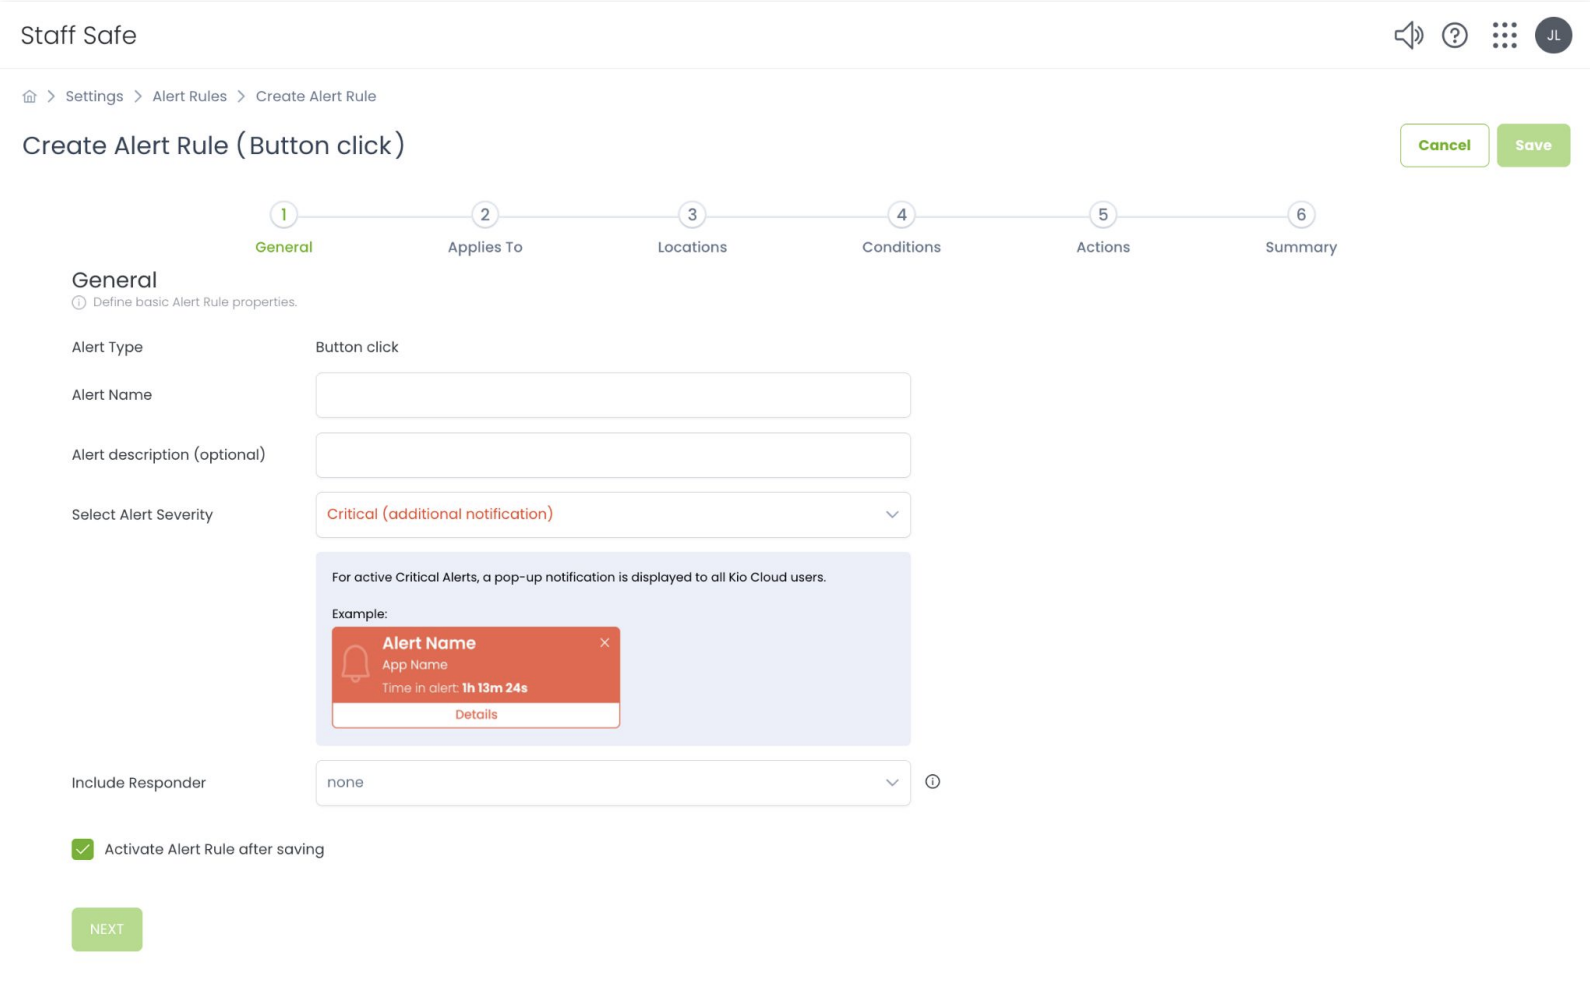
-
Add users
-
A user is someone who requires access to KIO Staff Safe, including administrators, responders, and stakeholders requiring access to metrics. The KIO platform uses role based access control (RBAC). Role assignment determines alert visibility, acknowledgement authority, dashboard access, and reporting capabilities. Roles must align with the organizationʼs safety and escalation policies
About Staff Safe Roles:-
Administrator: Full permissions.Best for users who manage all aspects of Staff Safe setup and configuration.
-
User: Access to staff and alerts.Best for users who manage staff, assign badges, and respond to alerts.
-
Alerts User: Access to alerts only. Best for users who view, acknowledge, resolve, and document alert activity.
-
Viewer: View-only access to alerts and dashboards on web and mobile. Best for users who need to monitor alerts, details, and analytics.
-
Mobile User: Access to the Kio Staff Safe Alerts iOS app only. Best for users who respond to and document alerts in the mobile app. Can be combined with Alerts User for web and mobile access.
-
-
How to add a user:
From your Kontakt.io Launchpad, select Users > Add User > enter information > select Save (user will receive an email to set their password).
Next, assign their Staff Safe role. From the list, select their Name > click Edit > from the Kio Apps section, navigate to Staff Safe > select their role > click Save. Related article: Manage user access to Staff Safe
-
-
Assign badges to Staff (badge provisioning)
Each staff that will wear a badge to trigger a duress alert must be assigned to their Smart Badge. Only badges claimed in Cisco Spaces and synchronized via the Spaces API can be assigned to staff.How to assign a badge:
From the Staff Safe Settings menu, select Staff > select the staff’s Name > select Edit > from the Assigned Tag setting, select the Smart Badge MAC address > select Save.
Related article: Assign badge to staff from Staff Safe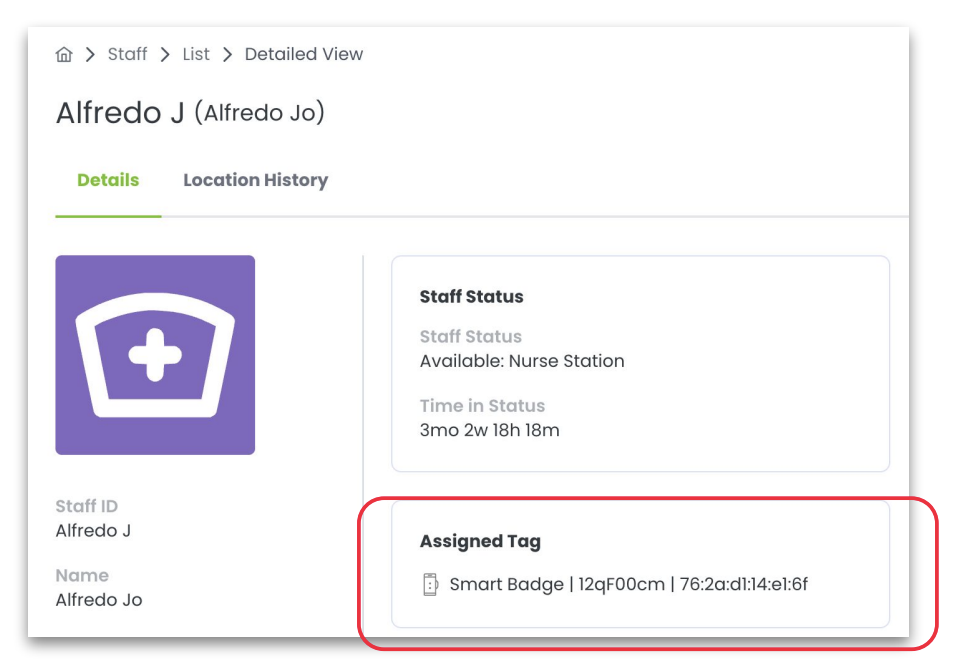
-
Validate dashboard and alert visibility
All active alerts are shown in the Simple View and Alerts List (active alerts). Navigate to Staff Safe Simple View and confirm that active alerts are displayed with correct staff identity and real-time X/Y location. Verify that alert state transitions function correctly, including Active, Acknowledged, and Resolved statuses. Ensure that historical incidents are logged and accessible for reporting. Confirm that responder users have appropriate visibility and permissions based on their assigned roles.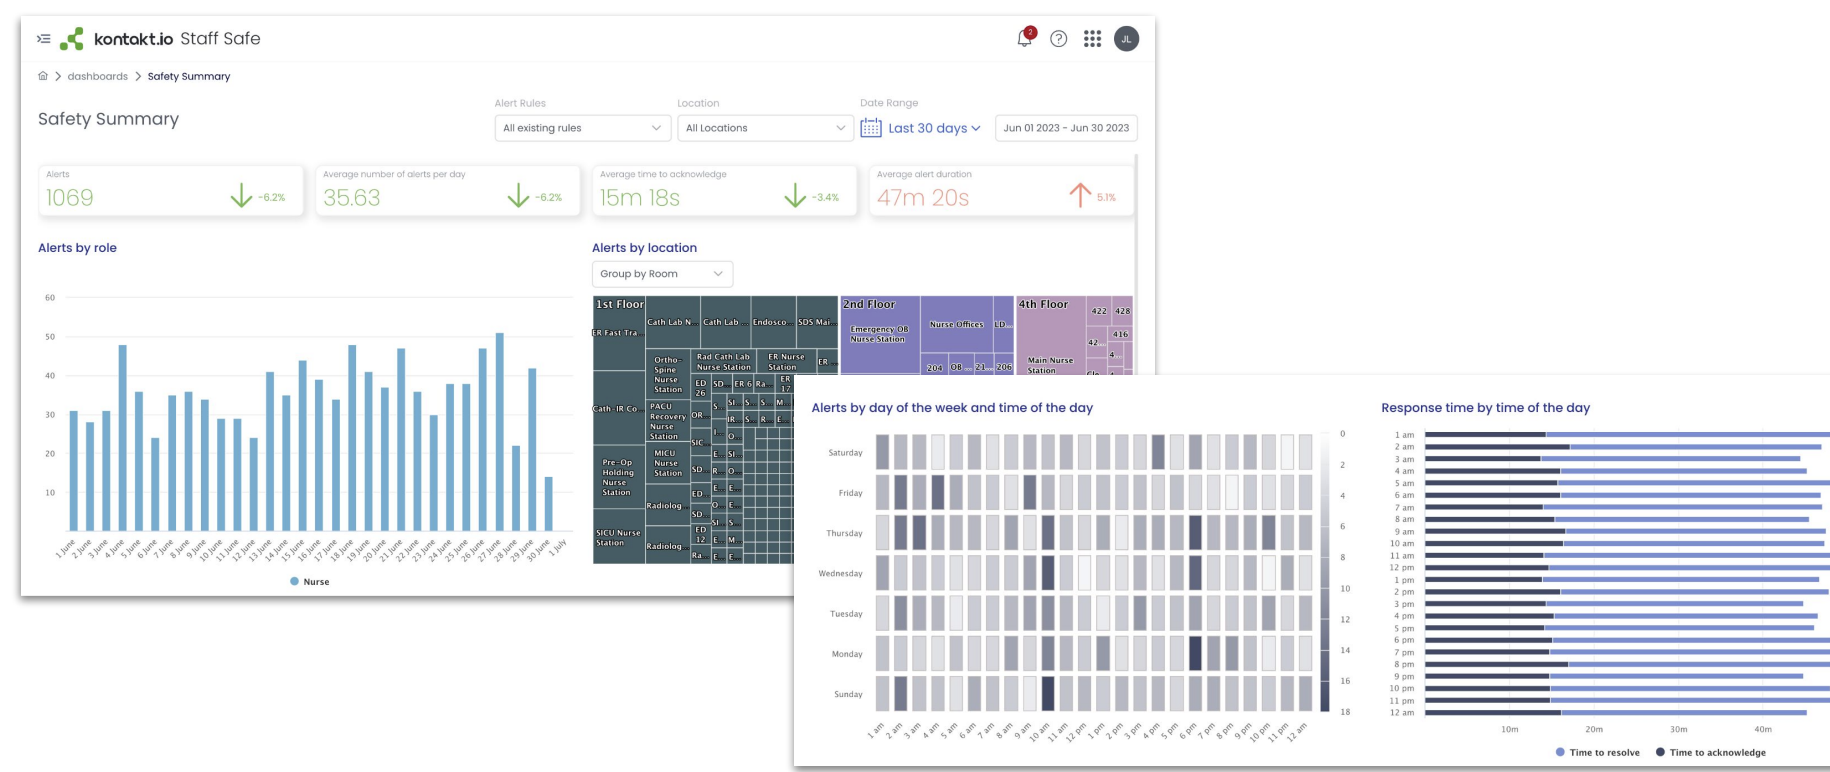
-
Configure Portal Beams (Optional, If Deployed)
If Portal Beams are deployed, navigate to Device Management → Infrastructure and verify that each Beam is online and assigned to the correct floor and location. Configure boundary detection parameters and associate Beam-generated events with relevant alert rules if zone-based escalation is required.
INTEGRATION VALIDATION CHECKLIST
-
Verify Cisco Spaces License and IoT Services Status
Confirm that the Cisco Spaces license is active and that IoT Services are enabled.
-
Confirm BLE Telemetry Ingestion
In Cisco Spaces IoT Services, verify that Smart Badge devices appear in inventory and that BLE message rates are visible. Confirm that “Last Heard” timestamps are updating in real time.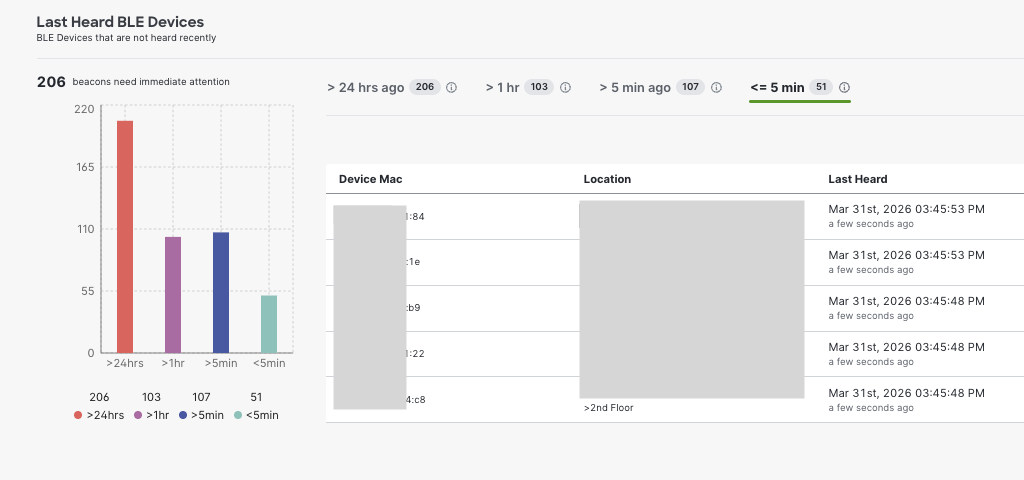
-
Validate Map Synchronization and AP Placement
Confirm that building and floor maps are correctly synchronized in Cisco Spaces and that access points are properly placed. Verify that the location hierarchy reflects the expected structure.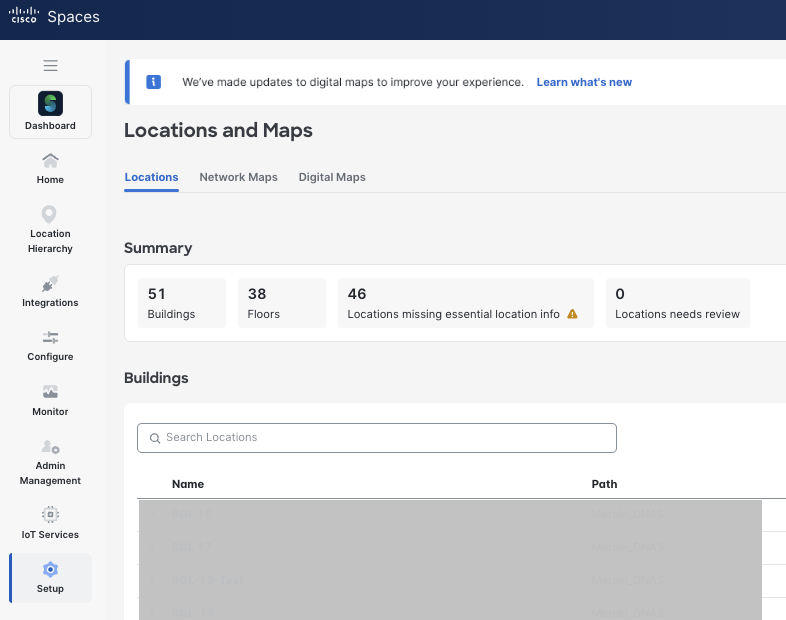
-
Validate Real-Time Location in Cisco Spaces
Using a test Smart Badge, confirm that location updates appear correctly on the map and that movement is reflected in near real time. -
Confirm Kio Partner App Activation
In Cisco Spaces, verify that the Kio Cloud Partner App appears under “Activated Apps” and that the correct locations and devices were selected during activation.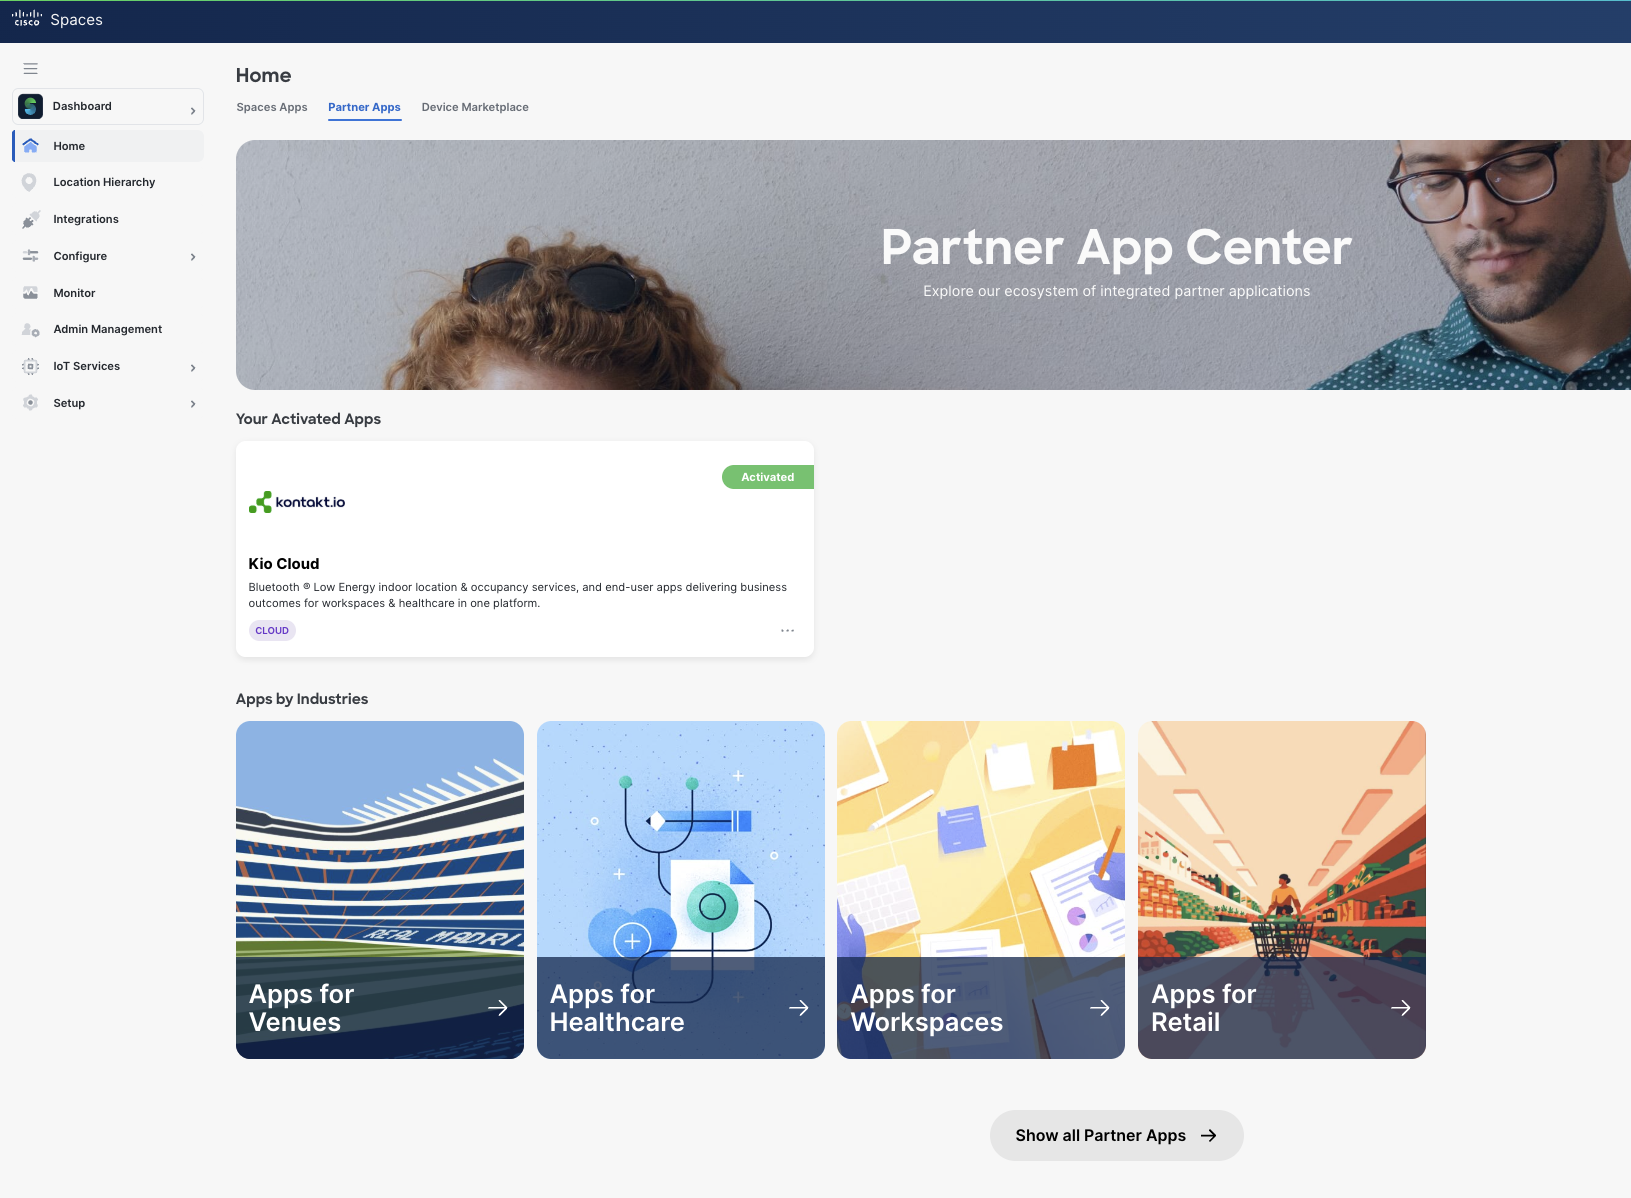
-
Verify Device Synchronization in Kio Cloud
Log in to Kio Cloud and confirm that Smart Badge MAC addresses are visible under Device Management. Verify that device status and last-seen timestamps are updating. -
Validate Staff-to-Badge Mapping
Confirm that each Smart Badge is assigned to the correct staff profile and that each staff wearing a badge is assigned to a badge (Assigned Tag within their profile). -
Perform Duress Button Test
Press the duress button on a test badge and verify that an alert is generated in the Staff Safe Simple View. Confirm that staff identity and real-time location are correctly displayed. -
Validate Alert Routing and Escalation
Confirm that the alert is delivered to the assigned responder group. Allow the alert to remain unacknowledged to verify reminders and/or escalations set in the Alert Rule are activated (may vary based on configuration). Acknowledge and resolve the alert to confirm correct state transitions. -
Validate Button Press Event
Validate end-to-end button press event delivery from Cisco Spaces to Kio Cloud, ensuring alerts are generated successfully from BLE telemetry.
CAVEATS AND TIPS
The following considerations should be reviewed during design, deployment, and operational phases to ensure optimal performance of the Staff Duress solution.
Map Accuracy Directly Impacts Location Precision
Accurate floor maps and correct AP placement are critical to achieving reliable X/Y location calculation. Improper scale configuration, missing RF attenuation settings, or incorrect AP positioning will degrade location accuracy. CAD-based Digital Pro maps with properly calibrated dimensions are strongly recommended.
Access Point Density Affects Triangulation
BLE-based triangulation requires overlapping AP coverage. Areas with sparse AP density may experience reduced location fidelity. For high-risk zones such as behavioral health units or emergency departments, ensure sufficient AP overlap to support consistent multi-AP RSSI detection.
BLE Scanning Must Remain Enabled
BLE scanning must remain enabled on all Catalyst AP's serving protected areas. Changes to wireless profiles or radio configurations that disable BLE may result in loss of badge visibility.
Connector High Availability Is Strongly Recommended
For mission-critical staff safety deployments, deploy Cisco Spaces Connector in a VIP configuration. This prevents telemetry interruption in the event of a single Connector failure.
Badge-to-User Mapping Must Be Maintained
Each Smart Badge must be uniquely assigned to a single active staff profile. Reassignments during shift changes should follow a defined operational procedure. Periodic audits of badge assignments are recommended.
Battery Monitoring Is Operationally Critical
Low battery levels may result in reduced BLE transmission frequency or loss of telemetry. Administrators should regularly monitor battery status within Kio Cloud and establish a battery replacement schedule.
This solution is validated for Cisco Catalyst infrastructure with Cisco Spaces IoT Services. Hybrid architectures involving third-party BLE gateways outside this design are not supported.
TROUBLESHOOTING GUIDE
This section provides guidance for diagnosing common issues in a Staff Duress deployment.
Smart Badge Not Visible in Cisco Spaces
If a Smart Badge does not appear in Cisco Spaces IoT Services:
-
Confirm the device was successfully claimed using the correct Kontakt.io Order ID.
-
Verify BLE scanning is enabled on Catalyst access points.
-
Confirm the Spaces Connector is online and healthy.
-
Check that the Catalyst 9800 WLC is connected to the Connector.
-
Validate that firewall rules allow outbound HTTPS from the Connector to Cisco Spaces Cloud.
If the badge remains invisible after validation, refer the steps below to create a TAC case with Cisco Spaces.
Smart Badge Visible in Spaces but Not in Kio Cloud
If devices appear in Cisco Spaces but not in Kio Cloud:
-
Confirm the Kio Cloud Partner App is activated in Cisco Spaces.
-
Verify the correct locations and BLE devices were selected during activation.
-
Confirm the Cisco Spaces API integration is active.
-
Re-authenticate the Kio Cloud Partner App if required.
If Spaces API connectivity is confirmed and devices still do not appear, create a ticket with Kontakt.io support.
No Real-Time Location Updates
If badge location is not updating:
-
Confirm Smart Badges are visible in Cisco Spaces.
-
Verify AP density provides sufficient overlapping coverage.
-
Confirm the badge battery level is not critically low.
-
Validate map scale and AP placement accuracy.
-
Ensure the Spaces Connector is forwarding telemetry without drops.
If location is inconsistent, review map calibration and RF attenuation settings. Refer the steps below to create a TAC case with Cisco Spaces.
Duress Button Press Does Not Generate Alert
If the button press is detected in Spaces but no alert appears in Staff Safe:
-
Confirm an active Alert Rule exists for Button Press.
-
Verify the rule applies to the staff or a staff role assigned to staff.
-
Confirm the badge is assigned to a valid staff profile.
-
Ensure the the Alert Rule Status is not set to Disabled.
If telemetry is reaching Kio Cloud but no alert is triggered, create a ticket with Kontakt.io support.
High Latency or Intermittent Updates
If location or alert delivery is delayed:
-
Verify WAN connectivity stability.
-
Confirm Connector health and telemetry throughput.
-
Review BLE message rates and drop statistics.
-
Check for RF interference or AP coverage gaps.
Consistent latency issues should be escalated based on which layer is impacted. Refer the steps below to create a TAC case with Cisco Spaces.
SUPPORT AND MONITORING
Joint Support Model
The Cisco Spaces Partner Ecosystem operates under a shared responsibility support model, ensuring issues are routed quickly to the team best positioned to resolve them.
|
Responsibility Area |
Primary Owner |
|
Cisco Spaces Platform, APIs, Network Integration |
Cisco Spaces Partner Team |
|
Smart Badges, KIO Cloud, Staff Safe App |
Kontakt.io Team |
|
Joint Use Case Runbook Creation & Maintenance |
Cisco Spaces Partner Team and Kontakt.io Team |
|
Cisco Space Partner App Validation, Listing, Marketplace Onboarding |
Cisco Spaces Partner Team |
Monitoring Model
Cisco Spaces provides native monitoring and platform support for the Cisco infrastructure, Cisco Spaces Connector, Cisco Spaces cloud services, and the Cisco Spaces to Kio Cloud integration layer. Kontakt.io provides application-specific support for the Kio Cloud platform, Staff Safe application workflows and Smart Badges.
Cisco Spaces provides native monitoring capabilities for BLE telemetry ingestion and infrastructure health. Continuous monitoring of the Cisco Spaces Connector and BLE gateway infrastructure is required to ensure reliable operation of the Staff Duress solution.
The Cisco Spaces Connector should be monitored for overall health, connectivity, and data flow performance. Key metrics include incoming and outgoing telemetry rates, data drops, and reachability to Cisco Spaces Cloud. Any degradation in these metrics may impact location accuracy or delay event delivery.
At the BLE infrastructure level, administrators should monitor the number of active BLE gateways (access points), BLE message rates, and device visibility. Consistent BLE message ingestion across access points is required to maintain accurate X/Y location calculation.
Cisco Spaces also provides visibility into BLE device counts and telemetry trends, enabling identification of anomalies such as sudden drops in message rates, missing devices, or irregular signal patterns. These indicators should be used to proactively detect coverage gaps, device issues, or infrastructure misconfiguration.
Monitoring responsibilities are shared across layers, with Cisco Spaces providing visibility into telemetry ingestion and infrastructure performance, and Kontakt.io providing application-level monitoring for alerts, workflows, and incident lifecycle management.
Support Workflow
The workflow for identifying, triaging, and resolving issues follows a structured path designed to ensure accountability, consistency, and efficiency across Cisco Spaces and Partner teams.
Issue Identification (Customer Initiated)
An issue is detected in a Staff Duress deployment integrated with Cisco Spaces and Kontakt.io, such as:
-
Smart Badge devices not visible in Cisco Spaces or Kio Cloud
-
Real-time location not updating or appearing inaccurately
-
Duress button press events not generating alerts
-
Responder notifications, escalation workflows, or dashboard visibility not functioning as expected
-
Device onboarding, federation, or partner app activation errors
-
Portal Beam events not appearing or being processed correctly
-
Unexpected behavior in the Staff Safe application or user interface
The reporting party should capture:
-
Time and date of occurrence
-
Error messages or screenshots
-
Affected sites, floors, badges, devices, or users
-
Recent changes to network, configuration, firmware, or application settings
-
Operational or clinical impact
Triage (Primary Determination of Ownership)
During triage, the issue is evaluated to determine its point of origin within the Cisco Spaces platform, partner application, or integration layer.
Using the responsibility tables defined above:
-
Ownership is identified
-
The appropriate Cisco Spaces or partner support teams are notified
This Runbook serves as the primary troubleshooting reference during this phase, helping to:
-
Match observed symptoms to known issues and common failure scenarios
-
Validate configuration and data flow expectations
-
Determine whether the issue can be resolved through documented steps or requires deeper technical investigation and escalation
This structured triage process ensures issues are routed correctly, reduces duplication of effort, and accelerates resolution.
Primary Support Routing
For issues suspected to originate within Cisco Spaces:
-
Open a Cisco TAC case
-
Cisco TAC manages the case end-to-end and coordinates internally with the Cisco Spaces Partner Team as needed
Steps to Open a Cisco TAC Case
-
Log in to Cisco Support: https://www.cisco.com/support
-
Select Open a Case
-
Choose the relevant Cisco Spaces product or service
-
Provide:
-
Detailed problem description
-
Logs, screenshots, and timestamps
-
Customer site and Spaces instance details
-
Confirmation that runbook troubleshooting steps were completed
-
-
Submit the case and record the TAC case number for tracking
Kontakt.io Support
If you have questions about Kio apps or Kontakt.io devices, contact the Technical Support team.
Support options
-
Visit our support portal: https://support.kontakt.io
-
From our support portal, submit a request to get in touch with our Technical Support team
-
Phone: +1 (336) 283-7646
Before contacting support, to help resolve issues as quickly as possible, please:
-
Verify that your system meets the requirements listed in the product documentation.
-
Be at the computer or device where the issue occurred so you can help reproduce the
problem. -
Have the following information available:
-
Customer ID/Tenant ID or account name
-
Kio app name and a description of the issue or question
-
Device hardware details (model, MAC address)
-
Troubleshooting steps already taken
-
Resolution and Closure
Once the issue is resolved:
-
The owning team validates the fix with the reporting party
-
Root cause analysis, corrective actions, and preventive guidance are documented
-
Any new learnings, configuration updates, or escalation paths are incorporated into the runbook
This creates a continuous feedback loop, improving future deployments and reducing mean time to resolution.
FREQUENTLY ASKED QUESTIONS (FAQ)
How are firmware upgrades for Kontakt.io devices performed?
Firmware upgrades for Kontakt.io devices can be managed through Cisco Spaces using the IoT Services in Cisco Spaces Dashboard. Once devices are claimed and synchronized, administrators can initiate firmware updates centrally without requiring physical access to each device. The upgrade process involves selecting the target devices, choosing the appropriate firmware version, and triggering the update from the Cisco Spaces interface. Cisco Catalyst access points act as BLE gateways to deliver firmware updates OTA to supported devices.
Navigate to Iot Services → Inventory → Claimed Devices.

From the Firmware column, identify a device with an available upgrade > select the device’s MAC address > go to the Firmware Management section > select the upgrade icon.
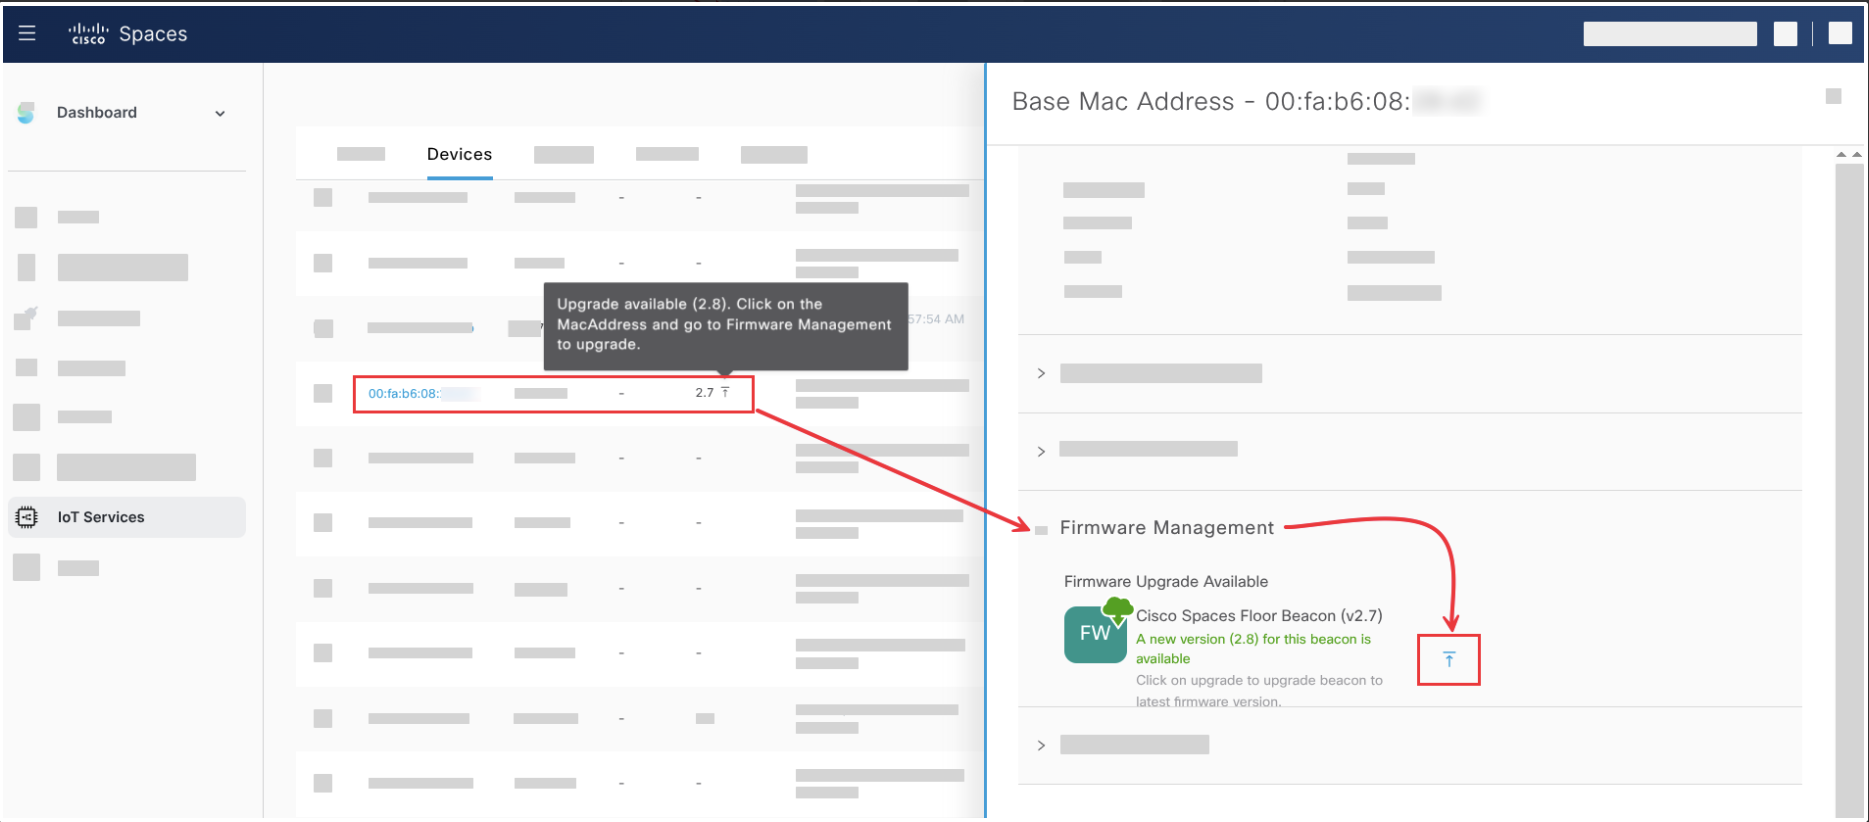
The Request History will show the progress of the update. After completion, confirm that devices are online, reporting telemetry, and functioning correctly within the Staff Safe application.
What happens if the location hierarchy is updated in Cisco Spaces?
Cisco Spaces acts as the authoritative source for location hierarchy in this solution. Updates to location heirarchy in Cisco Spaces may be reflected in Kio Cloud through the active partner integration.
Because Staff Safe workflows rely on this location context, any changes to the hierarchy can impact how devices are associated to locations, how alerts are routed, and how information is displayed in dashboards and maps. As a result, all hierarchy and map updates should be validated after they are made.
As a best practice, perform hierarchy or map changes during a planned maintenance window and complete validation before returning the solution to normal operation.
What happens if BLE coverage is insufficient in certain areas?
Insufficient coverage may result in delayed or inaccurate location updates. In such cases, AP density should be increased, placement adjusted, or supplemental technologies deployed in critical areas.
What level of location accuracy is required for Staff Duress use cases?
For Staff Duress use cases, the objective is to enable responders to reliably identify the immediate vicinity of the staff member in distress in real time.
Cisco Spaces validated design guidance emphasizes that location accuracy is dependent on infrastructure design, including access point density, placement, and map quality. Accurate outcomes require that BLE devices are consistently detected by multiple access points and that deployments are validated using Cisco Spaces location accuracy tools.
For Staff Duress deployments:
-
Infrastructure should be designed so that each device is detected by at least three access points with consistent signal strength across all critical areas
-
Location accuracy should be validated in the actual environment prior to go-live using Cisco Spaces testing tools
Ultimately, the required level of accuracy is defined by the operational need to locate and assist staff quickly, and the deployment should be designed and validated to meet that outcome.
REFERENCES
FEEDBACK AND CONTINUOUS IMPROVEMENT
This runbook is a living document that evolves based on real-world deployments and customer feedback. Your input helps us improve accuracy, clarity, and completeness of the runbook.
Submit Feedback: Runbook Feedback Form
Email: ciscospacespartnerteam@cisco.com
For technical support issues, please follow the Support and Escalation Process outlined in this document.