IOT Services Deployment, Monitoring, and Troubleshooting Guide
OVERVIEW
Cisco Spaces is the next generation outcomes cloud from Cisco, which builds on top of years of industry leading indoor location solutions and adds in multiple new components to deliver an end-to-end solution to solve business use cases through a cloud and subscription-based delivery model. It is designed to help organizations understand how people and things move and interact within their physical spaces, enabling them to make data-driven decisions to improve customer experiences, operational efficiencies, and business outcomes. It provides a single point of entry for all location technology and intelligence through a single dashboard interface. Cisco Spaces delivers the industry's most scalable location-based services platform, while being compatible across existing Cisco Aironet® wireless LAN Controllers, Cisco Catalyst® 9800 series wireless LAN Controllers, select Cisco Catalyst® 9000 series of switches, Cisco Meraki® infrastructure (including MV Cameras), as well as select Cisco Collaboration endpoints and support for a wide range of deployment options. In addition, Cisco Spaces can consume and control the IoT radios on select Wireless Access Points to deliver new IoT use cases and enable true Smart Spaces Solutions.
In addition to consuming data from the network infrastructure, Cisco Spaces processes, filters and cleanses the data, provides toolkits to act on this data and makes this data accessible to partners - Independent Software vendors, enterprise software as well as solution partners for delivering business outcomes. There is also an entire ecosystem of third party IoT devices (known as Cisco Spaces IoT Device Marketplace) which can be controlled by IoT gateways which are installed on Wireless Access Points and Catalyst switches via the Cisco Spaces dashboard. Cisco Spaces also enables customers to send data to multiple software partners which are available in the Cisco Spaces Partner App Center to integrate the Cisco solution with a different third-party solution which can be focused on verticals like Healthcare, Manufacturing, Retail, Higher Education or could deliver dedicated use cases like High Value Asset Tracking, Patient and Staff Safety, Employee Experience and Customer Management, Space Utilization, Environmental Monitoring and Compliance etc.
SUPPORT AND ONBOARDING
Please follow the link below to find out about the different ways to get support for Cisco Spaces.
CISCO SPACES IOT SERVICES FOR BLE
Cisco Spaces IoT Services is a component of the Cisco Spaces platform that focuses on integrating and managing Internet of Things (IoT) devices to provide enhanced insights and automation capabilities within physical spaces. The IoT Services component allows organizations to connect various BLE/IoT sensors and devices to the Cisco Spaces cloud, enabling them to collect, analyze, and act on data from these devices.
Key aspects of Cisco Spaces IoT Services include:
Device Management: Simplifies the onboarding, configuration, and management of IoT devices. This includes provisioning new devices, monitoring their status, and managing firmware updates.
Integration with Cisco Infrastructure with a multi-vendor multi technology gateway: Leverages existing Cisco wireless and networking infrastructure to support IoT device connectivity by deploying multi-vendor gateways on the APs and switches. This integration reduces the need for additional hardware, dedicated point solutions and gateways, reduces costs and TCO, and simplifies deployment.
Data Collection and Analytics: Collects data from connected IoT devices, such as environmental sensors (temperature, humidity, air quality), occupancy sensors, and asset trackers. The platform then analyzes this data to provide actionable insights.
Event and Rule Engine: Allows users to create custom rules and events based on data from IoT devices. For example, users can set up alerts for temperature thresholds, motion detection, or equipment usage patterns, triggering automated actions or notifications.
End to End Monitoring and Support: Cisco Spaces monitors for any anomalies and failures across the infrastructure, the cloud and APIs to generate proactive alerts and warnings as well as provide an end to end dedicate support channel for resolving any issues seen or reported.
APIs and SDKs: Provides APIs and software development kits (SDKs) for developers to build custom applications and integrations. This enables organizations to tailor the platform to their specific needs and integrate with other enterprise systems as well as third party ecosystem ISVs.
Use Cases: Supports a wide range of use cases across various industries, such as:
Smart Spaces: Optimizing energy usage, enhancing security, and improving occupant comfort.
Healthcare: Monitoring environmental conditions, tracking assets and medical equipment, prevent loss and ensuring patient/staff safety.
Retail: Managing inventory, optimizing store layouts, and enhancing customer experiences.
Manufacturing: Monitoring equipment location, ensuring worker safety, and improving operational efficiency.
Cisco Spaces IoT Services provides a comprehensive solution for leveraging IoT technologies to gain deeper insights into physical spaces, automate processes, and improve overall efficiency and effectiveness in various operational contexts.
How to use this guide
In this guide, we will be focusing specifically on IOT services – how to deploy, monitor and troubleshoot the network to be able to consistently deliver these outcomes. This guide is tailored for an IT audience with a foundational understanding of network infrastructure, typically someone with administrative access to Spaces dashboard, the wireless and other network equipment in the enterprise, who oversees monitoring, maintaining and troubleshooting the network to make sure the business outcomes are not impacted.
This guide will be broken into three main sections:
Day 0 – This section will cover things that the IT teams should understand ahead of time to deliver a successful deployment. It would cover topics such as reference architectures, best practices for Access Point (AP) deployment, recommended minimum software releases, supported AP models and Wireless LAN controller (WLC) deployment modes etc.
Day 1 – This section will focus on some best practices that should be followed during the setup and will cover some different examples of use cases. It is meant to provide a good understanding of what ideal scenarios may look like for long term deployment success.
Day N – This section will cover monitoring and troubleshooting that should be done by IT teams for avoiding any issues, but what troubleshooting to do if there are issues seen.
Throughout this guide, we will include Cisco recommendations, best practices, notes, and cautions where relevant. Happy reading!
DAY 0 - BLE DEPLOYMENT PREREQUISITES AND BEST PRACTICES
Understanding BLE as an IOT technology
Bluetooth Low Energy (BLE) is a pivotal IoT technology designed for short-range, low-power wireless communication, making it ideal for connecting a multitude of smart devices. BLE's energy-efficient design allows for prolonged battery life in IoT devices such as sensors, beacons, and wearables, facilitating seamless data exchange and real-time monitoring. Its capability to operate in the 2.4 GHz ISM band enhances its utility in creating interconnected ecosystems for smart buildings, healthcare, industrial automation, and retail environments and more. Cisco’s WiFi6 and newer Access Points all support BLE and allow customers to leverage that existing infrastructure
A key difference between BLE and traditional Bluetooth is the power consumption. In Bluetooth, the primary device connects to the secondary and maintains the connection, which while is lot more energy greedy than BLE, allows for use cases such as VoIP. BLE on the other hand is generally advertisement based but also allows for some connections to be established for exchanging small amounts of data. In BLE, the primary detects the secondaries broadcast, and (if interested) connects, retrieves data, and closes the connection (few milliseconds, energy efficient, exchange small amounts of data)
Feature | BLE |
|---|---|
Max range (theoretical) | < 100 m |
Data rate | 1 Mbps 2 Mbps (BLE5) |
Throughput | 0.27 Mbps |
Time to send data | 6 ms |
Power consumption | 0.01 to 0.5 W |
A typical question that comes up when IT teams are asked to turn on BLE based use cases is whether it would interfere or cause issues with existing 2.4GHz Wi-Fi network. The fact is BLE is built to be Wi-Fi friendly. As mentioned before, for the most common use cases, such as location tracking, telemetry reading etc. only BLE advertising is sufficient. BLE advertisements only happen on non-Wi-Fi Channels 37, 38 and 39 which do not interfere with Wi-Fi channels 1, 6 and 11 which are typically used for 2.4GHz in the enterprise.
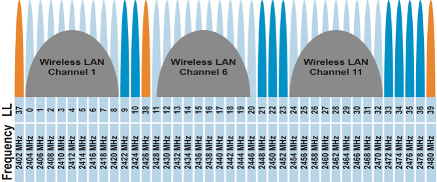
Channels colored in orange are used for BLE advertisements
When BLE connection is indeed made (for example: to read specific BLE telemetry or connect to Meraki Things device or to upgrade the firmware of a BLE device etc.), Wi-Fi can be impacted, but adaptive frequency hopping reduces interference.
Cisco Recommendation
The abundance of devices on 2.4GHz is something that should be considered and Cisco’s recommendation is to move any critical Wi-Fi SSIDs to use 5GHz or 6GHz band wherever possible.
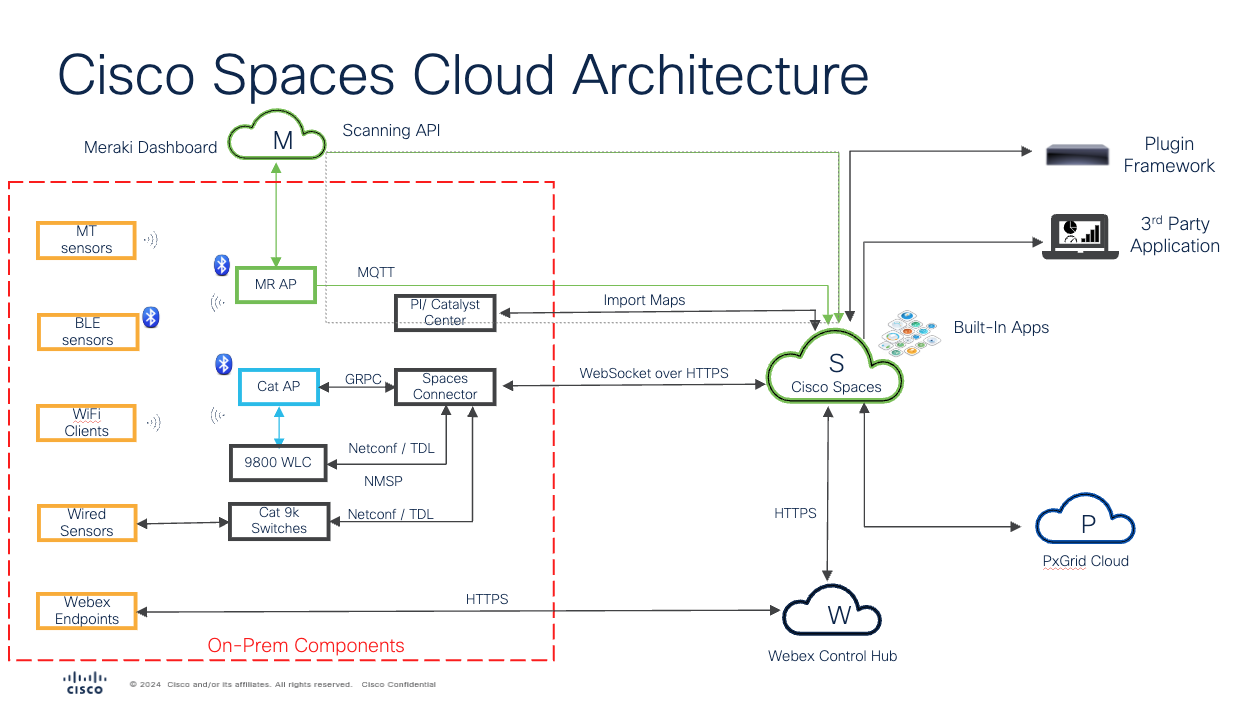
Cisco Spaces IOT Services Architecture
Note
As of the writing of this guide, the direct MQTT for BLE data from Meraki MR APs to Cisco Spaces cloud is still under Quality Assurance but is expected to be available shortly. Hence, it has been added in this guide.
Cisco Spaces IOT Services supports both Catalyst and Meraki based deployments, which few key differences in the features and outcomes delivered. We will review those next, but first, let’s quickly understand some key components of the IOT Services architecture.
Cisco Spaces Connector - Cisco Spaces Connector is a software component (available only as a VM – deployable on VMWare ESXi, Microsoft Hyper-V and as an AMI on AWS) that facilitates the integration of Cisco Spaces with a customer's on-premises infrastructure. It acts as a bridge between the Cisco Spaces cloud platform and the customer's local network, allowing for seamless data exchange and enabling the various location-based services and analytics that Cisco Spaces offers.
Catalyst Access Points – Act as bi-directional multi-vendor BLE gateways allowing not only for scanning and/or transmitting BLE signals, but also the ability to configure and manage BLE devices that have been previously claimed in Cisco Spaces.
Scan and forward BLE advertisements and payload directly from AP to connector (GRPC)
Receive configuration and management commands from Spaces via connector (GRPC)
Initiate downstream BLE connection with BLE tags and push configuration and firmware (i.e., configuration and management of BLE tags from IOT Device Marketplace)
Catalyst 9800 WLC - The Catalyst 9800 controller is the single point for configuring and managing a wireless network and access points. The Catalyst 9800 controller configures and manages APs using the CAPWAP protocol. The Catalyst 9800 controller receives BLE configuration from Cisco Spaces over NETCONF and passes the configuration to AP over CAPWAP. The feedback path from the AP to the wireless controller is through CAPWAP, and from the Catalyst 9800 controller to Cisco Spaces through Telemetry data logger (TDL) telemetry streaming. The gRPC configuration from Cisco Spaces also goes through Catalyst 9800 controller and from there to the corresponding AP. The configuration sets up the gRPC channel between the AP and Cisco Spaces.
Meraki Access Points – Act as uni-directional BLE gateway. They can scan and/or transmit BLE signals (configured via Meraki dashboard) but Cisco Spaces cannot currently use Meraki APs to push configuration down to 3rd party BLE devices, even if they are claimed in Cisco Spaces.
Scan and forward BLE advertisements and payload directly from APs via MQTT – arrives to Spaces in near real time
Meraki Dashboard – The Meraki dashboard is the configuration pane of glass for all APs. While raw BLE data can be sent directly from Meraki APs to Cisco Spaces, processing of BLE data from those APs is done in Meraki cloud.
Forwards calculated BLE location from dashboard via Scanning API – which can be delayed, normally in the range of 3-5 minutes, but there is no specific limit to how long can be that delay.
Spaces Cloud – Provides all the functionality in the cloud. With respect to IOT Services, the Spaces cloud delivers several functionalities, such as:
Receives raw BLE messages from Meraki and Catalyst
Leverages Network maps from DNAC / PI. Or customer can use CAD files + Spaces AP Auto Locate as a replacement for network maps and create Cisco Digital maps.
Merges location hierarchy from multiple sources like DNAC / PI / Webex / Meraki into a common model for use across all native and partner apps
Calculates the x/y for tags using Cloud Location Engine for Catalyst and receive calculated location for Meraki
Onboard, group, manage, configure and view BLE devices using IOT Services framework
Control and manage infrastructure
3rd party Apps – To carry IOT data in Cisco Spaces IOT Services solution, Cisco offers two options for approved 3rd party partner applications:
Cloud Firehose API (Preferred) – Carries all data end to end with full scale and visibility. Examples of data available – maps, location hierarchy, BLE, Wi-Fi, UWB, location X/Y, identity and more.
Local Firehose API (for select partners) – carries subset (minimal) data.
Take Caution
Specific Firewall Ports need to be opened to make sure the data can flow correctly. Please validate and confirm the following ports are opened correctly on Catalyst environment. The following ports need to be opened to allow for the basic functionality of Cisco Spaces. In addition to basic functionality, additional ports need to be opened for IoT Services
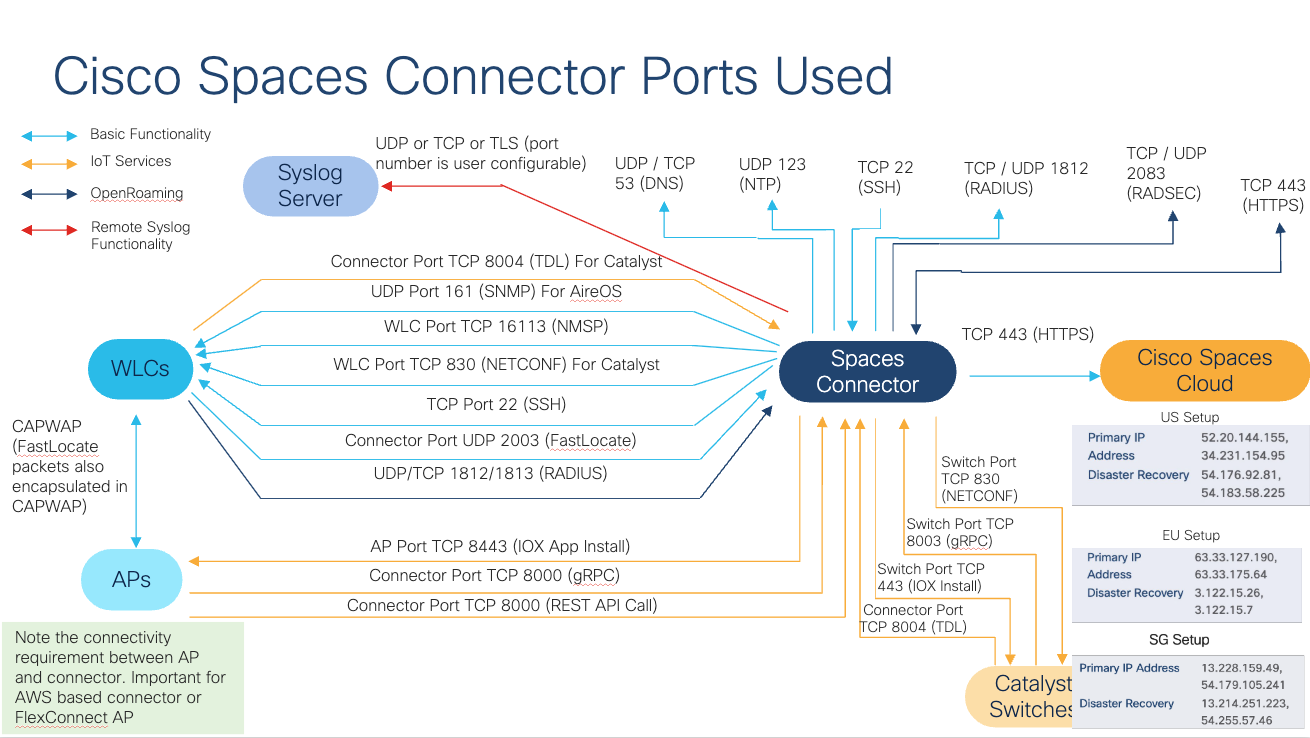
Table of Ports Needed
Normal Operations | IOT Services |
|---|---|
16113 TCP (NMSP) | 8004 TCP (TDL) |
830 TCP (NETCONF) – only for Catalyst Controllers | 8443 TCP (IOX App Install) |
22 TCP (SSH) | 8000 TCP (gRPC and REST API calls) |
(optional) 2003 UDP (FastLocate) |
Hardware / Software Compatibility Matrix
Cisco Spaces IOT Services works best with specific versions of software. Below lists the different releases and AP models that are tested and supported for IOT Services. Anything not listed should be considered untested and officially unsupported. Please reach out to your Cisco Spaces specialists or Cisco account teams if there are any questions and we can assist with specific guidance.
Catalyst 9800 Hardware | 9800-CL, 9800-L, 9800-40, 9800-80 |
Catalyst 9800 Software | While IOT Services has been supported since IOS-XE 17.3.1, Cisco has added new features and identified/resolved multiple critical known defects related to BLE. Hence, for any production deployment, customers need to deploy minimum 17.9.6 or 17.12.4 once available. Until those releases are available, recommendation is to use either 17.9.5 or 17.12.3. Other releases can lead to customers hitting the same defects leading to poor experience. |
Catalyst 9800 Deployment Mode | · Not supported on Cisco Embedded Wireless Controller on Cisco Catalyst Access Points (Cisco EWC-AP) · Not supported on Catalyst 9800 Controller running on Catalyst Switches in SD-Access mode (ECA). This limitation is looking to be addressed in the future. |
Spaces Connector | Spaces Connector 3 (May 2024) |
Catalyst AP Models | Internal Antenna Models: The following APs are supported: 9105, 9115, 9117, 9120, 9130, 9136, 9162, 9164, 9166. However, for better BLE performance, customers are highly encouraged to leverage the following AP models for mission critical use cases due to better BLE radio performance - Catalyst 9120, 9130, 9136, 916x
External Antenna Models: Only ANT-9101, 9102, 9103 and 9104 antennas have a dedicated IOT element in the antenna allowing for BLE signals to properly be transmitted and received at the IOT radio for Catalyst APs. All other antenna types haven’t been validated and may not work. |
Prime Infrastructure | 3.8 MR1 and later |
Catalyst Center | Release 2.1.1 and later |
Meraki | Release r30 and later |
Things to keep in mind pre-deployment
For IOT services to function normally, Spaces requires APs to be placed correctly on Maps and having those Maps added. This not only required for accurate location calculation but is also important for further systems in the data pipeline that require location of BLE devices. Customers can either:
Leverage CAD based Spaces Digital Maps with Any Locate to automatically place APs on the floor map, or
Catalyst Center or Cisco Prime Infrastructure based maps
Always use the latest Spaces connector versions. All the services in Spaces Connector 3 run as individual docker containers and can be upgraded inline without major downtime. Best practice is to start with the latest versions available at deployment and check once a month for any new upgrades and plan for upgrade when possible. This is applicable to all connector services, including IOT Wireless, Local Firehose etc.
Always use the latest IOX application for the Access Points. The IOX application can be upgraded from Spaces dashboard directly. Best practice is to start with the latest versions available at deployment and check once a month for any new upgrades.
While any BLE tag from any vendor can be supported in Spaces, that statement comes with a large caveat. Technically, any BLE device that is heard by the APs will be heard in Spaces, however, we have seen many instances of customers running into issues such as poor or highly inaccurate locations due to device misbehaviors. For example, a BLE device may not be sending an iBeacon frame out correctly, or it is sending the packet at extremely low power so not enough APs can hear it, or that it is using some custom firmware that Cisco has no idea about etc. As many random BLE tags can behave very differently, and as Cisco has no control of device behavior, it is not possible for Cisco to provide any location accuracy guarantees.
For location and device level support, Cisco Spaces fully supports devices that are part of the Cisco Spaces IOT Device Marketplace for applications. If you or someone on your behalf is placing an order directly with the IDM device vendor, remember to make sure the vendor is made aware to provide devices compatible with Cisco Spaces and running the Cisco BLE SDK on the device.
If you decide to choose to use a device from a different vendor or a device that is not running Cisco BLE SDK, then we suggest you first validate the location accuracy with those tags in a smaller setup with limited devices in few different locations first. Only if the location accuracy and tag behavior is acceptable to your use case should you go forward with in for any production use cases. Cisco Spaces can only provide best-effort location calculation for such devices which can range anywhere from good location accuracy to extremely poor accuracy.
Remember to keep all the devices in NTP sync correctly otherwise it can lead to errors.
For HA on Spaces Connector 3.x, you must configure the connectors in a Virtual IP (VIP) Pair. The two connectors need to be on the same Layer 2 subnet for VIP based HA to work.
If the Cisco Spaces: Connector is an Amazon Elastic Compute Cloud (EC2) Instance from Amazon Machine Images (AMI), ensure that the wireless controller and connector are in the same virtual private cloud (VPC). Ensure that the wireless controller has a private IP address so that the security group of connectors does not block the traffic, allowing enabled IOT streams to function. Permit all the TCP traffic at the Virtual private clouds (VPC) level so that the Telemetry Data Logger (TDL) is established without any issues.
Netconf must be enabled on the Catalyst 9800 WLC, and the credential provided to Spaces must have full privilege to run Netconf commands on the WLC. Remember to add these commands to the WLC running config before adding WLC to Spaces.
aaa new-model
aaa authentication login default local
aaa authorization exec default local
For Meraki based network, remember that the scanning API can provide location updates that can be delayed. Cisco Spaces is leveraging that same API for location information, so if there are mission critical / time sensitive use cases that need the location calculation with quick update rate, understand that there may be limitations in what is realistically achievable. For Catalyst networks, Cisco Spaces calculates the location from raw data in real time.
For Meraki based networks, having a lot of MT devices can impact the BLE performance of MR Access Points as MT devices require BLE connection to be established and during that time, the BLE radio is sharing resources.
In general, for any deployment, if there is a lot of congestion on 2.4GHz band – either due to existing Wi-Fi deployment or other sources of interference, BLE performance will be impacted. It is recommended to move critical Wi-Fi to non-2.4GHz band. In general, BLE tags are generally going to advertise frequently so APs will catch some of the messages. So for the most part, the use case may not be heavily impacted, but customers should understand the RF behavior in their space and set expectations accordingly.
Plan for correct scale and deployment size of Spaces Connector. See details next.
Cisco Spaces Connector Scale and Size Guidance
While the Spaces Connector 3 VM is highly scalable and created for high performance, it is important to size the VM correctly for the scale and use cases selected. We offer three ready-made variations of the resource combinations for the connector: Standard (2vCPU, 4 GB RAM), Advanced1 (4vCPU, 8GB RAM) and Advanced2 (8vCPU, 16GB RAM). However, at the end of the day, it is still just a VM so customers can always simply add more resources if needed very easily. That is generally not going to be needed but is an option depending on the load on the VM. Note that for HA, both the active and standby connectors need to have the same exact resource specification.
For customers looking to understand how to best size their connectors, there are few things to understand:
Ideally, you will be fine until the overall CPU / Memory doesn’t go above 75%. Anything more than that and you will start to run into issues like BLE messages getting dropped, excessive lag and delays, failure to push configurations etc. and need to scale up. We will cover how to monitor for these metrics in the Day N section of the guide.
All services contribute to the load on the connector. So, depending on the number of services turned on, the load will grow for the same network. For example, if you have only IOT Wireless service with 500 APs running BLE, a connector may be running at 50% CPU, but if you turn on Local Firehose, the connector may jump to 70%. Adding Hotspot or IOT Wired may make it go to 95%, even though the number of APs is still 500.
The connector load is also dependent on the number of BLE messages (scans) that are being processed. For the same example above, a customer with 500 APs in say, a hospital with limited BLE devices may hear 15K BLE messages per second across all APs. But if it’s an airport or a venue with lots of devices continuously moving in and out with rotating mac addresses, the connector may be processing 30K messages per second.
Remember, number of APs, number of BLE messages, services turned on – all contribute to the load on the connector and need to be considered when sizing the connector.
If the only services in use are Service Manage and IOT Wireless, then a typical guidance that customers can use as a reference to choose the appropriate size to go with. Remember that this is only a guidance, and every deployment is different and other services can have an impact.
Advanced2 Connector
vCPU: 8
Memory: 16GB
Disk Space: 120GB
Cisco Recommendation
Cisco recommends starting with at least Advanced1 spec and then monitor for key CPU, memory and message rate metrics available from Spaces dashboard and deciding to scale up to scale down. Always make your decision based on actual usage of the connector resources and re-evaluate this whenever making changes such as adding more load or services.
Additional considerations
Other than the load of the network, customers should also consider the uplink connectivity as well as the bandwidth available to the connectors to make sure BLE deployments can be successful.
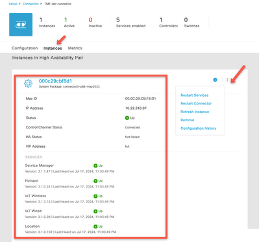
For connectivity, Cisco expects customers to have a stable internet connection between connectors and the cloud. If the link is unstable or intermittent, then customers should also additionally monitor for connection drops (Setup > Wireless Networks > View Connector > Click on Connector Name > Metrics > Service Manager > Control Channel Status) and run connectivity test from Connector as explained here. If the connection is dropping more than once every 15 minutes, then it is not a stable uplink and can result in various issues such as failure to push configuration, mismatched configurations, delays etc. Customers are recommended to move the connector to a more stable uplink in that case.
For bandwidth, Cisco expects customers to have an uplink of at least 100Mbps for best performance. If the bandwidth available is low, customers should additionally monitor the packet drop rate from the connector as well as the connection drops. Depending on the number of BLE messages being processed and sent to the cloud, a low bandwidth link will result in the link choking and delays or messages dropped.
Best Practices for AP Deployment and Tag config for Location
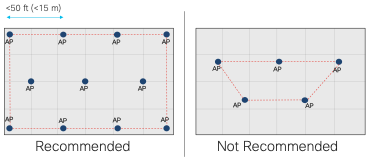
The same AP deployment best practices that have always held true for RTLS continue to apply. Propagation of BLE signals is like 2.4GHz Wi-Fi signals.
Have at least one AP per 2500 sq feet (230 sq m). Make sure APs have BLE radio turned on and is either in scan mode or dual mode to hear BLE beacons.
Have APs on the edges of the floors and then covering inside.
Create a convex hull area around the area with BLE devices.
Create inclusion and exclusion zones in the maps imported in Spaces.
Place APs on maps accurately and if antenna orientations are available, they should be accurate on the source (PI or Catalyst Center)
A minimum of 3 or more APs should hear BLE devices with an RSSI of -75dbm or higher
For BLE tags, prerequisites for location accuracy are:
Use iBeacon profile whenever possible
Best accuracy is achieved when devices are using Cisco BLE SDK (part of Cisco Spaces IoT Device Marketplace) and those devices are claimed in Cisco Spaces
Run accuracy test in Spaces to understand the expected accuracy ahead of time for any tag before deploying it across a large use case
A BLE tag with a typical transmit power of -12dBm has a typical max range of 65 ft (20 m). That also will vary with the physical characteristics of the deployment location. Hence, it’s highly recommended to have at least a few APs within 50 ft of the tag for best coverage. If the tag is not heard properly, IDM devices are able to be configured using IOT Services and Catalyst APs. Customers should bump up the configured transmit power of those tags and consider updating the transmit frequency to improve the BLE performance of the tag (downside being increased battery consumption).
DAY 1 - SETUP VALIDATION, BEST PRACTICES FOR EXAMPLE USE CASES
Welcome to Day 1. You have decided to go ahead and start using Cisco Spaces IOT Services. You’ve reviewed the prerequisites, things to keep in mind and have setup the wireless infrastructure for delivering successful BLE based outcomes. This section will go over some of the best practices and things to keep in mind during the setup process, understand what to look for a successful validation, as well as provide some additional guidance for specific types of use cases.
Note
The validation steps here are expected to be used for after the configuration is completed to make sure things are working as expected. Customers are expected to be able to use these as a reference to do troubleshooting, but they should not need to run these if the prerequisites are met before and IOT services is setup correctly as per the configuration guides.
Validation of end-to-end connection
Validation of Connector
Validate that the connector status is up, all the services such as IOT Wireless, Local Firehose etc. are up and running the latest available versions. If HA is configured, then validate the HA / VIP status.
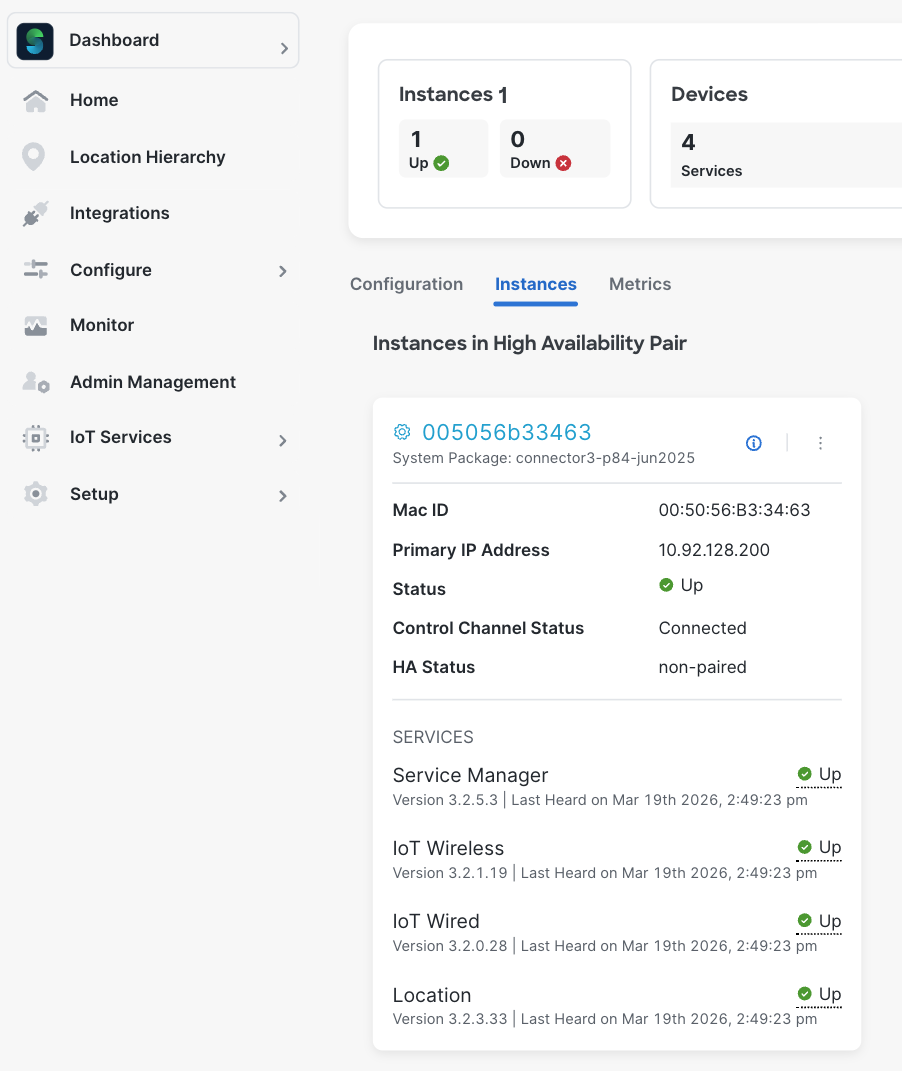
Validate proxy (if used) and NTP and DNS details on the connector UI. Often times, customers don’t realize is that data transfer would run into failures with NTP, DNS and proxy issues. While Spaces connector fully supports proxies, it’s important to understand that configurations of proxies need to be done correctly otherwise it leads to data failures.
Validate the IOT Wireless service health from the connector UI. Make sure the heartbeat is recent, confirm the Active GRPC counts and confirm the incoming and outgoing messages are updating.
Open the details of the IOT Wireless Service and confirm there are no auth failures or error counts continuously increasing. On the same UI page, you would also be able to confirm all the WLCs that have BLE / IOT Streams turned on, their status, last heard time, APs and per-AP BLE counters.
Validation of AP
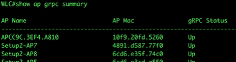
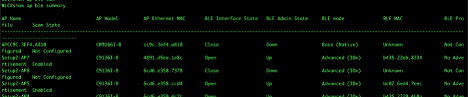
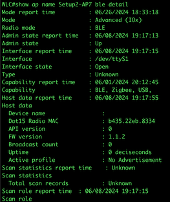
Validate that the IOX app (if used), floor beacon channel (gRPC), AP beacon channel (TDL) are all up for all APs. Floor beacon channel should be last heard within the last few seconds, AP beacon channel should be last heard within 2 hours and IOX app channel should be heard within last few seconds.
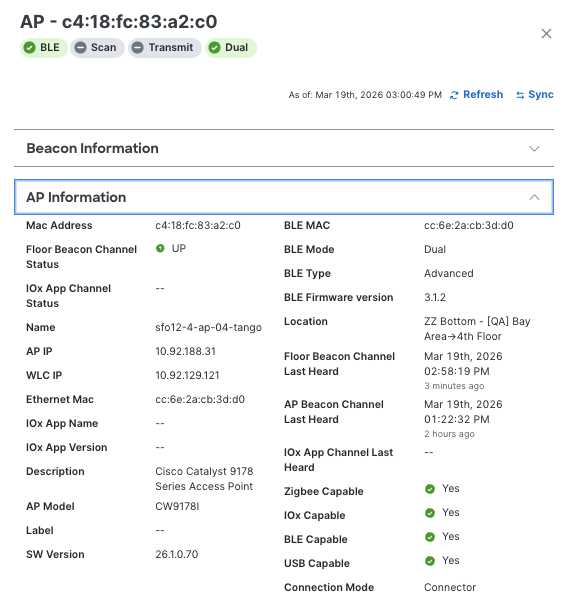
If Step 1 is showing all correct, then the additional commands below aren’t needed. But, for additional reference for IT teams, we are listing CLI commands that can be used for additional validation and troubleshooting.
Verify connection between the AP and the connector is valid. State should be Ready and URL should be the connector on port 8000.
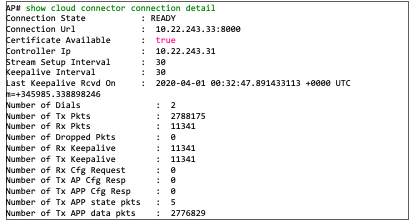
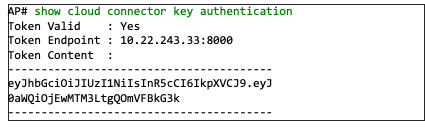
Verify streaming token is valid for the GRPC tunnel. Token should be Valid and Last Success should be recent than the failure.

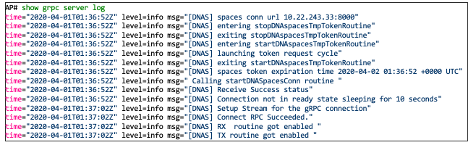
If there are errors, GRPC server logs can be used to understand potential issues.
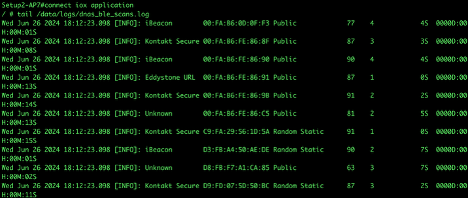
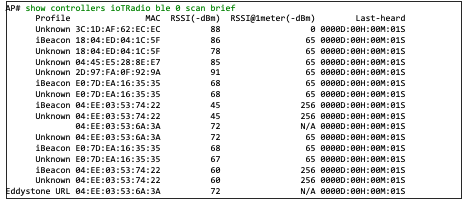
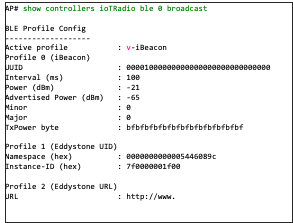
If AP is running IOX App (i.e. in Advanced Gateway mode, recommended), then the following commands can help understand if BLE is functioning correctly on the AP itself. There are commands and logs for BLE scan records to validate if the AP is scanning for BLE devices, metrics to monitor health.

If AP is not running IOX App, then there are some different commands to help understand if BLE is functioning correctly on the AP itself – both for scanning and transmit, depending on the BLE configuration done on Spaces.

Validation of WLC
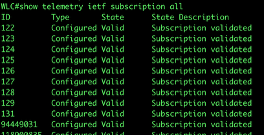
Validate TDL subscription is correctly configured, and all the subscriptions are valid. For Spaces, IDs 122-131 need to be present and Valid.
Validate if the actual telemetry ID is working correctly.

Note
It’s important for customers to understand different telemetry streams are used for sending different data to the cloud. For example, one subscription may be sending AP name or BLE status, another can be used to send temperature/humidity from AP sensors from Catalyst 9136, 9166 APs etc. So, it’s important that all the subscriptions that Spaces uses (122-131) are up and valid.
Sometimes, the WLC can have issues such as firewall problems, or too many subscriptions limit reached on 9800 etc. which will lead to issues. Hence, it’s critical to validate that all the subscriptions are working correctly.
Validate AP statuses and GRPC statuses.

Grouping and Filtering
With Cisco Spaces, customers can filter BLE devices in multiple ways, including the ability to filter in the cloud, say for subsequent upstream or partner applications or even at the connector (version 3) or at the latest BLE IOX application running on the AP.
Most customers should be fine with the default filtering that can be done at the cloud, and we’ll cover that next. But for advanced users, we will also provide the ability to understand how additional layer of filtering can be achieved.
Cisco Spaces Cloud based filtering:
You can create groups and assign devices to them. You can focus attention on certain devices, and view only these devices by filtering them by the group.
The advantages of manual groups are as follows:
Policies are applied to groups.
Firehose APIs can filter devices by these groups.
In the Cisco Spaces: IoT Service dashboard, you can filter devices by groups.
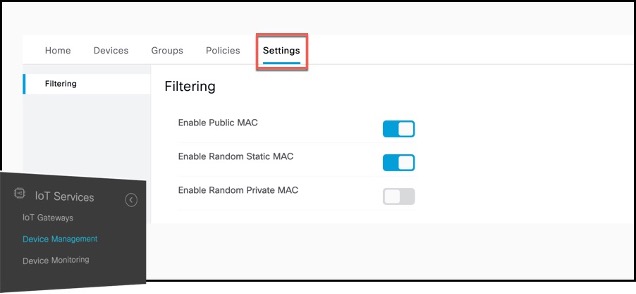
While Cisco Spaces: IoT Service scans all devices, you may not want to view certain devices on the dashboard. You can now filter out devices from the Cisco Spaces: IoT Service dashboard using types of MAC addresses. Filtering is currently at the cloud level and not at AP-level. Once filtered, these devices do not appear in the following locations;
Cisco Spaces: Detect and Locate
Cisco Spaces: IoT Service
Output of Firehose API calls
You can filter out devices based on the following MAC address types.
Enable Public MAC: Allows global, fixed MAC addresses that are registered with the IEEE Registration Authority, which does not change during the device’s lifetime.
Enable Random Static MAC: Allows random static MAC address, which is a random number generated every time that the device boots up or a value that stays the same for the device’s lifetime. However, it does not change within one power cycle of the device.
Enable Random Private MAC: Allows random private MAC addresses of two types:
Resolvable: These are generated from an identity resolving key (IRK) and a random number. They can be changed often (even during the lifetime of a connection) and prevents an unknown scanning device from identifying and tracking the device. Only scanning devices that possess the IRK distributed by the beaconing device (exchanged using a private resolvable address) can resolve that address, allowing the scanning device to identify the beaconing device.
Unresolvable: A random number that can change anytime.
Best Practice
If tracked assets/sensors are tags and not apple / android devices, verify random private mac filtering is turned on in IoT Services.
Note
If the system load continues to be high (CPU, Memory, Outgoing message rate) then customers can work with Cisco Spaces support team to implement additional filtering based on device OUI. That way, only the chosen devices with specific OUI or BLE MAC prefixes are processed and sent to Spaces and all other device data is dropped. This reduces the system load significantly. However, it also means that no other BLE devices will be seen by Spaces. So customers should consider this only if necessary. It may be easier to just scale the connector up first and see if the load is manageable.
Connector and IOX Application BLE Scan Filtering:
The connector BLE scan filter will allow BLE scan payloads to be filtered at the Cisco Spaces Connector (version 3) on the customer's premises before the information is transmitted to the cloud. Based on the applied filters, this will ensure that the BLE scan data does not leave the customer's location. The filtering parameter is done based on MAC address (prefix or full MAC address). The MAC prefix filter allows a list of MAC address substrings to be applied to the start of the MAC address. It only allows the BLE payloads with a MAC address matching one of the MAC prefixes to be forwarded to Cisco Spaces.
Currently, the actual ability to configure these prefixes are controlled by the Cisco Spaces support / backend teams and done at customers’ request via a Support Case. If you would like to add specific mac address(es) as filters to limit the data that is processed by the connector and sent to the Spaces, please reach out to Cisco support for requesting that. Note, that the filtering is only able to be done at the entire tenant level. So any filters applied will be pushed to all the connectors and onto the IOX application for APs.
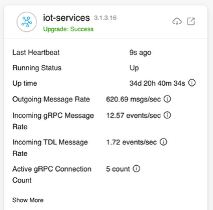
Once the filter is set with Cisco team’s help, customers can view that information on the Cisco Spaces connector UI. The current MAC prefix filter settings can also be verified locally on the Cisco Spaces Connector user interface. To view the settings, login to the web interface of the Cisco Spaces Connector. The main dashboard will have boxes for each of the running services. Click on the launch icon in the upper right corner for iot-services.

The page will provide more details about the service, including the MAC Prefix Filter. Also, the current metrics for how many events are being dropped as a result of using the filter.
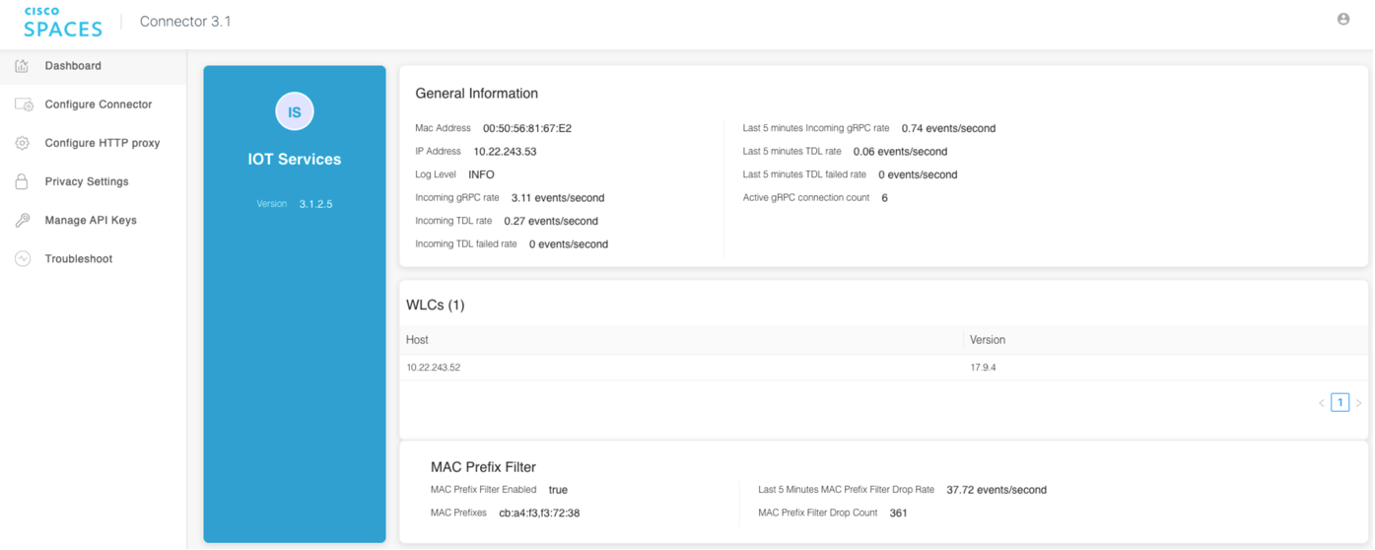
Logging for the filtering will also be available on the connector. A new file named filter.log will be added to the IoT Services logging directory. The log file will contain the MAC prefix filter settings when loaded or changed at any time while IoT Services runs. The log file can troubleshoot the MAC prefix filter at any time. A new counter metric, incoming-grpc-dropped-filter-rate, tracks the number of packets dropped on the Cisco Spaces Connector due to the MAC prefix filter. The metric will not appear on the Cisco Spaces dashboard for the IoT Services but will be available only in the metric log files, which can be remotely uploaded for troubleshooting.
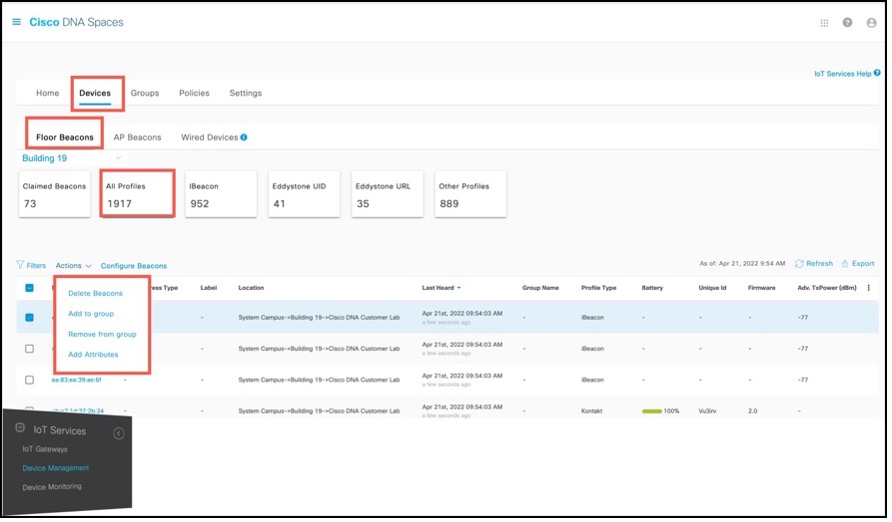
Device Monitoring
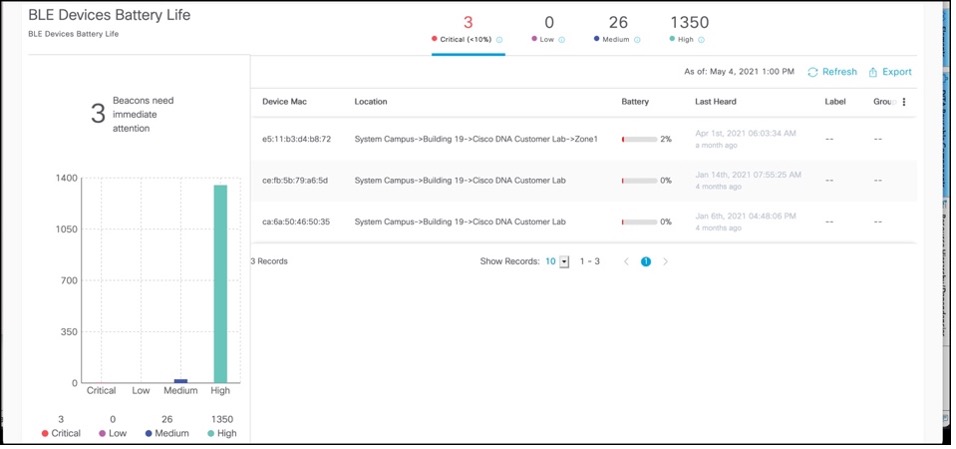
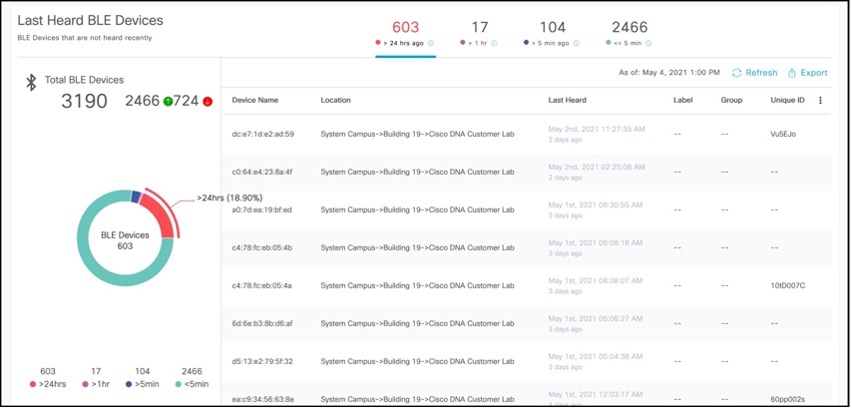
From the IoT Service > Device Monitoring page, you can monitor all the IoT devices and gateways, and get a one-shot categorized view of devices according to their battery life and last heard time.
In the Total gateways part of this section, you can see an overview of all gateways that are being monitored. You can also see the number of reachable gateways (base and advanced) counted under the green dot, and the number of unreachable gateways counted under the red dot.
In the Total BLE Devices part of this section, you can see an overview of all BLE devices that are being monitored. You can also see the number of reachable devices (base and advanced) counted under the green dot, and the number of unreachable devices counted under the red dot.

In the Battery life section, you get an overview of only those BLE devices (beacons) that can sense their own battery life. The devices are categorized according to their current battery life as Critical, Low, Medium or High.
In the section for Last Heard, you get an overview of all BLE devices (beacons). The devices are categorized according to the last time they were heard. Generally, you want to make sure the devices that you care about the most as being heard. In the Day 3 section, we will also talk about how you can set up specific alerts for devices not being heard.
Best Practices for Asset Tracking Use Case
Best Practice
For Catalyst based deployments, use the minimum recommended IOS-XE release. For any production deployment, customers need to use minimum 17.9.6 or 17.12.4 once available. Until those releases are available, recommendation is to use either 17.9.5 or 17.12.3.
Deploy APs in recommended fashion as explained before in the guide. Make sure APs are correctly placed on the maps, with exclusion/inclusion zones marked correctly, AP models, height, antennas etc. selected correctly.
Run accuracy tests ahead of time to understand the expected accuracy. If there are issues with the tests, it could be due to APs not in the right location, not turned on for BLE scanning, devices not being heard at high enough RSSI, device misbehavior. Re-check to make sure any deployment issues are resolved. If the issue is still seen, open a Cisco Spaces support case.
Make sure devices are using iBeacon and are claimed in Spaces. If devices are unclaimed, or from a random device manufacturer that is not part of the IDM, such a tag can be used for asset tracking, but you won’t have any visibility in device health to guarantee outcomes. Any BLE or firmware vulnerability will either become a massive security risk or you will need to deploy additional gateways or mobile app to update tag one by one in person. Also, due to any potential device misbehavior beyond Cisco’s control, Spaces will not be able to guarantee location accuracy. Customers should consider this when choosing the device to use.
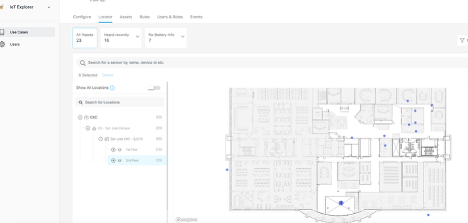
Asset Tracking with Cisco Spaces IOT Explorer
The Cisco Spaces: IoT Explorer app enables you to monitor and optimize the performance of your assets, sensors, alerting system, and workflows. While the application covers three different use cases (asset tracking, temperature monitoring, presence detection), Asset tracking is the primary use case for this application within Cisco Spaces.
You can create rules/alerts, view data logs, view the real time location and status of the device or sensor. The end application can be leveraged both via the Spaces Dashboard (meant for IT / Spaces admins) as well as a web application, which is available as a beta/limited feature as of the time of the writing of this guide.
Asset Tracking use case allows you to add asset tags to help manage and monitor the location of important objects and search for assets on a map and see their location in real time with automatic location updates. You can also add new asset tags with scalable and streamlined on-board processes and create rules to quickly notify team members when an item leaves a specific zone. The Cisco Spaces: IoT Explorer application retains asset location history for at least one year.
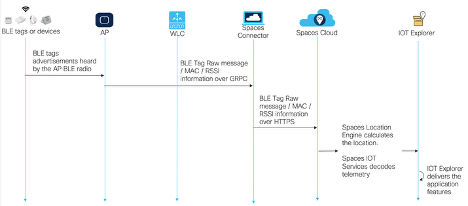
The following is the data flow of how asset tracking use case is delivered on IOT Explorer when the underlying infrastructure is Catalyst.
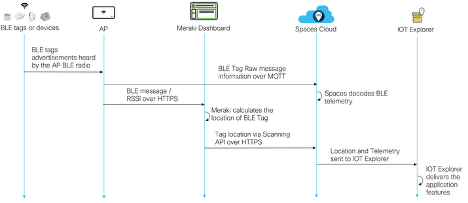
The following is the data flow of how asset tracking use case is delivered on IOT Explorer when the underlying infrastructure is Meraki. Note that at the time of writing this guide, the direct BLE path from MR AP to Spaces via MQTT and decoding of the telemetry is in Spaces QA testing, expected to be made generally available shortly.
Best Practices for Staff Duress Use Case
Best Practice
Best practices for BLE based Staff Duress solution are same as asset tracking. Please refer to the same.
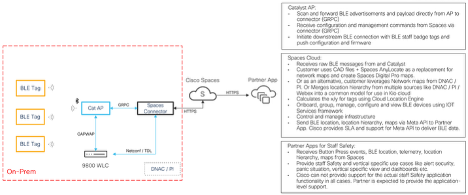
The following is an example of Staff Duress solution delivered via a Spaces partner using Firehose API to receive telemetry information (such as button press) and the location of BLE badge from Spaces to deliver the end-to-end Staff Duress solution.
Design Practices for Cisco Spaces Wayfinding Use Case
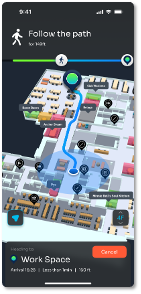
Cisco Spaces recently launched native Indoor Wayfinding solution allowing customers to Improve productivity by finding your way to collaboration spaces quickly and make navigating the workplace effortless. It helps customers extend their experience to your mobile phone for wayfinding on the go by leveraging app clips where no custom mobile app needed and no app downloads needed (for iOS devices). It also allows employees, guests and other users to get turn by turn directions to relevant spaces and points of interest.
 |  |
|---|
Wayfinding use case requires a lot of planning so here are some guidelines and best practices to help understand what is takes to implement the solution.
Beacon density / ceiling height | Example environment | Typical guidance | Estimated Accuracy |
High density / low ceiling | Workspaces, Open Offices | 1 beacon / 300 – 700 sq ft (28 - 65 sq m) Avg 1 per 500 sq ft | < 3m |
Medium density / high ceiling | Warehouses, Hospitals, Retail stores | 1 beacon / 700 – 1500 sq ft (65 - 140 sq m) Avg 1 per 1200 sq ft | 3 -5 m |
Low density / high ceiling | Airports, Parking Garages | 1 beacon / 1500 – 3000 sq ft (140 - 278 sq m) | 5 -6 m |
Design Principals for Wayfinding:
Whenever beacons (Cisco APs or supplemental) are placed, Homogeneity of signal is the most important factor
Beacons at intersections of hallways, helps with changing directions
Line of sight to user device, don’t plan for beacons tucked around corners
Evenly distribute beacons, add dedicated linear beacons for long hallways
Beacons at point of level change (top / bottom of stairs, elevator etc.), helps with correct level assignment and automated level change turn by turn wayfinding
Install on ceilings as low as possible, maximum height 10m. Anything more will degrade performance. Balance with potential theft if can be easily reached by humans moving around.
Rule of thumb: Rooms with capacity of 4+ get their own beacons
Remember all locations are different. Leverage Cisco’s support to get the best beacon placement layout for the location
DAY N - TROUBLESHOOTING AND MONITORING
This section of the guide will focus on talking about what are the common scenarios for IT teams to handle, including monitoring and troubleshooting any Cisco Spaces IOT Services BLE issues.
Monitoring on the Connector
Customers should always keep an eye on the health of their connectors are they are the primary means of sending the data to the cloud and the success of any business outcomes depend on the connectors staying healthy. While Spaces provides multiple ways to view the key performance indicators via the dashboard and the connector UI (covered in the section on connector validation earlier), realistically, customers can not be expected to always be looking at those screens. Being aware of what to look at in the dashboards and UI is important to understand what’s going on and spot checks, but being able to consistently monitor it using APIs is something we recommend.
The KPIs that should be monitored and recommended values are:
System CPU – recommended to be < 70%
System Memory – recommended to be < 70%
IOT wireless service CPU and Memory – recommended to be < 70%
GRPC connection count – which shows how many APs have GRPC up and active
GRPC message and input / output rate – provides a baseline of the data flow. Large variation like drops can point to an issue
While these metrics are available from the connector UI, this section will focus on how to use connector APIs to monitor these directly.
Prerequisites for using REST APIs:
APIs are receiving data directly from the connector docker. So:
Services should be up. For this guide, at a minimum, service manager and IOT Wireless services need to be deployed.
The connector needs to be added to a Spaces Account
The following steps can be used to generate the API keys and then use REST to get the monitoring data
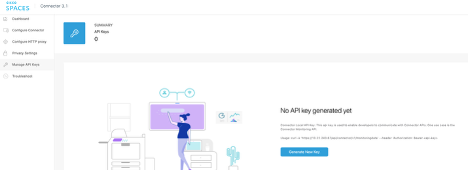
Login into the Connector 3 UI and go to Manage API Keys. Generate a new Key.
You can use this API key to simply run a HTTPS request to the connector to get a one time output of the monitoring information. Two example ways to run this that we cover in this guide are using terminal and Postman. Customers can easily use common scripting methods such as Python requests module to run this and automate data collection and alerting.
Example 1: Terminal curl command
You can run this command on terminal.
curl -k 'https://<ip of connector>/api/connector/v1/monitoringdata' --header 'Authorization: Bearer <API Key>'
Example 2: Postman
You can use the same API key under Security -> Bearer Token and run the same API URL in Postman
https://<ip of connector>/api/connector/v1/monitoringdata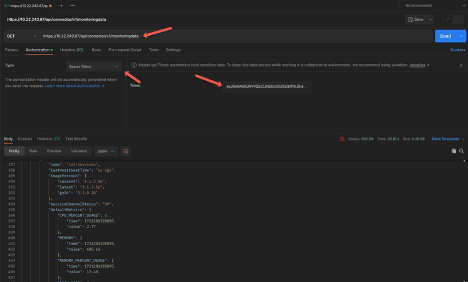
Cisco Recommendation
Cisco recommends that customers use these APIs to monitor key indicators to make sure the system is working optimally, such as not under heavy load or not unexpected drops in the GRPC counts or rates. If such a scenario happens, customers are encouraged to leverage this guide to make sure the configuration is done correctly and can review some common troubleshooting scenario examples. But if that doesn’t help recover the system to a normal working state, customers should open a Cisco support ticket.
Monitoring on the Cloud
In addition to the connector, customers should leverage the Spaces dashboard to keep an eye on the deployment.
Monitoring Devices – This was already covered in the earlier section
Monitoring for Updates -
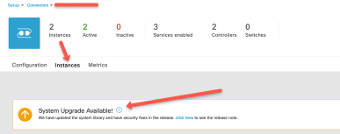
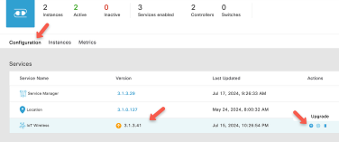
Customers are encouraged to always upgrade to the latest software versions for the connector and services when available. Cisco continuously rolls out newer features and bug fixes in the different services such as IOX application and connector services.
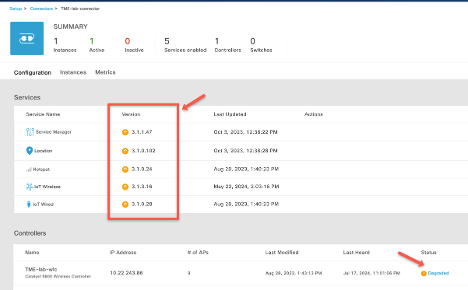
It’s recommended to upgrade these services. For any issues seen with any service, the controller will be marked as degraded, and customers can look at the details by clicking on that link.
A controller can be marked degraded if:
A Service is deployed but not correctly activated
Errors with the service
Additional monitoring for services status can be checked by clicking on Instances Tab and Metrics Tab.

Customers can also use the Rules in IOT Explorer Application to create rules for critical BLE devices that are used for mission critical use cases for making sure timely alerts are received for triggers such as:
· Device Not Heard – can be useful for making sure BLE is working as expected, to prevent loss, as well as to provide a level of confidence for any business-critical outcome.
· Device Entered or Exit – useful for location-based alerts
Steps to configure such rules are covered in the IOT Explorer configuration guide available here.
Troubleshooting scenario examples
Poor location accuracy
Ensuring accurate location reporting in the Cisco Spaces platform requires a systematic approach to troubleshooting. Here are the key points to check:
Understand RSSI and RF Characteristics
RSSI (Received Signal Strength Indicator) is critical for determining location accuracy.
Different physical locations can have varying RF characteristics, impacting RSSI readings.
Conduct location accuracy tests from the Cisco Spaces dashboard across multiple locations to establish a baseline. This will help in understanding the expected accuracy and identifying any deviations.
Verify AP Placement on Maps
Accurate placement of Access Points (APs) on the map is essential.
Ensure all APs that are present and reporting RSSI are correctly placed on the map.
Use the Detect and Locate configuration page to identify and rectify any missing APs on the map.
Enable and Verify BLE Scanning
Ensure that Bluetooth Low Energy (BLE) scanning is enabled for all APs.
Confirm that BLE data is being received from these APs.
Check GRPC and TDL settings, and review AP scanning logs if necessary to troubleshoot BLE data issues.
Sensor Characteristics and Device Recommendations
Different sensors have varying power and behavior characteristics.
Cisco recommends using devices from the IOT device marketplace, which have been tested for compatibility.
If using a different tag type, be aware that Cisco cannot guarantee location accuracy. Test the tags in a small deployment before scaling up to a larger deployment.
Enable iBeacon Profile
Ensure the iBeacon profile is enabled to facilitate accurate location tracking.
Ensure Sufficient AP Coverage
At least three or more APs should hear the device at -75 dBm or better.
Use AP scanning logs to verify the RSSI levels received at different APs.
Check Connector Health
Monitor the health of connectors, specifically checking CPU usage, memory usage, and packet drops.
Address any performance issues to maintain optimal operation and location accuracy.
IOX app install failures
IOX application install can fail on the Access Points for a couple of commonly found reasons. Try the following things to resolve it.
Check AP storage
Sometimes the AP storage space is already too full – maybe due to existing cores or log files that take up excessive storage. Unfortunately, in that case, the IOX application install will not be successful. To remediate it, you can try a couple of options.
Manually delete all the core files by logging into the AP (SSH / Console) or using a script to do it in bulk.
Add a core dump TFTP server to the wireless configuration. When you do that, subsequent cores that may get generated are uploaded to the server and then deleted from the AP. But it will only take effect after the setting is applied, previous cores will still be needed to be deleted.
If you aren’t sure which APs have enough storage or not, it may be best to just run a simple script and delete any existing cores from the APs before trying to do the IOX application install, or BLE gateway deployment.
Firewall rules
The most common reason for IOX application installs failure is not opening the right firewall ports. Please double check the firewall rules and confirm the ports are correctly opened as explained in the configuration guides.
When to change the power of BLE device
In the Cisco Spaces platform, you have the capability to configure and manage BLE devices that are claimed into an account, including the ability to adjust their transmit power levels. Adjusting the transmit power level can be crucial in various scenarios to ensure optimal performance and location accuracy. Here are key points to consider when deciding to change the transmit power level of BLE devices:
When to Consider Changing Transmit Power Level
Signal Reliability: If the BLE device's signal is not reliably being heard by APs, resulting in frequent data drops, it may be necessary to increase the transmit power level.
Distance Between APs: If APs are too far apart to provide accurate location data, increasing the device’s power level might help before considering adding more APs.
Dense AP Deployment: In cases where there is a very dense deployment of APs, reducing the power level of the BLE devices can help minimize overall noise levels and limit the range so that the signal is only heard by a select few APs.
Factors Affecting BLE Signal Range
The expected range of a BLE device depends primarily on its transmission power setting.
Environmental factors such as interference, multipath, or absorption can also impact BLE signal range.
Transmit Power Level Guidelines
A general rule of thumb is that if a BLE device is transmitting at a power level of -12 dBm, its range is approximately 65 feet (20 meters).
To ensure reliability, maintain at least a 20% buffer from the maximum range. For example, if the transmit power level of -12 dBm provides a range of 65 feet, aim to place APs within a maximum distance of 50 feet.
If you need more APs to hear the signal or if the APs are farther away, consider increasing the device's transmit power level.
Configuration for Cisco IDM Devices
Cisco IDM devices are configured to transmit at a power level of -12 dBm by default.
Customers can adjust this setting based on their specific deployment needs.
TX Power setting | Transmission power (dBm) | Approximate range |
|---|---|---|
0 | -30 dBm | 6.5 ft (2 m) |
1 | -20 dBm | 13 ft (4 m) |
2 | -16 dBm | 32 ft (10 m) |
3 (default) | -12 dBm | 65 ft (20 m) |
4 | -8 dBm | 98 ft (30 m) |
5 | -4 dBm | 131 ft (40 m) |
6 | 0 dBm | 196 ft (60 m) |
7 | 4 dBm | 229 ft (70 m) |
Netconf failures
You may see some failures in configuration of BLE related settings, which can be due to Netconf failures. Netconf is used between the connector and the WLC to push configuration to the WLC and in turn the APs. If there is any failure in that (example: configuration, credential, bug etc.) then it will lead to potential failures on Cisco Spaces end. Check to make sure Netconf is working as expected.
Check the logs
You may first want to get and review the connector server.log file to see if you see any Netconf errors.
Check configuration
Make sure Netconf is enabled
WLC requires a few aaa Netconf commands provided earlier in the guide. Make sure those are still present on the WLC configuration
Make sure you have not enabled Netconf operation in candidate store mode as Spaces does not support that. If you have, you’d want to disable it by running the following command on the WLC.
no netconf-yang feature candidate-datastoreCheck authorization
Make sure that the credential provided to Spaces is authorized to run Netconf commands on the WLC. You may want to use local credential to add WLC to Spaces.
Service upgrade failures
As mentioned multiple times in this guide, it’s highly recommended to make sure you are running the latest service and system versions. Best practice is to check at regular intervals (Example: once a month) for new system and service package versions.
However, if you run into any failure or issue with a service upgrade, here are the steps you should try.
Check the connectivity.
Having intranet or internet issues can lead to failures with service package downloads and installs.
If you have setup VIP HA on the connector, then they need to be on the same subnet and there should be no connectivity issues between the connector pair and each connector’s internet reachability.
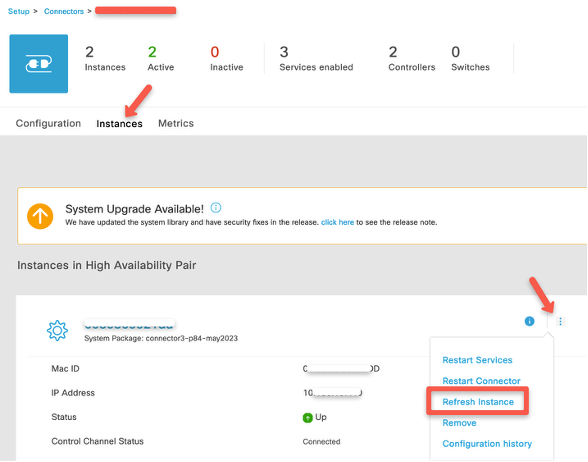
Try to refresh instance of the connector.
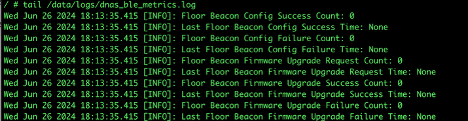
TDL Subscription failure
If you see issues with AP beacon channel (ideally last updated time for that should be within 2 hours) as seen in IOT Services, then that can point to some TDL subscription issues. You should try some common steps to troubleshoot those.
Make sure enough TDL subscriptions are available.
Catalyst 9800 WLC have limited number of subscriptions that it can support, depending on the WLC hardware type.
Run the WLC command show telemetry ietf subscription all and details to make sure Spaces related subscriptions are present and valid and connected as explained before in this guide.
Delete or remove subscriptions of other services if needed
If you are running too many services, for example: you have added Catalyst Center, Cisco Prime Infrastructure etc. together will Spaces connector, then it’s possible you have run out of the limit of subscriptions that the WLC can support.
Please remove the other subscriptions and retry.
In this section, we have tried to cover some of the common scenarios that you may see in your IOT Services deployment, but it’s not an exhaustive list either in terms of the issues or the steps that may need to be taken. While the steps should be able to help you troubleshoot and fix, or at least provide you insight into what may be happening, you may still need further help. As explained before, if you’ve tried to run the troubleshooting and still are facing issues, it is recommended to open a Cisco support case for requesting the next level of assistance.
CONCLUSION
In deploying and maintaining Cisco Spaces IoT Services, attention to detail in troubleshooting and debugging is essential for optimal performance and accurate location tracking. By understanding the complexities of RSSI and RF characteristics, ensuring precise AP placement, enabling and verifying BLE scanning, and considering the unique characteristics of different sensors, you can address common issues that affect location accuracy. Additionally, careful management of BLE device transmit power levels, maintaining sufficient AP coverage, and monitoring connector health are crucial steps to ensure the reliability and efficiency of your IoT deployment.
Following this guide, you can systematically troubleshoot and debug your Cisco Spaces IoT services, resulting in a robust and accurate location tracking system. Always remember to test configurations in smaller deployments before scaling up, and leverage the tools and settings provided by Cisco Spaces to fine-tune your setup. With diligent monitoring and timely adjustments, you can achieve the high level of accuracy and performance needed for your IoT applications.