OVERVIEW
This Knowledge Article is designed only as a follow on from the Cisco Spaces OpenRoaming Runbook. If you have not completed that runbook yet, please go back and ensure that the deployment has been validated against that before continuing here.
The Cisco Spaces Software Development Kit (SDK) leverages OpenRoaming technology to attach users, seamlessly and securely, to Wi-Fi networks, without the need for user interaction. It allows an iOS or Android application developer to configure iOS and Android devices with an identity of choice that can be verified with the back-end system. This paves the way to allows businesses to generate information and engage with customers, directly on their devices, through contextual push notifications within an iOS and Android notification framework.
The outcomes SDK Integration provides businesses include:
-
Differentiated experience for loyalty/enterprise app users
-
Drive contextual engagement and marketing campaigns
-
Drive up app downloads and at-location app usage
-
Address privacy MAC challenges
PREREQUISITES
Enable and configure OpenRoaming App as per the Cisco Spaces OpenRoaming Runbook.
Once the Open Roaming app is enabled and the steps to configure are completed, follow the next steps to configure Cisco SDK Integration.
IMPLEMENTATION
To successfully register a new app, the following procedure must be completed:
-
Register App
-
Configure Profile
-
Push Notification
-
Authentication
The steps below demonstrate how to setup and activate Cisco Spaces SDK.
-
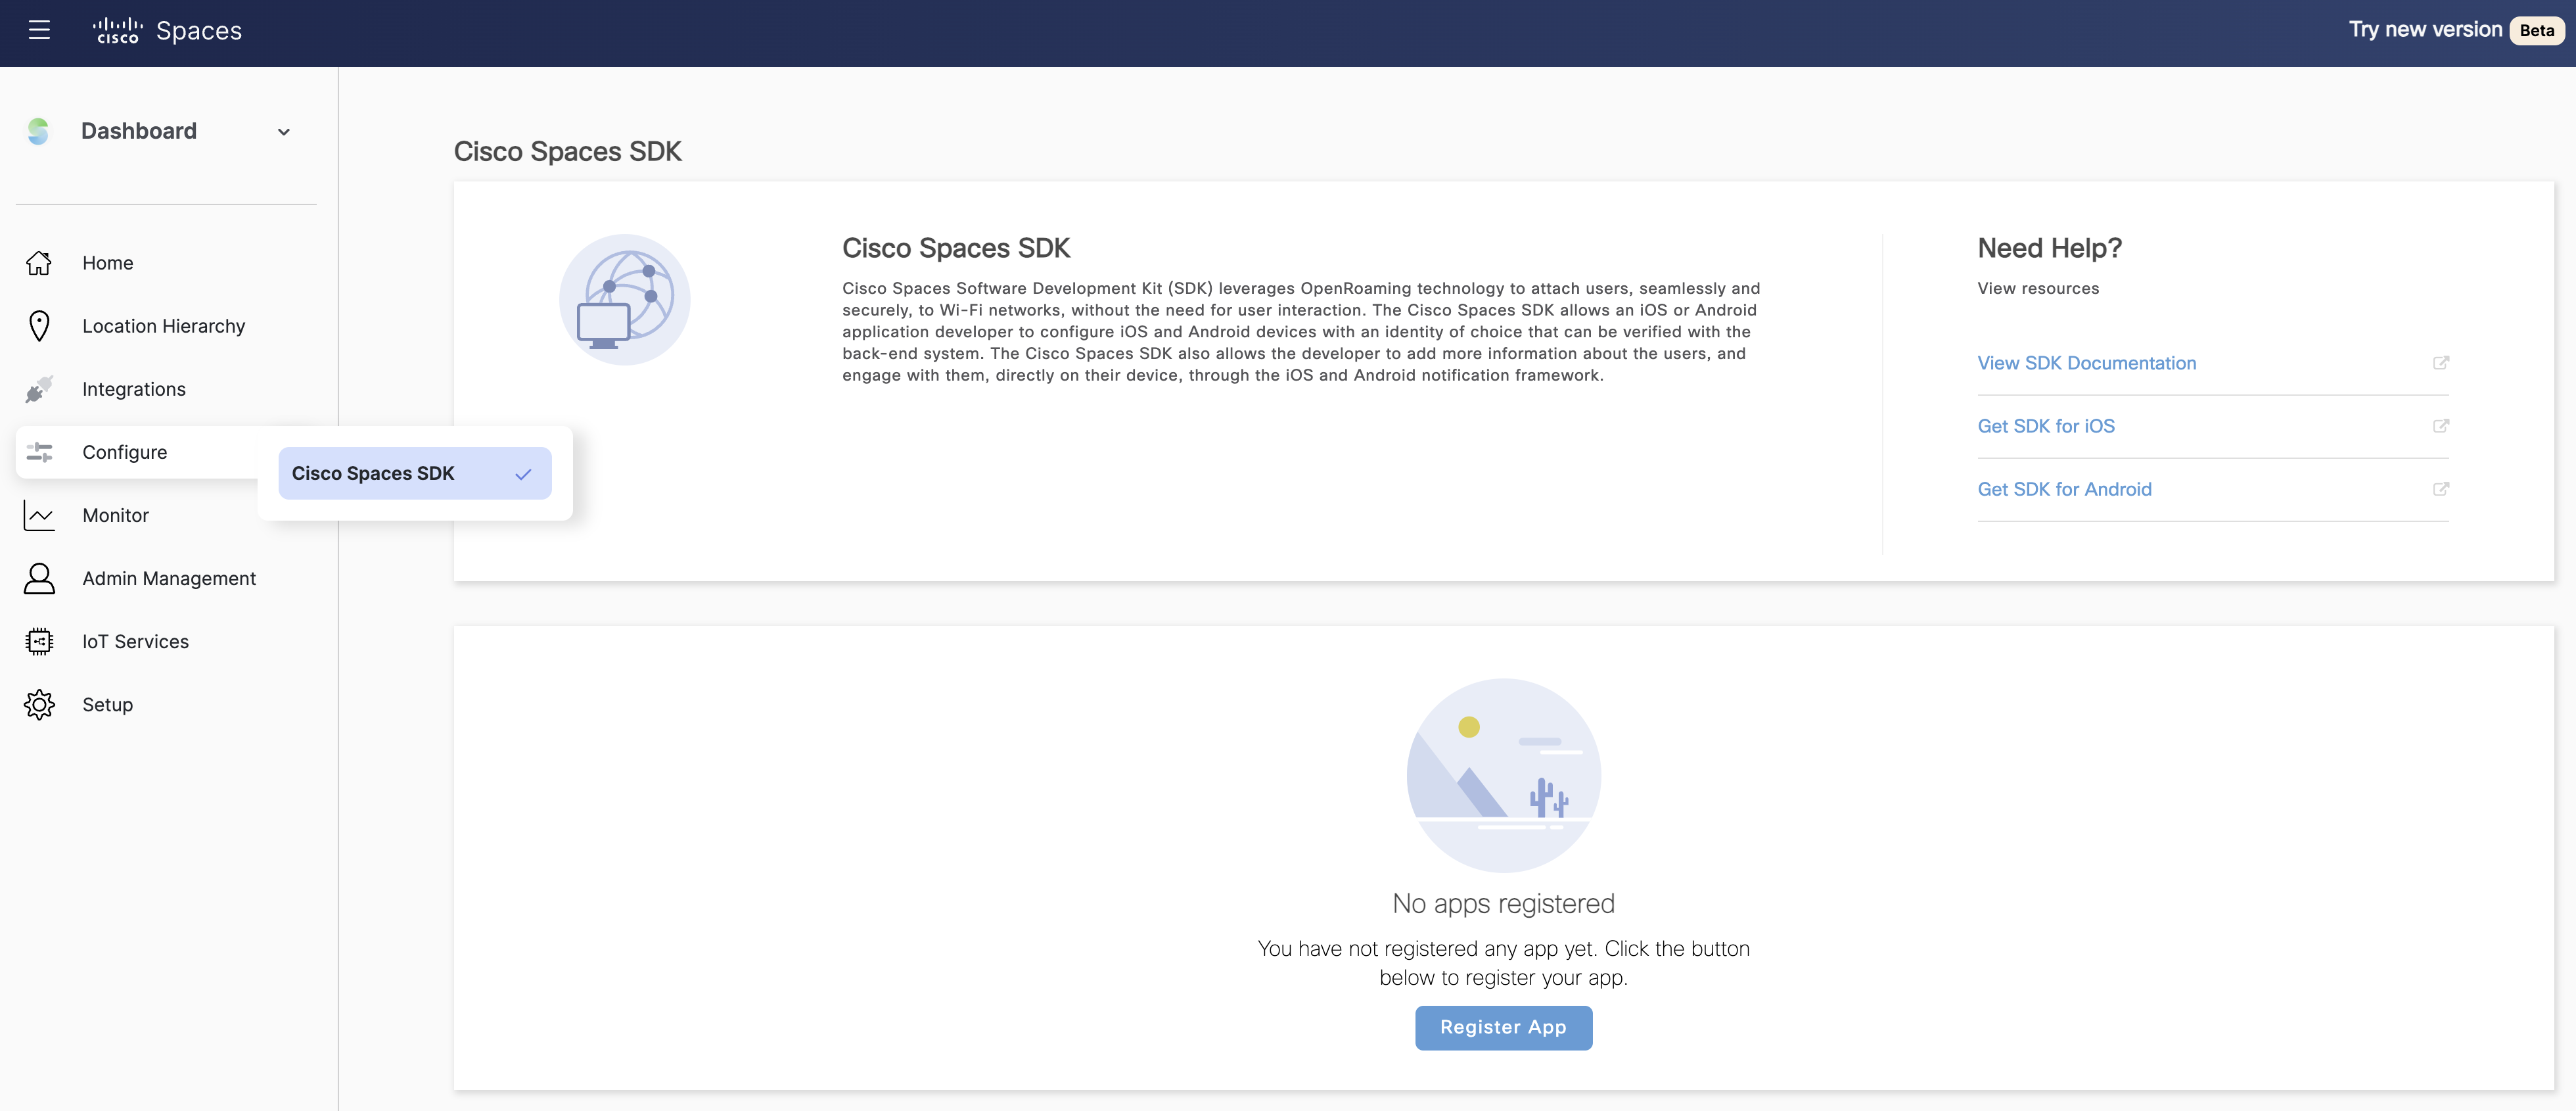
Log in to Cisco Spaces.
-
Navigate to Configure > Cisco Spaces SDK
-
Click Register App.
-
To choose the platform for the new app, check either the iOS or Android check box or both.
If you select both platforms, the subsequent windows display parameters for both platforms.
-
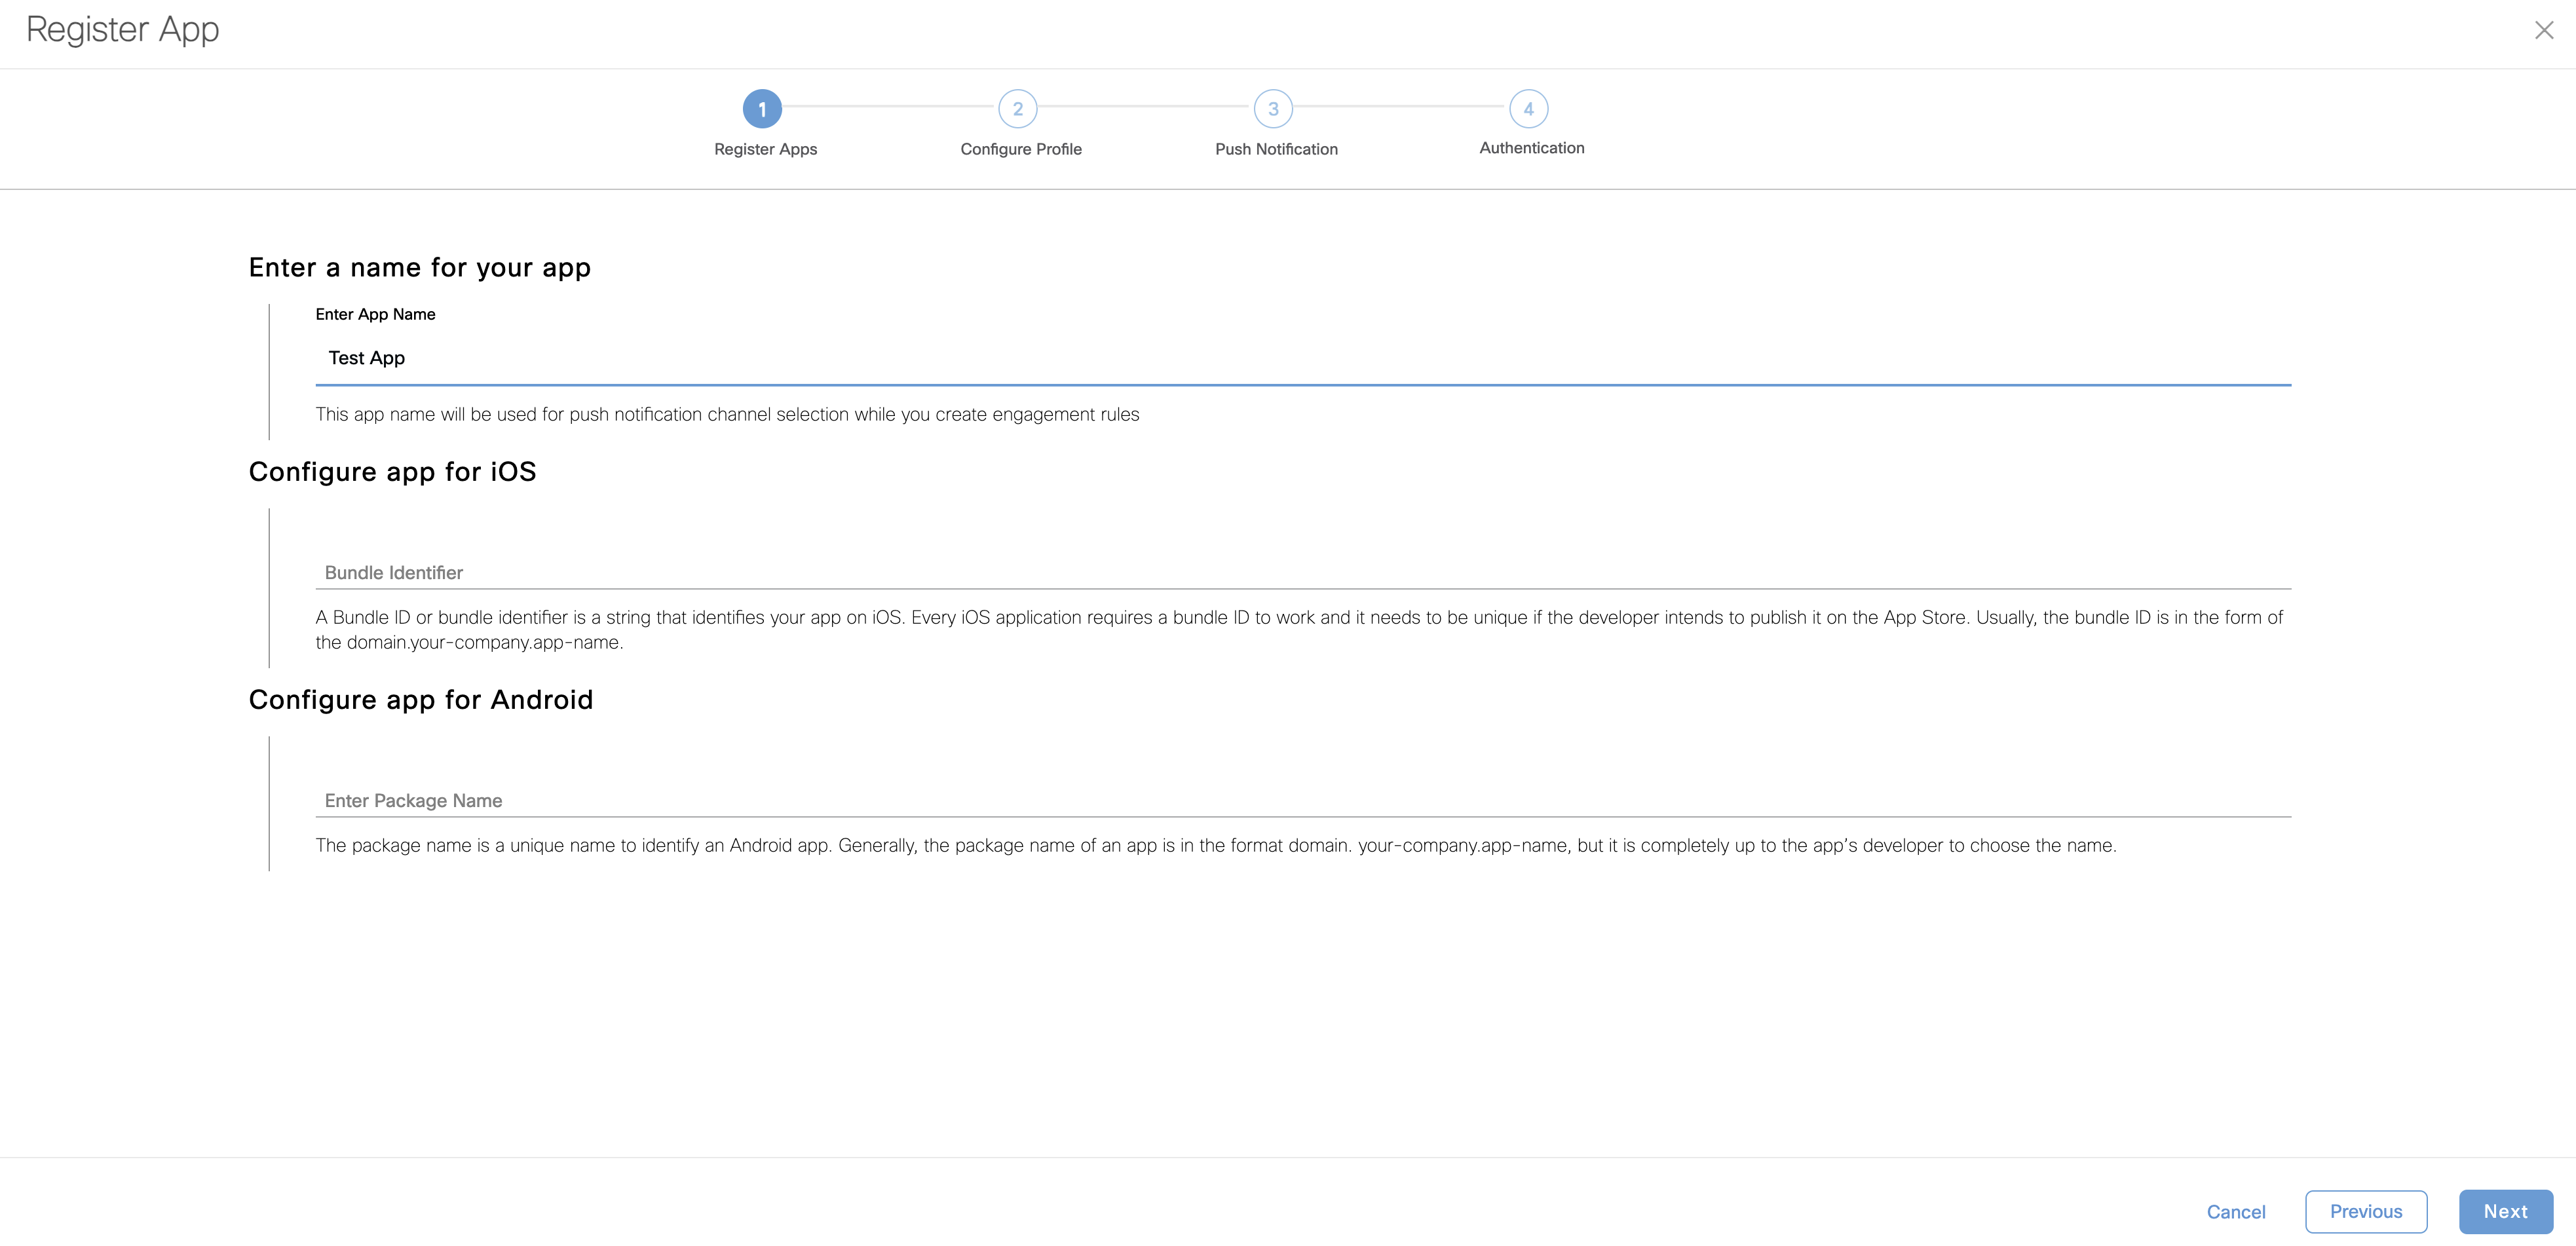
In the Register App section, enter the following:
-
App Name: Enter the name of the application.
-
Bundle Identifier: Enter the Bundle ID or bundle identifier string that identifies your app on the iOS platform.
-
Every iOS application requires a bundle ID to work and must be unique if the developer intends to publish it on the App Store. The bundle ID is in the format domain.your-company.app-name.
-
-
Package Name: Enter the unique package name to identify an Android app.
-
The package name of an app is in the format domain.your-company.app-name. However, you can choose to enter any name.
-
Click Next.
-
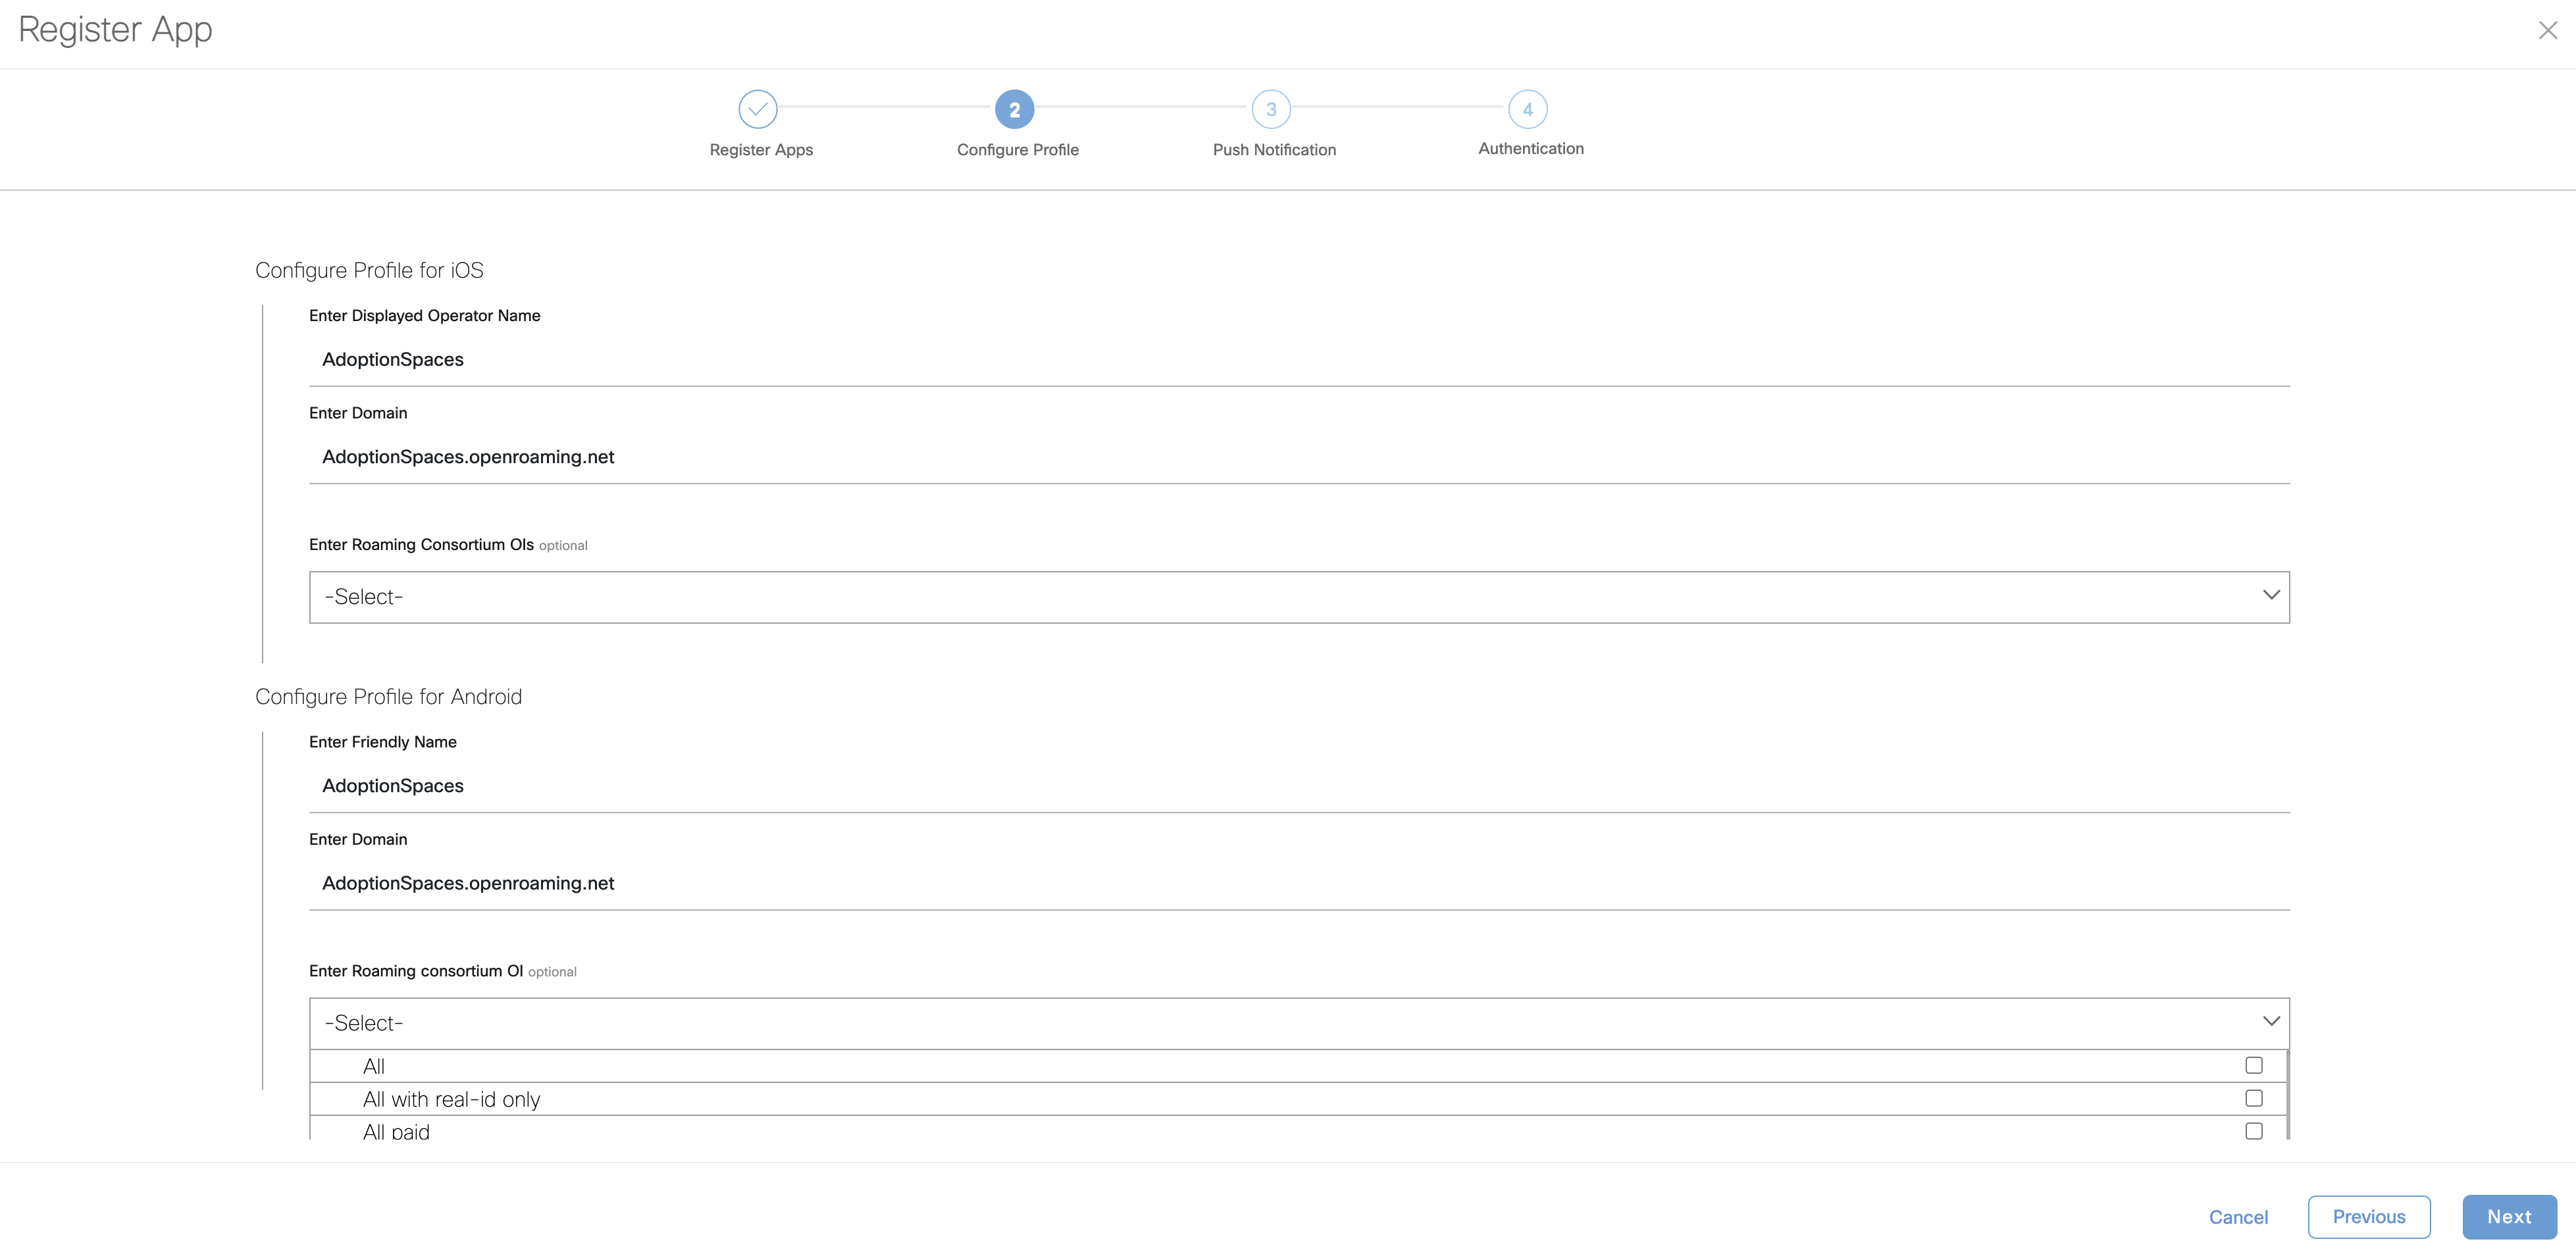
In the Configure Profile section, enter the following:
-
Displayed Operator Name: Enter a valid identifier. This name is displayed as the Wi-Fi SSID name on the user’s android or iOS device.
-
Domain: Enter a unique domain name for the profile.
-
The domain name is available in the OpenRoaming app. For more information see, Configure Network Controller.
-
You should add this domain name in the controller configuration.
-
If you have more than one app, then each app must have a unique domain name.
-
-
Roaming Consortium OIs: From the Roaming Consortium OIs drop-down list, check the check box next to the array of Roaming Consortium Organization (RCO) identifiers. This is optional.
-
-
To enable push notifications for iOS, check the Enable Push Notification for iOS check box.
-
Enter the iOS App ID.
-
Click Upload to browse and upload the APNS P12 and Certificate.
-
Enter the APNS certificate password.
-
-
To enable push notifications for Android, check the Enable Push Notification for Android check box.
-
Enter the Android App ID.
-
Enter the API key.

-
-
Click Next.
-
To support Apple sign-in as the user identity for the new mobile app, check Enable Apple Sign In in the Authentication section.
-
In the Enter Client ID field, enter the apple account sign-in client ID.
-
In the Enter Secret Key field, enter the secret key for Apple account.
-
-
To support Google sign-in as the user identity for the new mobile app, check Enable Google Sign In in the Authentication section.
-
In the Enter Client ID field, enter the google account sign-in client ID.
-
In the Enter Secret Key field, enter the secret key for Google account.
-
-
Click Register App to complete the app registration. The registered apps are displayed.
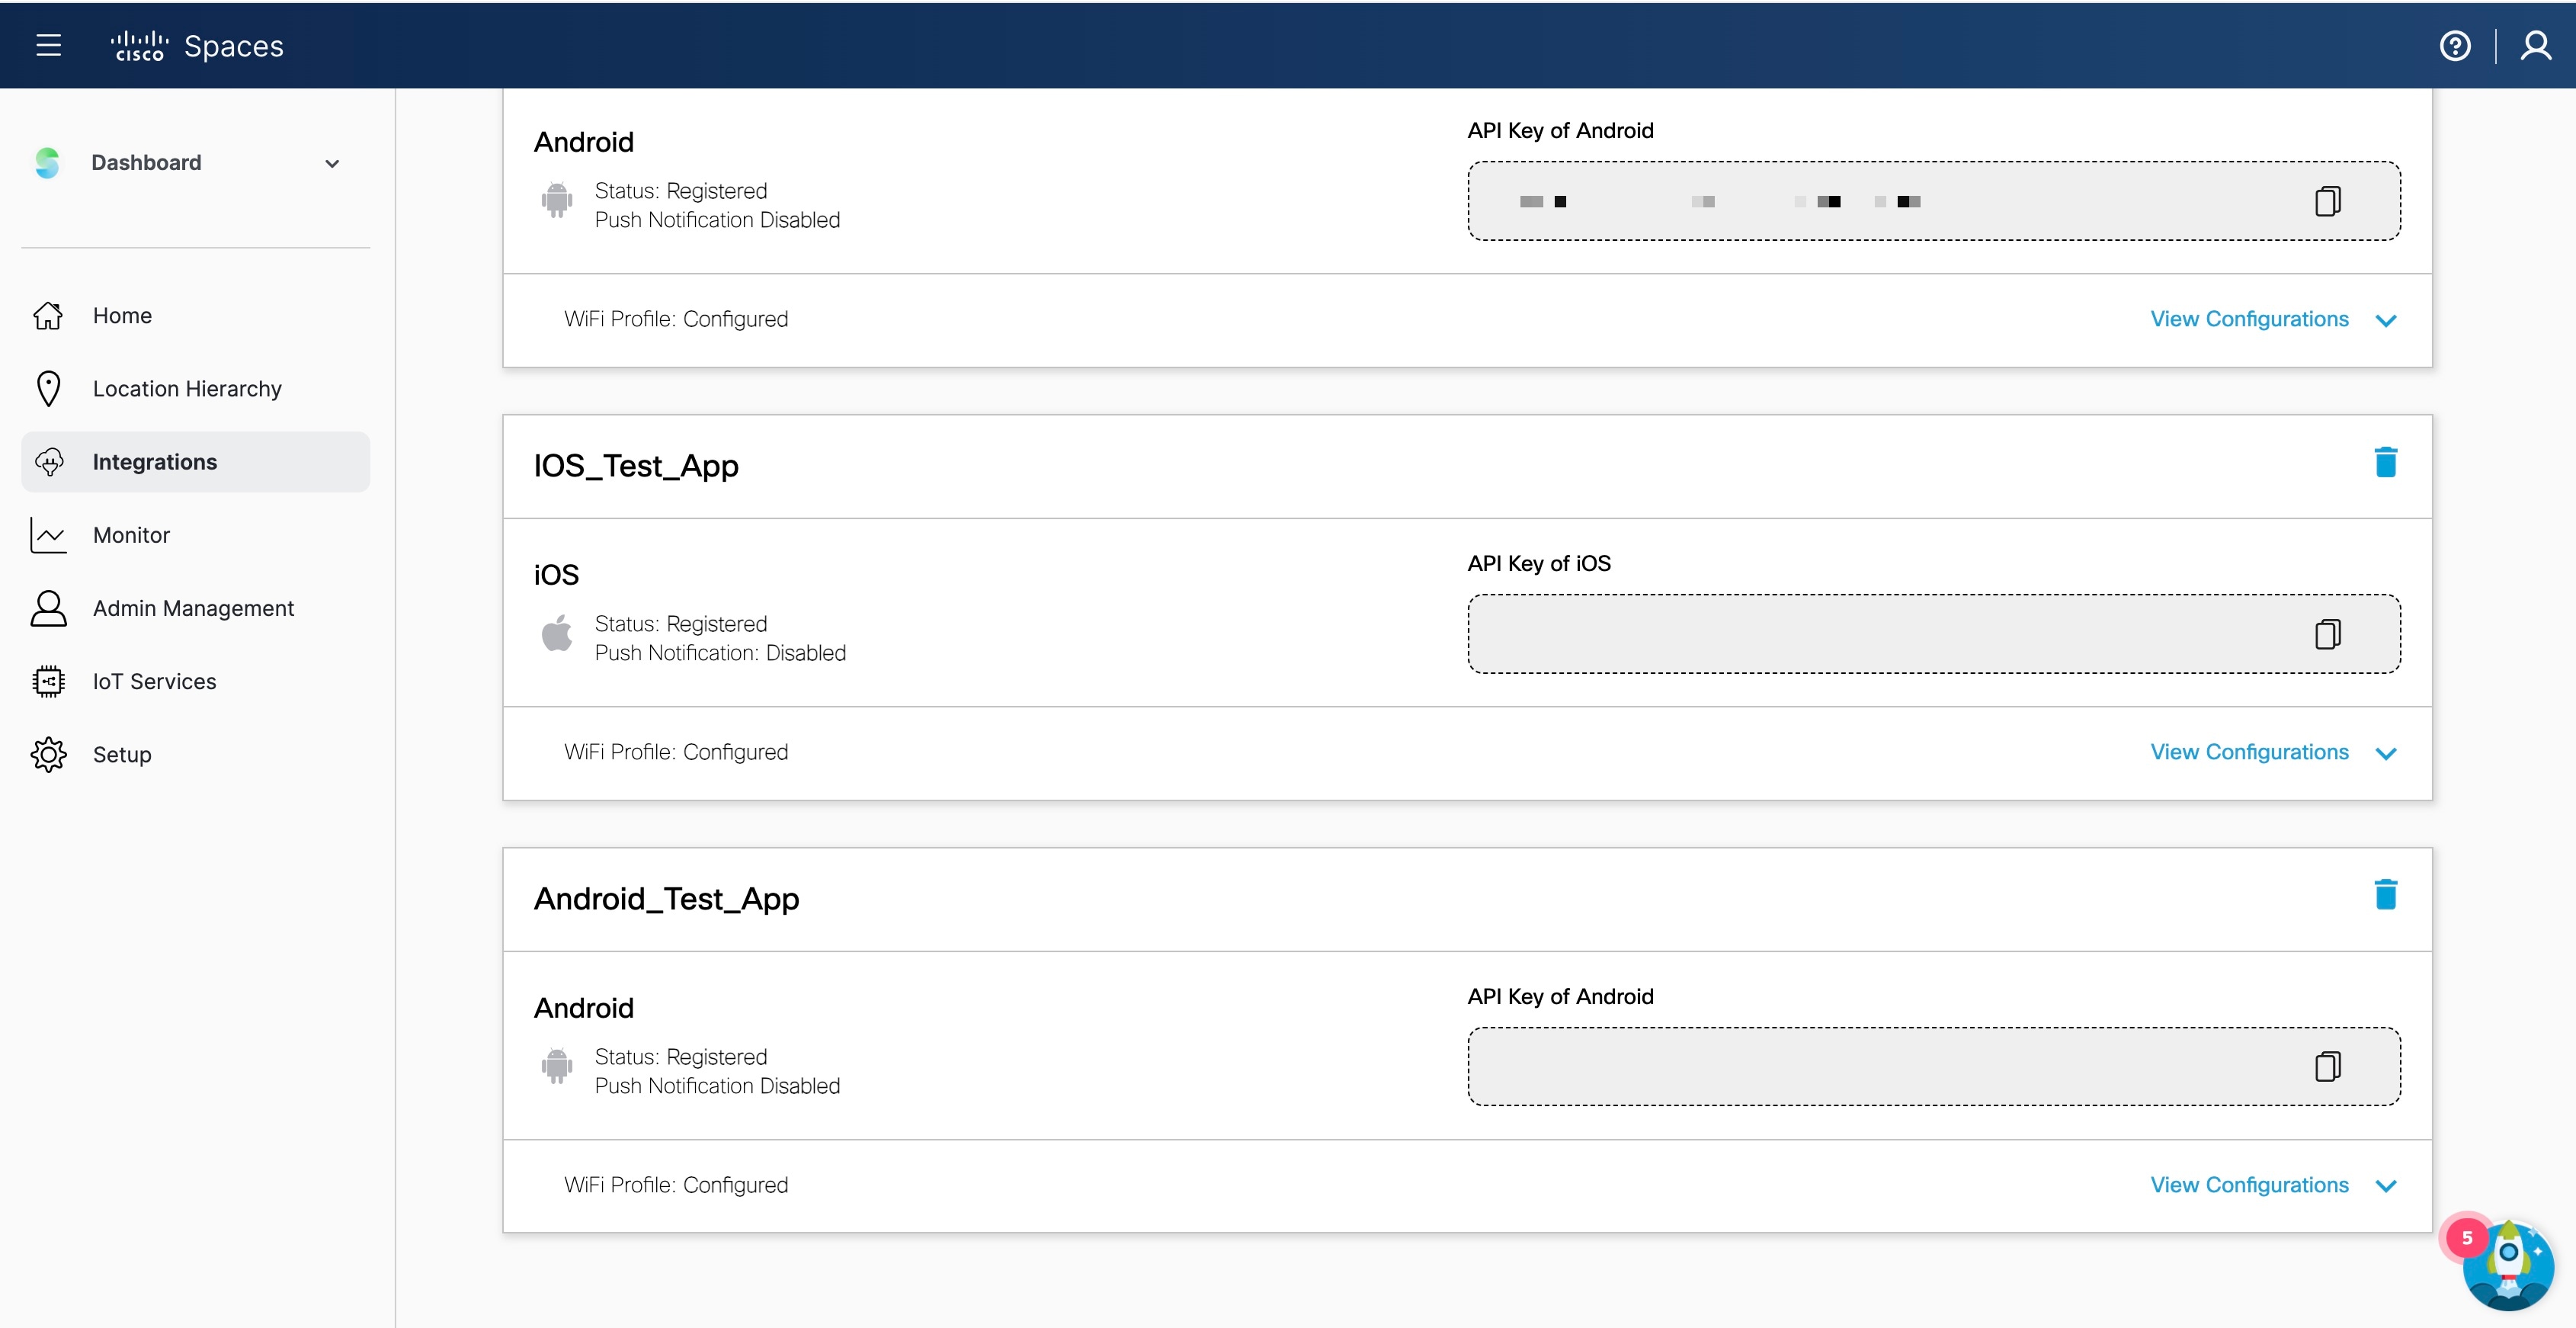
You can click:
-
View Configurations: To view the application configuration details.
-
Delete icon: To delete the registered application.
-
-
(Optional) Click Edit to update push notifications for iOS and Android platforms.
-
(Optional) Click Update.